96 steering depower
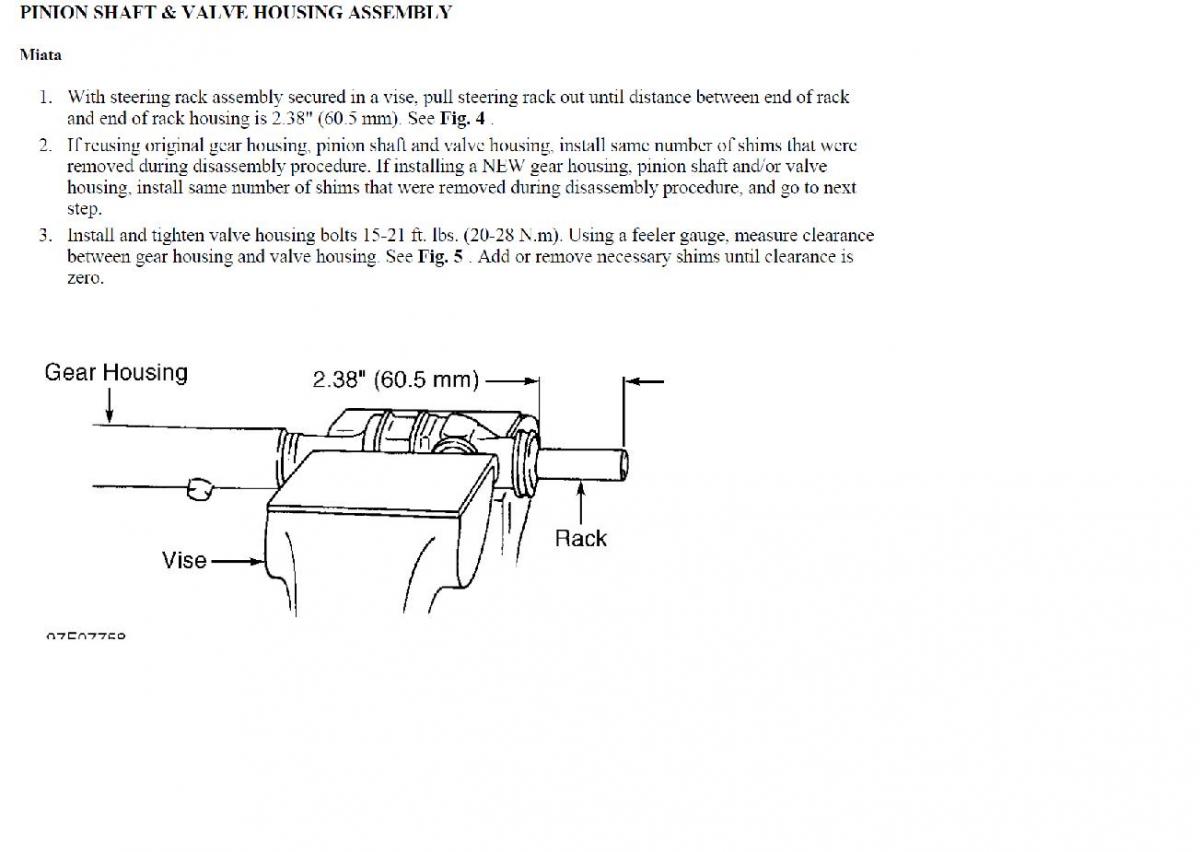
 03-29-2014, 03:47 PM
#1
Junior Member
Thread Starter

Join Date: Jan 2014
Location: Tulsa, OK
Posts: 46
Total Cats: 4
I've found this write up for NB's Clicky, and of course FM's write up on early NA's, but I've read that the 96 is different than the early NA's, and that power steering racks aren't compatibly from NA to NB.
How do I depower a 96 steering rack? I would gladly go pick up the 96 and fondly it for answers, but I'm stuck at work all weekend. I'm asking this to see if it's worth my while to go to my parents house, aka the parts house, and get the rack monday before heading home or should I just go to a junk yard and get an early NA rack to replace mine. I want to do the depower with a spare steering rack so that I can just swap them out real quick like and not have too much down time.
So, where should I look to do the 96/97 depower, or should I just get an early NA rack?

Reply
 0
0

0
03-29-2014, 09:51 PM
#2
Junior Member
Thread Starter
Join Date: Jan 2014
Location: Tulsa, OK
Posts: 46
Total Cats: 4
I've found one or two threads that say you just have to force the inner seal that is on the housing out and then you can remove the seals on the rack. I'm going to go ahead and get the rack and pinion from my parts pile monday and give it a go. I don't want to spend 115 bucks on a new PS pump, and I intend to take the broken AC compressor off anyhow so why not knock all this crap out right now instead of waiting.
Reply
0
0
03-30-2014, 01:47 AM
#3
Newb

Join Date: Feb 2011
Location: Goldsboro, NC
Posts: 12
Total Cats: 0
When I depowered my 96 rack, I used Dave Coleman's how-to article. The rack he uses in the article is identical to the 96 rack. Best of luck!
Project Miatabusa Part 5 - De-Powering the Steering
Project Miatabusa Part 5 - De-Powering the Steering
Reply
0
0
03-30-2014, 04:03 AM
#4
Junior Member
Thread Starter
Join Date: Jan 2014
Location: Tulsa, OK
Posts: 46
Total Cats: 4
Thanks for confirming that article will work. I read it early today, but I wasn't thinking about steering at the time, I actually found it through the exocet website when looking at alternate power plants for miata/exocets.
Is it really that hard to take apart off the car? If nothing else I'll bolt it to a 2x6.
Is it really that hard to take apart off the car? If nothing else I'll bolt it to a 2x6.
Reply
0
0
03-30-2014, 11:23 AM
#6
Junior Member
Thread Starter
Join Date: Jan 2014
Location: Tulsa, OK
Posts: 46
Total Cats: 4
I'm going to bolt my vise to a board to work on this. I'm currently living in an apartment so everything is exponentially more difficult. I'll just put my feet on it and pull. On second thought, to hell with the vise, I'll just bolt the rack to a 2x6 and use it to keep things steady while working. I'll probably follow up on this thread with some pictures so it's a little easier to search for "96 or 97 depower steps".
Last edited by jj1000; 03-30-2014 at 01:25 PM.
Reply
0
0
03-30-2014, 02:41 PM
#7
Newb
Join Date: Feb 2011
Location: Goldsboro, NC
Posts: 12
Total Cats: 0
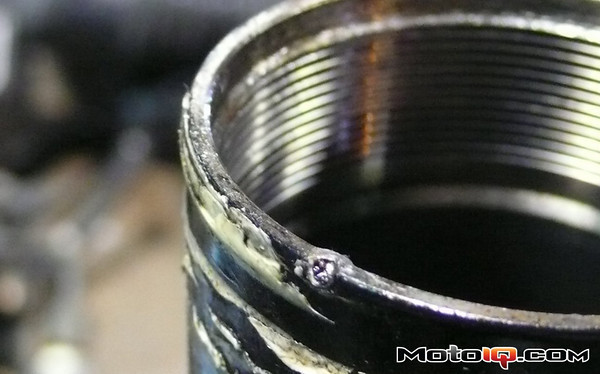
Definitely remember to get rid of the little locking dent, otherwise you will booger up the threads, making for a fun time when you go to thread it back in.
Also, you will most likely have some extra PS fluid left in the rack, so be weary of that. Whenever I was tugging mine out, fluid shot out with each successive stroke, eventually leading to a huge climax when it came free.
Also, you will most likely have some extra PS fluid left in the rack, so be weary of that. Whenever I was tugging mine out, fluid shot out with each successive stroke, eventually leading to a huge climax when it came free.
Reply
0
0
 03-30-2014, 11:27 PM
#9
Junior Member
Thread Starter
Join Date: Jan 2014
Location: Tulsa, OK
Posts: 46
Total Cats: 4
 Good to know. I'm going to put a tarp down to work on it. I'm not cut out for apartment life. Plus lots of shop towels and rubber gloves to keep things half way clean. Also going to swing through the harbor freight speedshop for one of those fancy deadblow impacts like the miatabusa guy has.
Reply
0
0
03-30-2014, 11:46 PM
#10
Junior Member
Join Date: Oct 2009
Location: Springfield, MO
Posts: 492
Total Cats: 3
lol didn't even know the write up was for earlier ones. I followed this on my 2000, I knew it was different but I just figured it was for 94-97. Anyways there was differences but the basics are the same. If I can follow this for my nb, I'm sure you can for the 96.
The other links posted are for welding the pinion, I don't know anything about that, I didn't have a way to do that and if your doing it in an apartment i'm guessing you don't either. If you don't plan on welding just follow the fm write up:
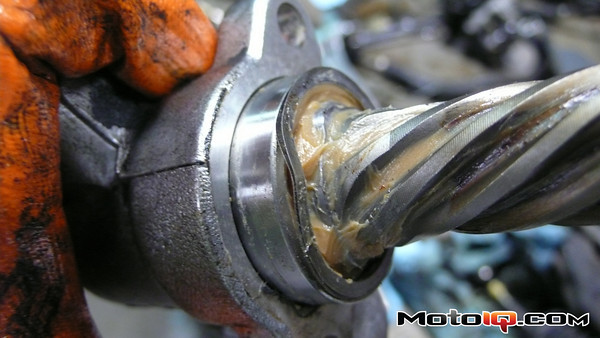
1: keep taking things apart until you get to this seal
2:
3: lube it all up with grease
4: put it back together in reverse order.
I didn't have to take apart the pinion or anything like that. Really its not as complicated as it seems, I was in the same boat obsessing over finding every little detail about my specific application until I finally just dove in.
Edit: and leafy's right, crap just KEEPS coming out of it lol
The other links posted are for welding the pinion, I don't know anything about that, I didn't have a way to do that and if your doing it in an apartment i'm guessing you don't either. If you don't plan on welding just follow the fm write up:
1: keep taking things apart until you get to this seal
2:
3: lube it all up with grease
4: put it back together in reverse order.
I didn't have to take apart the pinion or anything like that. Really its not as complicated as it seems, I was in the same boat obsessing over finding every little detail about my specific application until I finally just dove in.
Edit: and leafy's right, crap just KEEPS coming out of it lol
Reply
0
0
03-31-2014, 03:20 AM
#11
Junior Member
Thread Starter
Join Date: Jan 2014
Location: Tulsa, OK
Posts: 46
Total Cats: 4
I'm going to take it somewhere to have it welded. I have a hard enough time soldering in the apartment, doubt I could pull off welding. I work 3-11 fri and then 7a-11p sat/sun so I had all weekend to sit and work and try researching this little project, which lead to the obsessing and this thread. After seeing the links posted I'm not worried. Gonna pull the rack off the sub frame tomorrow and head back home to make a mess in the spare room, hopefully without my girlfriend getting too upset.
Reply
0
0
04-08-2014, 10:23 PM
#12
Junior Member
Thread Starter
Join Date: Jan 2014
Location: Tulsa, OK
Posts: 46
Total Cats: 4
how do you make sure the wheel is centered when you bolt the rack back in? Can I measure the exposed shaft on either side of the housing to make sure it's centered and then eye ball the wheel, or is there a easier way?
Reply
0
0
04-08-2014, 10:30 PM
#13

You center the wheel when you do an alignment. It's probably too late, but you should have counted how many turns the outer tie rods were turned onto the inners for a ballpark guess.
To center the rack, turn it all the way to one side as far as it will go, then turn it to the other while counting how many whole turns and what part of a turn. Divide that by two, and rotate back. Bam. Center.
To center the rack, turn it all the way to one side as far as it will go, then turn it to the other while counting how many whole turns and what part of a turn. Divide that by two, and rotate back. Bam. Center.
Reply
0
0
04-08-2014, 11:08 PM
#14
Junior Member
Thread Starter
Join Date: Jan 2014
Location: Tulsa, OK
Posts: 46
Total Cats: 4
Not too late, the car still has the factory rack in it, just without a ps belt. It's a bitch to drive, but my DD. I'm depowering a rack that I got with the 96 chassis I bought for my motor.
Centering the wheel is easy, the outer tie rods I'll thread on as far as the ones that are on it now when i take it off. To center the ram can I use a tape measure and just make it equal? I assume that will work, I'm just thinking and looking for confirmation.
Centering the wheel is easy, the outer tie rods I'll thread on as far as the ones that are on it now when i take it off. To center the ram can I use a tape measure and just make it equal? I assume that will work, I'm just thinking and looking for confirmation.
Reply
0
0
04-09-2014, 12:27 AM
#16
Junior Member
Thread Starter
Join Date: Jan 2014
Location: Tulsa, OK
Posts: 46
Total Cats: 4
oh, got it. I misread it and though you were talking about the wheel and turning the input shaft via the wheel. Ok, that's easy enough. I'm out of the apartment now so I'll be able to actually work on **** again. I need to finish this up. my drifto depower is kicking my ***, but after 3 weeks of this, the proper depower is going to feel as easy as before the pump broke.
Reply
0
0
04-16-2014, 06:40 PM
#19
So, I am doing my own depower with a 99 rack, which is pretty similar to what's on Project Miatabusa. Except I have a problem.
I don't have these shims. They weren't on the input shaft housing when I took it off, or inside the rack housing. Is it possible I don't need them for a 99?
Edit: They're not mentioned in any of the NB writeups I've found.
I don't have these shims. They weren't on the input shaft housing when I took it off, or inside the rack housing. Is it possible I don't need them for a 99?
Edit: They're not mentioned in any of the NB writeups I've found.
Last edited by TheScaryOne; 04-16-2014 at 07:00 PM.
Reply
0
0