Andy Hollis' One Lap Miata (K24 Honda power)
 02-08-2015, 08:07 AM
#1
Junior Member
Thread Starter

Join Date: Nov 2006
Posts: 290
Total Cats: 183
Follow us on Facebook here: http://www.OneLapMiata.com
See related topic here: https://www.miataturbo.net/engine-pe...ta-swap-71588/
Recent milestone:
************************************************** ******
With the car now at a local race shop getting caged, I've got some breathing time to finally do a comprehensive dump here of what I've learned so far. As more folks are attempting this swap, I hope to share what I've learned to make theirs easier. In addition, it's been a few years since I've built a Miata, and those were autocross cars, so I'm hoping to lean on this group here for track prep brainstorming. Emilio has already been a massive help in that regard.
Background and motivation:
This car is being built for the One Lap of America, which has become my primary motorsports outlet each year. I could go on and on about how cool it is, and the people, but I'll just leave at this...if you are a gearhead you need to find a way to participate, even if only in a rental or as a transit driver for somebody else. It is the motorsports vacation of a lifetime with the best friends you haven't met yet. Yes, we keep score, but it's really all about getting everyone to the finish line in one piece.
For the past four years we've run a Honda CRX with a K24 swap, prepped with learning from our rookie year in a K20-swapped Civic. The latter was simply a version of our ST-class autocrosser, with a JDM engine swap for more power. The CRX has been continually developed throughout, has always run in the top ten overall in the event, and finally finished fourth overall last year. We were only beaten by three Nissan GTR's sporting 1000+ hp. In addition, we trimmed the car out and ran 170mph at the Texas Mile on a scary day with swirling crosswinds. And finally, this past year we took it to SCCA Solo Nationals and won the SMF championship. There is little low-hanging fruit left in the CRX, so it's time for something different.
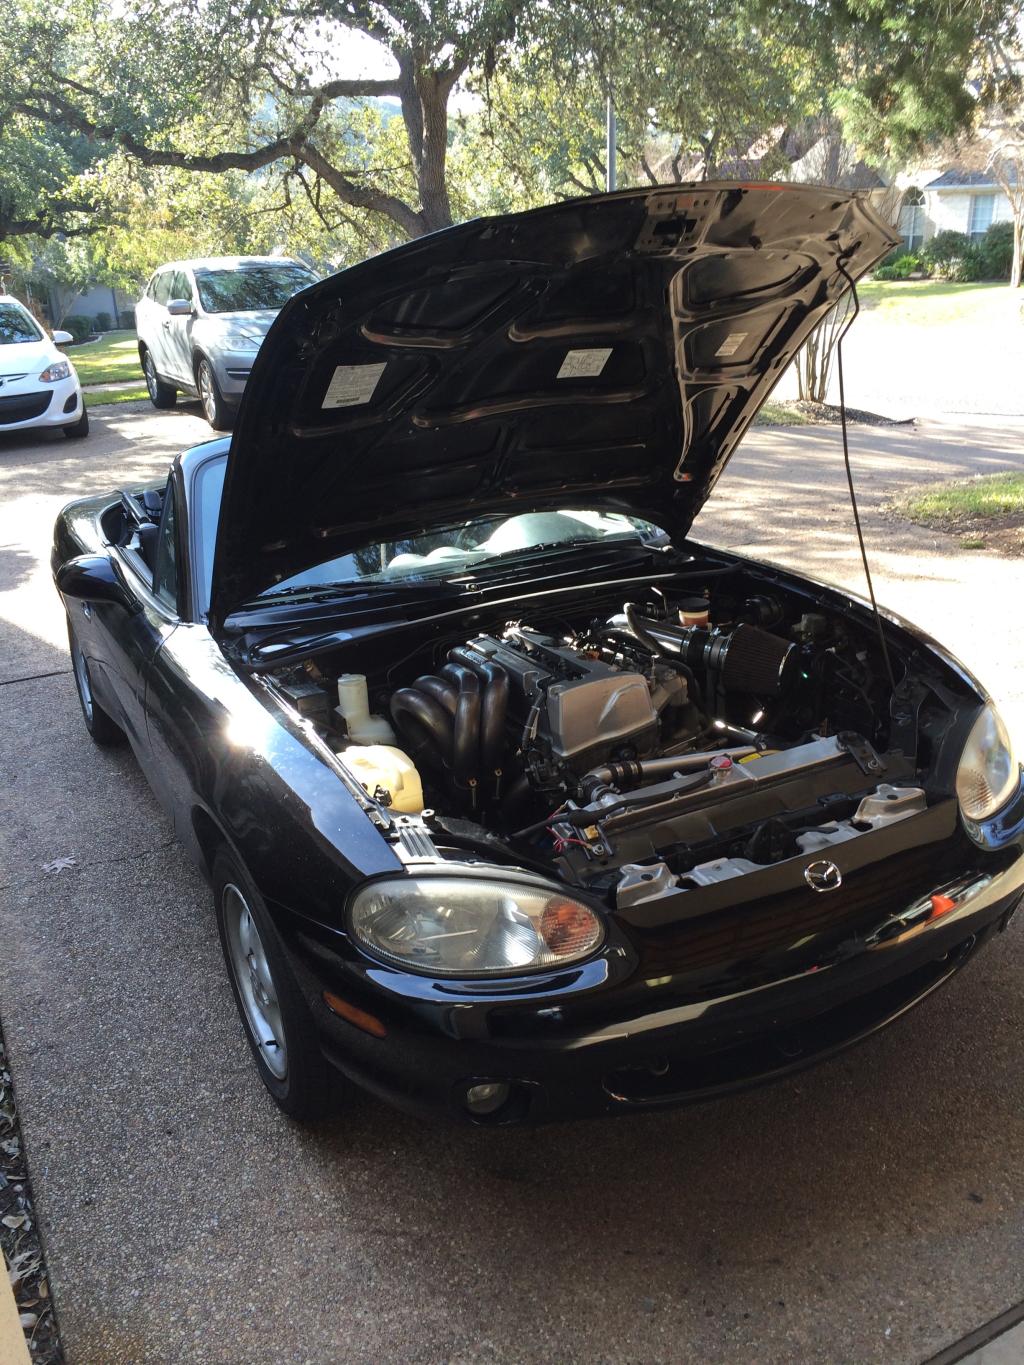
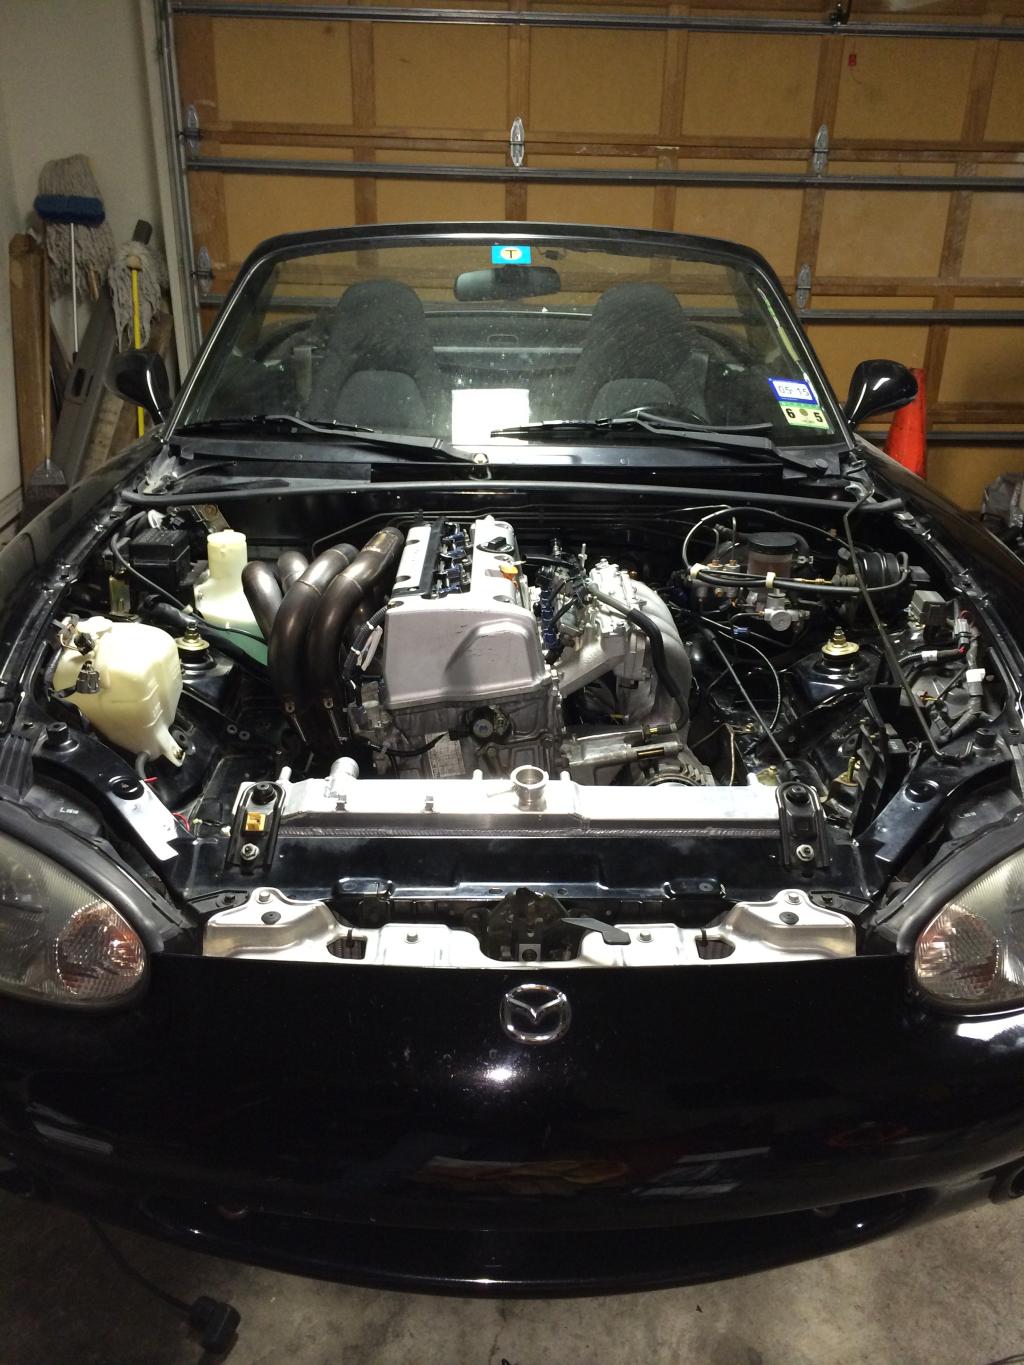
The CRX has two major design limitations...FWD and 65/35 weight distribution. It also has tiny wheelwells, so wheel/tire choice is limited. A decade ago, we spent quite a few years autocrossing a Miata in various forms (Stock, CSP & STS) and are very familiar with the chassis. Always loved the handling, if not the lack of major power. The KMiata swap seems like a perfect solution to making a 50/50 RWD version of our CRX, since the all-aluminum engine weight is very similar to the cast iron block 1.8 Miata motor.
Starting the build:
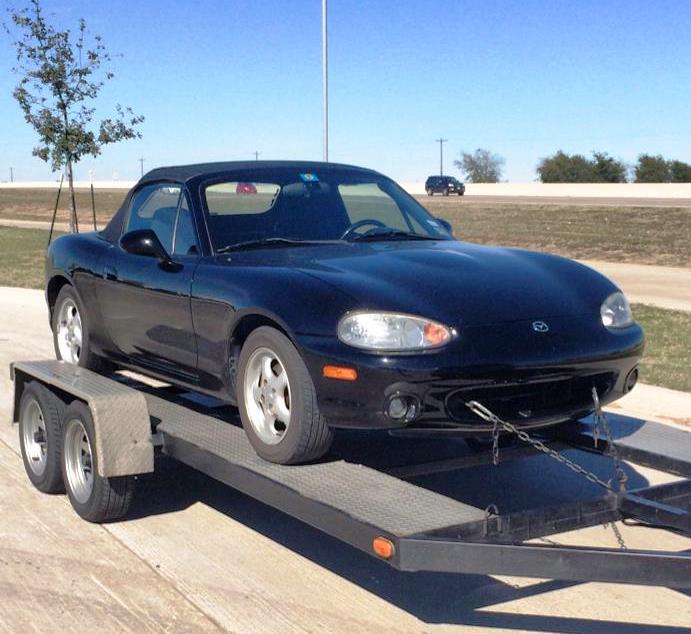
We joined the first KMiata group buy late last Summer, got our kit in the early Fall, and bought a car in November. Funny story there...I got it off CL...buyer seemed really knowledgeable about Miatas...had owned a dozen of them...when I go to see the car, turns out the owner is Tim Buck, long-time staff member at Mazdaspeed Motorsports (aka Mazda Comp), Spec Miata racer, etc. He has since moved to the DFW area and works now at Vorshlag. Small world. The car is a beauty, having lived all but one year of its life in a garage, but driven enough to accumulate 105K miles. No accidents, no major issues.
And so it began...
See related topic here: https://www.miataturbo.net/engine-pe...ta-swap-71588/
Recent milestone:

************************************************** ******
With the car now at a local race shop getting caged, I've got some breathing time to finally do a comprehensive dump here of what I've learned so far. As more folks are attempting this swap, I hope to share what I've learned to make theirs easier. In addition, it's been a few years since I've built a Miata, and those were autocross cars, so I'm hoping to lean on this group here for track prep brainstorming. Emilio has already been a massive help in that regard.
Background and motivation:
This car is being built for the One Lap of America, which has become my primary motorsports outlet each year. I could go on and on about how cool it is, and the people, but I'll just leave at this...if you are a gearhead you need to find a way to participate, even if only in a rental or as a transit driver for somebody else. It is the motorsports vacation of a lifetime with the best friends you haven't met yet. Yes, we keep score, but it's really all about getting everyone to the finish line in one piece.
For the past four years we've run a Honda CRX with a K24 swap, prepped with learning from our rookie year in a K20-swapped Civic. The latter was simply a version of our ST-class autocrosser, with a JDM engine swap for more power. The CRX has been continually developed throughout, has always run in the top ten overall in the event, and finally finished fourth overall last year. We were only beaten by three Nissan GTR's sporting 1000+ hp. In addition, we trimmed the car out and ran 170mph at the Texas Mile on a scary day with swirling crosswinds. And finally, this past year we took it to SCCA Solo Nationals and won the SMF championship. There is little low-hanging fruit left in the CRX, so it's time for something different.
The CRX has two major design limitations...FWD and 65/35 weight distribution. It also has tiny wheelwells, so wheel/tire choice is limited. A decade ago, we spent quite a few years autocrossing a Miata in various forms (Stock, CSP & STS) and are very familiar with the chassis. Always loved the handling, if not the lack of major power. The KMiata swap seems like a perfect solution to making a 50/50 RWD version of our CRX, since the all-aluminum engine weight is very similar to the cast iron block 1.8 Miata motor.
Starting the build:
We joined the first KMiata group buy late last Summer, got our kit in the early Fall, and bought a car in November. Funny story there...I got it off CL...buyer seemed really knowledgeable about Miatas...had owned a dozen of them...when I go to see the car, turns out the owner is Tim Buck, long-time staff member at Mazdaspeed Motorsports (aka Mazda Comp), Spec Miata racer, etc. He has since moved to the DFW area and works now at Vorshlag. Small world. The car is a beauty, having lived all but one year of its life in a garage, but driven enough to accumulate 105K miles. No accidents, no major issues.
And so it began...


Reply
 1
1

1
02-08-2015, 08:12 AM
#2
Junior Member
Thread Starter
Join Date: Nov 2006
Posts: 290
Total Cats: 183
Our plan is as follows:
1) Do the basic swap using a bone-stock TSX K24A2. That will allow us to work through all of the logistical issues with the basic swap.
2) Install race suspension/brakes, and start dialing in the car on the track using our existing wheels/tires from the CRX (they fit).
3) Get safe: Cage the car, install a race seat, safety net, fire system, etc.
4) Install one of our 300hp race motors and better LSD.
5) Add aero.
6) Put a tag on it, take it to One Lap 2015...and kick butt.
We will be using off-the-shelf solutions as much as possible, in known combinations, in order to "buy" back development time.


Reply
2
2
02-08-2015, 08:27 AM
#3
Junior Member
Thread Starter
Join Date: Nov 2006
Posts: 290
Total Cats: 183
Prepping the motor...
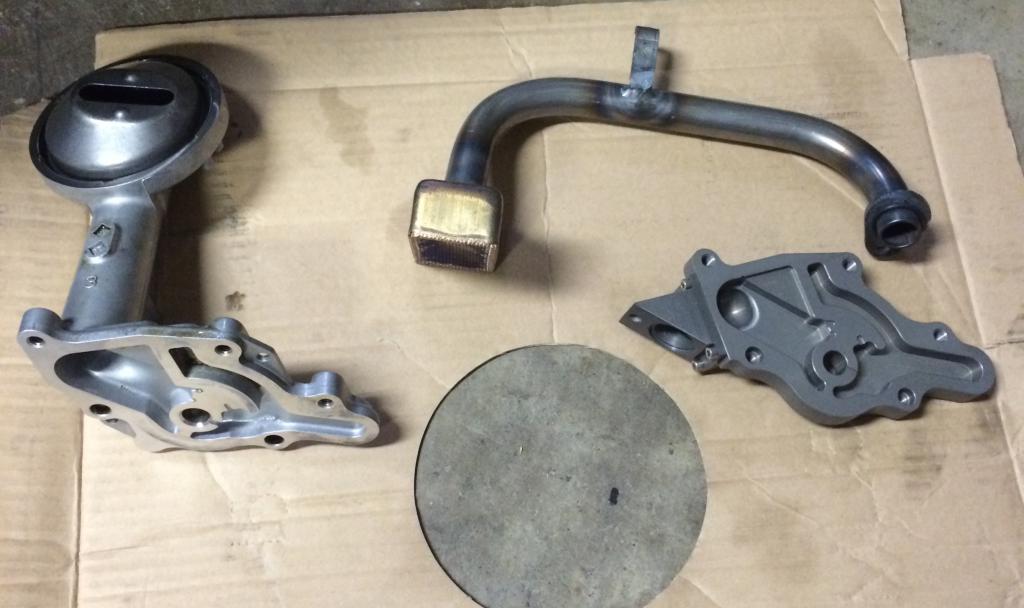
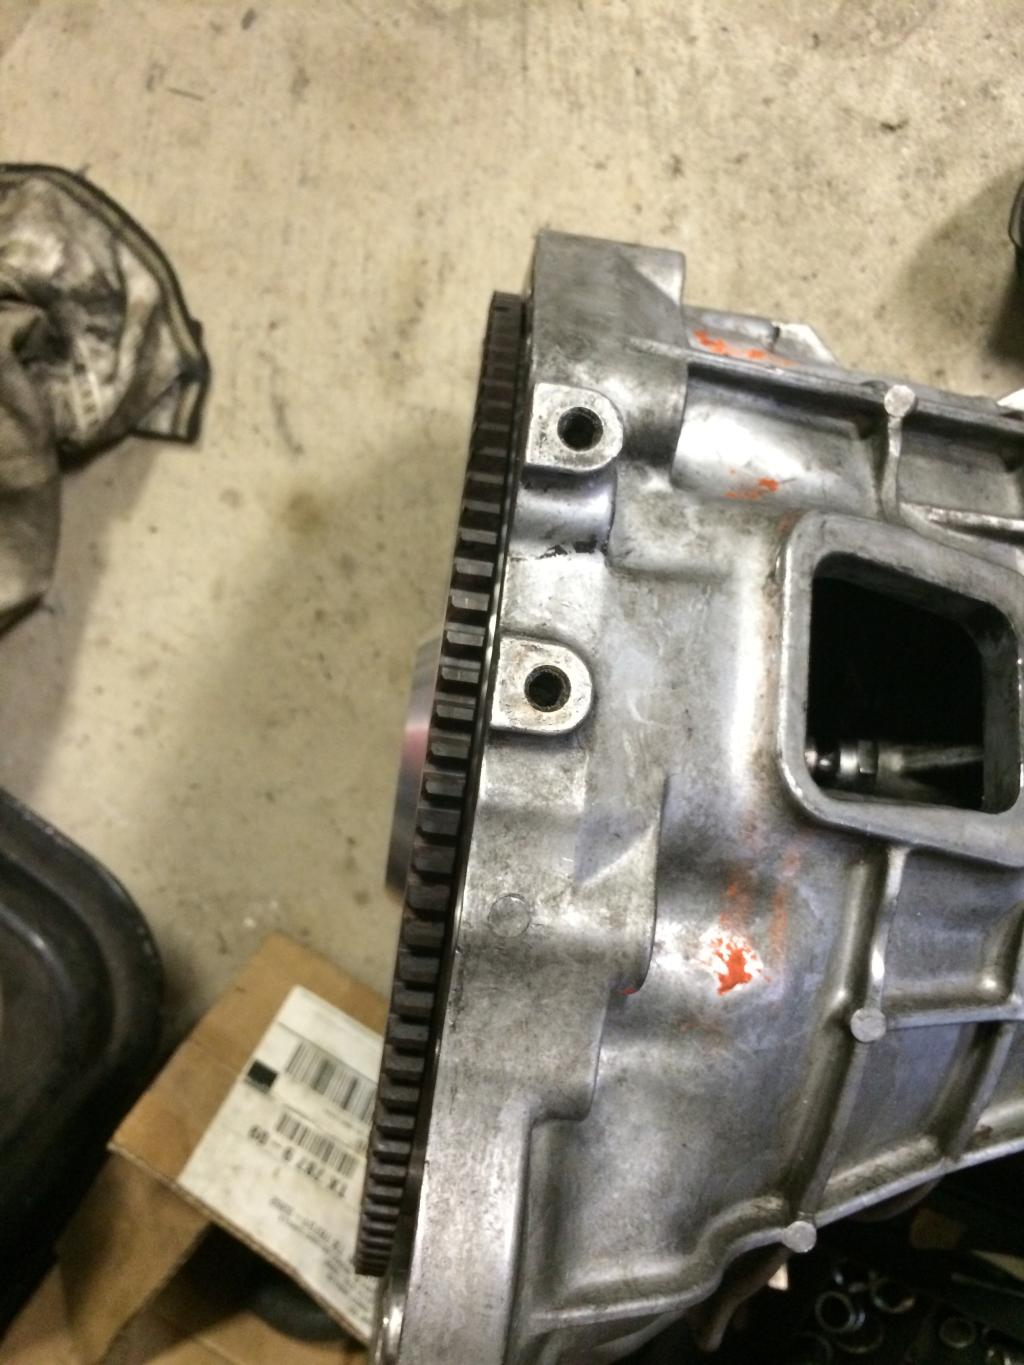
Since the steering rack goes through where the OE oilpan would be, the kit includes a custom double-sump Moroso-built oil pan with baffles.
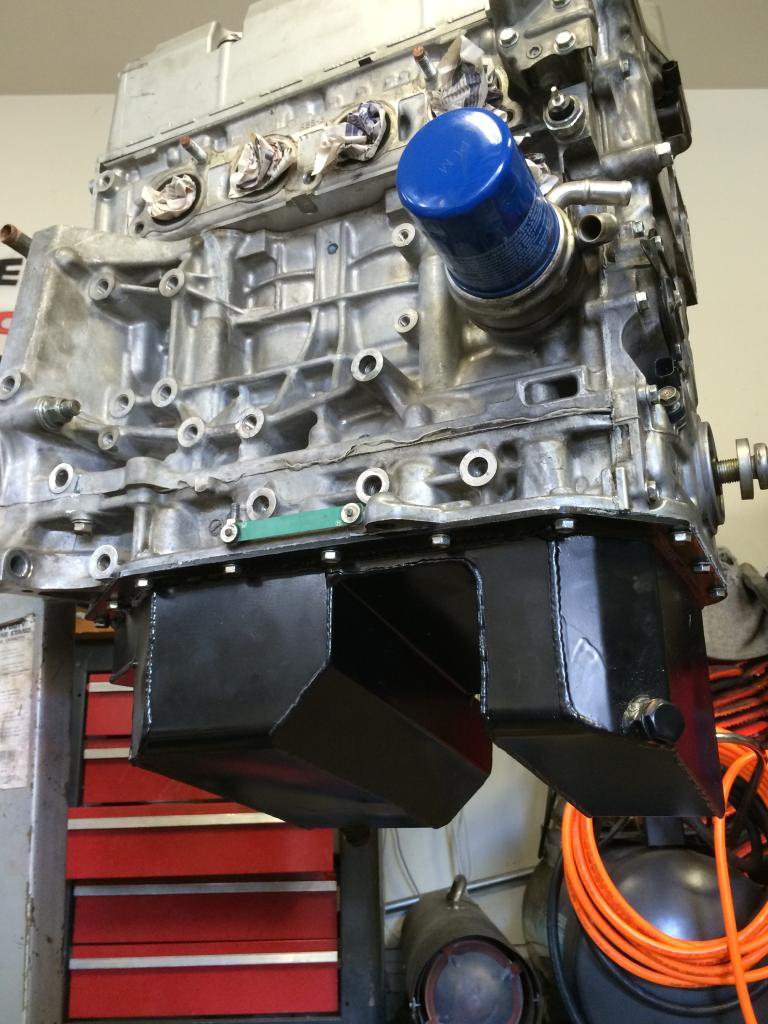
Moroso also supplies an oil pump pickup extender...
Kit also has a custom CNC-machined oil pump back half to mate to the new pickup (OE pickup on the left in the pic below). It requires the use of K20A2 (RSX-S) oil pump, which works to higher revs and has no balance shafts like the typical K24A2 TSX motor. Also frees up some ponies w/o those shafts spinning, but does idle a smidge rougher.
Since the steering rack goes through where the OE oilpan would be, the kit includes a custom double-sump Moroso-built oil pan with baffles.

Moroso also supplies an oil pump pickup extender...

Kit also has a custom CNC-machined oil pump back half to mate to the new pickup (OE pickup on the left in the pic below). It requires the use of K20A2 (RSX-S) oil pump, which works to higher revs and has no balance shafts like the typical K24A2 TSX motor. Also frees up some ponies w/o those shafts spinning, but does idle a smidge rougher.

Reply
1
1

 02-08-2015, 08:33 AM
#5
Junior Member
Thread Starter
Join Date: Nov 2006
Posts: 290
Total Cats: 183
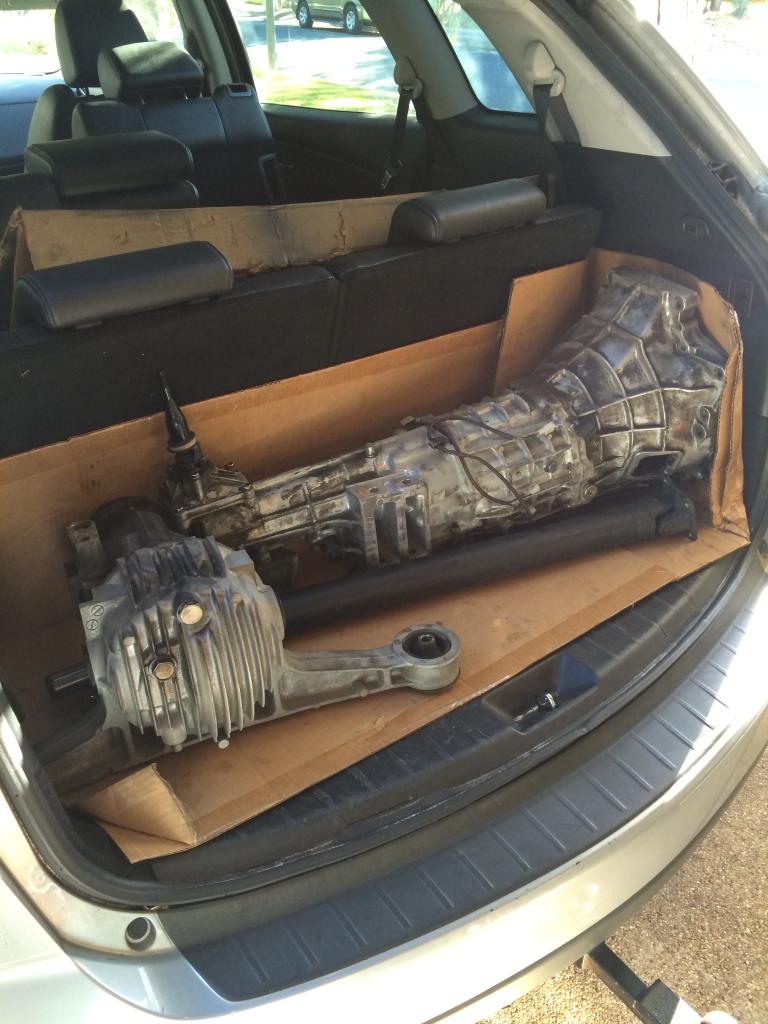
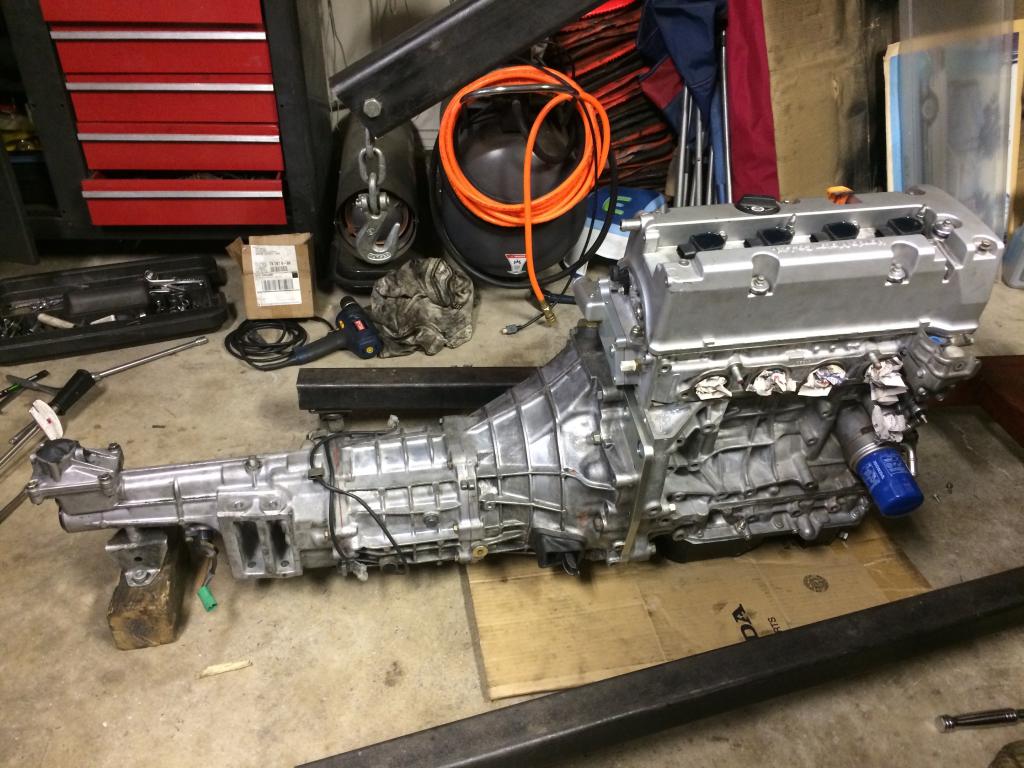
Trunkful of goodness from a 2000 SE part-out: 3.9 Torsen and 6-spd from 2000 SE. Gives us the same ratios we run in the CRX. Spent half the morning giving that trans the Simple Green treatment.
This setup gives us almost identical gearing to what we ran in the CRX. 1st will be mostly useless, 2nd will spin the street tires but it still useful, 3/4/5 are our primary track gears, and 6th is highway cruise and big track top end (Daytona, VIR, Road America, COTA, Summit Main, etc.)
This setup gives us almost identical gearing to what we ran in the CRX. 1st will be mostly useless, 2nd will spin the street tires but it still useful, 3/4/5 are our primary track gears, and 6th is highway cruise and big track top end (Daytona, VIR, Road America, COTA, Summit Main, etc.)

Last edited by AndyHollis; 02-08-2015 at 11:39 AM.
Reply
1
1
 02-08-2015, 08:37 AM
#7
Junior Member
Thread Starter
Join Date: Nov 2006
Posts: 290
Total Cats: 183
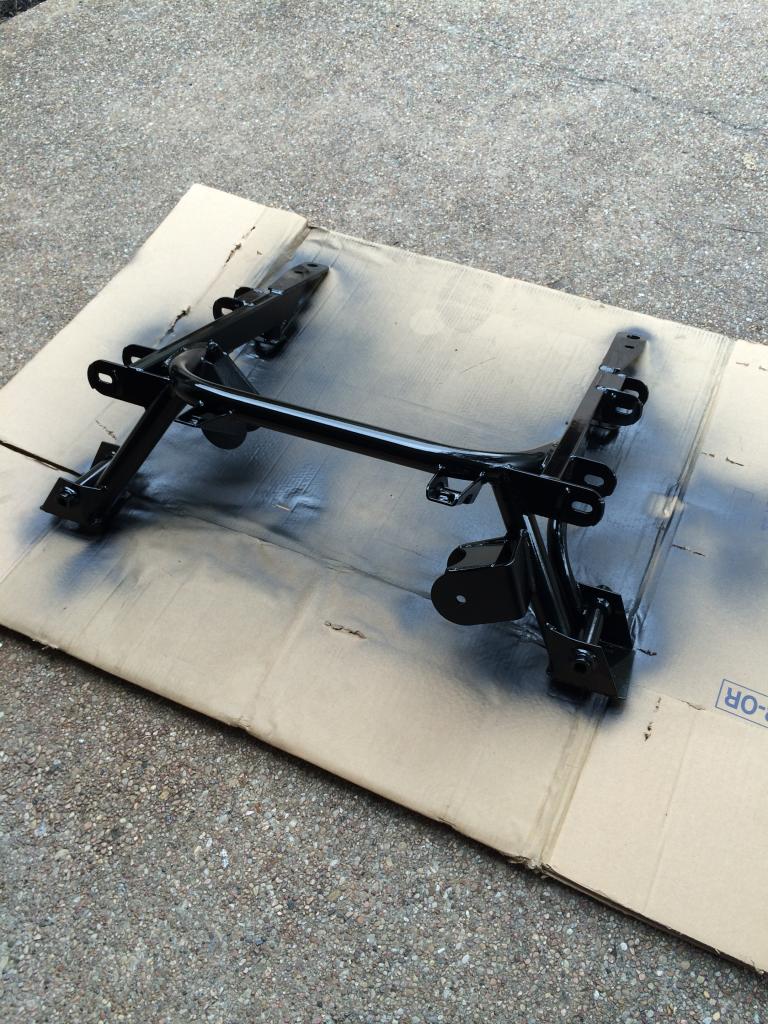
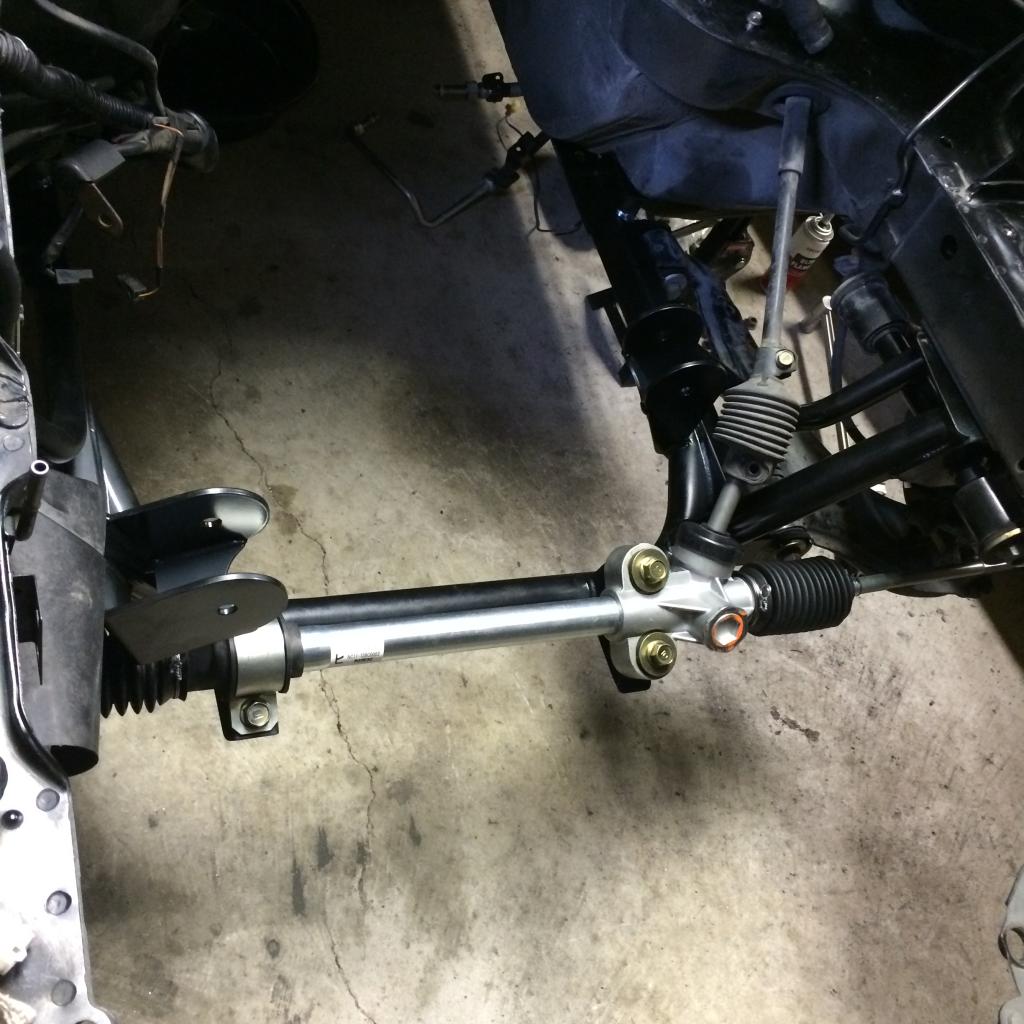
New tubular crossmember painted and installed (6lbs lighter than OE...uses NB pickup points) with new rack. Took quite a bit of filing on one of the crossmember bolt holes, but it's nice and cozy now.


Last edited by AndyHollis; 02-08-2015 at 09:19 AM.
Reply
1
1
 02-08-2015, 08:47 AM
#9
Junior Member
Thread Starter
Join Date: Nov 2006
Posts: 290
Total Cats: 183
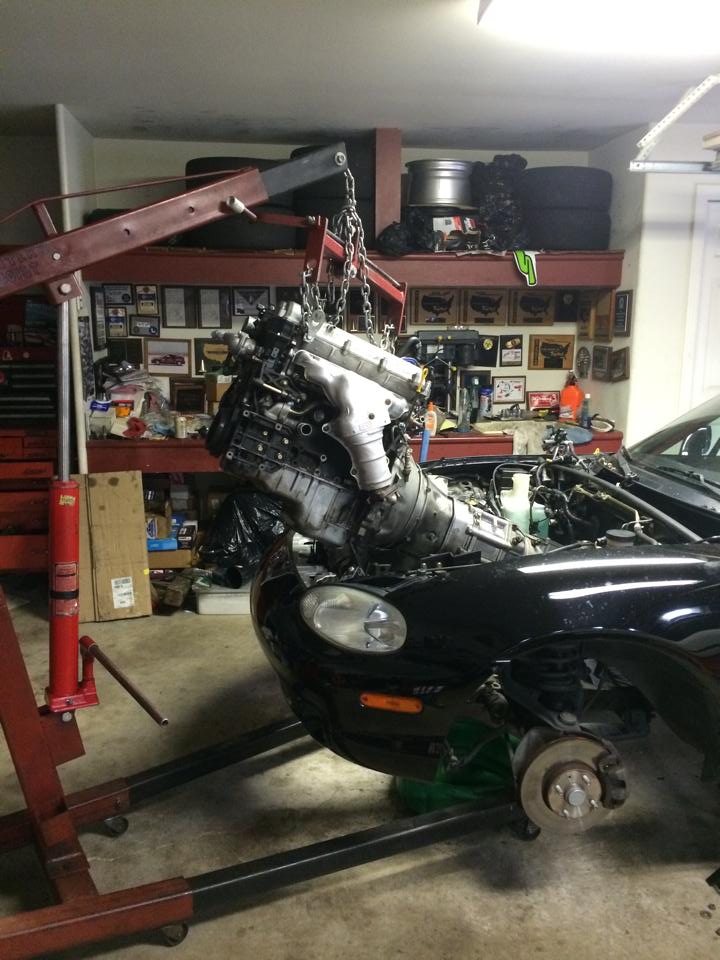
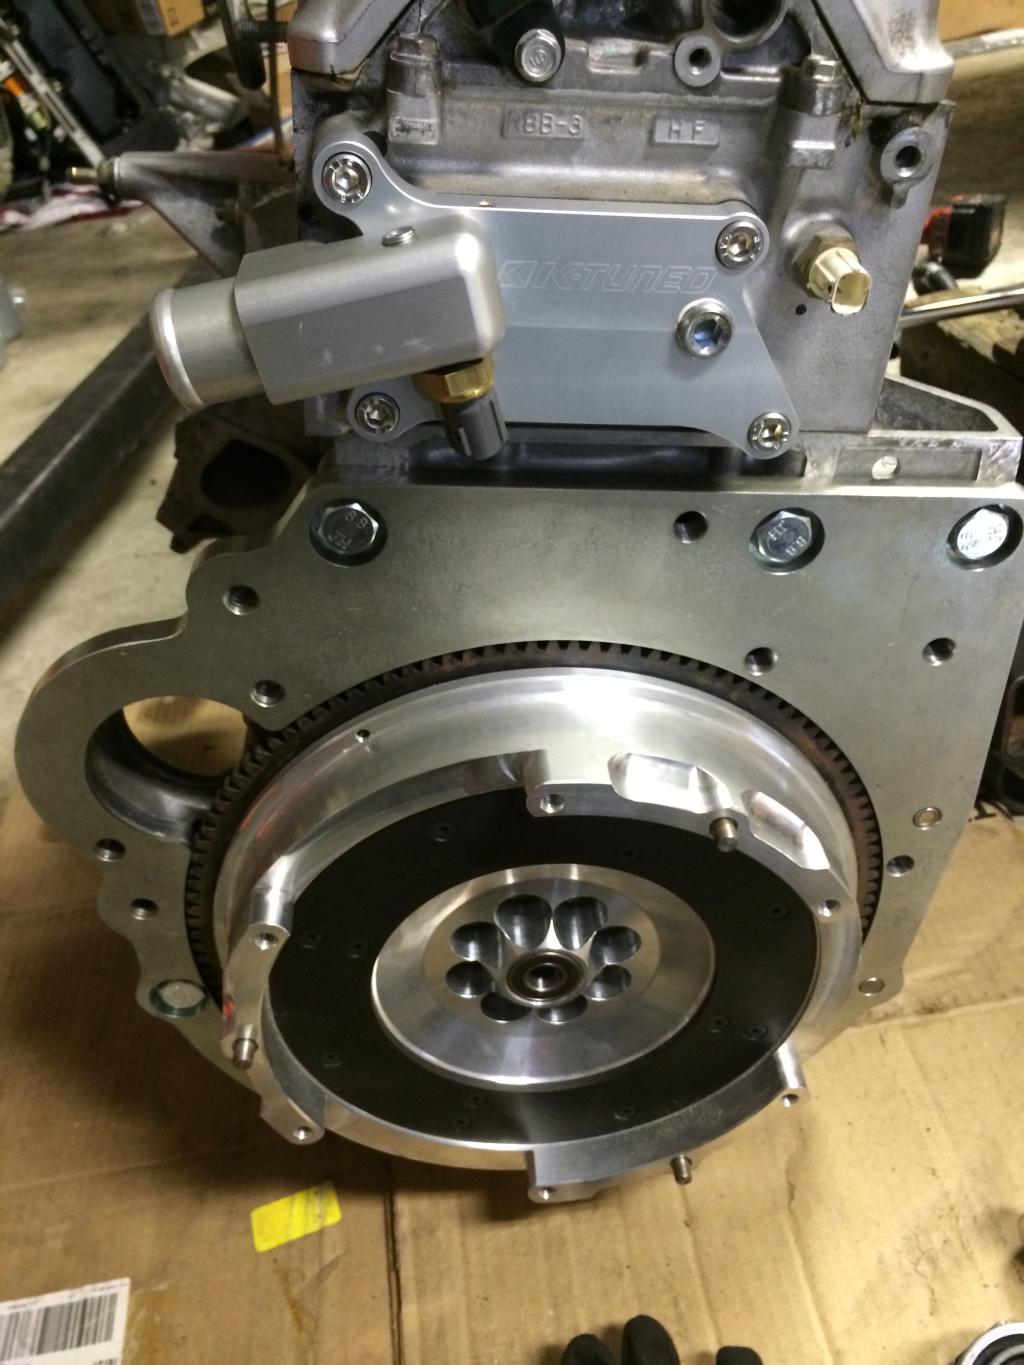
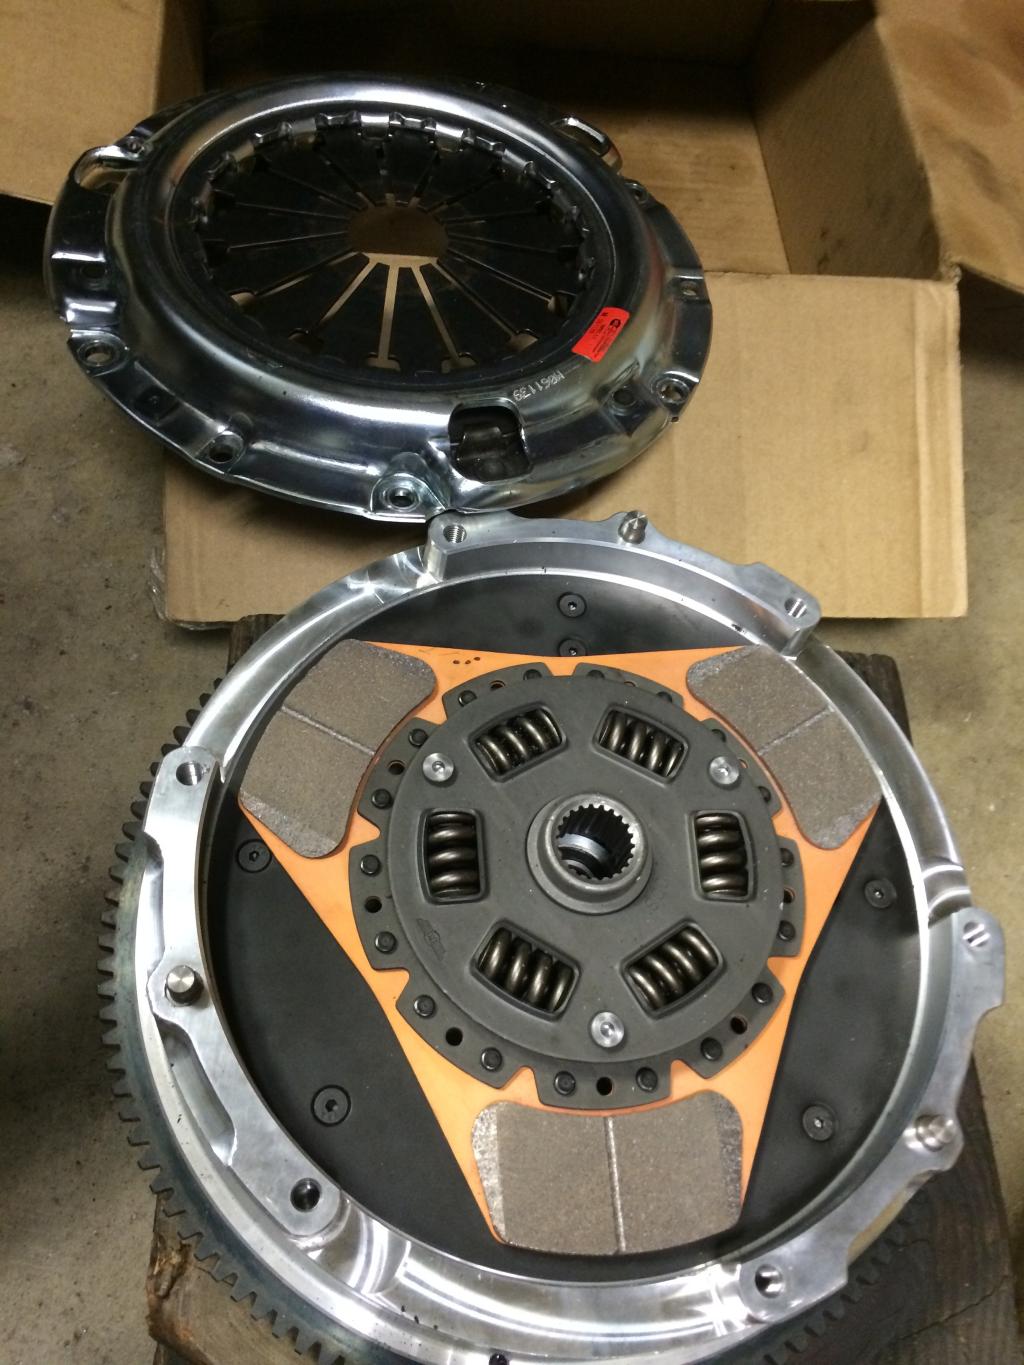
Here's the bastard child in all it's glory...followed by some of the mock-ups. Clearance between the release bearing slider tube and the clutch disc hub was still pretty tight, so I ground some off the top of the disc nub just for good measure. The flywheel is slightly recessed in the adapter, and when mocked up on the trans, pretty much the same clearance exists between the flywheel and the trans housing face that mates to the adapter. Which made me nervous.
After assembly, I pulled the plugs and rotated the motor a bunch to verify no dragging sounds inside the bellhousing. A few odds and ends to put on the thing and then it goes in the hole.
BTW, that's an Exedy Stage 2 cerametallic clutch. Same one I run on my CRX. Miata 1.8 pressure plates are weird...which makes the flywheels weird....


Reply
1
1
02-08-2015, 08:56 AM
#10
Junior Member
Thread Starter
Join Date: Nov 2006
Posts: 290
Total Cats: 183
Tips and lessons learned:
1) I prefer JIC bolts instead of the German sized stuff that the kit includes. They also fit better in the holes since the heads are smaller. Also, some in the kit do not provide maximum engagement in the adapter plate. I used a combination of Honda and Mazda bolts I had laying around, sometimes grinding off a mm or two to get max engagement. You can also get generic ones online.
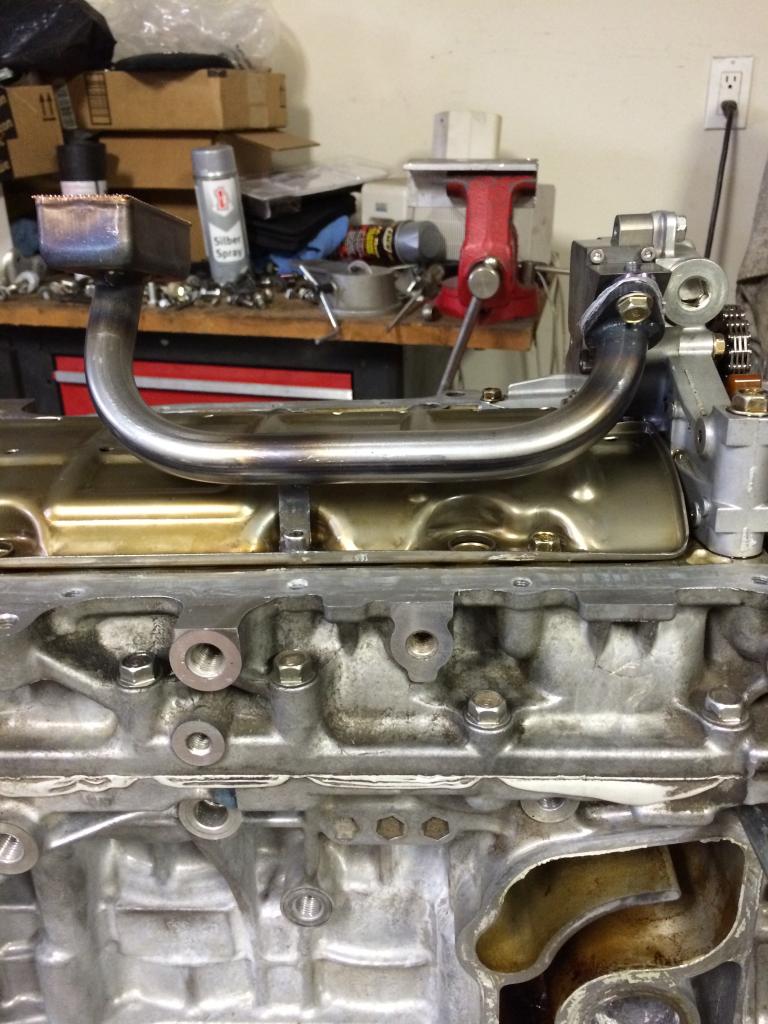
2) The KTuned water outlet is slick, and a must-have for TSX "z3" style cylinder heads. It comes in a variety of configurations, so make sure and get the right one. The K20A2 heads have the water outlet on the side so they will look different. I drilled/tapped the bottom of mine to mount the Miata temp gauge sensor, and am using the plugged top as a fill bleed for coolant. When we get to the cooling setup, this need will become clear. Without the bleed you'll have air pockets and indicated overheating.
3) The flywheel bolts benefit from grinding the outer edge a bit to aid in alignment within the close tolerance of the flywheel holes. It can be quite a chore to get the flywheel on the crankshaft, as everything has to line up perfectly for the bolts to snug down properly. Very easy to get it all misaligned. I found it easier to put the flywheel on the crank first, then mount the adapter plate.
4) The standard mounting transmission dowels from the TSX/RSX block are too long to fit into the shorter recess of the adapter plate. The local Honda dealer will have shorter ones for a couple of dollars.
1) I prefer JIC bolts instead of the German sized stuff that the kit includes. They also fit better in the holes since the heads are smaller. Also, some in the kit do not provide maximum engagement in the adapter plate. I used a combination of Honda and Mazda bolts I had laying around, sometimes grinding off a mm or two to get max engagement. You can also get generic ones online.
2) The KTuned water outlet is slick, and a must-have for TSX "z3" style cylinder heads. It comes in a variety of configurations, so make sure and get the right one. The K20A2 heads have the water outlet on the side so they will look different. I drilled/tapped the bottom of mine to mount the Miata temp gauge sensor, and am using the plugged top as a fill bleed for coolant. When we get to the cooling setup, this need will become clear. Without the bleed you'll have air pockets and indicated overheating.
3) The flywheel bolts benefit from grinding the outer edge a bit to aid in alignment within the close tolerance of the flywheel holes. It can be quite a chore to get the flywheel on the crankshaft, as everything has to line up perfectly for the bolts to snug down properly. Very easy to get it all misaligned. I found it easier to put the flywheel on the crank first, then mount the adapter plate.
4) The standard mounting transmission dowels from the TSX/RSX block are too long to fit into the shorter recess of the adapter plate. The local Honda dealer will have shorter ones for a couple of dollars.
Last edited by AndyHollis; 02-08-2015 at 12:46 PM.
Reply
3
3


 02-08-2015, 09:26 AM
#13
Junior Member
Thread Starter
Join Date: Nov 2006
Posts: 290
Total Cats: 183
Time to get the girl fully dressed.
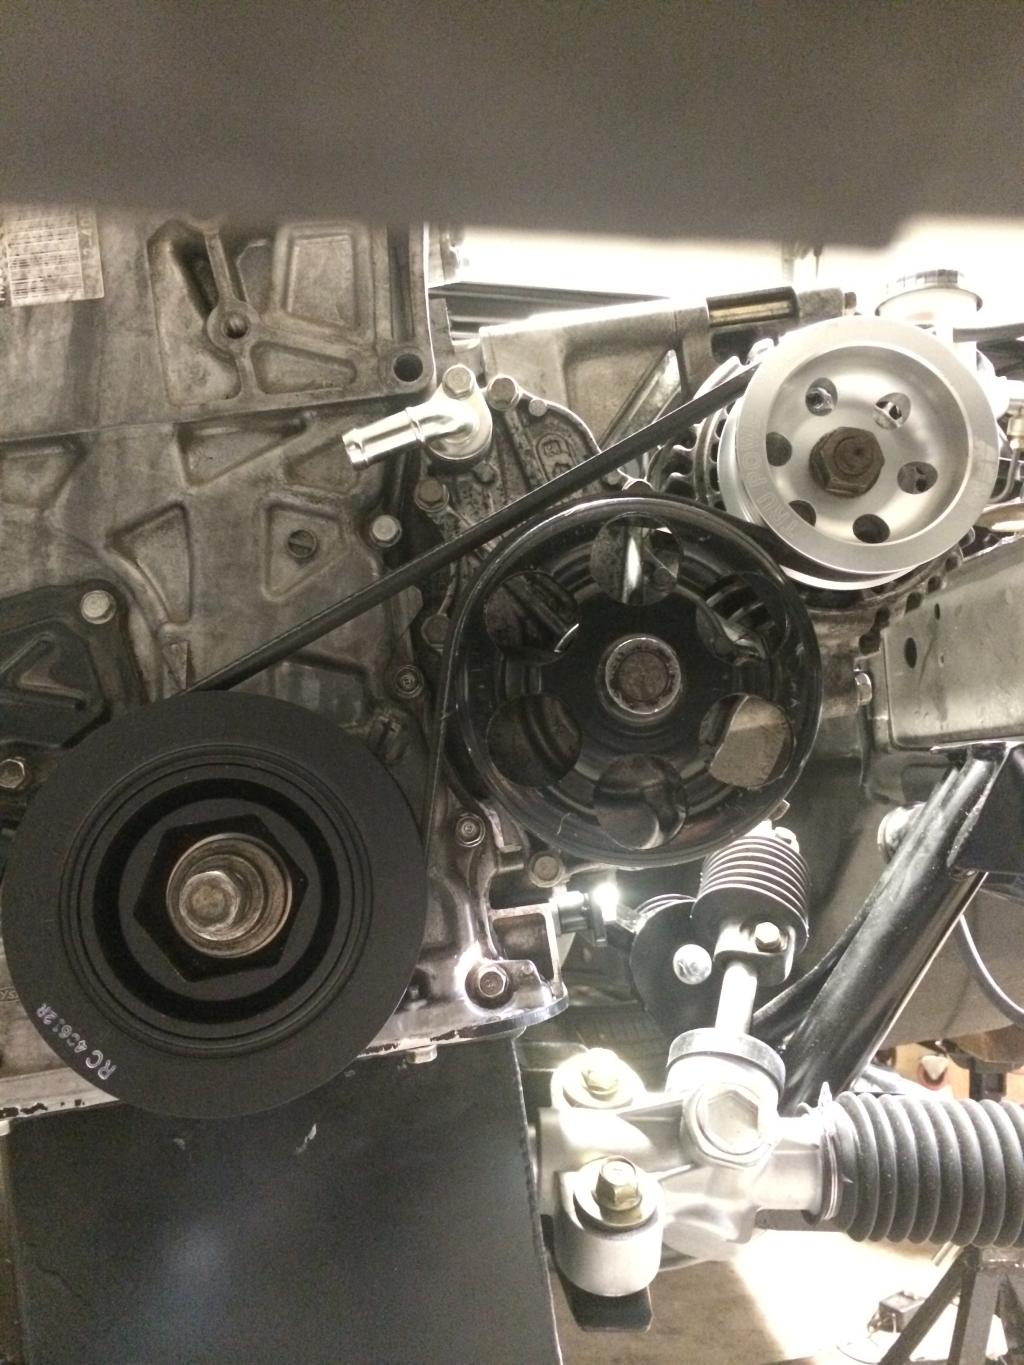
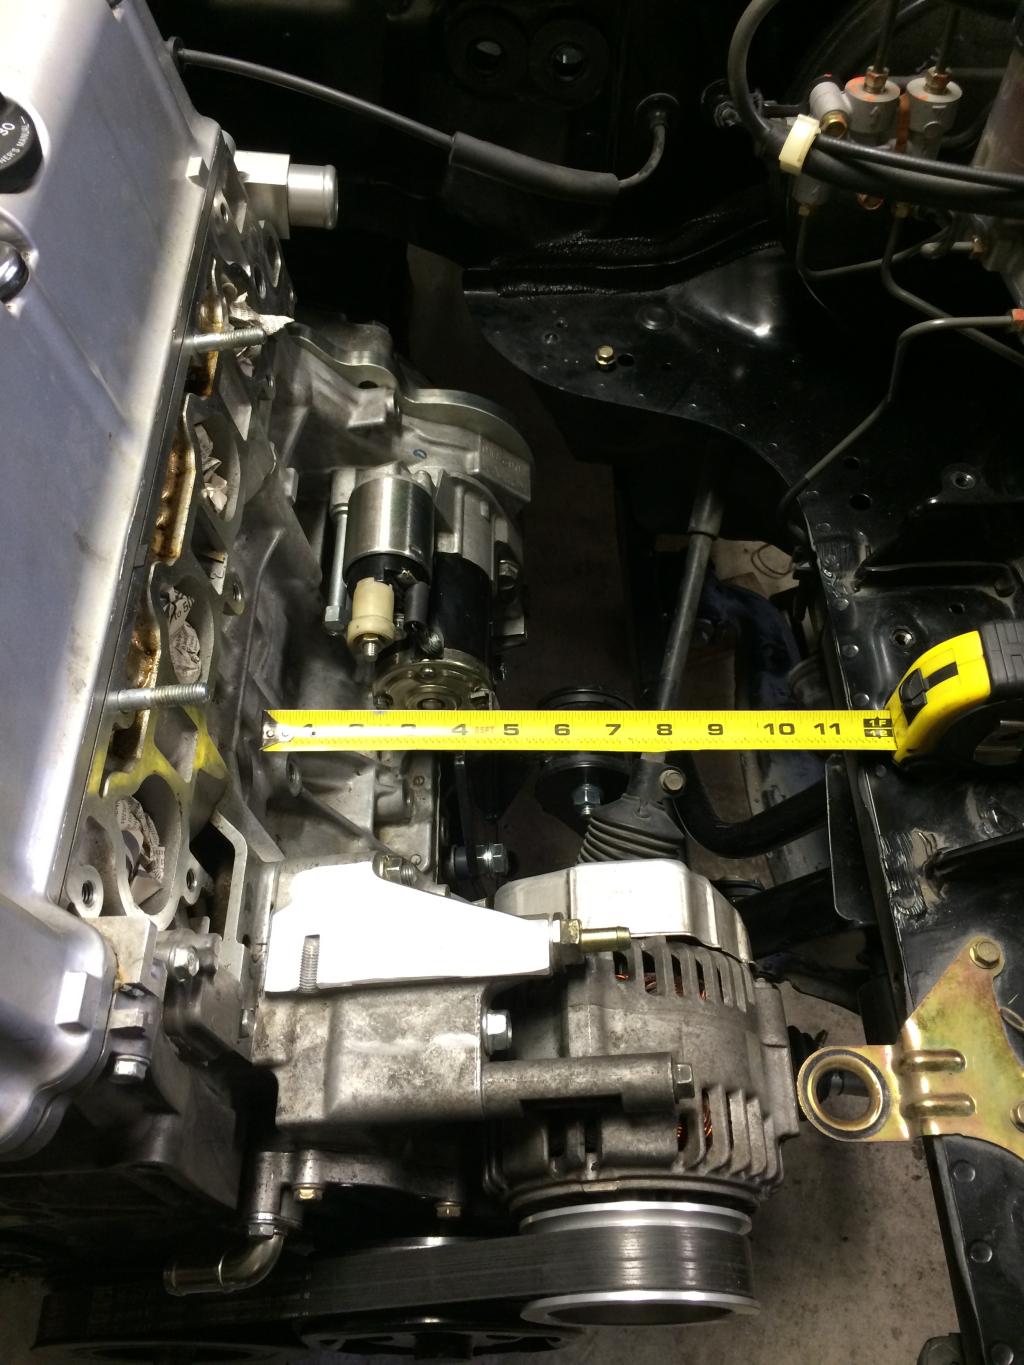
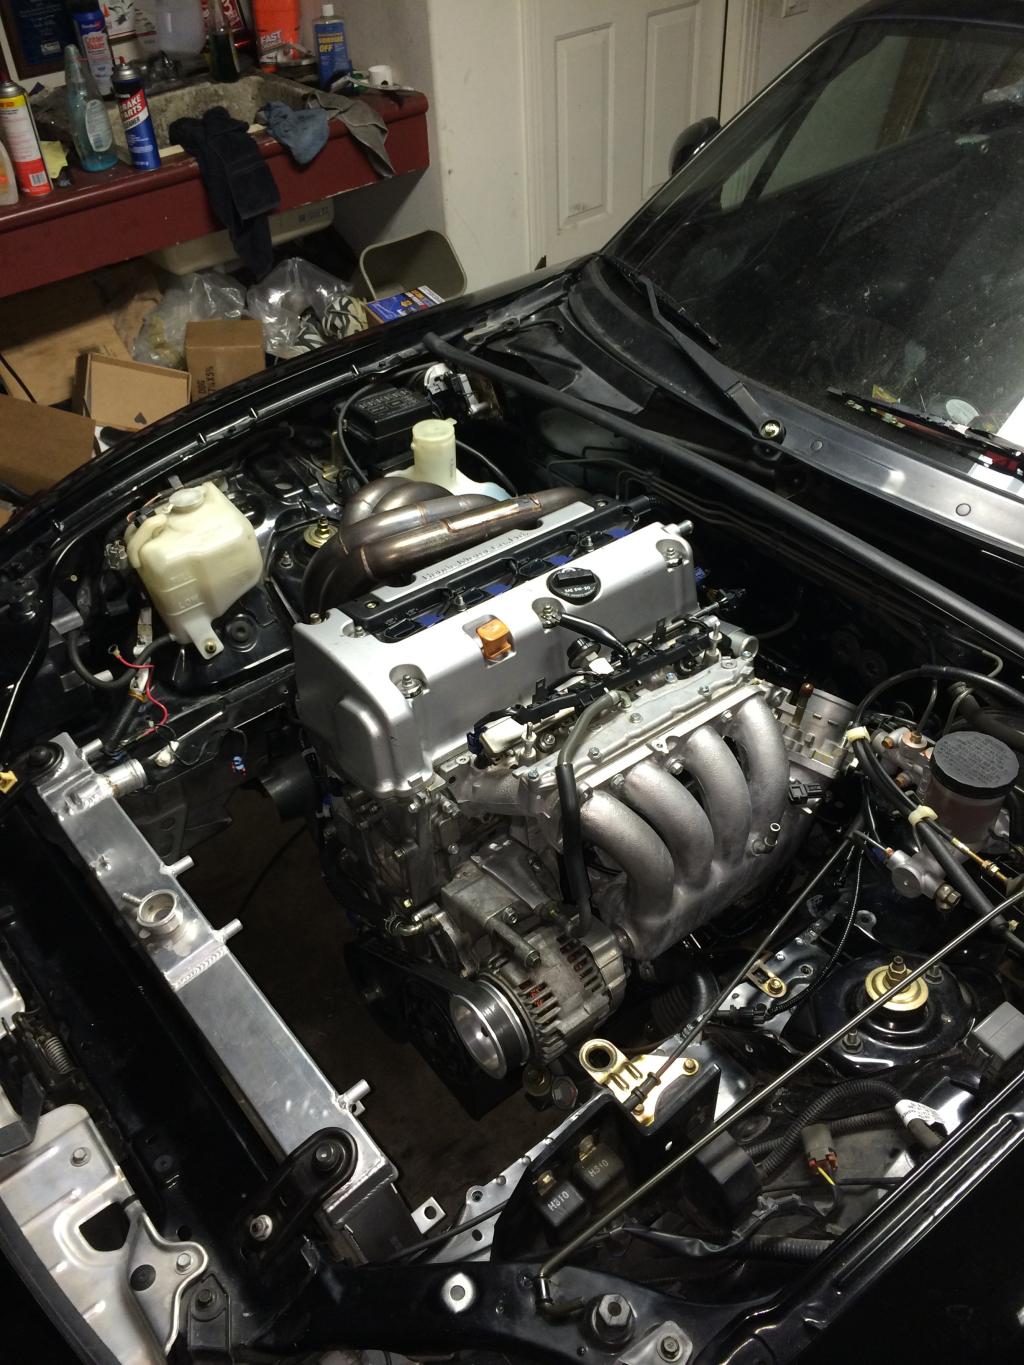
Here's the classic "three-pulley" setup in order to give maximum room for the intake manifold. Tensioner bracket has been shaved off the water housing, and a large underdrive pulley goes on the alternator. AEM pulley is no longer sold but we scored a lightly used one recently on eBay. This combines with the smaller "PRC" crank pulley from the JDM K20A to give just the right dimensions. The CRX has the same setup.
The long run from the alternator to the crank pulley will develop a harmonic oscillation at about 3000 rpm, but it isn't too bad if the belt is kept tight. Thin washers under the top mount of the alternator can be used to adjust tension. This was a new belt so it was tight w/o any.
We will eventually be converting to a lighter D-series alternator that is plug n' play electrically, allows for easier tension adjustment, but requires some custom bracketry


Reply
1
1
02-08-2015, 09:37 AM
#14
Junior Member
Thread Starter
Join Date: Nov 2006
Posts: 290
Total Cats: 183
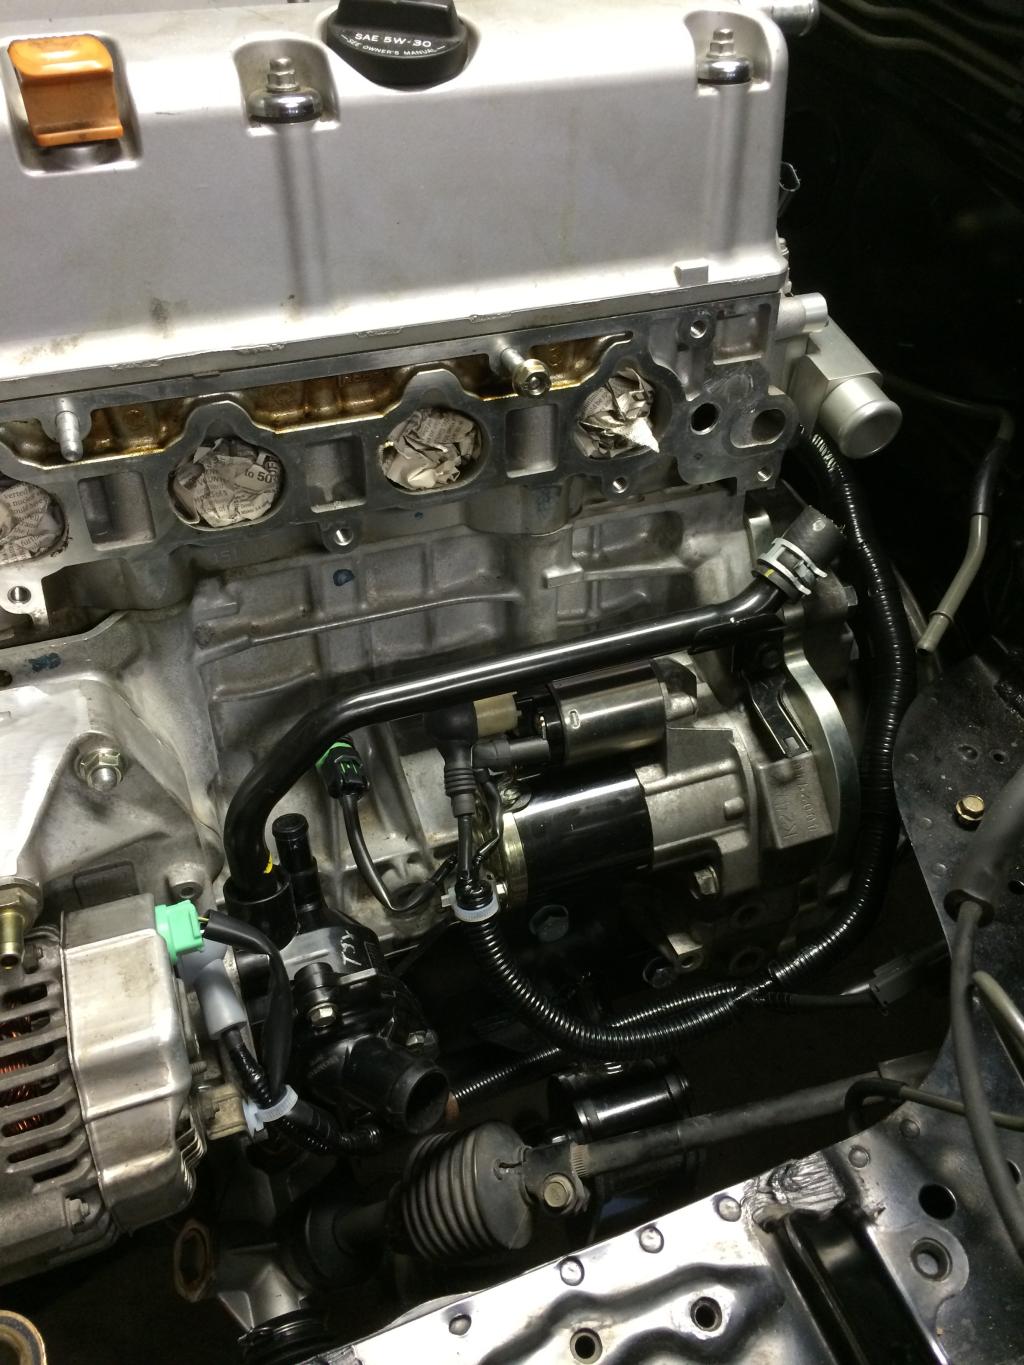
David @ KMiata sold us his original custom big-tube stainless prototype header from Lovefab so we'd have something to work with while his less-expensive small-tube "production" headers (mild steel, double coated) were in development.
It is of the "bundle of snakes" variety because the exhaust has to switch sides of the car. K-series Honda motors really want 3" exhaust and there just is not room to run one on the PPF side of the tunnel. So the long-tube, equal-length header has all of the primary tubing in the engie bay, with the collecter exiting where the Miata starter would normally be. From there, a pair of 90-degree turns route the exhaust behind the oil pan and in front of the bellhousing.
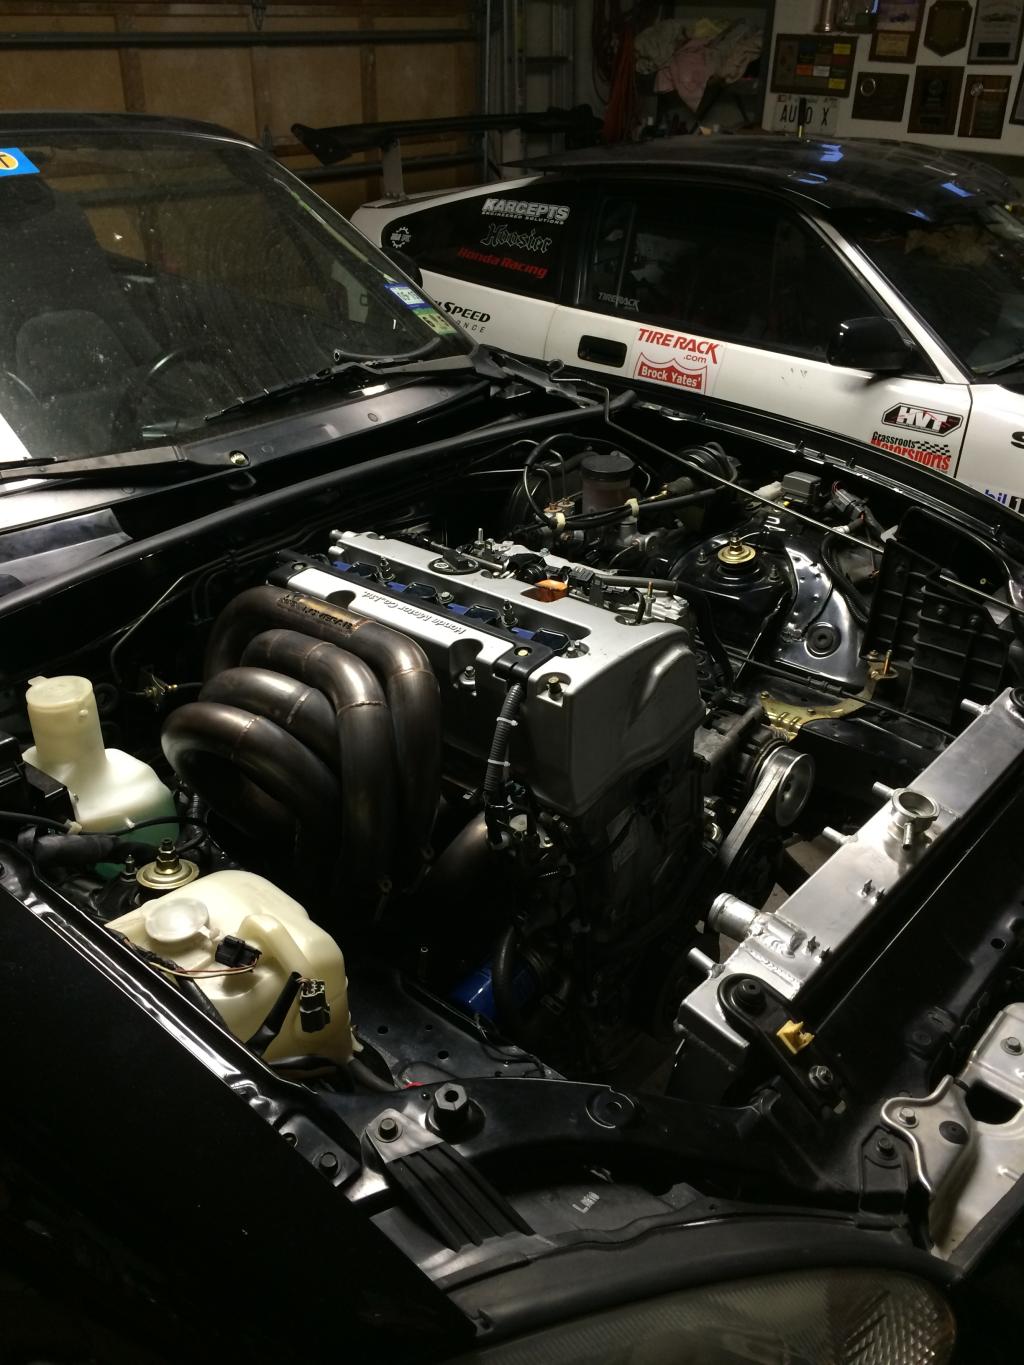
It is of the "bundle of snakes" variety because the exhaust has to switch sides of the car. K-series Honda motors really want 3" exhaust and there just is not room to run one on the PPF side of the tunnel. So the long-tube, equal-length header has all of the primary tubing in the engie bay, with the collecter exiting where the Miata starter would normally be. From there, a pair of 90-degree turns route the exhaust behind the oil pan and in front of the bellhousing.


Last edited by AndyHollis; 02-08-2015 at 03:23 PM.
Reply
1
1
02-08-2015, 09:40 AM
#15
Junior Member
Thread Starter
Join Date: Nov 2006
Posts: 290
Total Cats: 183
For now, we are going to use the stock TSX intake manifold (RBB), but had to source an 03 Accord cable-operated throttle body since the TSX is DBW. Bolts right on, and is plug-compatible with the RSX harness, though some wires are not exactly in the right place. The throttle cable will be a bit of a kludge, too. And it requires leaving out the heater core for now. David @ Kmiata is working on a new intake setup that promises to be on the level with what we run in the CRX (RRC Euro Accord), where the adapted S2000 setup is not.
To plumb the fuel line, we disconnected the first two mounting brackets and then carefully bent it around to the driver's side of the tunnel. We then added -6 AN hard-line fittings (5/16") to both the fuel line and injector rail, and connected those two with push-lock hose and fittings. That gives a little bit of slop for engine movement. Here's a good video on how to do this: http://www.anplumbing.com/page/16


To plumb the fuel line, we disconnected the first two mounting brackets and then carefully bent it around to the driver's side of the tunnel. We then added -6 AN hard-line fittings (5/16") to both the fuel line and injector rail, and connected those two with push-lock hose and fittings. That gives a little bit of slop for engine movement. Here's a good video on how to do this: http://www.anplumbing.com/page/16

Last edited by AndyHollis; 02-09-2015 at 08:53 PM.
Reply
0
0
02-08-2015, 09:49 AM
#16
Junior Member
Thread Starter
Join Date: Nov 2006
Posts: 290
Total Cats: 183
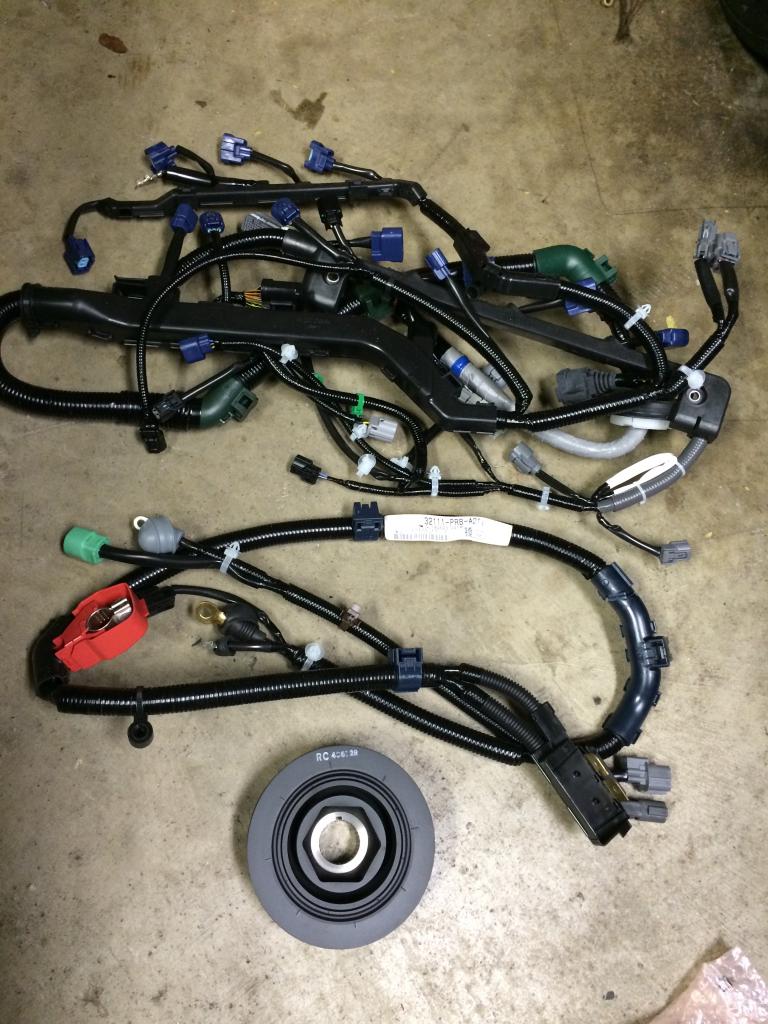
We used a brand-new RSX-S charge harness with all of the plastic covers removed. Wrecking yard parts are cheaper, but we did not want to take the risk on a 10+ year-old heat-cracked wiring loom in a track car.
After mocking up positions in the engine bay on the motor, we cut the main power cables and crimped on 6 gauge ring connectors. On the Miata end of things, we cut off the plastic connectors housing the ends that normally connect to the alternator and starter, and joined them to the corresponding cable from the Miata chassis harness near back of the motor using bolts. The alternator cable was folded back on itself so we could use the original crimped connector. Using a vise, we bent the Miata starter cable end flat, and ground it into a normal eye shape to make bolting together easier. Tie wraps were used to keep it from moving and chafing, and then it was stuffed in convoluted tube and wrapped in electrical tape.
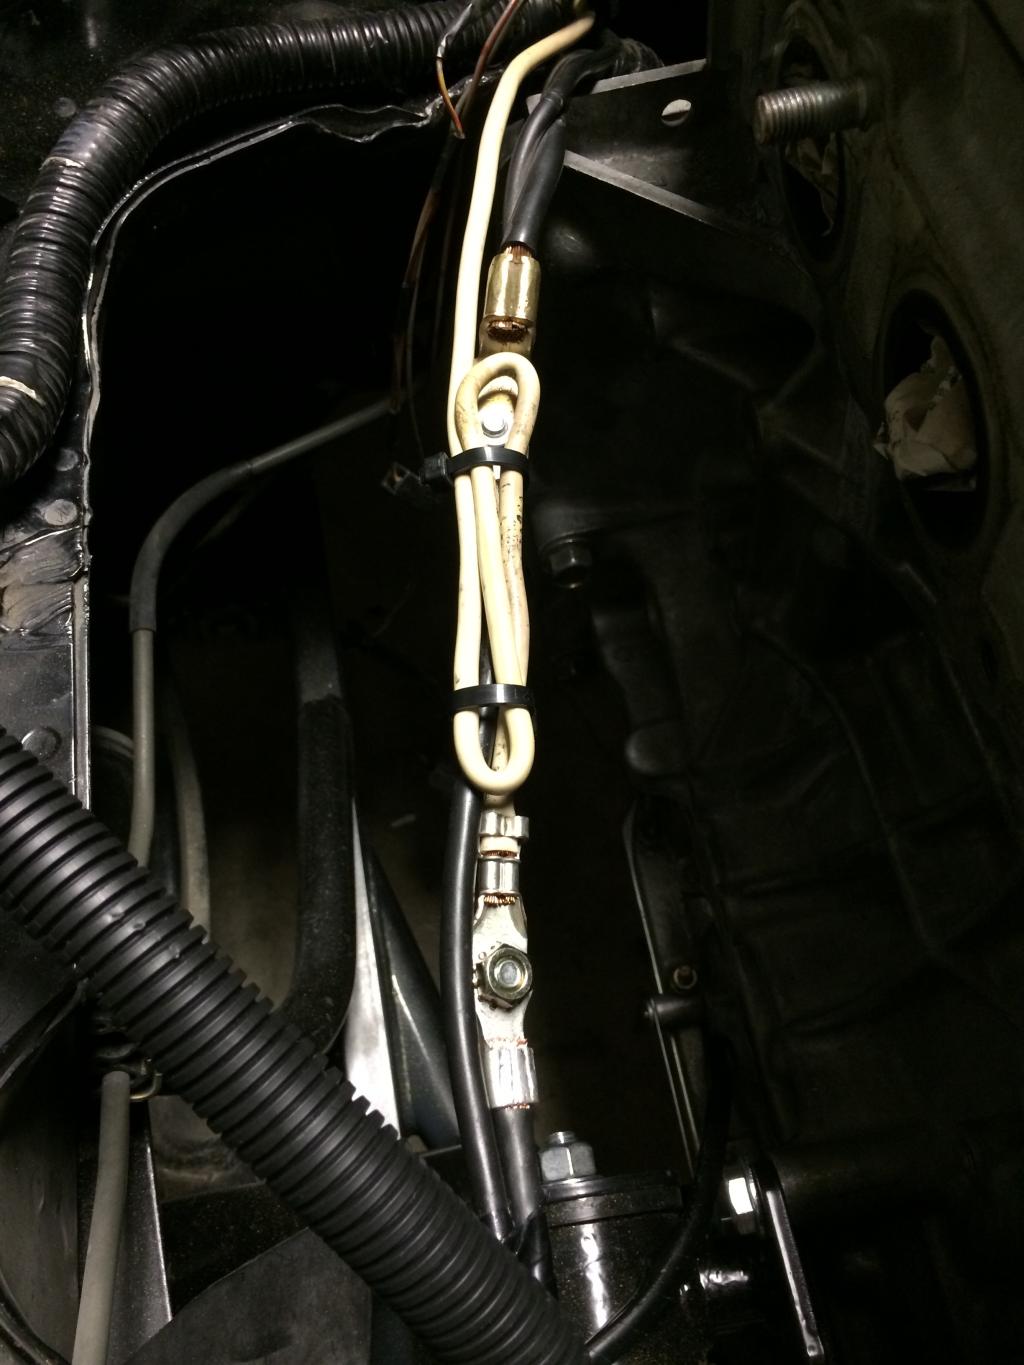
Honda alt/starter harness spliced into Miata wiring.
Some extra Miata wiring we've set aside for now. That will eventually all go away.
After mocking up positions in the engine bay on the motor, we cut the main power cables and crimped on 6 gauge ring connectors. On the Miata end of things, we cut off the plastic connectors housing the ends that normally connect to the alternator and starter, and joined them to the corresponding cable from the Miata chassis harness near back of the motor using bolts. The alternator cable was folded back on itself so we could use the original crimped connector. Using a vise, we bent the Miata starter cable end flat, and ground it into a normal eye shape to make bolting together easier. Tie wraps were used to keep it from moving and chafing, and then it was stuffed in convoluted tube and wrapped in electrical tape.

Honda alt/starter harness spliced into Miata wiring.

Some extra Miata wiring we've set aside for now. That will eventually all go away.

Reply
1
1
02-08-2015, 10:10 AM
#17
Junior Member
Thread Starter
Join Date: Nov 2006
Posts: 290
Total Cats: 183
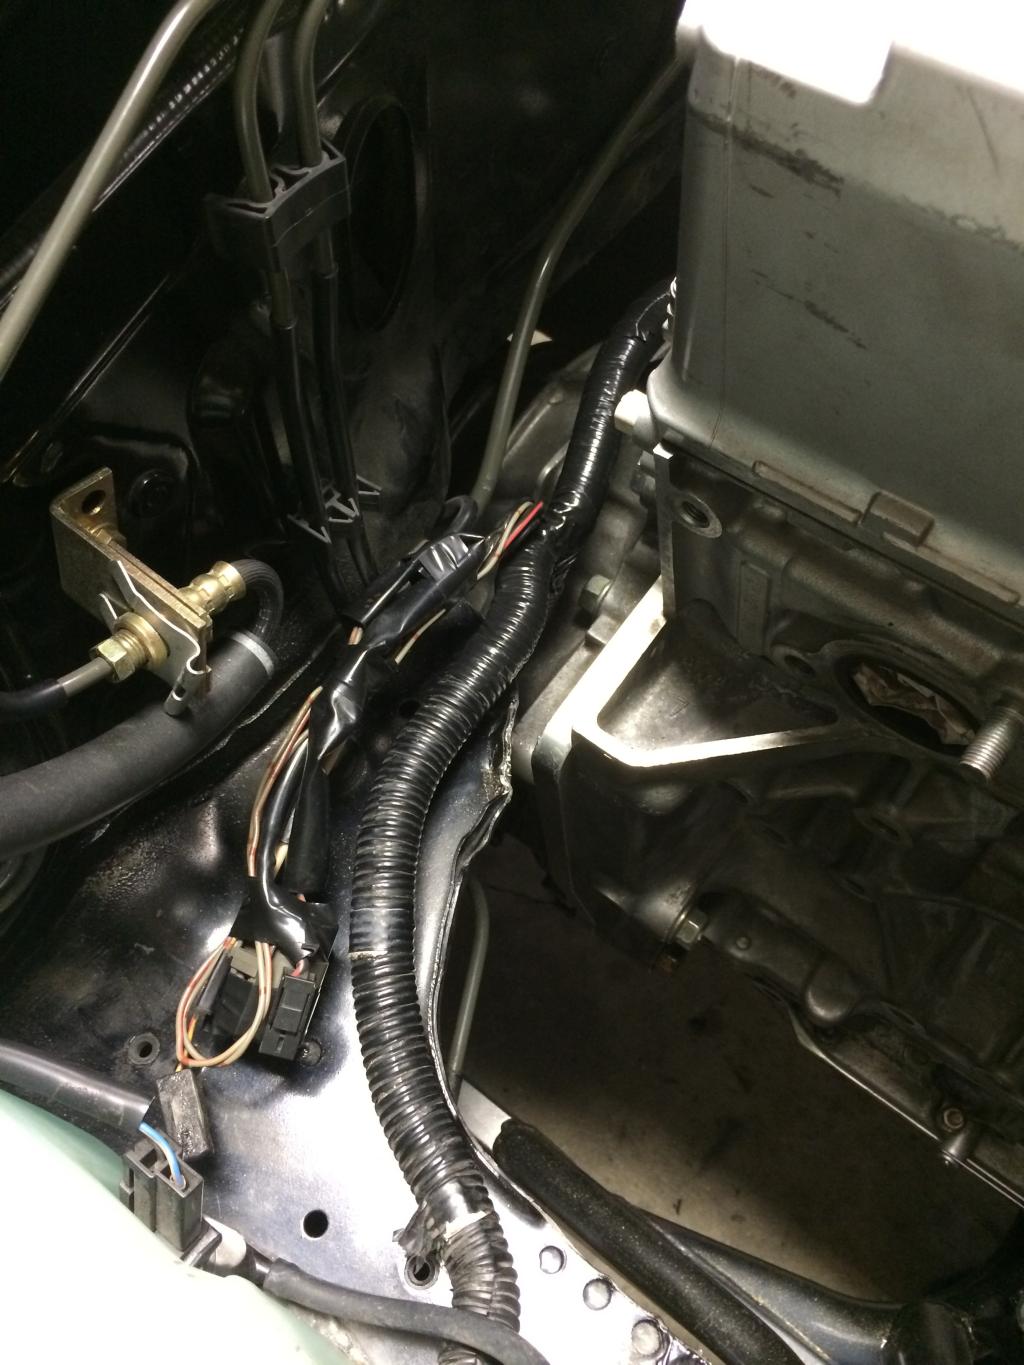
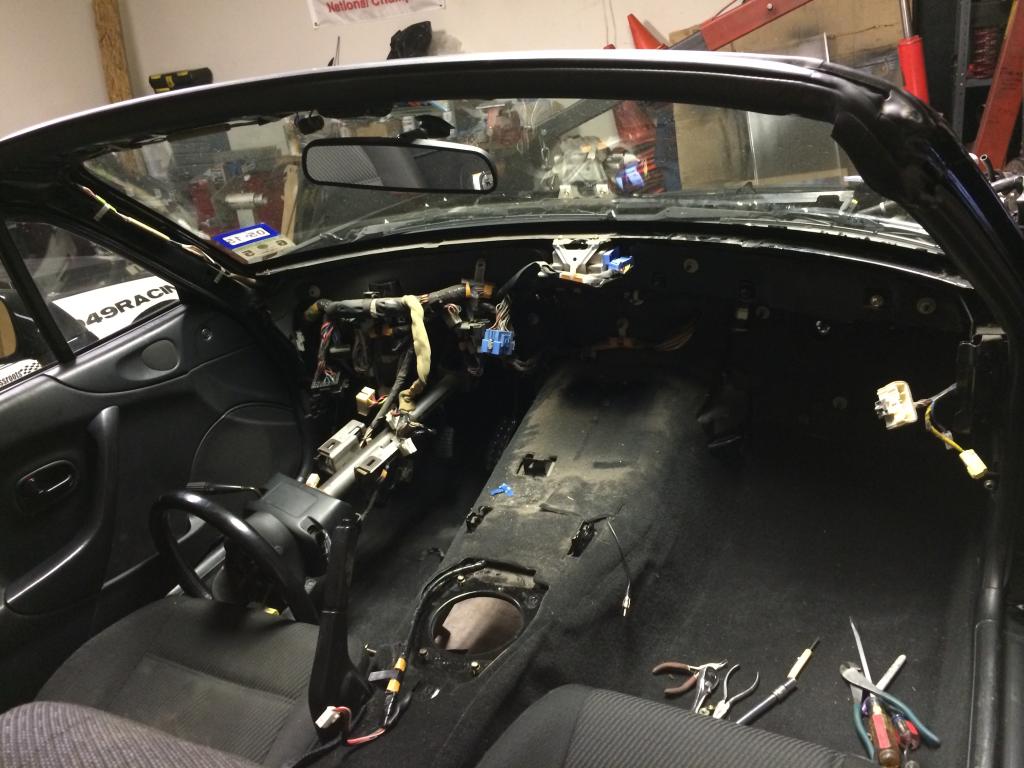
Pulled the dash, and removed the Miata ECU and engine harness completely.
Fresh RSX-S engine harness from Honda. Expensive, but the reliaility is worth for our purposes.
The engine harness was mocked up on the motor and pulled through the firewall. The seal plug had to be slotted to move it where it belonged. Eventually, we'll source a Miata seal that fits the hole better (anybody got a spare one?).
Mounted the KPro on a piece of coroplast signboard, along with the relays and such from the harness adapter. There's about 18" of extra wiring length in the engine harness so it got wound around the board. All of that will tuck under the carpet for now. Once the cage is in, I'll mount it on a piece of aluminum plate and put in the final position. Might be up on the tunnel by the firewall.
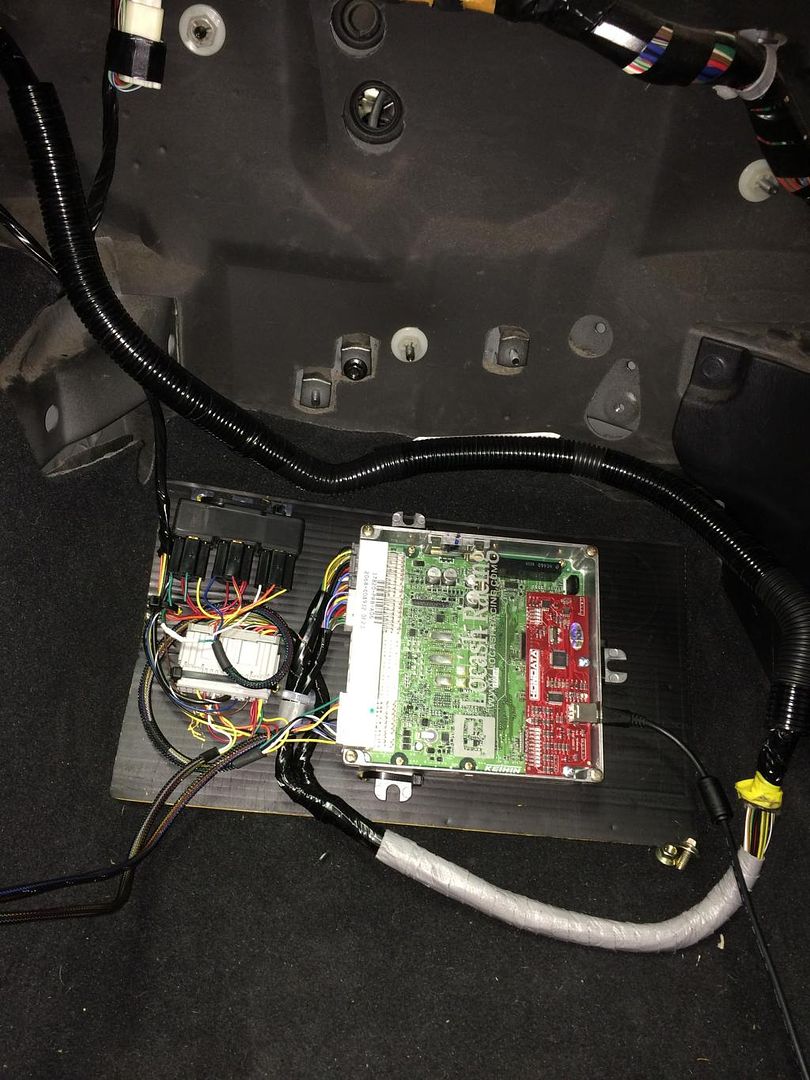

Fresh RSX-S engine harness from Honda. Expensive, but the reliaility is worth for our purposes.

The engine harness was mocked up on the motor and pulled through the firewall. The seal plug had to be slotted to move it where it belonged. Eventually, we'll source a Miata seal that fits the hole better (anybody got a spare one?).
Mounted the KPro on a piece of coroplast signboard, along with the relays and such from the harness adapter. There's about 18" of extra wiring length in the engine harness so it got wound around the board. All of that will tuck under the carpet for now. Once the cage is in, I'll mount it on a piece of aluminum plate and put in the final position. Might be up on the tunnel by the firewall.

Reply
1
1
02-08-2015, 10:24 AM
#18
Junior Member
Thread Starter
Join Date: Nov 2006
Posts: 290
Total Cats: 183
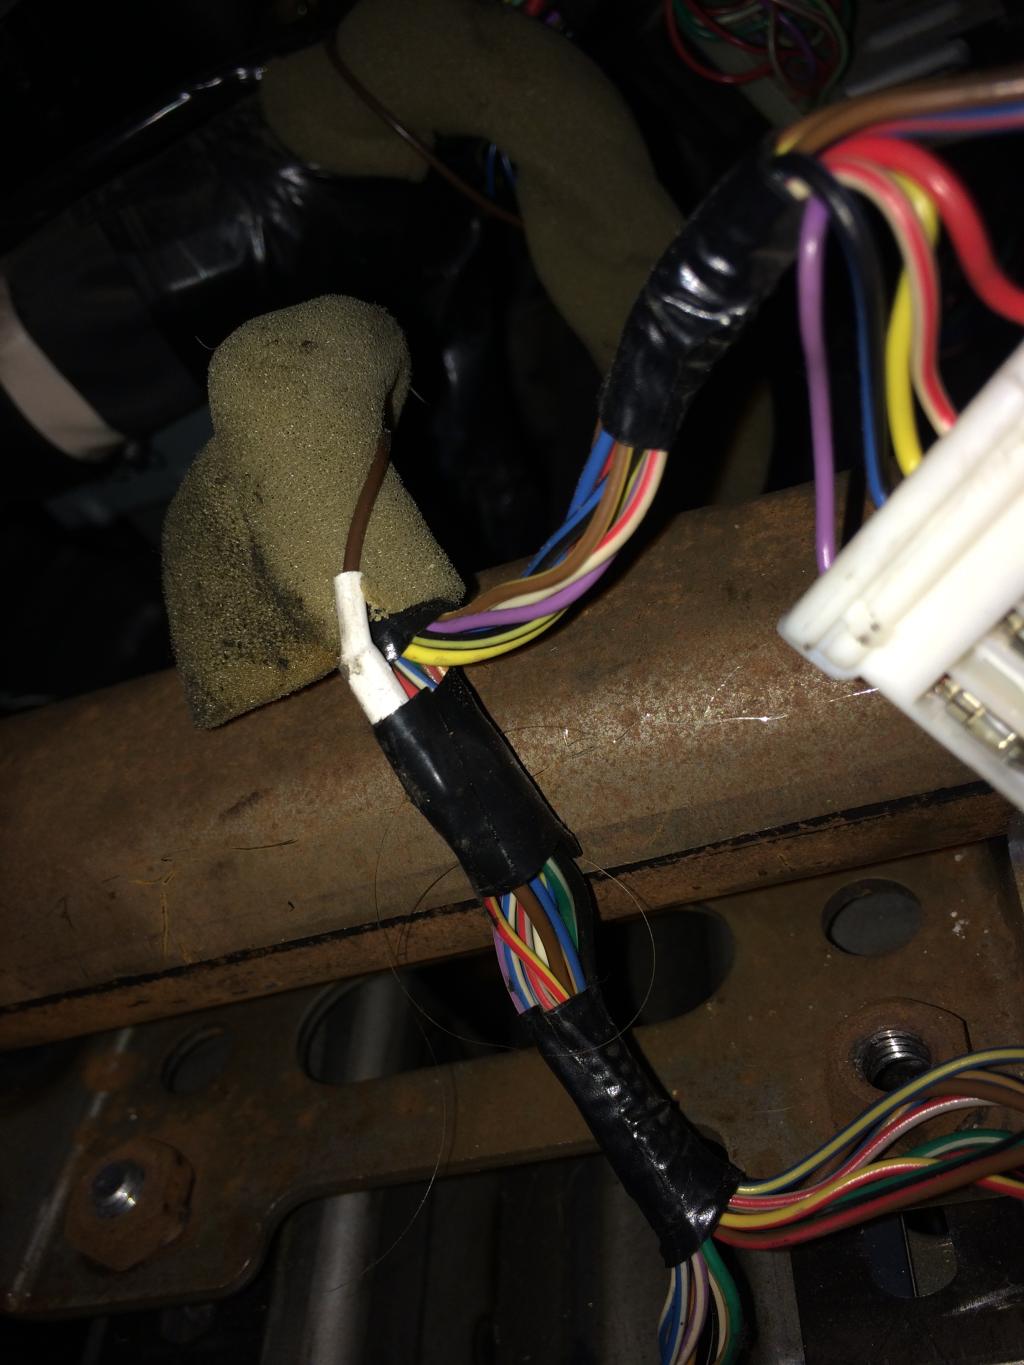
<<Placeholder for detailed wiring description>>
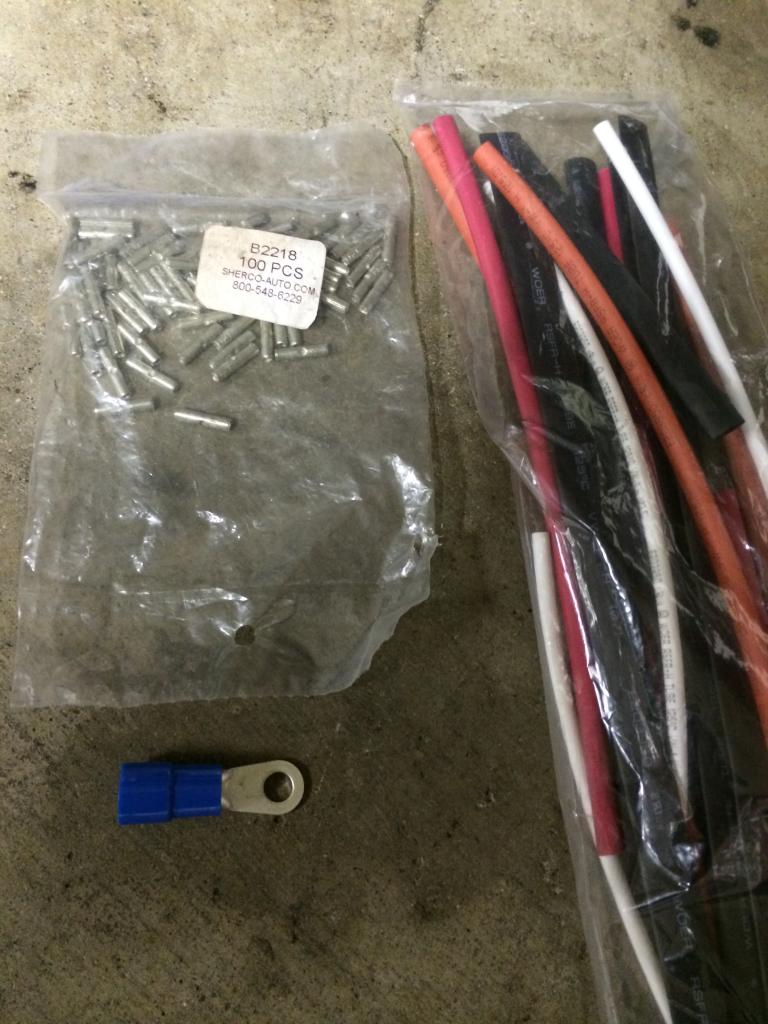
The wiring instructions included with the KMiata kit are designed for a 99-00 NB, which is one of the reasons we chose our 2000 PEP (the other being factory cruise control). That said, we are not fans of "tapping" into wiring lines, especially with vampire taps (the Devil's work!!). Nor are we fans of soldering, since it creates wiring stress in race cars. So we use non-insulated butt splices, with heat shrink wrapping and a quality crimping tool. There are also some really cool (and expensive) crimp splices available that include the heat shrink and solder. So you crimp, heat, solder all at once. Clever.
Fuel pump wiring variance => The supplied adapter includes a relay for the fuel pump, which is driven by a grounding signal from the ECU. The output of this relay is a small gauge wire. The Miata has its own fuel pump relay with large gauge wiring. Since we'll be upgrading our fuel pump to a high performance model from Deatchworks, we are not looking to downsize the wire with that level of current draw. So we bypassed the adapter pump relay and sent that ground signal direct to the Miata relay.
<<insert pic of modified relay wiring here>>>
While the supplied instructions suggest tapping into a variety of wires, we were able to do all of our wiring by cutting and splicing. As you might imagine, most of the connections to the Honda ECU are the same ones the Miata ECU would need. And since those plugs remain unsed, you can cut their wires with impunity (big blue block and the 3rd plug removed from the Miata ECU when the stock engine harness was disconnected. This numbering follows that of the instructions.
1) Constant 12V - Blue/red wire from the ECU plug connects to red wire on conversion harness.
2) Switched 12V - Black/white wire on blue block connects to orange wire on conversion harness.
3) Fuel pump - Light Green wire on blue block connects to green wire from conversion harness (see notes above about fuel pump relay).
4) RPM signal - Green/orange wire on blue block connects to black wire from conversion harness.
5) Radiator fan control - Red/green on ECU plug connects to blue wire on conversion harness
6) Starter signal - We bypassed the clutch interlock function by connecting the Black/white wire from the adapter harness directly to the output side of the interlock switch connector, found on the driver's kick panel near the hood release.
7) MIL light - White/blue wire on ECU plug connects to yellow wire on conversion harness
8) Oil light/gauge - Cut the Yellow/red wire in the instrument cluster harness and connect the brown wire from the conversion harness to the gauge side of the cut.
10) We coiled up the OBD2 wiring and secured it to our KPro mounting board.
To drive the Miata coolant temp gauge, we drilled/tapped the sensor into the K-Tuned water outlet on the back of the head. A pigtail was sourced from a local wrecking yard and the bottom wire of the "V" was sheathed in shrink wrap and run through the firewall where we connected it to the Violet/white wire in the harness at the blue block connector.
Hint: to source the coolant temp gauge sender and pigtail, look up the Miata part on the O'Reilly Auto parts web site and hit the "compatibility" tab for a list of target cars for your pick n' pull adventure.
The Big Blue Block connector...and our cut/splices therein. vvvvvv
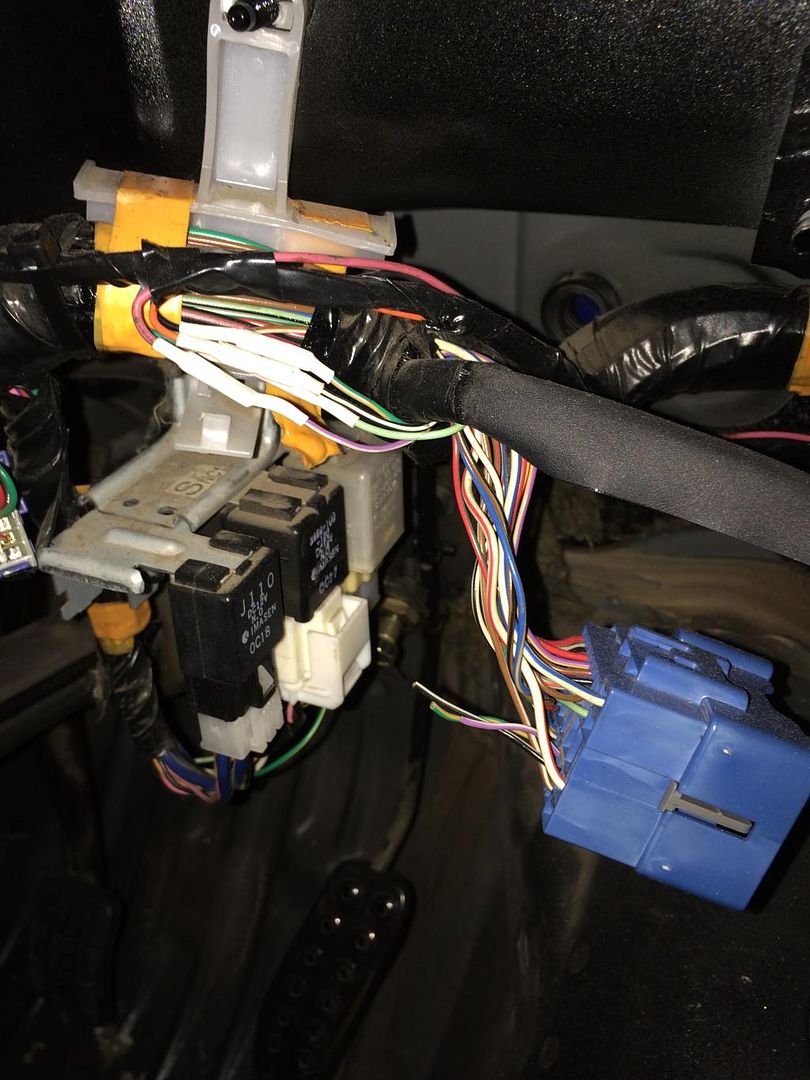
Starter signal (#6 above), bypassing the clutch interlock vvvvvvv

Oil pressure "gauge" connection vvvv
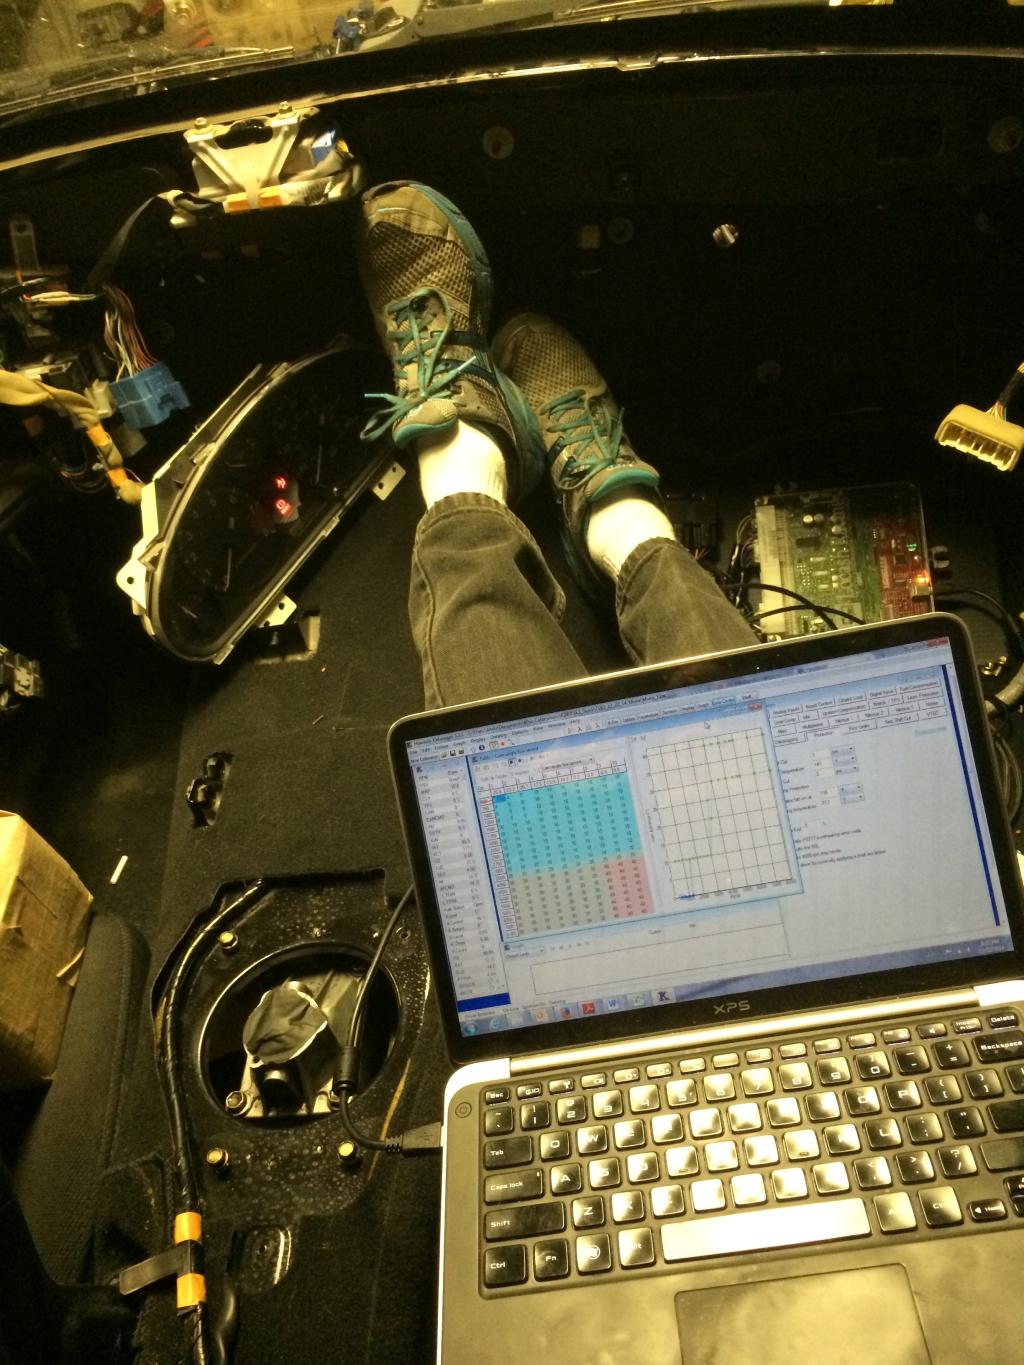
Once completed, the wiring should be tested before reinstalling the dash in case there are issues. Plug in the inrtument cluster, hook up the battery, and connect your laptop to the KPro with KManager running. Turn the key to the first position and KManager should indicate that the KPro is alive. Your instrument cluster should also show life.
Click to enable datalogging in KManager. You should now be able to read all the engine sensor values in the left hand column. Check each one. Next, load up a base map for your configuration and set the appropriate parameters for injector sizing, etc. Calibrate your TPS. If all is well, crank the thing. Debug and tune as necessary. The latter may require experienced professional help to avoid severely damaging your engine.
The wiring instructions included with the KMiata kit are designed for a 99-00 NB, which is one of the reasons we chose our 2000 PEP (the other being factory cruise control). That said, we are not fans of "tapping" into wiring lines, especially with vampire taps (the Devil's work!!). Nor are we fans of soldering, since it creates wiring stress in race cars. So we use non-insulated butt splices, with heat shrink wrapping and a quality crimping tool. There are also some really cool (and expensive) crimp splices available that include the heat shrink and solder. So you crimp, heat, solder all at once. Clever.

Fuel pump wiring variance => The supplied adapter includes a relay for the fuel pump, which is driven by a grounding signal from the ECU. The output of this relay is a small gauge wire. The Miata has its own fuel pump relay with large gauge wiring. Since we'll be upgrading our fuel pump to a high performance model from Deatchworks, we are not looking to downsize the wire with that level of current draw. So we bypassed the adapter pump relay and sent that ground signal direct to the Miata relay.
<<insert pic of modified relay wiring here>>>
While the supplied instructions suggest tapping into a variety of wires, we were able to do all of our wiring by cutting and splicing. As you might imagine, most of the connections to the Honda ECU are the same ones the Miata ECU would need. And since those plugs remain unsed, you can cut their wires with impunity (big blue block and the 3rd plug removed from the Miata ECU when the stock engine harness was disconnected. This numbering follows that of the instructions.
1) Constant 12V - Blue/red wire from the ECU plug connects to red wire on conversion harness.
2) Switched 12V - Black/white wire on blue block connects to orange wire on conversion harness.
3) Fuel pump - Light Green wire on blue block connects to green wire from conversion harness (see notes above about fuel pump relay).
4) RPM signal - Green/orange wire on blue block connects to black wire from conversion harness.
5) Radiator fan control - Red/green on ECU plug connects to blue wire on conversion harness
6) Starter signal - We bypassed the clutch interlock function by connecting the Black/white wire from the adapter harness directly to the output side of the interlock switch connector, found on the driver's kick panel near the hood release.
7) MIL light - White/blue wire on ECU plug connects to yellow wire on conversion harness
8) Oil light/gauge - Cut the Yellow/red wire in the instrument cluster harness and connect the brown wire from the conversion harness to the gauge side of the cut.
10) We coiled up the OBD2 wiring and secured it to our KPro mounting board.
To drive the Miata coolant temp gauge, we drilled/tapped the sensor into the K-Tuned water outlet on the back of the head. A pigtail was sourced from a local wrecking yard and the bottom wire of the "V" was sheathed in shrink wrap and run through the firewall where we connected it to the Violet/white wire in the harness at the blue block connector.
Hint: to source the coolant temp gauge sender and pigtail, look up the Miata part on the O'Reilly Auto parts web site and hit the "compatibility" tab for a list of target cars for your pick n' pull adventure.
The Big Blue Block connector...and our cut/splices therein. vvvvvv

Starter signal (#6 above), bypassing the clutch interlock vvvvvvv

Oil pressure "gauge" connection vvvv

Once completed, the wiring should be tested before reinstalling the dash in case there are issues. Plug in the inrtument cluster, hook up the battery, and connect your laptop to the KPro with KManager running. Turn the key to the first position and KManager should indicate that the KPro is alive. Your instrument cluster should also show life.
Click to enable datalogging in KManager. You should now be able to read all the engine sensor values in the left hand column. Check each one. Next, load up a base map for your configuration and set the appropriate parameters for injector sizing, etc. Calibrate your TPS. If all is well, crank the thing. Debug and tune as necessary. The latter may require experienced professional help to avoid severely damaging your engine.

Last edited by AndyHollis; 02-09-2015 at 08:44 PM.
Reply
0
0
02-08-2015, 10:40 AM
#19
Junior Member
Thread Starter
Join Date: Nov 2006
Posts: 290
Total Cats: 183
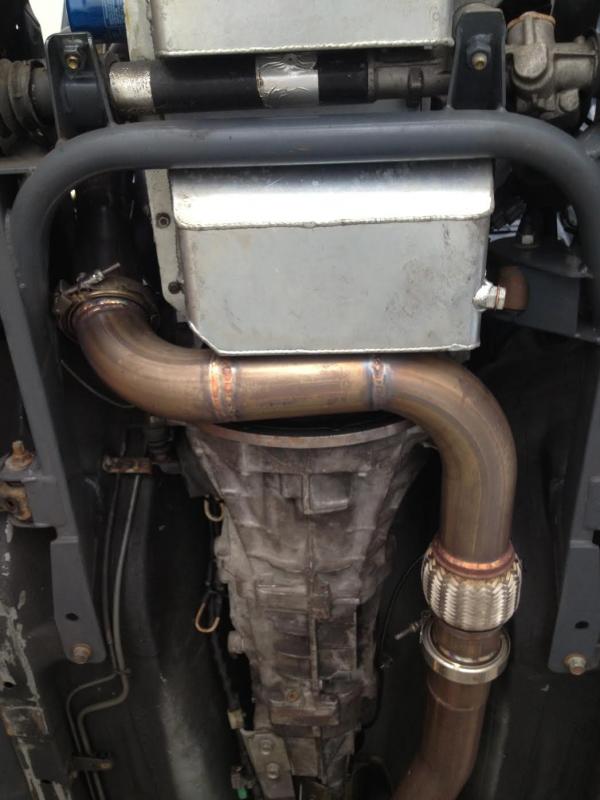
This exhaust kicked my *** for quite awhile. Uses the same mufflers as the CRX (Burns 4.5x18 and Magnaflow 4x9x14), and has the same two big bends (two 90's, in this case right after the header in the down pipe...moving from passenger side to driver's side of the PPF). So power/flow/wave tuning should be similar.
It's a tight fit to get 3" pipe along with the Burns squeezed in around the diff and the chassis bracing, and I have maybe an inch of clearance in each direction at rest. Built this out of spare pipe laying around the garage, so there's a few extra joints to piece it together. I fully expect to build a Version 2 out of thinner stainless later in the year to save weight.
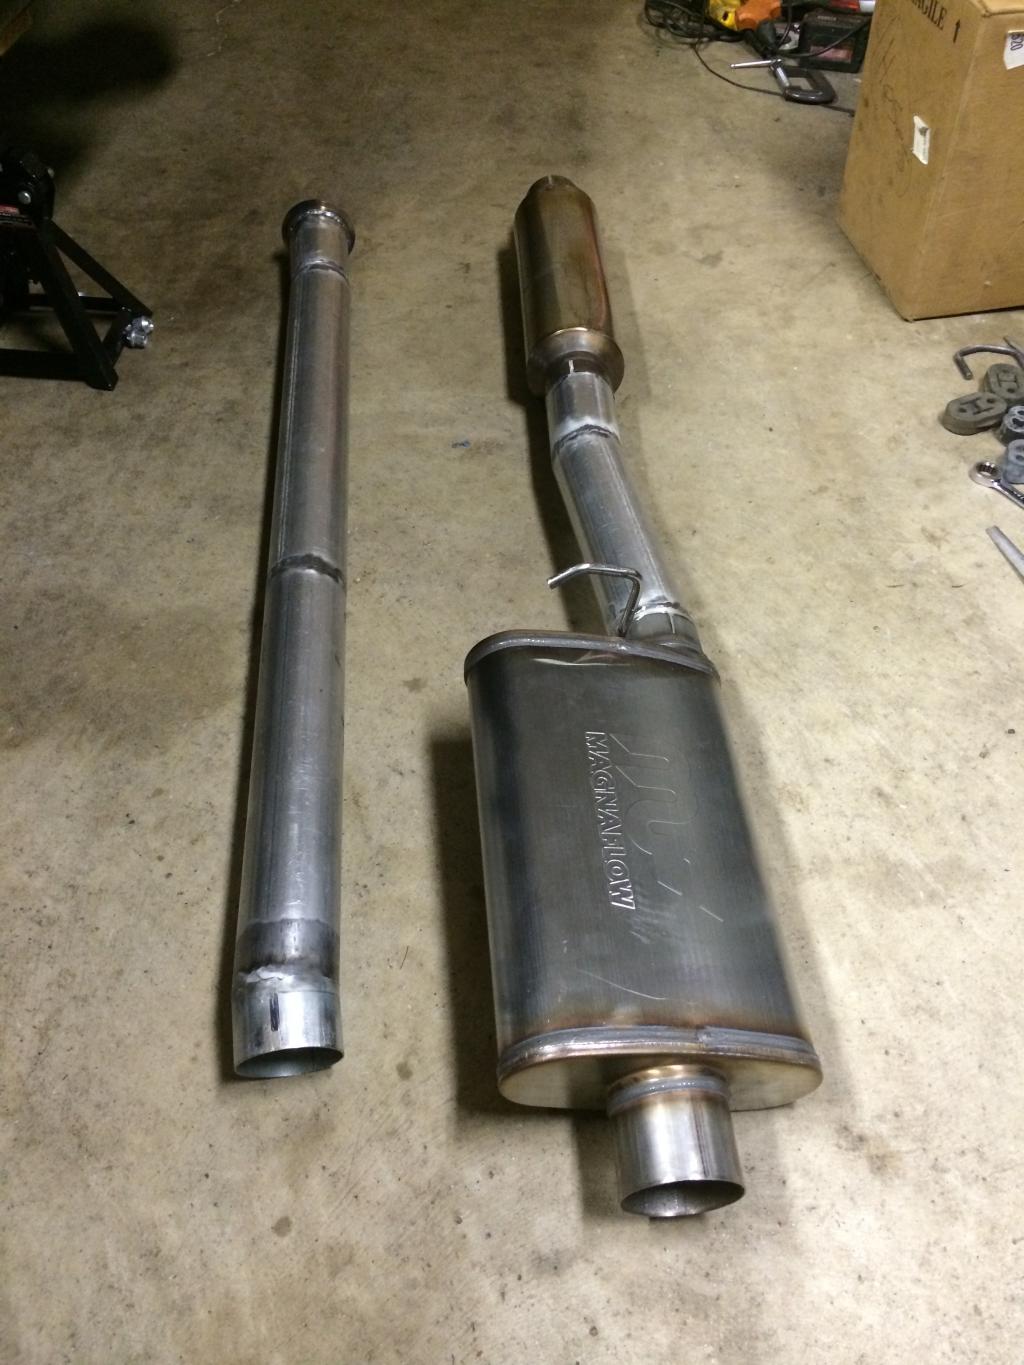
It's a tight fit to get 3" pipe along with the Burns squeezed in around the diff and the chassis bracing, and I have maybe an inch of clearance in each direction at rest. Built this out of spare pipe laying around the garage, so there's a few extra joints to piece it together. I fully expect to build a Version 2 out of thinner stainless later in the year to save weight.

Reply
0
0
02-08-2015, 10:43 AM
#20
Junior Member
Thread Starter
Join Date: Nov 2006
Posts: 290
Total Cats: 183
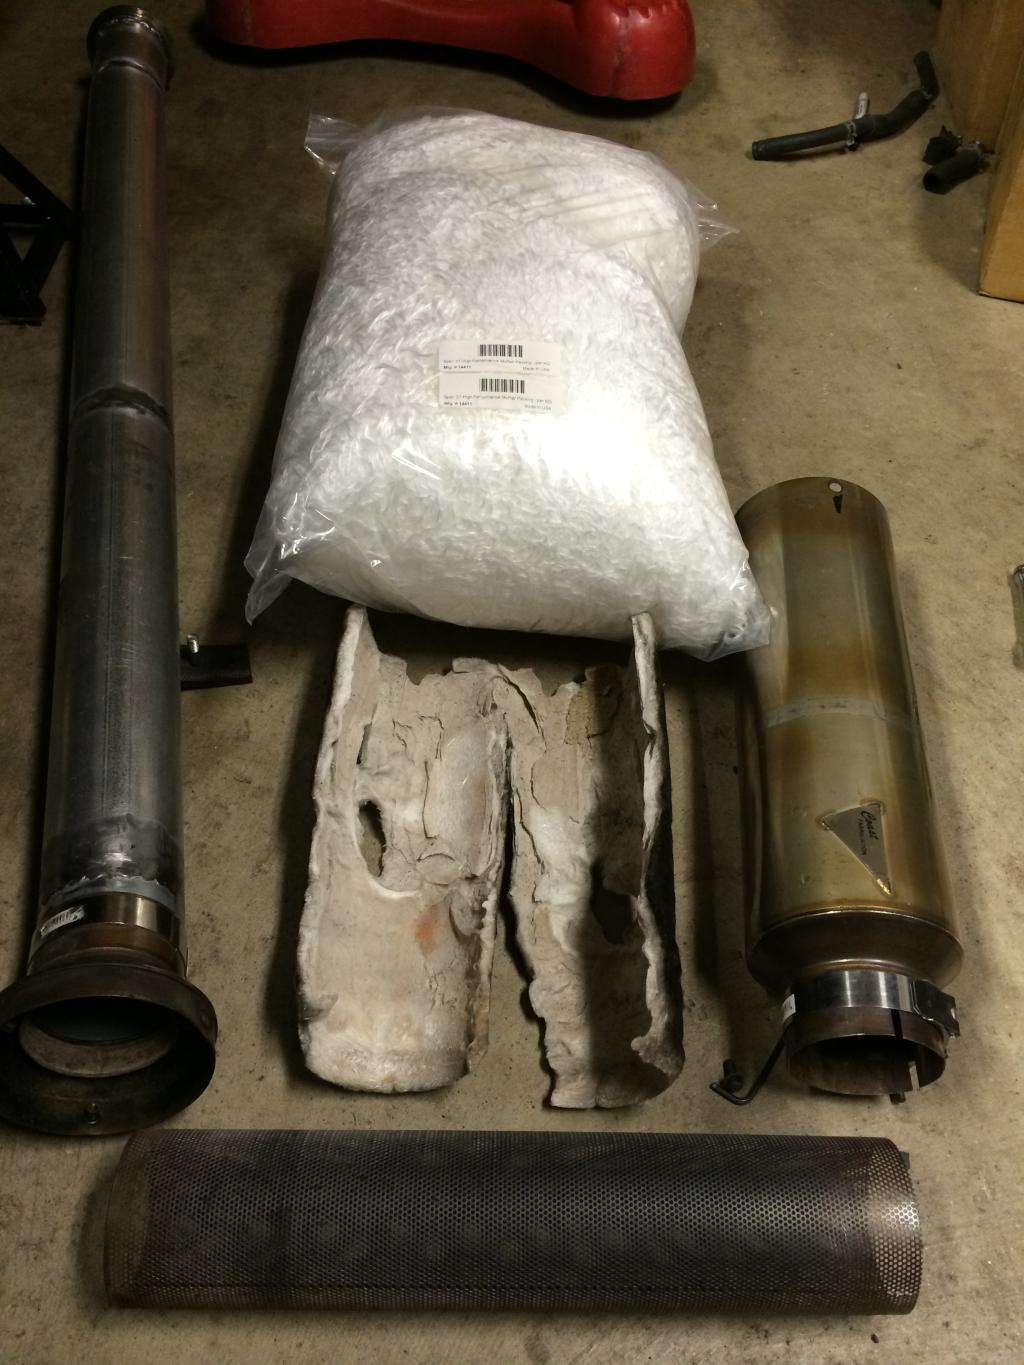
Repacked the Burns /CoastFab muffler we stole from the CRX (new duplicate is being built by Coast right now)... Using longer-lasting Bristol Core Spec 31 as a refill. Also added a couple of extra hangers to keep the exhaust from hitting things under lateral loads. It's not going ANYWHERE now...but does transmit a bit of vibration.

Reply
1
1


