Motor Mount Install
 10-21-2006, 01:54 PM
#1
Elite Member
Thread Starter
iTrader: (9)

Join Date: Aug 2006
Location: Concord, North Carolina
Posts: 4,160
Total Cats: 6
Alright, I do not have any pictures right now, I didn't take any, but I'll look for some across the internet or got take some of my own later, but here are the basics, its not hard, just time consuming.
What you need.
-hydraulic jack, small section of 2x4...no more than 4-6 inches long.
-jackstands/ramps I used ramps up from, jackstand in the rear.
-10, 12, 14 mm sockets and wrenches, small and long extensions, torque wrench, cheater bar would help.
-new motor mounts
-some PB plaster (or penatrating lubracant) Spray the nuts and bolts that you think will stick.
-All nuts 42-58 ft-lbs
-All bolts 27-38 ft-lbs
1) Place the car set up on ramps/jacks, and as haynes says: disconnect the negative battery...I didn't...its a pain to get to... As I said, I had the front on some high ramps and then placed the back on jackstands.
2) remove intake box and tubing (if you have it...if not, just go through the motions of removing exhuast manifold and dp) I'm still n/a so I just had to remove my K&N intake, and factory exhaust manifold at the cat and remove from the car, make sure to remember to take the O2 sensor out. lol. Get underneath and loosen both 14mm nuts located on the subframe crossmember in the recessed hole, its not hard to find. I had to use a small extension and regular socket with a breaker bar to get it loose. Loosen both till they are at the end of the threads, you should have about 1/4 inch of stud showing.
3) Loosen both nuts but DO NOT REMOVE either nut yet. Place jack under the oil pan with the piece of 2x4. VERY carefully jack the 2x4 underneath the oil pan, its not big so, theres only really one place to go, try to center it though.
4) I started with the drivers side mount, so remove that nut and washer and jacked the engine up another inch or so, you will here the mount when it breaks loose from its original position, stop jacking there. Remove the 3 14mm bolts from the engine and remove the mount assembly. The driver side nuts are the same size, so no need to remember which one goes where. remove the metal cup that the bottom of the nut rest on and you'll see you have to remove another nut from the plate. This is hard b/c it was torqued on there pretty tight, I had a long screwdriver through one of the hole and had a friend stand on it while I loosened it with a socket and breaker bar. Remove and install new mount, tighten the nut to 42-58 ft-lbs.
5) place back in metal cup. Slide and hand tighten nut from underneath, the try to replace bolts into the block, this took some time, and a bit of adjusting the jack and upper and lowering to get the bolt holes lined up b/c engine tilted. Just be patient, it took me about 15-20 minutes. Torque the bottom nut to specifications ^^^. and the torque the bolts to the block.
6) Now remove the passenger side nut and be prepared to cuss, get cut and be pissed off if you don't remove everything on the passenger side...I didn't so yeah. Repeat the same steps on the passenger side, only you have it manuever between hoses, brackets, and the throttle body. The top right bolt is the short one, the bottom right is the long one. it took me about 40 minutes to remove the mount with just a socket and extension and a long wrench for leverage (cheater bar couldn't fit). repeat installation of motor mount the same way as first mount. Place mount in carefully (its hard to reach) and tighten bottom nut first, and I found it easiest to do the left most nut next. A bracket was in my way for the throttle body that worked with the mount, I removed it because it was in my way. Do your best to tighten the nuts, this side was a LOT easier to align the bolt holes...
one tight, torque down, the lower jack and check torque settings AGAIN. then replace everything and go for a drive ...
...
Mine mounts were shot, I'll get a picture of them if I can soon
Hope this helps, ask some questions, I'll try to change some things if I find errors etc.
What you need.
-hydraulic jack, small section of 2x4...no more than 4-6 inches long.
-jackstands/ramps I used ramps up from, jackstand in the rear.
-10, 12, 14 mm sockets and wrenches, small and long extensions, torque wrench, cheater bar would help.
-new motor mounts
-some PB plaster (or penatrating lubracant) Spray the nuts and bolts that you think will stick.
-All nuts 42-58 ft-lbs
-All bolts 27-38 ft-lbs
1) Place the car set up on ramps/jacks, and as haynes says: disconnect the negative battery...I didn't...its a pain to get to...
As I said, I had the front on some high ramps and then placed the back on jackstands.2) remove intake box and tubing (if you have it...if not, just go through the motions of removing exhuast manifold and dp) I'm still n/a so I just had to remove my K&N intake, and factory exhaust manifold at the cat and remove from the car, make sure to remember to take the O2 sensor out. lol. Get underneath and loosen both 14mm nuts located on the subframe crossmember in the recessed hole, its not hard to find. I had to use a small extension and regular socket with a breaker bar to get it loose. Loosen both till they are at the end of the threads, you should have about 1/4 inch of stud showing.
3) Loosen both nuts but DO NOT REMOVE either nut yet. Place jack under the oil pan with the piece of 2x4. VERY carefully jack the 2x4 underneath the oil pan, its not big so, theres only really one place to go, try to center it though.
4) I started with the drivers side mount, so remove that nut and washer and jacked the engine up another inch or so, you will here the mount when it breaks loose from its original position, stop jacking there. Remove the 3 14mm bolts from the engine and remove the mount assembly. The driver side nuts are the same size, so no need to remember which one goes where. remove the metal cup that the bottom of the nut rest on and you'll see you have to remove another nut from the plate. This is hard b/c it was torqued on there pretty tight, I had a long screwdriver through one of the hole and had a friend stand on it while I loosened it with a socket and breaker bar. Remove and install new mount, tighten the nut to 42-58 ft-lbs.
5) place back in metal cup. Slide and hand tighten nut from underneath, the try to replace bolts into the block, this took some time, and a bit of adjusting the jack and upper and lowering to get the bolt holes lined up b/c engine tilted. Just be patient, it took me about 15-20 minutes. Torque the bottom nut to specifications ^^^. and the torque the bolts to the block.
6) Now remove the passenger side nut and be prepared to cuss, get cut and be pissed off if you don't remove everything on the passenger side...I didn't so yeah. Repeat the same steps on the passenger side, only you have it manuever between hoses, brackets, and the throttle body. The top right bolt is the short one, the bottom right is the long one. it took me about 40 minutes to remove the mount with just a socket and extension and a long wrench for leverage (cheater bar couldn't fit). repeat installation of motor mount the same way as first mount. Place mount in carefully (its hard to reach) and tighten bottom nut first, and I found it easiest to do the left most nut next. A bracket was in my way for the throttle body that worked with the mount, I removed it because it was in my way. Do your best to tighten the nuts, this side was a LOT easier to align the bolt holes...
one tight, torque down, the lower jack and check torque settings AGAIN. then replace everything and go for a drive
...Mine mounts were shot, I'll get a picture of them if I can soon
Hope this helps, ask some questions, I'll try to change some things if I find errors etc.

Reply
 1
1

1
 10-21-2006, 11:53 PM
#3
Elite Member
Thread Starter
iTrader: (9)
Join Date: Aug 2006
Location: Concord, North Carolina
Posts: 4,160
Total Cats: 6
Just be careful with the tranny out to make sure the engine doesn't really tip over to much when you remove the mounts.
searching around I found it easier to change 1 at a time, less stress on the oil pan.
searching around I found it easier to change 1 at a time, less stress on the oil pan.
Reply
0
0
 10-24-2006, 12:52 AM
#7
Elite Member
Thread Starter
iTrader: (9)
Join Date: Aug 2006
Location: Concord, North Carolina
Posts: 4,160
Total Cats: 6
nice...I don't have a digtal camera at school with me...I'll see what I can find online asap...its pretty straight forward though. 1 nut underneath the car, 3 bolts on the block
Reply
0
0
 06-20-2007, 04:29 PM
#10

I did this on my R package without removing anything other than the splash pan under the car. I had it on a lift and loosened the MM bolts, used a tall jackstand/screw lift thingy to support the side of the motor I was working on and removed the MM. Replace with new mount, tighten bolts, repeat for other side.
Reply
0
0
 09-08-2013, 11:10 PM
#13

Adding some pics to this, because it's the first thread that pops when you search for motor mount replacement on Google.
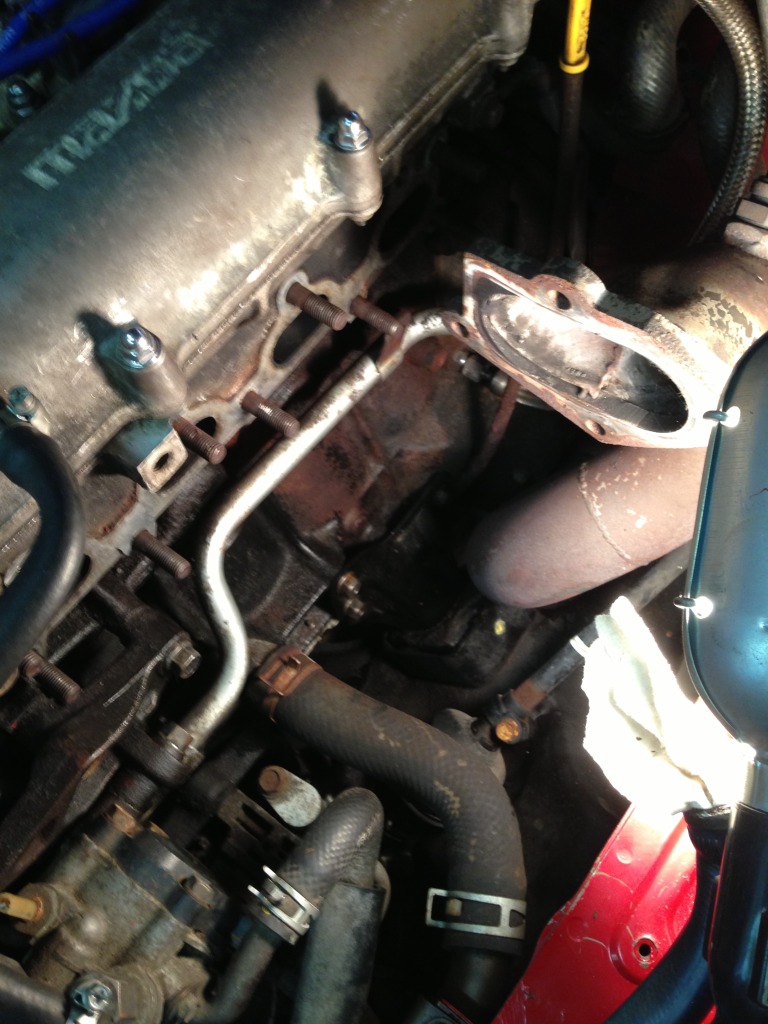
This is your driver's side motor mount. This is with the exhaust manifold removed completely (not necessary, but happened to be that way in this case). You can clearly see here the three top bolts.
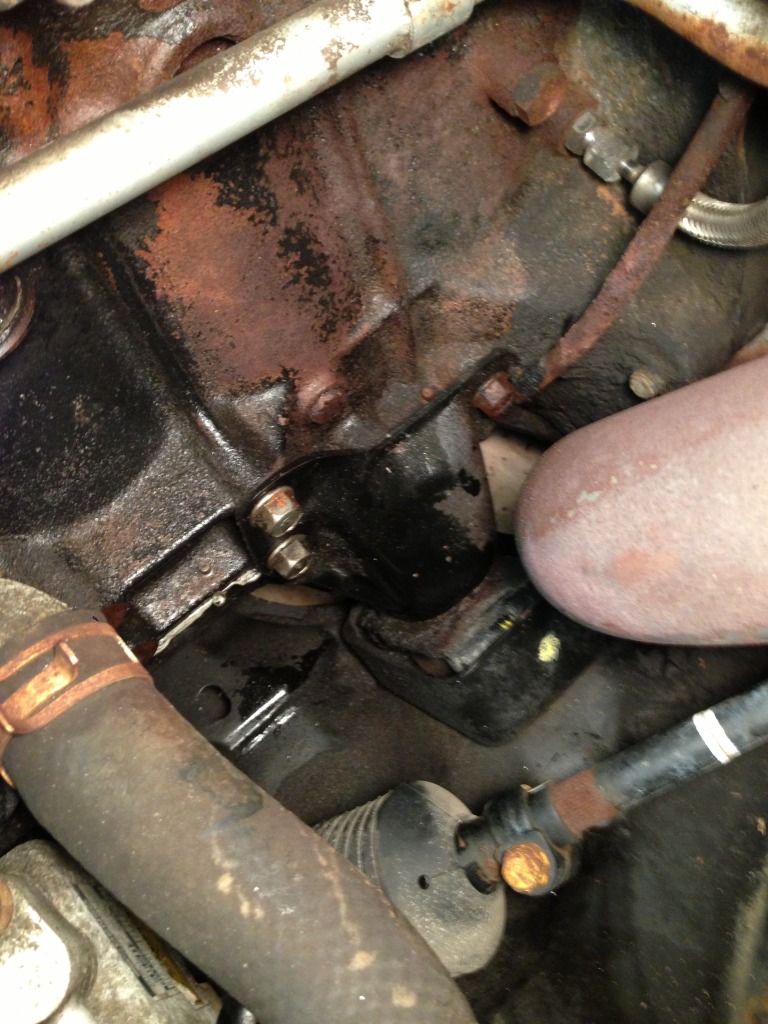
This is a little farther back to give you some context.
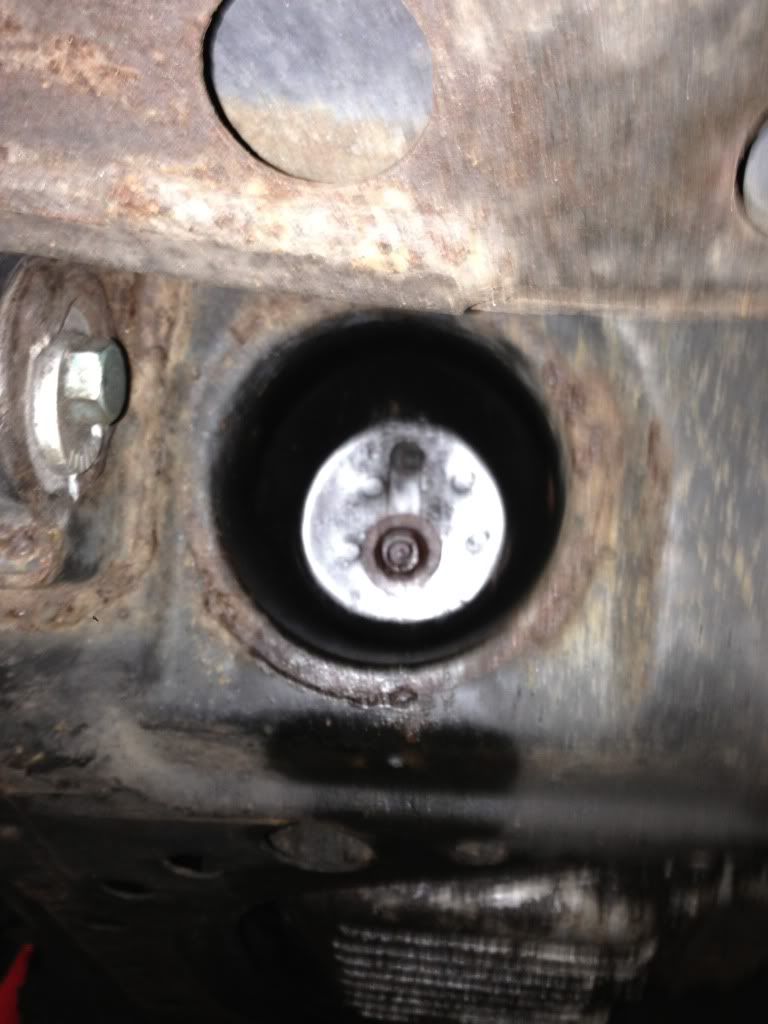
This is the lower nut of the motor mount which you can easily see if you look up into the subframe underneath where the motor mount sits. This is really easy to get to and pretty much the same on both sides..
This is the passenger side looking in through the wheel well with the wheel off. The three empty holes there are where the motor mount is located normally. The top hole goes through a bracket and that section of the mount fits behind it and the bolt goes through the bracket and the mount. What I did was loosen the three bolts from up top (a socket wrench with wobble extension can do it) and then pull the whole thing out through the wheel well.
This is your driver's side motor mount. This is with the exhaust manifold removed completely (not necessary, but happened to be that way in this case). You can clearly see here the three top bolts.
This is a little farther back to give you some context.
This is the lower nut of the motor mount which you can easily see if you look up into the subframe underneath where the motor mount sits. This is really easy to get to and pretty much the same on both sides..
This is the passenger side looking in through the wheel well with the wheel off. The three empty holes there are where the motor mount is located normally. The top hole goes through a bracket and that section of the mount fits behind it and the bolt goes through the bracket and the mount. What I did was loosen the three bolts from up top (a socket wrench with wobble extension can do it) and then pull the whole thing out through the wheel well.
Reply
0
0
 09-11-2013, 07:38 PM
#15
Junior Member
iTrader: (1)

Join Date: Apr 2010
Location: Virginia Beach, Va
Posts: 139
Total Cats: 5
I would recommend that you have universal joints for you 3/8" and 1/4" drive socket wrenches. I changed the motor mounts on the MSM a while back I had to remove the down pipe on the drivers side and still had trouble removing and installing the motor mount assembly.
Reply
0
0
09-12-2013, 12:42 PM
#17
Universal/wobble sockets are a godsend when doing work in tight spots. I'd say it is extremely easy to do these with the exhaust side removed, but obviously most people want to avoid doing that. It's obviously going to be dependent on your specific setup as well. I found that the downpipe was not really in my way, but I'm using the Greddy with a Turbo Tony downpipe and since I had the manifold off I could go in from the top anyway.
Reply
0
0

Thread
Thread Starter
Forum
Replies
Last Post
StratoBlue1109
Miata parts for sale/trade
21
09-30-2018 01:09 PM
stoves
Suspension, Brakes, Drivetrain
5
04-21-2016 03:00 PM


