How (and why) to Ramble on your goat sideways

 10-01-2017, 10:08 PM

IIRC if trying to be ready for emissions/inspections, there is an allowance of 1 or 2 readiness codes allowed to be pending (not ready/complete). When I was trying to get mine all complete, I drove into the city/crowded area to do some stop-and-go traffic/low-speed stuff. Pulled over, turned the car off for a few min., jumped back on the road and drove out to where there was far less traffic and found long/open(ish) roads to hold constant speeds between 30-50 mph.
Well, go figure all can't go nice and easy. Figuring my way through the steering rack swap really wasn't too bad.....had there been some diagrams/points of specific items or orders/tips, it would have gone a bit quicker. Buttoning everything up went pretty quickly. Yay. I do wish I had taken maybe a measurement or two more to get the toe as straight as possible, but the car is going for tires and alignment first thing in the morning. The steering wheel is a bit to the left going in a straight line, but it's not pulling. I guess I'm just over thinking if one tie-rod is significantly more threaded than the other.......I just marked where the ends were of the rack before taking them off and putting the LE/R-pkg ends on......I don't think I counted the number of threads each side took. Oh well.
But that's not the reason for stating that all things can't go easy.
On the test-drive, I decided to goose it a bit since it's nice and cool out. Boost gauge ran up pretty quickly with some stumbling in closed-loop/before the transition to open-loop like....which is not normal, and then just barely after the open-loop transition at WOT, it broke up particularly badly and I immediately lifted......just to be greeted by a flashing CEL (then went steady after 30 sec or so). Car drives fine in vacuum....starts to brake up transitioning into boost. I didn't mess with ANYTHING electrical or anything while doing the rack swap.....so now I'm stumped. Car was running perfectly fine before going on sands for a few days as I did the rack swap. Soooooo W T F . Ugh.

Reply
 0
0

0
10-03-2017, 09:59 AM
Elite Member

iTrader: (2)

Join Date: Jun 2009
Location: Istanbul, Turkey
Posts: 3,214
Total Cats: 1,687
So I had my car in for a paint job...
The car spent 6 weeks + 10 days at the shop.
I found some mistakes and less than ideal workmanship in a couple areas first time I picked it up and returned it so they could correct the paint.
Looks pretty good now, but more importantly, a couple spots here and there (like the battery well in the trunk) with surface rust are all properly taken care of.
Next paint job will be in 2027, with engine, trans, subframes all removed.
Pics as soon as I have a chance to wash the car.
It's been raining here pretty much every day lately.
Reply
0
0
10-03-2017, 11:06 AM
mkturbo.com

iTrader: (24)
Join Date: May 2006
Location: Charleston SC
Posts: 15,176
Total Cats: 1,680
At least not what a GOOD professional paint job costs.
I remember helping my friend tow his spitfire shells and frame to get painted. I think he spent like $5k-$7k on just the paint job alone. It looked amazing and was worth every penny to him, but damn did I think it was expensive.
I remember helping my friend tow his spitfire shells and frame to get painted. I think he spent like $5k-$7k on just the paint job alone. It looked amazing and was worth every penny to him, but damn did I think it was expensive.
Reply
0
0
10-03-2017, 11:13 AM
Boost Pope

iTrader: (8)
Join Date: Sep 2005
Location: Chicago. (The less-murder part.)
Posts: 33,019
Total Cats: 6,587
I spent about $500 in total re-painting my '90.
Took a month, and still looked like a $500 paint job.
That's mostly a commentary on my own skills, though I admit it was kind of fun to drive a car with no doors, hood, windshield, fenders, trunklid, etc., for a couple of weeks.
Took a month, and still looked like a $500 paint job.
That's mostly a commentary on my own skills, though I admit it was kind of fun to drive a car with no doors, hood, windshield, fenders, trunklid, etc., for a couple of weeks.

Reply
0
0
10-03-2017, 11:17 AM
Elite Member
iTrader: (2)
Join Date: Jun 2009
Location: Istanbul, Turkey
Posts: 3,214
Total Cats: 1,687
My 98 NB is worth $20K in pure stock form over here.
Paint job was about $1000.
I guess I can safely take it in for a full paint job every 10 years..
It is, after all, the best way to keep a car "young".
Paint job was about $1000.
I guess I can safely take it in for a full paint job every 10 years..
It is, after all, the best way to keep a car "young".
Reply
0
0
10-03-2017, 11:32 AM
Oh well. Off to finishing the steering rack swap......slowly de-MSM'ing the MSM of the "WTF" parts Mazda thought were good ideas. I'll be happy to have a normal turning radius back soon. Unfortunately, there is actually little information on doing this, so I'm having to figure out some steps and technique all on my own, and probably not exactly the fastest/most timely way to do this, but oh well. Figure when I'm done, I'll probably do some kinda of quick guide oh how to do it for future reference. All the stuff I found had to do with removing it from a subframe lacking an engine, or just doing a de-power procedure/looping the lines......nothing about removal/replacement.
2) remove bolt that connects linkage to rack
3) remove 2 nuts and then mounting strap on passenger side of rack from subframe
4) remove 2 bolts from rack on driver side of subframe
5) remove rack
6) installation is the reverse of removal
It's about a 15-20 minute job start to finish including putting the car on jackstands, not including an alignment.
Reply
0
0
10-03-2017, 11:34 AM
Elite Member
iTrader: (9)
Join Date: Jun 2006
Location: Chesterfield, NJ
Posts: 6,892
Total Cats: 399
I've had a few $7000 quotes. This is a respray of '92 white, some surface rust repair.
I may end up repainting it myself once my children can do the prep work. Or someone buy it please.
I may end up repainting it myself once my children can do the prep work. Or someone buy it please.
Reply
0
0
10-03-2017, 05:10 PM
Boost Pope
iTrader: (8)
Join Date: Sep 2005
Location: Chicago. (The less-murder part.)
Posts: 33,019
Total Cats: 6,587
In the movie Westworld, one of the first signs of trouble in the park was that a snake attacked and bit a guest.
That was essentially a reptile dysfunction.
That was essentially a reptile dysfunction.
Reply
0
0
10-04-2017, 09:17 AM

Signed up for IEEE a few months ago. Worst decision ever. They're worse than spambots. I hit unsubscribe to about 5 emails a day, called them, messaged them online, tagged their emails as SPAM...I'm starting to think that I need to contact the FCC to get off their damn contact lists.
Reply
0
0
10-04-2017, 12:09 PM
1) pop out outer tie rods from spindles
2) remove bolt that connects linkage to rack
3) remove 2 nuts and then mounting strap on passenger side of rack from subframe
4) remove 2 bolts from rack on driver side of subframe
5) remove rack
6) installation is the reverse of removal
It's about a 15-20 minute job start to finish including putting the car on jackstands, not including an alignment.
15-20 minutes to put one back in...maybe lol. That list makes it seem like all will go well, and that all the bolts are easy to get to and that nothing will be in the way haha.
-Pop out tie-rod ends: Yeah, only had a pickle fork to do this, ******* were well stuck in there. Ended up using the fork + pounding on the hub. That all took like 10 min.
-Loosen/tuck aside the hard lines in front of the rack....the 2 brackets/clamps, and the line bracket right above the coupler (hard line to hose part), use zip ties to hold everything out of the way. These have to be loosened in order to be able to flex the hard line running right over the 17mm banjo bolt....they prevent access to the bolt otherwise.
-Use a 17mm short socket to remove the feed/banjo fitting from the rack, while also pushing aside the hard line, wait for fluid to drain.
-10mm socket to loosen the 2 bolts from the yoke (correct name of part?)
-Maneuver some pliers in the tight space next to the yoke to remove the spring clamp from the soft line the runs right next to the yolk, then use a long screw driver/pry bar to slide the rubber line off/up. This part might be exceptionally fun specifically on the MSM because of the routing of that hose around/under the turbo.
-Remove 4 17mm mounting bolts.
-Wiggle rack out.
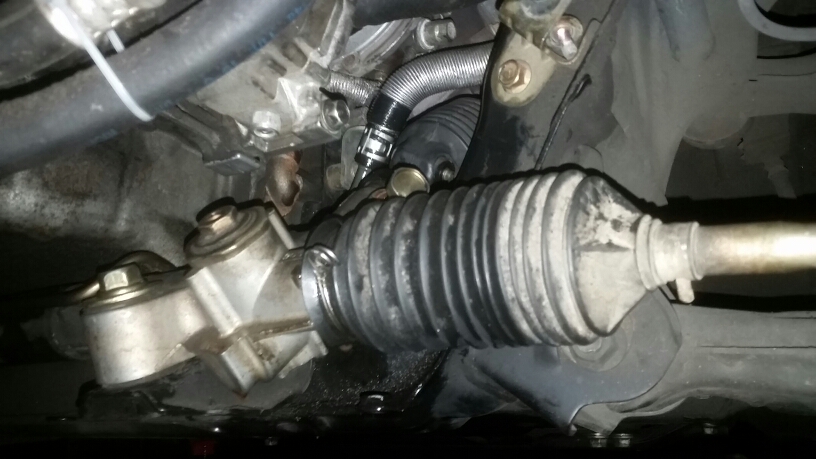
In this pic, you can see the loop of hard lines that run in front of the rack and need to be tucked aside.....taking up work space. They're just behind the sway bar. Also, you can see the line/connection next to the yoke.
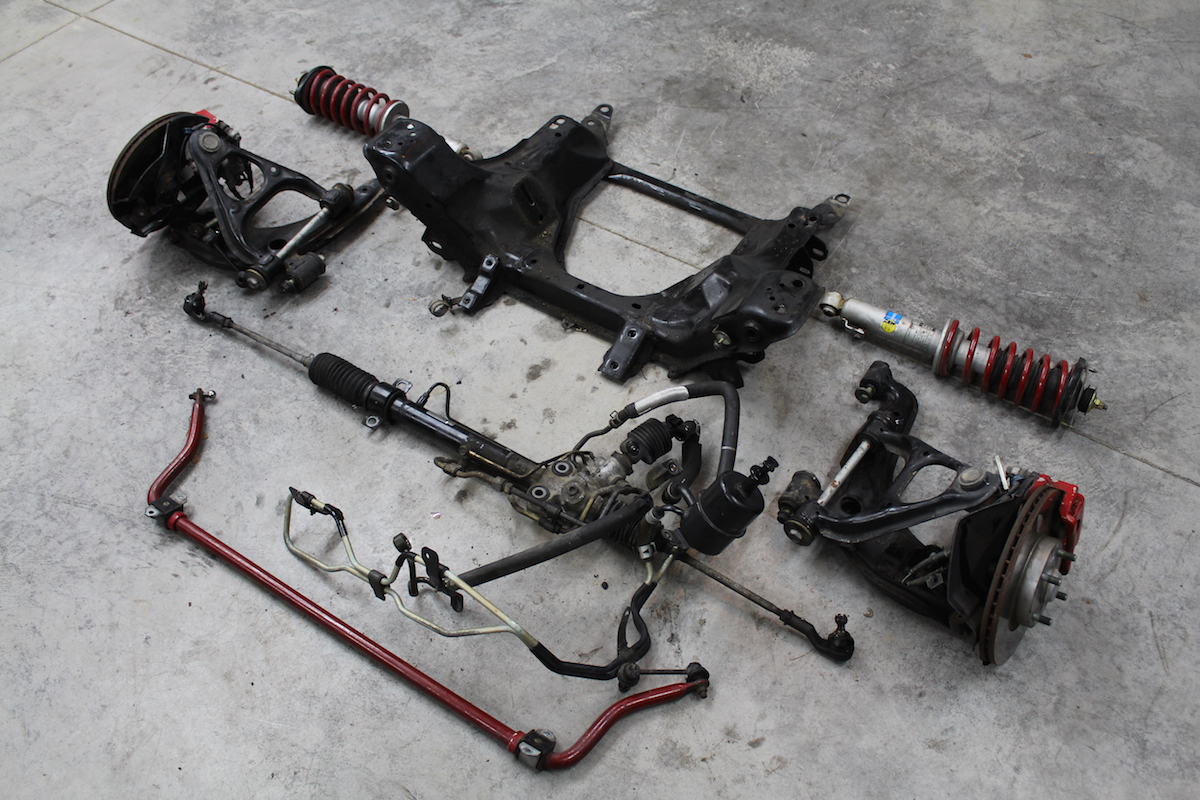
Dunno what years of Miatas have different steering rack/line configurations....perhaps earlier ones are simple compared to later? I've never looked into anything about the power steering system before the other day. For example, this would have been MUCH easier to remove...

...and here you an see the nice, tight working space for the yoke and the line next to it....getting to that clamp/hose was fun.
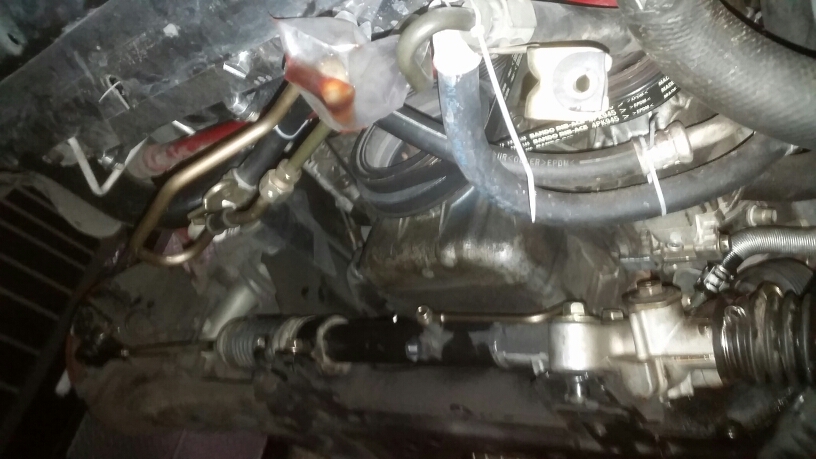
Here you can see where I tucked the lines out of the way (the gold-colored lines at upper left are the ones that mount right to the front of the rack)....
Reply
0
0
10-04-2017, 05:21 PM
mkturbo.com
iTrader: (24)
Join Date: May 2006
Location: Charleston SC
Posts: 15,176
Total Cats: 1,680
I had my last commute home from a corporate job this afternoon. Starting tomorrow I am diving into MKTurbo full time. It feels really weird knowing I won't have a steady paycheck. But the fact that I'm now going to be doing something that I love full time and will be my own boss is surreal.
Reply
5
5
10-04-2017, 05:35 PM
Elite Member
iTrader: (2)
Join Date: Jun 2009
Location: Istanbul, Turkey
Posts: 3,214
Total Cats: 1,687
Guess I'm going back to school for a graduate degree in Automotive Engineering.
I've been thinking about this for a while, and I'm going to pull the trigger this spring.
It's offered at one of the top 5 universities in the country, and the entire curriculum is in English.
I am excite and nervy.
I've been thinking about this for a while, and I'm going to pull the trigger this spring.
It's offered at one of the top 5 universities in the country, and the entire curriculum is in English.
I am excite and nervy.
Reply
3
3
10-04-2017, 06:41 PM
15-20 minutes to put one back in...maybe lol. That list makes it seem like all will go well, and that all the bolts are easy to get to and that nothing will be in the way haha.
-Pop out tie-rod ends: Yeah, only had a pickle fork to do this, ******* were well stuck in there. Ended up using the fork + pounding on the hub. That all took like 10 min.
-Loosen/tuck aside the hard lines in front of the rack....the 2 brackets/clamps, and the line bracket right above the coupler (hard line to hose part), use zip ties to hold everything out of the way. These have to be loosened in order to be able to flex the hard line running right over the 17mm banjo bolt....they prevent access to the bolt otherwise.
-Use a 17mm short socket to remove the feed/banjo fitting from the rack, while also pushing aside the hard line, wait for fluid to drain.
-10mm socket to loosen the 2 bolts from the yoke (correct name of part?)
-Maneuver some pliers in the tight space next to the yoke to remove the spring clamp from the soft line the runs right next to the yolk, then use a long screw driver/pry bar to slide the rubber line off/up. This part might be exceptionally fun specifically on the MSM because of the routing of that hose around/under the turbo.
-Remove 4 17mm mounting bolts.
-Wiggle rack out.
In this pic, you can see the loop of hard lines that run in front of the rack and need to be tucked aside.....taking up work space. They're just behind the sway bar. Also, you can see the line/connection next to the yoke.
Dunno what years of Miatas have different steering rack/line configurations....perhaps earlier ones are simple compared to later? I've never looked into anything about the power steering system before the other day. For example, this would have been MUCH easier to remove...
...and here you an see the nice, tight working space for the yoke and the line next to it....getting to that clamp/hose was fun.
Here you can see where I tucked the lines out of the way (the gold-colored lines at upper left are the ones that mount right to the front of the rack)....
 Only difference is that i installed a de-powered rack and added about 5 minutes on the job removing the rest of the power steering system.
Reply
0
0
10-04-2017, 07:42 PM
Bannisheded

Join Date: Jun 2008
Location: Senatobia, MS
Posts: 165
Total Cats: -1
I had my last commute home from a corporate job this afternoon. Starting tomorrow I am diving into MKTurbo full time. It feels really weird knowing I won't have a steady paycheck. But the fact that I'm now going to be doing something that I love full time and will be my own boss is surreal.
Reply
0
0
10-04-2017, 08:00 PM
Junior Member

Join Date: Mar 2015
Location: Columbus Indiana
Posts: 178
Total Cats: 74
Guess I'm going back to school for a graduate degree in Automotive Engineering.
I've been thinking about this for a while, and I'm going to pull the trigger this spring.
It's offered at one of the top 5 universities in the country, and the entire curriculum is in English.
I am excite and nervy.
I've been thinking about this for a while, and I'm going to pull the trigger this spring.
It's offered at one of the top 5 universities in the country, and the entire curriculum is in English.
I am excite and nervy.
Reply
0
0
10-04-2017, 10:46 PM

I've never messed with anything pertaining to the PS system, so perhaps I was just being a slow **** to make sure I didn't end up ******* something up...as is my luck. Now, if I did it again, it'd probably be a 30 minute job start to finish.
Reply
0
0
10-05-2017, 07:40 AM
Alright. I need the brain collective.
For the first time in nearly 10 years since owning the thing, my 2001 Frontier (2.4 5spd) has left me stranded.
Ran beautifully yesterday. Post Irma it wouldn't start for 3 days after the storm. Engine turns over fine but wouldn't catch. This morning it was/is pouring stupid hard and my truck decided to sputter to a stall on US1.
In a preemptive strike to get my bottom bitch back (currently only bitch...) on the road I've ordered new plugs, new cap/rotor and new wires (I'm assuming these are all stock @ 221k miles). It's clearly a moisture issue, but how and why.
Reply
0
0


