New NB Turbo from Atlanta
 10-13-2013, 09:59 PM
#1
Junior Member
Thread Starter

Join Date: Oct 2013
Posts: 77
Total Cats: 5
Long time lurker, first time poster.
Stats:
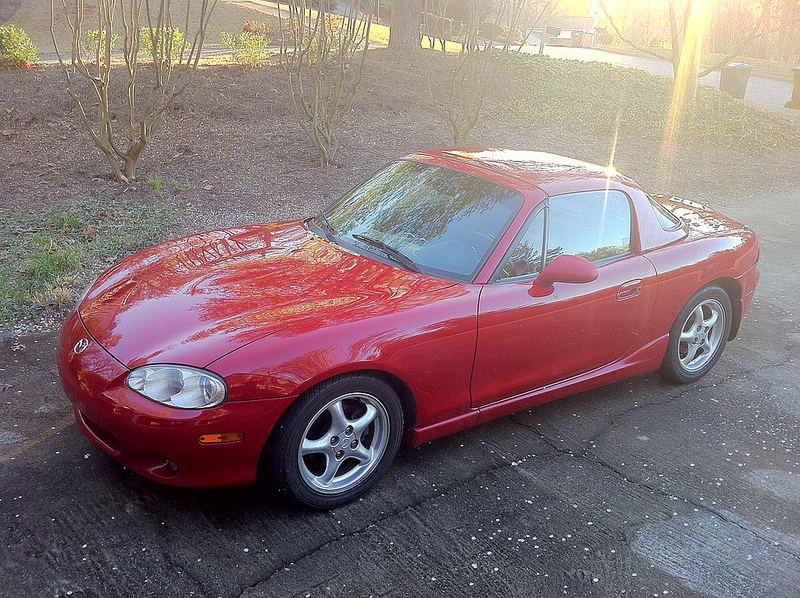
2002 DIY Turbo (OBDII Legal - because Georgia...)
Turbo build over the winter of 2012:
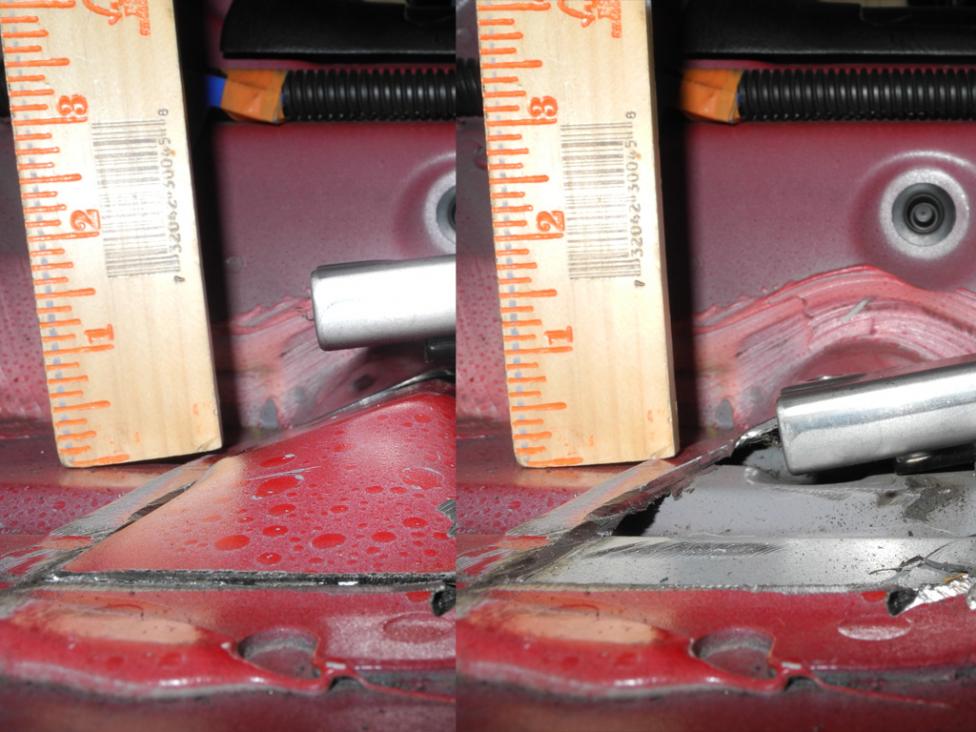
Stock driver seat is still on the stock rails, lowered 2" and has additional foam-ectomy. Probably the best DD mod done to the car.


...and the requisite cat picture.

Stats:
2002 DIY Turbo (OBDII Legal - because Georgia...)
Turbo build over the winter of 2012:
- Turbo is SR20 T25 with BEGI manifold, BEGI separated gases down pipe to 3" DIY exhaust w/ high flow cat
- Intercooler & routing are modified FM style with A/C and PS intact
- ECU is a Link Piggy w/ 4 manifold injectors (hate all you want but...before you do show me another emissions legal solution that will run 12-14 PSI)
- AEM Wideband
- Radiator is stock but FULLY ducted. Works find for DD with stock hood, have a DIY extraction hood for the track (or DD).
- Suspension is full FatCat Bilstein, FM Springs, RB 1.25" Sway up front.
- All maintenance is up to date and compression & leak down tests were great, even at 175,000 miles
Stock driver seat is still on the stock rails, lowered 2" and has additional foam-ectomy. Probably the best DD mod done to the car.
...and the requisite cat picture.

Reply
 0
0

0


 10-14-2013, 10:55 PM
#7
Junior Member
Thread Starter
Join Date: Oct 2013
Posts: 77
Total Cats: 5
18, Erat- Thanks for the welcome. I'd love to go beyond the Link to a parallel MS, OBDII compatible. That may be the next project.
rwyatt- I love me a southern car. North of the salt air in FL and South of any road salt. Good place to be. (It also helps that I had red color matched wax and some crafty camera work).
Brain - great site, good knowledge and ...interesting... people.
sixshooter -Only time she's ever looked like that was when we brought our first kid home from the hospital. Looked like the world ended.
Reply
0
0

 10-17-2013, 11:39 PM
#12
Junior Member
Thread Starter
Join Date: Oct 2013
Posts: 77
Total Cats: 5
I guess I'll have to make a thread, but essentially, I cut out the rear "humps" on the floor that the seat mounts to. Reinforced the sheet metal floor on the bottom side with 1"X3" steel, cut the back of the seat rails to increase the rake of the seat (make more of a bucket). Worked the bottom of the seat pan so that it clears the floor with the shortened rails. Re-bolted it all to the floor.
It was a LOT of work, but it makes all the difference in the world. I'd have gone lower, but the rails are on the floor now. Without removing the carpet I won't get much lower.
It was a LOT of work, but it makes all the difference in the world. I'd have gone lower, but the rails are on the floor now. Without removing the carpet I won't get much lower.
Reply
0
0
 01-12-2014, 03:05 PM
#15
Elite Member
iTrader: (37)

Join Date: Apr 2010
Location: Very NorCal
Posts: 10,441
Total Cats: 1,899
That is a stupid clean NB, welcome to the site!
You need to repost that thread here and rehost the images so I don't have to register at mx5atlanta to view them 
Been meaning to update this for ages. Here's the seat drop thread: Seat Droppin'
Reply
0
0
01-12-2014, 04:01 PM
#16
Junior Member
Thread Starter
Join Date: Oct 2013
Posts: 77
Total Cats: 5
Just for lazy people like EO2K - What do you do when a foamectomay just won't cut it?
I picked up a new to me Hard Dog roll bar last weekend. Install was quick and easy, but I ran into a nasty issue with seat height and driving position.
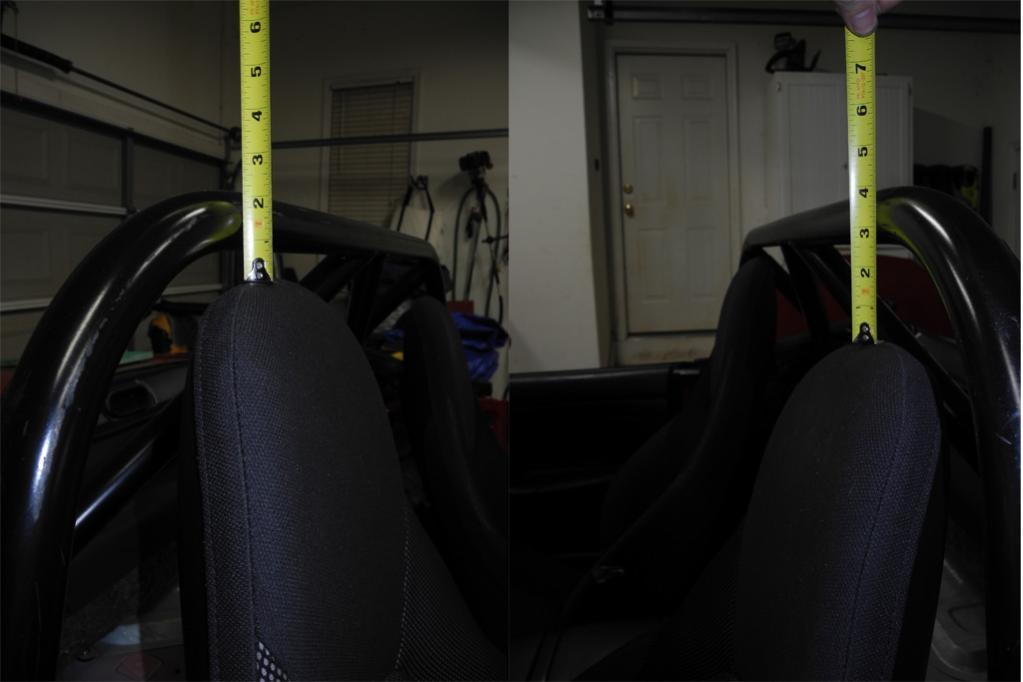
At 5' 10" I was bumping my head on the roll bar. Since I'm hunched over to see stop lights anyway, I decided it was time to lower my seating position. After some trial and error (including sitting ON the floor) I decided that 2" lower was a good target.
From reading about foamectomies, I know we're not going to get a real 2" drop and retain a comfortable DD seat. My first pass was a "bottom" foamectomy cutting out the bottom bump on the NB seat. The foamectomy got me about 5/8". While not bad I'm still bumping the roll bar.
Time for drastic measures. We pulled the seat out, shortened the bottom bracket of both sliders, removed both of the "humps" that the stock sliders mount to and bolted the shortened (steeper rake on the seat) slider rails directly to the floor. We back plated both of them to reinforce the floor since the "humps" were pretty stout. Since I had already done a foamectomy I was able to hammer the bump in the seat pan up about 1/2" to clear the carpet.
All in all, a pretty dramatic difference and I retained the ability to adjust the seat. It took the better part of a 8 hours, but that was a lot of engineering and trial fitting.
I'm pleased with the results (both seats in the same position on rails and same recline angle):
How To (Proceed at your own risk!)
First we removed the seat.
Next we removed the slider brackets from the seat (4 bolts on the tracks, 2 on the tranny tunnel side and the main seat belt receiver bolt).
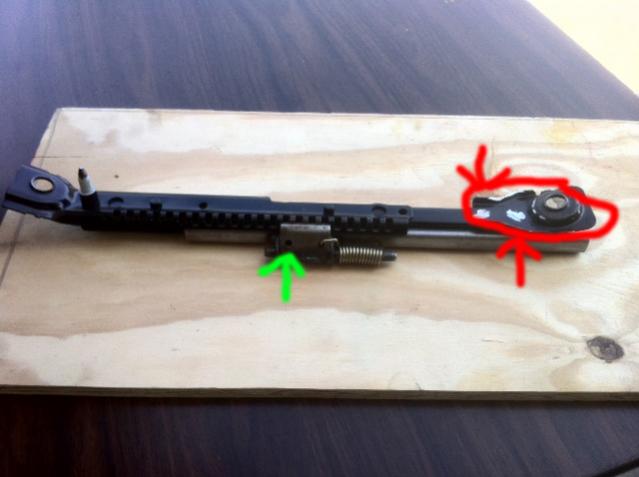
With the slider brackets free we also disconnected the wire connecting the track adjustment mechanisms (Green arrow).
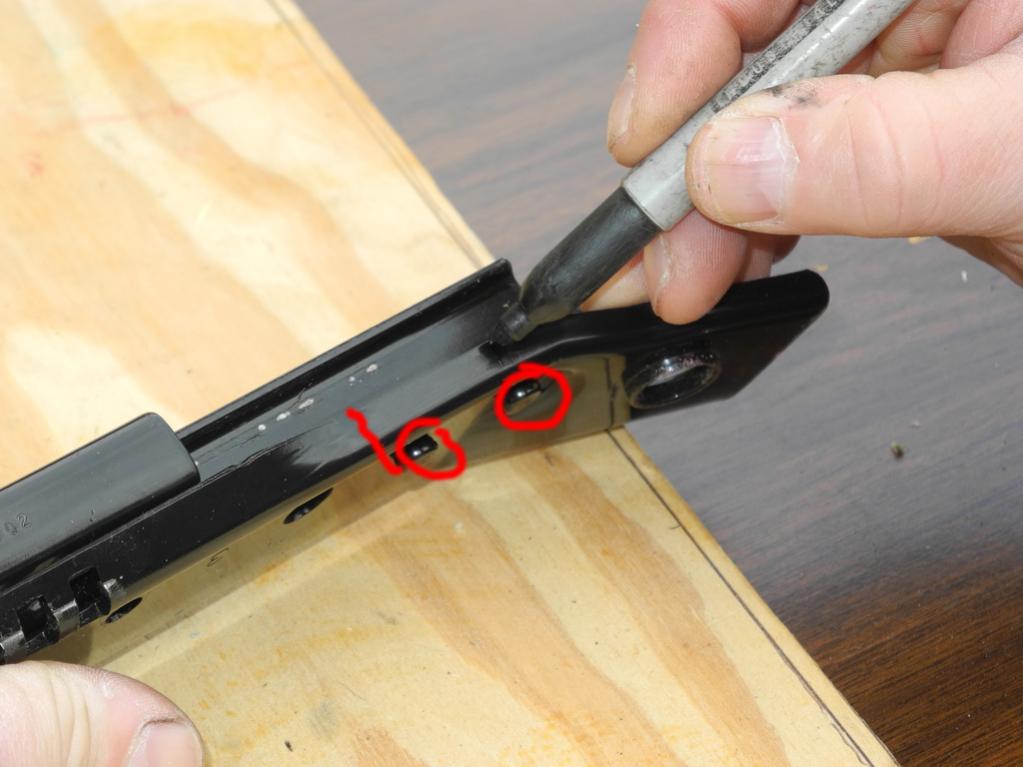
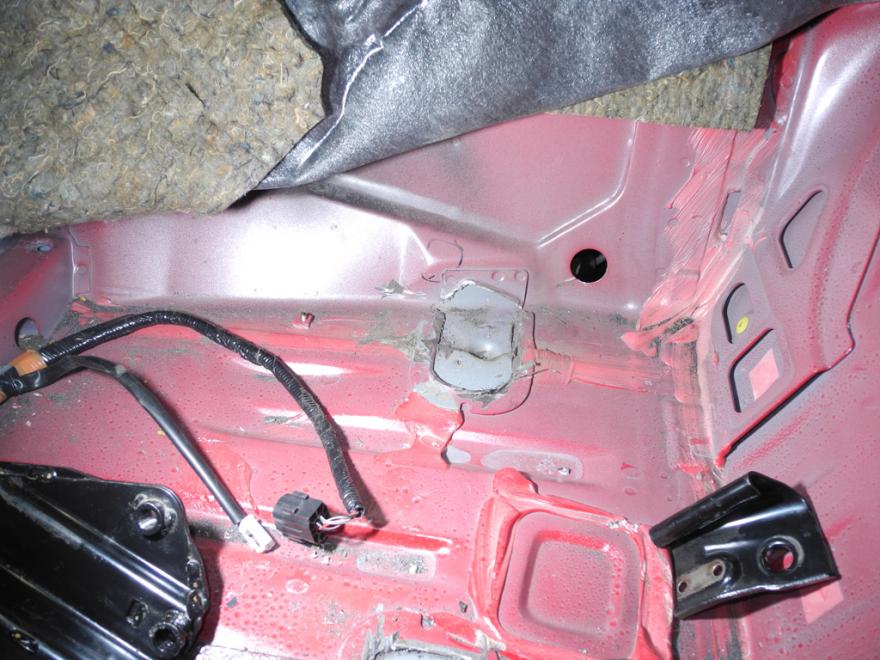
The picture below is the driver side, outside bracket and is the easiest to start with. We ground off the rivets at the back (Red arrows) and removed the stamped steel bracket (red circle). This frame rail is now modified. The new bolts go right through the holes left by the rivets, through the floor sheet metal, through the backer plate and get nuts (with lock-tight). You may want to enlarge the holes a bit to use a bigger bolt, but don't go much bigger. Also a bolt with the shoulder ground down makes install easier since you can slip it into the channel of the seat rail and it won't spin while you put the nuts on from the bottom.
Now, the tranny tunnel side rail is a bit more complicated. The front and back mounting points are actually a single piece of stamped steel. The basic idea is the same, locate and grind off the rivets that hold the back of the rail the seat slides on to the mounting bracket (Circled below), then make a cut at the red line (it's a U shaped channel so it's really 3 cuts). The goal is to cut the bottom piece that bolts to the stock mounting hole off, while leaving the actual slider rail intact. Just like the outside rail, we'll use the rivet holes in the slider track as our new mounting point.
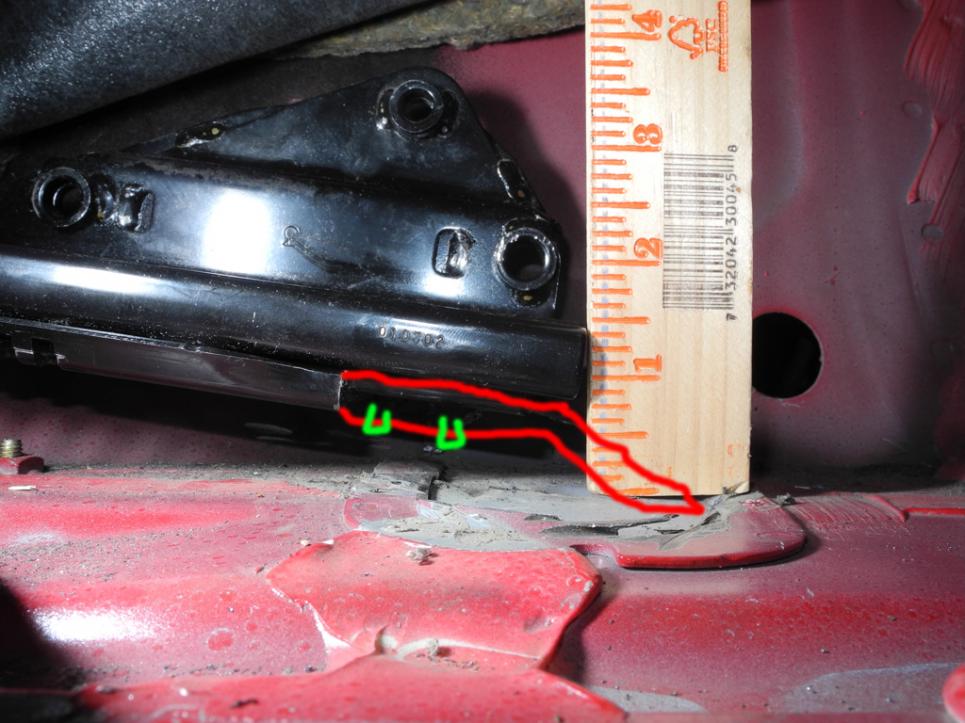
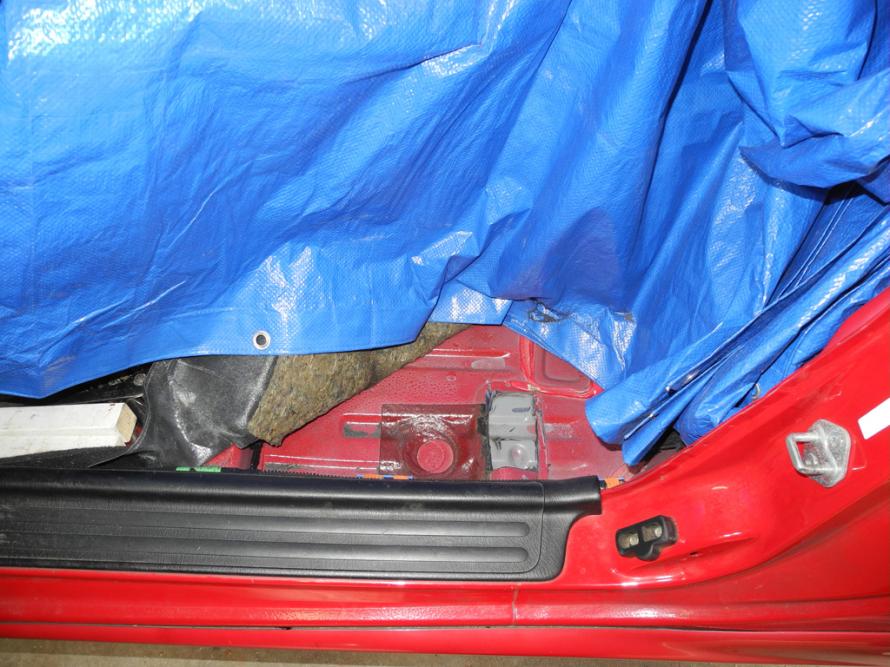
Installed in the car, the picture below is looking in from the driver's door, the tranny tunnel in the background. The outline in red is the stock bracket that we removed (dad's fingers are touching it in the picture above), the green marks are the approximate location on the rivet holes.
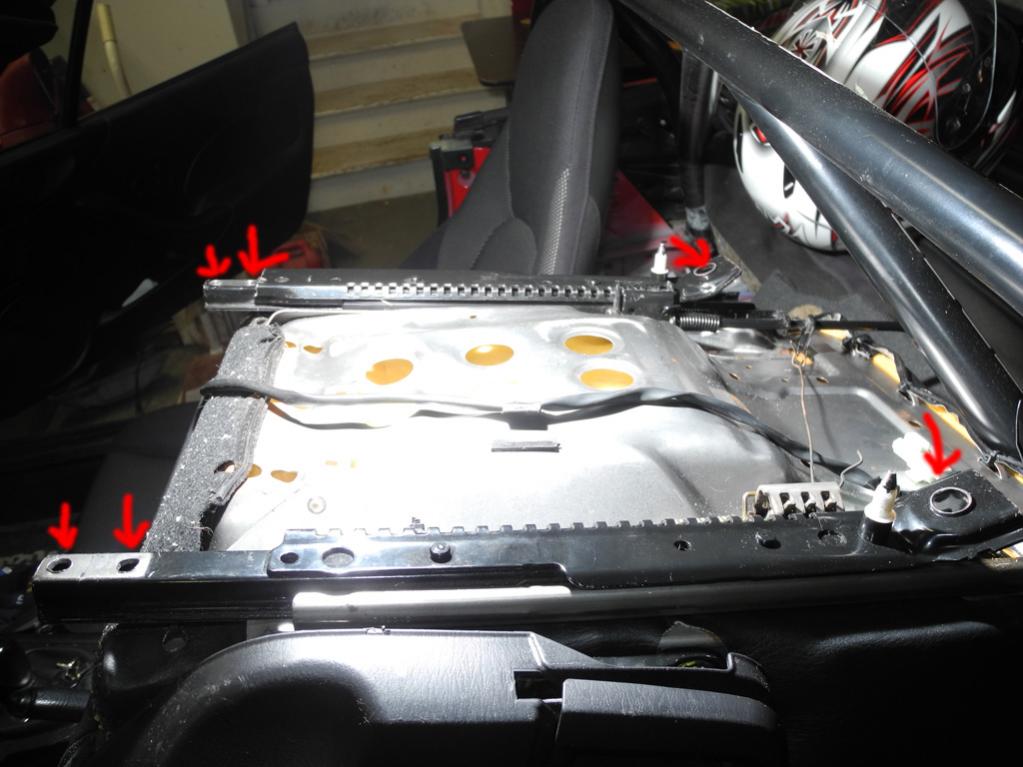
After drilling holes through the floor and building backer plates, reattach the rails to the seat pan. There are now 6 bolt holes instead of 4 (Red arrows). In this picture, the seat is propped up upside down and the far side is the tranny tunnel side. You can see both of the front mounts remain stock.
We also used a dead blow hammer to cave in the lowest part of the seat pan. The bump we removed foam from during the foamectomy actually drags on the floor if you don't modify it. Don't go any farther than you need to (~3/4" at the back) or you risk compromising the rigidity of the seat pan (and the back of the seat).
Let me know if this still isn't clear and I'll take some better pictures next weekend when the seat's back out.
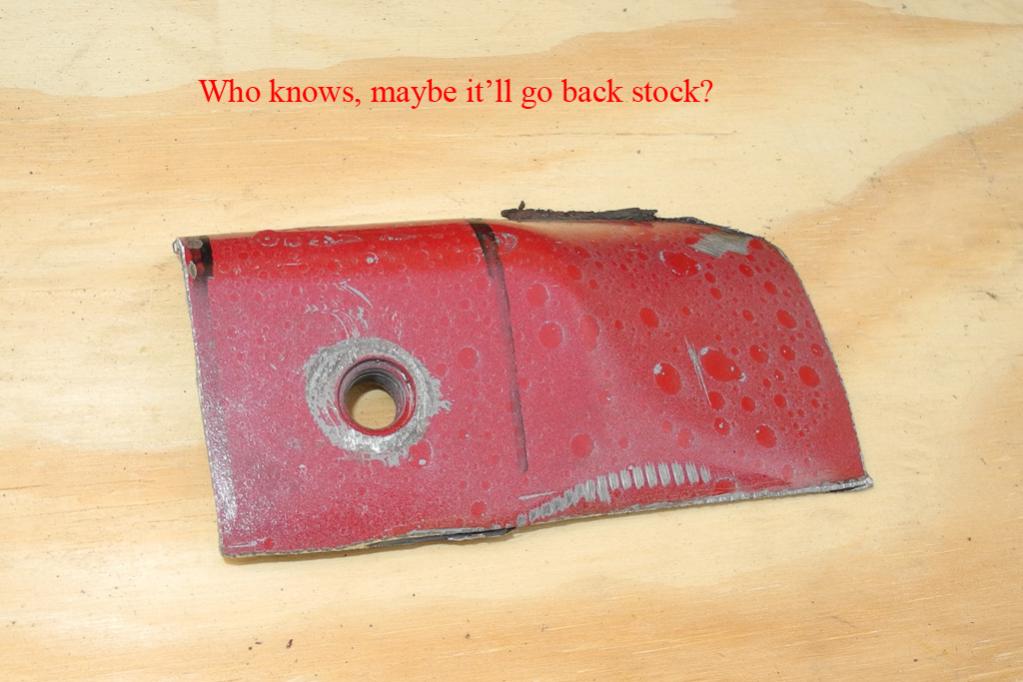
Oh and I almost forgot, the humps:
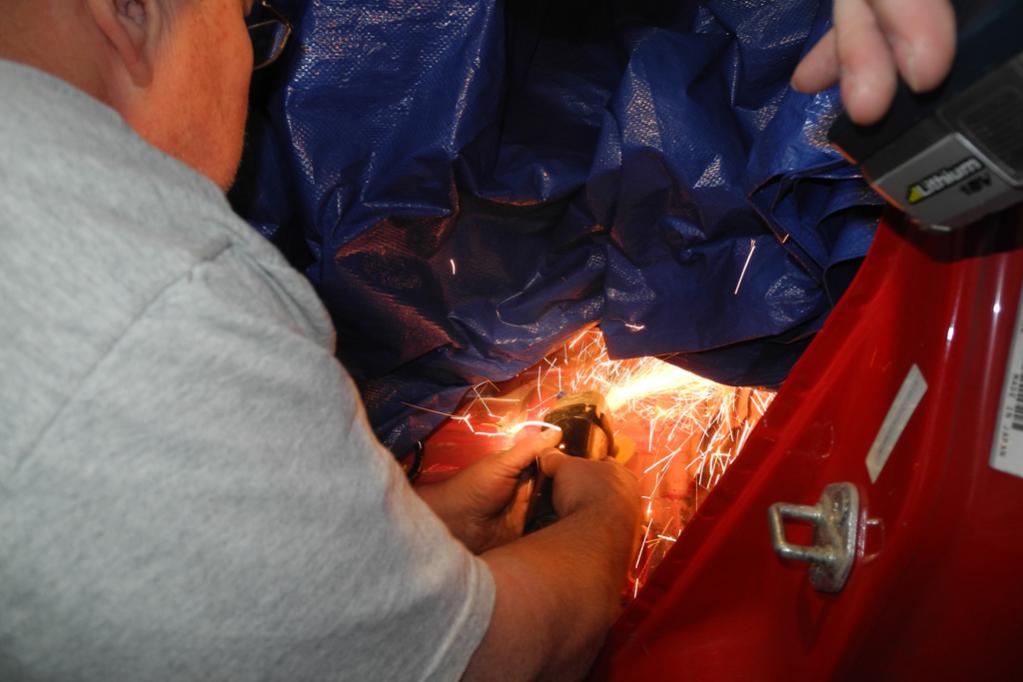
**Make sure to protect the interior and soft top. You don't want hot metal shavings on that stuff!**

I picked up a new to me Hard Dog roll bar last weekend. Install was quick and easy, but I ran into a nasty issue with seat height and driving position.
At 5' 10" I was bumping my head on the roll bar. Since I'm hunched over to see stop lights anyway, I decided it was time to lower my seating position. After some trial and error (including sitting ON the floor) I decided that 2" lower was a good target.
From reading about foamectomies, I know we're not going to get a real 2" drop and retain a comfortable DD seat. My first pass was a "bottom" foamectomy cutting out the bottom bump on the NB seat. The foamectomy got me about 5/8". While not bad I'm still bumping the roll bar.
Time for drastic measures. We pulled the seat out, shortened the bottom bracket of both sliders, removed both of the "humps" that the stock sliders mount to and bolted the shortened (steeper rake on the seat) slider rails directly to the floor. We back plated both of them to reinforce the floor since the "humps" were pretty stout. Since I had already done a foamectomy I was able to hammer the bump in the seat pan up about 1/2" to clear the carpet.
All in all, a pretty dramatic difference and I retained the ability to adjust the seat. It took the better part of a 8 hours, but that was a lot of engineering and trial fitting.
I'm pleased with the results (both seats in the same position on rails and same recline angle):
How To (Proceed at your own risk!)
First we removed the seat.
Next we removed the slider brackets from the seat (4 bolts on the tracks, 2 on the tranny tunnel side and the main seat belt receiver bolt).
With the slider brackets free we also disconnected the wire connecting the track adjustment mechanisms (Green arrow).
The picture below is the driver side, outside bracket and is the easiest to start with. We ground off the rivets at the back (Red arrows) and removed the stamped steel bracket (red circle). This frame rail is now modified. The new bolts go right through the holes left by the rivets, through the floor sheet metal, through the backer plate and get nuts (with lock-tight). You may want to enlarge the holes a bit to use a bigger bolt, but don't go much bigger. Also a bolt with the shoulder ground down makes install easier since you can slip it into the channel of the seat rail and it won't spin while you put the nuts on from the bottom.
Now, the tranny tunnel side rail is a bit more complicated. The front and back mounting points are actually a single piece of stamped steel. The basic idea is the same, locate and grind off the rivets that hold the back of the rail the seat slides on to the mounting bracket (Circled below), then make a cut at the red line (it's a U shaped channel so it's really 3 cuts). The goal is to cut the bottom piece that bolts to the stock mounting hole off, while leaving the actual slider rail intact. Just like the outside rail, we'll use the rivet holes in the slider track as our new mounting point.
Installed in the car, the picture below is looking in from the driver's door, the tranny tunnel in the background. The outline in red is the stock bracket that we removed (dad's fingers are touching it in the picture above), the green marks are the approximate location on the rivet holes.
After drilling holes through the floor and building backer plates, reattach the rails to the seat pan. There are now 6 bolt holes instead of 4 (Red arrows). In this picture, the seat is propped up upside down and the far side is the tranny tunnel side. You can see both of the front mounts remain stock.
We also used a dead blow hammer to cave in the lowest part of the seat pan. The bump we removed foam from during the foamectomy actually drags on the floor if you don't modify it. Don't go any farther than you need to (~3/4" at the back) or you risk compromising the rigidity of the seat pan (and the back of the seat).
Let me know if this still isn't clear and I'll take some better pictures next weekend when the seat's back out.
Oh and I almost forgot, the humps:
**Make sure to protect the interior and soft top. You don't want hot metal shavings on that stuff!**
Last edited by Rick02R; 01-12-2014 at 04:13 PM.
Reply
1
1
03-18-2014, 09:45 PM
#17
Junior Member

Join Date: Jun 2010
Location: Minneapolis, MN
Posts: 247
Total Cats: 37
Thanks for the pictures and explanation of lowering your seat! I saw something similar in another thread where the rear mount points were bent instead of removed. This definitely inhibited rearward travel.
In another thread you mentioned hammering the seat pan in wasn't enough to get the last few clicks of travel. Did you solve this issue? Do you think adding a thin bushing under the rail would help? I know this would partially defeat the intent of this modification.
I had a '99 base Miata with an aggressive foamectomy but the seat started tearing soon after. I upgraded to a very low mileage, '01 LS with Hard S suspension and LSD. With a less aggressive foamectomy, I'm really slouching to fit and I still hit the top bows. In an accident the metal roof parts would be dangerous or fatal. As it is, I sit with the seat all the way back and fully tilted. Even one click forward which allows one more click of tilt is barely drivable with my long legs. I'm 6'2" - 6'3".
Would you still recommend I try this at 4-5" taller than you or should I just order the most daily driver friendly "race" seat with lower thigh bolsters and mount it directly to the floor? I'm tired of looking like a giant driving a clown car and would really like increased safety and comfort!
Thank you!
Reply
0
0
03-19-2014, 12:57 PM
#18
Junior Member
Join Date: Jun 2010
Location: Minneapolis, MN
Posts: 247
Total Cats: 37
After spending a lot of time studying pictures of sliders in various positions on eBay and checking the seat position in my Miata, specifically how the slider's top rail is oriented to the bottom rail when the seat is furthest back, it looks like this modification won't work for me.
By removing the rear attachment points off the slider, it looks like you lose 2-3" of seat travel because the upper slider that attaches to the seat will hit the floor much sooner. I will verify this after the weather warms up and I take my Miata out of winter slumber. At that time I'll use a tape measure and remove the seat to verify.
This modification looks great if you are shorter than 6' but doesn't look promising for those of us that require full, rearward seat travel for long legs. My inseam is 35-36". I understand dropping the rear of the seat will change leg angle and increase leg room but will it fully cancel out the loss of travel?
If anybody else 6' or taller attempts this, please share your measurement findings or pictures ASAP. I will do the same once my car comes out of winter storage. My goal is to save myself and others the trouble of removing the seat humps only to find they aren't 100% happy with the results. Sacrificing leg room to gain headroom isn't an option for me. Even one click makes a huge difference!
By removing the rear attachment points off the slider, it looks like you lose 2-3" of seat travel because the upper slider that attaches to the seat will hit the floor much sooner. I will verify this after the weather warms up and I take my Miata out of winter slumber. At that time I'll use a tape measure and remove the seat to verify.
This modification looks great if you are shorter than 6' but doesn't look promising for those of us that require full, rearward seat travel for long legs. My inseam is 35-36". I understand dropping the rear of the seat will change leg angle and increase leg room but will it fully cancel out the loss of travel?
If anybody else 6' or taller attempts this, please share your measurement findings or pictures ASAP. I will do the same once my car comes out of winter storage. My goal is to save myself and others the trouble of removing the seat humps only to find they aren't 100% happy with the results. Sacrificing leg room to gain headroom isn't an option for me.
Even one click makes a huge difference!
Reply
0
0
03-20-2014, 02:26 AM
#19
Jess,
I actually just recently did this. Left front mounting locations, cut rear ones out, modified stock slider and bolted it to floor in the back.
I'm 5'10". 32" inseam (more torso) and this is what I found.
Stock leather MSM seats, hair touched soft top.
Foamectony on the seat underbottoms. Gained me about an inch.
Stock sliders out, built barstock mounts. Gained me about another inch.
Stock sliders back in, rear mounts cut out. Sledged bottom of seat so I could get it to go back another 2 or 3 notches. Seat would suck if I didn't do this. Gained another inch over barstock mounts, but lost about 2 inches leg room in that seat no longer goes back as far. Seat is also noticeably more angled. Feels different, weird at first, but getting used to it.
So by doing this mod, I definitely gained a lot of head room, probably at least 3" but lost maybe 1-2" of leg room. If my legs were any longer, this would not last long as my current seat position. But it actually works pretty decently for me.
Hope this all helps
Reply
0
0
03-20-2014, 03:42 PM
#20
Junior Member
Join Date: Jun 2010
Location: Minneapolis, MN
Posts: 247
Total Cats: 37
Thank you! I still plan on removing my seat and checking how the top/bottom rails on the slider are with the seat back as far as possible.
If you added a spacer under the shortened slider, the seat would go back another click or two, right? In the image in my head, this wouldn't raise the seat any because it would still be limited by the seat pan hitting the floor...see what I'm saying?
How did you manage to tighten all the seat bolts with metal, bar stock rails? Do you install the rear, floor bolts first and then pull the recline lever on the seat to fold it and bend the bar stock up to install the 4 seat bolts? Finally attaching the front, floor bolts? How much of a pain is it to get the holes drilled properly in the bar stock?
I really don't need sliders but they sure would be nice to keep. I like to allow others to drive occasionally to experience the handling and top down driving experience! Maybe I should look into having the floor cut out and dropped. I know I saw this somewhere on the web.
Reply
0
0


