
Making Composite Parts
 04-27-2016, 08:56 PM
#1
Senior Member
Thread Starter

Join Date: Oct 2011
Location: The Race Track & St Pete FL
Posts: 638
Total Cats: 57
So I made this thread to help, ask questions and share ideas about make composite parts out of Fiberglass, Aramid and Carbonfiber.
If you want to make a HOOD lets say, here is pretty much a step by step. Now this is what I have learned in the industry over the past few years
Step 1: Prep the Plug
Clean and make your part how you want (shinny, matte and etc)
Make the flange go at 4"-6" from the part
Wax the part/flange at least 5 times. 1 wax job is coat the part with mould release, wait until haze (10-15 min). Wipe off with clean rag and do not touch part with anything other than a clean rag (hands, gloves etc...) IMPORTANT Then let air dry for 15-20 mins, this will let the micro layer of wax to harden. REPEAT 4 more times
Put modeling clay in the joint between the part and the flange so it doesn't make a mechanical bond (locked together)
Step 2: Making the Mould (Mold)
Spray or bush on 2 heavy coats of Tooling Jell Coat
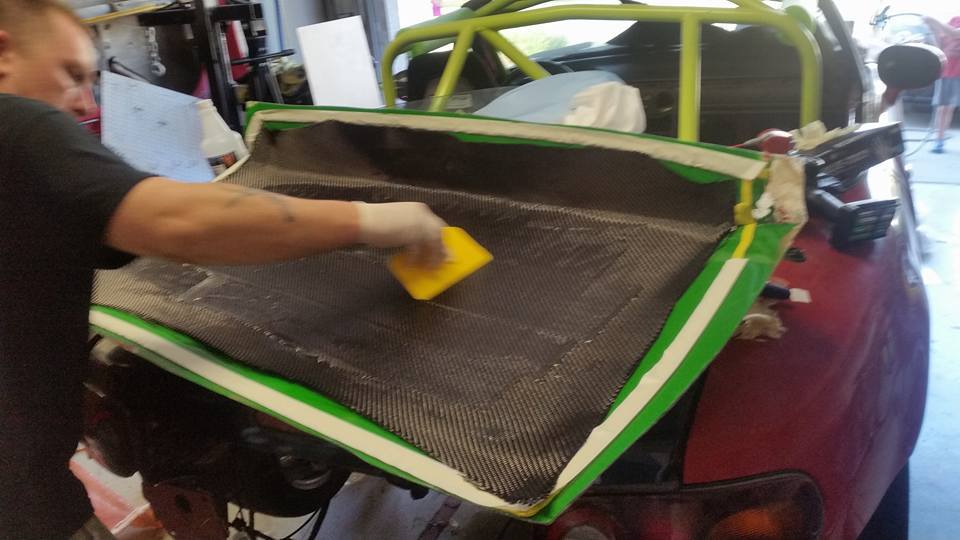
When jell is tacky (barely leaves a finger print) put on your skin coat of fiberglass which is a 1 or 1.5 oz Mat IMPORTANT Make sure all air bubble are rolled out.
Once the resin is cured look over the part for air bubbles. I some are found, grind them out and do not go in to the jell coat. I use Resin Putty to fill the grinned out areas.
Put on another layer of Glass/resin Mat
Now once there is a skin coat and a first layer, there can be layers of glass be put on at a time MAX: (2) 2 oz layers at a time
Build it up to your needed thickness. Can use foam or wood in between the mould and the last layer to add Stiffness
Put some wedges in between the flanges and work the way around to pop it loose slowly. Don't force it. The best sound is a good release
Now the mould can be wet sanded and buffed to the desired surface
Post all you projects and ask away!
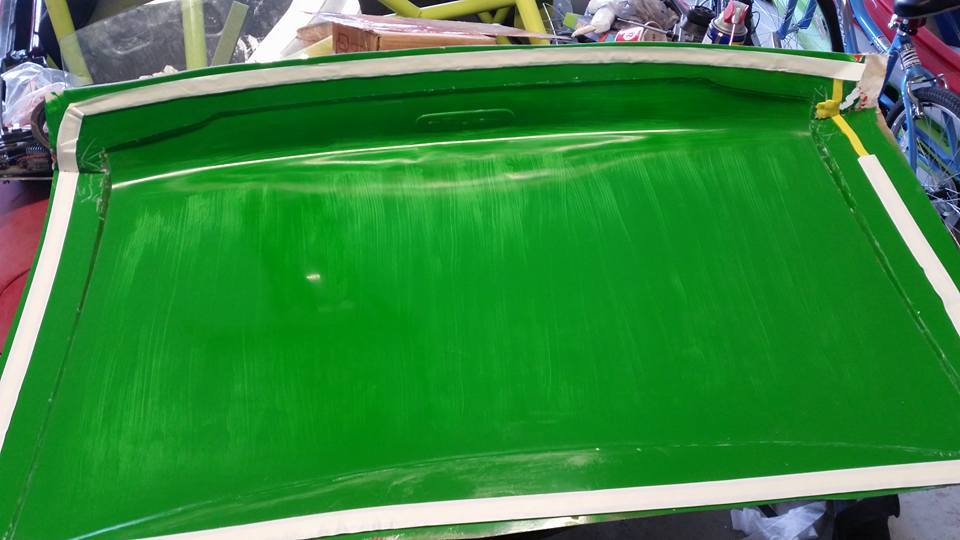
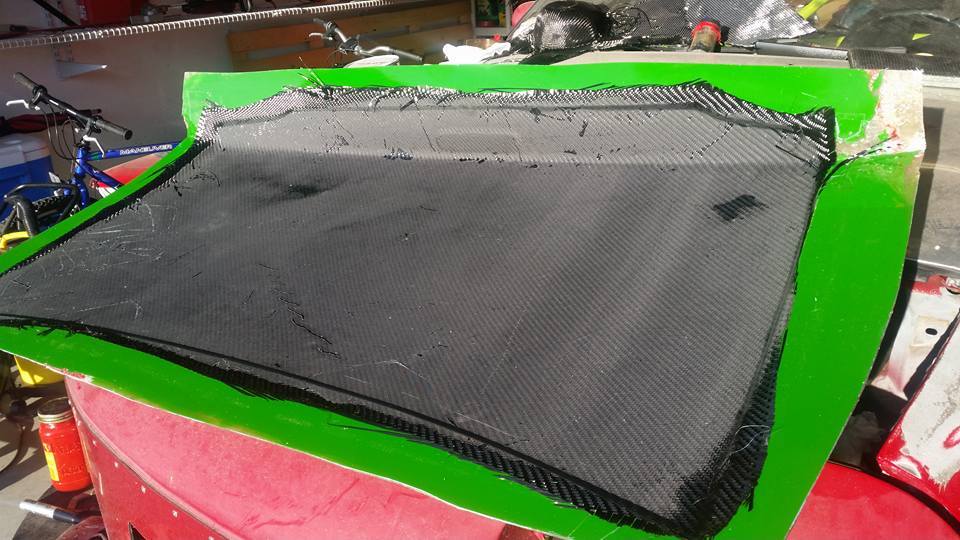
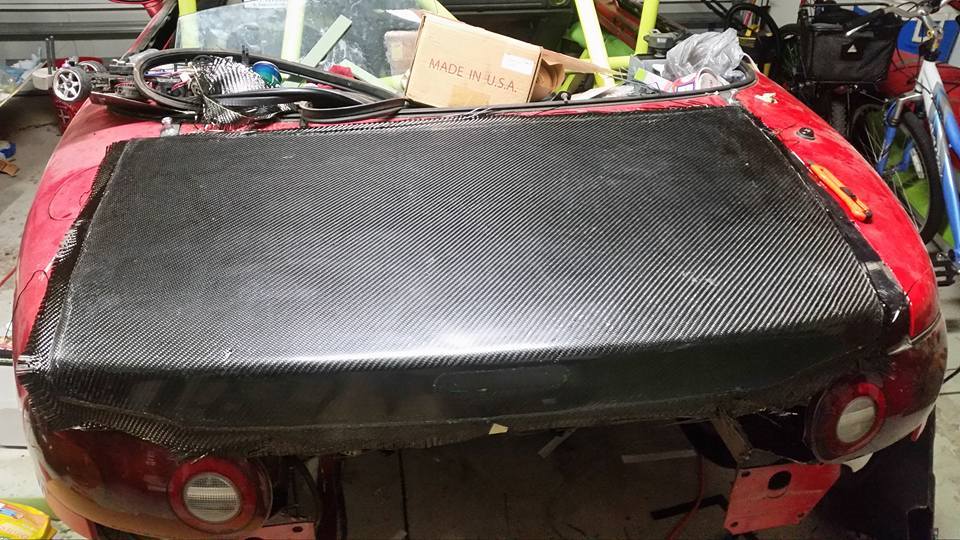
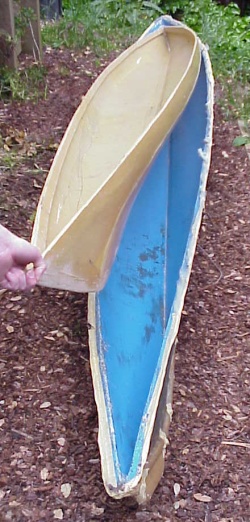
Here is my newest part I made and currently its still in the works


If you want to make a HOOD lets say, here is pretty much a step by step. Now this is what I have learned in the industry over the past few years
Step 1: Prep the Plug
Clean and make your part how you want (shinny, matte and etc)
Make the flange go at 4"-6" from the part
Wax the part/flange at least 5 times. 1 wax job is coat the part with mould release, wait until haze (10-15 min). Wipe off with clean rag and do not touch part with anything other than a clean rag (hands, gloves etc...) IMPORTANT Then let air dry for 15-20 mins, this will let the micro layer of wax to harden. REPEAT 4 more times
Put modeling clay in the joint between the part and the flange so it doesn't make a mechanical bond (locked together)
Step 2: Making the Mould (Mold)
Spray or bush on 2 heavy coats of Tooling Jell Coat
When jell is tacky (barely leaves a finger print) put on your skin coat of fiberglass which is a 1 or 1.5 oz Mat IMPORTANT Make sure all air bubble are rolled out.
Once the resin is cured look over the part for air bubbles. I some are found, grind them out and do not go in to the jell coat. I use Resin Putty to fill the grinned out areas.
Put on another layer of Glass/resin Mat
Now once there is a skin coat and a first layer, there can be layers of glass be put on at a time MAX: (2) 2 oz layers at a time
Build it up to your needed thickness. Can use foam or wood in between the mould and the last layer to add Stiffness
Put some wedges in between the flanges and work the way around to pop it loose slowly. Don't force it. The best sound is a good release
Now the mould can be wet sanded and buffed to the desired surface
Post all you projects and ask away!
Here is my newest part I made and currently its still in the works


Last edited by 1993ka24det; 05-05-2016 at 07:46 PM.

Reply
 3
3

3

 04-28-2016, 02:48 PM
#4

Looks cool. This makes me want to do body panels so badly. The trunk is probably the easiest panel to make but also lower priority for me than things on the front of the car.
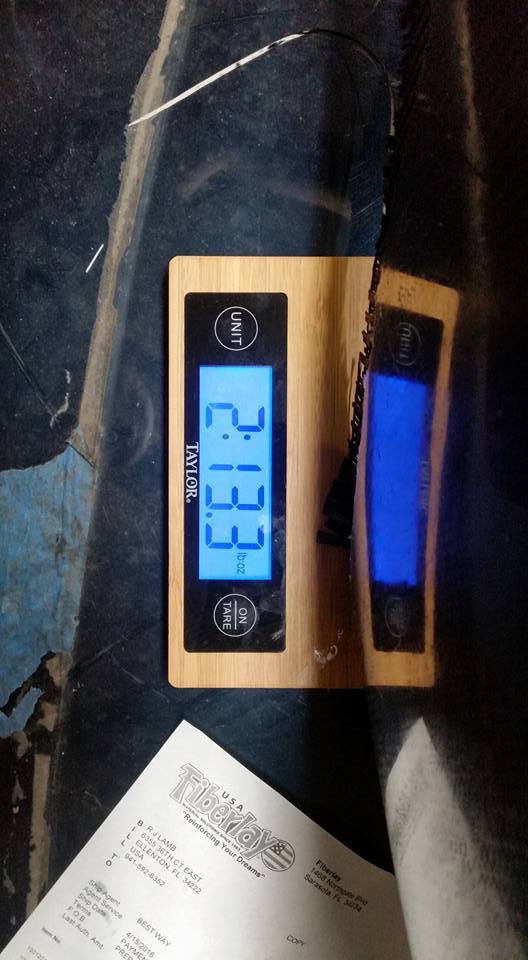
Also, what cloth and core material are you using? 2lb 13oz seems a bit heavy for a panel that size. It seems like wet layup and core materials are tricky- like it would be hard to keep the core from taking on a bunch of resin.
Also, what cloth and core material are you using? 2lb 13oz seems a bit heavy for a panel that size. It seems like wet layup and core materials are tricky- like it would be hard to keep the core from taking on a bunch of resin.
Last edited by asmasm; 04-28-2016 at 03:06 PM.
Reply
0
0
04-28-2016, 02:58 PM
#5
Here is a spreadsheet I put together to try and figure out how much weight a carbon prepreg sandwhich core hood could save. I have it as 3 plies right now, might need to be 4. Also, one annoying thing about our hood is that it is wider than a typical 50" roll of fabric.

Also, what gelcoat are you using on your mold? The stuff I have gives me trouble when I try to brush it on.
Also, what gelcoat are you using on your mold? The stuff I have gives me trouble when I try to brush it on.
Reply
0
0
04-28-2016, 07:13 PM
#7
Senior Member
Thread Starter
Join Date: Oct 2011
Location: The Race Track & St Pete FL
Posts: 638
Total Cats: 57
Looks cool. This makes me want to do body panels so badly. The trunk is probably the easiest panel to make but also lower priority for me than things on the front of the car.
Also, what cloth and core material are you using? 2lb 13oz seems a bit heavy for a panel that size. It seems like wet layup and core materials are tricky- like it would be hard to keep the core from taking on a bunch of resin.
Also, what cloth and core material are you using? 2lb 13oz seems a bit heavy for a panel that size. It seems like wet layup and core materials are tricky- like it would be hard to keep the core from taking on a bunch of resin.
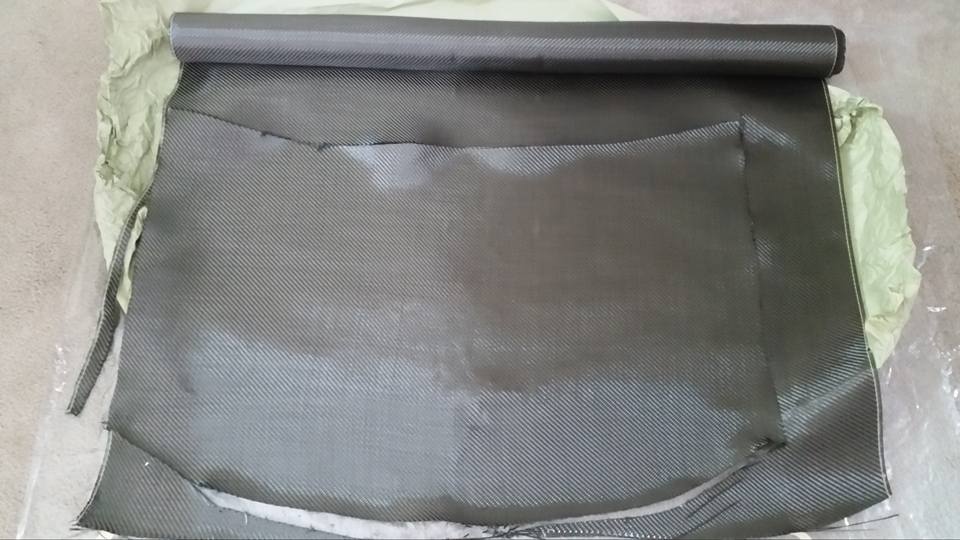
 . I am using coring foam, though for my first part it isn't a bad weight. The foam is closed cell which doesn't suck up much.
 Layer 1 250 grams/8.8 ounces of 10 ounce Carbon
250 grams of Epoxy Resin
Vacuum bagged at 28 in/mer
Layer 2 250 grams of 10 ounce Carbon
200 grams 20x30 inch 1/4in foam core
450 gram of epoxy resin
I think if I went to a nomex core I would save about 7 ounces, but it isn't cheap. and went to the Triaxial weave Spread Tow Carbon Fiber which uses 20% less resin
Carbon/Kevlar

Carbon

Reply
0
0
04-28-2016, 07:26 PM
#8
Senior Member
Thread Starter
Join Date: Oct 2011
Location: The Race Track & St Pete FL
Posts: 638
Total Cats: 57
Here is a spreadsheet I put together to try and figure out how much weight a carbon prepreg sandwhich core hood could save. I have it as 3 plies right now, might need to be 4. Also, one annoying thing about our hood is that it is wider than a typical 50" roll of fabric.
Also, what gelcoat are you using on your mold? The stuff I have gives me trouble when I try to brush it on.
Also, what gelcoat are you using on your mold? The stuff I have gives me trouble when I try to brush it on.
Your reinforcement (Carbon) is your strength and your core (foam/ honeycomb) is your stiffeners(doesn't add to your strength) I read some where that 1/4 foam makes it 70 times stiffer.
The tooling gel is from work and I don't know the company's name, but I'm going to spray it on at my new job (building 26' Carbon fiber boats)
Reply
0
0
04-29-2016, 09:40 AM
#10
2 Props,3 Dildos,& 1 Cat


iTrader: (8)
Join Date: Jun 2005
Location: Fake Virginia
Posts: 19,338
Total Cats: 573
I just want to sell it though. I don't really need it now.
Reply
0
0
04-29-2016, 11:51 AM
#12
2 Props,3 Dildos,& 1 Cat
iTrader: (8)
Join Date: Jun 2005
Location: Fake Virginia
Posts: 19,338
Total Cats: 573
I will have to get the tag off the box, but what I said above... Hexcel brand, roughly 5 oz loose plain weave. tens of yards by, I think 50ish inches wide. Now that I think about it, it might be much lighter than that.
It was a Hexcel blemish roll but I have never seen what that blem is. I'm certainly not going to unroll it to find out.
I also have a roll of pretty heavy fiberglass chop strand but it's not as long. Great for molds though.
If you're serious, I will pull them out of my basement and get specs and photos. They're buried under a few other things and heavy and awkward.
Suffice it to say that the project it was being saved for never materialized. I'm willing to let the whole roll go for a small fraction of retail plus shipping (it's big).

Fun!
It was a Hexcel blemish roll but I have never seen what that blem is. I'm certainly not going to unroll it to find out.
I also have a roll of pretty heavy fiberglass chop strand but it's not as long. Great for molds though.
If you're serious, I will pull them out of my basement and get specs and photos. They're buried under a few other things and heavy and awkward.
Suffice it to say that the project it was being saved for never materialized. I'm willing to let the whole roll go for a small fraction of retail plus shipping (it's big).
Fun!
Reply
0
0
04-29-2016, 02:31 PM
#16
If anyone is curious on stock NA body panel weights:
Fenders 6.5lb each (not including hardware)
Hood with headlight covers, latch, hinges, and release cable: 22.1lb
Front Bumper without hardware: 14.24lb
Stock door stripped of all removables except triangle glass and the bar that supports it: 31.92lb
Trunk lid with OEM R package spoiler, hinges, springs, third brake light installed. (I still need to weigh the latch and cable): 22.5lb
My guesses at how much very light carbon sandwhich core pieces could be. Assuming a near perfect resin to fiber ratio:
5.5lb hood with 4 aerocatch latches
fenders: 1lb each
Doors: 8lb each - probably not able to mount factory glass/speakers/other crap back in them
Bumper: 6lb?
Trunk lid: 3.5lb with latches
That comes out to roughly 100lb and would require about 10 molds.
Reply
0
0
05-03-2016, 02:06 AM
#17
Supporting Vendor

iTrader: (3)

Join Date: Jul 2006
Location: San Diego
Posts: 3,303
Total Cats: 1,216
That trunk looks great for a first shot at things, nice job.
I've only done basic wet layups, made some small CF parts and planned to get deeper into properly making stuff but then got sidetracked with the whole new drivetrain thing..
What I'm curious about is the vac bagging. That's been the thing I have yet to ever get a full walk-through on from someone who really knows and have the *aha* moment - mostly writeups online that always seem to be just vague enough that I'm left with a few questions. I have a parts list floating around here somewhere of all the bits you need for making a DIY vac setup and all the materials needed like peel ply, breather, etc. but words on a page don't quite cut it, I'm a visual person, just need to see it all in front of me once.
We do a lot of work with a composites shop, but they're busy doing their job and vice versa... I should really carve out some time to go get a crash-course.

Reply
0
0
05-03-2016, 09:26 AM
#18
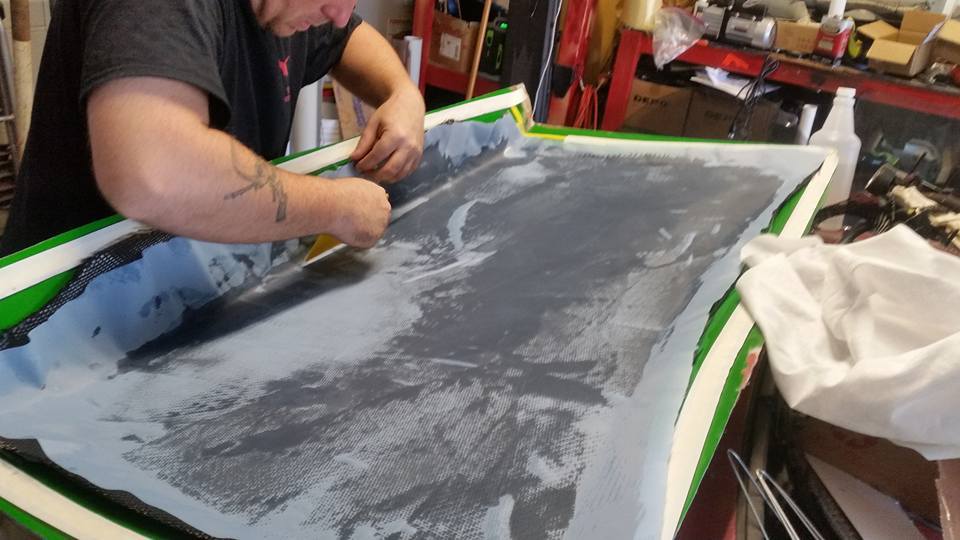
Vac bagging is pretty straight forward. Your basic stack looks like this (from bottom to top):
*Tool with release agent
*Fabric/resin
*Release material of some kind. This can be a treated fabric that allows resin to pass through it, plastic films with perforation for resin transfer, or plastic films with no perforation (usually only used with prepreg). Your release film choice affects how much resin gets pulled out of the laminate by the vacuum. Most of the time with wet layup you want take as much resin as possible out of the part.
*Breather fabric- Basically just a soft fabric material that allows air/vacuum to be distributed everywhere in the bag. Its also good for sharp corners to prevent the bag from tearing under vacuum
*Vacuum bagging film. This is basically plastic sheeting. The most common films are the stretchlon products. Some of them can stretch really far before rupturing. Depending on how your mold is made, you will either seal the film to the mold with tacky tape or you can envelope bag the whole part.
The biggest thing to keep in mind with all of this to prevent any bridging from happening. You want your carbon completely pressed into all small corners, and you need your entire bagging stack to be able to conform tightly. Any bridging will result in either a void or poor fiber compaction. Often times you will see people add pleats to their vacuum bags in order to have more material to fill in large concave areas.
Also, generally as a workflow you want to have your entire bagging setup figured out, all your materials cut and tested for fit before you start mixing resin. Dealing with bagging leaks is a pain in the *** and it can take a longer than your resin pot life to get it all set up. If you have a good pump that can do continuous duty you can get away with some small leaks.
Reply
0
0
05-03-2016, 09:44 AM
#19
2 Props,3 Dildos,& 1 Cat
iTrader: (8)
Join Date: Jun 2005
Location: Fake Virginia
Posts: 19,338
Total Cats: 573
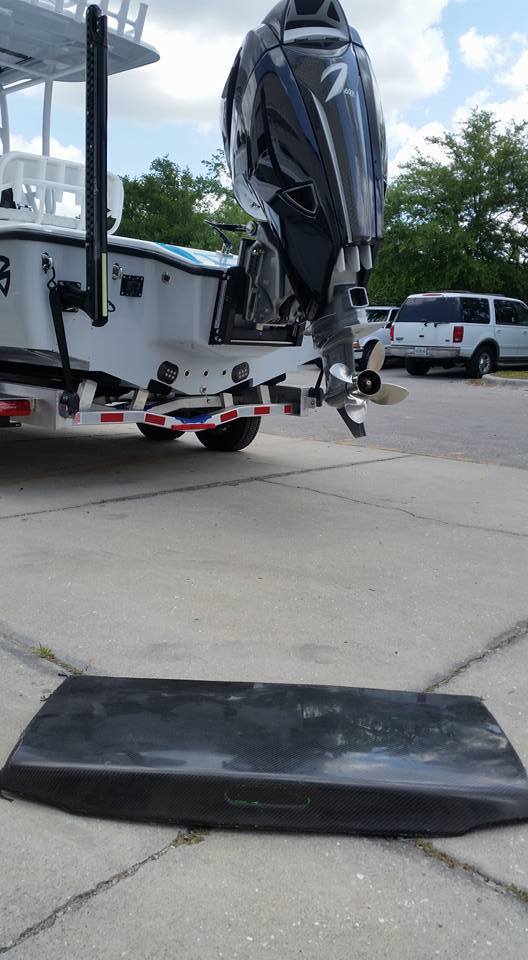
Bagging is pretty easy to practice on small parts. We bagged the boat pictured above. It wasn't terribly hard and came out pretty consistent.
I know some people like to use a big vacuum reservoir like a hot water heater and venturi vacuum pumps to keep things simple.
I know some people like to use a big vacuum reservoir like a hot water heater and venturi vacuum pumps to keep things simple.
Reply
0
0


