
Miata cooling system thread
 07-10-2014, 05:01 PM
#1

I am starting this thread in hopes of creating a single repository for the combined community knowledge on how to get the 89-05 Miatas to run cooler. For those of you new to Miatas and/or new to the track, they run hot! A bone stock but perfectly maintained NA6 with A/C will run 230� clt at a steady 70mph on a 100� day. Use full throttle a lot or add a bit of power and you're at 245�. Head gasket lets go at around 255�. Not everyone will agree with our conclusions but this is a compilation of the important stuff and general consensus from those who have direct personal experience and have done some testing.
The cooling system will be most efficient when it relies on conduction. That is direct contact with the hot/cold masses. That means getting all the hot coolant (reroute) to the core (efficient core design) then blasting it with as much cold air as possible (ducting, sealing). The radiator also transfers heat by simple radiation. Even with zero airflow you will feel infrared radiation (heat) above the core when you open the hood. Similarly, the top of the rad will be a bit hotter than the bottom from convection. Focus on conduction.
The two primary and endemic weaknesses in the Miata OEM cooling system are poor airflow and the poor coolant path through the engine.
Radiator size
OEM manual 12mm thick, auto is 16mm. Most aftermarket OEM replacement radiators are the 16mm auto version. Thicker is always better up to a point. Too thick and the rear of the core isn’t getting enough airflow to efficiently reject heat. It ends up working more like a heat sink just radiating through convection more than conduction but every bit helps. We like 30-40mm for <250whp cars with good airflow but no hood vents. Add A/C, FMIC without hood vents and you will overheat on track regardless of how thick the core is because of the poor airflow. Spec Miatas are not allowed a reroute so they run massive 50-60mm cores to hold temps at bay. The filled weight difference between a high efficiency 32mm and the bulkiest 55+mm SM style core is about 6 lbs. For 300whp+ track cars with FMIC, excellent airflow, reroute, vented hood and all the tricks, you will likely still need a whopper 50mm+ crossflow. The best 50mm+ crossflows have the advantage of excess cooling capacity that can allow a lower HP car to skip some of the other cooling system mods and still keep temps low. The price for that luxury is extra weight on the nose and the additional cost of the big core. It is always more efficient to improve airflow before adding core thickness. Each tuner needs to decide what will work best for their needs.
Radiator construction
-Material
The OEM has an aluminum core with plastic tanks. While plastic is light, it is a poor conductor of heat. Even though the tanks are only responsible for a very small portion of heat rejection, every little bit counts. Virtually every aftermarket high performance Miata radiator is all aluminum. This is the material of choice. The OEM Miata black plastic radiator tank turns a brown color when it’s old and brittle. Then it turns a yellow color right before it falls to pieces. These faded OEM radiator are time bombs, just waiting to burst. If your plastic Miata radiator isn’t black, don’t take it to the track. Some aftermarket radiators are brass, copper and or steel. Avoid these like the plague. Besides being obscenely heavy, these black bettys are not as efficient as a plain jane Koyo OEM plastic/aluminum replacement radiator.
-Type
The OEM radiator is a downflow. Meaning coolant flows into a top mounted tank then siphons down through the vertically arranged tubes to the bottom tank. From there the cooled coolant exits back the water pump via the lower hose. Many high performance race car applications (not just Miatas) utilize crossflow radiator designs. The crossflow has its tanks on the sides. Coolant enters the top of the side mounted tank. Coolant then flows across the core laterally to the tank on the other side. Coolant exits the bottom of that end tank. The primary advantage of a crossflow is that the coolant spends more time in contact with the tubes in the core. Some crossflows partition the lateral segments of the core so the coolant flows across to the exit tank, back across to the inlet tank, then back across to the exit tank. This is known as a triple pass. While this type of core increases the time coolant spends in the core, it also raises internal resistance to flow. This increase in resistance makes the water pump work harder, sapping power, and sometimes requires modification of the pressure controlling hardware of the system to maintain function and prevent leaks. Crossflow radiators cost more to make than traditional downflow radiators. In a Miata that was never designed for a crossflow, it’s common to need minor modifications to OEM shrouds, fan mounts or other radiator mounting hardware to get the crossflow integrated.
Coolant path
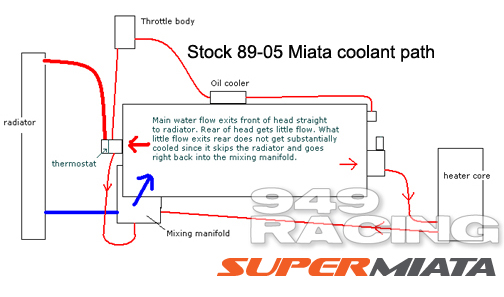
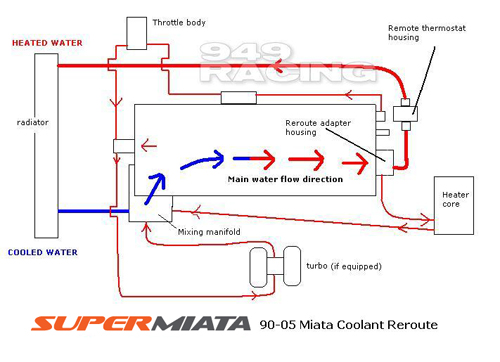
The B series Miata engine started life in the fwd Mazda GLC mounted transversely (fwd) about 30 years ago. Like all inline 4 cylinder engines, the coolant entered one end of the block and exited the other end from the head. Mazda wanted improve weight distribution for the longitudinal engine MX5 so they shoved the B6 as far back as they could. On the assembly line, the body is lowered over the chassis with engine already on it. To keep the engine further aft and clear the chassis during this, Mazda relocated the coolant outlet to the same end of the engine as the inlet, at the front. This flow path does a poor job of scavenging all the heated coolant out of the head effectively and contributes to the overheating problem. In 2008 we worked with a vendor to develop the coolant reroute to solve that problem. The reroute does just that, directing the coolant flow out the back of the head as Mazda intended. Our newest reroute in 2017 is a complete redesign, implementing all we have learned over a decade of racing.
Airflow
The airflow is so bad on a stock Miata that they can overheat just running a sustained high cruising speeds on a hot day with the A/C on.
-Leaks
First off is sealing or blocking all the gaps around the radiator where precious cooling air can leak around the side of core. Under the radiator, along the sides and the gaping hole where the hood latch resides. This leakage poses two problems. One, it means less air through the core. Two, it pressurizes the engine compartment. This pressurization makes it harder for the air being forced in from the front to make it’s way through the radiator core.
-Undertray
It’s common for modified Miatas to have their OEM under trays missing or cut up for intercooler piping. Unfortunately, this allows the air being stuffed under the car to creep up in to the engine bay at speed and , you guessed it, pressurize the engine bay. This has the same detrimental effect on pressure differential across the radiator that the leakage has. An intact OEM under tray works great. Even better is a flat undertray that covers the entire bottom of the car from the front axle centerline to the front bumper skin. This is often just a 3/16” Birch plywood sheet cut to fit, roughly in the shape of a mushroom. DIY attachment and you are good to go. Visit the DIY aero thread for info on attaching under trays.
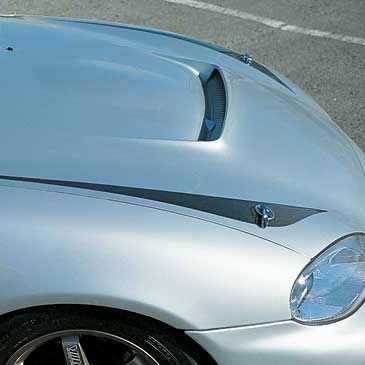
-Hood vents
With a good undertray, leaks sealed, reroute and high performance radiator an N/A up to about 170whp can stay cool even drafting in 100� heat. Start going above 200whp and hood vents are needed to increase airflow. Go above 300whp and you need the highest performance radiator available too. $200 Chinese ebay specials need not apply. Hood vent location is critical. There are a few images on this forum mapping the areas of low pressure across the hood. Put the vent in the wrong place and you will actually shove air back in and make the cooling worse. In general, a loaf of bread sized area just in front of the valve cover but behind the fans is good. The other good area is two angle areas starting at the front corners of the valve cover and extending about a third the way back towards the hood latches. Combine them together and you get a sort of flat bottomed “V” shape. Kickers or spoilers help a bit but really all you need is a hole with maybe some mesh on it to keep rocks out. Hood vents make a huge difference in airflow through the radiator as they extract from the engine bay. The OEM aluminum hood is a scant 14lbs and very stiff. It needs to be stiff as there is significant aero lift across its surface. Make and aftermarket hood to flexy and it will lift enough at speed to see a 3” gap along the side. Not good. The only “carbon” hood that are actually lighter and as stiff as the OEM are vacuum bagged dry carbon prepreg and quite expensive. In our shop, we simply hack up OEM hoods as they end up being light and stiff enough while being a fraction of the cost of the sexy dry carbon hoods.
-Adding more cooling intakes
This never works. The opening in the OEM bumper skin is already larger than it needs to be to meet the area requirements of the radiator. What we see too often is these “cooling intakes” bypassing the radiator and actually dumping into the engine bay. The thought is “ I’ll cool the engine”. What actually happens is that high pressure air mass packing into the engine bay makes it harder for the high pressure air trying to make its way through the radiator to well, get through. The result is reduced airflow. The engine itself is a sucky radiator. Let the coolant and radiator to the thermal conduction.
-Hood risers
Very effective at ramming more high pressure air into the engine bay and reducing the radiators efficiency at speeds over about 15mph. Great when parked but that's about it. In a word, don't.
The Details
Radiator cap
Make sure your radiator cap is new. We have seen many and engine blow because it had a fancy rerouted cooling system but and old worn our radiator cap. If it leaks just a bit, it allows too much bypass into the reservoir then doesn’t suck it back in when the engine cools. The result is your coolant level dips on every heat cycle until the rad is half full but your reservoir still has some in it. Boom. We like 1.3 or 1.4bar caps with heat resistant silicone seals as opposed to the OEM 1.1bar cap with EPDM rubber seals.
Coolant
While antifreeze has a higher boiling point, it doesn’t reject heats as well as plain water. Most racing sanctioning bodies do not allow any antifreeze in a road race car since it’s damned slippery when it gets onto the track. We use distilled water, half a bottle of Redline water wetter, and splash of antifreeze. Why the anti freeze? To help reduce corrosion and also allows the drivers /crew to more quickly catch tiny coolant leaks. That sharp smell gives it away faster than plain water does.
Head gasket
Mazda recognized the cooling issues and altered the head gasket in the 01-05 "NB2" VVT (BP6D) engines. This change restricted the coolant flow to 1-2 cylinders thereby increasing flow to 3-4. Bandaid fix that doesn't really solve the problem of the backwards coolant flow. It's OK to use a reroute in an NB2 engine. If you have the engine apart already, further improvements in flow can be made by swapping in the 94-00 # BP26-10-471 head gasket. We run this HG on all of our VVT engines.
Burping
Even an OEM system can get air bubbles in it. With a modified high performance cooling system, you might have an air bubble in the thing and never know it until the first time you get it really hot. It will often run cool even half empty. First really hot day.. Boom. After opening the cooling system or modifying it, raise the front of the car and run the car until the thermostat opens to make sure you get all the air out. With a reroute, you need to really raise the front of the car, at least 10” higher than the rear, when bleeding it.
Thermostat
The OEM Miata ECU begins to reduce ignition advance and add fuel when the coolant rises past 200-210� depending on the year. Both of these correction table adjustments reduce power. Best power and fuel economy with the stock ECU comes when the coolant temps are kept around 200�. The OEM 195� thermostat is a good place to start with a stock ECU. With an aftermarket ECU or reflashed OEM ECU (Spec Miata), a 180� or even 170� thermostat can unlock a few more hp. We like the Stant “SuperStat” line of thermostats provide the highest peak flow and temp reduction. The 45868 180� SuperStat fits all years 89-05 and should only be used if you have adjusted the relevant tables in your programmable ECU. A 180 tstat in a stock ECU is a recipe for bad fuel economy and reduces power since the stock ECU wants to see 195-205.

Fans and shrouds
On a track car, only one fan is needed and no extra shrouds. We use one OEM fan and call it a day. Any extra shrouding actually inhibits high air flow mass at higher speeds on cars with adequate ducting. There is a sort of minimum air flow mass required to cool a high hp track car. Add full coverage shrouds for low speed, light load street cooling problems and you are handicapping high speed, high load airflow. On cars that are more street oriented, have A/C and big power, fans can help bandaid airflow enough to keep it alive if it never goes on track. If that same car that requires massive dual fans to survive on the street ever gets driven in anger on the track.. it’s a better idea to ditch the shrouds, start cutting up the hood and improve ducting through the nose. You will rarely see fans and full coverage shrouds on a purpose built racecar unless it's an offroad car where low speeds and debris are concern for an externally mounted core.
The cooling system will be most efficient when it relies on conduction. That is direct contact with the hot/cold masses. That means getting all the hot coolant (reroute) to the core (efficient core design) then blasting it with as much cold air as possible (ducting, sealing). The radiator also transfers heat by simple radiation. Even with zero airflow you will feel infrared radiation (heat) above the core when you open the hood. Similarly, the top of the rad will be a bit hotter than the bottom from convection. Focus on conduction.
The two primary and endemic weaknesses in the Miata OEM cooling system are poor airflow and the poor coolant path through the engine.
Radiator size
OEM manual 12mm thick, auto is 16mm. Most aftermarket OEM replacement radiators are the 16mm auto version. Thicker is always better up to a point. Too thick and the rear of the core isn’t getting enough airflow to efficiently reject heat. It ends up working more like a heat sink just radiating through convection more than conduction but every bit helps. We like 30-40mm for <250whp cars with good airflow but no hood vents. Add A/C, FMIC without hood vents and you will overheat on track regardless of how thick the core is because of the poor airflow. Spec Miatas are not allowed a reroute so they run massive 50-60mm cores to hold temps at bay. The filled weight difference between a high efficiency 32mm and the bulkiest 55+mm SM style core is about 6 lbs. For 300whp+ track cars with FMIC, excellent airflow, reroute, vented hood and all the tricks, you will likely still need a whopper 50mm+ crossflow. The best 50mm+ crossflows have the advantage of excess cooling capacity that can allow a lower HP car to skip some of the other cooling system mods and still keep temps low. The price for that luxury is extra weight on the nose and the additional cost of the big core. It is always more efficient to improve airflow before adding core thickness. Each tuner needs to decide what will work best for their needs.
Radiator construction
-Material
The OEM has an aluminum core with plastic tanks. While plastic is light, it is a poor conductor of heat. Even though the tanks are only responsible for a very small portion of heat rejection, every little bit counts. Virtually every aftermarket high performance Miata radiator is all aluminum. This is the material of choice. The OEM Miata black plastic radiator tank turns a brown color when it’s old and brittle. Then it turns a yellow color right before it falls to pieces. These faded OEM radiator are time bombs, just waiting to burst. If your plastic Miata radiator isn’t black, don’t take it to the track. Some aftermarket radiators are brass, copper and or steel. Avoid these like the plague. Besides being obscenely heavy, these black bettys are not as efficient as a plain jane Koyo OEM plastic/aluminum replacement radiator.
-Type
The OEM radiator is a downflow. Meaning coolant flows into a top mounted tank then siphons down through the vertically arranged tubes to the bottom tank. From there the cooled coolant exits back the water pump via the lower hose. Many high performance race car applications (not just Miatas) utilize crossflow radiator designs. The crossflow has its tanks on the sides. Coolant enters the top of the side mounted tank. Coolant then flows across the core laterally to the tank on the other side. Coolant exits the bottom of that end tank. The primary advantage of a crossflow is that the coolant spends more time in contact with the tubes in the core. Some crossflows partition the lateral segments of the core so the coolant flows across to the exit tank, back across to the inlet tank, then back across to the exit tank. This is known as a triple pass. While this type of core increases the time coolant spends in the core, it also raises internal resistance to flow. This increase in resistance makes the water pump work harder, sapping power, and sometimes requires modification of the pressure controlling hardware of the system to maintain function and prevent leaks. Crossflow radiators cost more to make than traditional downflow radiators. In a Miata that was never designed for a crossflow, it’s common to need minor modifications to OEM shrouds, fan mounts or other radiator mounting hardware to get the crossflow integrated.
Coolant path
The B series Miata engine started life in the fwd Mazda GLC mounted transversely (fwd) about 30 years ago. Like all inline 4 cylinder engines, the coolant entered one end of the block and exited the other end from the head. Mazda wanted improve weight distribution for the longitudinal engine MX5 so they shoved the B6 as far back as they could. On the assembly line, the body is lowered over the chassis with engine already on it. To keep the engine further aft and clear the chassis during this, Mazda relocated the coolant outlet to the same end of the engine as the inlet, at the front. This flow path does a poor job of scavenging all the heated coolant out of the head effectively and contributes to the overheating problem. In 2008 we worked with a vendor to develop the coolant reroute to solve that problem. The reroute does just that, directing the coolant flow out the back of the head as Mazda intended. Our newest reroute in 2017 is a complete redesign, implementing all we have learned over a decade of racing.
Airflow
The airflow is so bad on a stock Miata that they can overheat just running a sustained high cruising speeds on a hot day with the A/C on.
-Leaks
First off is sealing or blocking all the gaps around the radiator where precious cooling air can leak around the side of core. Under the radiator, along the sides and the gaping hole where the hood latch resides. This leakage poses two problems. One, it means less air through the core. Two, it pressurizes the engine compartment. This pressurization makes it harder for the air being forced in from the front to make it’s way through the radiator core.
-Undertray
It’s common for modified Miatas to have their OEM under trays missing or cut up for intercooler piping. Unfortunately, this allows the air being stuffed under the car to creep up in to the engine bay at speed and , you guessed it, pressurize the engine bay. This has the same detrimental effect on pressure differential across the radiator that the leakage has. An intact OEM under tray works great. Even better is a flat undertray that covers the entire bottom of the car from the front axle centerline to the front bumper skin. This is often just a 3/16” Birch plywood sheet cut to fit, roughly in the shape of a mushroom. DIY attachment and you are good to go. Visit the DIY aero thread for info on attaching under trays.
-Hood vents
With a good undertray, leaks sealed, reroute and high performance radiator an N/A up to about 170whp can stay cool even drafting in 100� heat. Start going above 200whp and hood vents are needed to increase airflow. Go above 300whp and you need the highest performance radiator available too. $200 Chinese ebay specials need not apply. Hood vent location is critical. There are a few images on this forum mapping the areas of low pressure across the hood. Put the vent in the wrong place and you will actually shove air back in and make the cooling worse. In general, a loaf of bread sized area just in front of the valve cover but behind the fans is good. The other good area is two angle areas starting at the front corners of the valve cover and extending about a third the way back towards the hood latches. Combine them together and you get a sort of flat bottomed “V” shape. Kickers or spoilers help a bit but really all you need is a hole with maybe some mesh on it to keep rocks out. Hood vents make a huge difference in airflow through the radiator as they extract from the engine bay. The OEM aluminum hood is a scant 14lbs and very stiff. It needs to be stiff as there is significant aero lift across its surface. Make and aftermarket hood to flexy and it will lift enough at speed to see a 3” gap along the side. Not good. The only “carbon” hood that are actually lighter and as stiff as the OEM are vacuum bagged dry carbon prepreg and quite expensive. In our shop, we simply hack up OEM hoods as they end up being light and stiff enough while being a fraction of the cost of the sexy dry carbon hoods.
-Adding more cooling intakes
This never works. The opening in the OEM bumper skin is already larger than it needs to be to meet the area requirements of the radiator. What we see too often is these “cooling intakes” bypassing the radiator and actually dumping into the engine bay. The thought is “ I’ll cool the engine”. What actually happens is that high pressure air mass packing into the engine bay makes it harder for the high pressure air trying to make its way through the radiator to well, get through. The result is reduced airflow. The engine itself is a sucky radiator. Let the coolant and radiator to the thermal conduction.
-Hood risers
Very effective at ramming more high pressure air into the engine bay and reducing the radiators efficiency at speeds over about 15mph. Great when parked but that's about it. In a word, don't.
The Details
Radiator cap
Make sure your radiator cap is new. We have seen many and engine blow because it had a fancy rerouted cooling system but and old worn our radiator cap. If it leaks just a bit, it allows too much bypass into the reservoir then doesn’t suck it back in when the engine cools. The result is your coolant level dips on every heat cycle until the rad is half full but your reservoir still has some in it. Boom. We like 1.3 or 1.4bar caps with heat resistant silicone seals as opposed to the OEM 1.1bar cap with EPDM rubber seals.
Coolant
While antifreeze has a higher boiling point, it doesn’t reject heats as well as plain water. Most racing sanctioning bodies do not allow any antifreeze in a road race car since it’s damned slippery when it gets onto the track. We use distilled water, half a bottle of Redline water wetter, and splash of antifreeze. Why the anti freeze? To help reduce corrosion and also allows the drivers /crew to more quickly catch tiny coolant leaks. That sharp smell gives it away faster than plain water does.
Head gasket
Mazda recognized the cooling issues and altered the head gasket in the 01-05 "NB2" VVT (BP6D) engines. This change restricted the coolant flow to 1-2 cylinders thereby increasing flow to 3-4. Bandaid fix that doesn't really solve the problem of the backwards coolant flow. It's OK to use a reroute in an NB2 engine. If you have the engine apart already, further improvements in flow can be made by swapping in the 94-00 # BP26-10-471 head gasket. We run this HG on all of our VVT engines.
Burping
Even an OEM system can get air bubbles in it. With a modified high performance cooling system, you might have an air bubble in the thing and never know it until the first time you get it really hot. It will often run cool even half empty. First really hot day.. Boom. After opening the cooling system or modifying it, raise the front of the car and run the car until the thermostat opens to make sure you get all the air out. With a reroute, you need to really raise the front of the car, at least 10” higher than the rear, when bleeding it.
Thermostat
The OEM Miata ECU begins to reduce ignition advance and add fuel when the coolant rises past 200-210� depending on the year. Both of these correction table adjustments reduce power. Best power and fuel economy with the stock ECU comes when the coolant temps are kept around 200�. The OEM 195� thermostat is a good place to start with a stock ECU. With an aftermarket ECU or reflashed OEM ECU (Spec Miata), a 180� or even 170� thermostat can unlock a few more hp. We like the Stant “SuperStat” line of thermostats provide the highest peak flow and temp reduction. The 45868 180� SuperStat fits all years 89-05 and should only be used if you have adjusted the relevant tables in your programmable ECU. A 180 tstat in a stock ECU is a recipe for bad fuel economy and reduces power since the stock ECU wants to see 195-205.
Fans and shrouds
On a track car, only one fan is needed and no extra shrouds. We use one OEM fan and call it a day. Any extra shrouding actually inhibits high air flow mass at higher speeds on cars with adequate ducting. There is a sort of minimum air flow mass required to cool a high hp track car. Add full coverage shrouds for low speed, light load street cooling problems and you are handicapping high speed, high load airflow. On cars that are more street oriented, have A/C and big power, fans can help bandaid airflow enough to keep it alive if it never goes on track. If that same car that requires massive dual fans to survive on the street ever gets driven in anger on the track.. it’s a better idea to ditch the shrouds, start cutting up the hood and improve ducting through the nose. You will rarely see fans and full coverage shrouds on a purpose built racecar unless it's an offroad car where low speeds and debris are concern for an externally mounted core.
__________________

Last edited by emilio700; 04-16-2020 at 04:00 PM.

Reply
 34
34

34
07-10-2014, 06:25 PM
#2

I'd like to point out that my high performance 1966 Cadillac has a cross flow radiator 
Pressure maps for all three generations of Miata hood are found here: http://www.flyinmiata.com/support/in...sc/louvers.pdf
Pressure maps for all three generations of Miata hood are found here: http://www.flyinmiata.com/support/in...sc/louvers.pdf
Reply
6
6
07-10-2014, 06:37 PM
#3
I'd like to point out that my high performance 1966 Cadillac has a cross flow radiator
Pressure maps for all three generations of Miata hood are found here: http://www.flyinmiata.com/support/in...sc/louvers.pdf
Pressure maps for all three generations of Miata hood are found here: http://www.flyinmiata.com/support/in...sc/louvers.pdf
__________________
Reply
0
0

 07-10-2014, 07:56 PM
#7
That is a matter of opinion. We have run lots of street and race miles with a reroute and stock BP6D gasket without issue. This is on cars with standalone coolant temp and pressure gauges that are run in w2w competition an enduros. Come to think of it, we have run the Thunderhills 25 hrs like that. BP26 gasket is better but the stock BP6D gasket is fine.
__________________
Reply
1
1
 07-11-2014, 12:02 AM
#10

Thank you for this write up. I have done every single thing you have mentioned so far minus the hood ventd. This is my next target to reduce water temps on my turbo nb with ac. When at high speed and the ac on, I creep up in temperature. But when stopped, drops and cools quickly.
I currently have: mtuned reroute, koyo 54mm radiator, spa fans and a full shroud. As I read, I don't necessarily need a shroud correct? Could I just drill holes in the shroud to increase air flow at higher speeds since the fans then are obsolete?
I currently have: mtuned reroute, koyo 54mm radiator, spa fans and a full shroud. As I read, I don't necessarily need a shroud correct? Could I just drill holes in the shroud to increase air flow at higher speeds since the fans then are obsolete?
Reply
0
0
07-11-2014, 12:15 AM
#11
Thank you for this write up. I have done every single thing you have mentioned so far minus the hood ventd. This is my next target to reduce water temps on my turbo nb with ac. When at high speed and the ac on, I creep up in temperature. But when stopped, drops and cools quickly.
I currently have: mtuned reroute, koyo 54mm radiator, spa fans and a full shroud. As I read, I don't necessarily need a shroud correct? Could I just drill holes in the shroud to increase air flow at higher speeds since the fans then are obsolete?
I currently have: mtuned reroute, koyo 54mm radiator, spa fans and a full shroud. As I read, I don't necessarily need a shroud correct? Could I just drill holes in the shroud to increase air flow at higher speeds since the fans then are obsolete?
__________________
Reply
0
0
07-11-2014, 12:26 AM
#12
These questions are asked over and over again and it is great that Emilio took the time to post a comprehensive overview of the facts involved in this process. Airflow is critical - It's really all about airflow and airflow is all about pressure differential.
One of the more meticulous members at the MSM site spent an excruciating amount of time ducting his MSM in a way that kept the OEM look from the front. It's not real practical for a track beast but if you are struggling on the freeway at 80mph, and don't want to hack up your hood or get in and out of parking lots with an EP airdam and splitter, give it a read:
Radiator / Intercooler ducting
Emilio - not that you need any more props but...
Reply
0
0
07-11-2014, 12:41 AM
#13

I for one am still confused about the VVT engines and coolant reroutes. There are a multitude of places that talk about the redesign of the head gasket in 01 and that if you reroute the coolant you will create a big flow imbalance (inherent to the revised head gasket design which attempted to alleviate cooling imbalance in stock configuration) With that being said, what is the proper way to do a coolant reroute on the VVT motor, WHILE using the VVT gasket? From the research I have done, a normal/simple reroute like "Mike the King" or whoever the youtube guy is will be less than optimal for the vvt gasket cars. I have heard in passing that the BEGI design and Mtuned design MIGHT potentially work better and have less imbalance. Thoughts, opinions, advice, real world knowledge? Thanks!
Reply
0
0
07-11-2014, 12:47 AM
#14
Cpt. Slow

iTrader: (25)
Join Date: Oct 2005
Location: Oregon City, OR
Posts: 14,175
Total Cats: 1,129
Peeps who have done no testing or research panicked with the thought of less coolant holes and a reroute. I doubt any engines have blown up solely because of this combo.
Emilio- I noticed the stark difference between NA and NB overflow containers while taking apart my MSM. Any benefit to one or the other?
Emilio- I noticed the stark difference between NA and NB overflow containers while taking apart my MSM. Any benefit to one or the other?
Reply
0
0
07-11-2014, 11:01 AM
#15

On a new vane, the trackspeed huge 72mm core cross flow triple pass is the highest heat transfer radiator you can get off the shelf for a miata right? And this does cover pretty much every car but it takes up another inch of engine bay compared to a 50mm core radiator. Why hasnt anyone made a cross flow, counter flow, triple pass radiator 3 18mm core should be able to shed the same amount of heat as the 72mm trackspeed assuming they used the same quality cores. I'm guessing the fact that practically zero counter flow radiators for cars exists is the main reason. And now Emilio, in pursuit of perfection, has pushed the release date of the super miata cross flow off till next year.
Reply
0
0
07-11-2014, 11:11 AM
#16
About poking holes in shrouds - you can add these flaps from Spal. They'll open up when the shroud is restricting flow but will seal when the fans are pulling. You see them on a number of OE applications. We use them on our shrouds.
The greater the area blocked off by the shroud, the more of them you'll want to use. Two smaller fans will cover more of the rad than one big one, this is pretty much a worst case here (not a Miata application).
The greater the area blocked off by the shroud, the more of them you'll want to use. Two smaller fans will cover more of the rad than one big one, this is pretty much a worst case here (not a Miata application).
Reply
2
2
07-11-2014, 11:22 AM
#17
Junior Member

Join Date: Feb 2012
Location: Atlanta, Ga
Posts: 280
Total Cats: 36
I recently purchased a Garage Vary hood (CF!) for not a huge amount of $$... seemed to have the vent in the right place and the lip in front of it should further reduce the pressure directly behind.... no?
Reply
0
0
07-11-2014, 01:00 PM
#18
Senior Member

Join Date: May 2011
Posts: 638
Total Cats: 76
What's the consensus on the stock oil cooler and stock tb usage. Are those that don't have separate oil coolers still using the filter sandwich plate and the tb coolant lines?
I've got mine setup now with just a bypass from the oil filter cooler sandwich plate directly to the water neck/thermo housing.
Emilio... any plans to release a "Big Cooling Kit" in teh future with a re-route, 949 cross flow, thermostat and the 1.3 bar silicone seal rad cap?
I've got mine setup now with just a bypass from the oil filter cooler sandwich plate directly to the water neck/thermo housing.
Emilio... any plans to release a "Big Cooling Kit" in teh future with a re-route, 949 cross flow, thermostat and the 1.3 bar silicone seal rad cap?
Reply
0
0
07-11-2014, 01:12 PM
#19
Retired Mech Design Engr
iTrader: (3)
Join Date: Jan 2013
Location: Seneca, SC
Posts: 5,009
Total Cats: 856
I am starting this thread in hopes of creating a single repository for the combined community knowledge on how to get the 89-05 Miatas to run cooler. For those of you new to Miatas and/or new to the track, they run hot! A bone stock but perfectly maintained NA6 with A/C will run 230� clt at a steady 70mph on a 100� day. Use full throttle a lot or add a bit of power and you're at 245�. Head gasket lets go at around 255�. Not everyone will agree with our conclusions but this is a compilation of the important stuff and general consensus from those who have direct personal experience and have done some testing.
The cooling system will be most efficient when it relies on conduction CONVECTION. That is direct contact with the hot/cold masses. That means getting all the hot coolant (reroute) to the core (efficient core design) then blasting it with as much cold air as possible (ducting, sealing). The radiator also transfers heat by simple radiation. Even with zero airflow you will feel infrared radiation (heat) above the core when you open the hood. Similarly, the top of the rad will be a bit hotter than the bottom from convection. Focus on conduction CONVECTION].
The two primary and endemic weaknesses in the Miata OEM cooling system are poor airflow and the poor coolant path through the engine.
Radiator size
OEM manual 12mm thick, auto is 16mm. Most aftermarket OEM replacement radiators are the 16mm auto version. Thicker is always better up to a point. Too thick and the rear of the core isn�t getting enough airflow to efficiently reject heat. It ends up working more like a heat sink just radiating through convection RADIATION more than conduction CONVECTION but every bit helps. We like 30-40mm for <250whp cars with good airflow but no hood vents. Add A/C, FMIC without hood vents and you will overheat on track regardless of how thick the core is because of the poor airflow. Spec Miatas are not allowed a reroute so they run massive 50-60mm cores to hold temps at bay. The filled weight difference between a high efficiency 32mm and the bulkiest 55+mm SM style core is about 6 lbs. For 300whp+ track cars with FMIC, excellent airflow, reroute, vented hood and all the tricks, you will likely still need a whopper 50mm+ crossflow. The best 50mm+ crossflows have the advantage of excess cooling capacity that can allow a lower HP car to skip some of the other cooling system mods and still keep temps low. The price for that luxury is extra weight on the nose and the additional cost of the big core. It is always more efficient to improve airflow before adding core thickness. Each tuner needs to decide what will work best for their needs.
Radiator construction
-Material
The OEM has an aluminum core with plastic tanks. While plastic is light, it is a poor conductor of heat. Even though the tanks are only responsible for a very small portion of heat rejection, every little bit counts. Virtually every aftermarket high performance Miata radiator is all aluminum. This is the material of choice. The OEM Miata black plastic radiator tank turns a brown color when it�s old and brittle. Then it turns a yellow color right before it falls to pieces. These faded OEM radiator are time bombs, just waiting to burst. If your plastic Miata radiator isn�t black, don�t take it to the track. Some aftermarket radiators are brass, copper and or steel. Avoid these like the plague. Besides being obscenely heavy, these black bettys are not as efficient as a plain jane Koyo OEM plastic/aluminum replacement radiator.
-Type
The OEM radiator is a downflow. Meaning coolant flows into a top mounted tank then siphons down through the vertically arranged tubes to the bottom tank. From there the cooled coolant exits back the water pump via the lower hose. Many high performance race car applications (not just Miatas) utilize crossflow radiator designs. The crossflow has its tanks on the sides. Coolant enters the top of the side mounted tank. Coolant then flows across the core laterally to the tank on the other side. Coolant exits the bottom of that end tank. The primary advantage of a crossflow is that the coolant spends more time in contact with the tubes in the core. Some crossflows partition the lateral segments of the core so the coolant flows across to the exit tank, back across to the inlet tank, then back across to the exit tank. This is known as a triple pass. While this type of core increases the time coolant spends in the core, it also raises internal resistance to flow. This increase in resistance makes the water pump work harder, sapping power, and sometimes requires modification of the pressure controlling hardware of the system to maintain function and prevent leaks. Crossflow radiators cost more to make than traditional downflow radiators. In a Miata that was never designed for a crossflow, it�s common to need minor modifications to OEM shrouds, fan mounts or other radiator mounting hardware to get the crossflow integrated.
Coolant path
The B series Miata engine started life in the fwd Mazda GLC about 30 years ago. Like all inline 4 cylinder engines, the coolant entered one end of the block and exited the other end from the head. Mazda wanted improve weight distribution so they shoved the B6 as far back as they could. On the assembly line, the body is lowered over the chassis with engine already on it. To keep the engine further aft, Mazda relocated the outlet to the same end of the engine as the inlet at the front. This flow path does a poor job of scavenging all the heated coolant out of the head effectively and contributes to the overheating problem. In 2008 we worked with a vendor to develop the coolant reroute to solve that problem. The reroute does just that directing the coolant flow out the back of the head as Mazda intended.
Airflow
The airflow is so bad on a stock Miata that they can overheat just running a sustained high cruising speeds on a hot day with the A/C on.
-Leaks
First off is sealing or blocking all the gaps around the radiator where precious cooling air can leak around the side of core. Under the radiator, along the sides and the gaping hole where the hood latch resides. This leakage poses two problems. One, it means less air through the core. Two, it pressurizes the engine compartment. This pressurization makes it harder for the air being forced in from the front to make it�s way through the radiator core.
-Undertray
It�s common for modified Miatas to have their OEM under trays missing or cut up for intercooler piping. Unfortunately, this allows the air being stuffed under the car to creep up in to the engine bay at speed and , you guessed it, pressurize the engine bay. This has the same detrimental effect on pressure differential across the radiator that the leakage has. An intact OEM under tray works great. Even better is a flat undertray that covers the entire bottom of the car from the front axle centerline to the front bumper skin. This is often just a 3/16� Birch plywood sheet cut to fit, roughly in the shape of a mushroom. DIY attachment and you are good to go. Visit the DIY aero thread for info on attaching under trays.
-Hood vents
With a good undertray, leaks sealed, reroute and high performance radiator an N/A up to about 170whp can stay cool even drafting in 100� heat. Start going above 200whp and hood vents are needed to increase airflow. Go above 300whp and you need the highest performance radiator available too. $200 Chinese ebay specials need not apply. Hood vent location is critical. There are a few images on this forum mapping the areas of low pressure across the hood. Put the vent in the wrong place and you will actually shove air back in and make the cooling worse. In general, a loaf of bread sized area just in front of the valve cover but behind the fans is good. The other good area is two angle areas starting at the front corners of the valve cover and extending about a third the way back towards the hood latches. Combine them together and you get a sort of flat bottomed �V� shape. Kickers or spoilers help a bit but really all you need is a hole with maybe some mesh on it to keep rocks out. Hood vents make a huge difference in airflow through the radiator as they extract from the engine bay. The OEM aluminum hood is a scant 14lbs and very stiff. It needs to be stiff as there is significant aero lift across its surface. Make and aftermarket hood to flexy and it will lift enough at speed to see a 3� gap along the side. Not good. The only �carbon� hood that are actually lighter and as stiff as the OEM are vacuum bagged dry carbon prepreg and quite expensive. In our shop, we simply hack up OEM hoods as they end up being light and stiff enough while being a fraction of the cost of the sexy dry carbon hoods.
-Adding more cooling intakes
This never works. The opening in the OEM bumper skin is already larger than it needs to be to meet the area requirements of the radiator. What we see too often is these �cooling intakes� bypassing the radiator and actually dumping into the engine bay. The thought is � I�ll cool the engine�. What actually happens is that high pressure air mass packing into the engine bay makes it harder for the high pressure air trying to make its way through the radiator to well, get through. The result is reduced airflow. The engine itself is a sucky radiator. Let the coolant and radiator to DO the thermal conduction CONVECTION.
-Hood risers
Very effective at ramming more high pressure air into the engine bay and reducing the radiators efficiency at speeds over about 15mph. Great when parked but that's about it. In a word, don't.
The Details
Radiator cap
Make sure your radiator cap is new. We have seen many and engine blow because it had a fancy rerouted cooling system but and old worn our radiator cap. If it leaks just a bit, it allows too much bypass into the reservoir then doesn�t suck it back in when the engine cools. The result is your coolant level dips on every heat cycle until the rad is half full but your reservoir still has some in it. Boom. We like 1.3 or 1.4bar caps with heat resistant silicone seals as opposed to the OEM 1.1bar cap with EPDM rubber seals.
Coolant
While antifreeze has a higher boiling point, it doesn�t reject heats as well as plain water. Most racing sanctioning bodies do not allow any antifreeze in a road race car since it�s damned slippery when it gets onto the track. We use distilled water, half a bottle of Redline water wetter, and splash of antifreeze. Why the anti freeze? To help reduce corrosion and also allows the drivers /crew to more quickly catch tiny coolant leaks. That sharp smell gives it away faster than plain water does.
Head gasket
Mazda recognized the cooling issues and altered the head gasket in the 01-05 "NB2" VVT (BP6D) engines. This change restricted the coolant flow to 1-2 cylinders thereby increasing flow to 3-4. Bandaid fix that doesn't really solve the problem of the backwards coolant flow. It's OK to use a reroute in an NB2 engine. If you have the engine apart already, further improvements in flow can be made by swapping in the 94-00 # BP26-10-471 head gasket. We run this HG on all of our VVT engines.
Burping
Even an OEM system can get air bubbles in it. With a modified high performance cooling system, you might have an air bubble in the thing and never know it until the first time you get it really hot. It will often run cool even half empty. First really hot day.. Boom. After opening the cooling system or modifying it, raise the front of the car and run the car until the thermostat opens to make sure you get all the air out. With a reroute, you need to really raise the front of the car, at least 10� higher than the rear, when bleeding it.
Thermostat
The OEM Miata ECU begins to reduce ignition advance and add fuel when the coolant rises past 200-210� depending on the year. Both of these correction table adjustments reduce power. Best power and fuel economy with the stock ECU comes when the coolant temps are kept around 200�. The OEM 195� thermostat is a good place to start with a stock ECU. With an aftermarket ECU or reflashed OEM ECU (Spec Miata), a 180� or even 170� thermostat can unlock a few more hp. We like the Stant �SuperStat� line of thermostats provide the highest peak flow and temp reduction. The 45868 180� SuperStat fits all years 89-05 and is what we use in our coolant reroute.
Fans and shrouds
On a track car, only one fan is needed and no extra shrouds. We use one OEM fan and call it a day. Any extra shrouding actually inhibits high air flow mass at higher speeds on cars with adequate ducting. There is a sort of minimum air flow mass required to cool a high hp track car. Add full coverage shrouds for low speed, light load street cooling problems and you are handicapping high speed, high load airflow. On cars that are more street oriented, have A/C and big power, fans can help bandaid airflow enough to keep it alive if it never goes on track. If that same car that requires massive dual fans to survive on the street ever gets driven in anger on the track.. it�s a better idea to ditch the shrouds, start cutting up the hood and improve ducting through the nose. You will rarely see fans and full coverage shrouds on a purpose built racecar unless it's an offroad car where low speeds and debris are concern for an externally mounted core.
I edited the quote from your original post as there is a bit of confusion on the terms "conduction" and "convection". Conduction pretty much is isolated to heat flow in solid material. Whenever heat is transfered to particles, and then the particles move, therefore moving the heat energy, that is Convection. Convection can be natural (due to "hot air rises") or forced, as in circulation of coolant.
As an example, in the radiator, the coolant brings in the heat... convection... and passes it to the tubes ...convection... then the heat moves through the walls of the tubes and into the fins ...conduction... then from the surface of the tubes and fins to the air ...convection... and out of the compartment ...convection.
Minor editorial commentary.
DNM
Reply
2
2
07-11-2014, 01:37 PM
#20
What's the consensus on the stock oil cooler and stock tb usage. Are those that don't have separate oil coolers still using the filter sandwich plate and the tb coolant lines?
I've got mine setup now with just a bypass from the oil filter cooler sandwich plate directly to the water neck/thermo housing.
Emilio... any plans to release a "Big Cooling Kit" in teh future with a re-route, 949 cross flow, thermostat and the 1.3 bar silicone seal rad cap?
I've got mine setup now with just a bypass from the oil filter cooler sandwich plate directly to the water neck/thermo housing.
Emilio... any plans to release a "Big Cooling Kit" in teh future with a re-route, 949 cross flow, thermostat and the 1.3 bar silicone seal rad cap?
I think you mean the oil warmer. That giblet does nothing to reduce oil temps. Not a single track car in our shop has one. We typically use a Mocal thermostat sandwich plate and generic Chinese temp sender plate (Glow-shift, Greddy, etc)) stacked. TB coolant lines always capped off.
__________________
Reply
1
1


