
Post your DIY aero pics
 09-19-2012, 10:51 PM
#201

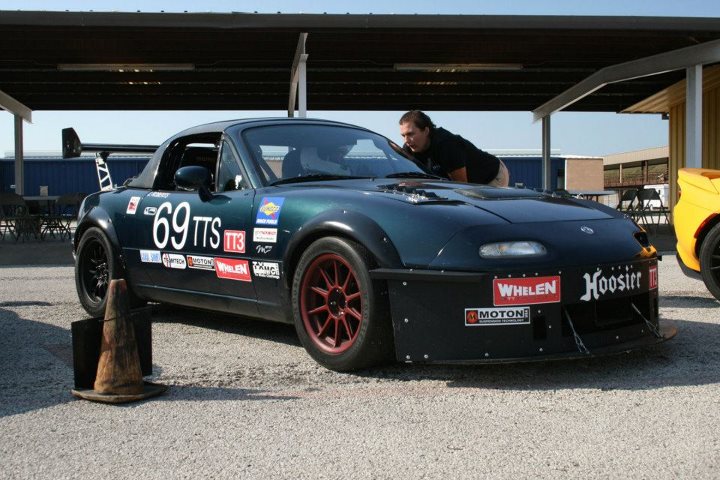
I've been wanting to build some aero stuff all year, so when I saw that only 3 other cars were registered in my class for NASA Nationals and I wasn't going to be eligible for Hoosier contingency, I said what the hell and decided to treat nationals as a bit of a test day.
Note: I started on this stuff the sunday before nationals (which started Wednesday night), and since I don't have a truck, was limited to home depot parts I could fit in the trunk of my daily driver E30. None of this is a "final" product... just testing/playing around. Feel free to make fun of how jank the bumper is lol.
Dollars spent: $400ish for everything.- Got lucky and found someone that thought they were selling a "show" quality NASCAR wing for $300 on ebay, but it was a race quality one.
How effective:2 =slightly better.
Materials used: Below
Bracket location:Below
Tracks tested on: Mid-Ohio
Race/TT class built for: NASA TTE
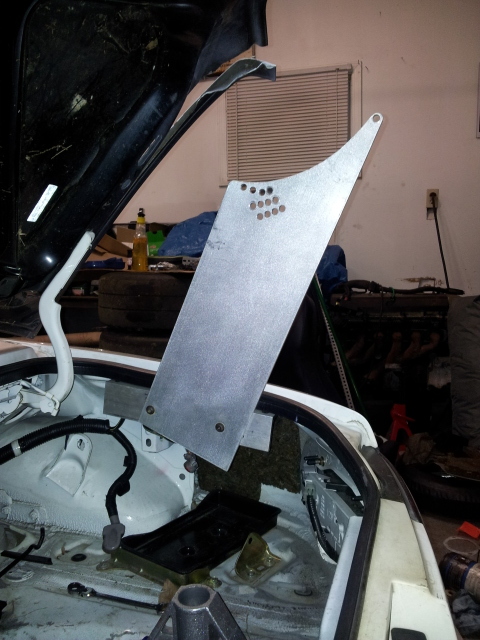
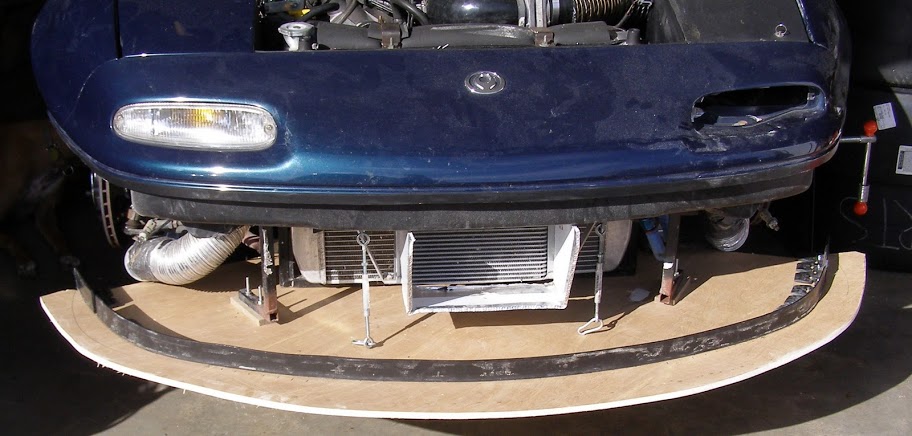
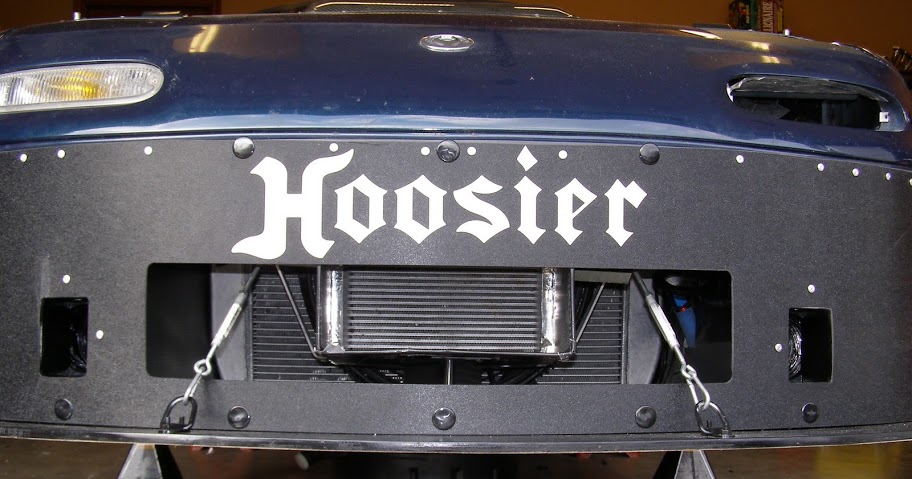
Undertray: 1/2" Birch, mounted and stiffened with perforated steel angle from home depot. The perforated angle was actually pretty awesome- no drilling for mounting holes, and since it has so many holes it's surprisingly lightweight for steel. I removed ALL of the structure for the front bumper beam (including the two stamped metal boob pieces), and mounted the front of the undertray with 2 vertical pieces of angle. Rear is bolted to two of the factory tabs under the steering rack.
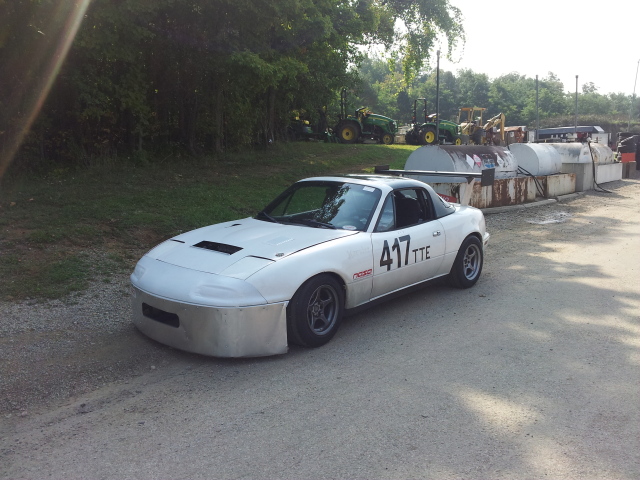
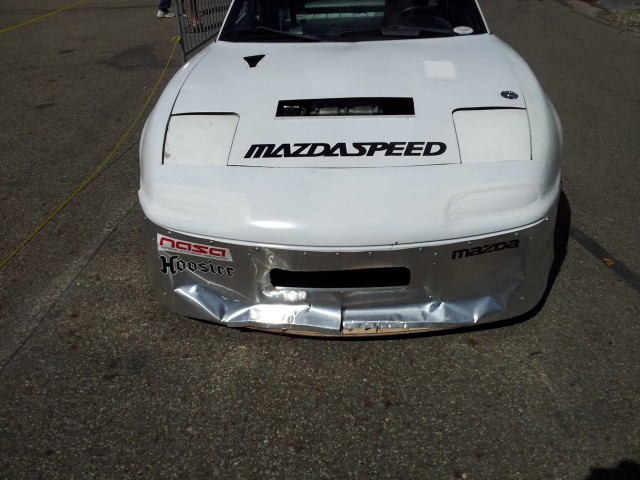
Bumper: Hacked up stock bumper. Air dam made from 14" wide aluminum roof flashing, which left 2" of ground clearance on my baby 13" tires. The roof flashing is way too thin and caved in at speed. I ended up buying more aluminum angle at home depot while at mid-ohio and adding a bunch of stiffening ribs to the back side, but it still gave up on sunday. Next attempt will be 1/8" ABS plastic. Also, 2" is not enough clearance with 700/400 spring rates. It hit the ground multiples times in the paddock, and my friends said they could hear it scraping in the braking zones while I was on track lol.
Wing: NASCAR element off ebay. Super nice wing. I drew it up in CAD so that I could get a good hole pattern arrangement with good adjustment, then made the mounts out of 1/4"x6" aluminum plate and 1/4"x2" aluminum angle bolted to the rain rails in the trunk. Extremely sturdy. I'll probably make a new set this winter to move the wing further back, since it looks a little weird in it's current location. End plates were made out of some 1/4" ABS plastic that I had laying around.
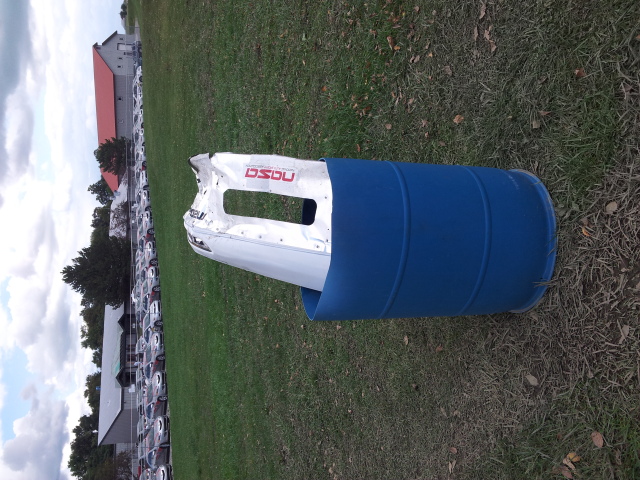
Hood: Radiator hole with aluminum angle bolted to the front edge to get a little lower pressure going, home depot louver on the header side, and NACA duct feeding the intake on the pass side. It looks pretty ghetto up close, but I saw a huge drop in IATs.

Had to make it a proper '91! lol

And finally, why $12 aluminum flashing may seem appealing, but is actually a **** idea.
Final impression: I tried the wing with my stock front bumper on thursday and the car had some scary understeer, as expected. Mounted the front end stuff on thursday night, pulled 2-3 degrees out of the wing, and the car felt good enough that I didn't adjust it the rest of the weekend. The GPS antenna on my DL1 died so I don't have any data from this event, but from watching RPM on my video, even with the wing and only 130hp, it looks like I picked up around 200rpm on the back straight thanks to the front end stuff. Looking forward to doing more testing next year.
Note: I started on this stuff the sunday before nationals (which started Wednesday night), and since I don't have a truck, was limited to home depot parts I could fit in the trunk of my daily driver E30. None of this is a "final" product... just testing/playing around. Feel free to make fun of how jank the bumper is lol.
Dollars spent: $400ish for everything.- Got lucky and found someone that thought they were selling a "show" quality NASCAR wing for $300 on ebay, but it was a race quality one.
How effective:2 =slightly better.
Materials used: Below
Bracket location:Below
Tracks tested on: Mid-Ohio
Race/TT class built for: NASA TTE
Undertray: 1/2" Birch, mounted and stiffened with perforated steel angle from home depot. The perforated angle was actually pretty awesome- no drilling for mounting holes, and since it has so many holes it's surprisingly lightweight for steel. I removed ALL of the structure for the front bumper beam (including the two stamped metal boob pieces), and mounted the front of the undertray with 2 vertical pieces of angle. Rear is bolted to two of the factory tabs under the steering rack.
Bumper: Hacked up stock bumper. Air dam made from 14" wide aluminum roof flashing, which left 2" of ground clearance on my baby 13" tires. The roof flashing is way too thin and caved in at speed. I ended up buying more aluminum angle at home depot while at mid-ohio and adding a bunch of stiffening ribs to the back side, but it still gave up on sunday. Next attempt will be 1/8" ABS plastic. Also, 2" is not enough clearance with 700/400 spring rates. It hit the ground multiples times in the paddock, and my friends said they could hear it scraping in the braking zones while I was on track lol.
Wing: NASCAR element off ebay. Super nice wing. I drew it up in CAD so that I could get a good hole pattern arrangement with good adjustment, then made the mounts out of 1/4"x6" aluminum plate and 1/4"x2" aluminum angle bolted to the rain rails in the trunk. Extremely sturdy. I'll probably make a new set this winter to move the wing further back, since it looks a little weird in it's current location. End plates were made out of some 1/4" ABS plastic that I had laying around.
Hood: Radiator hole with aluminum angle bolted to the front edge to get a little lower pressure going, home depot louver on the header side, and NACA duct feeding the intake on the pass side. It looks pretty ghetto up close, but I saw a huge drop in IATs.
Had to make it a proper '91! lol
And finally, why $12 aluminum flashing may seem appealing, but is actually a **** idea.
Final impression: I tried the wing with my stock front bumper on thursday and the car had some scary understeer, as expected. Mounted the front end stuff on thursday night, pulled 2-3 degrees out of the wing, and the car felt good enough that I didn't adjust it the rest of the weekend. The GPS antenna on my DL1 died so I don't have any data from this event, but from watching RPM on my video, even with the wing and only 130hp, it looks like I picked up around 200rpm on the back straight thanks to the front end stuff. Looking forward to doing more testing next year.

Reply
 1
1

1
09-19-2012, 10:57 PM
#202
Good to know. I was thinking the guys used epoxy on the foam mold for the seat we attempted to make for our SAE car, but maybe they used polyester. Or maybe it was just a different kind of foam. Whatever it was that they used, it did a number on the foam, so I just made a mental note to never mix resin and foam.
Reply
0
0
09-19-2012, 11:50 PM
#204

I've used epoxy like the, west systems kit and it works fine. Polyester resin, like the bondo stuff you buy at autozone will melt it.
Also, for air dam material, you're basically a moron to not use this stuff. http://www.speedwaymotors.com/Colore...0-Ft,1557.html Enough to make enough air dams for you and all your friends.
Also, for air dam material, you're basically a moron to not use this stuff. http://www.speedwaymotors.com/Colore...0-Ft,1557.html Enough to make enough air dams for you and all your friends.
Last edited by Leafy; 09-20-2012 at 12:00 AM.
Reply
0
0
 10-05-2012, 07:57 AM
#207
Senior Member

Join Date: Aug 2009
Location: melbourne aus
Posts: 515
Total Cats: 92
I have made another aero bit.
Cost $$ still rising
I found with the slickback on the hardtop it allowed the wing to work better. So we will be testing the new proper fastback in a few weeks.
Cost $$ still rising

I found with the slickback on the hardtop it allowed the wing to work better. So we will be testing the new proper fastback in a few weeks.
Reply
1
1
10-05-2012, 08:11 AM
#208
God I hit the $$$$ this is costing significantly more than I intended and taking way longer. I thought I'd have the wing sections done by now. NOPE I just got the 2nd plane foam core together. Tonight should consist of homework and getting the main plane foam core together and hopefully getting a layer of glass on each plane.
Reply
0
0
10-05-2012, 05:42 PM
#210
Senior Member
Join Date: Aug 2009
Location: melbourne aus
Posts: 515
Total Cats: 92
God I hit the $$$$ this is costing significantly more than I intended and taking way longer. I thought I'd have the wing sections done by now. NOPE I just got the 2nd plane foam core together. Tonight should consist of homework and getting the main plane foam core together and hopefully getting a layer of glass on each plane.
Reply
0
0
10-07-2012, 06:39 PM
#212
Junior Member

Join Date: Dec 2009
Posts: 110
Total Cats: 28
Custom made front splitter.
To work better with the lip and seal better i fiberglass in an aluminum angle infront of where the lip sits to divert air over instead of through the gap. Its also strong enough for me to stand on and bounce up and down
Testing it out on thursday at Queensland Raceway so hopefully i can notice a difference
Reply
1
1
 10-07-2012, 08:23 PM
#214
Tour de Franzia

iTrader: (6)
Join Date: Jun 2006
Location: Republic of Dallas
Posts: 29,085
Total Cats: 375
Custom made front splitter.
To work better with the lip and seal better i fiberglass in an aluminum angle infront of where the lip sits to divert air over instead of through the gap. Its also strong enough for me to stand on and bounce up and down
Testing it out on thursday at Queensland Raceway so hopefully i can notice a difference
To work better with the lip and seal better i fiberglass in an aluminum angle infront of where the lip sits to divert air over instead of through the gap. Its also strong enough for me to stand on and bounce up and down
Testing it out on thursday at Queensland Raceway so hopefully i can notice a difference
Reply
0
0
 10-08-2012, 05:53 PM
#217

Custom made front splitter.
To work better with the lip and seal better i fiberglass in an aluminum angle infront of where the lip sits to divert air over instead of through the gap. Its also strong enough for me to stand on and bounce up and down
Testing it out on thursday at Queensland Raceway so hopefully i can notice a difference
To work better with the lip and seal better i fiberglass in an aluminum angle infront of where the lip sits to divert air over instead of through the gap. Its also strong enough for me to stand on and bounce up and down
Testing it out on thursday at Queensland Raceway so hopefully i can notice a difference
Reply
0
0
10-09-2012, 10:28 PM
#220
Elite Member
iTrader: (15)

Join Date: Dec 2007
Location: San Antonio, Texas
Posts: 4,847
Total Cats: 27
Great thread, again!
For the earlier question about who allows unlimited aerodynamic mods, the TTS,U,R classes in NASA are set up this way. There are some minor restrictions, like no movable surfaces are allowed (and they just added that for 2012. Too bad, because I was contemplating a poor man's DRS). Anyway, a rear diffuser, undertray and side skirts would be class legal for my car, and I am considering adding all three for next year's racing season (in that order).
DIY aero summary of what I have so far:
- 3/8" birch plywood splitter (for some reason 3/8" birch is hard to find here now). DIY fabricated mounts attached to the tow hook attachment points, and Lowe's Racing aluminum turnbuckles attached to holes in the stock bumper. I can stand on it, works great, and it definitely balances out the rear wing.
- 1/8" ABS front air dam. DIY brake duct flanges made from PVC plumbing parts at Lowe's Racing.
- Fully sealed front nose using coroplast. All air flow is forced through the radiator. The car does not overheat on the track in South Texas 100F heat (320 RWHP LS1).
- Oil cooler duct made from coroplast. This made a big difference with oil temperatures versus just having it in the same place with no ducting.
- Rear wing is a NASCAR COT wing. I love it. It is attached to the trunk with aluminum L-brackets and some APR uprights I had from my previous dual-element wing. Since I gutted most of the trunk frame, I reinforced the mounts underneath with form-fitting thermoset structurally anisotropic composite (chopped fiberglass Bondo).
- The fender flares are Autokonexion Version 1 units.
- Hood vents are a Carbontrix hood vent, and side vents are very inexpensive plastic units available at larger boating supply stores.
- No rear window in the hard top yet. I have been holding off to build a fastback type unit and will be totally stealing, er I mean building a homage tribute of lightyear's approach. Like with the ABS air dam, I had been brainstorming this sort of thing, and now that someone else has done it I can see that it looks pretty damn cool and, more importantly, effective for a track car. I need to get with it already and build one.
All of this was tested to 145+ mph (5 Hz GPS logged with Trackmaster) which is the highest speed I have reached so far at the end of the front straight at TWS. Point being, it is all sturdy and it all works.
Total spent, say ~$900 with most of that being the cost of the COT wing, fender flares, and Carbontrix hood vent (impulse buy).
Beating up on TT NARRA Vipers worth a lot more money than my little Miata, priceless.
The splitter with the main supports visible, and the front nose cut off to make way for the ABS air dam.
Closer view of the nose
Sitting on the grid waiting for my TT session at the TWS NARRA race. Holy $^it they required a lot of sponsor stickers.
Yeah, I just passed that Viper

Gratuitous podium shot. Me in second place on the left. Incidentally, first place in the middle is Chris, also in a V8 Miata, very nicely built and tuned by Perryrace at miata.net. Chris broke the TWS NARRA TT-3 class lap record, and spanked a lot of very expensive Vipers in the process. It was a glorious weekend for Miatas, especially considering I was a riff-raff poor-man racer compared to the serious $$$ hardware most of the field showed up with.

Video of my fast lap for the weekend. There were at least two more seconds in the car, but I had been struggling with suspension tuning issues which I figured out too late (to get in some faster lap times). Instructing, driving, and tuning/wrenching as a one-man operation makes for a busy weekend. Whatever, good enough for 2nd place and some free Hoosiers. Ignore the dash speedometer because it is not calibrated correctly.
What is the point of all this information? DIY Aero FTW!
For the earlier question about who allows unlimited aerodynamic mods, the TTS,U,R classes in NASA are set up this way. There are some minor restrictions, like no movable surfaces are allowed (and they just added that for 2012. Too bad, because I was contemplating a poor man's DRS). Anyway, a rear diffuser, undertray and side skirts would be class legal for my car, and I am considering adding all three for next year's racing season (in that order).
DIY aero summary of what I have so far:
- 3/8" birch plywood splitter (for some reason 3/8" birch is hard to find here now). DIY fabricated mounts attached to the tow hook attachment points, and Lowe's Racing aluminum turnbuckles attached to holes in the stock bumper. I can stand on it, works great, and it definitely balances out the rear wing.
- 1/8" ABS front air dam. DIY brake duct flanges made from PVC plumbing parts at Lowe's Racing.
- Fully sealed front nose using coroplast. All air flow is forced through the radiator. The car does not overheat on the track in South Texas 100F heat (320 RWHP LS1).
- Oil cooler duct made from coroplast. This made a big difference with oil temperatures versus just having it in the same place with no ducting.
- Rear wing is a NASCAR COT wing. I love it. It is attached to the trunk with aluminum L-brackets and some APR uprights I had from my previous dual-element wing. Since I gutted most of the trunk frame, I reinforced the mounts underneath with form-fitting thermoset structurally anisotropic composite (chopped fiberglass Bondo).
- The fender flares are Autokonexion Version 1 units.
- Hood vents are a Carbontrix hood vent, and side vents are very inexpensive plastic units available at larger boating supply stores.
- No rear window in the hard top yet. I have been holding off to build a fastback type unit and will be totally stealing, er I mean building a homage tribute of lightyear's approach. Like with the ABS air dam, I had been brainstorming this sort of thing, and now that someone else has done it I can see that it looks pretty damn cool and, more importantly, effective for a track car. I need to get with it already and build one.
All of this was tested to 145+ mph (5 Hz GPS logged with Trackmaster) which is the highest speed I have reached so far at the end of the front straight at TWS. Point being, it is all sturdy and it all works.
Total spent, say ~$900 with most of that being the cost of the COT wing, fender flares, and Carbontrix hood vent (impulse buy).
Beating up on TT NARRA Vipers worth a lot more money than my little Miata, priceless.
The splitter with the main supports visible, and the front nose cut off to make way for the ABS air dam.
Closer view of the nose
Sitting on the grid waiting for my TT session at the TWS NARRA race. Holy $^it they required a lot of sponsor stickers.
Yeah, I just passed that Viper
Gratuitous podium shot. Me in second place on the left. Incidentally, first place in the middle is Chris, also in a V8 Miata, very nicely built and tuned by Perryrace at miata.net. Chris broke the TWS NARRA TT-3 class lap record, and spanked a lot of very expensive Vipers in the process. It was a glorious weekend for Miatas, especially considering I was a riff-raff poor-man racer compared to the serious $$$ hardware most of the field showed up with.
Video of my fast lap for the weekend. There were at least two more seconds in the car, but I had been struggling with suspension tuning issues which I figured out too late (to get in some faster lap times). Instructing, driving, and tuning/wrenching as a one-man operation makes for a busy weekend. Whatever, good enough for 2nd place and some free Hoosiers. Ignore the dash speedometer because it is not calibrated correctly.
What is the point of all this information? DIY Aero FTW!
Last edited by ZX-Tex; 10-09-2012 at 11:12 PM.
Reply
1
1


