
Some Seam Weld Photos
 08-19-2011, 07:37 AM
#41
I'm Miserable!
Thread Starter

Join Date: Feb 2010
Posts: 583
Total Cats: -1
Why would an X be more torsionally rigid than a box?
The spectrograph measures vibration, which is my primary concern. My goal is more of ride quality. The shimmy/vibration cheapens the car's feel. Not stiffness directly, nor handling - I don't run a track biased super stiff suspension. My miata is a street car / canyon carver.
The spectrograph measures vibration, which is my primary concern. My goal is more of ride quality. The shimmy/vibration cheapens the car's feel. Not stiffness directly, nor handling - I don't run a track biased super stiff suspension. My miata is a street car / canyon carver.
;-)
The X concept is much more efficient at creating torsional rigidity since structure is placed directly along the load path. After all, cars have tires at their four corners which are the only places the entire assembly touches the ground. So that is where road forces are applied to the structure. You can increase torsional strength a number of ways but some are inherently more efficient. When you twist a frame, one diagonal gets stretched (tension) and the other gets compressed.
Just try out my tape example on your car and you'll see what I mean. The one where you tape an X across the car. Roof down, top of windshield diagonally across the car. And the other way too so that an X is formed. Jack the car and see the twist primarily hit one diagonal as exhibited by droop.
Drop by a book store and examine the Herb Adams book Chassis Engineering. In it he shows example car frame made of wooden sticks. He mounts them and then hangs a weight to one corner. This applies a twisting force to the model frame. Which version twists the least? The one with an X.
Edit: Here you can see the model frames being twisted, along with text from the book Chassis Engineering: http://books.google.com/books?id=rY2...page&q&f=false
Last edited by sjmarcy; 08-19-2011 at 07:56 AM.

Reply
 0
0

0
08-19-2011, 01:10 PM
#43
Elite Member

Join Date: Jul 2005
Posts: 6,420
Total Cats: 84
Once in a great while on backroads with rippled surfaces while accelerating I hit a ripple at a frequency close to the chassis torsional resonant frequency. I feel the tire skip. Here's a case where the lack of rigidity affects grip.
I think the spectrograph is very useful for measuring the effect of rigidity mods.
The X concept is much more efficient at creating torsional rigidity
What is the Boxster's structure like? The NC?
Reply
0
0
08-21-2011, 03:17 PM
#44
Newb

Join Date: Jan 2007
Location: Michigan
Posts: 2
Total Cats: 0
Speed bump test. Before (top), After (below). I hit the speedbumps faster this time around, yet the worst peak vibrations (red intensity) is less intense. Also if I look at the center of the worst red spot, the new data shows about 0.2 Hz higher frequency.
I'm pretty convinced it helped, but again, not as much as the STB (based on data) and not as much as the door bars or butterfly (butt-o-meter)
In a fit of industriousness, I may get a round tuit and install my Frog Arms.
Reply
0
0
08-21-2011, 03:31 PM
#45
Elite Member
Join Date: Jul 2005
Posts: 6,420
Total Cats: 84
The thread describing my test setup:
https://www.miataturbo.net/suspension-brakes-drivetrain-49/spectrographic-analysis-chassis-shimmy-59764/
https://www.miataturbo.net/suspension-brakes-drivetrain-49/spectrographic-analysis-chassis-shimmy-59764/
Reply
0
0
03-09-2013, 10:51 PM
#46
Junior Member

Join Date: Jul 2012
Location: Campbell, CA
Posts: 65
Total Cats: 0
Here's an interesting piece of work I found on prodracing.com, "chassis stiffness rule of thumb" thread. Yes, a Miata is not a NASCAR "Cup" car, but this SAE Technical paper is VERY enlightening.
Since adding my EP/D-Prepared cage, there is zero noticeable twist when jacking up my car, but I'm still Jones'n some more cage/tubing from the front hoop to the front strut towers.
Cheers,
Since adding my EP/D-Prepared cage, there is zero noticeable twist when jacking up my car, but I'm still Jones'n some more cage/tubing from the front hoop to the front strut towers.
Cheers,
Last edited by Ski_Lover; 03-11-2013 at 10:48 AM.
Reply
0
0
03-10-2013, 10:12 AM
#47
Senior Member

Join Date: Oct 2011
Location: The Race Track & St Pete FL
Posts: 638
Total Cats: 57
Why not use high density foam in the voids. That is what I'm about to do, not just because making the chassis more stiff, but to keep the water out that keeps getting in there some way. Here is an article I found on the foam by Eric Hsu
Chassis Stiffening - Question It - Import Tuner Magazine
Chassis Stiffening - Question It - Import Tuner Magazine
Reply
0
0
03-10-2013, 02:15 PM
#48

Why not use high density foam in the voids. That is what I'm about to do, not just because making the chassis more stiff, but to keep the water out that keeps getting in there some way. Here is an article I found on the foam by Eric Hsu
Chassis Stiffening - Question It - Import Tuner Magazine
Chassis Stiffening - Question It - Import Tuner Magazine

Reply
0
0
 03-12-2013, 06:48 PM
#51

BTW, to answer some questions posted earlier in this thread - if you look at the bare chassis of various Miatas over the years, you can see the attention Mazda paid to the ends of the transmission tunnel. The flange between the rear bulkhead and the tunnel got bigger and bigger. On a 2001+ car, it's significantly larger than earlier cars. I read somewhere (somewhere legitimate, but I don't recall the exact source) that they actually went to thinner sheetmetal on that rear bulkhead in 2001 thanks to the extra stiffness from elsewhere. There's a photo of the differences in my latest book, I don't have them handy in digital form.
Various braces at the corners of the cockpit got beefed up as well.
About the butt-o-meter - we can really feel the difference in seam-welded cars when we're building the V8s for customers. Never tried to quantify it, but it sure feels good.
Various braces at the corners of the cockpit got beefed up as well.
About the butt-o-meter - we can really feel the difference in seam-welded cars when we're building the V8s for customers. Never tried to quantify it, but it sure feels good.
Reply
0
0
03-12-2013, 07:05 PM
#52

Thanks for the update Kieth. I am doing some seam welding myself. I have not done any welding in the driver compartment because I am doing a cage. I did to the frame rail project however.
I am spending some time on the front of the car where frog arms are often installed. Any input where the welding should be on the front would be helpful from anyone in the know.
I am spending some time on the front of the car where frog arms are often installed. Any input where the welding should be on the front would be helpful from anyone in the know.
Reply
0
0
03-13-2013, 11:38 AM
#53
You can use the diagrams that have been on the FM site for years or the clearer ones in my book.
Flyin' Miata : Tech: Seam welding
Flyin' Miata : Tech: Seam welding
Reply
1
1
03-13-2013, 12:04 PM
#54
Elite Member
iTrader: (37)

Join Date: Apr 2010
Location: Very NorCal
Posts: 10,441
Total Cats: 1,899
A good friend of mine seam welded his 2000 and it made a SIGNIFICANT difference over my unwelded 2000. Our setups are almost exactly the same, except I have the under-fender frog arms. Driving our cars back-to-back mine feels super limpy whereas his is planted and happy.
I WILL be seam welding my car.
I WILL be seam welding my car.
Reply
0
0


 03-13-2013, 12:56 PM
#56
You can use the diagrams that have been on the FM site for years or the clearer ones in my book.
Flyin' Miata : Tech: Seam welding
Flyin' Miata : Tech: Seam welding
My thoughts exactly.
Reply
0
0
03-13-2013, 01:28 PM
#57

So my car is a little different than most here, it is missing the windshield header.
BIG increase in stiffness around the firewall and front of the cockpit came from seam welding. Before you could push down on the area were the wiper arms used to be and feel it move and hear creaking. After the seam welding, there is no more noticeable flex and the creak disappeared.
This was welding the section where the dash bar attaches to the body. I have a straight tube welded instead of the factory curvey tube. I also stitched the braces from the firewall to the tunnel, the firewall to body on the outside and the seams along the bottom of the firewall. *More was done but this section made the most immediately noticeable difference.
Reply
0
0
03-13-2013, 05:33 PM
#59
Cpt. Slow

iTrader: (25)
Join Date: Oct 2005
Location: Oregon City, OR
Posts: 14,175
Total Cats: 1,129
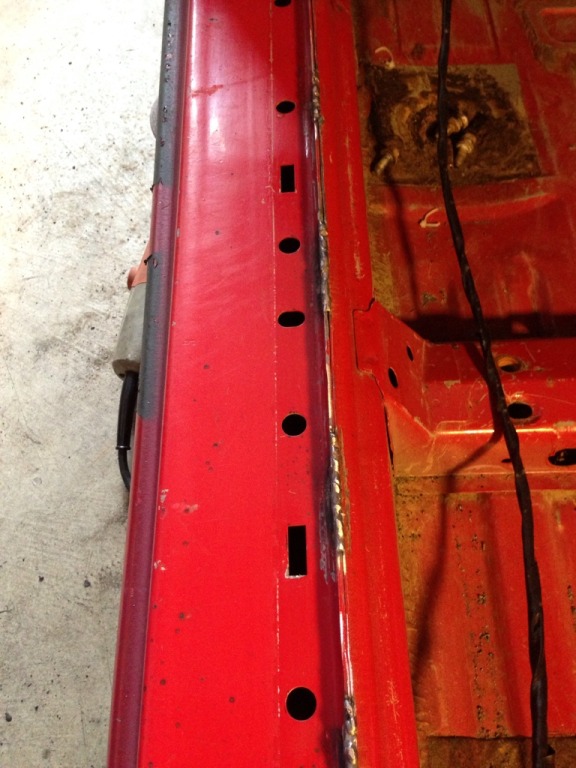
Anybody else have issues with the goo Mazda used to hold on the rubber trim piece? When I got around to welding that part, my welder would splatter and spit horribly.
Reply
0
0
03-13-2013, 05:54 PM
#60
Clean up of paint, seam sealer, and adhesive has been the biggest hurdle in any welding I have done on the body. It is like 3:1 in time investment over welding. Maybe more.
I have had good luck with a wire wheel on a drill. A 90* angle die grinder with a scotch bright pad works pretty good in some areas too. I used various size wood chisles for the globs of seam sealer or undercoating in many spots.
I have had good luck with a wire wheel on a drill. A 90* angle die grinder with a scotch bright pad works pretty good in some areas too. I used various size wood chisles for the globs of seam sealer or undercoating in many spots.
Reply
0
0


