

How to replace your rear wheel bearings without a press


Thread Starter
Newb
Joined: Jul 2010
Posts: 42
Total Cats: 4
I was changing my rear wheel bearings today and thought it might be cool to do it without the press and take some pictures in case anyone wants to attempt this at home. It's a pretty simple process, but a visual walkthrough might help some people so here we go.
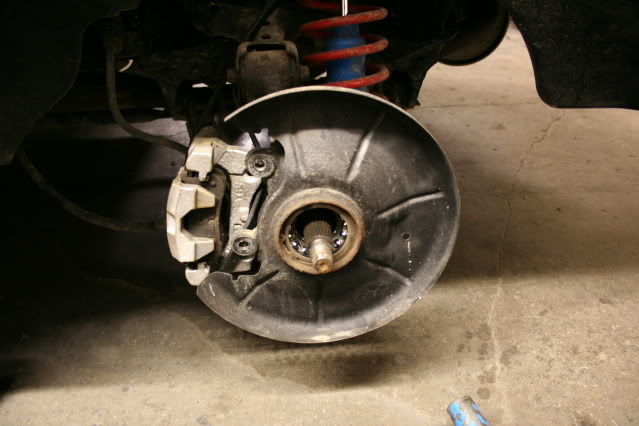
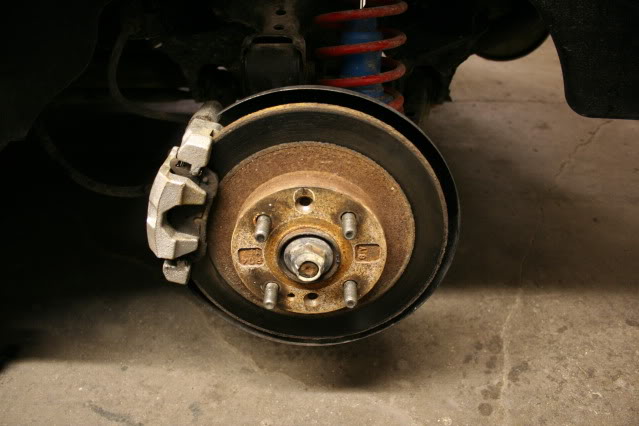
The first step is to take your wheel off.
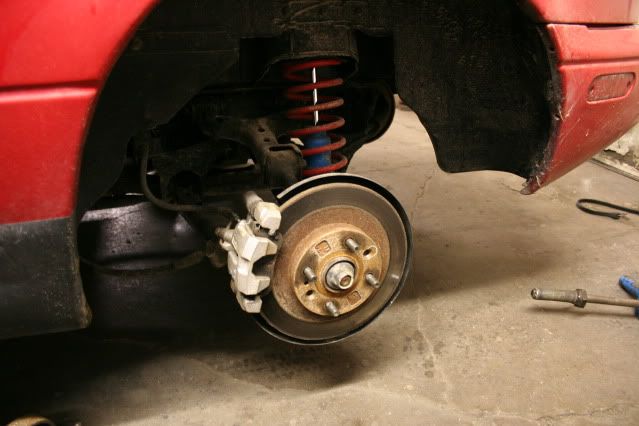
Next, remove the two 14mm bolts that hold your brake caliper bracket and move the whole assembly aside.
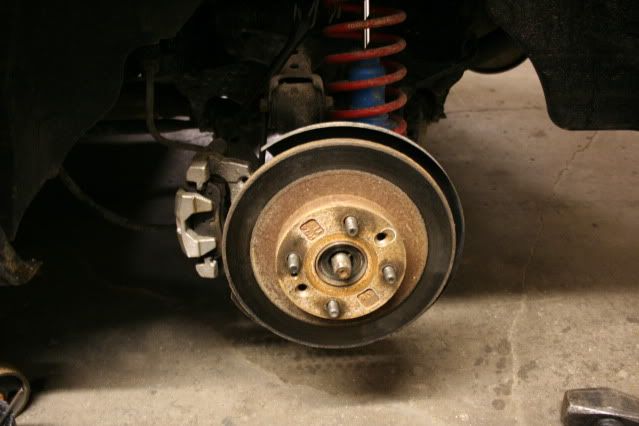
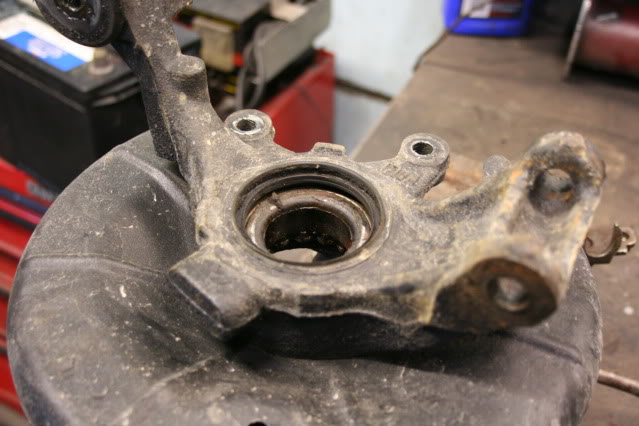
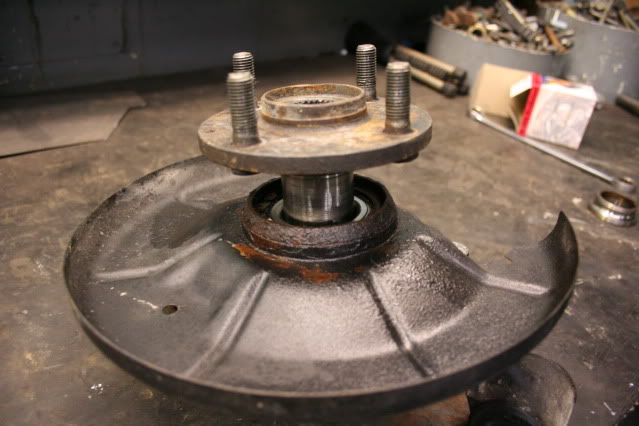
Remove your axle nut and pull the brake rotor off.
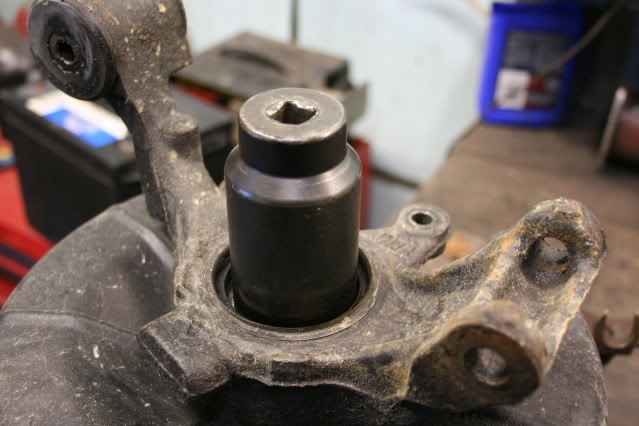
Attach a slide hammer to the lugnuts and give it a couple solid hits to pull the hub out (it's easiest to do this on the car).
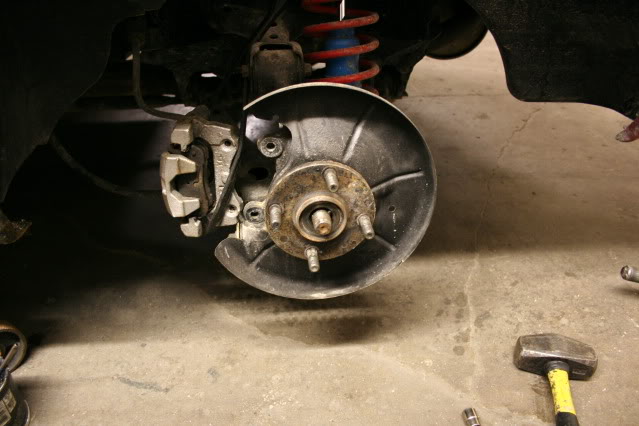
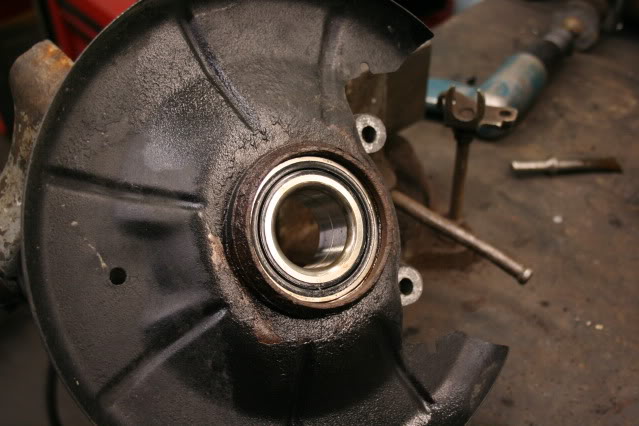
This is what it looks like after the hub has been removed.
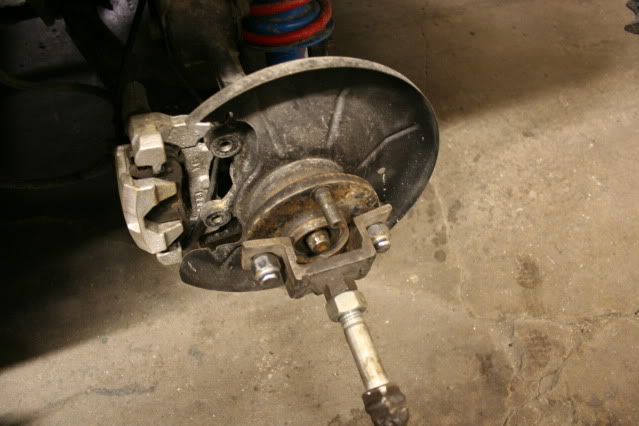
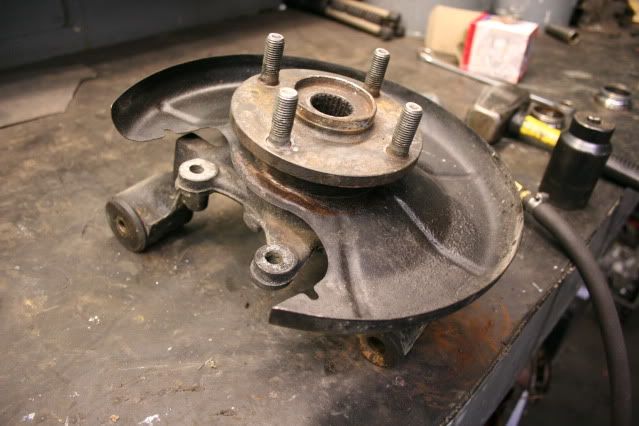
Remove the upper and lower bolts that hold the remaining bearing housing and pull it from the car.
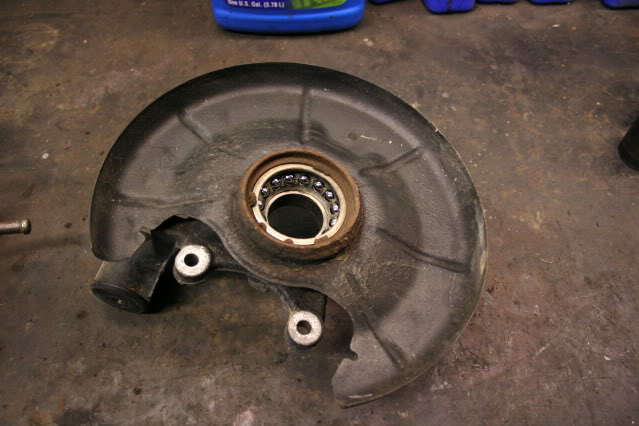
The big c clip that keeps the bearing in the housing will probably be rusted in by now.
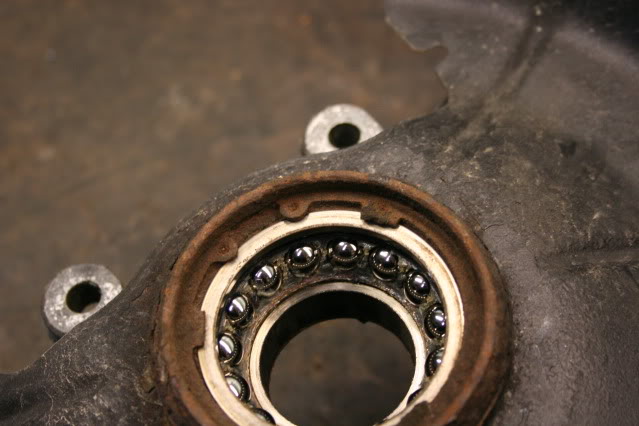
Hit that bad boy with some sort of penetrating oil and give it a few taps with a chisel in the direction show to break it loose.
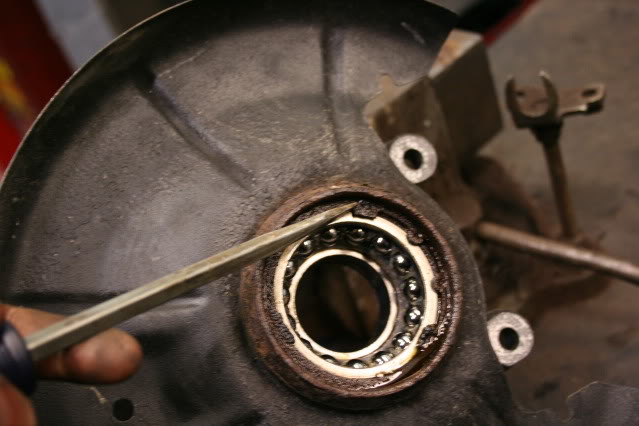
After you have it loose, use some c clip pliers to remove the clip and turn the housing over.
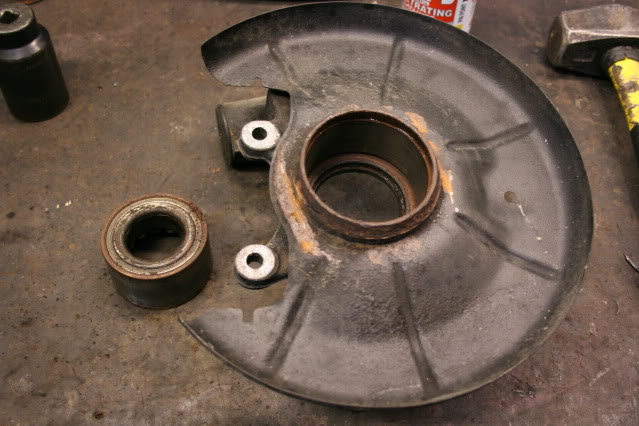
Secure the housing in a vice and knock out the bearing with a hammer and socket/pipe.
This is what it looks like with the bearing removed.
Clean the inner bore of the housing and lightly oil it to help keep the new bearing from binding when it is installed.
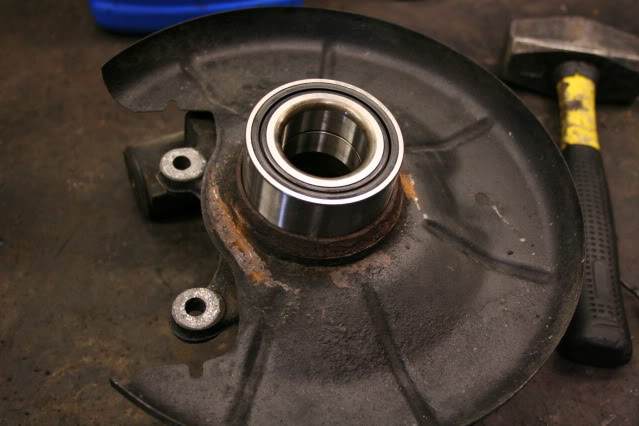
This is an important part, so take your time. Make sure the new bearing is sitting squarely on the housing and lightly tap it into place. Make sure it goes in straight by alternating your taps from side to side on the outside lip of the bearing.
Make sure that you drive it all the way down into the housing, so that the groove for the c clip is exposed. Grease the groove a little and reinsert the c clip.

Remember this guy? We need to get that bearing race off of there before we can put the hub back into the bearing.
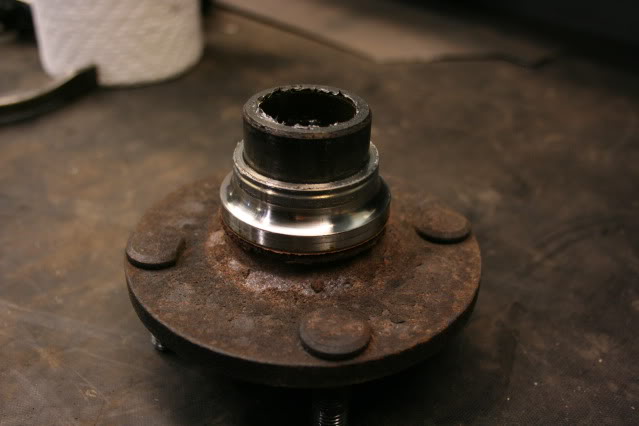
This is the part we are going to remove.

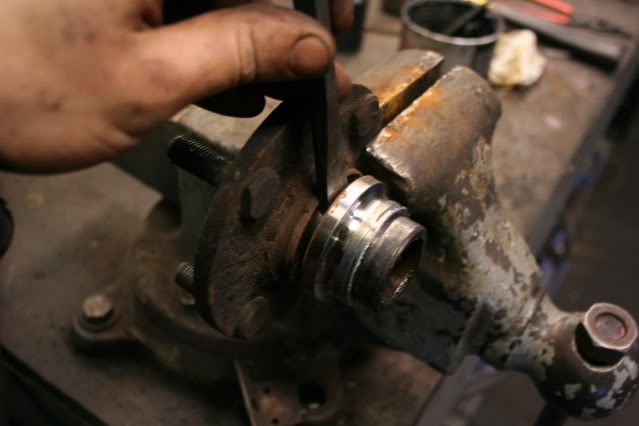
Put the hub in a vice to secure it and use a chisel to drive the race off of the hub.
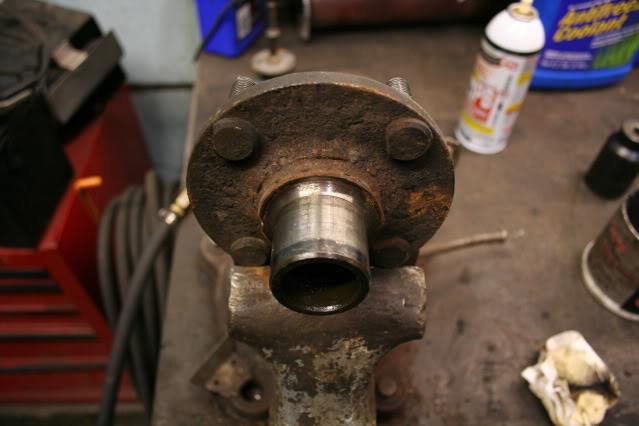
After you remove the bearing race, check the hub for any nicks and file them smooth.
Set the hub squarely on the bearing and start tapping it into place.
Drive it all the way down, using oil if necessary to keep it from binding.
Turn the housing over and check to make sure that the inner bearing race didn't start to pop out the other side, if it did gently tap it back into place.
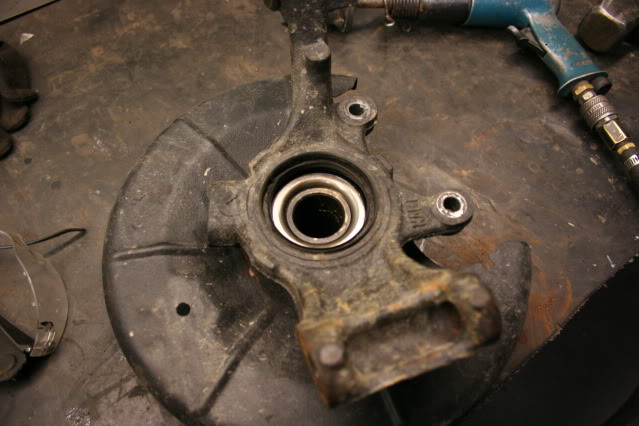
Put the housing back onto the car and reinstall the upper and lower bolts that hold it in place.
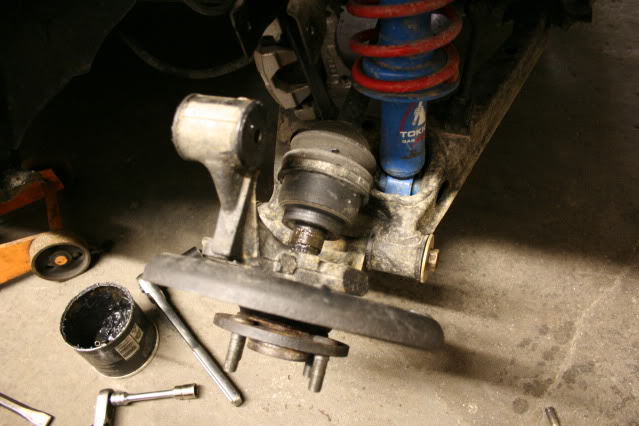
Put the rotor back on and then the brake caliper assembly. Reinstall the two 14mm bolts that hold the caliper bracket in place.
Replace the axle nut and torque it to spec, then use a chisel to peen the nut to the groove in the axle.
That's about all there is to it, I would suggest using an anti-seize compound on all of the bolts and axle splines.
The first step is to take your wheel off.
Next, remove the two 14mm bolts that hold your brake caliper bracket and move the whole assembly aside.
Remove your axle nut and pull the brake rotor off.
Attach a slide hammer to the lugnuts and give it a couple solid hits to pull the hub out (it's easiest to do this on the car).
This is what it looks like after the hub has been removed.
Remove the upper and lower bolts that hold the remaining bearing housing and pull it from the car.
The big c clip that keeps the bearing in the housing will probably be rusted in by now.
Hit that bad boy with some sort of penetrating oil and give it a few taps with a chisel in the direction show to break it loose.
After you have it loose, use some c clip pliers to remove the clip and turn the housing over.
Secure the housing in a vice and knock out the bearing with a hammer and socket/pipe.
This is what it looks like with the bearing removed.
Clean the inner bore of the housing and lightly oil it to help keep the new bearing from binding when it is installed.
This is an important part, so take your time. Make sure the new bearing is sitting squarely on the housing and lightly tap it into place. Make sure it goes in straight by alternating your taps from side to side on the outside lip of the bearing.
Make sure that you drive it all the way down into the housing, so that the groove for the c clip is exposed. Grease the groove a little and reinsert the c clip.
Remember this guy? We need to get that bearing race off of there before we can put the hub back into the bearing.
This is the part we are going to remove.
Put the hub in a vice to secure it and use a chisel to drive the race off of the hub.
After you remove the bearing race, check the hub for any nicks and file them smooth.
Set the hub squarely on the bearing and start tapping it into place.
Drive it all the way down, using oil if necessary to keep it from binding.
Turn the housing over and check to make sure that the inner bearing race didn't start to pop out the other side, if it did gently tap it back into place.
Put the housing back onto the car and reinstall the upper and lower bolts that hold it in place.
Put the rotor back on and then the brake caliper assembly. Reinstall the two 14mm bolts that hold the caliper bracket in place.
Replace the axle nut and torque it to spec, then use a chisel to peen the nut to the groove in the axle.
That's about all there is to it, I would suggest using an anti-seize compound on all of the bolts and axle splines.
Reply
 4
4

4


Joined: Jun 2006
Posts: 29,085
Total Cats: 375
From: Republic of Dallas
My personal preferences:
Great thread. I've attempted to use a press every time, and each time it resulted in the press locking out, and I used the sledge to get the bearings in and out.
- leave the new bearing in the freezer to shrink it down a bit
- use the old bearing to hammer in the new one (no galling, and a ball-hitch is my favorite "die" to hammer on)
- buy the NB style circlips (much easier to use)
- the three bearings I've replaced were "blasted" and I could smack the inner race with the sledge and it shattered off
- for the love of Mephistopheles, repack the bearings with AMSoil 2000 so you never have to do this again.
Great thread. I've attempted to use a press every time, and each time it resulted in the press locking out, and I used the sledge to get the bearings in and out.
Reply
0
0

Thread Starter
Newb
Joined: Jul 2010
Posts: 42
Total Cats: 4
Those are all good ideas hustler, but I probably wouldn't suggest people go attacking the inner race with a sledge. Someone who isn't used to swinging a hammer can do some damage to the machined surface of the hub pretty fast.
Reply
0
0

Newb
Joined: May 2010
Posts: 43
Total Cats: 1
From: Scandinavia
Reply
0
0

i tried a similar approach and my bearing wouldnt budge. had to press out my axle, then hub then bearing. even on the press it was rough to get all the parts off. good write up tho.
Reply
0
0

The freezer and the oven is your friend. Installing old style bearing races on break drums I use to just put the drum on top of a wood stove, then you could just about drop the race in the hole. Not sure you could do that with this project but you could heat the part you want to expand and cool the part you want to shrink.. then  the magic happends
You could probably use the original race to support back to prevent loading the bearing rollers.
BTW, +1 on using the old bearing to tap in the new.
What do you think about Green Grease??? Love that stuff.
I hold in my hand a National "Moog" replacement NB bearing. I don't see how you can repack these suckers. Must be a different design.
Nice, clean, & simple write-up. Good job & nice pictorial.
Edit: actually my bearing is the same design as the one in this pictorial... How the heck to you repack these things?
the magic happendsBTW, +1 on using the old bearing to tap in the new.
I hold in my hand a National "Moog" replacement NB bearing. I don't see how you can repack these suckers. Must be a different design.
Nice, clean, & simple write-up. Good job & nice pictorial.
Edit: actually my bearing is the same design as the one in this pictorial... How the heck to you repack these things?
Last edited by JR4WDTRBO; May 7, 2011 at 10:22 AM.
Reply
0
0
^ For others wondering the same as me: I found this info on
Repacking the Front Hubs
The basic design looks similar so should be useful info.
Repacking the Front Hubs
The basic design looks similar so should be useful info.
Reply
0
0

What bearings are you guys using? I'd rather not re pack the rears. I can get NTK rears for $40/ea or so. What about front hubs? The prices seem to vary bigtime on hubs. I don't mind repacking the fronts with some good grease. I need bearings on all four.
Reply
0
0

I run ART front hubs. $160/ea, blueprinted and repacked.
Reply
0
0
Reply
0
0
Ok good to know. The rears are starting to make noise so I figured it's best to replace everything. Those art hubs look nice. Pricey but nice. How many hours do you have on them so far? Any sign of them starting to wear?
Reply
0
0


Newb
Joined: Jul 2011
Posts: 4
Total Cats: 0
Nice write up. When installing the hub you might want to secure the inner race with a socket from the underside though. I might try the slide hammer next time when removing the hub.
I used timken bearings from autozone 510003 they are prob the only brand I would use besides oem.
I cheated with a press though.
The old outer race works good to drive on the new rear seal also.
I used timken bearings from autozone 510003 they are prob the only brand I would use besides oem.
I cheated with a press though.
The old outer race works good to drive on the new rear seal also.
Reply
0
0


