When you click on links to various merchants on this site and make a purchase, this can result in this site earning a commission. Affiliate programs and affiliations include, but are not limited to, the eBay Partner Network.
The Miata Bushing MEGAthread: Heirarchy, DIY delrin dimensions, info and discussion
Intro and Scope
In this thread we will discuss the different materials and types of bushings commonly used in the miata control arm pivots, and the pros of cons of each. I will detail the dimensional specifications of each stock bushing as they came from Mazda, as best as I can with original 1990 bushings to measure. I will also detail the dimensions of delrin (aka acetal co-polymer) bushings for every location except the FLCA-R and RUCA-O, as well as the associated steel sleeve, so that you can make your own if you have the means.
Nomenclature
LCA: Lower Control Arm
FLCA: Front Lower Control Arm
FUCA: Front Upper Control Arm
RLCA: Rear Lower Control Arm
RUCA: Rear Upper Control Arm
FLCA-F or -R: Front Lower Control Arm front or rear bushing location, they are different
FLCA-F-f or -r: Front Lower Control Arm front bushing location front or rear bushing half. Most bushings will be 2 piece "top hats". Every location uses the same size top hat in the pair except for the LCA.
FLCA-R-f or -r: you get the point
RLCA-I or -O: Rear Lower Control Arm Inner or Outer bushings
RUCA-I or -O: you get the point, only the rears have inner and outer designation as the fonts have ball joints on the "outer".
knuckle bushing = RUCA-O
poly: polyurethane
sleeve: the steel cylinder that the bushing rotates about and is clamped by the subframe.
Delrin=Acetal The terms will be used interchangeably
NVH: Noise, Vibration, and Harshness
General Information and Considerations
The LCA and RUCA-O bushings require compliance for alignment purposes, primarily the LCA inner bushings, and to a lesser degree, the RLCA-O bushings, or they can bind and increase wear. This is because, unless the front and rear camber bolts on each LCA are in the same position of adjustment, meaning the cams are clocked/indexed the same; the bore of the bushing sleeves will be out of alignment. The subframe tries to hold the each control arms front and rear bushing bore in alignment, this causes the bushing to try and twist longitudinally in their bores, which imparts large side loads to the sleeve, increasing friction, and sometimes binding the arm up altogether. The RUCA-O is considered to be the worst offender and is why I developed the spherical kit for it. Depending on how much rear toe you run, the RLCA-O bushings may require some compliance as well, this is also dependent on your RUCA bushing material. So if you are going to install a full full delrin kit, one of each of the LCA bushings needs to stay rubber or be replaced with poly.
The SADfab delrin kit will include the poly bushings and bronze retrofit for these 4 locations. SADfab also has poly bushings for sale individually if you are machining your own delrin bushings. We can also make a kit for individual arms or locations to your needs, just let us know.
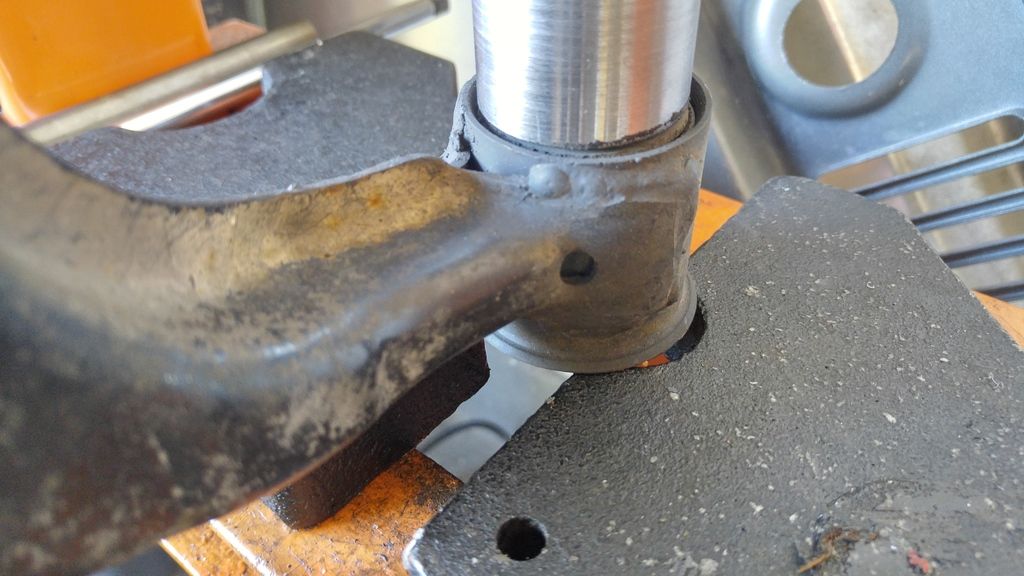
All of the control arm bushings are a metal to rubber interference fit. They do not need to burned out. If that is your thing, go for it, but a simple press will work with little effort. If you don't have a press, then you might be able to wrestle them out with a vise, or you can rent a BJ press from autozone or your equivalent auto parts retailer that loans tools. Last resort would be an all thread and pipe DIY press, but if you cant do any of those, then flames may be your only/best option.
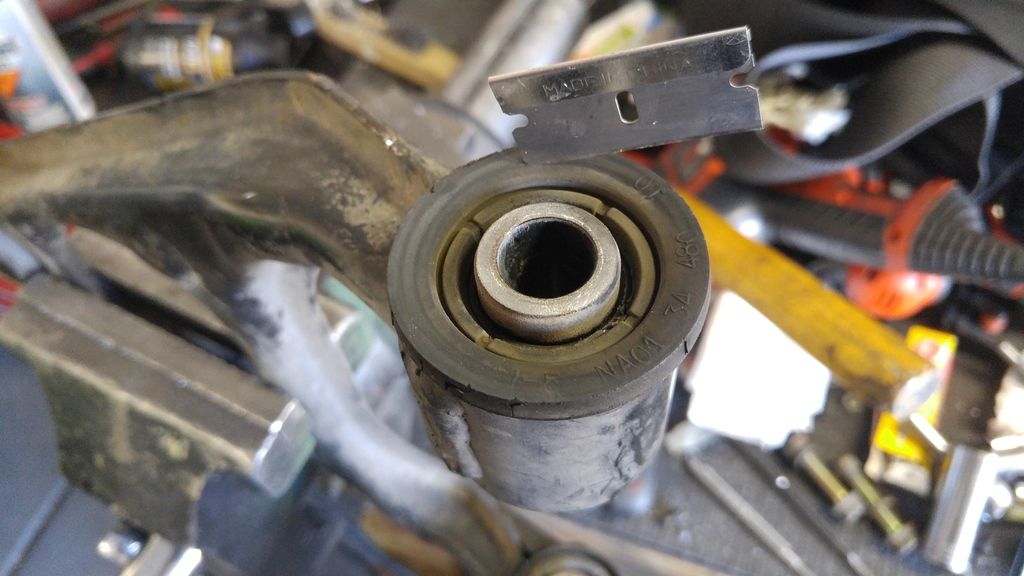
For most of the bushings, you need to start by trimming the rubber flange off one side, so that you can rest the control arm tubing on a press plate or a scrap piece of pipe or whatever you are using.
Like this:
Before
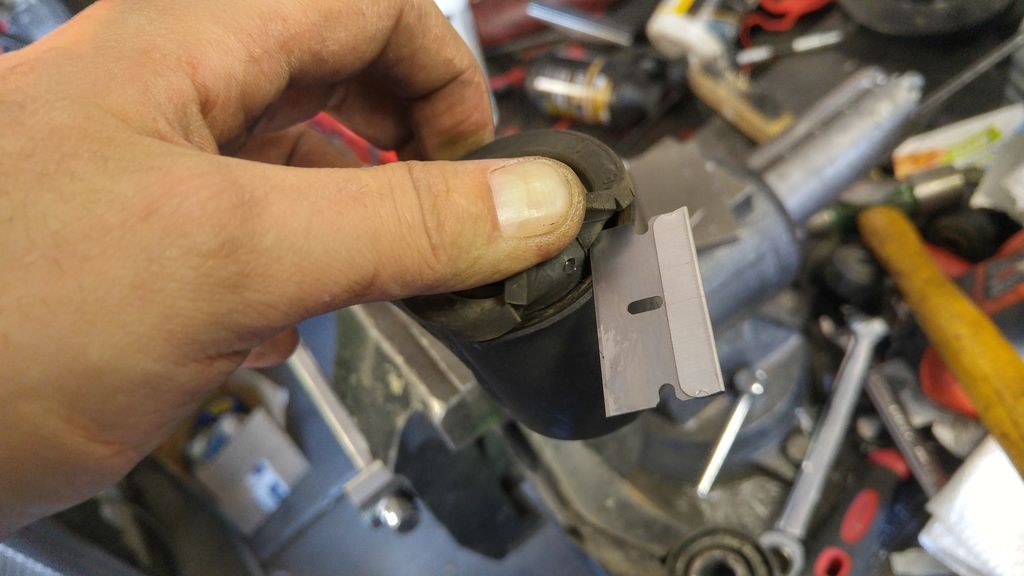
If you peel the lip back like this, and just touch a razor to it, it comes right off.
Like this
After
Now you can rest the edge of the tubing that comprises the bushing bore on press plates without interference.
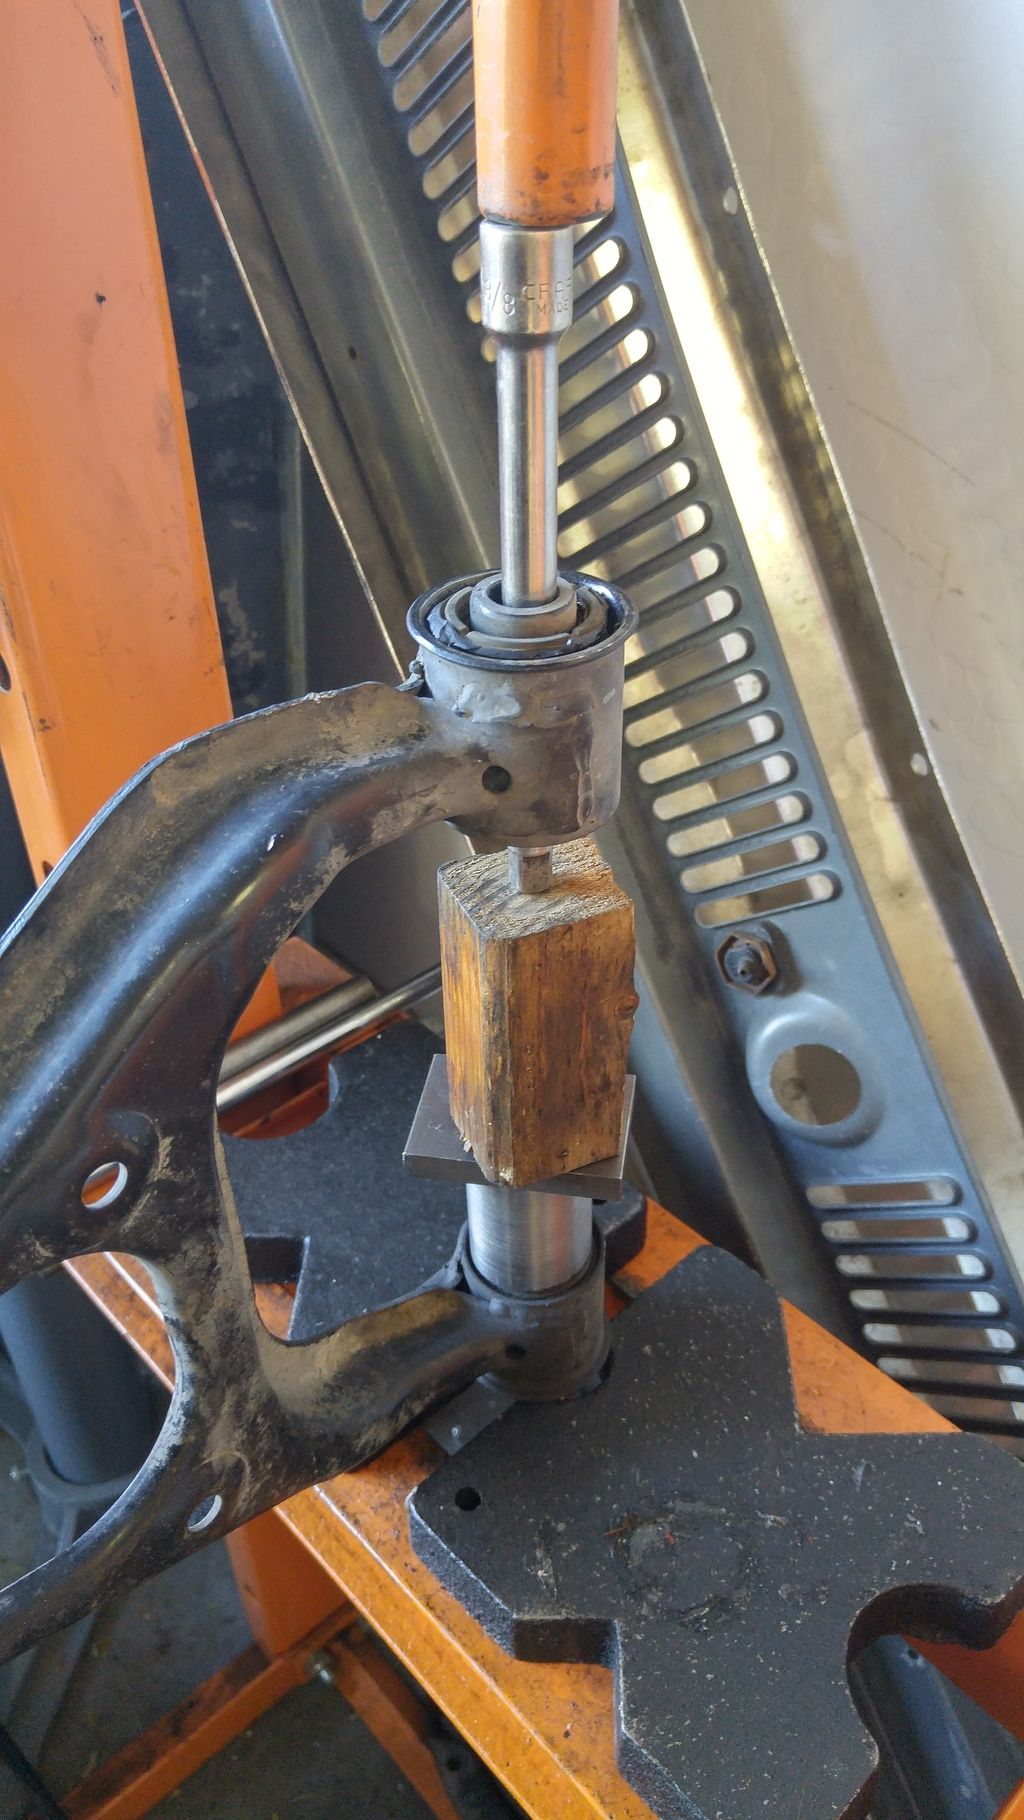
I highly suggest you press through the other bushing and support the bushing bore you are pressing on press plates. You will be tempted to just set the arm on the press, and press the busing out on top, and then flip the arm and repeat. This will put all the press forces across the entire arm, trying to squeeze the legs together. This can mangle your control arm, if you have to do it this way, at least jam a 2x4 or something between the legs of the control arm, especially the RLCA. Ask Aidan how he knows. The FLCA is probably the only one you can get away with pressing the whole arm, because of the way its constructed.
Something like this, but less sketchy is preferred.
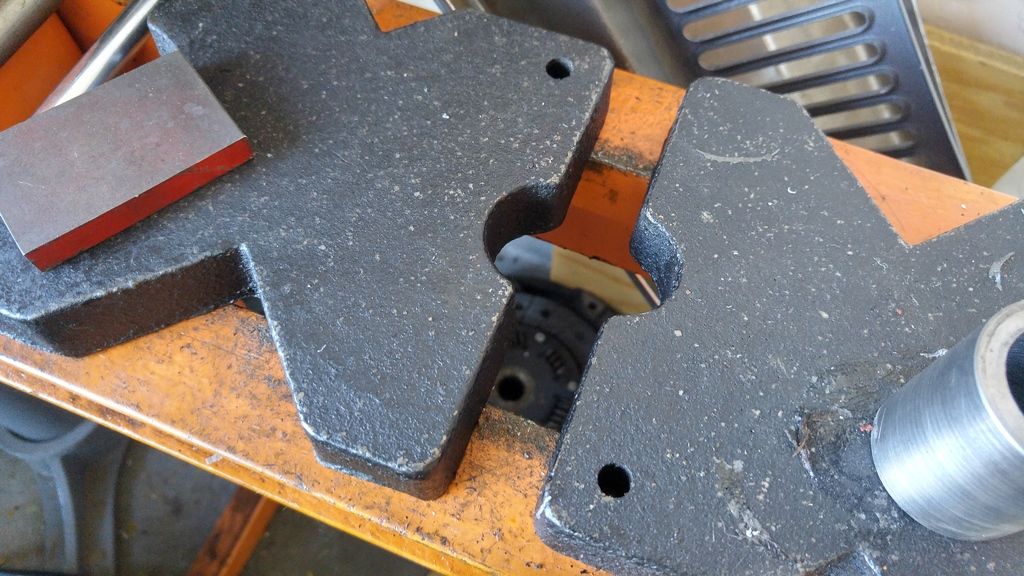
And here is what can happen if you don't support the arm properly. This is aidandj's handy work.
These are press plates, for the uninitiated.
All of the bushing bores on the miata are either 38mm or 40mm ID... kind of. When they welded the tubing to the rest of the control arm, it warped, every single one of them, and in almost the same way and amount. Every bushing bore is a very slight oval shape to the tune of about 0.015-0.025", meaning the longer measurement of the oval is about 0.015"-0.025" longer than the shorter side. Why does this matter? I will explain below where it applies. For now I will say the rubber and poly bushings will just conform and give no ***** about the oval-ing.
Grease fitting suggested locations:
FUCA. These must be installed facing down, since the unibody is right above the control arm and you would never be able to get a grease gun on them, although right angle fittings may work.
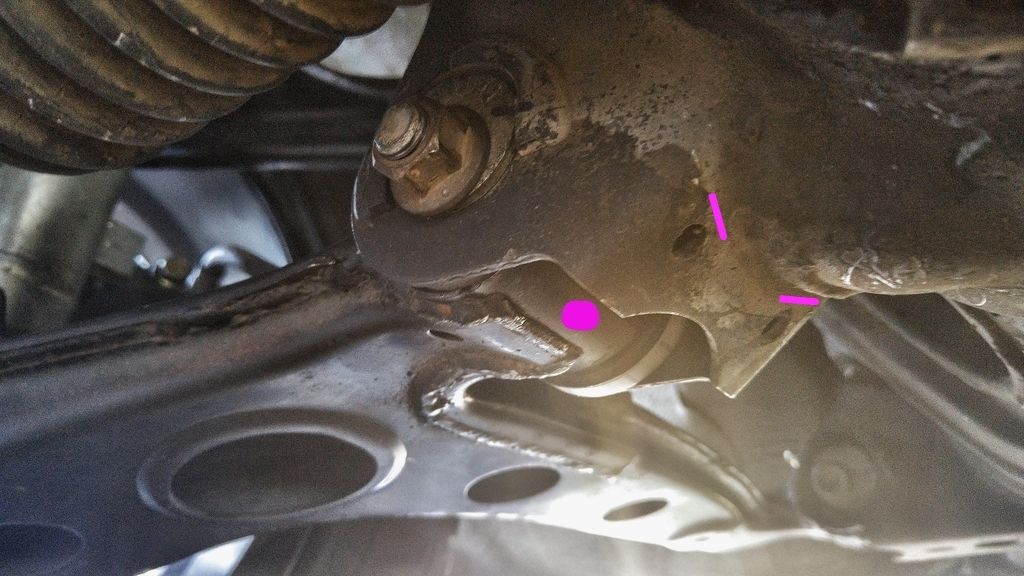
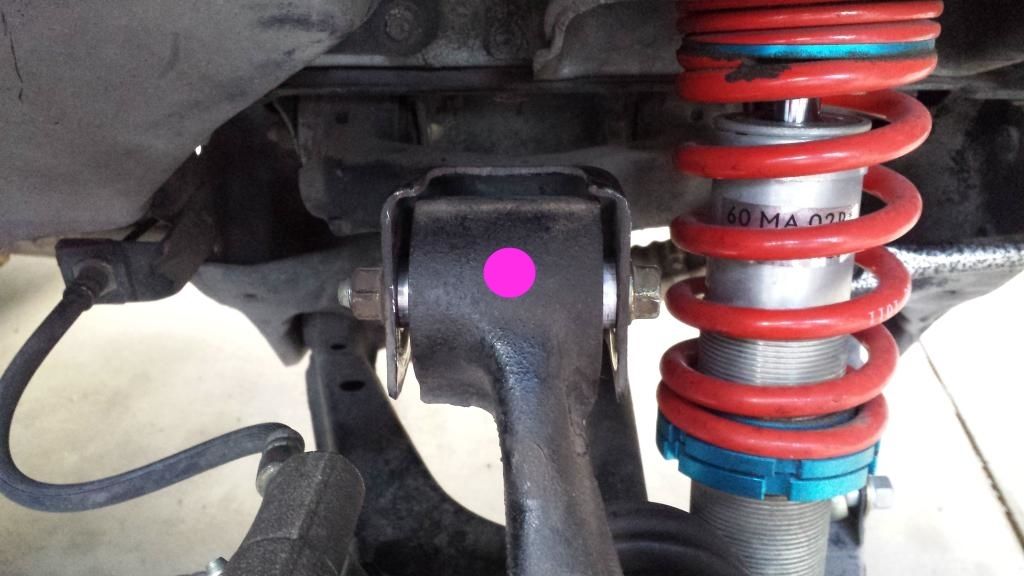
FLCA. You can install these through the hole in the arm where it is welded to the tubing (you still need to drill through the tubing), this will require extended length grease fittings.
The alternative if you only have normal length fitting is to install them on the bottom. Try to install them right in the middle of angry subframe's mouth there, on the pink dot, to help shield them from getting ripped off by your off track excursion at T5.
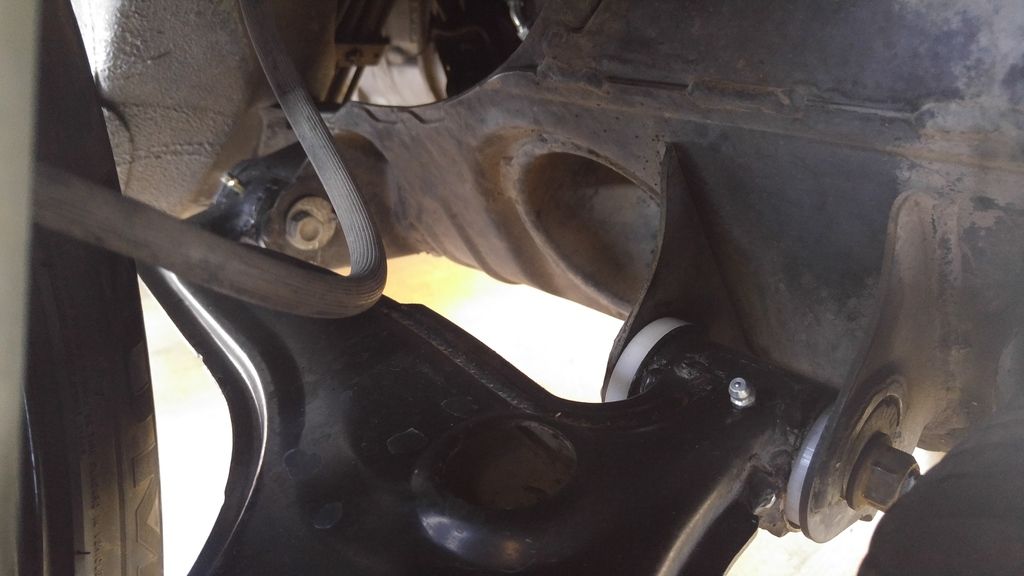
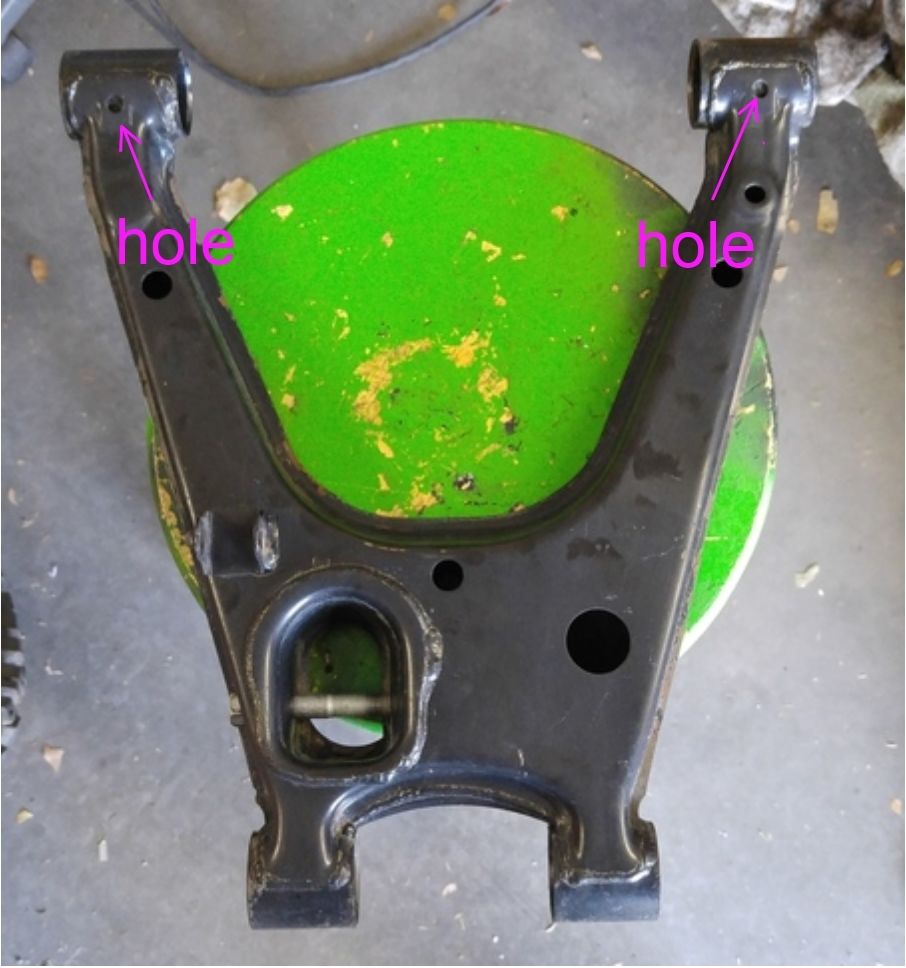
RUCA Inner. These can only be installed in the bottom of the arms, for the same reason as the FUCAs. There is an added complication, in that there is a strap connecting the subframe ears, that can interfere with the fitting at full droop. Different shocks have differnt amounts of droop, so you will need to check your car to see where you can put this fitting, you may end up having to drill through both layers of steel where the arm is welded to the tubing, in which case an extended length fitting may be required.
With my vmaxx's, I can install one in the hole/pink dot.
RUCA Outer/Knuckle. If you have the spherical kit, you dont need this. You wont be putting delrin here so if you have poly, this is where it goes. You'll probably have to take the wheel off to grease the rear control arm outer bushings.
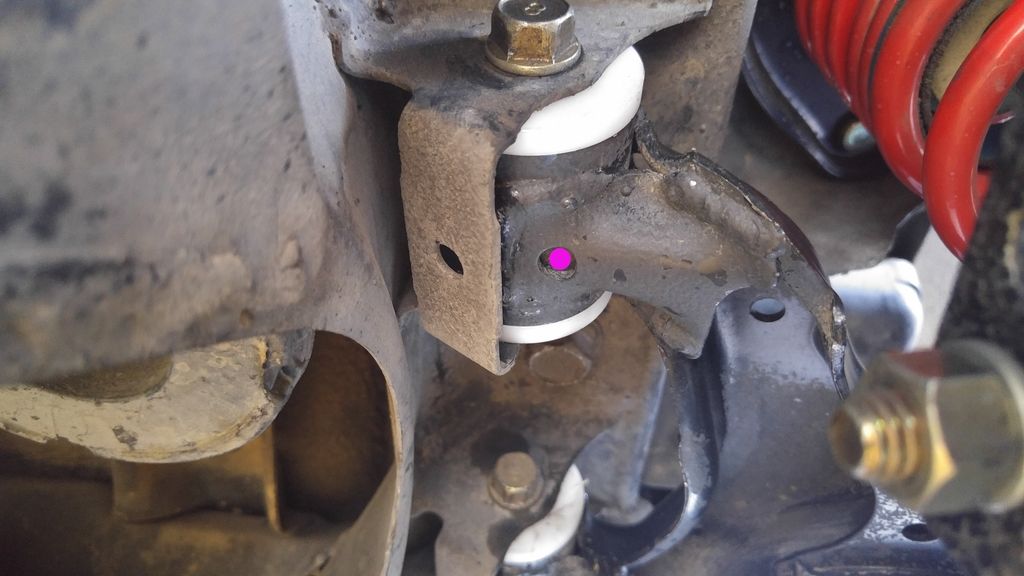
RLCA Inners. On NAs, the subframe has nice windows where you can install the fitting facing towards the center of the car. On NBs (some? all?) or any car with Mazda style subframe bracing, this window is covered up, and the situation becomes the same as the FLCA. Either it points down or you need an extra long one for the top where the hole is.
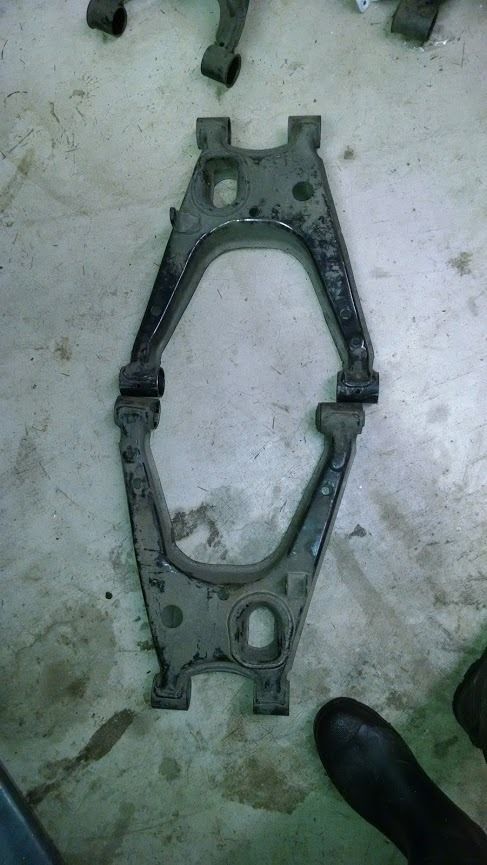
My NA
What are these holes I keep talking about?
RLCA Outers. The rear location can point just about where ever you want it. It's pretty well protected, seeing how its in the wheel, and you have to remove the wheel to grease it anyway.
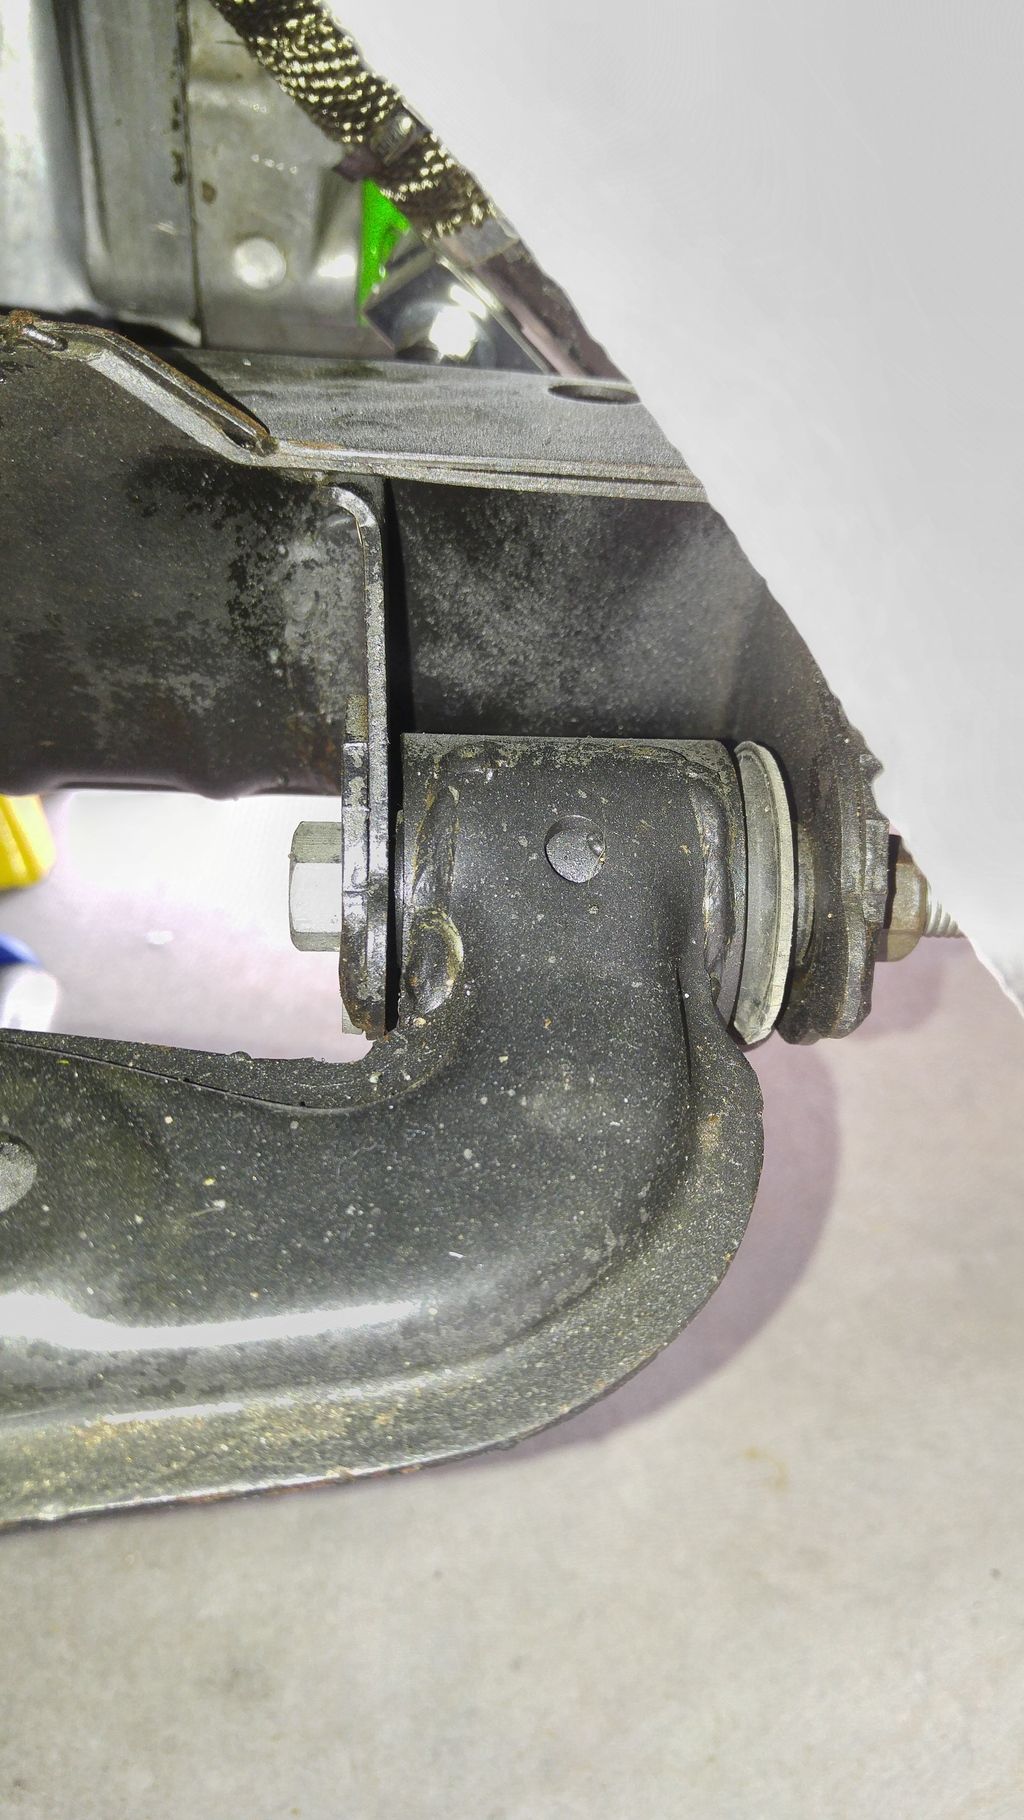
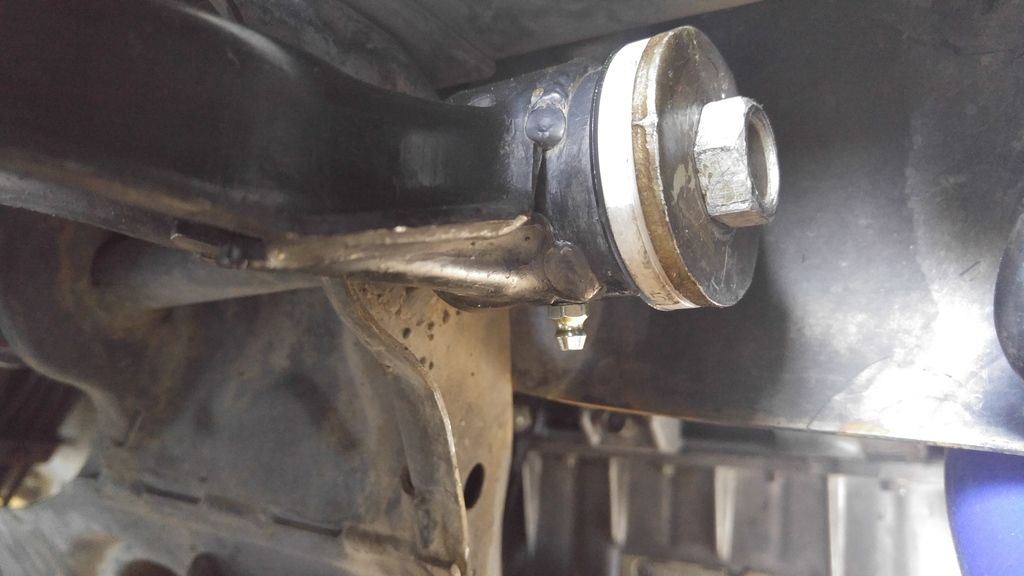
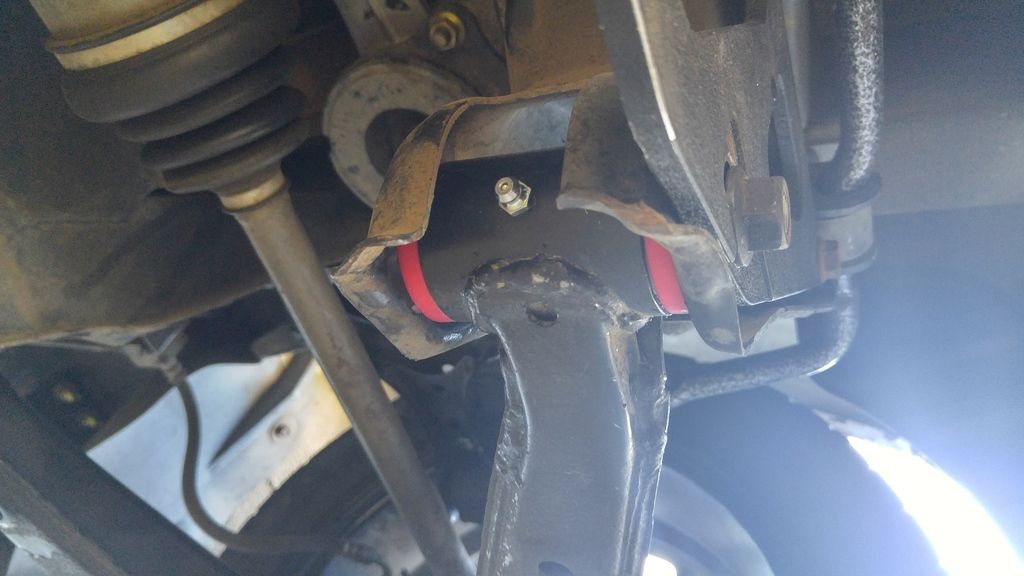
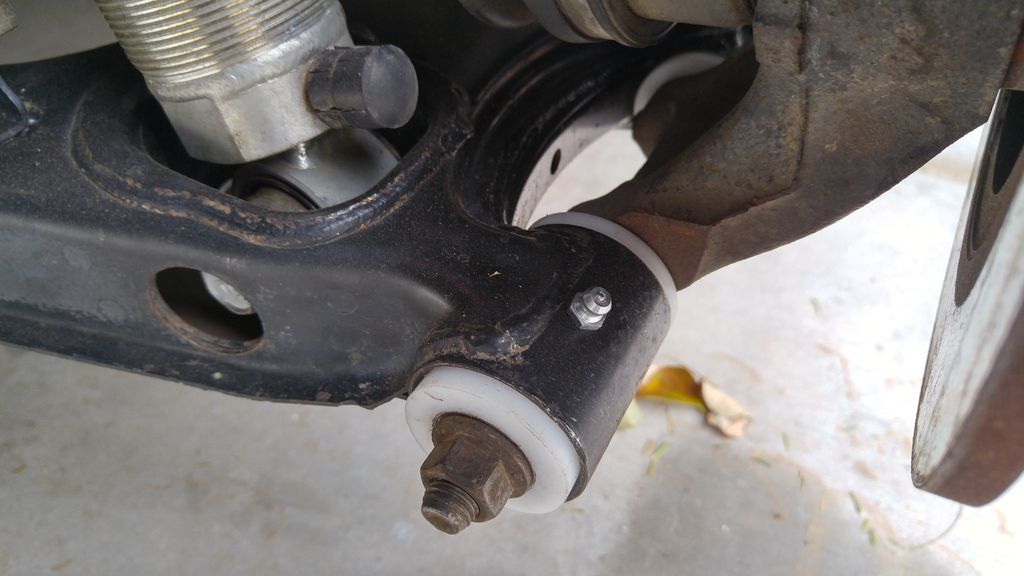
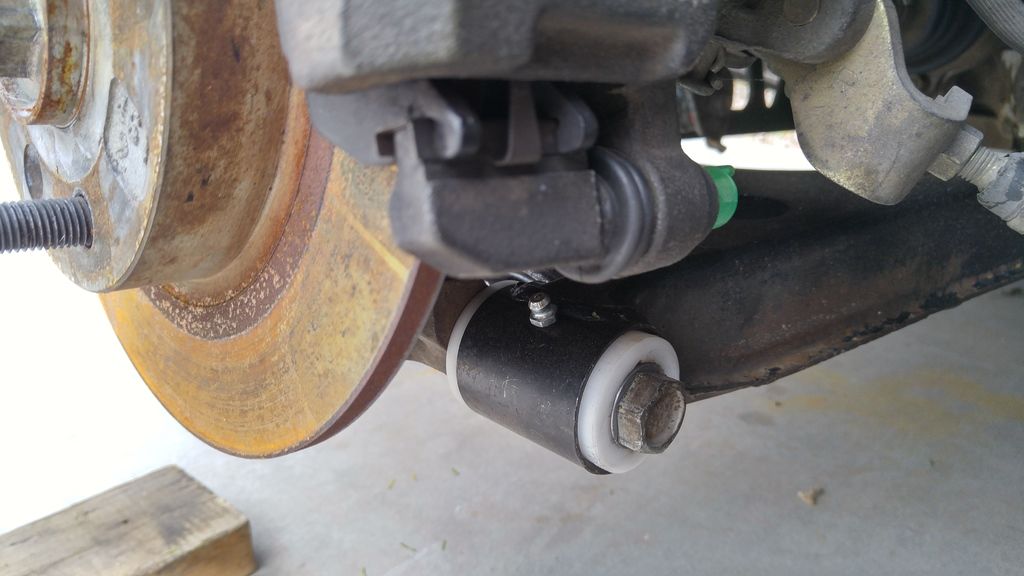
The front needs to point straight out, away from the car or down towards the ground. If you point it up like I did here, the caliper is kind of in the way when it somes time to grease...
With delrin bushings, drill straight through the control arm and bushing after pressing the bushings in, but before reaming them. Drill through using the tap diameter(7/32" for 1/4-28 for example), then just tap the steel of the control arm and thread the fittings in.
Materials and Hierarchy
The intended use of your miata and goals for the suspension will determine the hierarchy for you and your specific car, but because this is mt.net, i'm going to go with the track/man car hierarchy:
1. Polyurethane bushings
2. Factory Mazda rubber
3. Mazdacomp/Mazdaspeed rubber
4. Polyurethane bushings with bronze retrofit
5. Delrin (acetal)
6. Sphericals and other
1. Polyurethane bushings
First you must be thinking: "What a tard, how can he list poly bushings as the worst. I mean, I have them on my honda, and I get all the chicks".
Let me address this:
Poly bushings make a horrible bushing material for bushings that require a sliding or rotating element, such as every bushing in our miata control arms. This is for 2 reasons. 1- Poly has a very high coefficient of friction, and has an unreal level of stiction. Stiction is static friction, or the force required to break the initial friction to get the bushing sleeve rotating in the bushing. You may be thinking that all they need is grease, and you would be right, except: 2- Poly is the perfect seal/wiper material. It simply excels at pushing any grease or lubricant right out of the place it needs to be. So no matter what you do, or how often you grease it, poly bushings will always bind. It can take as little as one lap on track , or just a commute, to squeeze out the grease you just pumped in with your grease gun and zerk fittings. You'll notice the manufacturers of poly all have come out with their form or super sticky viscous grease to try to keep it where its applied. These lubes only delay the inevitable. This level of binding may be acceptable to you on your street car, or your 72 ford F-100 POS, but this type of performance has no place with $2000 coil overs on a chassis setup to handle. The binding will effectively add spring rate and change rebound characteristics, and it can do so it in an unpredictable way. There have actually been cases where the bushing binds to the sleeve so bad, that the bushing starts to spin the the control arm bore. Also, those chicks, are dudes.
You may now be saying to yourself " I have poly bushings everywhere!! what do I do?!!?!?!?", please refer to #4, the bronze retrofit solution.
In summary
Pros:
-cheap
-easy to install
-stiff, well stiff enough for some
-still compliant enough to be aligned
-wears well, long lasting
-can usually get offset versions
Cons:
-binding
-can start to squeak
-they bind
-flashy red gayness, unless you get the black ones, but who does that?
-they dont rotate very well, aka, bind
The Polyurethane section of the bushing megathread is dedicated to bbundy for his tireless work on the polyurethane final solution. You can read more in depth about the failing of poly bushings here: https://www.miataturbo.net/race-prep...6/#post1193866 along with the evolution of the bronze retrofit.
Last edited by hi_im_sean; 03-05-2018 at 11:43 PM.
2. Factory Mazda rubber bushings
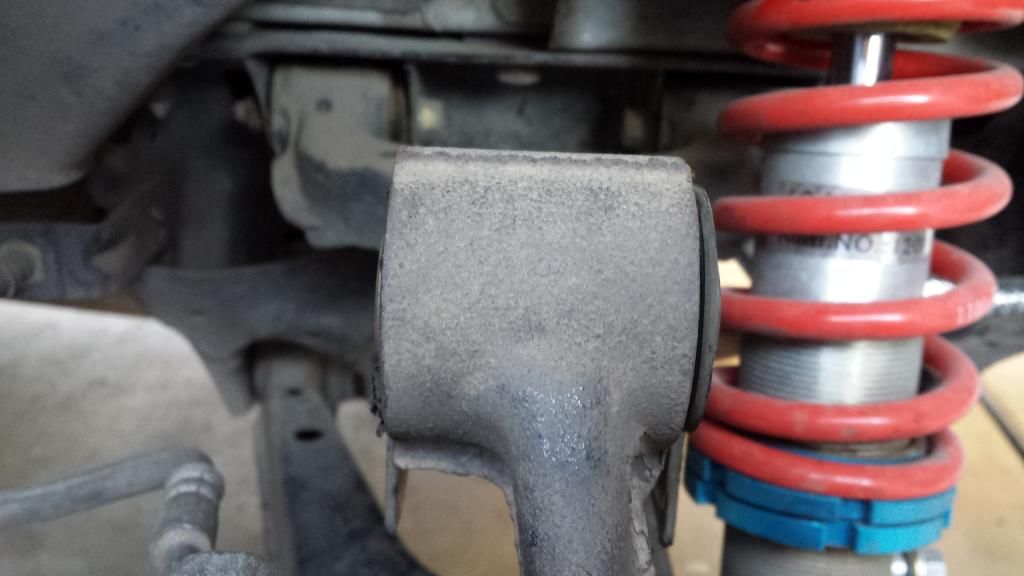
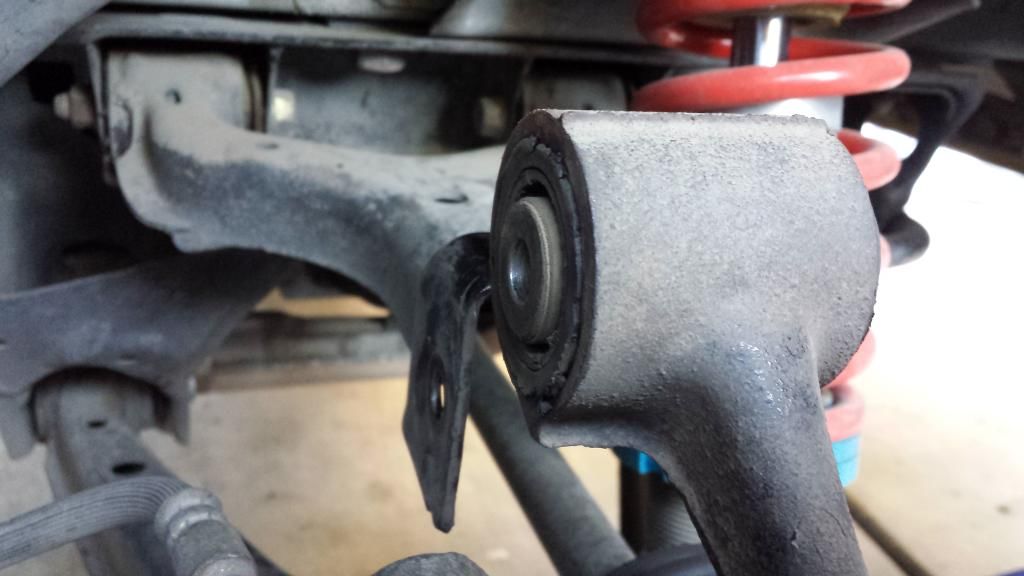
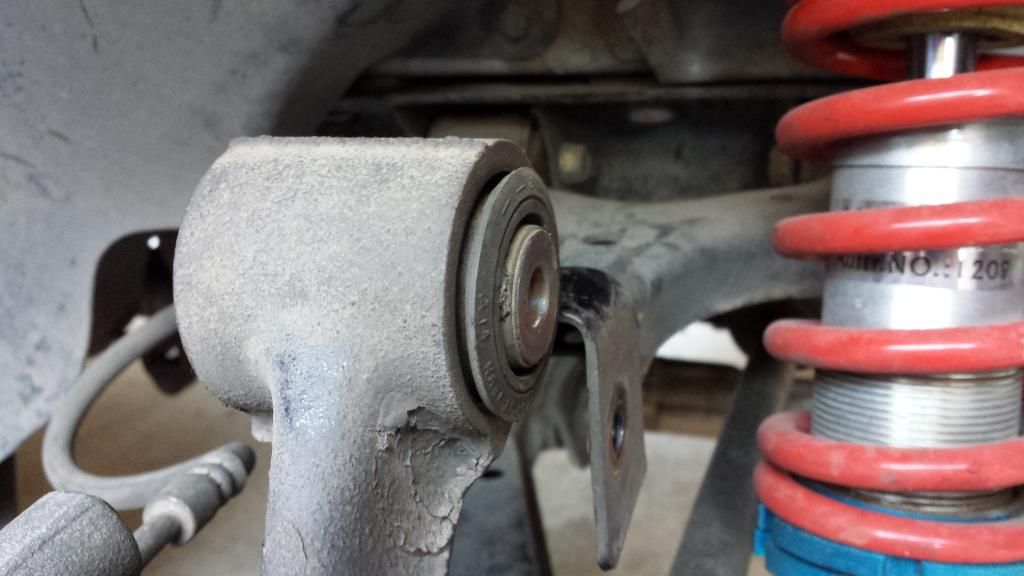
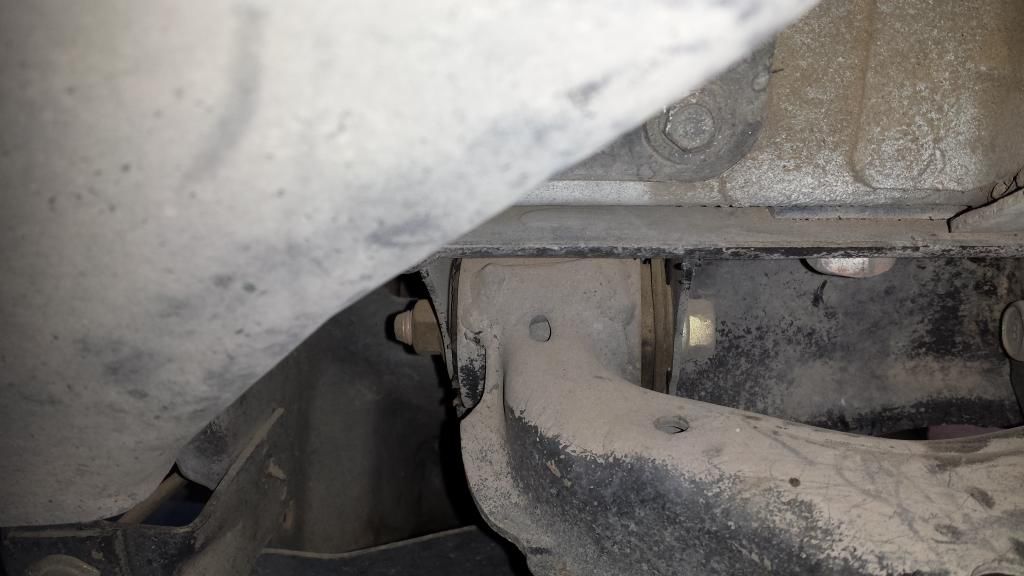
Not much to say about these. They work, they come with the car (unless its been modified of course), but they're soft, and the control arms can slip in them under high braking or acceleration loads. For 90% of drivers they're fine. But if you start pushing the car on stickier rubbers, they will quickly show their weaknesses. The compliance will cause the alignment and suspension geometry to move under load, which can be advantageous or a detriment depending on the nature of the movement. Most of the compliance in the stock miata rubber bushings is considered to be a disadvantage, so they are usually swapped for something stiffer. Rubber bushings also add to the effective spring rate, since they are bonded to their sleeve and don't rotate in their bores, any movement in the control arms require the rubber to twist. Because of this, control arm pivot hardware should not be torqued down until the car is sitting on it tires, which can be a pain on lowered miatae.
Here are some examples from my car of stock bushings that are sliding in their bores. Keep in mind, this is with only 90whp, and 205 kumho ecsta XS, but they did have 150k on them when I started tracking the car.
In summary
Pros:
-compliant for alignment
-comfy ride
-quiet
-long lasting
-cheap, they come with the car after all
Cons
-compliance allows for suspension deflection under load
-can slip in their bores, control arms then try to hole saw through the subframe
-adds spring rate
-car must be on the ground before torquing control arms
3. Mazdacomp or Mazdaspeed rubber bushings
These have all the same attributes, and pros and cons of the regular Mazda rubber with 2 exceptions. They are stiffer and they are very expensive. They aren't as stiff as poly, but considered to be 30-40% stiffer than stock. Expect to pay $700+ for the front and rear control arms, although recently IL motorsports has started to offer similar bushings for a little less.
4. Polyurethane bushings with bronze retrofit
This is how you reduce the friction of poly bushings, so you have all the benefits, and none of the detriments. If you read the spherical thread linked above, you will see how this idea came about.
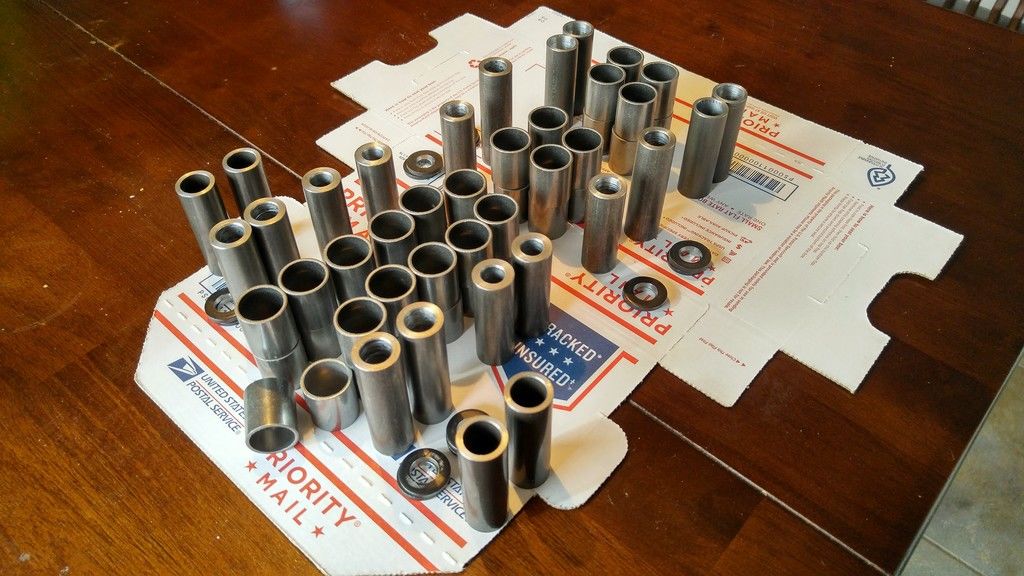
It turns out all poly bushings except the FUCA and RUCA-O bushings have a 7/8" bore, and all the bushings are over 2" wide. So, you can stuff 2, 7/8"ODx3/4"IDx1" long bronze bearings into each poly bushings. The FUCA bushings require that you drill them out to 7/8" from 0.813". This is easily accomplished in a lathe with a new sharp drill bit. If you purchase a SADfab kit, you can send the bushing to me to be drilled out for free or as part of the kit, if you dont have access to a lathe. The RUCA-O uses a 5/8" sleeve and a different diameter bearing. You then make 3/4" sleeves to fit in the bronze bearing lined bushing, with the correct bolt hole size, and length, for its location. The locations that have a camber bolts require a larger contact face than the 3/4" sleeve can provide, so in those locations a 7/8" thick washer is used to help spread the clamp load. They also help seal off the bearings from the elements, and retain grease. See the spherical thread linked above for more discussion on that with lots of number and maths from mechanical engineers.
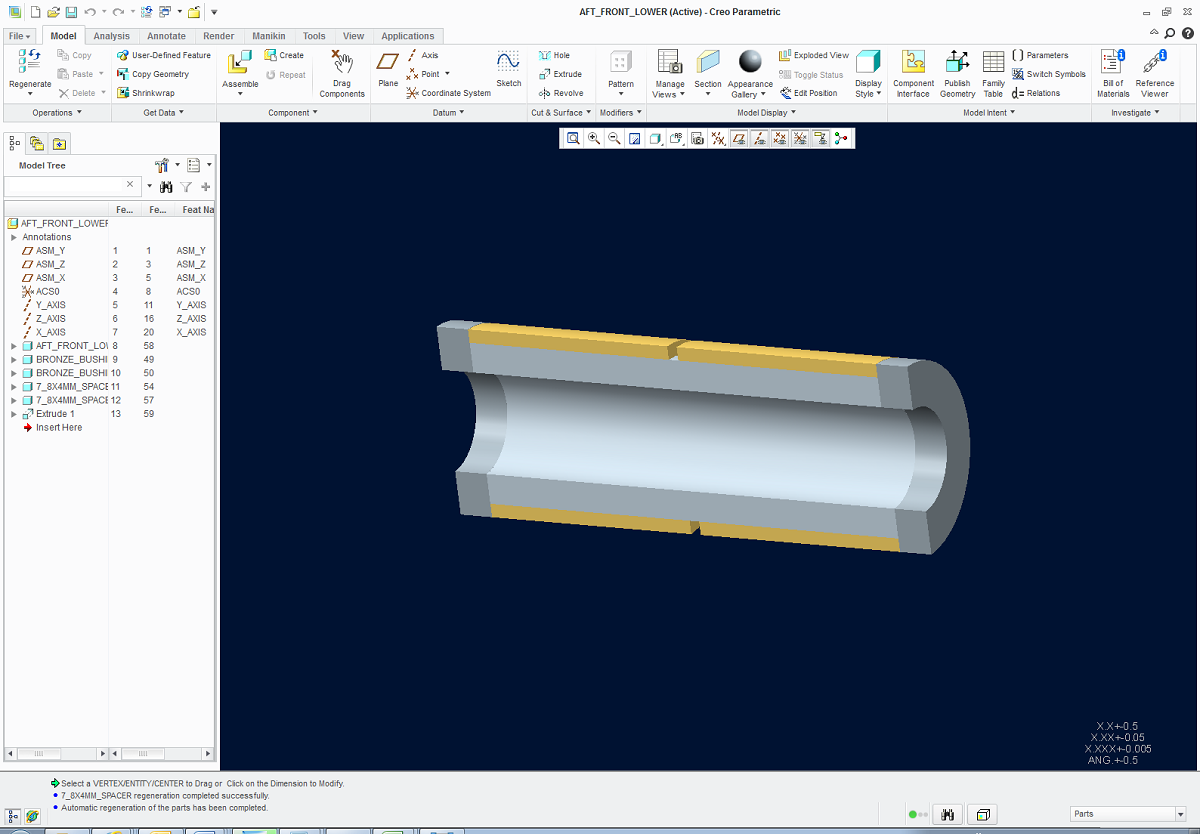
Here is a CAD drawing of the basic idea with washers shown as this is a camber colt location.
The bearings used are of the SAE863 spcification, which is a high load, iron-copper based (not even really bronze I guess), oil impregnated bearing. These. I recommend a chromoly or SS for the sleeve. Bob used 4340 and I use 4130 chromoly. Mild 1018 steel will work too, although it will not wear as well.
SADfab will be offering Bronze Bearing Retrofit kits, if you would like a set pm me, or aidan.
The dimensions of the sleeves can easily be found in Energy Suspension's literature if you'd like to make these yourself, just make the OD 0.750". Also, if you're using a poly RUCA-O, you will need a 5/8" sleeve and a different bearing since that bushing has a 3/4" bore.
The addition of grease fittings on each bushing bore is a great idea as well. You can position it so it is in between the bushing halves, and it will direct grease right to the bearing. In addition to lubricating the assembly, the grease will help push dirt out and water proof anything that can rust and hinder performance. I highly recommend you use grease fittings even though the bearing are rated for and can be run "dry". They will last longer, and pivot more freely.
In summary
Pros:
-low friction, no binding
-easy to install
-stiff, well stiff enough for some
-still compliant enough to be aligned
-wears well, long lasting
-a kitten is born every time a SADfab retrofit is installed
Cons:
-poly price plus retrofit kit price adds up, $$$
5. Delrin (Acetal)
Delrin is DuPont's name for Acetal Copolymer, or Polyoxymethylene (POM). Other names include Tecaform, Celcon, Duricon, Kepital, and Hostaform. Its all the same ****. There are 20+ grades of acetal made by DuPont alone, but only 2 seem to be readily available to small, non industrial consumers. The normal, affordable version is known as Delrin 100 or 150. They're both a general purpose acetal, that every aftermarket automotive acetal bushing I know of is made out of, including SADfab delrin bushings. The other grade is know as AF blend, which is the cheaper form of 20% teflon impregnated acetal. AF blend is about 6-8 times the cost of 100/150, at over $100 per foot of 2" diameter rod. 100 can be black or white, AF blend is a brown color.
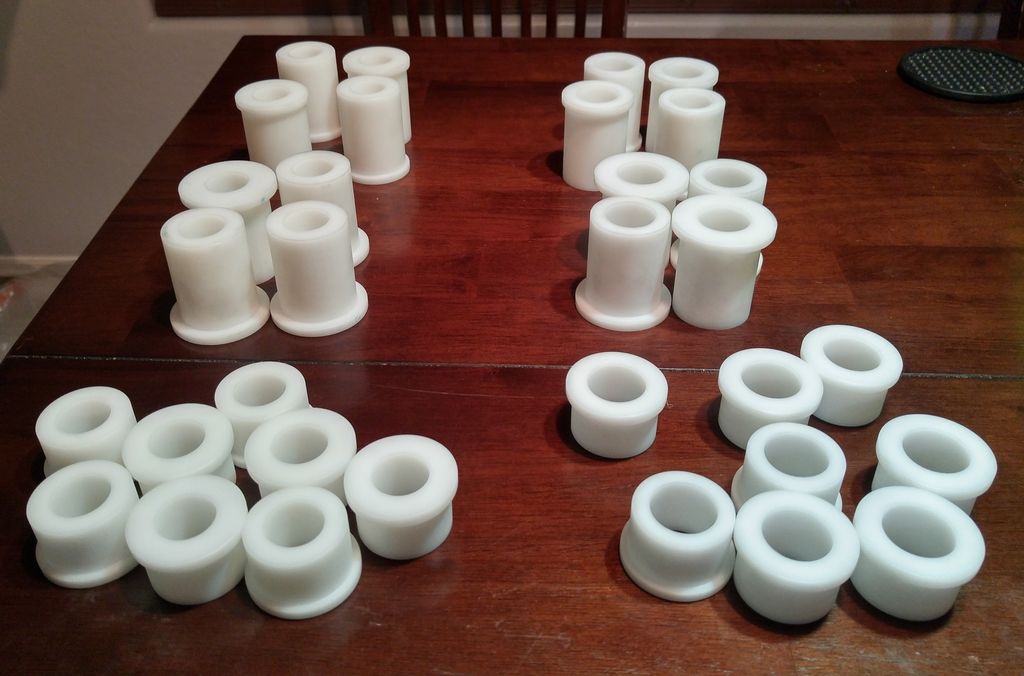
An assortment SADfab bushings. If you would like a set, or even a kit for individual arms, contact me or aidan.
Delrin is "self lubricating" and has a low coefficient of friction. Its very stiff and does not deflect. For that reason you can't, or shouldn't use delrin in both front and rear locations of each LCA. Only one or the other. For the FLCA it should be placed in the front position, since that bushing sees the majority of the lateral loads during cornering, and benefits the most from the increased stiffness. Its also the bushing that can be made into an offset for more camber. The rear bushing being offset would effect caster. The RLCA doesn't matter, either position is fine.
Offset FLCA bushing
I also recommend using grease fitting with delrin bushings. Although its not required to lubricate delin after initial assembly, it only helps reduce friction and decrease wear, but more importantly, it pushes out dirt and provides a moisture barrier for parts that can rust. Information from DuPont on implementing acetal as a bearing. The bushings are considers a bearing since the sleeve(a shaft) rotates in them. I will also attach this pdf in case DuPont deletes more info.
DuPont used to have a much better, more detailed document, but they watered it down for some reason, and I never saved it. In the previous version, they heavily stressed, dirt and foreign debris as the number one cause of wear. They did R&D to show that greasing the bushings or removing debris through other means, at least doubled bushing life.
Delrin bushings press into the control arms easily with a bench vise, or even a large C-clamp if you have to, because of their low friction, and plastic nature. Since they are plastic, they crush a little upon installation. This crushing causes the bushings sleeve bore to shrink, and therefor requires drilling out or reaming after installation into the control arms. Also recall earlier that I mentioned that the control arm bores are ovaled. So when the bushing crushes, its not symmetrical, the delrin bushing bore is now something other than a circle. When you ream it out with the drill bit, you are now indexing the bushing to the control arm bore oval. Its for this reason that the bushings really need to be drilled out in the arm they will be run in, and if they are removed, they should be put back in the same position and clocked the same as when they were removed. If they are ever transferred to different arms, re-reaming them may be necessary.
You also need to make sure the bores are smooth and the edges are "clean". What I mean by clean, is no weld slag, or burrs around the edge. I found quite a few on my arms, but they are easily knocked down with a file. The flanges on the delrin bushings are made for a close fit to the subframe ears when everything is torqued down. Any bur that keeps the flange from seating all the way can cause interference and increase thrust face wear.
Here you can see a small bur that needs to be filed down.
And a little rust blister than needed a wire brush treatment.
Hostess box makes decent soft jaws
On the rear suspension, when using all delrin, extreme toe targets may become an issue and cause bind. Im not sure at what value binding will start, but I tend to think for 95% of users this will be a non issue, especially if you are running less than +/- 1/16" per side, or +/-1/8" total rear toe. This is because, as toe is adjusted on the rear of the miata, the rear knuckle swings in an arc on the end of the RLCA. That arc is transferred through the knuckle to the RUCA, which now has 0 compliance, because delrin. The fix is either rubber or poly RUCA-I or RLCA-O bushings.
In any circumstance, during assembly of the rear suspension, you should leave every bolt loose until everything is installed. Only torque them down after all 6 pivot bolts are in place. Its also worth noting that you can torque all the pivots points with the car in the air and tires off the ground when running delrin bushings. The only exception is if you've retained the factory rubber bushings in required LCA locations. Just torque those after the car has been set down on its tires. You should also have all 6(per side) rear suspension bolts loose during alignment to let everything "find its place" with full delrin rear.
Offset delrin bushings in the front for more camber-
Normally offset bushings done in the FUCA. This is because there is less load on the FUCA compared to the FLCA, both laterally and longitudinally. This matters because lateral force will try and twist an offset bushing in its bore. The one big downside to this is that you loose tire clearance, since it tips the top of the wheel in. Cars running 9" or wider and 245 or larger tires run the risk of rubbing the coilover, or top hats under compression when using offset FUCA bushings. Some have had to run 5mm spacers or smaller diameter springs after the conversion to offset FUCA bushings. For this reason I like to run the offset bushings in the FLCA-f position. You loose 0 tire clearance, and I have had no issues with bushings spinning in their bores, providing you pin it with an extra long grease fitting or small bolt. I also make my offset bushings a few thousandths larger for a tighter press fit into the control arm. I offset the bushing 1/4", which works about to about 1.5 to 2 degrees more camber. On my NA, with the cam bolt about half way through its available adjustment, it's at 3 degrees. Also note, that running an offset FLCA delrin bushing requires that you have poly in the FLCA-r position for thrust loading in the non braking direction.
In summary
Pros:
-low friction, no binding when used in conjunction with the proper compliant bushings in select locations
-very stiff
-can be made into an offset
-if/when the bores wear out, you can drill them out to the next size, or just stuff bronze bearings in them! delrin bushings have 9 lives
Cons:
-NVH
-a little pricy since they are custom machined parts and delrin isnt the cheapest stuff around. You can save a good bit by going with 1018 mild steel for the sleeves.
Last edited by hi_im_sean; 02-14-2016 at 12:27 PM.
6. Sphericals and Other
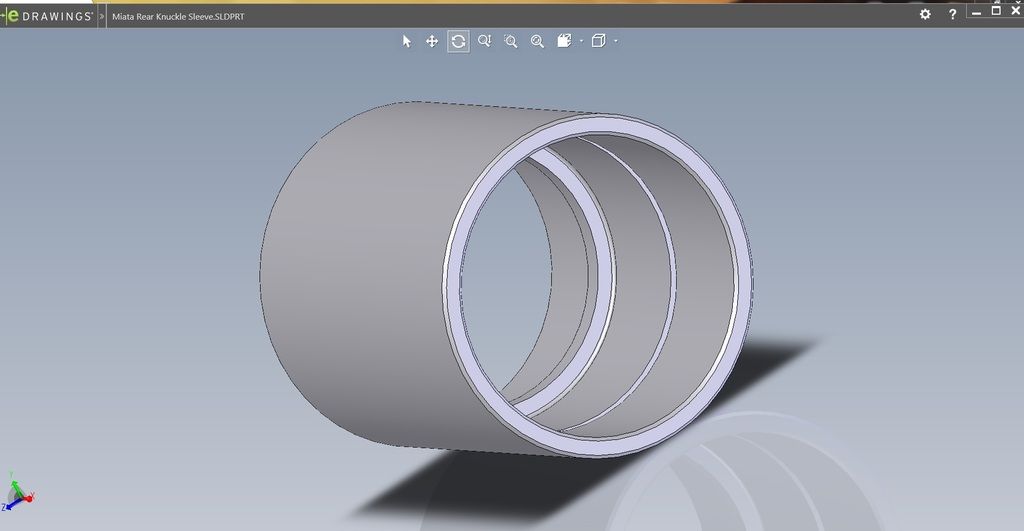
Beyond a very small handful of specialty race shops, you are probably on your own here. There are 2 ways to install spherical bearings: you can machine a sleeve with a snap ring like I have for the rear knuckle, or just press 38 and 40mm bearings directly into the control arms with something on each side to retain them. Again the oval shaped control arm bores come into play here and are actually an advantage in this case. They ovate bore will help with the direct press fit needed for a spherical in the control arm, although you will still need a means of keeping them put longitudinally. I go over a few ideas on that in the second post of the spherical thread.
Example of the sleeve idea. The spherical bearing is pressed into the sleeve up to the shoulder, a snap ring retains it. The assembly is welded or "glued and pressed" into the control arm with retaining compound (loctite 638 or 640).
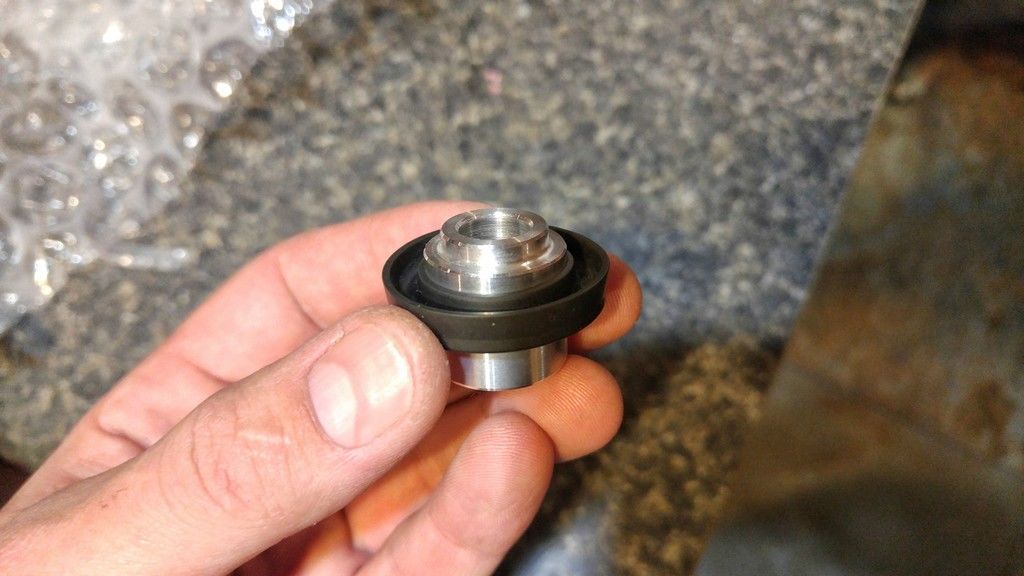
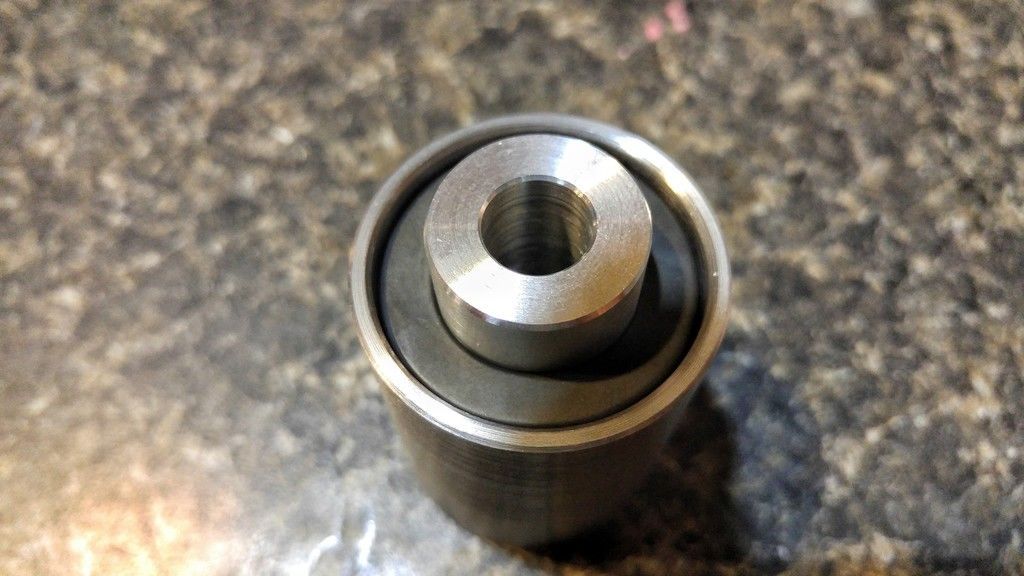
Of course, you will need to machine your own spacers too.
And find a way to seal them. I find "U-Cup" seals, used in hydraulics work great if one of the standard sizes approximates the diameters you need.
The awesome advantage of sphericals is their precision, low friction, and their ability to rotate in multiple axis, and zero deflection, while still being complaint. But, they are the most expensive option available, and can be the highest maintenance depending on material selection and if they are teflon lined or not. A full car spherical install can be well over $1000. Depending on how they are installed, they can be the most difficult to replace as well. And worst of all, they wear the quickest of all the previous options.
Sphericlas are truly #becauseracecar.
In summary
Pros:
-lowest friction
-absolutely no binding if implemented properly
-very precise, no slop or shifting, until they wear out anyway
-you'll be a badass
Cons:
-very expensive, expect at a minimum, a 4 figure price tag
-high wear rate
-NVH, but if you're installing sphericals, you don't give a **** do you?
-maintenance and replacement can potentially suck
The "Other" category includes DelAlum(combination of delrin and aluminium), aluminium, nylon, nyloil, etc. bushings. I won't go into those because I lack the knowledge and don't care as the above options satisfy most any need.
Dimensions
Miata
Here are some of the rough/nominal dimensions of the miata and the stock rubber bushings sleeves(will be expressed as LxODxID), used to develop the delrin sizes. The car is formed and welded sheet metal, so nothing is truly square or round or even straight really. Things that are easy to measure accurately with calipers like bushing bore and length, are accurate, but everything else is... close.
Every bushing except the FLCA-F is centered in the subframe ears. The FLCA-F is offset about 2mm forward. This is to help take the thrust load the front brakes place on that particular bushing.
Youll notice the sleeves are either 21mm or 23mm in diameter. They have a very consistent and healthy chamfer of about 3 mm across the diameter, so the actual contact face is only about 18mm and 21mm respectively.
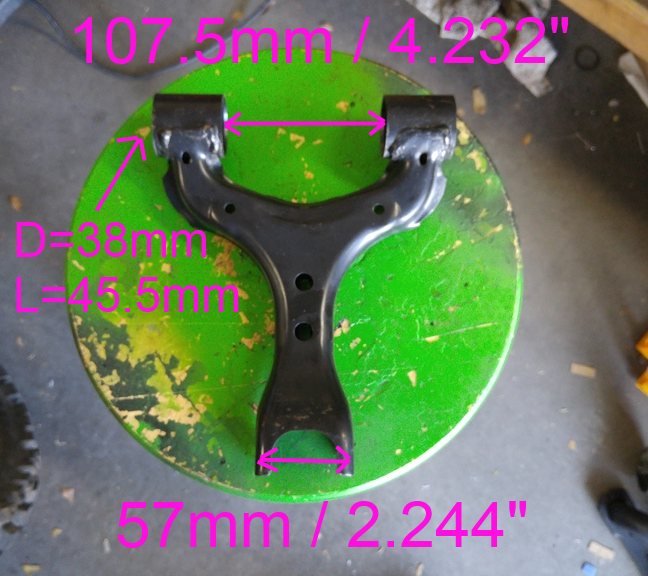
FUCA. The large bolt that runs through both bushings and the subframe is 15mm diameter. The sleeve is 56x23x15.32mm.
FLCA. Both camber bolts are 12mm in diameter. The Front bushing sleeve is 70x23x12.32mm and the rear is 60x23x12.32.
RUCA. Both inner and outer bushing use 10mm diameter bolts, and the same sleeve dimensions, although the rubber is cast is a slightly different shape. The sleeves are 56x23x10.32mm.
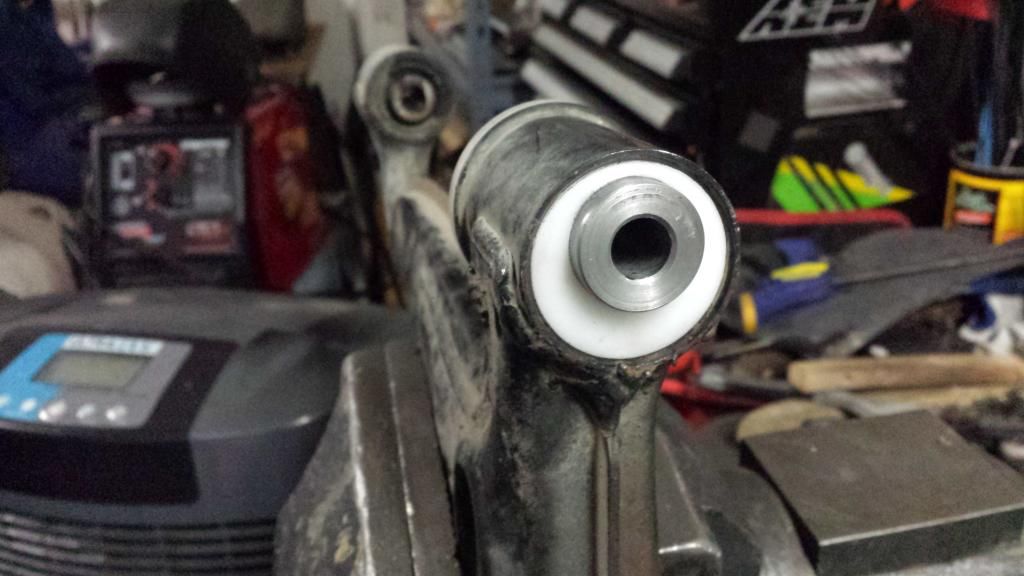
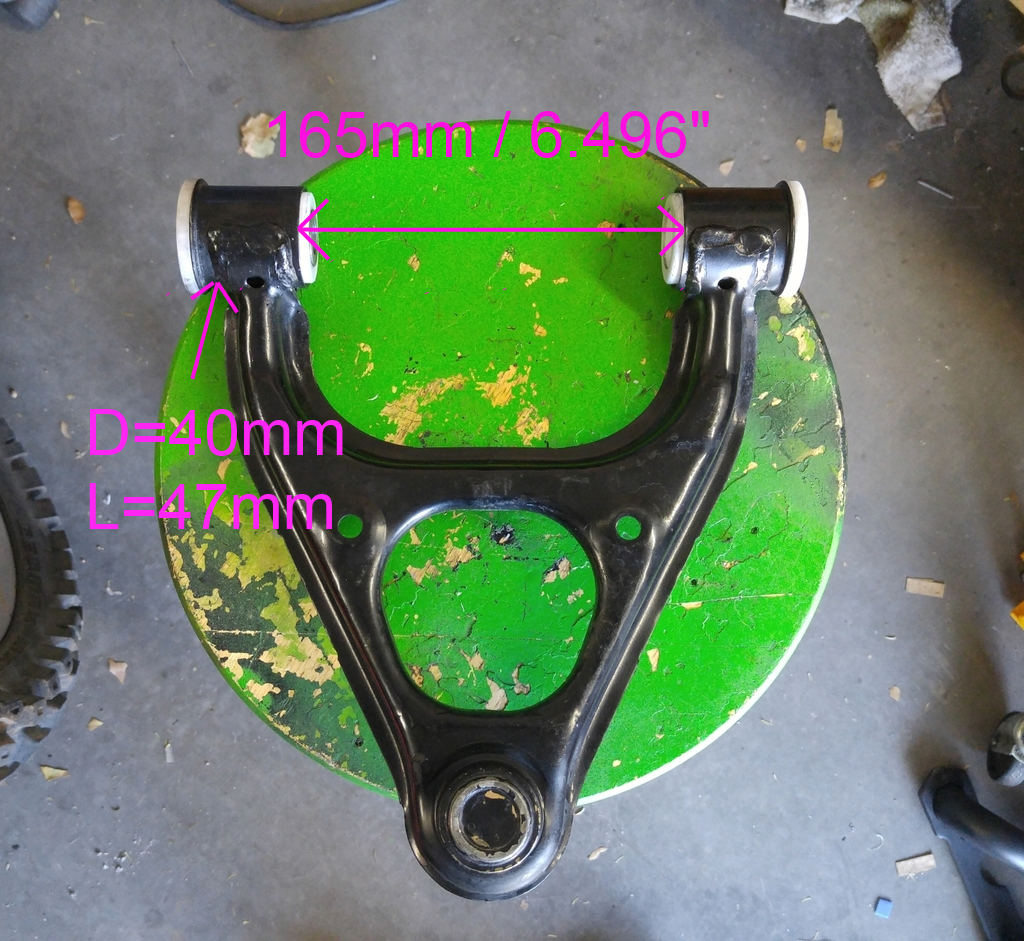
The knuckle bore is 38mm in diameter and 47mm long.
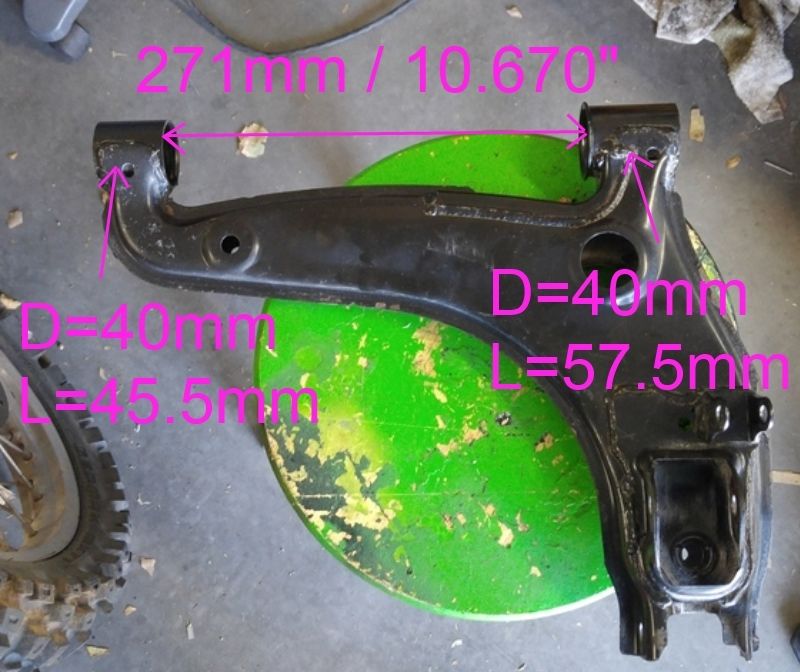
RLCA. Unlike the FLCA, both front and rear inner bushings are the same and use the same sleeve, the camber bolts are the same as the fronts at 12mm diameter. The sleeve dimensions are 70x23x12.32.
The bolt that runs through the outer bushings and the knuckle is 14mm in diameter. The outer bushing sleeves are 59x21x14.32mm. The knuckle is 80mm wide where the bolt goes through.
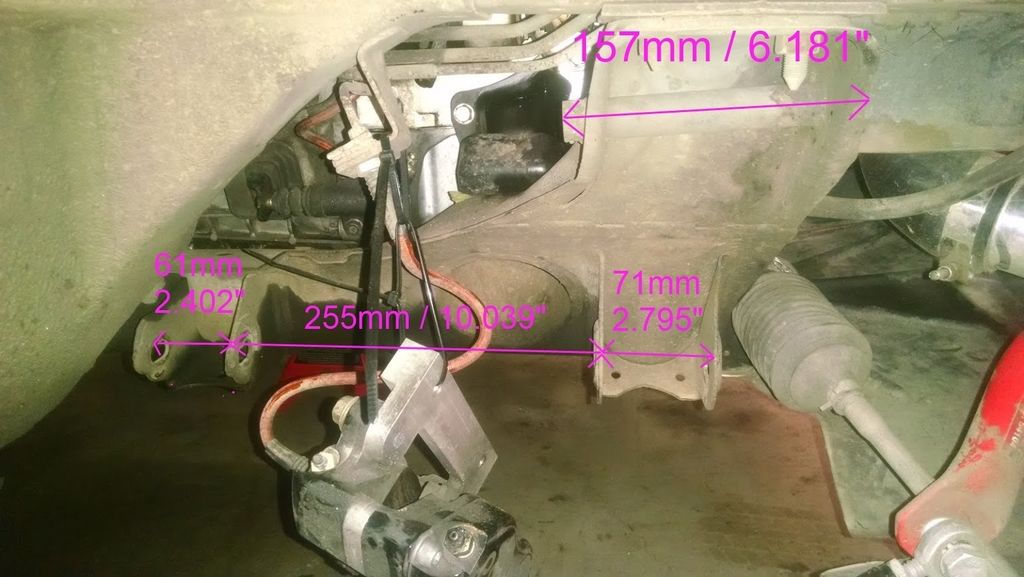
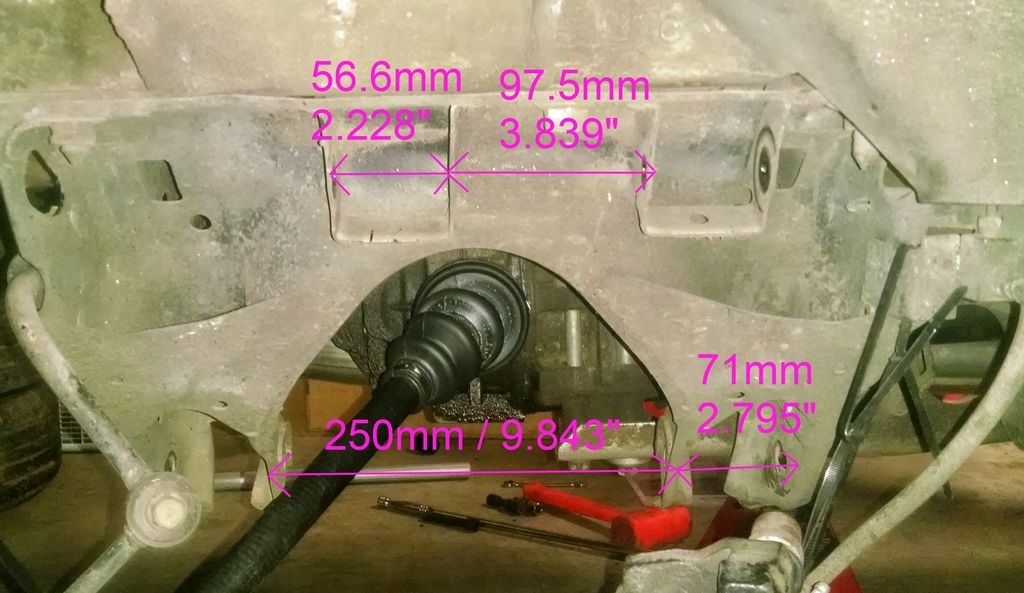
Subframes
Measurements between front and rear mounts on the subframe for each arm, are from inside face to inside face.
Front
Rear
Delrin Dimensions
Can be seen here. You are free to use this information to make bushings for yourself, for your husband, a friend. You are not free to use this information to make and sell these. If there are any changes I will update them so check back before you machine your bushings for possible changes. I have made a change log so you can tell if you have the latest data or keep track of the changes.
Again, contact @aidandj for the 4 LCA poly bushings you will need if you are making your own delrin bushings.
Besides bbundy, I'd also like to give honorable mentions, as contributors to past discussions that lead up to this thread, and some of the ideas in it, to: aidandj, leafy, ftjandra, madjak, and others im sure im forgetting (sorry).
DISCUSSSS!!!!!!!!!!!!!!
Mod Note: The following was moved here from post #101 of this thread, on Sean's request that it become part of the first page.
Bushing Megathread Supplemental 1.0:
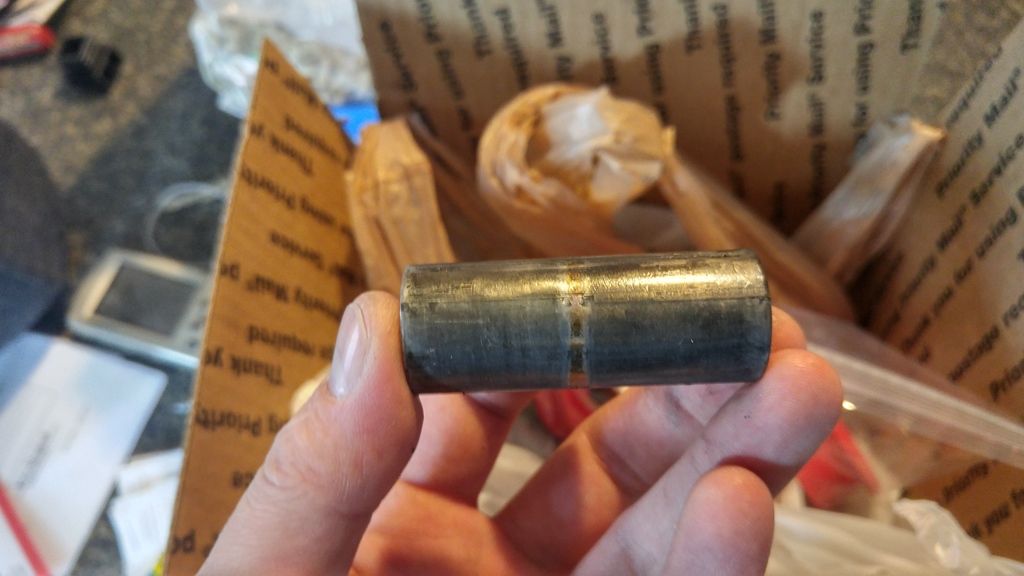
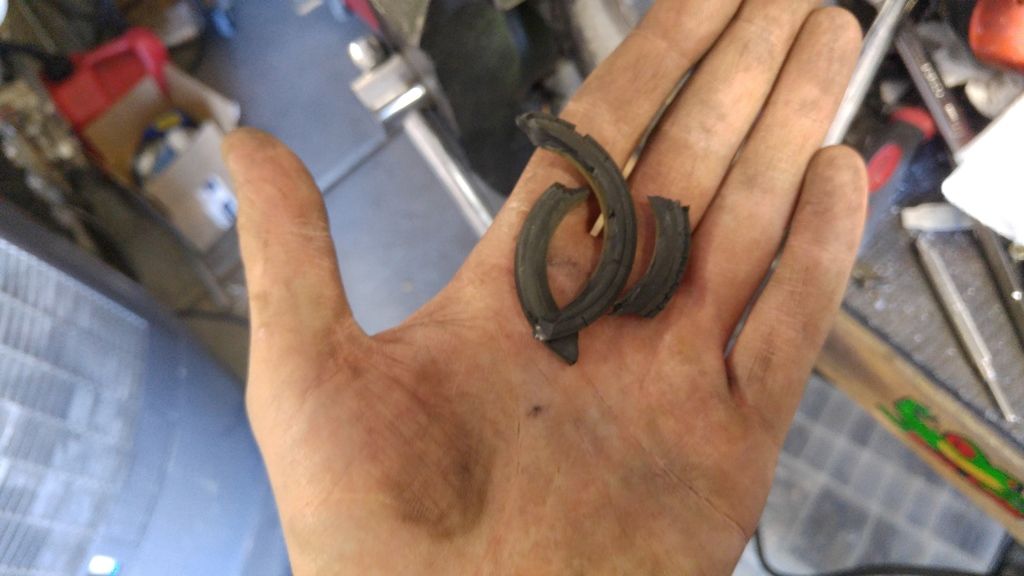
First a reminder of how bad poly sucks.
A few weeks ago Arca_ex(Aaron) and I did the swap from ES poly to the full "NASA Delrin" kit on his car. All but 1 or 2 sleeves had to be pressed out with a hydraulic press. They were covered in very thick goo; the ES supplied silicone based lube mixes with dirt and turns into adhesive. Its also abrasive.
The plating is all worn away and most of the sleeves had shallow grooves worn in them from debris.
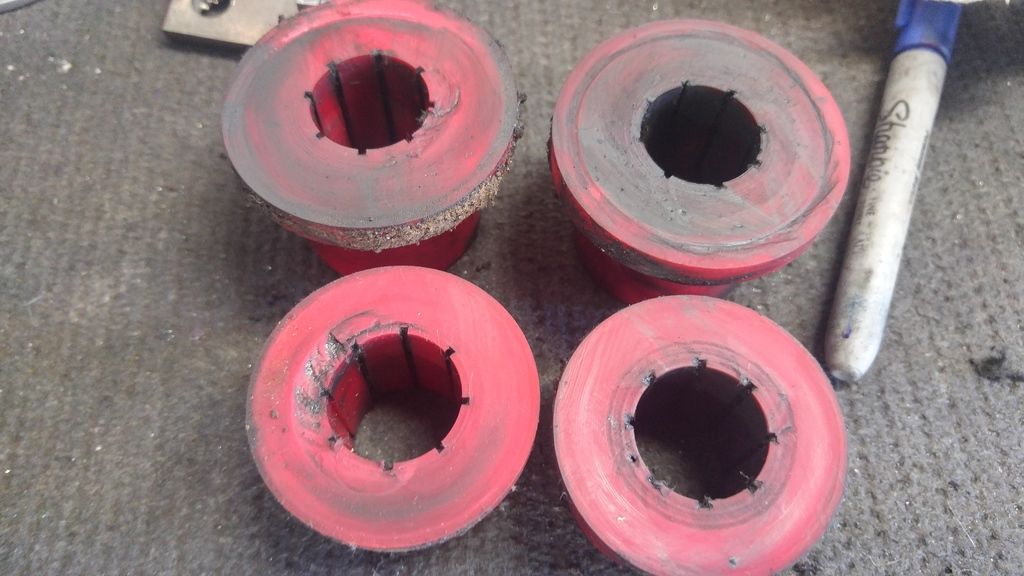
Here are some of the LCA bushings from Aaron's car. The thrust faces are eating themselves.
The compliance locations that are retained as poly with the delrin kit wont suffer from this, at least not to the same extent, as the delrin bushing will take most of the load. Poly/bronze retro-fitters may still suffer from this.
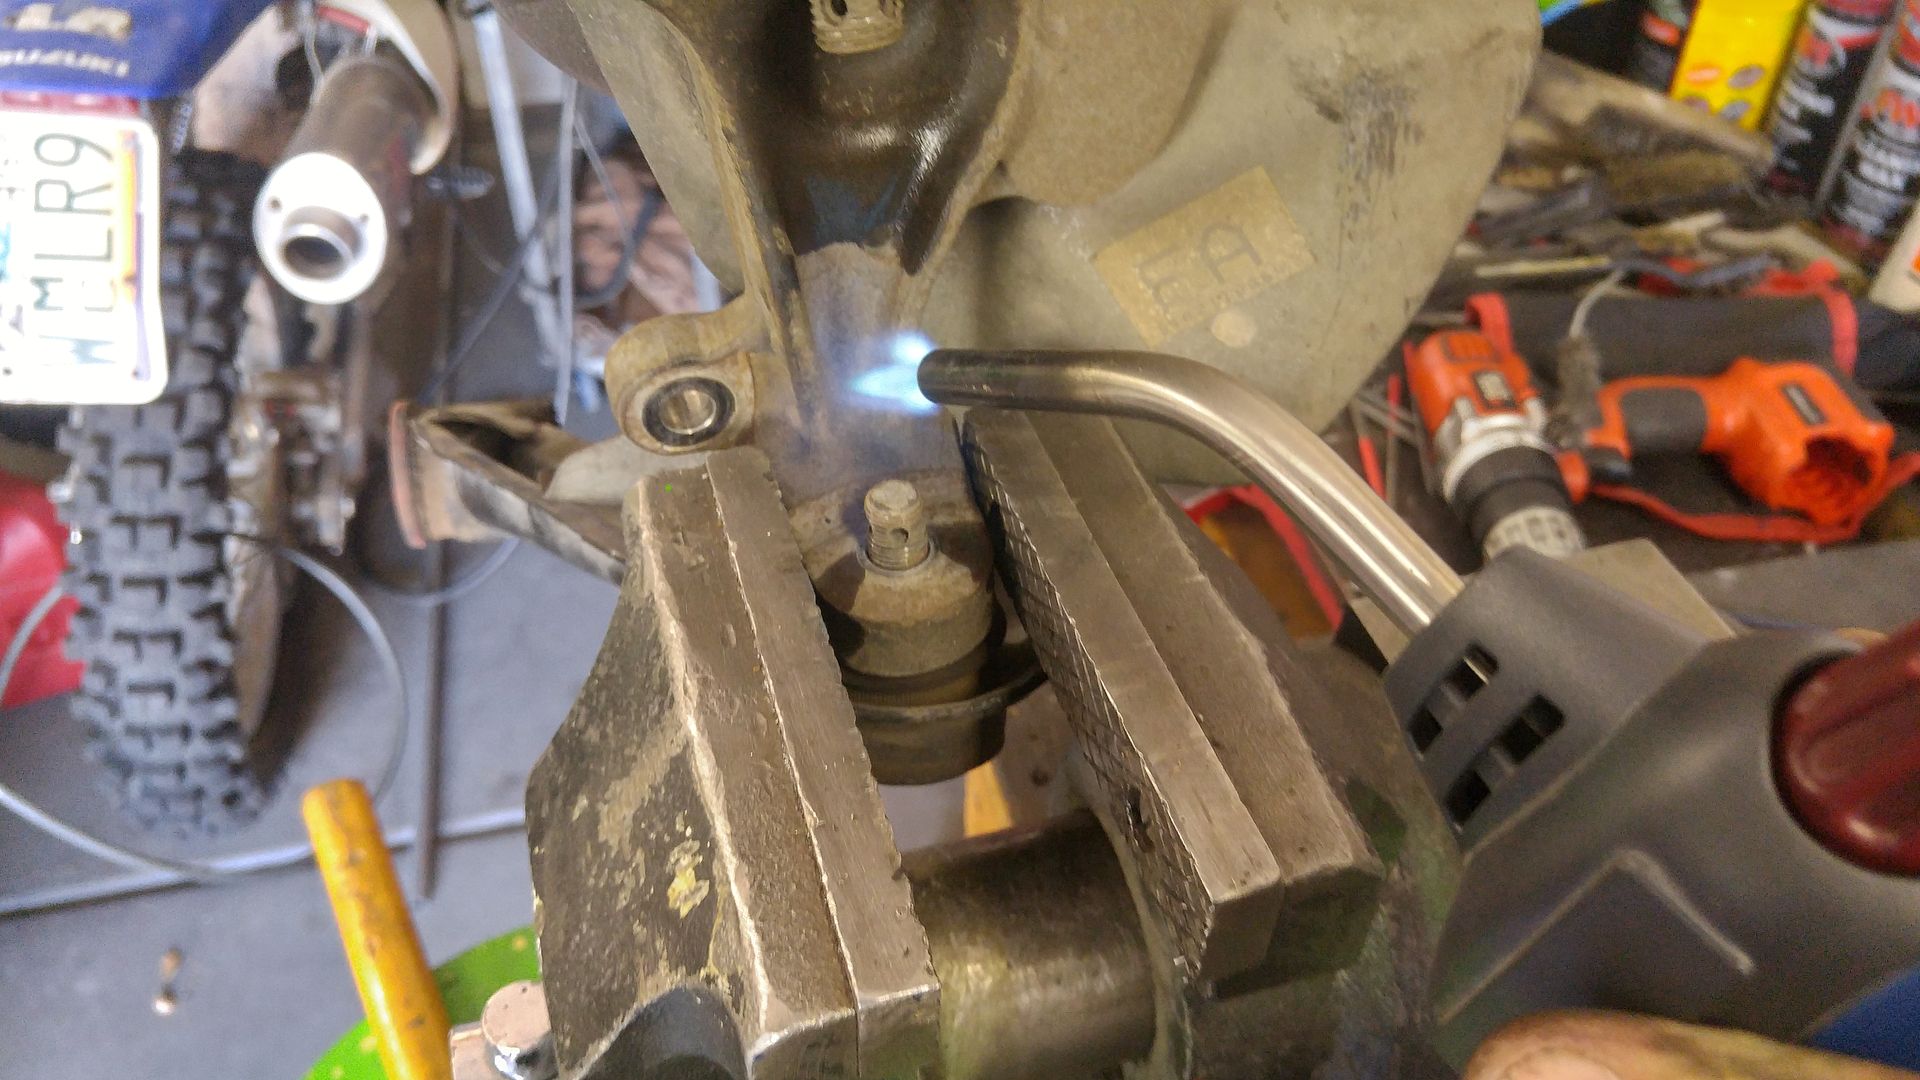
Cant get your BJ tapers to break free?
Heat the knuckle near the ball joint like so, 1.5-2 minutes is usually plenty. Then let it sit for another minute or 2 so the heat transfers, whack it with a brass drift and a hammer and they usually fall apart. When in doubt, bigger hammer and more heat! Use at your own risk
Installing delrin tips:
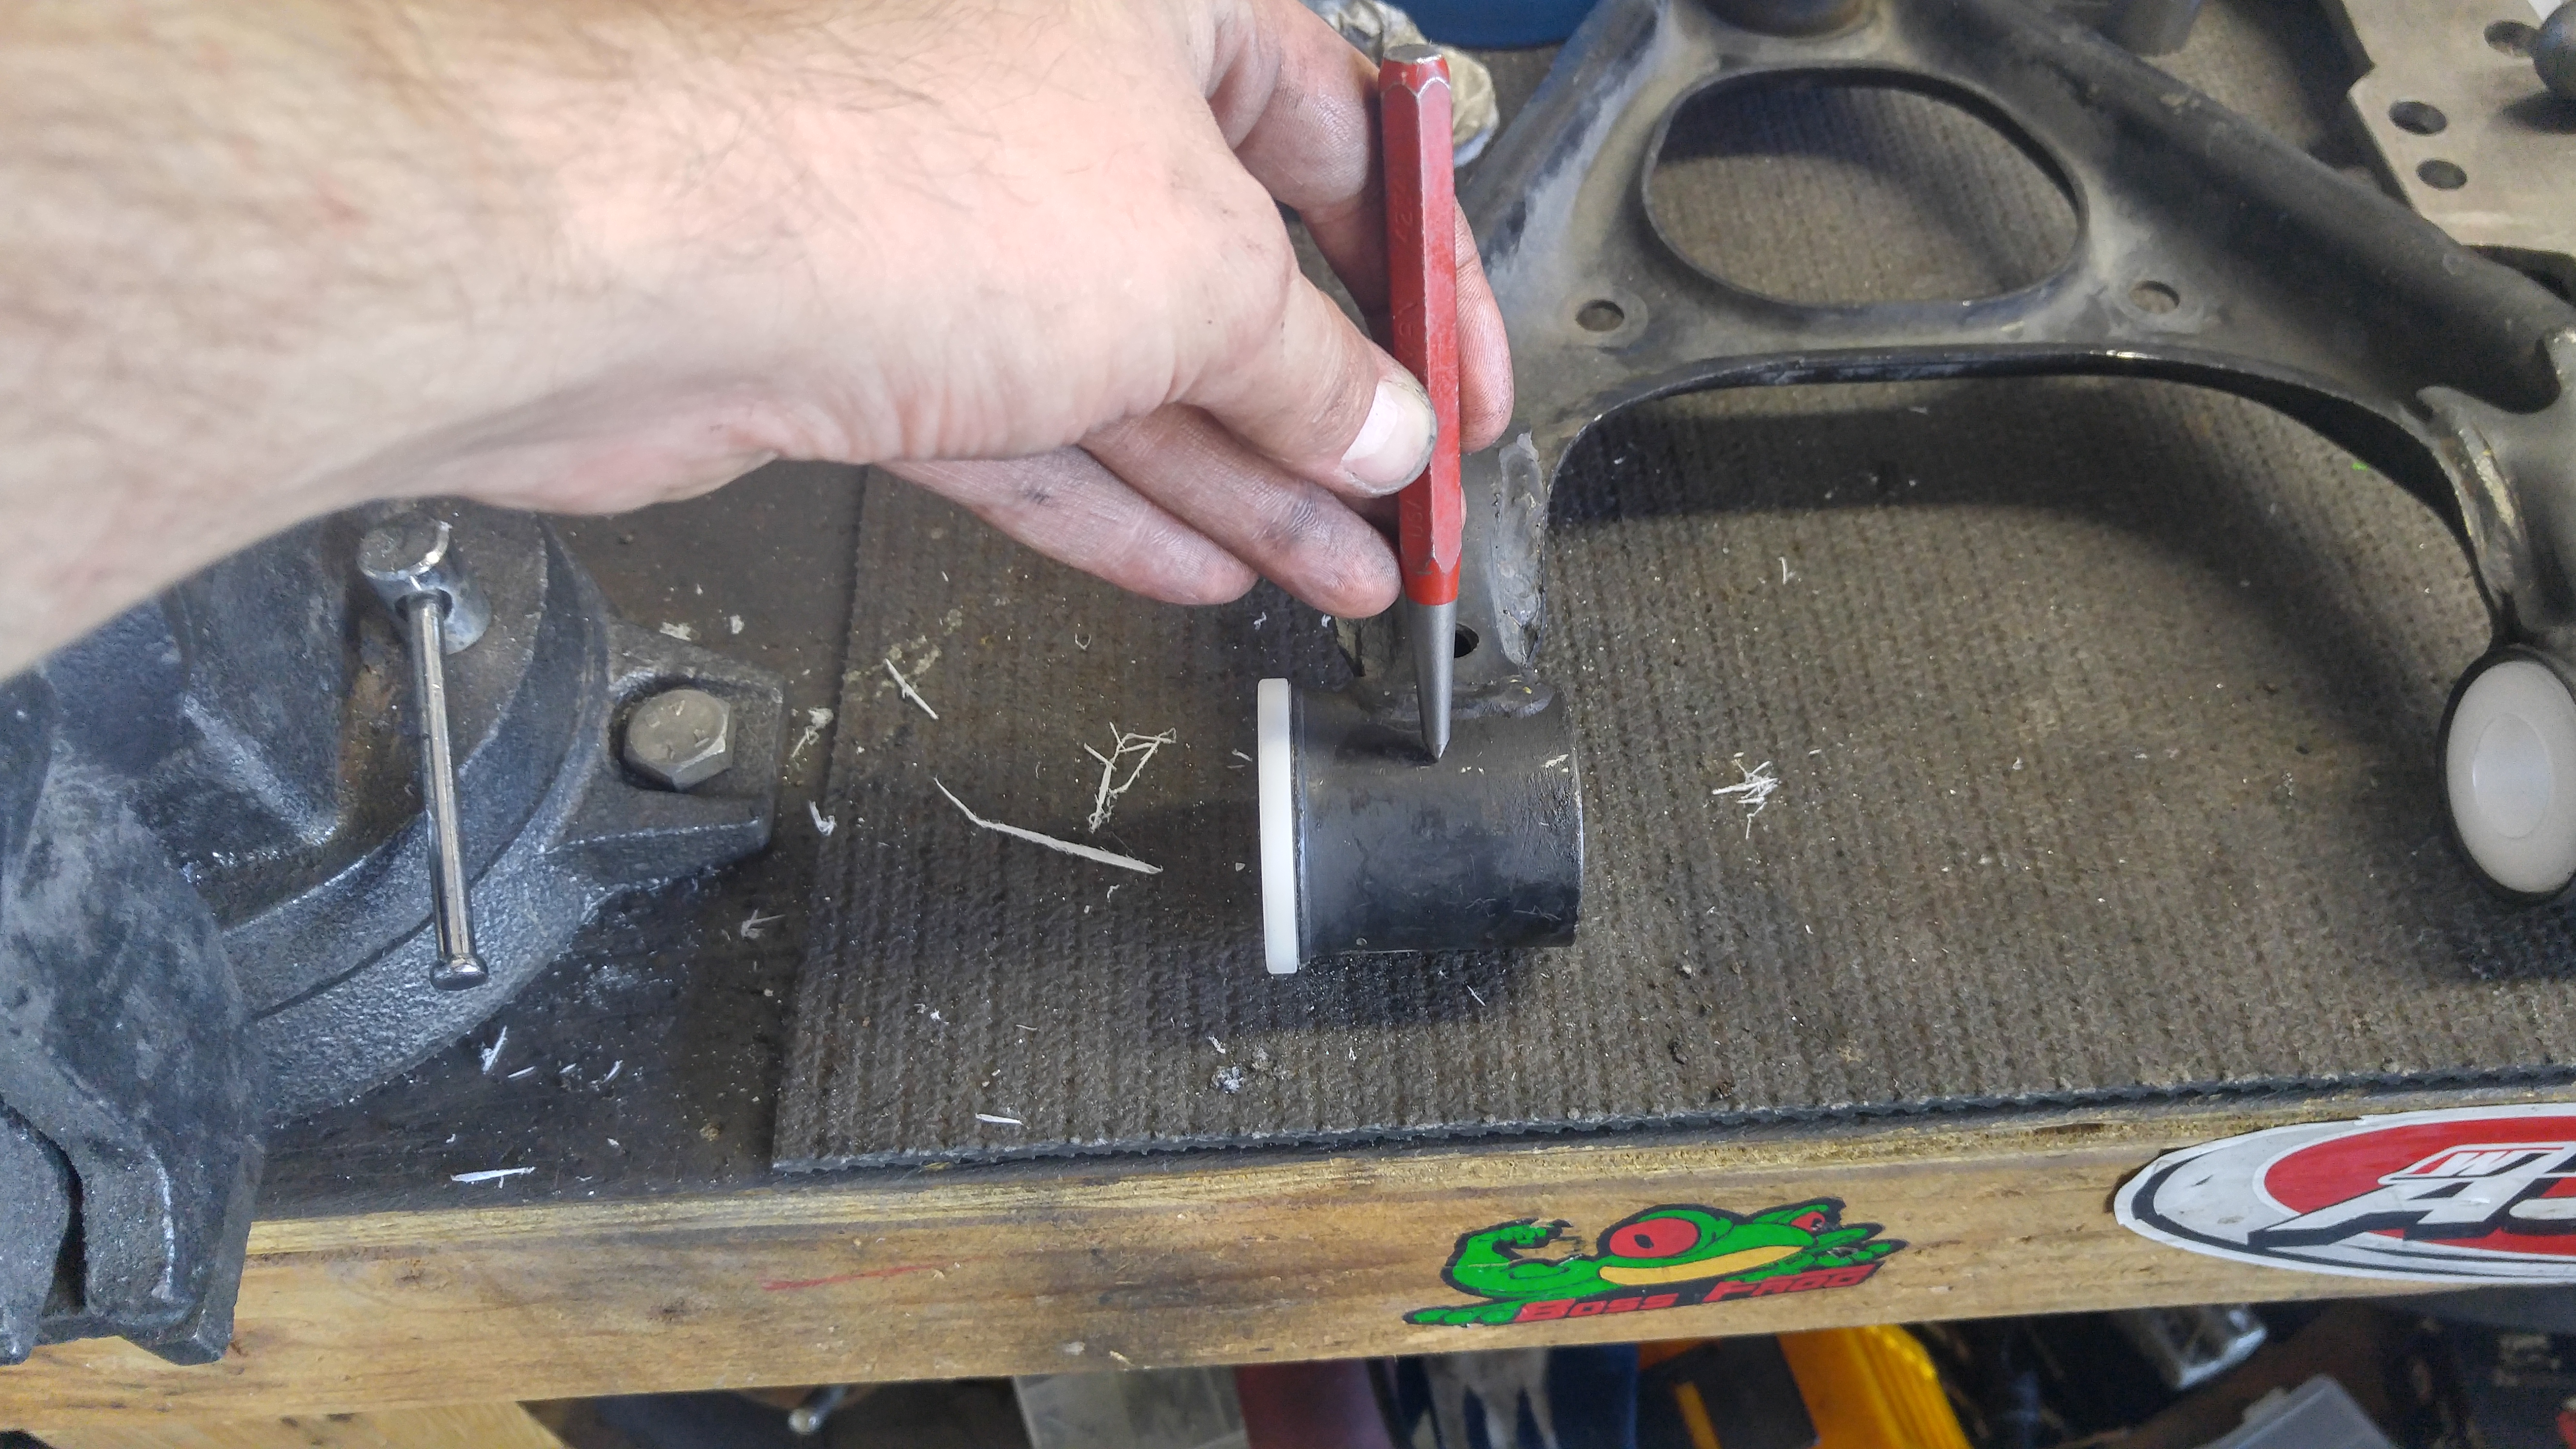
After youve cleaned the control arm bores and removed any burrs, press the bushings in. You will then want to drill and tap for the grease fittings, do this before reaming the bushings out. On the one piece bushings, put the fitting wherever is convenient, drill through the delrin into the sleeve bore. For the 2 piece bushings, aim for the gap in between the bushings and drill through them slowly to reduce the risk of cracking a chunk off when the bit comes through the delrin bore.
Punch your arms for drilling. Go buy a punch at the harbor freight if you dont have one.
I supply 1/4-28 grease fitting with all my kits. Use a 7/32" or #3 drill bit.
It should be round and look like this.
Tap to 1/4-28 just through the steel, and maybe a little of the delrin. Let the fittings form some of its own threads in the delrin where possible to help seal it up, use RTV on the short fittings. Dont install the fitting until after reaming though, or you will be picking delrin shaving out of the hole.
I supply a 1/4-28 SS screw with any offset bushings to help hold it in place in addition tot he fitting. Here is a FLCA with the offset installed for max negative camber. If you have offset drill this hole before reaming as well, but wait to install the screw until after yopuve reamed the bushing.
Also make sure you install the poly bushings in the correct locations, it does matter. I label the baggies they come in, but in case you opened them all up and threw them in a box, they have part numbers cast into them on the inside face.
64408, FLCA-F-F
64407, FLCA-F-R
64411, RLCA-F, front and rear positions
When in doubt, the thicker flange always takes the braking load.
I find it much easier to install the bronze bearing into the poly bushing before you install the bushing into the arm.
Like so
Push them in with the washers intil they are flush, that will set the depth, as they will hard to move once in the arms.
For any of the camber bolt locations, with the poly bronze, I use these thick washers. Youll notice, like any washer, that one side it rounded and the other side is sharp edged. try to face the sharp edges out, towards the sub frame ears. Its not critical.
Enjoy!
Last edited by hi_im_sean; 10-01-2018 at 02:58 PM.
Awesome work and thanks for adding the metric dimensions!
I'd just like to add that I'm using plastic bearings instead of bronze. I found sourcing non-metric bronze bearings in Australia was expensive so instead I'm using Iglidur G plastic bearings (which I think are a type of delrin) in metric sizes. You can also get these in the required 3/4" ID - 7/8" OD sizes in up to 1 1/2" length as a direct replacement to the bronze.
I've been running them for 6 months and so far there has been no visible sign of wear. The plastic bearings are great because they can be easily cut to size, they are very light, very cheap ($1.50 Aus a bearing), low maintenance and give very low friction.
I'll report back if I encounter and issues with them.
Go ahead and put me on the list for a bronze retrofit kit. I wouldn't have sold you my bronze bearings if I'd known you were going to offer a sleeve kit with washers. lol
Incredibly awesome post. I'd love to send money to SADfab for a full bronze sleeve and knuckle spherical retrofit, but right now all I can spring for is .
I gotta think with regular greasing that setup wouldn't fare too badly on a streetcar.
Incredibly awesome post. I'd love to send money to SADfab for a full bronze sleeve and knuckle spherical retrofit, but right now all I can spring for is .
I gotta think with regular greasing that setup wouldn't fare too badly on a streetcar.
That's the best part. The grease isn't required to eliminate stiction, it helps keep it clean, but even without grease it would still work just fine.
Go ahead and put me on the list for a bronze retrofit kit. I wouldn't have sold you my bronze bearings if I'd known you were going to offer a sleeve kit with washers. lol
I am going to throw out a question that I have wondered about since Bob Bundy first identified fabricating sleeves and material choice. While I am an injuneer, I stick to steel structures and not ME. Bob selected the bronze bushing size based on the size of the bushing, and then machined new sleeves. Why wouldn't you simply reuse the sleeves you already have, and then machine the bushings slightly oversized to accommodate bronze bearings? The bronze bearings are available in 1/8" increments, so it isn't exactly that the size isn't available.
Now then, I get the constraints that Bob is working with V8Roadsters tubular arms, and these have proprietary bushings. However stock Miata arms have larger bushings that can maybe accommodate this? And it seems to me (although I haven't verified) that machining polyurethane should be a whole lot cheaper than machining various steel selections to make new (smaller) sleeves. Also, IIRC Bob's calculations showed the slightly smaller sleeves were barely adequate for the loads.
I'd just like to add that I'm using plastic bearings instead of bronze. I found sourcing non-metric bronze bearings in Australia was expensive so instead I'm using Iglidur G plastic bearings (which I think are a type of delrin) in metric sizes. You can also get these in the required 3/4" ID - 7/8" OD sizes in up to 1 1/2" length as a direct replacement to the bronze.
I've been running them for 6 months and so far there has been no visible sign of wear. The plastic bearings are great because they can be easily cut to size, they are very light, very cheap ($1.50 Aus a bearing), low maintenance and give very low friction.
Why did you select the G-series? I get the general purpose, and suited for oscillating (vs. rotational), but seems there are others that might have better wear characteristics? I was also looking at materials with more vibration dampening characteristics (NVH) and dirty environment. Granted the price only goes up...
I am going to throw out a question that I have wondered about since Bob Bundy first identified fabricating sleeves and material choice. While I am an injuneer, I stick to steel structures and not ME. Bob selected the bronze bushing size based on the size of the bushing, and then machined new sleeves. Why wouldn't you simply reuse the sleeves you already have, and then machine the bushings slightly oversized to accommodate bronze bearings? The bronze bearings are available in 1/8" increments, so it isn't exactly that the size isn't available.
Now then, I get the constraints that Bob is working with V8Roadsters tubular arms, and these have proprietary bushings. However stock Miata arms have larger bushings that can maybe accommodate this? And it seems to me (although I haven't verified) that machining polyurethane should be a whole lot cheaper than machining various steel selections to make new (smaller) sleeves. Also, IIRC Bob's calculations showed the slightly smaller sleeves were barely adequate for the loads.
There are a few reasons, but you do bring up a good point-
Mainly, as mentioned, it would require drilling out all of your bushings. In my experience, its not something easily done (or even doable) with a hand drill. It required chucking in a lathe at high-ish speed, and a nice new sharp drill bit. To get a decent surface finish, you have to let the bit dwell in the bushing for a while and let it come up a temp where it starts to almost polish or burnish(its probably melting) the poly. If you have a lathe, this may be the better option for you. If not, you would need to send all your bushings to me or your machinist of choice to have them drilled out. If you are installing poly as a fresh install this may work as you can plan it out. But if you are retrofitting an existing install, providing the sleeves allows for a quick turn around. Some people may not want to have their car on jack stands for a few weeks. You are correct drilling poly is easier and cheaper, but by the time you send them to me and pay shipping you will be at least half way to the cost of machining sleeves. Also the bronze will be a little more money at the next size up, but that's only going to be a few dollars, with the added benefit of more bearing surface area.
Aidan an I actually debated getting quotes to cast our own bushings with 1" bores.
Minor issues are-
We don't know what material the ES and prothane sleeves are, although I'm positive they will be adequate, or at least no worse than 1018. Their ID tolerances suck, they are sloppy. Although that's more a perfectionist thing and less of an actual concern.
(12/6/17 edit- I have now had dozens of ES sleeves in my hands. They are rough on the OD, cadmium plated SUPER SOFT crap steel. I would not use these as a bearing race, even if the OD was turned and polished)
The only sleeve load concerns were the camber bolt locations where the sleeve interfaces with the edges of the oval shaped hole in the control arm leaving little surface area to transfer the load, and with using aluminum with the sphericlas. The camber bolt location is dealt with using the washers to spread the load. At 7/8" there is about 1mm more in diameter contact face than with stock rubber bushings, and the same as the sleeves than come with the poly kits. Myself and leafy still have the 3/4" 6061(you may recall 6061 was deemed to soft, 7075 was suggested, and at a larger diameter at that) spacers on our knuckles with 0 issues. I have cranked that bolt down as hard as I can without breaking something and the aluminum has shown no signs of deformation. I think even those only become a concern with a camber bolt slot, and this may a case where the theory and math don't line up exactly with real life.
I don't see column loading as a concern. The worst case scenario is the FUCA, with a 0.594" ID and a 0.750" OD for the sleeve, and using a large 15mm bolt clamping it together. I didn't run the math, because im not an engineer, but real life testing shows its fine. The tube that is welded to the subframe that the bolt runs through are almost the same dimensions at either 19 or 20mm OD with the same ID (I need to measure). So if the sleeves were made the next size up, to 7/8", the subframe will then be the next weakest link and will start to deform before anything else would. But, if you would like to run the math for us, please do!
Regarding the V8R arms, you are correct in that the bushing bores are too small at 1-1/8" to go with larger bronze bearings. Those must have new sleeves made.
Having said all that, drilling out the bushings is definitely an option, and something we will be glad to do, or people can do themselves if they chose to go that route.
Last edited by hi_im_sean; 12-06-2017 at 10:59 AM.
Wonderful! I was actually looking into making some acetal bushing sometime. Thank you a ton for the info, measurments, and work! I may be in contact in the future for bushings depending on pricing and how lazy I am feeling.
Why did you select the G-series? I get the general purpose, and suited for oscillating (vs. rotational), but seems there are others that might have better wear characteristics? I was also looking at materials with more vibration dampening characteristics (NVH) and dirty environment. Granted the price only goes up...
I chose the G bearings because they are the base material and so are the most common and are the cheapest. It was a total experiment so I wanted the cheapest option at the time. If they failed due to rotational wear or load then I figured I could move to a higher grade material. The pricing doubled or tripled with the higher grades and then you may as well go for the bronze.
Btw the metric sized bearings use a larger diameter sleeve @ 20mm vs the 19.05mm (3/4") sleeves. Its not much more but enough that I don't think I need the washers at each end on the adjustment bolts. There is a decent area to spread the load and if the sleeve material is higher grade then it should be fine. The washers do act to stop grime getting into the bearing though.
I am going to throw out a question that I have wondered about since Bob Bundy first identified fabricating sleeves and material choice. While I am an injuneer, I stick to steel structures and not ME. Bob selected the bronze bushing size based on the size of the bushing, and then machined new sleeves. Why wouldn't you simply reuse the sleeves you already have, and then machine the bushings slightly oversized to accommodate bronze bearings? The bronze bearings are available in 1/8" increments, so it isn't exactly that the size isn't available.
Now then, I get the constraints that Bob is working with V8Roadsters tubular arms, and these have proprietary bushings. However stock Miata arms have larger bushings that can maybe accommodate this? And it seems to me (although I haven't verified) that machining polyurethane should be a whole lot cheaper than machining various steel selections to make new (smaller) sleeves. Also, IIRC Bob's calculations showed the slightly smaller sleeves were barely adequate for the loads.
The urethane bushings are off the shelf. urethan is near impossible to machine nicely you would have to come up with new bushing molds. bolt clamp load will mushroom out the ends of the sleaves due to bolt clamp force on the lower adjustment slotted holes if you use a smaller diameter and low strenght mild steel material and tighten the bolts tight enough they dont slip its guarenteed. My standard diameter energy suspension bushing sleeves mushroomed the ends of the sleeves after several adjustments and occasional adjustment slipps. I don't think the energy suspension sleeves are as high of strenght as the steel used in OEM bonded rubber ones.

 02-01-2016, 06:10 PM


 29
29