
Shock Tech, 101
 12-07-2010, 11:24 AM
#281
I'm Miserable!
Thread Starter

Join Date: Mar 2010
Posts: 112
Total Cats: 0
So, to update everyone. I have purchased a Bilstein shock that will be dedicated to this thread. I will use this to show you the internals of the shock, and also how to create different curves on the graph.
Here is the shock on the dyno being set up for the initial runs. At this point, I am setting the preload and about to adjust the IR temp sensor.
Here is the shock on the dyno being set up for the initial runs. At this point, I am setting the preload and about to adjust the IR temp sensor.

Reply
 0
0

0
 12-07-2010, 06:10 PM
#283
Junior Member

Join Date: Jun 2008
Location: Fairfield, California
Posts: 436
Total Cats: -7
Here is a layout for a standard Bilstein build. Everything is in the order that it will go on the shaft.
Attachment 19119
Attachment 19119
Reply
0
0
 12-07-2010, 06:17 PM
#285
Junior Member
Join Date: Jun 2008
Location: Fairfield, California
Posts: 436
Total Cats: -7
Looking at the picture above, you will notice a notched shim. This is typical of how Bilstein achieves the bleed in their shocks.
The picture below shows how the notched shim sits on the piston. By changing the thickness of this shim you are able to change the amount of bleed.
The picture below shows how the notched shim sits on the piston. By changing the thickness of this shim you are able to change the amount of bleed.
When we're looking at your photo it actually looks like there are two notched shims.
1) Is that how the thickness is adjusted for the bleed shims - by adding or subtracting shims?
2) Are there bleed shims on both sides of the piston, or is bleed for both damping and bump adjusted from just one side of the piston?
3) Is bleed also controlled by other means; say differences in the bleed holes between different pistons, or different shim shapes?
4) Are the internals we're looking at the same as, or only similar to those within the yellow Bilstein's we're more familiar with for our Miatas?
Reply
0
0
12-07-2010, 06:54 PM
#286
I'm Miserable!
Thread Starter
Join Date: Mar 2010
Posts: 112
Total Cats: 0
Maybe I'm missing something. Where do you see two notched shims?
The bleed is adjusted by the thickness of the notched shim, along with the number of notches. This one in the picture has 8 notches, but they also have them in 4 and 2 notch.
The other way I adjust bleed is by drilling the piston. I've included a picture below of a piston with a .060" bleed hole.
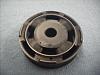
The bleed is adjusted by the thickness of the notched shim, along with the number of notches. This one in the picture has 8 notches, but they also have them in 4 and 2 notch.
The other way I adjust bleed is by drilling the piston. I've included a picture below of a piston with a .060" bleed hole.
Ok, I think I get it.
When we're looking at your photo it actually looks like there are two notched shims.
1) Is that how the thickness is adjusted for the bleed shims - by adding or subtracting shims?
2) Are there bleed shims on both sides of the piston, or is bleed for both damping and bump adjusted from just one side of the piston?
3) Is bleed also controlled by other means; say differences in the bleed holes between different pistons, or different shim shapes?
4) Are the internals we're looking at the same as, or only similar to those within the yellow Bilstein's we're more familiar with for our Miatas?
Reply
0
0
12-07-2010, 10:23 PM
#288
Junior Member
Join Date: Jun 2008
Location: Fairfield, California
Posts: 436
Total Cats: -7
Ok, Bernie explained the shim stack and I'll explain it to you.
Let's start with the second photo, the one with the completed piston assembly.
The red thing on the bottom - that's the droop bumper and it keeps the piston assembly from banging up against the top of the shock when the suspension goes into full droop mode.
Now let's move over to the photo of the various components. Imagine you have the shock shaft between your knees with the part of the shaft that's inside the shock body pointing up.
The first thing that goes on - at least for the sake of this discussion - is that red bumper. We're then going to take those various other shims and washers and put them on next - starting at the bottom row of the photograph.
On the bottom row there are two shims; one big and the other small. The big one, let's call it the "bottom plate", goes on first. It's job is to be the contact surface for that rubber bumper.
The smaller shim on the bottom row, let's call it the "top off shim", goes on next. I'll leave it to Bernie to explain what it does, but the "top off shim" comes in different diameters.
Moving to the next row from the bottom, the next shim to go on is the larger shim; let's call it the "main compression damping shim". Next is the smaller shim next to it, which we'll call the "pre-load shim". Again, Bernie will explain the function, but the "pre-load shim" comes in different thicknesses.
Ok, next the piston is slid onto the shaft, and then we move up to the row of shims above the piston.
The first to go on after the piston is another pre-load shim, but this one is for rebound damping; again, it comes in different thicknesses.
The slotted shim, which we've already introduced as the "bleed shim" is next. As Bernie mentioned this comes with different size and different numbers of slots. Interestingly, it's designed so that no matter how it's clocked on the shaft the same amount of bleed opening is exposed.
After the bleed shim comes the next large diameter shim in the row, which we'll call the "main rebound damping shim".
We're finally at the top row, and we'll begin on the right. The right most small shim is another "top off shim". Next to it, and next on the shaft, is the "top plate", and to the left of it, and the last on the shaft, is the washer against which the Nyloc nut that holds the assemble on the shaft rests against.
So, in summary, in order of assembly, we have:
Got it? Good.
Let's start with the second photo, the one with the completed piston assembly.
The red thing on the bottom - that's the droop bumper and it keeps the piston assembly from banging up against the top of the shock when the suspension goes into full droop mode.
Now let's move over to the photo of the various components. Imagine you have the shock shaft between your knees with the part of the shaft that's inside the shock body pointing up.
The first thing that goes on - at least for the sake of this discussion - is that red bumper. We're then going to take those various other shims and washers and put them on next - starting at the bottom row of the photograph.
On the bottom row there are two shims; one big and the other small. The big one, let's call it the "bottom plate", goes on first. It's job is to be the contact surface for that rubber bumper.
The smaller shim on the bottom row, let's call it the "top off shim", goes on next. I'll leave it to Bernie to explain what it does, but the "top off shim" comes in different diameters.
Moving to the next row from the bottom, the next shim to go on is the larger shim; let's call it the "main compression damping shim". Next is the smaller shim next to it, which we'll call the "pre-load shim". Again, Bernie will explain the function, but the "pre-load shim" comes in different thicknesses.
Ok, next the piston is slid onto the shaft, and then we move up to the row of shims above the piston.
The first to go on after the piston is another pre-load shim, but this one is for rebound damping; again, it comes in different thicknesses.
The slotted shim, which we've already introduced as the "bleed shim" is next. As Bernie mentioned this comes with different size and different numbers of slots. Interestingly, it's designed so that no matter how it's clocked on the shaft the same amount of bleed opening is exposed.
After the bleed shim comes the next large diameter shim in the row, which we'll call the "main rebound damping shim".
We're finally at the top row, and we'll begin on the right. The right most small shim is another "top off shim". Next to it, and next on the shaft, is the "top plate", and to the left of it, and the last on the shaft, is the washer against which the Nyloc nut that holds the assemble on the shaft rests against.
So, in summary, in order of assembly, we have:
Droop bumper
Bottom plate
Top off Shim (different diameters)
Main Compression Damping Shim
Pre-load Shim (different thicknesses)
PISTON
Pre-load Shim (different thicknesses)
Bleed shim (different slots, thicknesses)
Main Rebound Damping Shim
Top Off Shim (different diameters)
Top Plate
Washer
Nyloc Nut
Bottom plate
Top off Shim (different diameters)
Main Compression Damping Shim
Pre-load Shim (different thicknesses)
PISTON
Pre-load Shim (different thicknesses)
Bleed shim (different slots, thicknesses)
Main Rebound Damping Shim
Top Off Shim (different diameters)
Top Plate
Washer
Nyloc Nut
Got it? Good.
Reply
0
0
12-07-2010, 10:41 PM
#291
Junior Member
Join Date: Jun 2008
Location: Fairfield, California
Posts: 436
Total Cats: -7
The inside circle of slots on one side of the piston is common (connected) with the outside circle slots on the other side of the piston.
Flow through the piston is from the outside circle of slots to the inside circle of slots and then past the shims.
Reply
0
0
12-09-2010, 04:39 AM
#292
Newb

Join Date: Nov 2010
Posts: 6
Total Cats: 0
Maybe I'm missing something. Where do you see two notched shims?
The bleed is adjusted by the thickness of the notched shim, along with the number of notches. This one in the picture has 8 notches, but they also have them in 4 and 2 notch.
The other way I adjust bleed is by drilling the piston. I've included a picture below of a piston with a .060" bleed hole.
Attachment 19128
Reply
0
0
12-09-2010, 10:49 AM
#294
Junior Member

Join Date: Oct 2009
Location: A2 Michigan (UofM!)
Posts: 65
Total Cats: -14
Saw this thread and thought that perhaps I could rebuild my own bilsteins.
I am not thinking that any more.
The parts are relatively simple, but knowing what sizes etc is way beyond the diy'er without years of experience and a shock dyno. I'm happy that Bernie has the knowledge to do this.
I am not thinking that any more.
The parts are relatively simple, but knowing what sizes etc is way beyond the diy'er without years of experience and a shock dyno. I'm happy that Bernie has the knowledge to do this.
Reply
0
0
12-09-2010, 01:22 PM
#296
Junior Member
Join Date: Jun 2008
Location: Fairfield, California
Posts: 436
Total Cats: -7
Saw this thread and thought that perhaps I could rebuild my own bilsteins.
I am not thinking that any more.
The parts are relatively simple, but knowing what sizes etc is way beyond the diy'er without years of experience and a shock dyno. I'm happy that Bernie has the knowledge to do this.
I am not thinking that any more.
The parts are relatively simple, but knowing what sizes etc is way beyond the diy'er without years of experience and a shock dyno. I'm happy that Bernie has the knowledge to do this.
First, there's a highly pressurized chamber at the base of the shock. This probably isn't as big a problem as it first seems because you can probably just drill a hole at the base to evacuate the chamber and drill and tap the hole for a Schrader valve. That's what Shaikh does.
The other issue is Bilstein stakes the end of the damper rod so the plain nut they use doesn't fall off. Removing the nut buggers up the threads and they need to be recut; again more an issue of having the proper thread chaser/die rather than a major problem.
But yeah, the bigger issues are what do you put on there and how to you test it. In the long run, even if it's just R&R seals without changing damping, it's probably easier and cheaper to just send it to Bernie.
Reply
0
0
12-09-2010, 01:44 PM
#297
Junior Member
Join Date: Oct 2009
Location: A2 Michigan (UofM!)
Posts: 65
Total Cats: -14
Bilsteins can be bought for under $400 shipped (NB HDsport).
Wouldn't it be cool if Bilstein would do a SD spec'd edition and give Bernie a royalty. It would make life easier and cheaper for everyone and give SD more time to do custom spec.
Wouldn't it be cool if Bilstein would do a SD spec'd edition and give Bernie a royalty. It would make life easier and cheaper for everyone and give SD more time to do custom spec.
Reply
0
0
12-09-2010, 03:15 PM
#299
Junior Member
Join Date: Jun 2008
Location: Fairfield, California
Posts: 436
Total Cats: -7
Also, after speaking with Bernie, I'm pretty sure Bilstein isn't interested in being nearly as meticulous as Bernie is; it would take too much time and money. In Bernie's case his reputation is on the line in a way Bilstein's isn't; his customers expect a superior product and Bernie's got to deliver.
Bernie preps parts in a way Bilstein doesn't, and has some custom assemblies Bilstein doesn't use. Think of it as blue-printing your shock vs a factory job.
Bernie preps parts in a way Bilstein doesn't, and has some custom assemblies Bilstein doesn't use. Think of it as blue-printing your shock vs a factory job.
Reply
0
0
12-09-2010, 04:03 PM
#300
Junior Member
Join Date: Oct 2009
Location: A2 Michigan (UofM!)
Posts: 65
Total Cats: -14
+35 bucks per shock to get revalve? Do I buy my shocks and send to him or buy from him and add $35?
Dang that's good. I'm gonna wet myself.
I have an NA. I have NB hats, do I get NB HDsports? Or should I do NA HD and drill the hats (diy FMC hats)?
Forgot I was on mt.net. Give me a second to get my flamesuit on before replying to my dumb questions. Thanks in advance.
Dang that's good. I'm gonna wet myself.
I have an NA. I have NB hats, do I get NB HDsports? Or should I do NA HD and drill the hats (diy FMC hats)?
Forgot I was on mt.net. Give me a second to get my flamesuit on before replying to my dumb questions. Thanks in advance.
Reply
0
0


