Blaen's because 350hp build

 07-03-2012, 04:27 PM
#42
Elite Member
Thread Starter
iTrader: (6)
Join Date: Sep 2010
Location: Seattle, WA
Posts: 3,611
Total Cats: 25
I am painting it black. As a result, I have to pay extreme attention to the prep to get a good job.
P.S. DAMN YOU SAAAAAAAV! After seeing Theseus, I had to go black and can't go back.
Honestly, I find bodywork easier than wrenching under the goddamn car. I hate doing anything underneath the goddamn car so bad. It's the only reason I'm still on the 1.6 VLSD instead of a 1.8 Torsen at this point - I do not want to get under the car for a prolonged period.
 If CR would be all over these bumpers, I'd sell them on the spot and just get new bumper covers. They required an insane amount of work to get right, and I still have a tiny bit left to do on them.
Thank you!
Camo's not my thing 
Bodywork isn't that bad imo, it just takes patience.
I may have surprise pictures incoming in the next week - we'll see. I'm very close to spraying, and I'm 24 hours from final clear after the first layer of primer if I start.
FTFY Faefae, and I'll have to pass on Camo. Someday, if I get around to doing a pure track Miata though, I'll paint it bright pink camo with a big giant MT.net logo on it just for you guys though.
As for my update:
I've got what I need here for spraying. I'm using SPI black Epoxy Primer for the first two layers of primer, SPI 2k primer to get the final touches on it, reduced SPI black Epoxy as the sealer, then Wanda basecoat, with the SPI Universal Clearcoat on it. Primer tips will likely be 1.8mm, paint tips will be 1.4mm. Possibly giving a shot at a HF gun and (possibly) documenting it for the first layers of primer. If I end up going through with it, well, I would imagine there would be no small amount of interest from the guys here - although the HF gun is disposable. You only get one job out of it. But I would imagine the MT crowd is only looking to do one paint job, and not seriously considering a higher-end gun in the several hundred dollar or more range.
I may end up shortcutting and just using more Wanda products (Amazing products for the $$!), but we'll see. SPI's stuff is incredible, even ignoring the $$ cost and comparing it to high-end PPG/et al paints.
P.S. DAMN YOU SAAAAAAAV!
After seeing Theseus, I had to go black and can't go back. If CR would be all over these bumpers, I'd sell them on the spot and just get new bumper covers. They required an insane amount of work to get right, and I still have a tiny bit left to do on them.
Nice job on all of this, good body work impresses me. I'm jealous!
Body work is my worst enemy. I can't even imagine doing something like this.
I may have surprise pictures incoming in the next week - we'll see. I'm very close to spraying, and I'm 24 hours from final clear after the first layer of primer if I start.
As for my update:
I've got what I need here for spraying. I'm using SPI black Epoxy Primer for the first two layers of primer, SPI 2k primer to get the final touches on it, reduced SPI black Epoxy as the sealer, then Wanda basecoat, with the SPI Universal Clearcoat on it. Primer tips will likely be 1.8mm, paint tips will be 1.4mm. Possibly giving a shot at a HF gun and (possibly) documenting it for the first layers of primer. If I end up going through with it, well, I would imagine there would be no small amount of interest from the guys here - although the HF gun is disposable. You only get one job out of it. But I would imagine the MT crowd is only looking to do one paint job, and not seriously considering a higher-end gun in the several hundred dollar or more range.
I may end up shortcutting and just using more Wanda products (Amazing products for the $$!), but we'll see. SPI's stuff is incredible, even ignoring the $$ cost and comparing it to high-end PPG/et al paints.
Last edited by blaen99; 07-03-2012 at 07:31 PM.

Reply
 0
0

0
07-15-2012, 11:41 PM
#43
Elite Member
Thread Starter
iTrader: (6)
Join Date: Sep 2010
Location: Seattle, WA
Posts: 3,611
Total Cats: 25
Well, finally got around to taking pictures of the latest and updating on it.
So far, the Harbor Freight gun is working shockingly well for a HF piece of crap. I wouldn't get 10 foot near it as a long term gun, but as a single use gun, it works shockingly well. If it continues to work as well as it does for the paint, it may get an entry as win in the win or fail thread!
I still need to finish the front bumper, but everything is definitely getting there. This is the initial primer round, so guide coat incoming with lots of sanding, but there's definitely a great deal of progress being made.
Reply
0
0
07-16-2012, 12:09 AM
#44

Car is looking MUCH better. Really nice to see it go from looking like dookie to all nice and smooth, great job.
And re/ the HF gun: it works. And its cheap. And it works. That's a win in my book. We don't drive Ferraris, so I don't think you'd need a $2000 gun to shoot a $2000 miata.
And re/ the HF gun: it works. And its cheap. And it works. That's a win in my book. We don't drive Ferraris, so I don't think you'd need a $2000 gun to shoot a $2000 miata.
Reply
0
0
07-16-2012, 12:11 AM
#45
Elite Member
iTrader: (1)
Join Date: Feb 2008
Location: Birmingham Alabama
Posts: 7,930
Total Cats: 45
Is that the purple handle gun? My last one was a single use gun as I let paint dry and stop it up. Bought another for the Plastidip job I'm about to do. Works well.
Looks good. Excited to see how it turns out.
Looks good. Excited to see how it turns out.
Reply
0
0
07-16-2012, 12:23 AM
#46
Elite Member
Thread Starter
iTrader: (6)
Join Date: Sep 2010
Location: Seattle, WA
Posts: 3,611
Total Cats: 25
Car is looking MUCH better. Really nice to see it go from looking like dookie to all nice and smooth, great job.
And re/ the HF gun: it works. And its cheap. And it works. That's a win in my book. We don't drive Ferraris, so I don't think you'd need a $2000 gun to shoot a $2000 miata.
And re/ the HF gun: it works. And its cheap. And it works. That's a win in my book. We don't drive Ferraris, so I don't think you'd need a $2000 gun to shoot a $2000 miata.
I was prepared to go in with the HF gun just to test it and see how good it would work from a higher level perspective, but it so far has been a very pleasant surprise. However, with that said, it is NOT something that would work as a long-term painting gun.
Yeah, it's the purple-handled gun. So long as you don't expect more than a few uses at most from it, it works great. I'm surprised at how good it is relative to what I expected.
Reply
0
0
07-23-2012, 10:48 PM
#47
Elite Member
Thread Starter
iTrader: (6)
Join Date: Sep 2010
Location: Seattle, WA
Posts: 3,611
Total Cats: 25
The painting has just been finished, and it took a good 6 hours to do from the start to shooting final clear.
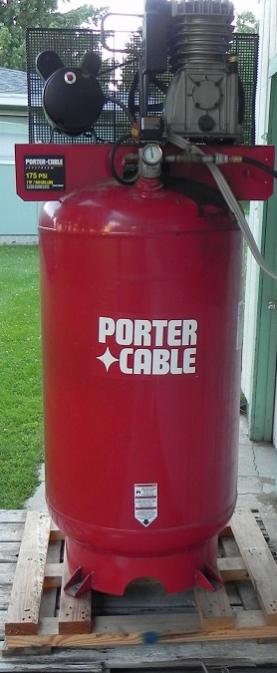
The first thing that I had to get a picture of is the compressor. This is the size of compressor you really should be using for paint, even if it's just a garage job. Yes, this compressor really is taller than I am, and I'm 6'1". It's gigantic, and for paint, larger is always better.

This paint job was done with the $50 harbor gun HVLP set. My overall take on it is it is okay - but only for one job. Realistically, if you can, it is best to only shoot with it once, although you can squeeze more than one shooting out of it if you have to. However, if you try to force more than 3 shootings out of it, you are insane and need to just bite the bullet and get a real paint gun - or buy a new one. 2 shootings was the practical limit for quality shooting with it, although you saw degradation immediately in the second shooting, and a third was still possible (It made it more difficult than was necessary to shoot with it the third time however - and it likely will end up costing me in time far more than the guns are worth).
The paint used and most primer was pure Wanda, using SPI black Epoxy as a sealer and as the first primer coat. Total material cost for the paint job was under $600 including a RIDICULOUS amount of bodyfiller and icing. If I had time to wait on SPI materials, however, what I would recommend is using all SPI primers/clears, with just a Wanda basecoat. The results you get will be definitely superior to the pure Wanda system at a minimal cost increase. Sadly, I was unable to get SPI materials here on a timeframe that was compatible with my schedule, but they are the best on the market imo - not best value for money, best period. And they are pretty cheap too.
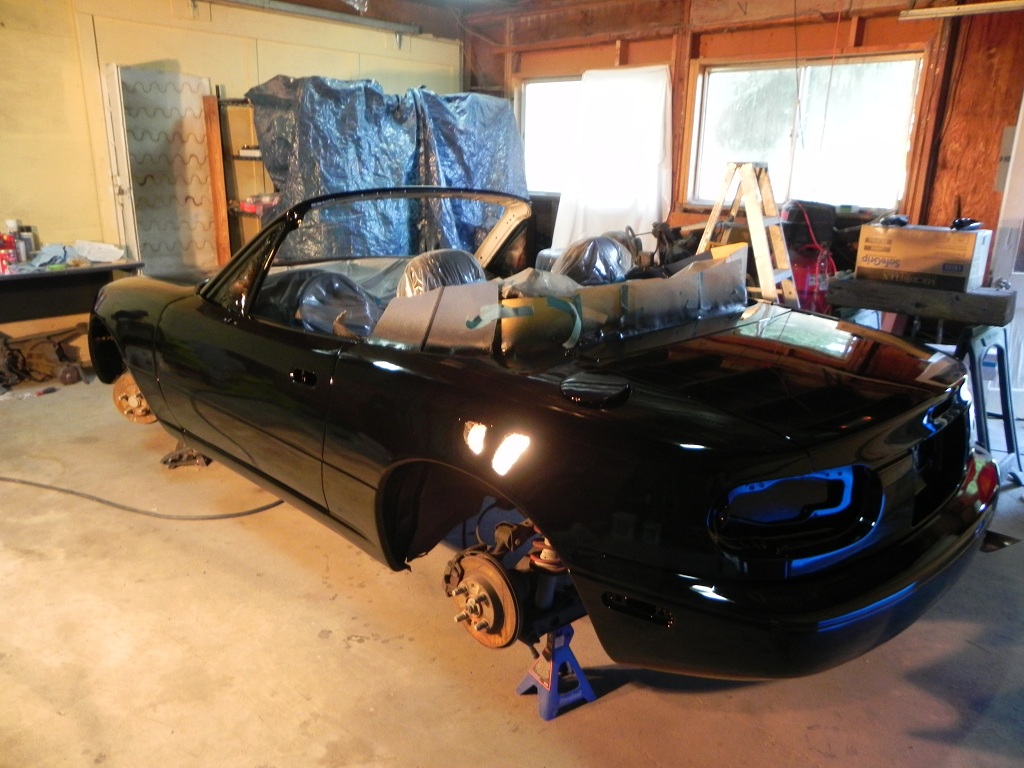
The pictures show a freshly-shot car that needs to be wet sanded. You can see the issues expected in a garage job, but none of them are unfixable - you just need a wet sanding and polish/buff. With that said, you will still get these same issues in a dedicated paint booth, and I have seen paint jobs come out of paint booths that look way worse than what was done in a crappy, ancient old garage here.
The first thing that I had to get a picture of is the compressor. This is the size of compressor you really should be using for paint, even if it's just a garage job. Yes, this compressor really is taller than I am, and I'm 6'1". It's gigantic, and for paint, larger is always better.
This paint job was done with the $50 harbor gun HVLP set. My overall take on it is it is okay - but only for one job. Realistically, if you can, it is best to only shoot with it once, although you can squeeze more than one shooting out of it if you have to. However, if you try to force more than 3 shootings out of it, you are insane and need to just bite the bullet and get a real paint gun - or buy a new one. 2 shootings was the practical limit for quality shooting with it, although you saw degradation immediately in the second shooting, and a third was still possible (It made it more difficult than was necessary to shoot with it the third time however - and it likely will end up costing me in time far more than the guns are worth).
The paint used and most primer was pure Wanda, using SPI black Epoxy as a sealer and as the first primer coat. Total material cost for the paint job was under $600 including a RIDICULOUS amount of bodyfiller and icing. If I had time to wait on SPI materials, however, what I would recommend is using all SPI primers/clears, with just a Wanda basecoat. The results you get will be definitely superior to the pure Wanda system at a minimal cost increase. Sadly, I was unable to get SPI materials here on a timeframe that was compatible with my schedule, but they are the best on the market imo - not best value for money, best period. And they are pretty cheap too.
The pictures show a freshly-shot car that needs to be wet sanded. You can see the issues expected in a garage job, but none of them are unfixable - you just need a wet sanding and polish/buff. With that said, you will still get these same issues in a dedicated paint booth, and I have seen paint jobs come out of paint booths that look way worse than what was done in a crappy, ancient old garage here.
Last edited by curly; 07-24-2012 at 02:49 AM.
Reply
0
0
07-23-2012, 11:01 PM
#49
Tour de Franzia

iTrader: (6)
Join Date: Jun 2006
Location: Republic of Dallas
Posts: 29,085
Total Cats: 375
dampening - definition of dampening by the Free Online Dictionary, Thesaurus and Encyclopedia.
The dictionary disagrees with you, as does in fact the English language itself.
The dictionary disagrees with you, as does in fact the English language itself.
Reply
0
0
07-23-2012, 11:03 PM
#50
Elite Member
Thread Starter
iTrader: (6)
Join Date: Sep 2010
Location: Seattle, WA
Posts: 3,611
Total Cats: 25
Car has come a long way.
Usage Note: Ain't has a long history of controversy. It first appeared in 1778, evolving from an earlier an't, which arose almost a century earlier as a contraction of are not and am not. In fact, ain't arose at the tail end of an era that saw the introduction of a number of our most common contractions, including don't and won't. But while don't and won't eventually became accepted at all levels of speech and writing, ain't was to receive a barrage of criticism in the 19th century for having no set sequence of words from which it can be contracted and for being a "vulgarism," that is, a term used by the lower classes, although an't at least had been originally used by the upper classes as well. At the same time ain't's uses were multiplying to include has not, have not, and is not, by influence of forms like ha'n't and i'n't. It may be that these extended uses helped fuel the negative reaction. Whatever the case, criticism of ain't by usage commentators and teachers has not subsided, and the use of ain't is often regarded as a sign of ignorance. � But despite all the attempts to ban it, ain't continues to enjoy extensive use in speech. Even educated and upper-class speakers see no substitute in folksy expressions such as Say it ain't so and You ain't seen nothin' yet. � The stigmatization of ain't leaves us with no happy alternative for use in first-person questions. The widely used aren't I? though illogical, was found acceptable for use in speech by a majority of the Usage Panel in an earlier survey, but in writing there is no acceptable substitute for the stilted am I not?
Last edited by blaen99; 07-23-2012 at 11:36 PM.
Reply
0
0
 07-25-2012, 12:17 AM
#57
Elite Member
Thread Starter
iTrader: (6)
Join Date: Sep 2010
Location: Seattle, WA
Posts: 3,611
Total Cats: 25
This is hardly my first time around the block, Hustler, and thank you very much. I am posting pictures of it in the sun now, however...
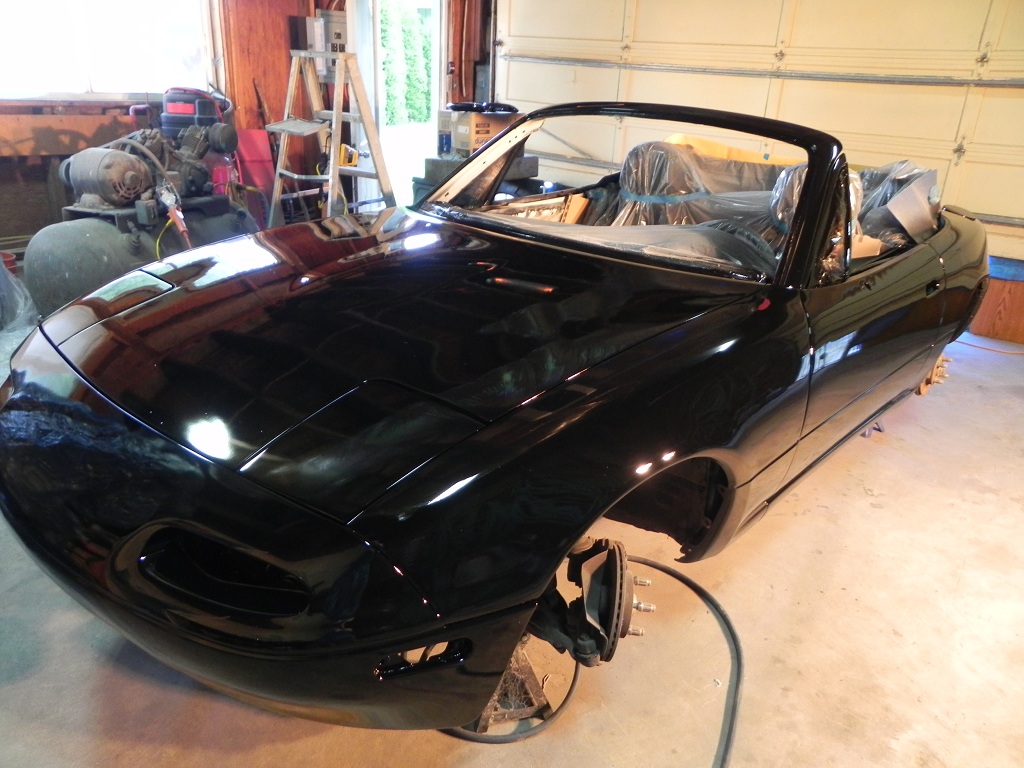
Pictures absolutely do not do this paint job justice. This is the q140 paint color from the Sikkens and Wanda line. It is the best black I have ever seen or heard of. It is recockulously deep and dark IRL, and no picture setting I can use (Or had my photographer use, 'cause I'm photo-illiterate) could properly reflect the actual color.
This is also before wet sanding. This is just the car after spraying, no sanding, nothing. This is just the result of good prep work underneath while using good quality components. I love how it looks, but I am completely unable to properly capture how it looks IRL - it looks far, far better IRL then in any photo I've been able to take or have taken for me. IRL, it's something like a 2'-5' job (Depending on what part, sadly, 18psi immediately saw some results of garage painting unfortunately) - without wetsanding, polishing, or buffing. I cannot believe that Wanda is as cheap as it is for the results it gave.
Disclaimer: I know there is dust on it. I am removing what dust I can slowly over time, but it's a week before I can even give it a light washing.
Reply
0
0


