The forever project
 04-23-2013, 02:46 AM
#1
Senior Member
Thread Starter
iTrader: (2)

Join Date: Nov 2007
Location: Saint Paul, MN
Posts: 1,489
Total Cats: 28
So my car has been a project for the last 6 years that started as a long-shot to even turbo the car. I've taken a long and expensive route to get here but I think I'm finally on the home-stretch on my project.
I started with a Brilliant Black 97 with some passenger-side fender trauma and a heavily worn top with a torn zipper. I bought a simple Wiseco 9:1/Carillo H-beam rods and 99 head with no porting done. I then spent a year with a built motor and no turbo hardware until the next spring, when I purchased and started the install of my FM2/2560 kit. Over time I added things like shocks and springs, tophats and chassis stiffening.
After 3 years of driving she met her unfortunate end hugging a light post evading an accident with a far more expensive car. I bought my current car (Red 95) from a friend of a friend and transplanted my whole setup. The car has extensive hail damage, which is why I got a 32k mile car for $3,000. Almost nothing from the 97 was broken, which was fantastic in my book. At this point the car is turbo with a nice setup of suspension and stiffening.
That's pretty much by backstory, I have been too lazy to start a build thread until today however the weather is shitty so why not start now?
My current setup as of April, 2013:
The Car:
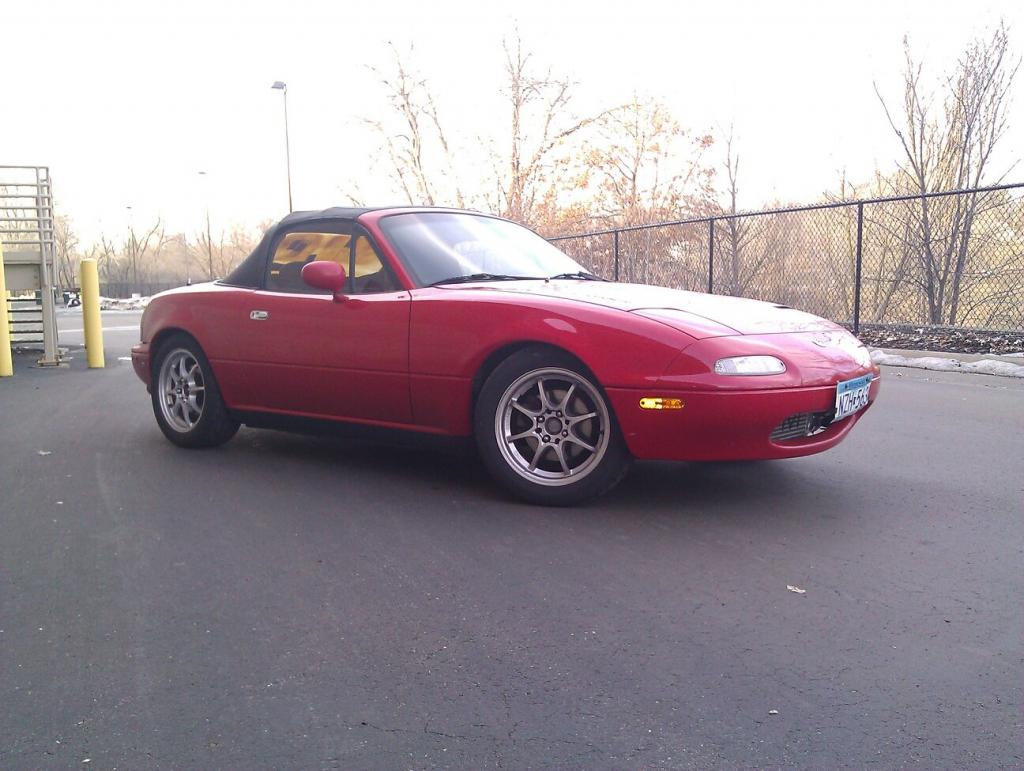
1995 Miata, Red - Bought with 32,000 miles - I bought it with that hail damage
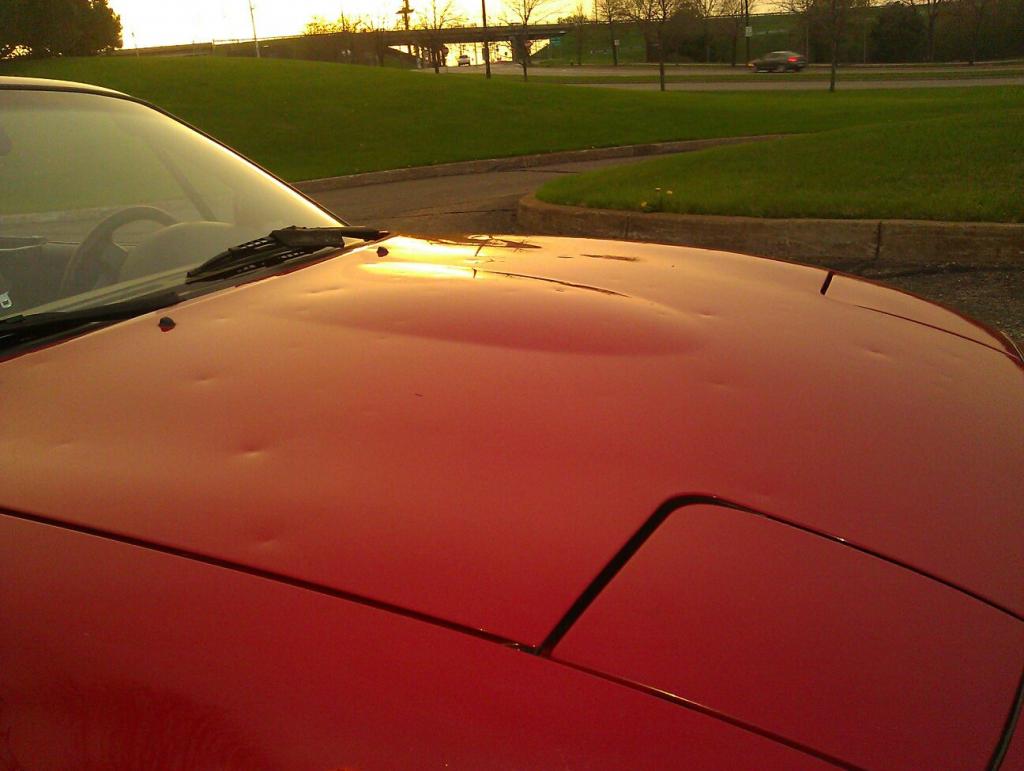
The hail damage:
The Engine:
94 1.8l block (yay driver side oil feed, got lucky on this one)
Wiseco pistons, 9:1cr
Carillo Rods
99 Head
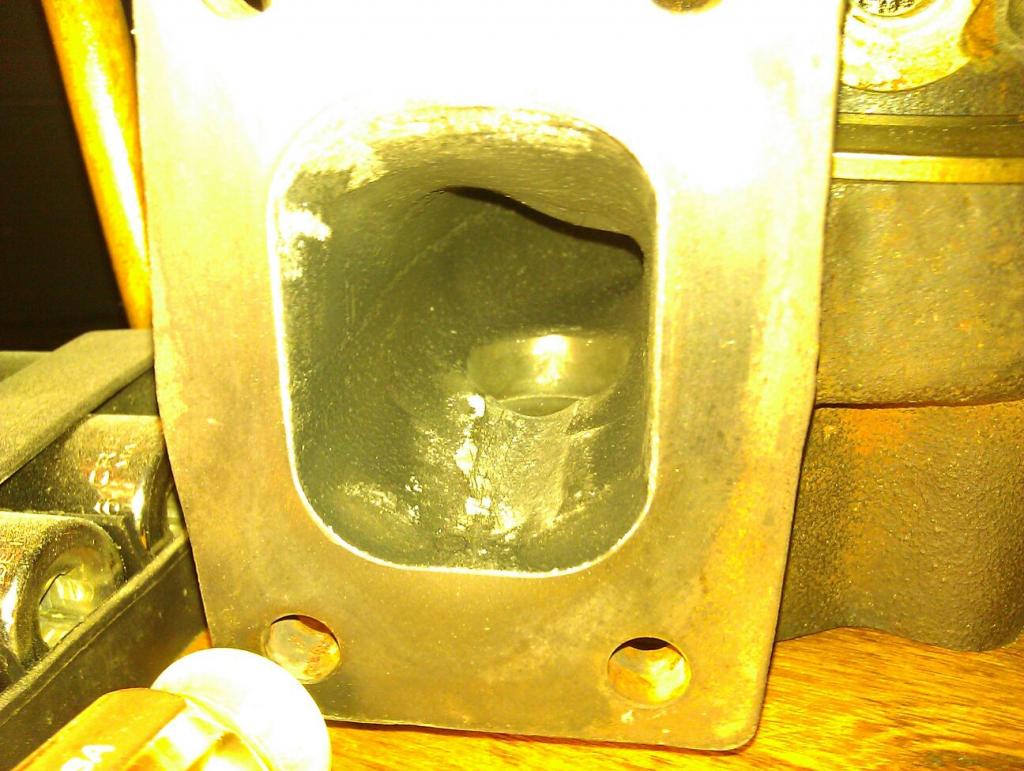
Garrett GT2560 turbo - home port on the exhaust housing
99 Intake w/ VICS controlled by EMS
3" Turbo-back Exhaust with a high-flow Magnaflow muffler. No resonator. Sounds mean, and a "too damn loud" for my neighbor apparently.
Mazda competition motor mounts
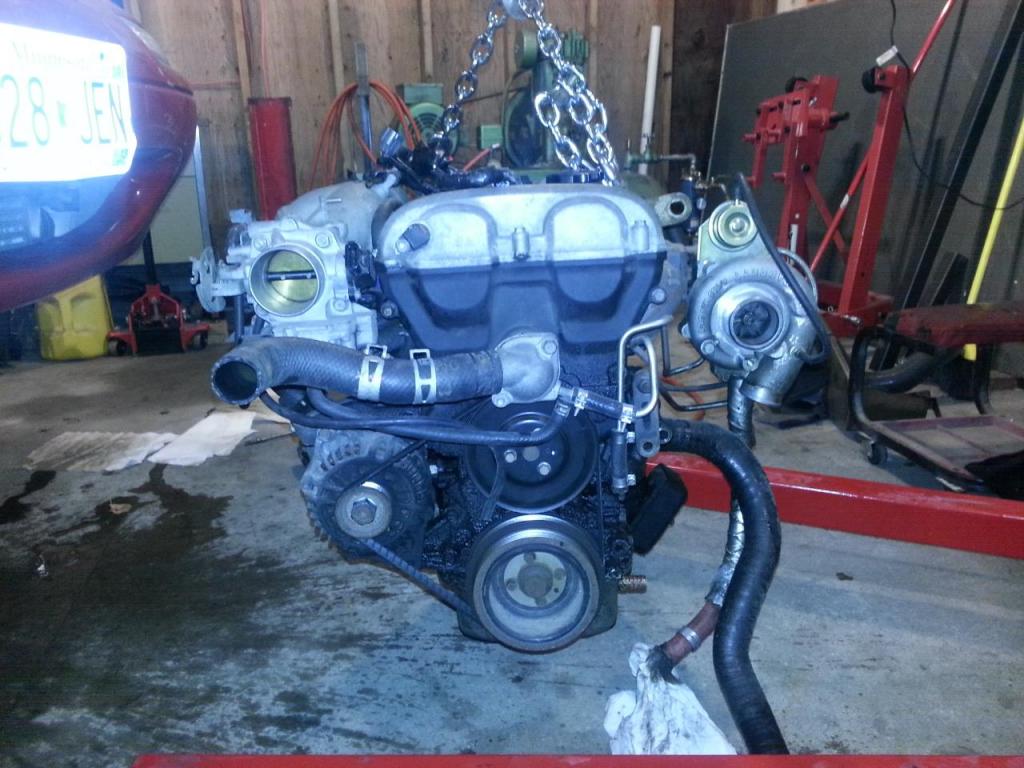
The engine, pulled 4-6-2013:
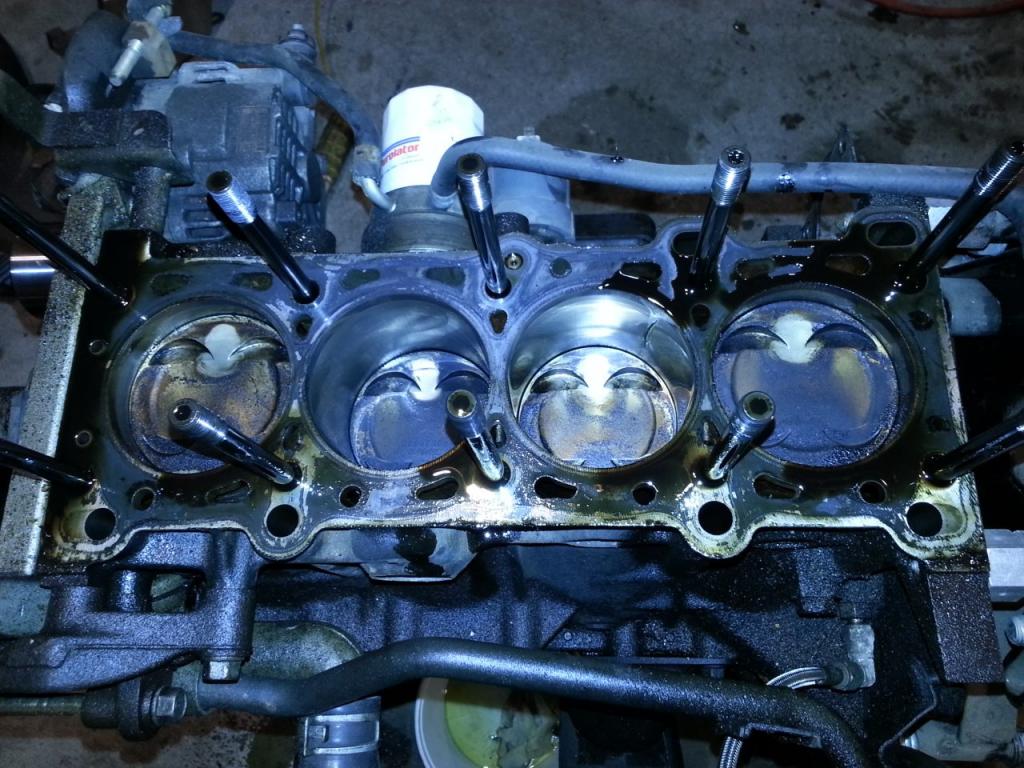
The inside, after ~20,000 miles. #4 is damp, and from the looks of the head it seems a valve seal was leaking..
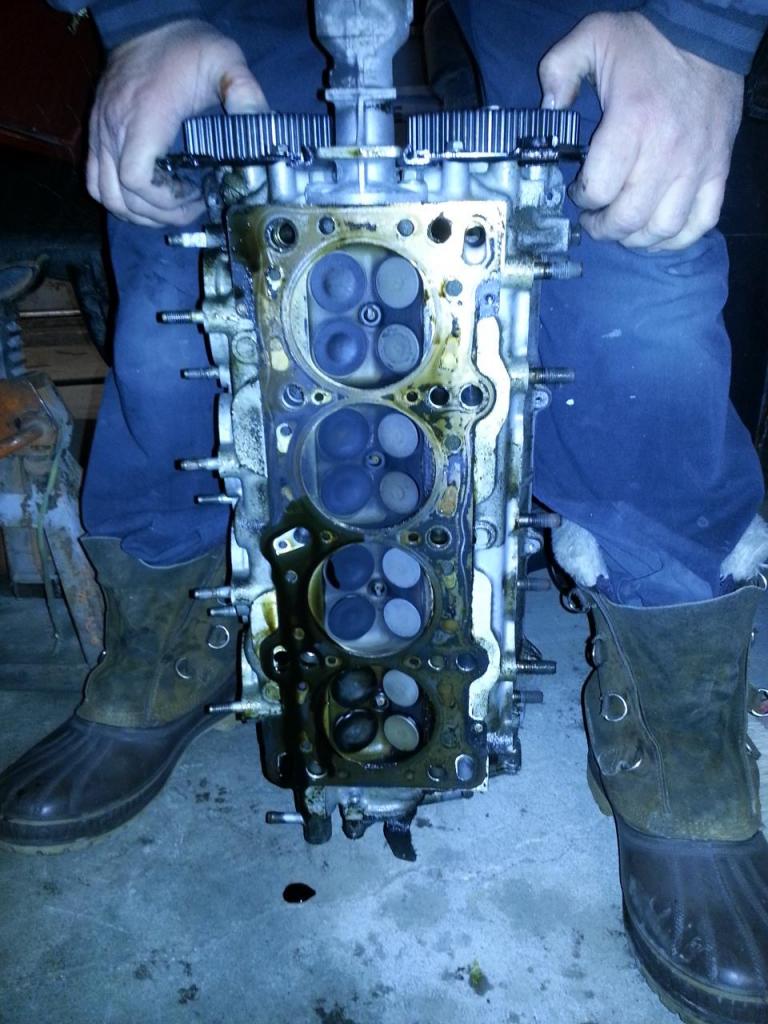
After an hour of cleaning with a toothbrush and some brakleen.
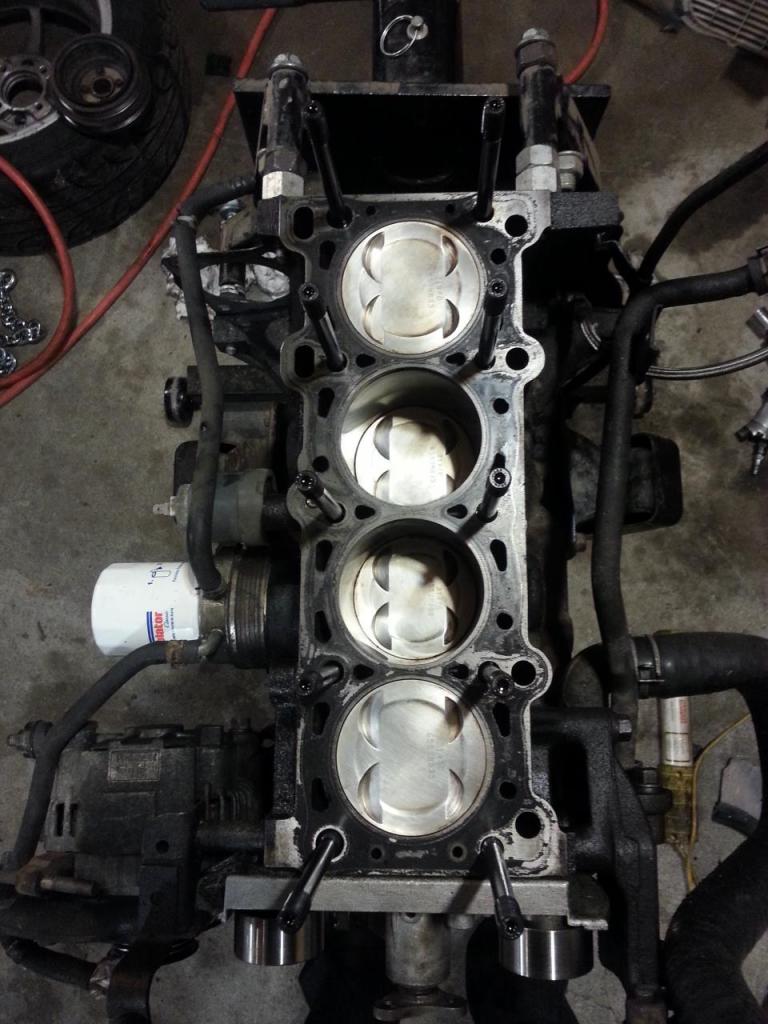
The 99 head, notice the wet valves on #4.
This show's the work when I was partway through porting the turbo. This was taken about halfway through my port. I still have some work to do though.
The Drivetrain:
Factory 5spd
ACT XACT Pro-light Flywheel
SPEC stage 3 clutch, 6puck
99 Torsen II 3.909 rear differential.
The Electricals:
Hydra 2.7 EMS
DW1000 injectors
The Suspension:
Tokiko Illumina shocks
Flyin Miata Ground Control kit
Flyin Miata front and rear sways
Flyin Miata butterfly brace
Polyurethane bushings in the control arms
Polyurethane bushings in the differential
Konig Helium 15x6.5 wheels
The Cooling:
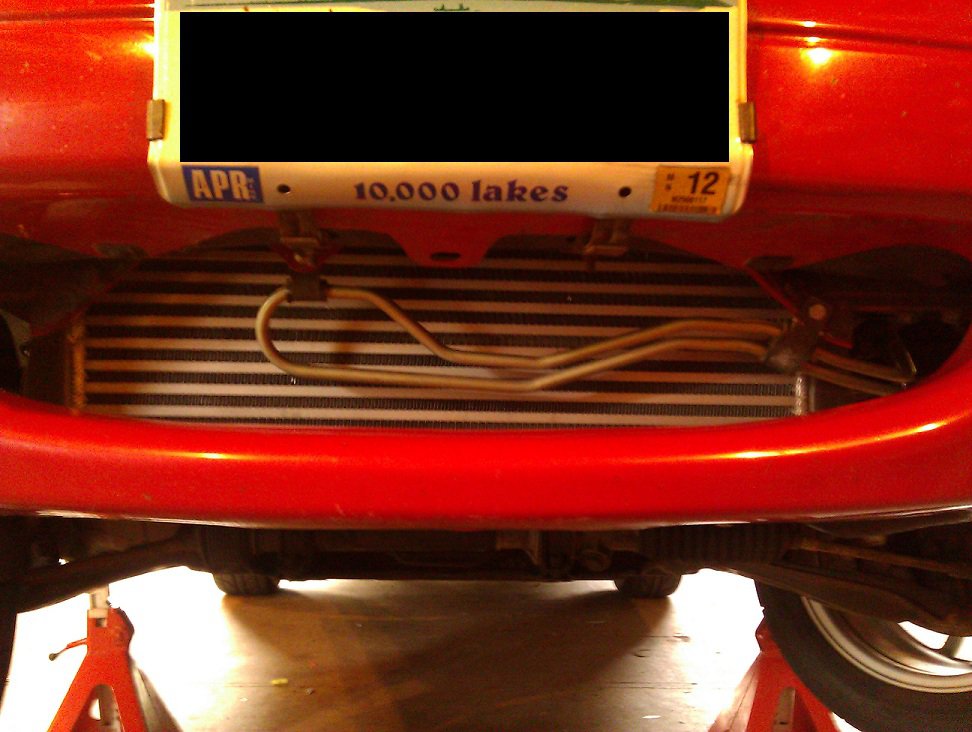
CX Racing intercooler (not sure on the size)
Mishimoto 55mm Aluminum radiator
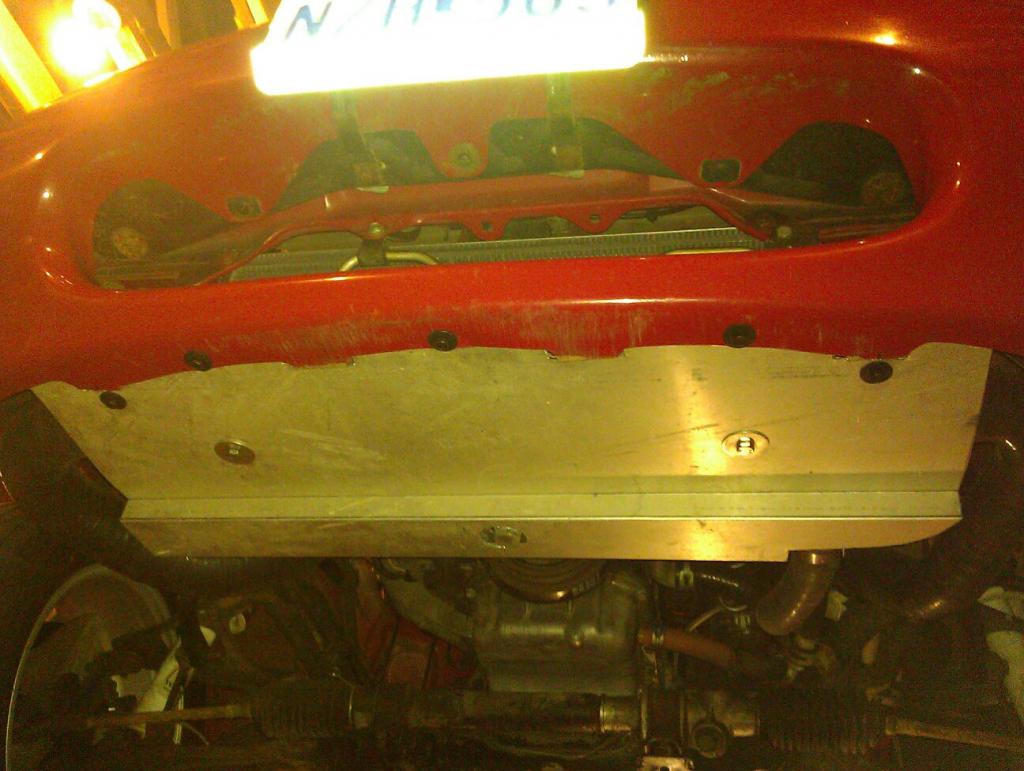
Full aluminum boxing around radiator and intercooler
Just a slight increase in surface area...
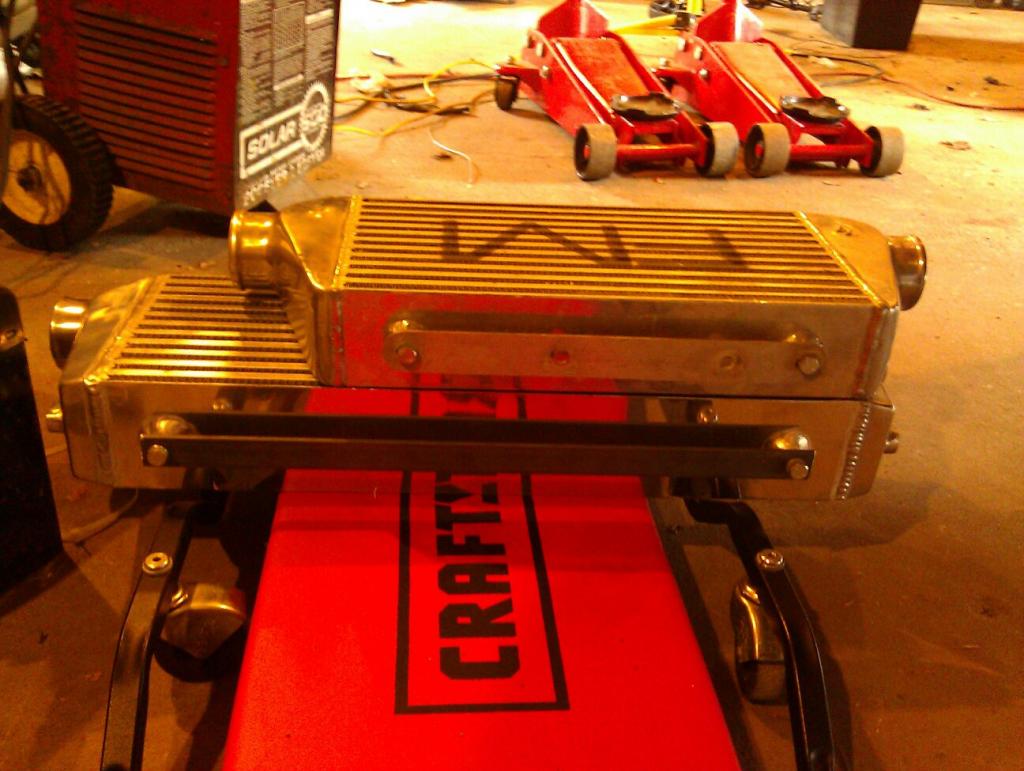
FM Intercooler, a good starting point, but not as good as I'd like..
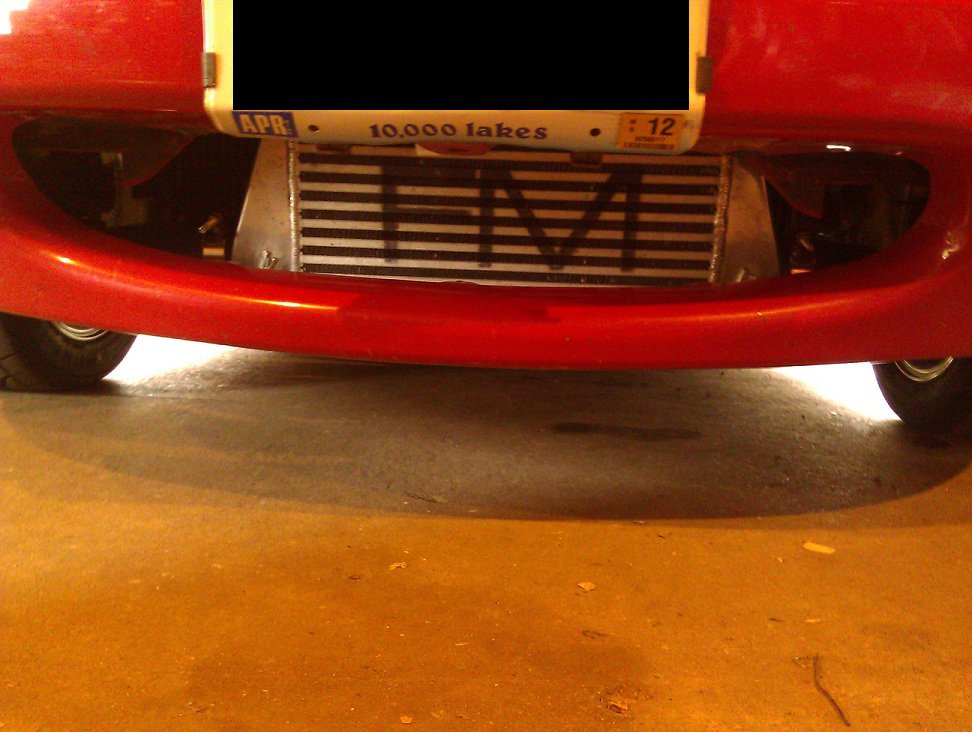
CXRacing intercooler. Quite a bit larger than the one I got with the FM kit.
Undertray; the cooling with this setup was significantly better than my unboxed setup previously.
Pending work:
Harddog double-diagonal Roll bar
Full re-tune of the map post head work, including tuning for general street use
Improved turbo-oriented Intake Manifold
I started with a Brilliant Black 97 with some passenger-side fender trauma and a heavily worn top with a torn zipper. I bought a simple Wiseco 9:1/Carillo H-beam rods and 99 head with no porting done. I then spent a year with a built motor and no turbo hardware until the next spring, when I purchased and started the install of my FM2/2560 kit. Over time I added things like shocks and springs, tophats and chassis stiffening.
After 3 years of driving she met her unfortunate end hugging a light post evading an accident with a far more expensive car. I bought my current car (Red 95) from a friend of a friend and transplanted my whole setup. The car has extensive hail damage, which is why I got a 32k mile car for $3,000. Almost nothing from the 97 was broken, which was fantastic in my book. At this point the car is turbo with a nice setup of suspension and stiffening.
That's pretty much by backstory, I have been too lazy to start a build thread until today however the weather is shitty so why not start now?
My current setup as of April, 2013:
The Car:
1995 Miata, Red - Bought with 32,000 miles - I bought it with that hail damage
The hail damage:
The Engine:
94 1.8l block (yay driver side oil feed, got lucky on this one)
Wiseco pistons, 9:1cr
Carillo Rods
99 Head
Garrett GT2560 turbo - home port on the exhaust housing
99 Intake w/ VICS controlled by EMS
3" Turbo-back Exhaust with a high-flow Magnaflow muffler. No resonator. Sounds mean, and a "too damn loud" for my neighbor apparently.
Mazda competition motor mounts
The engine, pulled 4-6-2013:
The inside, after ~20,000 miles. #4 is damp, and from the looks of the head it seems a valve seal was leaking..
After an hour of cleaning with a toothbrush and some brakleen.
The 99 head, notice the wet valves on #4.
This show's the work when I was partway through porting the turbo. This was taken about halfway through my port. I still have some work to do though.
The Drivetrain:
Factory 5spd
ACT XACT Pro-light Flywheel
SPEC stage 3 clutch, 6puck
99 Torsen II 3.909 rear differential.
The Electricals:
Hydra 2.7 EMS
DW1000 injectors
The Suspension:
Tokiko Illumina shocks
Flyin Miata Ground Control kit
Flyin Miata front and rear sways
Flyin Miata butterfly brace
Polyurethane bushings in the control arms
Polyurethane bushings in the differential
Konig Helium 15x6.5 wheels
The Cooling:
CX Racing intercooler (not sure on the size)
Mishimoto 55mm Aluminum radiator
Full aluminum boxing around radiator and intercooler
Just a slight increase in surface area...
FM Intercooler, a good starting point, but not as good as I'd like..
CXRacing intercooler. Quite a bit larger than the one I got with the FM kit.
Undertray; the cooling with this setup was significantly better than my unboxed setup previously.
Pending work:
Harddog double-diagonal Roll bar
Full re-tune of the map post head work, including tuning for general street use
Improved turbo-oriented Intake Manifold
Last edited by Der_Idiot; 04-23-2013 at 02:56 AM.

Reply
 0
0

0
04-23-2013, 02:49 AM
#2
Senior Member
Thread Starter
iTrader: (2)
Join Date: Nov 2007
Location: Saint Paul, MN
Posts: 1,489
Total Cats: 28
Soon:
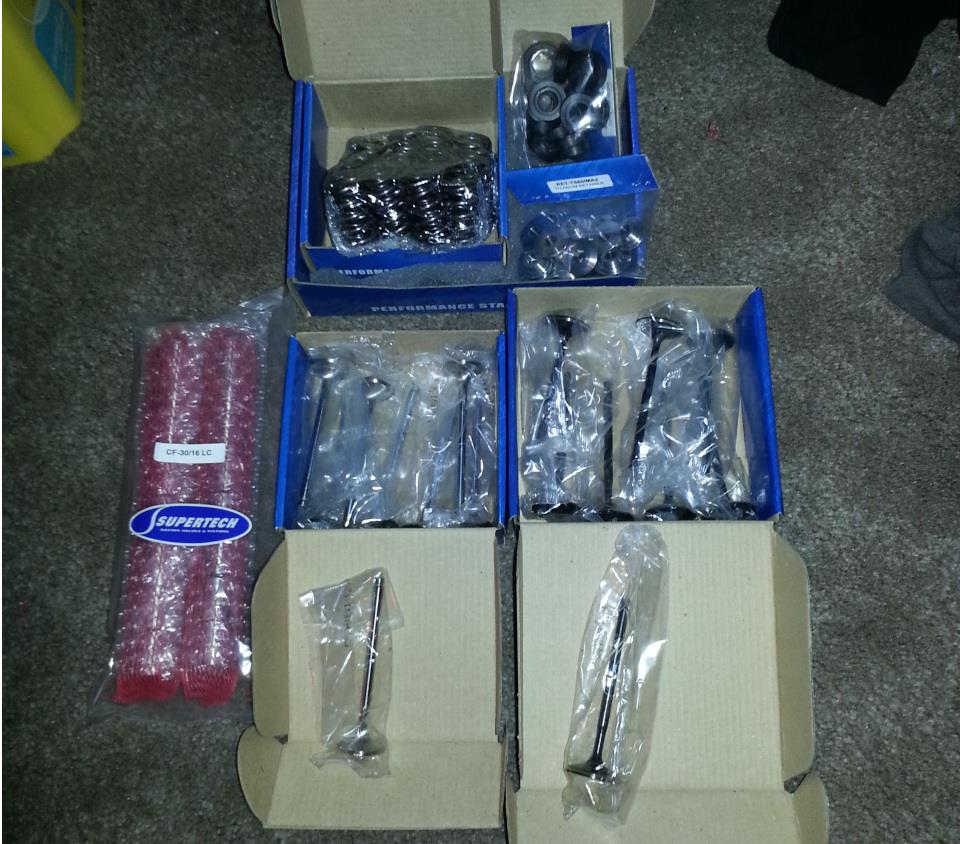
+1mm SuperTech SS Intake valves
+1mm SuperTech Inconel Exhaust valves
Shim Under Bucket setup
Supertech valves, light double spring kit. I hope to have a 7600rpm fuel cut, 7800 hard cut redline
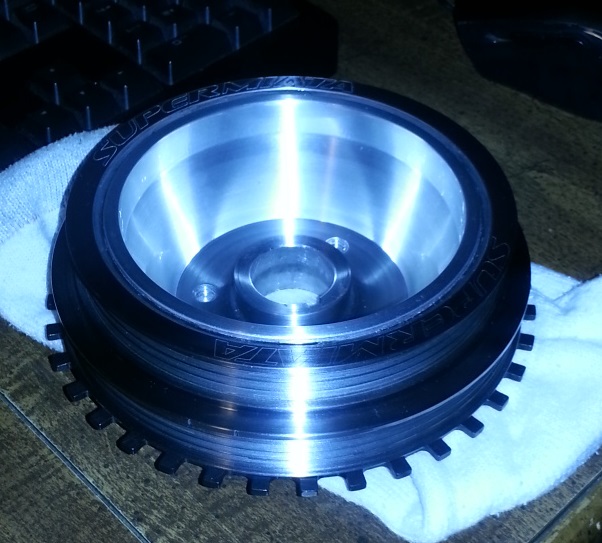
SuperMiata harmonic balancer

And I'm really hoping the oil on the engine/cradle is just from a bad PCV valve or valve cover; the oil seems to cover everything from the valve cover down. Thoughts?

+1mm SuperTech SS Intake valves
+1mm SuperTech Inconel Exhaust valves
Shim Under Bucket setup
Supertech valves, light double spring kit. I hope to have a 7600rpm fuel cut, 7800 hard cut redline
SuperMiata harmonic balancer
And I'm really hoping the oil on the engine/cradle is just from a bad PCV valve or valve cover; the oil seems to cover everything from the valve cover down. Thoughts?
Reply
0
0


 04-23-2013, 10:38 AM
#5
Senior Member
Thread Starter
iTrader: (2)
Join Date: Nov 2007
Location: Saint Paul, MN
Posts: 1,489
Total Cats: 28
Yeah, I had a bad rear pan seal that squeezed out and rubbed on the flywheel, leaking tons of oil. I fixed that issue though 3 years ago. It's dry back there now. I'm thinking the PCV was leaking or the valve cover gasket was leaking because I had oil all around the engine including on top of the intake and exhaust manifolds where they bolt to the head. My CAS has always leaked, no matter what I do.
I'm going to get head work done to it and decide what I want to do after that. I want to put a TODA cam gear on the intake and cut the valve cover, but still want to use the sensor to rid myself of the CAS.
I'm going to get head work done to it and decide what I want to do after that. I want to put a TODA cam gear on the intake and cut the valve cover, but still want to use the sensor to rid myself of the CAS.
Reply
0
0
04-26-2013, 11:54 AM
#6
Senior Member
Thread Starter
iTrader: (2)
Join Date: Nov 2007
Location: Saint Paul, MN
Posts: 1,489
Total Cats: 28
In other news, I ordered the BEGI coolant reroute. It's not as nice looking as the SuperMiata one, but for $80 less I can live with it. Now I'm just waiting on a response for my machine work. Anyone know if the car will sound different after the new valves/portwork? I'm itching to find out.
Reply
0
0
 04-27-2013, 01:32 PM
#9
Senior Member
Thread Starter
iTrader: (2)
Join Date: Nov 2007
Location: Saint Paul, MN
Posts: 1,489
Total Cats: 28
One step closer. I got the transmission out last night surprisingly easy, just unbolted the PPF from the transmission and slid it forward until it came out. All I need now is the head work completed and I can put the car back together. Still looking for a machinist that wont break the bank, I'd like to keep it under 1300 if I can.
Reply
0
0
04-29-2013, 11:18 AM
#10
Senior Member
Thread Starter
iTrader: (2)
Join Date: Nov 2007
Location: Saint Paul, MN
Posts: 1,489
Total Cats: 28
I'm having some trouble locating a machinist that I can afford and wont ruin my head, anyone have any suggestions? One local shop didn't even know how he would shim a Shim Under Bucket setup...
Reply
0
0
05-03-2013, 01:51 PM
#11
Senior Member
Thread Starter
iTrader: (2)
Join Date: Nov 2007
Location: Saint Paul, MN
Posts: 1,489
Total Cats: 28
Sent the head out to get ported and parts installed, I'm already suffering separation anxiety. From what I gathered I might have it back before June, just in time for the snow to finally die.
Reply
0
0
05-13-2013, 02:04 PM
#12
Senior Member
Thread Starter
iTrader: (2)
Join Date: Nov 2007
Location: Saint Paul, MN
Posts: 1,489
Total Cats: 28
The head is currently at the machine shop waiting for a teardown. He asked about Bronze valve guides, which I spent some time researching. I'm not sure the benefits outweigh the cost of more rebuilds due to the possibility for the guides to wear faster.
Anyone got any thoughts on these?
Anyone got any thoughts on these?
Reply
0
0
05-23-2013, 04:59 PM
#13
Senior Member
Thread Starter
iTrader: (2)
Join Date: Nov 2007
Location: Saint Paul, MN
Posts: 1,489
Total Cats: 28
I've been trying to reach the machinist for the last few days and he's not responding to my emails, I don't much care for having a car taking up my garage and no idea when I'll be able to put the engine back in and move it. 
I don't want to get locked out of autocross for the whole season again
I don't want to get locked out of autocross for the whole season again
Reply
0
0
06-19-2013, 02:17 PM
#14
Senior Member
Thread Starter
iTrader: (2)
Join Date: Nov 2007
Location: Saint Paul, MN
Posts: 1,489
Total Cats: 28
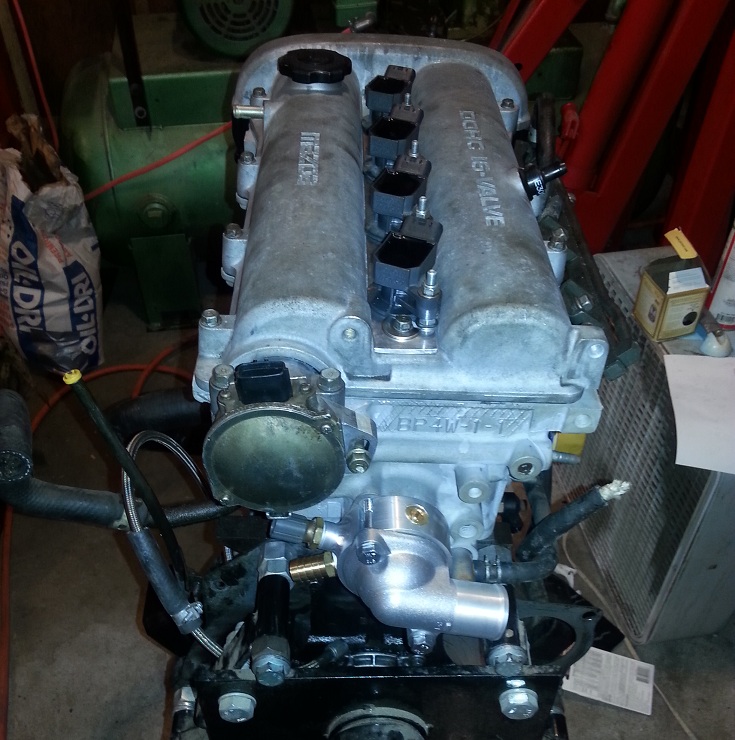
So the car needs sound deadening on the package shelf (lots of vibrations while cruising) and heat shielding for the transmission tunnel because the downpipe makes the tunnel crazy hot.
My solution? I have some left-over dynamat that I used for my DD that I will be putting under the carpet to stop whatever is buzzing at 70mph / 3500rpm. I originally considered Frost King duct insulation, however it was almost $20 for a 15' x 12" x 1/8" roll. I instead opted for this stuff:

Reflectix ducting insulation - essentially foil bubble wrap. This roll measures 16" x 25 x roughly 1/4" thick and cost me 11 bucks, $14 with duct tape. It's lighter than the Frost King solution as well. I'm going to cut it into sections and duct tape it to the tunnel and cover it with carpet.
The second solution I will put into place if this doesn't work, is a sheet of aluminum cut to fit the transmission tunnel, and held away from the tunnel about 1/4" to allow for a heat barrier. I'm hoping to avoid this since it's so much work though.
My solution? I have some left-over dynamat that I used for my DD that I will be putting under the carpet to stop whatever is buzzing at 70mph / 3500rpm. I originally considered Frost King duct insulation, however it was almost $20 for a 15' x 12" x 1/8" roll. I instead opted for this stuff:
Reflectix ducting insulation - essentially foil bubble wrap. This roll measures 16" x 25 x roughly 1/4" thick and cost me 11 bucks, $14 with duct tape. It's lighter than the Frost King solution as well. I'm going to cut it into sections and duct tape it to the tunnel and cover it with carpet.
The second solution I will put into place if this doesn't work, is a sheet of aluminum cut to fit the transmission tunnel, and held away from the tunnel about 1/4" to allow for a heat barrier. I'm hoping to avoid this since it's so much work though.
Last edited by Der_Idiot; 06-19-2013 at 02:40 PM.
Reply
0
0
06-23-2013, 10:34 PM
#15
Senior Member
Thread Starter
iTrader: (2)
Join Date: Nov 2007
Location: Saint Paul, MN
Posts: 1,489
Total Cats: 28
Installed the Reflectix and got the Transmission bolted in and attached to the driveshaft. Now all I'm waiting on is the head to put it all back together...
Reply
0
0
07-02-2013, 05:17 PM
#16
Senior Member
Thread Starter
iTrader: (2)
Join Date: Nov 2007
Location: Saint Paul, MN
Posts: 1,489
Total Cats: 28
My head has been at the machine shop since May 8th, is 2 months time long enough to do a port? I know it's the race season, but I feel like I'm getting pretty much ignored when I email or call for an update. If it hasn't been touched maybe I'll just call and have it shipped back so I can reinstall it and start my own race season; summer's going to be exceptionally short this year methinks.
Reply
0
0
07-12-2013, 07:45 PM
#17
Senior Member
Thread Starter
iTrader: (2)
Join Date: Nov 2007
Location: Saint Paul, MN
Posts: 1,489
Total Cats: 28

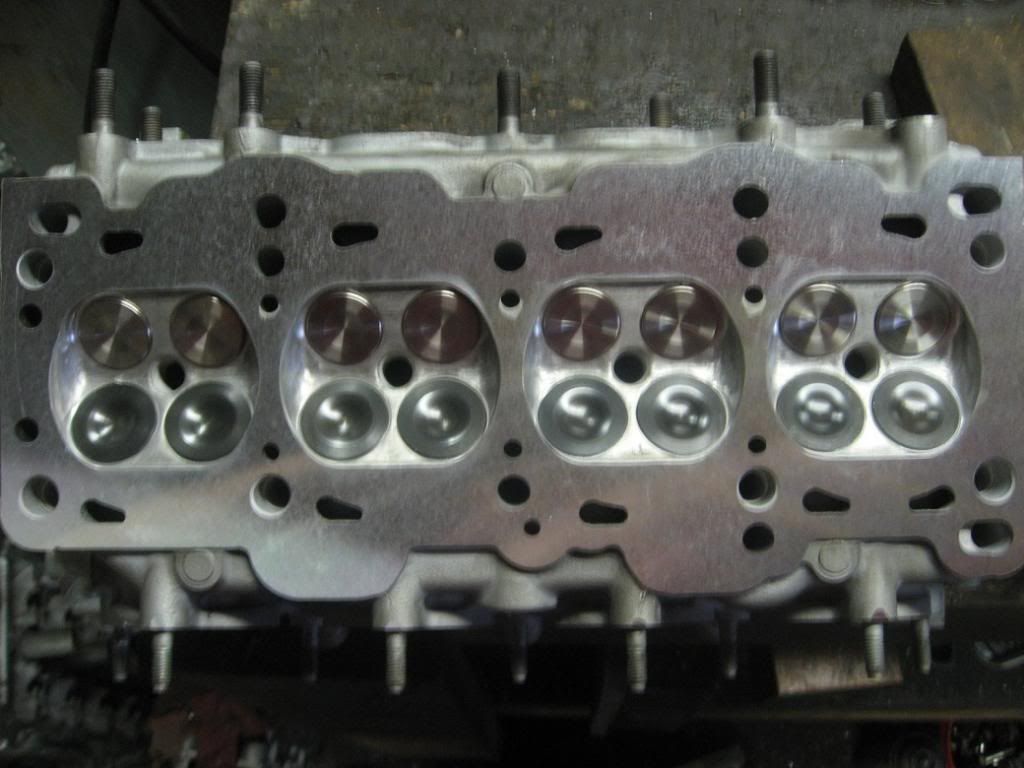
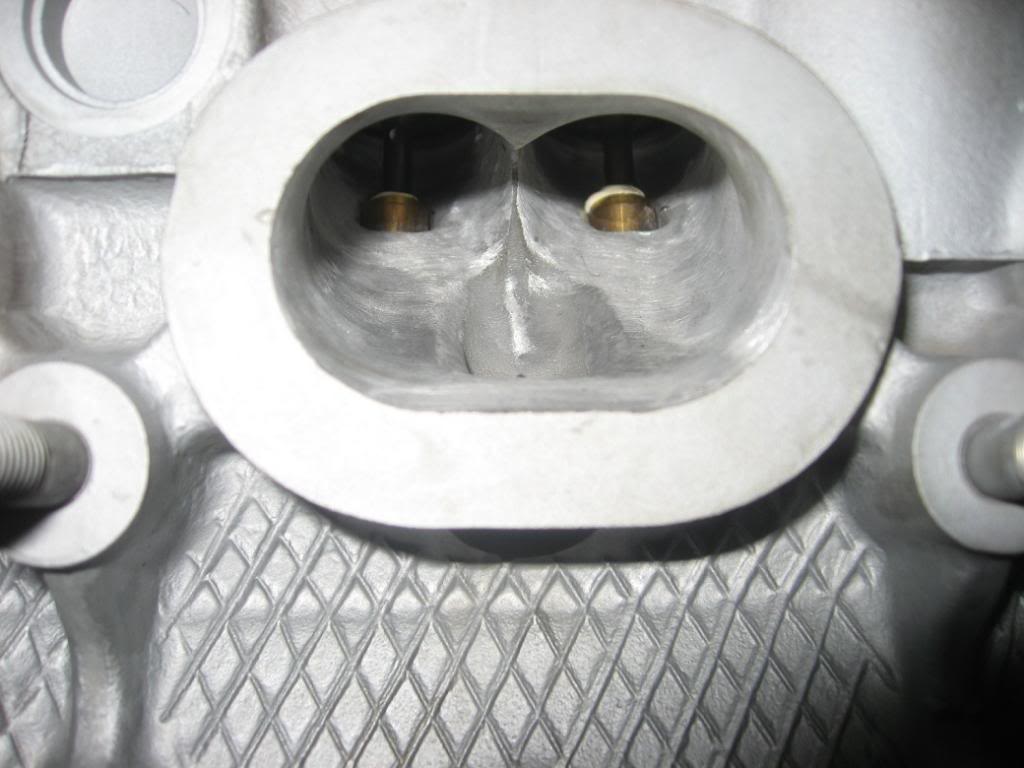
I've gotten an update on my porting, all the work except shims and final assembly is done. Lash should be set to .01 intake, .012 exhaust +/- .001.
+1mm Intake and Exhaust valves are machined in and installed! Head is looking really good right now:
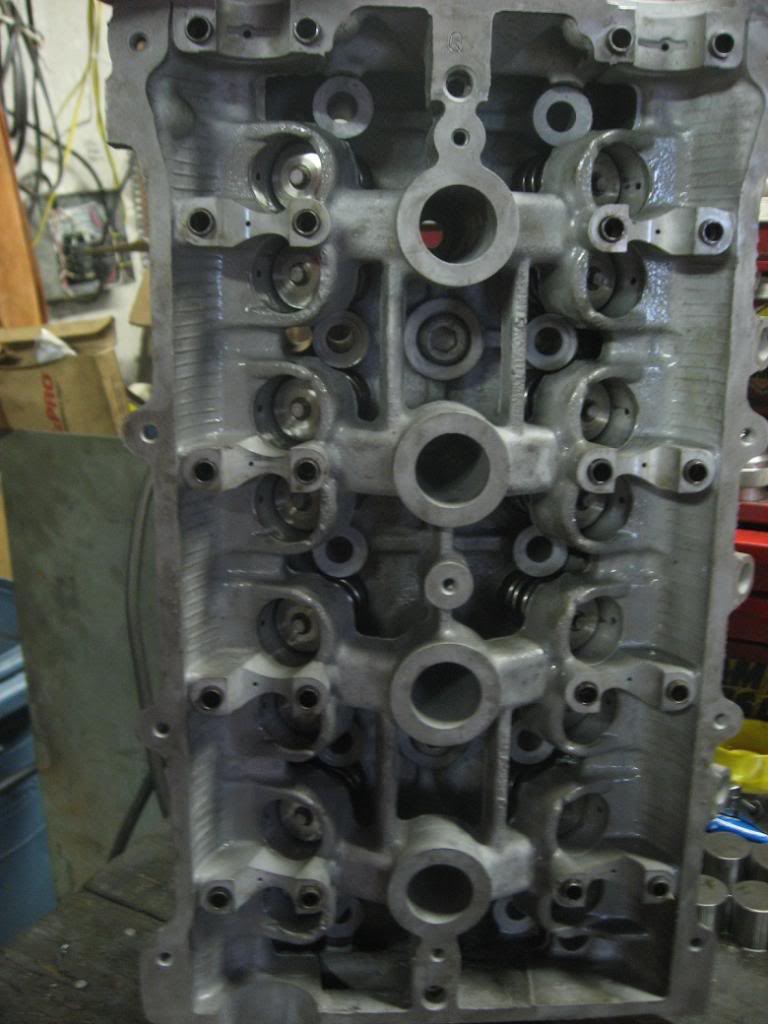
All valves and springs installed, just waiting on the shims for the SUB setup:
headhalfwayassembled.jpg?t=1373664108
I only have a picture of the intake runner, but it's looking pretty good! Note the bronze guides and check out that edging!
intakerunner.jpg?t=1373664053
Just waiting on shims (up to 10 business days) and final assembly.
Reply
0
0

 08-09-2013, 03:12 PM
#20
Senior Member
Thread Starter
iTrader: (2)
Join Date: Nov 2007
Location: Saint Paul, MN
Posts: 1,489
Total Cats: 28
I installed the coolant reroute to the head, however it leaked as soon as I added coolant. 
So I've pulled it off and cleaned the back of the head with lacquer thinner. Man, that was quite possibly the worst thing since ever. Look at the space, and take into account I installed it out of the car, and didn't flatten the speedo cable on the firewall at the time:

Seems the BEGi supplied gaskets are pretty bad at sealing. I picked up some of the silicone-ringed gaskets from FelPro (35251) with the silicone facing the BEGi-supplied ring so when I torqued down on the bolts, the silicone was pressed into the step machined out by BEGi for the thermostat (it's on both sides of the piece). I also RTV'd the assembly together, like so:

Long bolts are used to hold the old heater core hose fitting to the new assembly. Finger tighten to hold it together until the RTV sets a bit (1.5 hours in my case). I then RTV'd the back of the last gasket (already RTV'd on the assembly on one side), stuck it down and bolted it down finger tight and let it set for 4 hours and torqued it down.
Here's hoping this disaster doesn't repeat itself...
So I've pulled it off and cleaned the back of the head with lacquer thinner. Man, that was quite possibly the worst thing since ever. Look at the space, and take into account I installed it out of the car, and didn't flatten the speedo cable on the firewall at the time:
Seems the BEGi supplied gaskets are pretty bad at sealing. I picked up some of the silicone-ringed gaskets from FelPro (35251) with the silicone facing the BEGi-supplied ring so when I torqued down on the bolts, the silicone was pressed into the step machined out by BEGi for the thermostat (it's on both sides of the piece). I also RTV'd the assembly together, like so:
Long bolts are used to hold the old heater core hose fitting to the new assembly. Finger tighten to hold it together until the RTV sets a bit (1.5 hours in my case). I then RTV'd the back of the last gasket (already RTV'd on the assembly on one side), stuck it down and bolted it down finger tight and let it set for 4 hours and torqued it down.
Here's hoping this disaster doesn't repeat itself...
Reply
0
0


