Hornetball's Build
 04-11-2011, 11:27 PM
#61
Elite Member
iTrader: (2)

Join Date: Jan 2007
Location: Los Angeles, CA
Posts: 8,682
Total Cats: 130
Added an EBC disable switch in the engine compartment. This is for two reasons: (1) I'll be able to manually disable EBC if my manual WI test shows that I have a clogged nozzle; and (2) I'll be able to manually disable EBC when my teenage daughter wants to borrow the car. How long before my teenage daughter finds the "magic" switch that changes the car from a 5psi turbo to a 10psi turbo? I wonder.
By the way, your teenage daughter is going to die when she borrows your car. I have known many girls who drive as uh fearlessly as males.

Reply
 0
0

0
04-11-2011, 11:47 PM
#62
Elite Member
Thread Starter
iTrader: (4)

Join Date: Mar 2008
Location: Granbury, TX
Posts: 6,301
Total Cats: 696
So, after all that, actually starting and driving the car was pretty uneventful. I was surprised at how quiet and smooth the car is. Very little exhaust noise -- and lot's of interesting intake noise. I didn't really know what to expect, but it was nice. Of course, I'm really taking it easy right now -- and my tune is hyper conservative while I get things sorted. I noticed I do a lot less shifting -- there's actual low end torque now. Also, triple digits on the speedo just happens -- no effort required really.
So, I've got about an hour on the install right now, and I already have a list of fails and not-fails. Fails first:
1. LC-1 sensor is overheating. I put it in the stock Greddy location. I need to move it downstream. I love those codes from the LC-1. I've got code #8. It tells me exactly what's going on.
2. Valve cover breather. It's melting . . . melting . . . melting . . . . Need to replace with hose into filtered intake air. I actually used that breather because it was white and I wanted to see if I was blowing out any oil. No evidence of oil so far (I also haven't driven the car hard).
3. Need to adjust wastegate and recirculation valve. Not really fails -- just adjustments. Right now I'm getting too much boost and the recirculation valve activates too soon.
4. VEI software issue as discussed in a prior post. However, VEI customer service seemed on the ball and I'm expecting a new gauge any moment.
5. VEI gauge location. Hidden by the gear shift ****. This will have to change.
Not fails:
1. WI failsafes and indications. They worked great on pre-start, and are working great now. I know exactly when water is being injected -- the water injection pressure light is very visible.
2. I don't detect any turbo lag whatsoever. It feels normally aspirated from that standpoint -- with a lot more torque. Like it's a bigger motor.
3. Cowl induction. My intake temperature is low -- around 20F above ambient. Surprisingly, I don't see much of a drop or gain with throttle movement or water injection. It seems to take a little while for the sensor to respond.
4. Not even a hint of detonation so far. Also, no hesitation, no bogging, nice idle, etc. I think that having the MSPNP sorted prior to undertaking the turbo was a very good idea.
Anyway, break-in and lots of tuning to come. Time to change my signature line!!
Reply
0
0
04-19-2011, 06:46 PM
#63
Elite Member
Thread Starter
iTrader: (4)
Join Date: Mar 2008
Location: Granbury, TX
Posts: 6,301
Total Cats: 696
Some follow-up:
1. VEI made good on their gauge replacement. New gauge works just fine. Nice combination.
2. Moved LC-1 but still popping error 8. Turns out this is a longstanding LC-1 problem and Innovate is work on a software upgrade to fix it. Some users also revert to a prior software version that doesn't show the problem. See thread: https://www.miataturbo.net/showthrea...t=43202&page=2. It happens infrequently enough that I can still tune, but it sure is annoying.
3. Re-installed stock breather pipe and attached white-gauze breather filter to it. Still no sign of oil blowing out. I'm gaining confidence that my oil return routing isn't going to cause problems.
4. Wastegate adjusted for a solid 5psi. Getting ready to start EBC tuning for 10psi.
Reply
0
0
 04-22-2011, 10:18 AM
#65
Elite Member
Thread Starter
iTrader: (4)
Join Date: Mar 2008
Location: Granbury, TX
Posts: 6,301
Total Cats: 696
Thanks. Never finished though.
This build is different in that I had modest goals. Most around here are from the "ALL OF IT" school of thought. I was after a nice, streetable and reliable build (with a nice bump in power) that mostly left the sheet metal and wiring of the car intact. So far, so good.
This build is different in that I had modest goals. Most around here are from the "ALL OF IT" school of thought. I was after a nice, streetable and reliable build (with a nice bump in power) that mostly left the sheet metal and wiring of the car intact. So far, so good.
Reply
0
0

 07-06-2011, 02:33 PM
#67
Elite Member
Thread Starter
iTrader: (4)
Join Date: Mar 2008
Location: Granbury, TX
Posts: 6,301
Total Cats: 696
I implemented the Purge Valve mod on my MSPNP last week. The basic idea (another Joe Perez concoction) is to apply power to the Purge Valve when the AC compressor is engaged. This causes a vacuum leak to increase engine speed. Because this happens right away, it helps prevent RPM drop while the normal closed loop idle controls catch up. This is pretty important to me at the moment. June 2011 was, apparently, the hottest June on record since 1980. Average high temperature in my area was ~100�F with many days much hotter.
This modification can be done entirely inside the MS. The wires that are needed already exist in the stock harness. The ECU output to the AC relay is on the "L/B" line (Pin 1J on 90-93s), and the output to the Purge Valve is on the "Y/R" line (Pin 2X on 90-93s). I added a couple of diodes to my installation for safety, an isolation diode between "L/B" and "Y/R," and a flyback voltage diode from "Y/R" to ECU power on "W/R" (Pin 1B on 90-93s). Schematic is simple:
"L/B" Pin 1J---|<---"Y/R" Pin 2X--->|---"W/R" Pin1B
(where --->|--- is a 1N400X diode)
Here's a picture of my MSPNP daughter board mods:
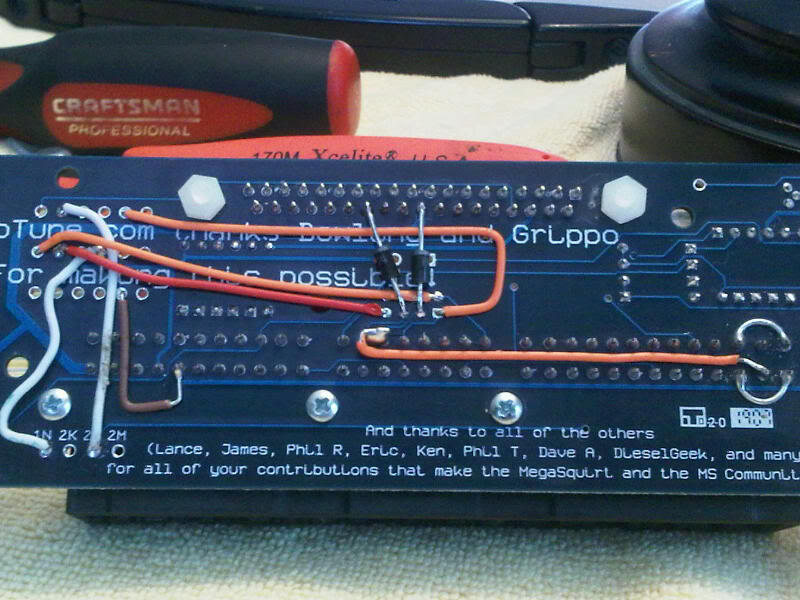
The two diodes go from unused header pins to the 37-pin connector at pins 28 (internally connected to ECU power on Pin 1B) and 31 (connected to Pin 1J as part of an earlier spark table switching mod). In addition, a jumper line was soldered between the unused header pins and Pin 2X.
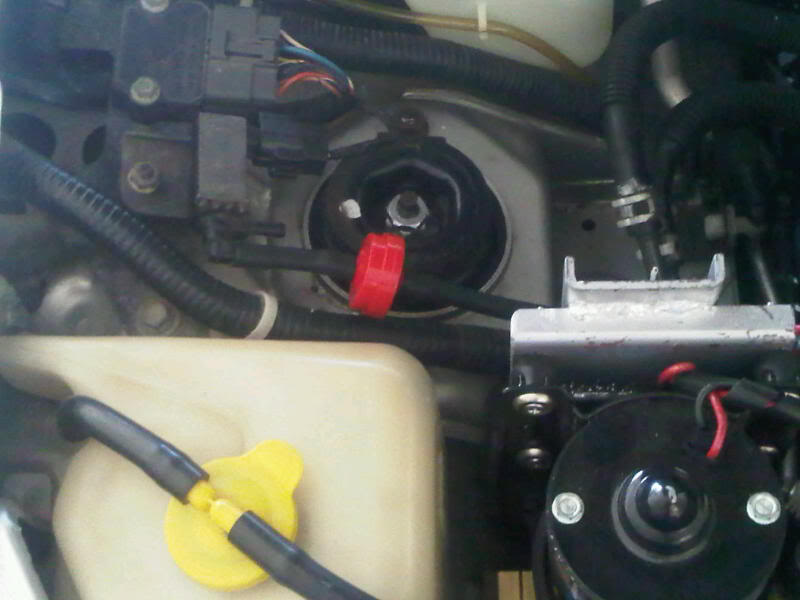
In the engine compartment, the purge valve is disconnected from the charcoal cannister. In my case, the cannister had already been removed to make way for my WI pump. The only other change was to add a small-engine inline fuel filter to filter the air from the purge valve. Here's a picture:
Bottom line on this modification is that it adds ~100-150RPM when activated. Most of the restriction comes from the length of rubber tube between the purge valve and the intake manifold. With different components, you could increase that RPM bump quite a bit, although at some point you would need to start worrying about boost leaks. Unlike the stock ECU, the MS doesn't disengage the AC at high throttle settings. If you're willing to hack the harness a bit, you could wire a TPS switch inline to perform that function.
Anyway, I'm pretty happy with the setup. Between the spark table switching (adds 8� of ignition advance when the AC relay activates) and this purge valve mod, my idle operation with AC on in the extreme TX heat has been pretty decent.
YMMV.
This modification can be done entirely inside the MS. The wires that are needed already exist in the stock harness. The ECU output to the AC relay is on the "L/B" line (Pin 1J on 90-93s), and the output to the Purge Valve is on the "Y/R" line (Pin 2X on 90-93s). I added a couple of diodes to my installation for safety, an isolation diode between "L/B" and "Y/R," and a flyback voltage diode from "Y/R" to ECU power on "W/R" (Pin 1B on 90-93s). Schematic is simple:
"L/B" Pin 1J---|<---"Y/R" Pin 2X--->|---"W/R" Pin1B
(where --->|--- is a 1N400X diode)
Here's a picture of my MSPNP daughter board mods:
The two diodes go from unused header pins to the 37-pin connector at pins 28 (internally connected to ECU power on Pin 1B) and 31 (connected to Pin 1J as part of an earlier spark table switching mod). In addition, a jumper line was soldered between the unused header pins and Pin 2X.
In the engine compartment, the purge valve is disconnected from the charcoal cannister. In my case, the cannister had already been removed to make way for my WI pump. The only other change was to add a small-engine inline fuel filter to filter the air from the purge valve. Here's a picture:
Bottom line on this modification is that it adds ~100-150RPM when activated. Most of the restriction comes from the length of rubber tube between the purge valve and the intake manifold. With different components, you could increase that RPM bump quite a bit, although at some point you would need to start worrying about boost leaks. Unlike the stock ECU, the MS doesn't disengage the AC at high throttle settings. If you're willing to hack the harness a bit, you could wire a TPS switch inline to perform that function.
Anyway, I'm pretty happy with the setup. Between the spark table switching (adds 8� of ignition advance when the AC relay activates) and this purge valve mod, my idle operation with AC on in the extreme TX heat has been pretty decent.
YMMV.
Reply
0
0
07-06-2011, 02:42 PM
#68
Elite Member
Thread Starter
iTrader: (4)
Join Date: Mar 2008
Location: Granbury, TX
Posts: 6,301
Total Cats: 696
I've struggeld with my LC-1. The two main issues I've had are:
1. The dreaded "Error-8"; and
2. Even when the LC-1 wasn't keeled over with Error-8, accuracy as read by my MSPNP was suspect.
So, hoping that others might gain . . . :
Error 8:
Error 8 is pretty nasty. It essentially puts the LC-1 into a failsafe mode where it outputs 0VDC on its analog output wire. This, of course, means it is useless for tuning or closed-loop mixture control (probably the reason that you bought it, right?).
The LC-1 documentation describes Error 8 as a "timing error" resulting from either overheating or sensor damage. Taking Innovative at their word, I dutifully had a new sensor bung welded in just upstream of the cat and moved the sensor. Alas, that had no effect.
Moving on to cause number two, I dutifully replaced the sensor. Again, no effect. Me not happy. Abandoning Innovative as being inept due to downsizing, I moved on to the forums . . . hmmm . . . I'm not alone. It seems that Error 8 is a common error with firmware version 1.10. That firmware has shipped with every new LC-1 since 2007, and is still shipping today. The fix for many . . . revert to firmware version 1.00.
Recently, Innovative has acknowledged that there is an Error-8 problem with firmware version 1.10 and has been working on a solution. This has resulted in Beta firmware version 1.20. This is the firmware I've been running for the past week. I've had no further Error-8 issues and everything else seems to work well.
So, if you have Error-8 and firmware 1.10, the first thing you should do is a firmware change, either to 1.00 or Beta 1.20. I've attached all of the LC-1 firmwares to this post in a zipfile.
Accuracy:
Since installing my turbo, I've noticed that my MegaTune AFR readout generally does not agree with the AFR reading on my VEI gauge. As a rule, the MSPNP seems to read high (lean) with the result that I've been running richer than desired (which, at least, is safe).
Anyways, I was tired of the situation, and decided to get everything calibrated and matched. The calibration tool I used was a $3.50 linear taper 50KΩ potentiometer from radio shack.
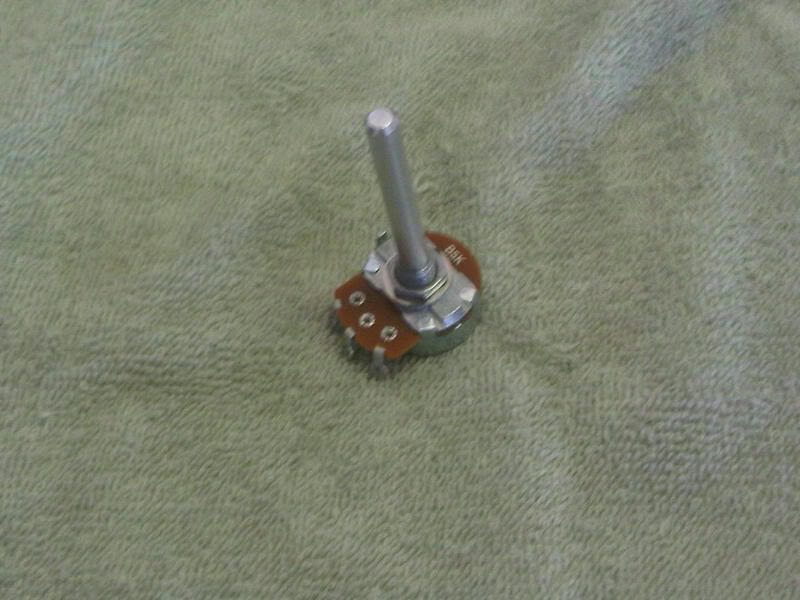
I used test cables to connect my high-tech calibration tool to my MSPNP and VEI as follows:
Red Cable -- Common 12VDC source for MSPNP and VEI, connected to one of the outer tabs of the pot.
Black Cable -- Common signal ground for MSPNP and VEI, connected to the other outer tab of the pot and the negative cable of the multimeter.
Green Cable -- Common input line for the MSPNP and VEI LC-1 analog signal, connected to the middle tab of the pot and the positive cable of the multimeter. Note that the LC-1 needs to be disconnected for this calibration.
Here's a picture of the setup:
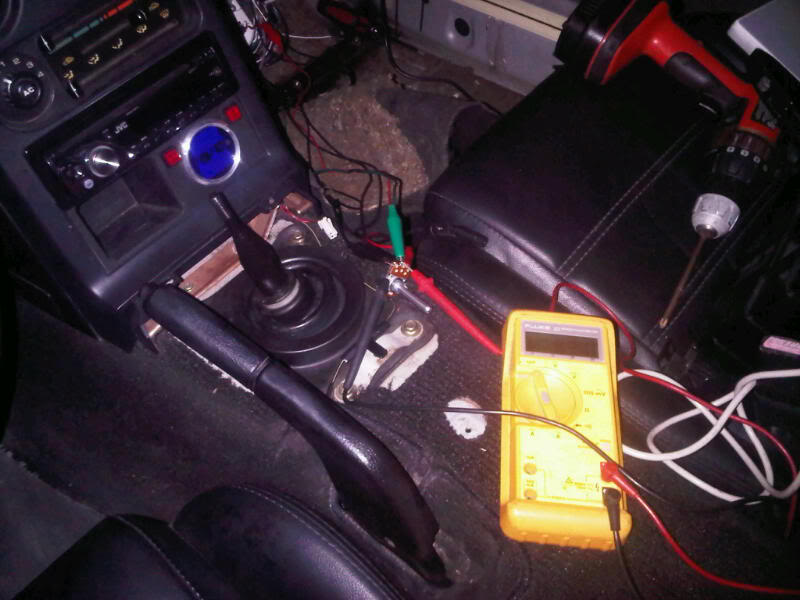
With this setup, I was able to input a reliable DC voltage into the signal input of the MSPNP and VEI. I could read the DC voltage on my multimeter. After setting up my MSPNP for LM-1 emulation (nominally 0VDC = 10:1 AFR and 5VDC = 20:1 AFR), I recorded the following linear relationships:
0.0VDC MSPNP=10.0:1 VEI=10.0:1
5.0VDC MSPNP=20.8:1 VEI=20.4:1
So, both devices were off a little with pretty normal component variances (in other words, yours WILL be different). Easily fixed though. For the MSPNP, I'm not aware of an adjustment that can be made . . . however both the VEI and LC-1 can be adjusted. I adjusted the VEI endpoints so that I got an exact match on the VEI display and Megatune -- confirmed by swinging through the range of input voltages with my high-tech tool. I then setup my LC-1 to output 0VDC at 10.0:1AFR and 5VDC at 20.8:1AFR.
1. The dreaded "Error-8"; and
2. Even when the LC-1 wasn't keeled over with Error-8, accuracy as read by my MSPNP was suspect.
So, hoping that others might gain . . . :
Error 8:
Error 8 is pretty nasty. It essentially puts the LC-1 into a failsafe mode where it outputs 0VDC on its analog output wire. This, of course, means it is useless for tuning or closed-loop mixture control (probably the reason that you bought it, right?).
The LC-1 documentation describes Error 8 as a "timing error" resulting from either overheating or sensor damage. Taking Innovative at their word, I dutifully had a new sensor bung welded in just upstream of the cat and moved the sensor. Alas, that had no effect.
Moving on to cause number two, I dutifully replaced the sensor. Again, no effect. Me not happy. Abandoning Innovative as being inept due to downsizing, I moved on to the forums . . . hmmm . . . I'm not alone. It seems that Error 8 is a common error with firmware version 1.10. That firmware has shipped with every new LC-1 since 2007, and is still shipping today. The fix for many . . . revert to firmware version 1.00.
Recently, Innovative has acknowledged that there is an Error-8 problem with firmware version 1.10 and has been working on a solution. This has resulted in Beta firmware version 1.20. This is the firmware I've been running for the past week. I've had no further Error-8 issues and everything else seems to work well.
So, if you have Error-8 and firmware 1.10, the first thing you should do is a firmware change, either to 1.00 or Beta 1.20. I've attached all of the LC-1 firmwares to this post in a zipfile.
Accuracy:
Since installing my turbo, I've noticed that my MegaTune AFR readout generally does not agree with the AFR reading on my VEI gauge. As a rule, the MSPNP seems to read high (lean) with the result that I've been running richer than desired (which, at least, is safe).
Anyways, I was tired of the situation, and decided to get everything calibrated and matched. The calibration tool I used was a $3.50 linear taper 50KΩ potentiometer from radio shack.
I used test cables to connect my high-tech calibration tool to my MSPNP and VEI as follows:
Red Cable -- Common 12VDC source for MSPNP and VEI, connected to one of the outer tabs of the pot.
Black Cable -- Common signal ground for MSPNP and VEI, connected to the other outer tab of the pot and the negative cable of the multimeter.
Green Cable -- Common input line for the MSPNP and VEI LC-1 analog signal, connected to the middle tab of the pot and the positive cable of the multimeter. Note that the LC-1 needs to be disconnected for this calibration.
Here's a picture of the setup:
With this setup, I was able to input a reliable DC voltage into the signal input of the MSPNP and VEI. I could read the DC voltage on my multimeter. After setting up my MSPNP for LM-1 emulation (nominally 0VDC = 10:1 AFR and 5VDC = 20:1 AFR), I recorded the following linear relationships:
0.0VDC MSPNP=10.0:1 VEI=10.0:1
5.0VDC MSPNP=20.8:1 VEI=20.4:1
So, both devices were off a little with pretty normal component variances (in other words, yours WILL be different). Easily fixed though. For the MSPNP, I'm not aware of an adjustment that can be made . . . however both the VEI and LC-1 can be adjusted. I adjusted the VEI endpoints so that I got an exact match on the VEI display and Megatune -- confirmed by swinging through the range of input voltages with my high-tech tool. I then setup my LC-1 to output 0VDC at 10.0:1AFR and 5VDC at 20.8:1AFR.
Reply
0
0
08-26-2011, 06:01 PM
#69
Elite Member
Thread Starter
iTrader: (4)
Join Date: Mar 2008
Location: Granbury, TX
Posts: 6,301
Total Cats: 696
So, I enabled EBC on my MSPNP and have been driving with it for the last month and a half. I really like it and it was simple to setup.
To tune it, I logged a series of third gear pulls. I started at 100% duty cycle and did a third gear pull until reaching my desired target boost. I then reduced to 90% duty cycle, followed by 80%, etc. I kept reducing the duty cycle until I reached the point that my target boost could no longer be achieved.
From the logs, I reduced the data into a duty cycle vs. RPM format (the RPM being the point at which my target boost was attained). For my car, these were the numbers (target of 10psi):
100% 3,890
90% 3,950
80% 4,000
70% 4,120
60% 4,340
55% 4,360
Below 55%, I generally wasn't able to generate 10psi. Using these numbers, I filled out my target duty cycle table as follows:
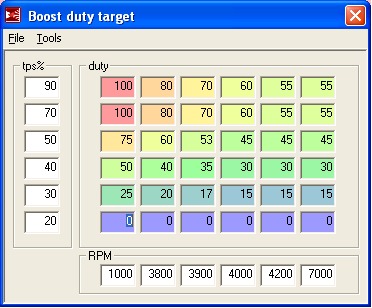
Anyway, the effect is really nice. Staying at 100% down low helps spool. You can see that my table is a bit delayed compared to the numbers I logged. This is to prevent overshoots. Boost quickly climbs to where it should be and sticks. The reduced duty cycles at lower throttle positions has the effect of varying boost psi based upon throttle position. This makes throttle response more linear.
The only downside is that this is open loop EBC -- it just sets a duty cycle -- it does not try to achieve a boost target. That means you can expect some variability in the actual boost achieved depending upon external conditions. Driving around for the past month and a half, I've seen it settle anywhere from 9 to 11psi -- but once it gets where it's going, it's rock solid. I think this is the best you can do with MS1. For true closed loop EBC, you need to upgrade to at least MS2, possibly MS3.
Nevertheless, count me a happy customer.
To tune it, I logged a series of third gear pulls. I started at 100% duty cycle and did a third gear pull until reaching my desired target boost. I then reduced to 90% duty cycle, followed by 80%, etc. I kept reducing the duty cycle until I reached the point that my target boost could no longer be achieved.
From the logs, I reduced the data into a duty cycle vs. RPM format (the RPM being the point at which my target boost was attained). For my car, these were the numbers (target of 10psi):
100% 3,890
90% 3,950
80% 4,000
70% 4,120
60% 4,340
55% 4,360
Below 55%, I generally wasn't able to generate 10psi. Using these numbers, I filled out my target duty cycle table as follows:
Anyway, the effect is really nice. Staying at 100% down low helps spool. You can see that my table is a bit delayed compared to the numbers I logged. This is to prevent overshoots. Boost quickly climbs to where it should be and sticks. The reduced duty cycles at lower throttle positions has the effect of varying boost psi based upon throttle position. This makes throttle response more linear.
The only downside is that this is open loop EBC -- it just sets a duty cycle -- it does not try to achieve a boost target. That means you can expect some variability in the actual boost achieved depending upon external conditions. Driving around for the past month and a half, I've seen it settle anywhere from 9 to 11psi -- but once it gets where it's going, it's rock solid. I think this is the best you can do with MS1. For true closed loop EBC, you need to upgrade to at least MS2, possibly MS3.
Nevertheless, count me a happy customer.
Reply
0
0
08-26-2011, 07:34 PM
#70
Elite Member
iTrader: (2)
Join Date: Jan 2007
Location: Los Angeles, CA
Posts: 8,682
Total Cats: 130
Boost control has driven me crazy. I want the same psi, all the time, in all weather conditions. Urgh
Any updates on the pre-compressor WI? If I'm not happy with the spool of my new setup I'll be giving it a try--- with a large nozzle per your results.
Any updates on the pre-compressor WI? If I'm not happy with the spool of my new setup I'll be giving it a try--- with a large nozzle per your results.
Reply
0
0
08-26-2011, 08:03 PM
#71
Elite Member
Thread Starter
iTrader: (4)
Join Date: Mar 2008
Location: Granbury, TX
Posts: 6,301
Total Cats: 696
I think I kind of lucked into a well balanced exhaust setup. I'm not having any issues with boost creep (well, I did a little before EBC, but it's gone now).
Actually, I was kind of following what you were doing with pre-compressor WI. I was just curious. Right now I'm purely conventional -- injecting H20 single stage from a MAP setpoint. If anything, I'm wishing that my nozzle was immediately before the throttle (ala Devil's Own instructions). I'm finding that water, for the most part, doesn't phase change until it hits the cylinders. I should have known this, psychrometric charts clearly show that higher pressure air holds less water -- plus, look at how much water you have to drain from your garage air compressor. With pre-compressor, you definitely want to run almost all meth.
I'm glad you're not perma-banned. Wuzup with that?
Reply
0
0
 08-26-2011, 09:48 PM
#73
Elite Member
Thread Starter
iTrader: (4)
Join Date: Mar 2008
Location: Granbury, TX
Posts: 6,301
Total Cats: 696
Actually, I haven't yet delved into the firmware. Maybe that's next, although I'm pretty weak with assembly.
Reply
0
0
 08-28-2011, 12:47 AM
#75
Elite Member
iTrader: (2)
Join Date: Jan 2007
Location: Los Angeles, CA
Posts: 8,682
Total Cats: 130
Actually, I was kind of following what you were doing with pre-compressor WI. I was just curious. Right now I'm purely conventional -- injecting H20 single stage from a MAP setpoint. If anything, I'm wishing that my nozzle was immediately before the throttle (ala Devil's Own instructions). I'm finding that water, for the most part, doesn't phase change until it hits the cylinders. I should have known this, psychrometric charts clearly show that higher pressure air holds less water -- plus, look at how much water you have to drain from your garage air compressor. With pre-compressor, you definitely want to run almost all meth.
I'm glad you're not perma-banned. Wuzup with that?
I'm glad you're not perma-banned. Wuzup with that?
Did you see I'm running 5 nozzles now?
Reply
0
0
08-31-2011, 01:36 PM
#76
Elite Member
Thread Starter
iTrader: (4)
Join Date: Mar 2008
Location: Granbury, TX
Posts: 6,301
Total Cats: 696
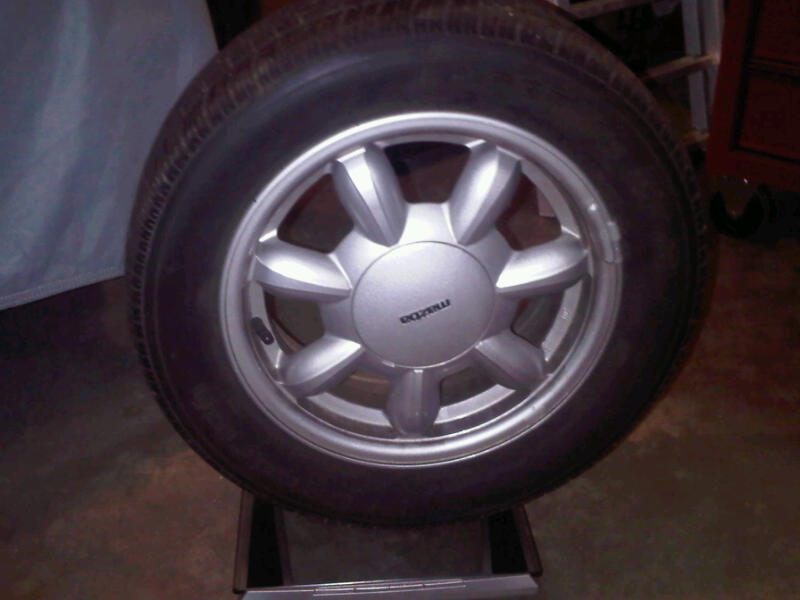
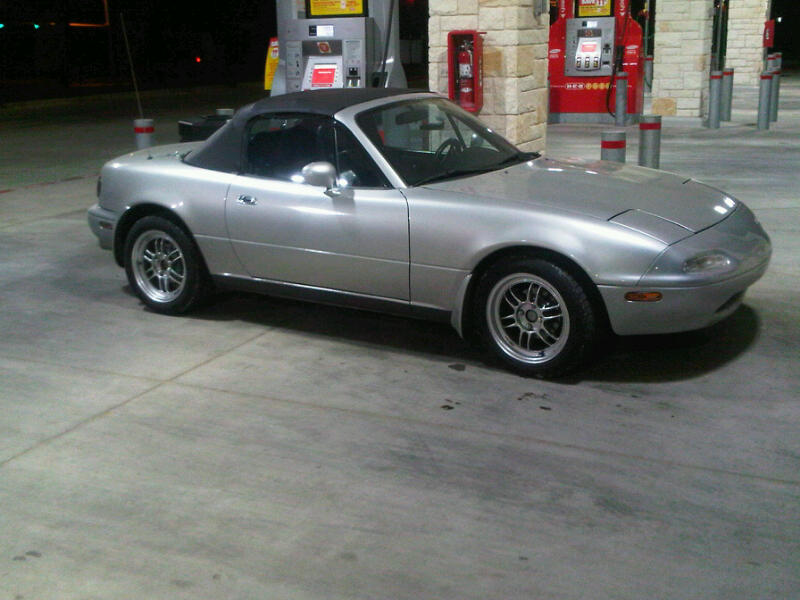
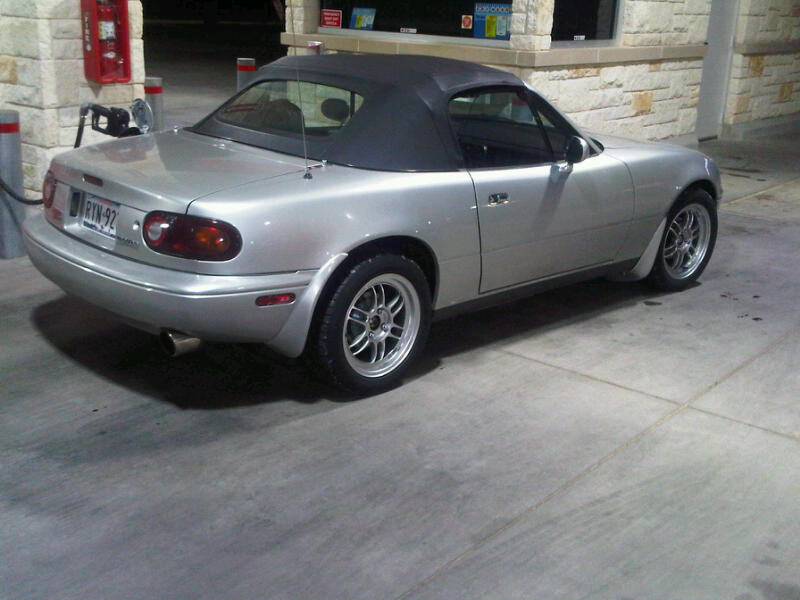
Got a nice present from UPS last night. Thought I would take the opportunity to document the progress of the wheels on my ride (along with weights).
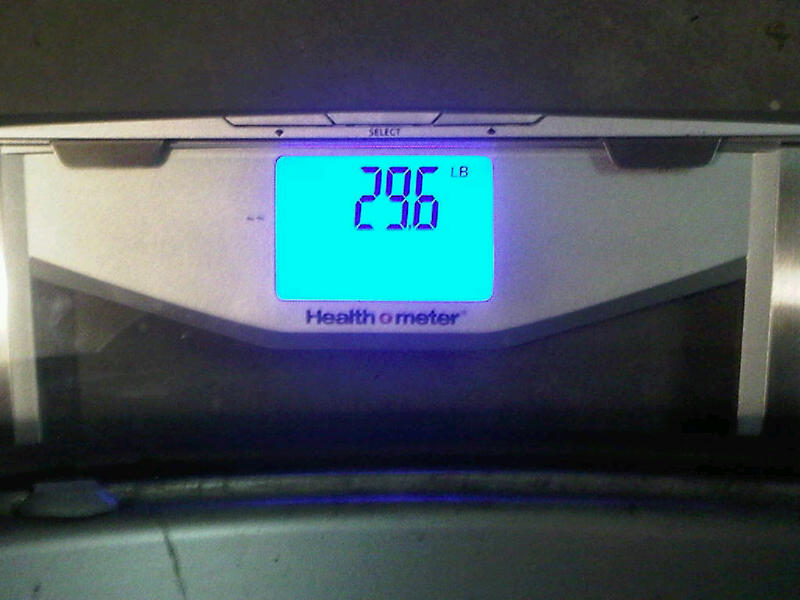
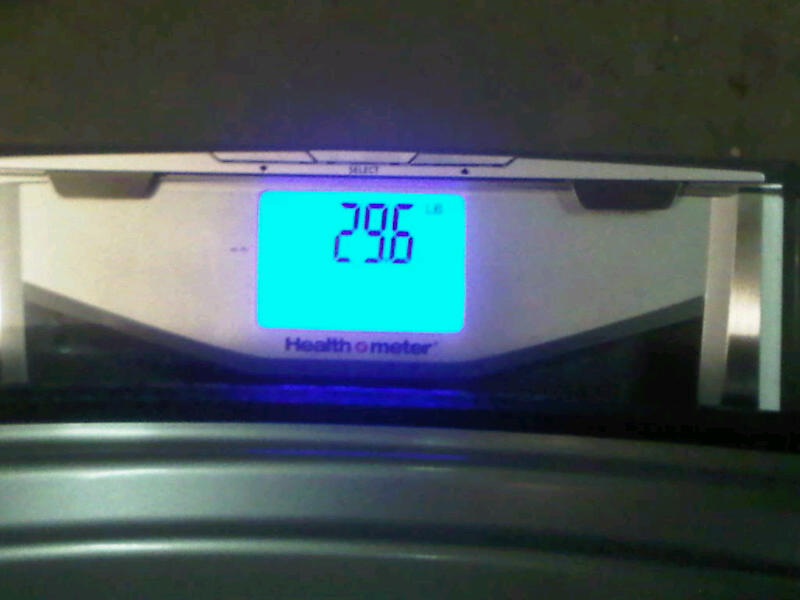
1. Daisy's (14x6) with BFG GT-H 185/60R14's (about 70% tread remaining). I was surprised at the weight of this combination (29.2 lbs). Mazda does a pretty good job.
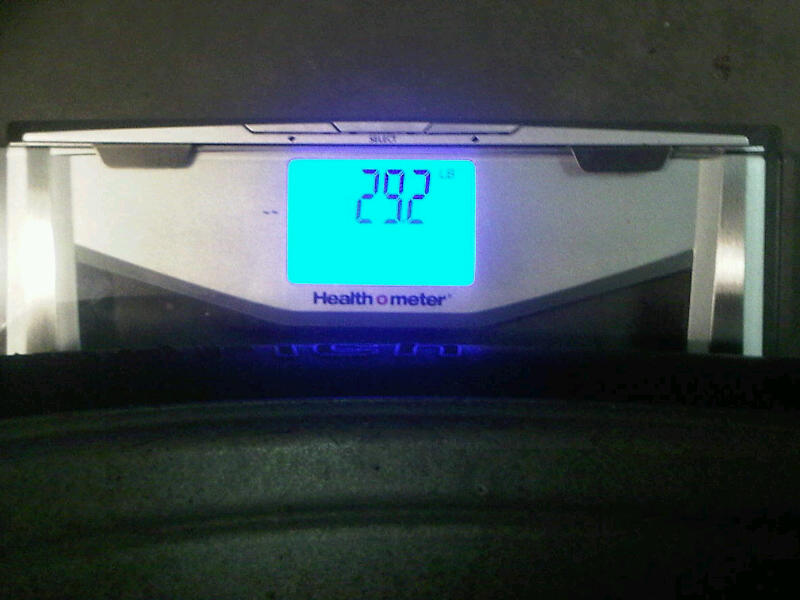
2. In 2007, I had a bit of a mishap on a wet road and bent two of the Daisy's big time. That gave me an opportunity to upgrade. I cheaped out on the wheels. Went with Konig Feathers (15x6.5) and Yoko S-Drive 195/50R15's. Been driving on these for almost four years. 40K miles on Summer Performance tires . . . not bad. With about 30% tread remaining, weight comes in at 29.6 lbs.
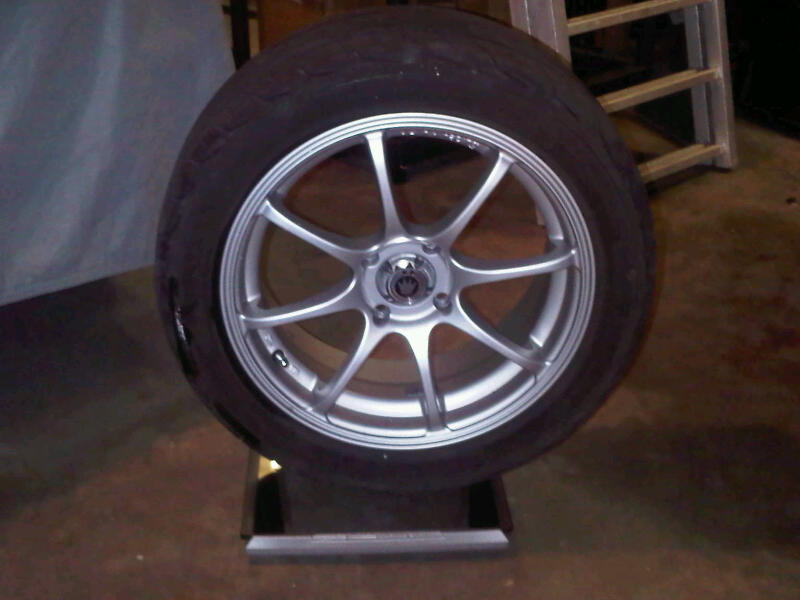
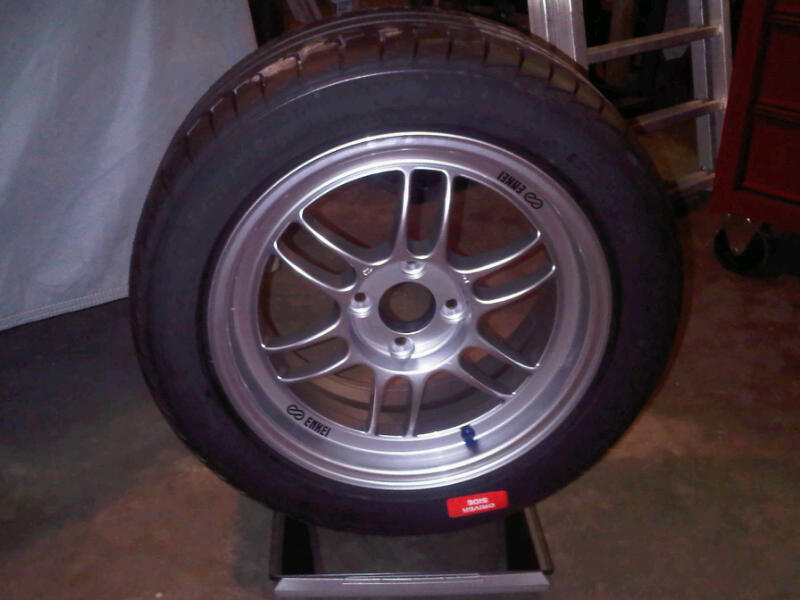
3. I recently developed a vibration. Turns out, I bent the inside rims of the 2 passenger-side Konig's (probably from being too apex aggressive). So, I upgraded to the high-strength rims that I really wanted all along. Enkei RPF1s (15x7). To keep my Dad happy (retired from BFG), got BFG G-Force Sports in 205/50R15. Brand new with more rubber, this combo came in at exactly the same weight as the worn Konig/S-Drives.
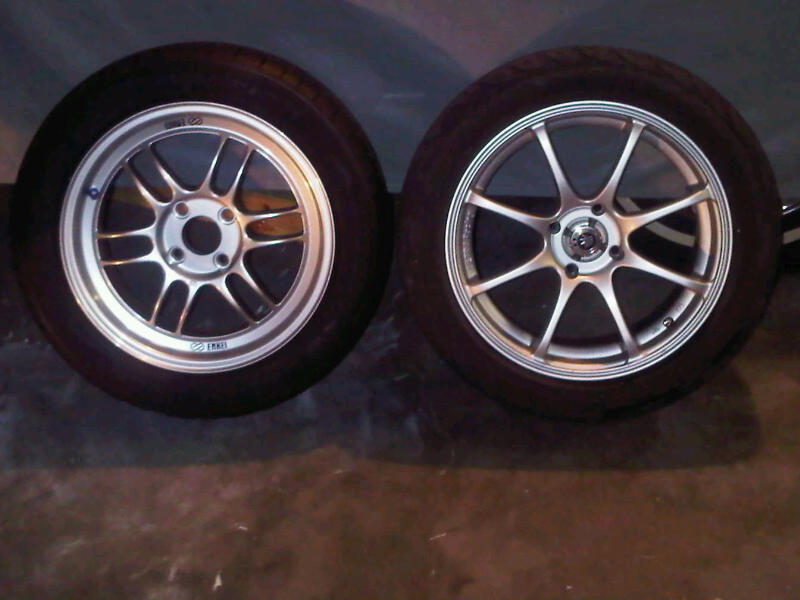
This is an interesting side-by-side of the Enkei and Konig. Gotta hand it to Konig, their wheels really have a nice, lightweight look. They create a visual illusion of a larger diameter too. In comparison, the Enkei wheels look like tank (or F1) wheels -- but weigh less. Wild. Note that I also heavily considered the 6UL, but the Made in China killed it for me. I prefer sending my money to Japan. There's also the convenience of having a tire/wheel combo shipped from TireRack and all I have to do is swap. I think 949 should consider selling tires.
Glory shots:
1. Daisy's (14x6) with BFG GT-H 185/60R14's (about 70% tread remaining). I was surprised at the weight of this combination (29.2 lbs). Mazda does a pretty good job.
2. In 2007, I had a bit of a mishap on a wet road and bent two of the Daisy's big time. That gave me an opportunity to upgrade. I cheaped out on the wheels. Went with Konig Feathers (15x6.5) and Yoko S-Drive 195/50R15's. Been driving on these for almost four years. 40K miles on Summer Performance tires . . . not bad. With about 30% tread remaining, weight comes in at 29.6 lbs.
3. I recently developed a vibration. Turns out, I bent the inside rims of the 2 passenger-side Konig's (probably from being too apex aggressive). So, I upgraded to the high-strength rims that I really wanted all along. Enkei RPF1s (15x7). To keep my Dad happy (retired from BFG), got BFG G-Force Sports in 205/50R15. Brand new with more rubber, this combo came in at exactly the same weight as the worn Konig/S-Drives.
This is an interesting side-by-side of the Enkei and Konig. Gotta hand it to Konig, their wheels really have a nice, lightweight look. They create a visual illusion of a larger diameter too. In comparison, the Enkei wheels look like tank (or F1) wheels -- but weigh less. Wild. Note that I also heavily considered the 6UL, but the Made in China killed it for me. I prefer sending my money to Japan. There's also the convenience of having a tire/wheel combo shipped from TireRack and all I have to do is swap. I think 949 should consider selling tires.
Glory shots:
Reply
0
0

 09-01-2011, 10:43 AM
#80
Elite Member
Thread Starter
iTrader: (4)
Join Date: Mar 2008
Location: Granbury, TX
Posts: 6,301
Total Cats: 696
Yes. They have a smoking deal on gas right now. Filled the wife's 4x4 Expedition and my Poncho G8 GT there the previous day. A little bit embarassing putting fuel into the tiny Miata gas tank after filling those brawny V8 tanks. It's also the closest station to my house!! My wife is super-excited about the new HEB opening. We live a dull life.
Reply
0
0


