Miata rally project

 07-12-2013, 10:16 PM
#22
Junior Member
Thread Starter
iTrader: (2)

Join Date: Jan 2013
Location: Michigan
Posts: 207
Total Cats: 5
Cool beans ! I welded a thick plate near the front roll bar attachments with a couple of nuts welded to it for the rear mounting. The front support used the existing tow hook mounting points.....the welding wasn't pretty, but so far nothing broke....good luck !
A little more progress this evening on the hood venting, did as much as I could - trying to avoid annoying the neighbors to much with grinding sounds...looks like I could take the side slits a little more rearward, without too much trouble...here it is with some temporary 1.5" wood spacers and a 4" side cut.
A little more progress this evening on the hood venting, did as much as I could - trying to avoid annoying the neighbors to much with grinding sounds...looks like I could take the side slits a little more rearward, without too much trouble...here it is with some temporary 1.5" wood spacers and a 4" side cut.
Last edited by TheV's; 07-12-2013 at 10:32 PM.

Reply
 0
0

0
07-14-2013, 10:18 PM
#23
Junior Member
Thread Starter
iTrader: (2)
Join Date: Jan 2013
Location: Michigan
Posts: 207
Total Cats: 5
Sticker time !
So the hood vent work continues, lots more hood reinforcement pieces removed, and a template made for the gurney flap and side panels. I'm going to see if I can make it in one piece, since I don't have alu welding capability....
And I stuck on my mazda contingency stickers, see if we can't pay for gas for the trip to the rallycross this coming weekend.
Reply
0
0
09-14-2013, 10:53 PM
#24
Junior Member
Thread Starter
iTrader: (2)
Join Date: Jan 2013
Location: Michigan
Posts: 207
Total Cats: 5
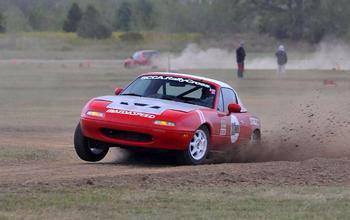
Once again I had the great honour of being the course open car for this years 65th running of POR. Friday night saw us starting from Indian River, heading over the Macinac bridge and into the UP. Car ran great all night, but picked up a puncture...funny...last time I was in the UP doing this the same thing happened. The rally roads were awsome, fast, flowing for the most part, but the stones are pretty sharp ! Rain came and went, we must have put the top up and down 1/2 dozen times, and started to classify how hard it was raining buy the speed we could go without getting wet - 60mph rain was normally time to stop and put the top up. We managed to ride back over the big bridge about half past midnight with it down though, pretty unique experience ! Among other wildlife we also saw a big moose, followed it for maybe 1/4 mile, very cool. Picture is of us waiting for a control crew to show up near the beginning of leg #2
Reply
0
0
09-19-2013, 11:31 PM
#25
Junior Member
Thread Starter
iTrader: (2)
Join Date: Jan 2013
Location: Michigan
Posts: 207
Total Cats: 5
Saturdays event was much longer, necessitating an earlier start. All in all it was about 350 miles of wonderful trails. These roads are generally a mix of sand and forest loam and can be quite slippery, but a whole bunch of fun. They then to be slower and with more twisters which is just a blast ! We had perfect rally weather, some light rain to keep the dust down and locals home, but dry enough to run top down until the end at about 4am. Picture was taken just before dark, I think somewhere over towards Glennie. Hood was up after a particularly sporty drive to the checkpoint ! Yes I'm still seeing high temps....
Reply
0
0
09-19-2013, 11:40 PM
#26
Junior Member
Thread Starter
iTrader: (2)
Join Date: Jan 2013
Location: Michigan
Posts: 207
Total Cats: 5
We started to see quite a few deer, but at about 11ish we ran out of luck an one jumped out right in front of me. I was locked up as the deer hit the front of the car, turned its head and winked at me, bounced back onto all fours and ran off into the woods.....my passenger side driving light was now pointing at the stars, and the headlamp bent and no longer working, but, it could have been a lot worse....
Reply
0
0
09-21-2013, 03:07 PM
#27
Junior Member
Thread Starter
iTrader: (2)
Join Date: Jan 2013
Location: Michigan
Posts: 207
Total Cats: 5
Finally managed to spend some time cleaning up the car....and trying on my newly painted hard top...

Note the sand washed from the car...and it's still coming

Note the sand washed from the car...and it's still coming
Reply
0
0
09-22-2013, 09:55 AM
#28
Junior Member
Thread Starter
iTrader: (2)
Join Date: Jan 2013
Location: Michigan
Posts: 207
Total Cats: 5
So it turns out the British flag is actually quite difficult to make, lots of dimensions and ratios to figure out. after some time measuring up and then putting together a spreadsheet to scale the dimensions I was ready. My good friend Craig put down a coat or two of sealer and then we added our 1st base coat - this is Ford Flex Roof white... The red was an easy choice - signal red (Mazda SU CLASSIC RED 1989-2006 41350 941350), but finding a non metallic Blue proved a challenge, eventually ending up with something from Mitsubishi - bright blue - 5883 MIT color T10.
So here we are after taping up, ready for the Red

My daughter helped lay on the Blue and Red
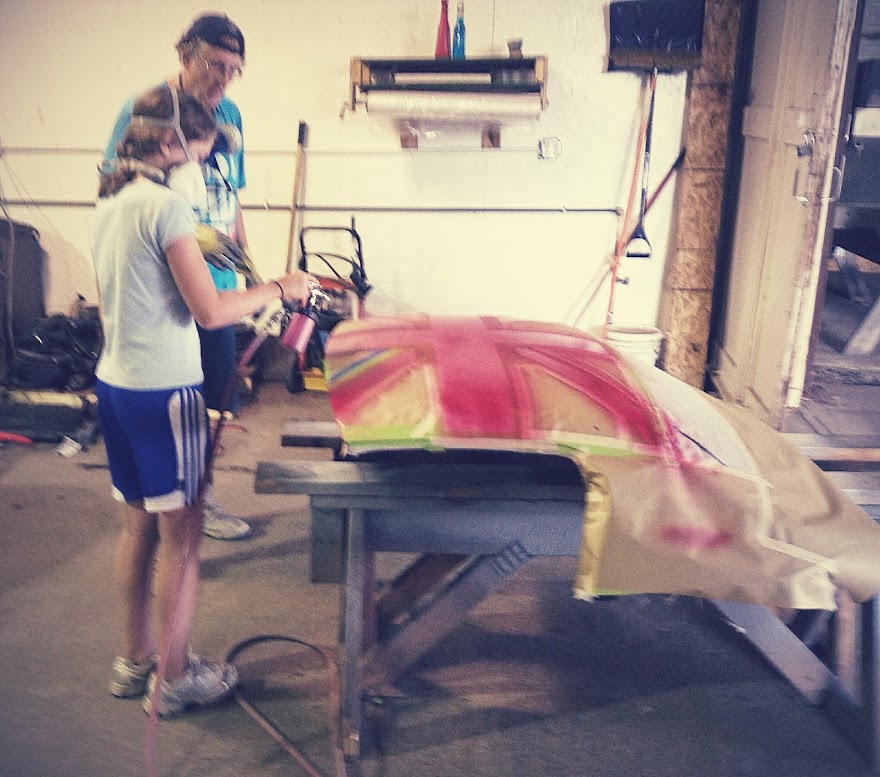
And then the pro stepped in...
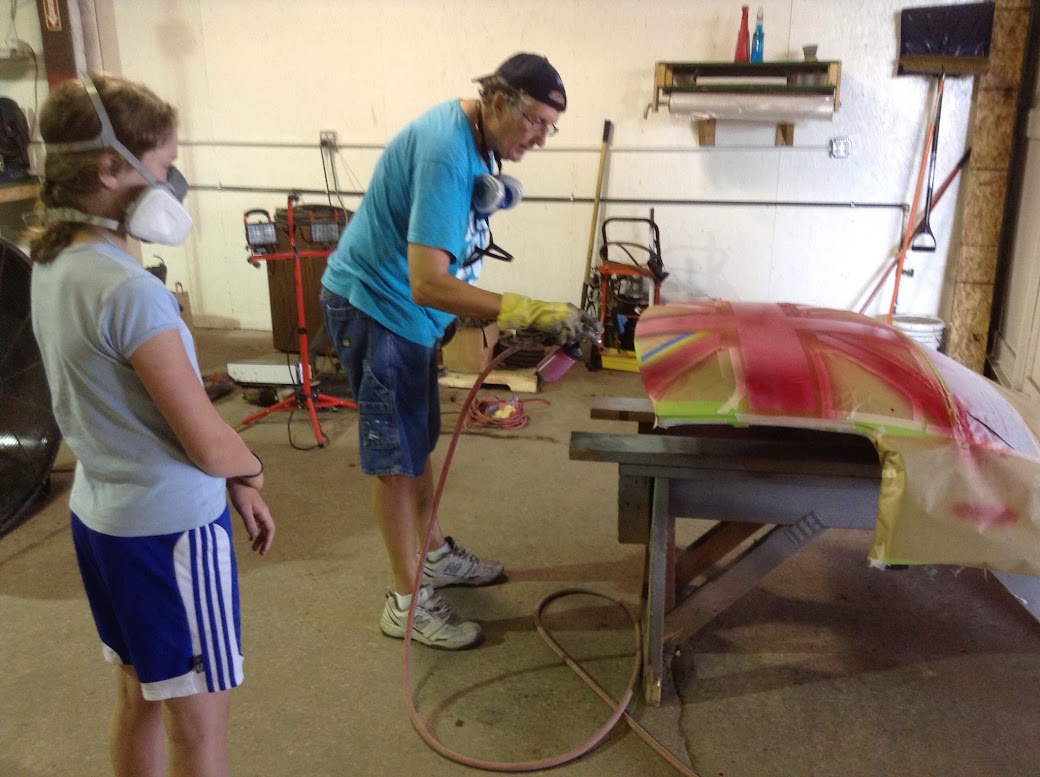
And then after untaping and adding a coat or three of clear coat...Violla !

So here we are after taping up, ready for the Red
My daughter helped lay on the Blue and Red
And then the pro stepped in...
And then after untaping and adding a coat or three of clear coat...Violla !
Reply
2
2
 09-22-2013, 11:01 AM
#30

Then I remembered we did the LSPR, which is spiritually the POR, but not actually the POR.
Reply
0
0
09-22-2013, 12:44 PM
#31
Junior Member
Thread Starter
iTrader: (2)
Join Date: Jan 2013
Location: Michigan
Posts: 207
Total Cats: 5
Yes it was pretty bad last year on POR on the Friday night also ! at one point I was thinking a rudder would work better ! I can usually stay reasonably well over CAST, but not last year in those mud holes ! But the rally tires did their thing and we made it...
Last edited by TheV's; 09-22-2013 at 04:21 PM.
Reply
0
0
09-29-2013, 06:03 PM
#32
Junior Member
Thread Starter
iTrader: (2)
Join Date: Jan 2013
Location: Michigan
Posts: 207
Total Cats: 5
At last i've started work on the engine. It's from a 94' I parted out and when i tore it down was pretty loose but no major scoring or bad stuff happening to the bearings. It's been at D&S in Troy to be get bores bored .25 over. crank polished and balanced. They do an awesome job of cleaning, I think they bake it and who knows what to get it super clean. Anyway after retrieval I decided not to let it rust so after a thorough masking job painted the outside with high temp engine paint.
I chose white just so any leaks show up really well

After this I spent about 1.5 hours cleaning out all the threads...fun !
I chose white just so any leaks show up really well
After this I spent about 1.5 hours cleaning out all the threads...fun !
Reply
0
0
10-03-2013, 09:03 PM
#33
Junior Member
Thread Starter
iTrader: (2)
Join Date: Jan 2013
Location: Michigan
Posts: 207
Total Cats: 5
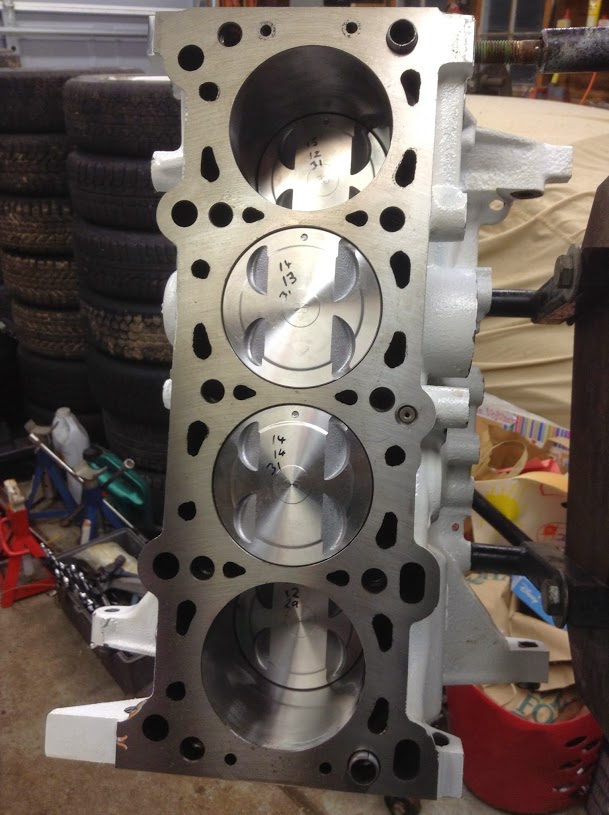
Well not actually from detroit, decided to go with stock pistions and rings with new forged rods..., here they are before assembly

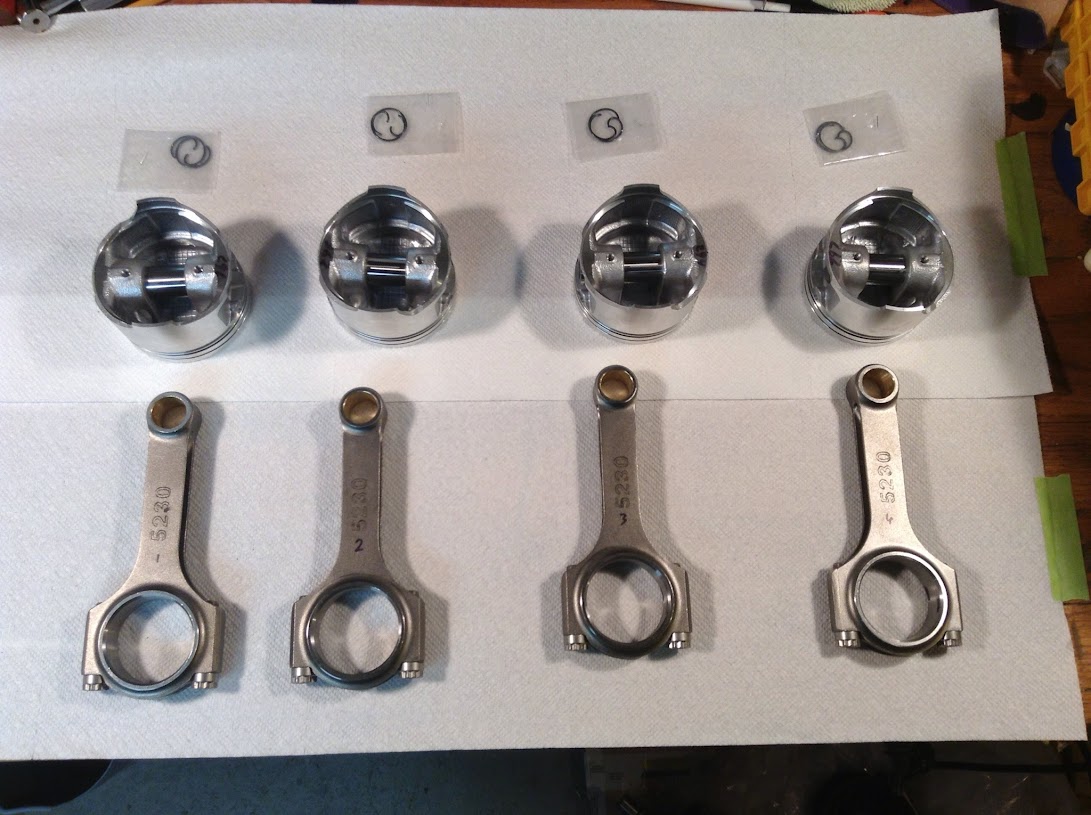
Gave everything a thorough clean and final wipe down, then time for plenty of redline assembly lube. Taking care to match the front of engine dimple on the pistons up with the correct orientation of the rods...

Mmm, that was easy !
Gave everything a thorough clean and final wipe down, then time for plenty of redline assembly lube. Taking care to match the front of engine dimple on the pistons up with the correct orientation of the rods...
Mmm, that was easy !
Reply
0
0
10-17-2013, 06:40 PM
#34
Junior Member
Thread Starter
iTrader: (2)
Join Date: Jan 2013
Location: Michigan
Posts: 207
Total Cats: 5
So after copious amounts of measuring with a bore gauge and micrometer it was looking like my bearing clearances were a little tight if i stayed standard. My engine machinist recommended I go on the loose side of the specs so I ordered up some ACL's for my mains at 0.001" loose. These arrived and so I installed and plastigauged only to find my clearances were running up near 0.003" which is well outside of spec. After talking to FM it seems like they build nearer to 0.002", but of course were out of stock for this size.....After trying everywhere I came to the realization there were none in the USA. Since these things come from Austrailia I had to wait until the surf was down and they restocked everybody....Finally they arrived and I installed the crank...
Crank installed awaiting plastigauge

Just a shade under 0.002"

Lubrication city - this redline is nice stuff to use....


Installed the crank scraper and all torqued...done


Crank installed awaiting plastigauge
Just a shade under 0.002"
Lubrication city - this redline is nice stuff to use....
Installed the crank scraper and all torqued...done
Reply
2
2
10-17-2013, 06:44 PM
#35
Junior Member
Thread Starter
iTrader: (2)
Join Date: Jan 2013
Location: Michigan
Posts: 207
Total Cats: 5
Of course I have a spare set of bearings, 0.001" loose for sale. I would think perfect for anybody with a new crank - follow the link to the classifeds section
https://www.miataturbo.net/miata-par...earings-75227/
https://www.miataturbo.net/miata-par...earings-75227/
Reply
0
0
 10-20-2013, 04:35 PM
#38
Junior Member
Thread Starter
iTrader: (2)
Join Date: Jan 2013
Location: Michigan
Posts: 207
Total Cats: 5
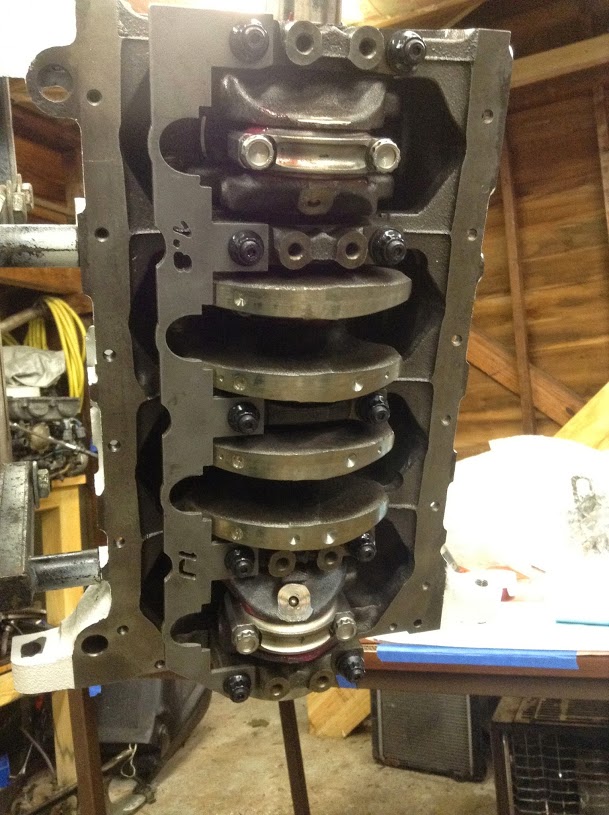
Took longer than I thought, but the pistons and rods are now all in.....After reading several threads saying no oil, and then other say must have oil, I opted for the with oil on the rings and mostly applied to the ring compressor. Each rod was plastiguaged and came in loose end of in spec around 0.002" which to me is about perfect.
Reply
0
0
10-30-2013, 04:12 AM
This message has been deleted by sixshooter.
Reason: Spamming to post a for sale ad pissed off the mods