Pats Whipple W100AX Street/Track '99 Build Thread


 03-08-2015, 02:14 PM
#102
Elite Member
Thread Starter
iTrader: (16)
Join Date: Aug 2007
Location: Houston, TX
Posts: 9,297
Total Cats: 477
Have you ever used those SPAL fans before? I have just one of them on my Radiator and it pulls so much current we had to add timing and fuel at idle to keep the motor running when it kicked on. I don't see how in the world to have two of them running at the same time. But DAMN...they pull a serious amount of air.
What I did, is I designed and built a series/parallel fan controller that runs the fans in series (half of system voltage to each fan, so as above 14/2 = 7V) for "low" then parallel at 14V for high.
So Low, they only pull 420/2 = 210 Watts. Stock fans pull 7A and 6A, which is 7+6=13A, at 14V, 13*14=182 Watts. So these fans on low, will only be 210/182 = 15% more current draw at idle vs stock. I'll have a solenoid that opens to add extra air to the motor to compensate for this load.
They will only switch into HIGH (840 Watts) under load, where it won't be noticeable or affect idle. I don't know that I'll ever try to run them on high at idle, probably not! Not unless I setup a high idle feature for this purpose.
At LOW, these fans pull a little more air than the stock fans on high!

Reply
 0
0

0
03-08-2015, 02:17 PM
#103
Elite Member
Thread Starter
iTrader: (16)
Join Date: Aug 2007
Location: Houston, TX
Posts: 9,297
Total Cats: 477
I will have 7 thermocouple installed, so I'll be able to directly measure heat exchanger effectiveness for the oil cooler, radiator, and intercooler. So there won't be no guessing.

Reply
0
0
03-11-2015, 01:47 AM
#104
Elite Member
Thread Starter
iTrader: (16)
Join Date: Aug 2007
Location: Houston, TX
Posts: 9,297
Total Cats: 477
Update...
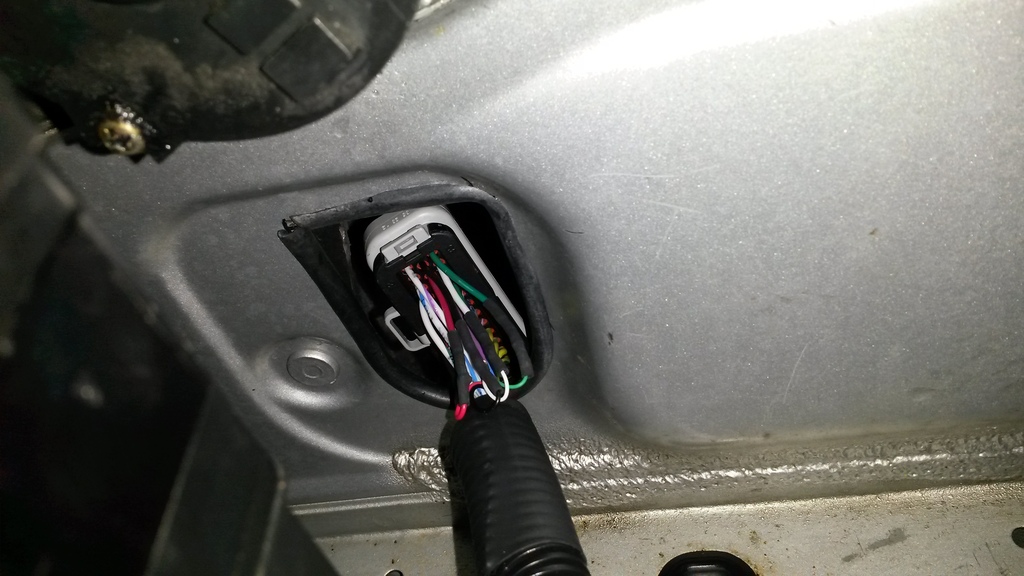
Slow progress. I spent a few hours today taking out the HVAC blower and the piece it snaps into (which is way the hell up under the dash...) so I could enlarge the hole I made that passes through the firewall. I wanted to make it oval shaped and large enough that the ECU connectors could go through the firewall to allow removal of the wiring harness if ever needed, vs hardwiring everything and it can not be removed without being cut...
So got that done, huge pain, had to use a dremel.... But it's done.
Then put all that crap back together. Then decided I'd hook my stereo back up so I could listen to music through it. I have a 8 yr old, 1,000 dollar flip up stereo that's supposed to do everything. Well, I couldn't figure out how to hook my phone up through the auxiliary. Spent a couple hours, found the manual online, I guess something is broke, it won't work.
So put it back in anyways, sans auxiliary cable. Also put rest of center stack back in, cleaned stuff, etc. No pics of this, I forgot, not that important anyway.
Then I started working on WHERE all these electronics are going. I need to install ALL of the following somewhere...
1. MS3-PRO
2. MS Labs 24CH Analog Input Expander-CAN BUS
3. MS Labs 24CH Output Expander-CAN BUS
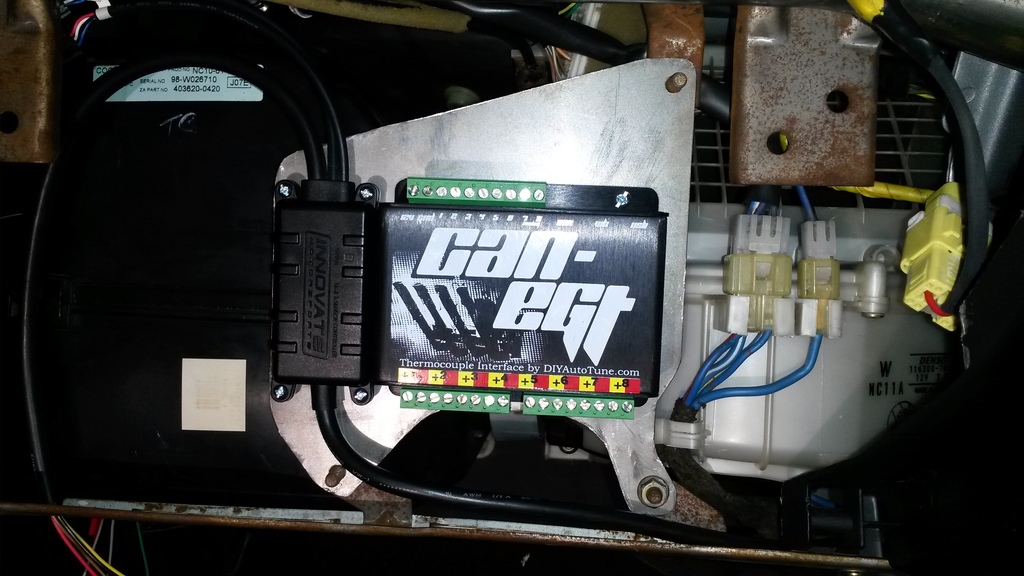
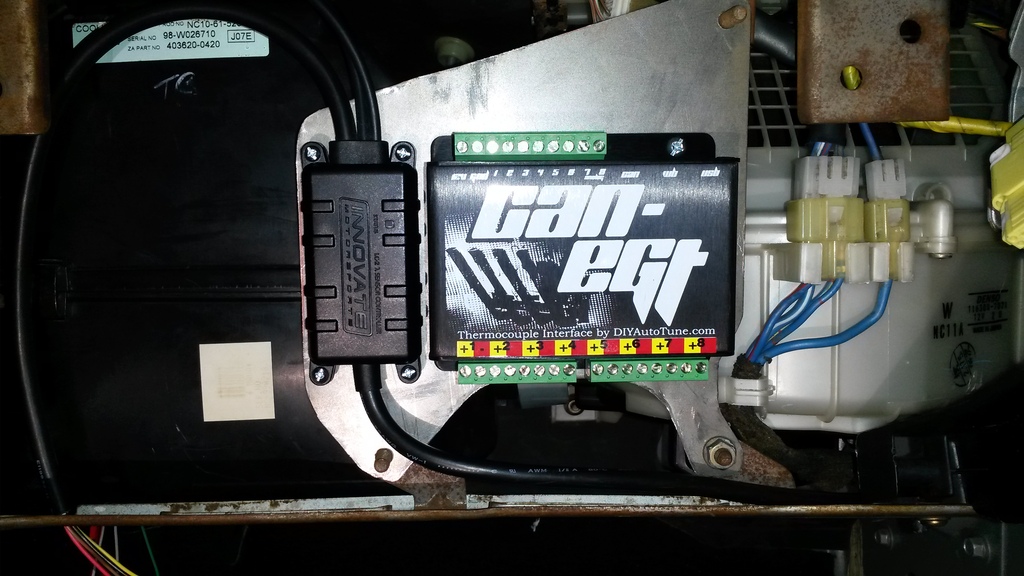
4. CAN EGT-CAN BUS
5. LC-2- Digital signal to ECU
6. Relay/Fuse Box I fab'd a while back.
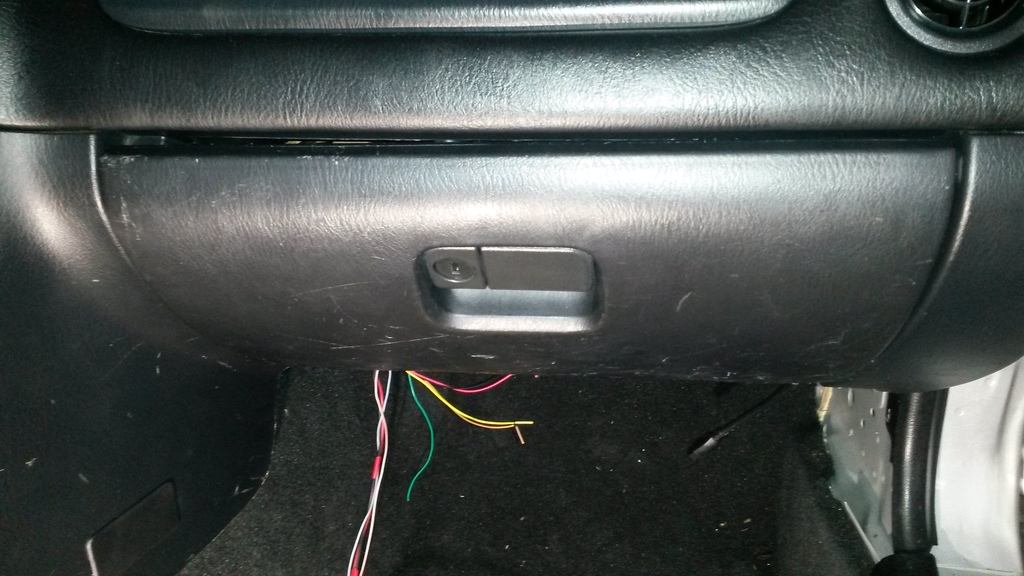
I'm currently planning to put items 1-5 all together, behind where the glove box used to be. Basically I gutted the glove box, but I'm keeping the lid/cover that snaps closed so it looks normal. But behind it is a bunch of empty space now.
Item 6 will likely go in the engine bay, against the firewall on the passengers side, just a few inches away from the hole I made today.
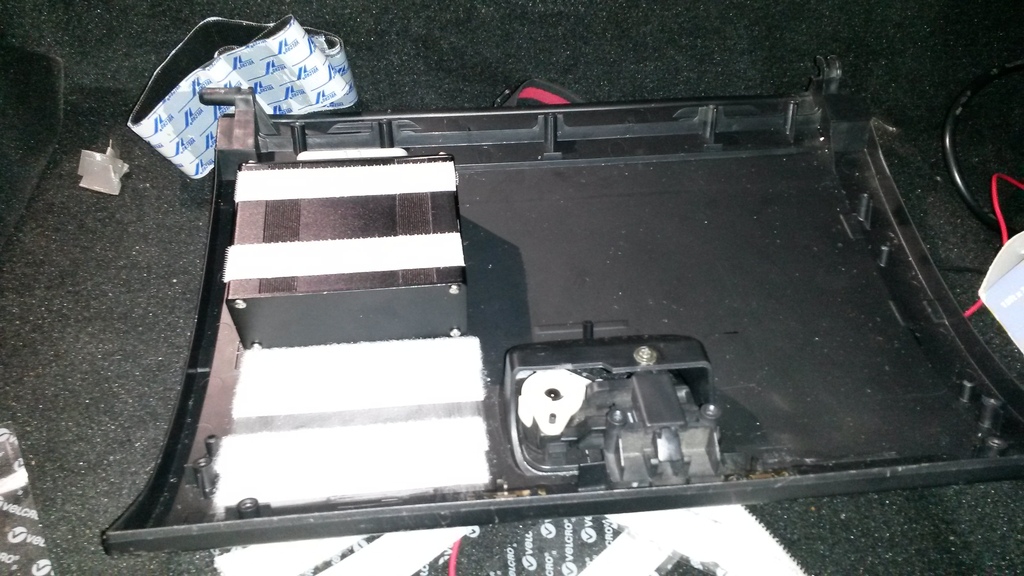
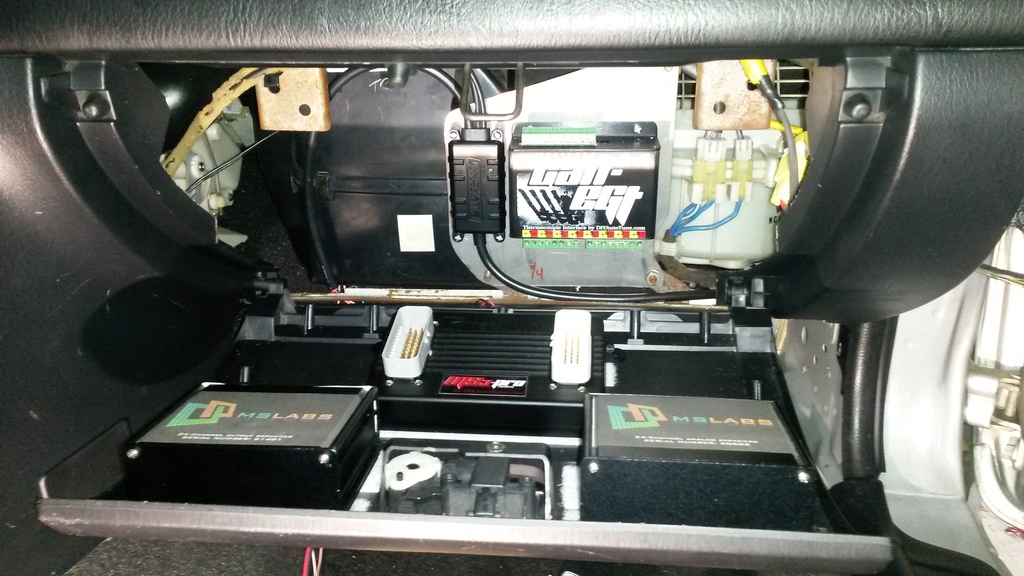
Pics! I have some pics of the layout of items 1-5. I'm thinking of just velcroing items 1, 2 and 3 as shown, then fab a bracket that puts items 4 and 5 above them. All items will be attached to the lid, and have enough slack in the wires that you can un-snap the lid, and pull the electronics all out if needed to service. Thoughts? Ideas?
Okay pics this time!
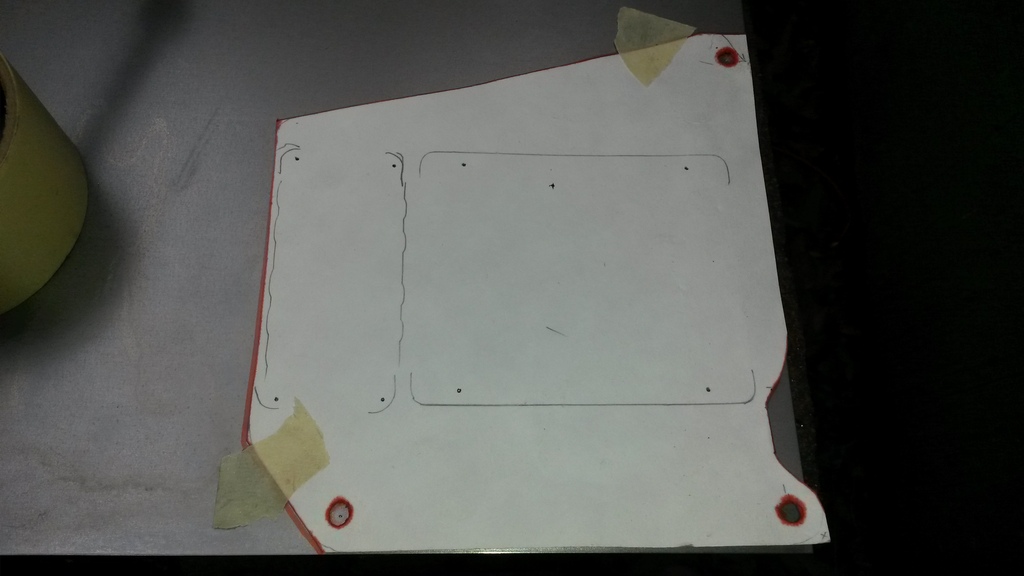
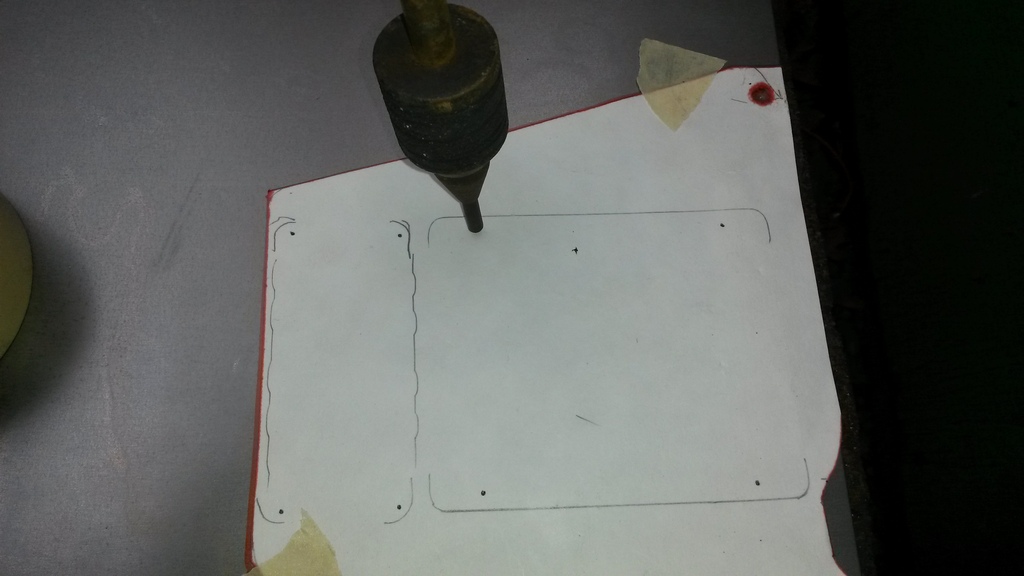
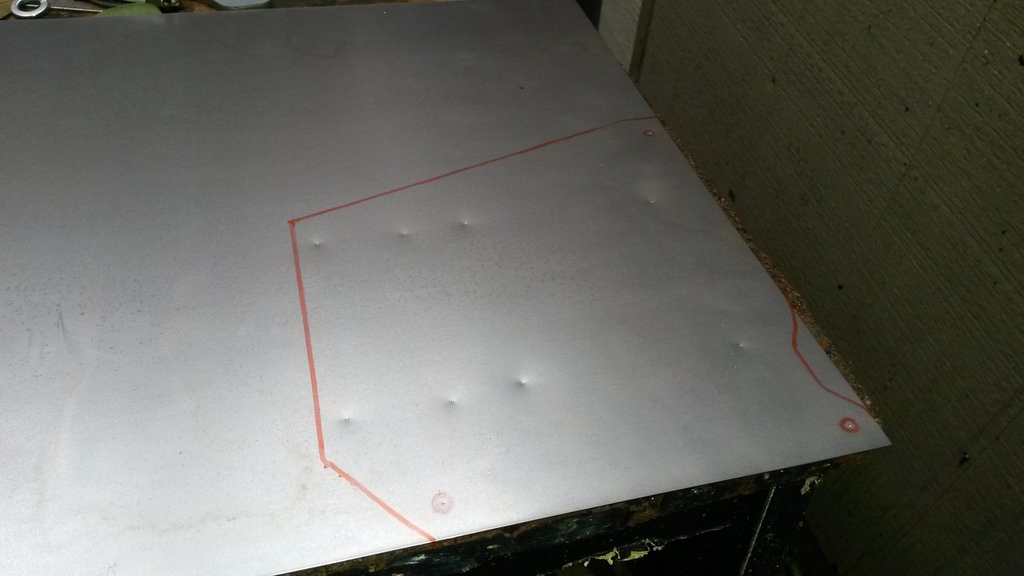
Here's a pic of where my temp sensors are going for the engine bay. These are only MS3 Sensors, factory ECU will have it's stock sensors of course.
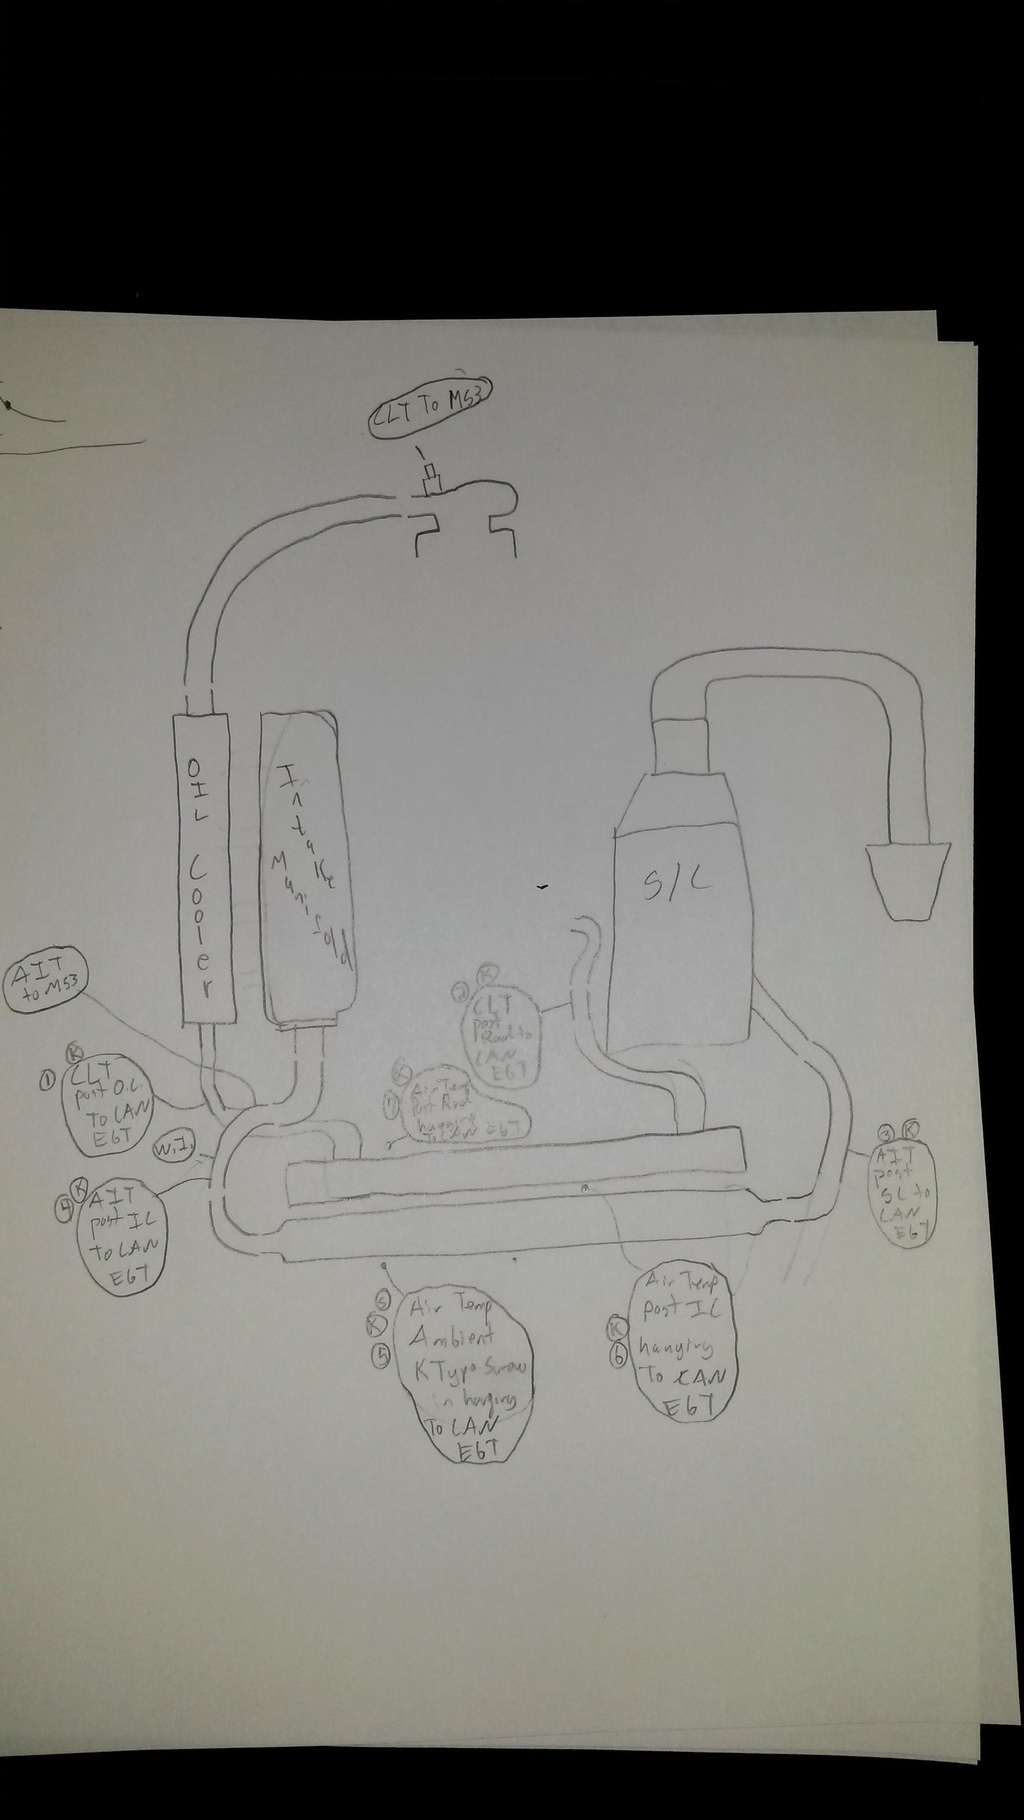
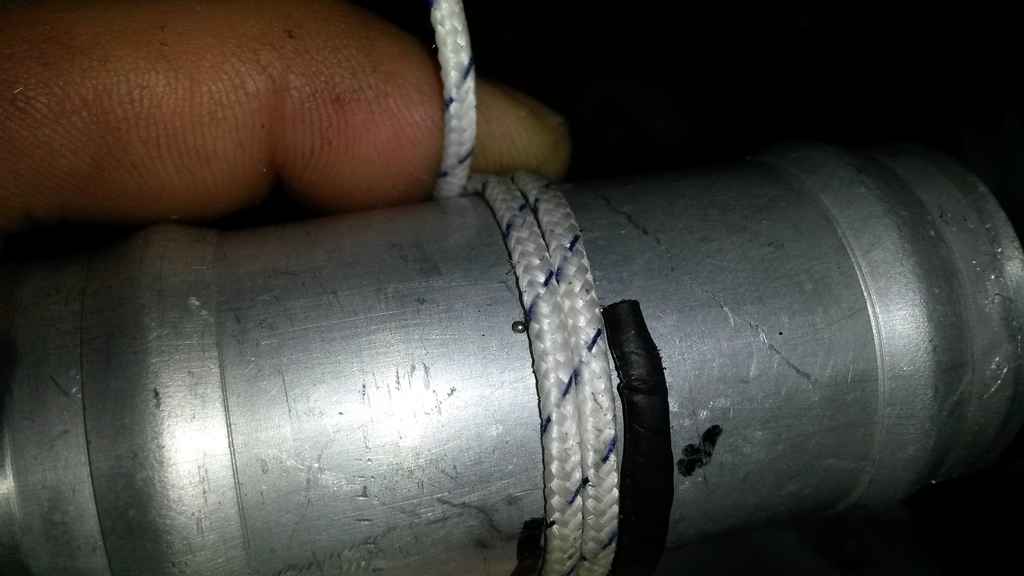
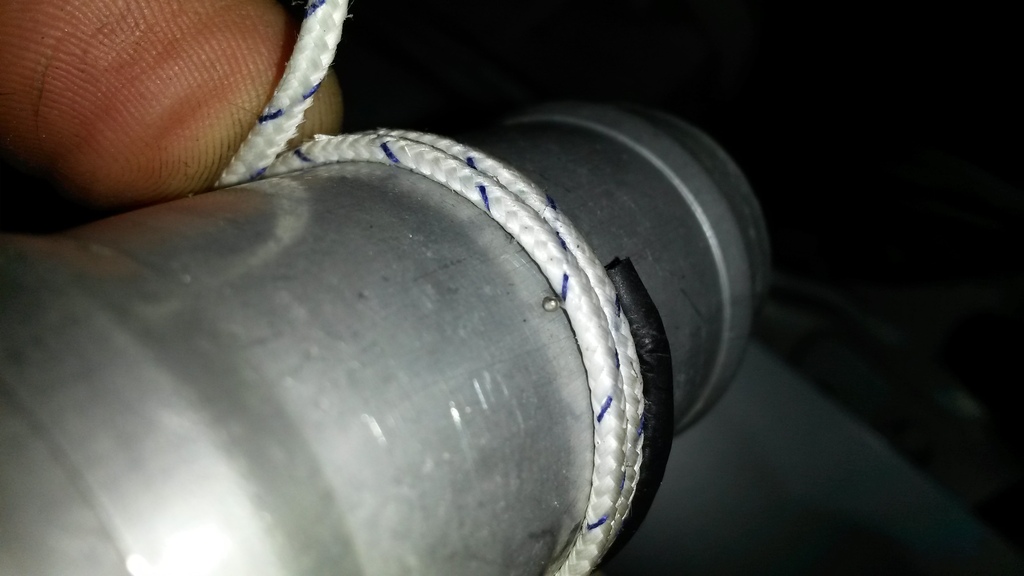
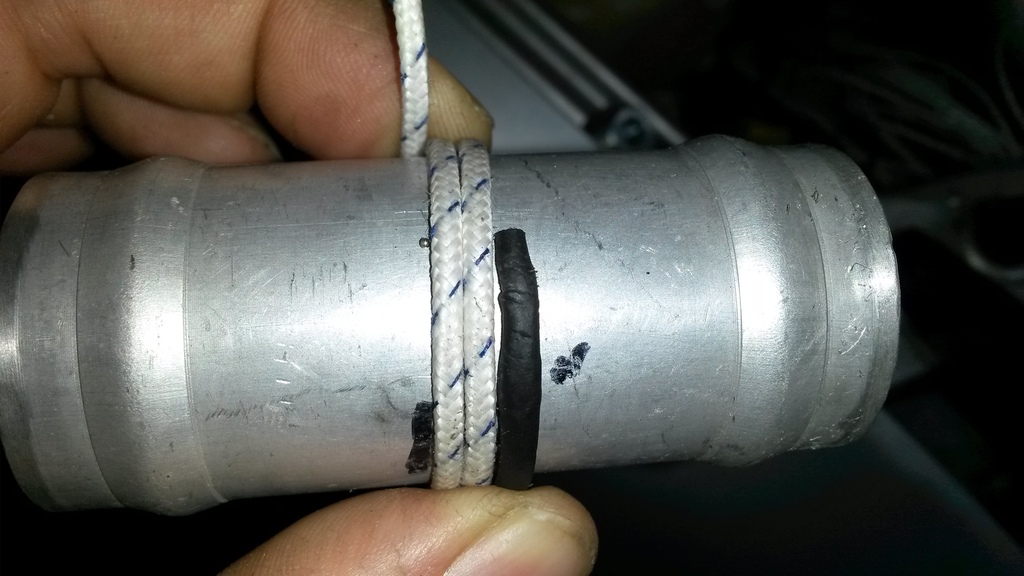
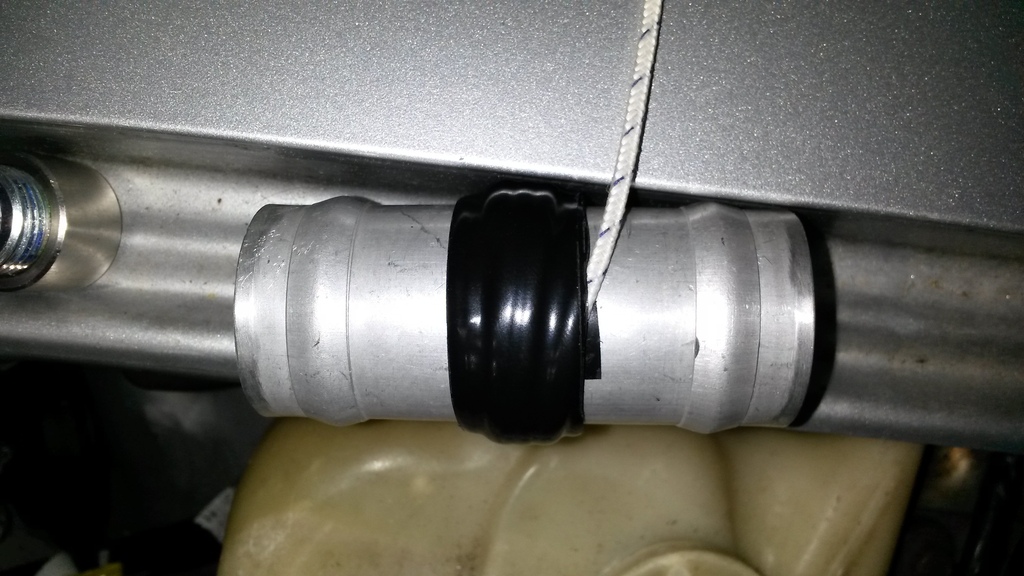
How I'm attaching the thermocouples to the engine coolant hoses. Will test and see how well it works, I think it will be fine. I may insulate further over them if needed. These pieces will slip into the hose where needed (only 2, one before, one after radiator). Metal pipe is aluminum, so I doubt there will be much lag due to that.
For the intake pipes, I'm drilling a hole and inserting the probe directly into the charge pipes. That way they will have more or less instant response. I don't have pics, but I found a way I think will work to do this, basically drill a tiny hole, stick them in, seal them with something (RTV probably) and a zip tie or 2 to keep it mounted to the pipe. No pics, haven't finalized this, just tested doing it this way and it seems fine.
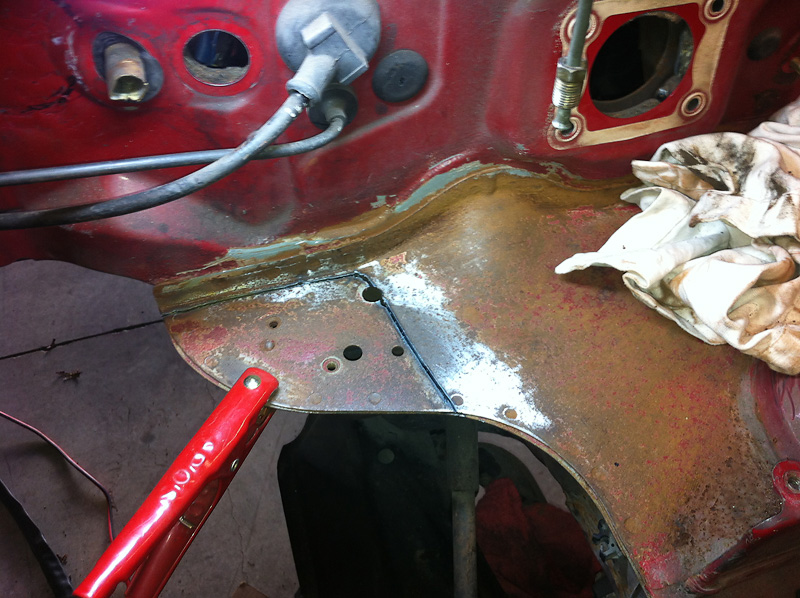
Firewall hole
With vacuum hose split tubing protector
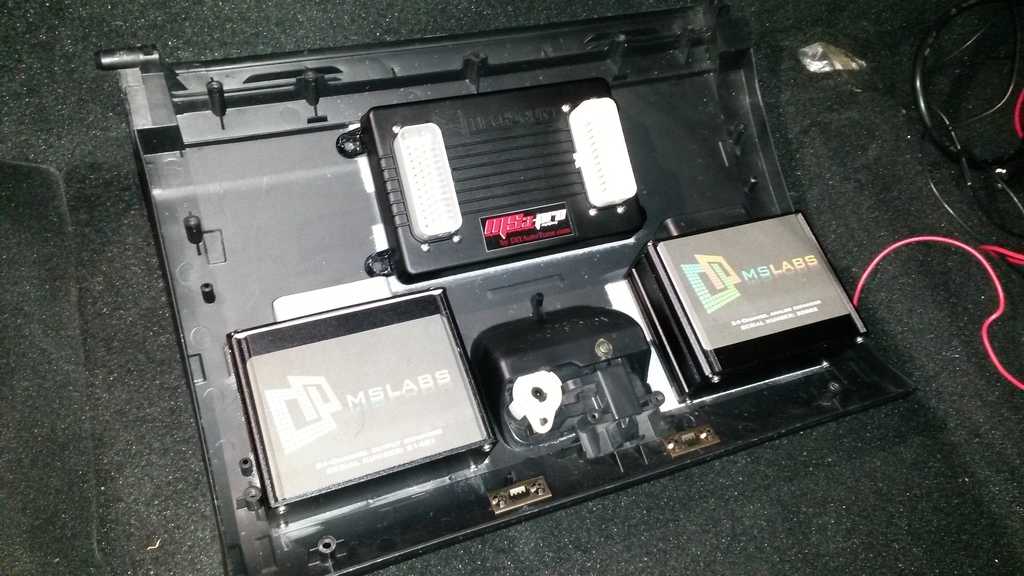
Plug fits! MS3 PRO and MS LABS box's have same plugs!
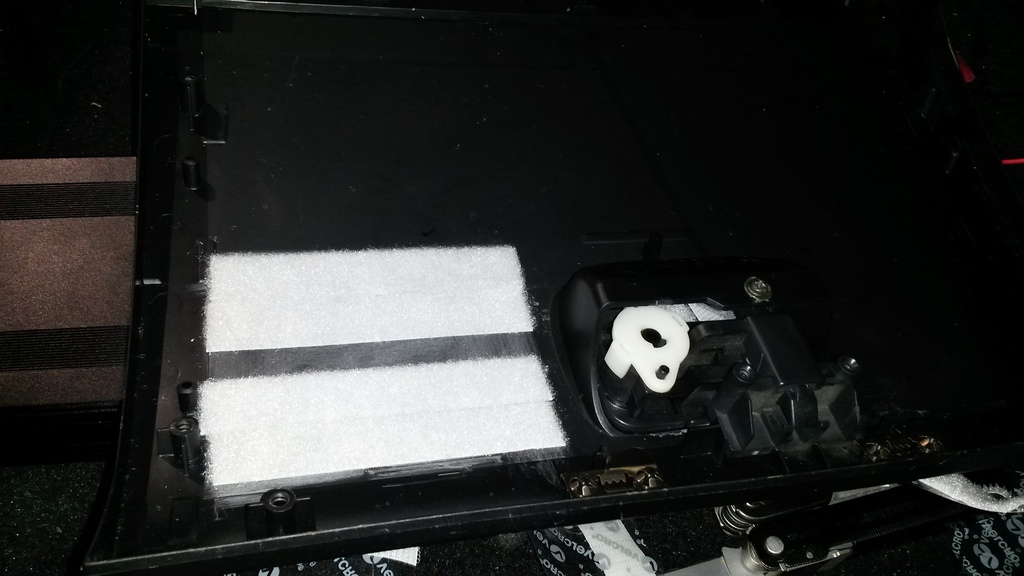
Interior view, air boxes removed.

This hole can't be seen with blower motor installed, but you can still reach behind it, and removing the blower motor now takes me <3 minutes.
Money! Ha I bet this is over 2K in electronics.... With sensors, uh... never mind...
Proposed layout
Then stack EGT and LC2 on top. Not literally on top, but floating say 1/4" or so above them via a bracket/floor.
Slow progress. I spent a few hours today taking out the HVAC blower and the piece it snaps into (which is way the hell up under the dash...) so I could enlarge the hole I made that passes through the firewall. I wanted to make it oval shaped and large enough that the ECU connectors could go through the firewall to allow removal of the wiring harness if ever needed, vs hardwiring everything and it can not be removed without being cut...
So got that done, huge pain, had to use a dremel.... But it's done.
Then put all that crap back together. Then decided I'd hook my stereo back up so I could listen to music through it. I have a 8 yr old, 1,000 dollar flip up stereo that's supposed to do everything. Well, I couldn't figure out how to hook my phone up through the auxiliary. Spent a couple hours, found the manual online, I guess something is broke, it won't work.
So put it back in anyways, sans auxiliary cable. Also put rest of center stack back in, cleaned stuff, etc. No pics of this, I forgot, not that important anyway.
Then I started working on WHERE all these electronics are going. I need to install ALL of the following somewhere...
1. MS3-PRO
2. MS Labs 24CH Analog Input Expander-CAN BUS
3. MS Labs 24CH Output Expander-CAN BUS
4. CAN EGT-CAN BUS
5. LC-2- Digital signal to ECU
6. Relay/Fuse Box I fab'd a while back.
I'm currently planning to put items 1-5 all together, behind where the glove box used to be. Basically I gutted the glove box, but I'm keeping the lid/cover that snaps closed so it looks normal. But behind it is a bunch of empty space now.
Item 6 will likely go in the engine bay, against the firewall on the passengers side, just a few inches away from the hole I made today.
Pics! I have some pics of the layout of items 1-5. I'm thinking of just velcroing items 1, 2 and 3 as shown, then fab a bracket that puts items 4 and 5 above them. All items will be attached to the lid, and have enough slack in the wires that you can un-snap the lid, and pull the electronics all out if needed to service. Thoughts? Ideas?
Okay pics this time!
Here's a pic of where my temp sensors are going for the engine bay. These are only MS3 Sensors, factory ECU will have it's stock sensors of course.

How I'm attaching the thermocouples to the engine coolant hoses. Will test and see how well it works, I think it will be fine. I may insulate further over them if needed. These pieces will slip into the hose where needed (only 2, one before, one after radiator). Metal pipe is aluminum, so I doubt there will be much lag due to that.


For the intake pipes, I'm drilling a hole and inserting the probe directly into the charge pipes. That way they will have more or less instant response. I don't have pics, but I found a way I think will work to do this, basically drill a tiny hole, stick them in, seal them with something (RTV probably) and a zip tie or 2 to keep it mounted to the pipe. No pics, haven't finalized this, just tested doing it this way and it seems fine.
Firewall hole

With vacuum hose split tubing protector

Plug fits! MS3 PRO and MS LABS box's have same plugs!

Interior view, air boxes removed.

This hole can't be seen with blower motor installed, but you can still reach behind it, and removing the blower motor now takes me <3 minutes.
Money! Ha I bet this is over 2K in electronics.... With sensors, uh... never mind...

Proposed layout

Then stack EGT and LC2 on top. Not literally on top, but floating say 1/4" or so above them via a bracket/floor.

Reply
0
0
03-11-2015, 09:10 AM
#105
something like this: New 50 Amp Air Plasma Cutter DC Inverter 50A Cutting | eBay
With a CL air compressor for $100 would save a lot of effort. I've had mine for a couple of years now and it's never failed me. I've cut everything from 3/8" steel to 16 ga. aluminum sheet. Just makes it easy IMO.
With a CL air compressor for $100 would save a lot of effort. I've had mine for a couple of years now and it's never failed me. I've cut everything from 3/8" steel to 16 ga. aluminum sheet. Just makes it easy IMO.
Reply
0
0
03-11-2015, 05:43 PM
#106
Elite Member
Thread Starter
iTrader: (16)
Join Date: Aug 2007
Location: Houston, TX
Posts: 9,297
Total Cats: 477
Mid day update...
Ordered the grease that m.net says is awesome for fixing my super slow windows, will be here friday, so friday I should be tearing those apart and hopefully making my windows work again/no go 0.003 miles/year.
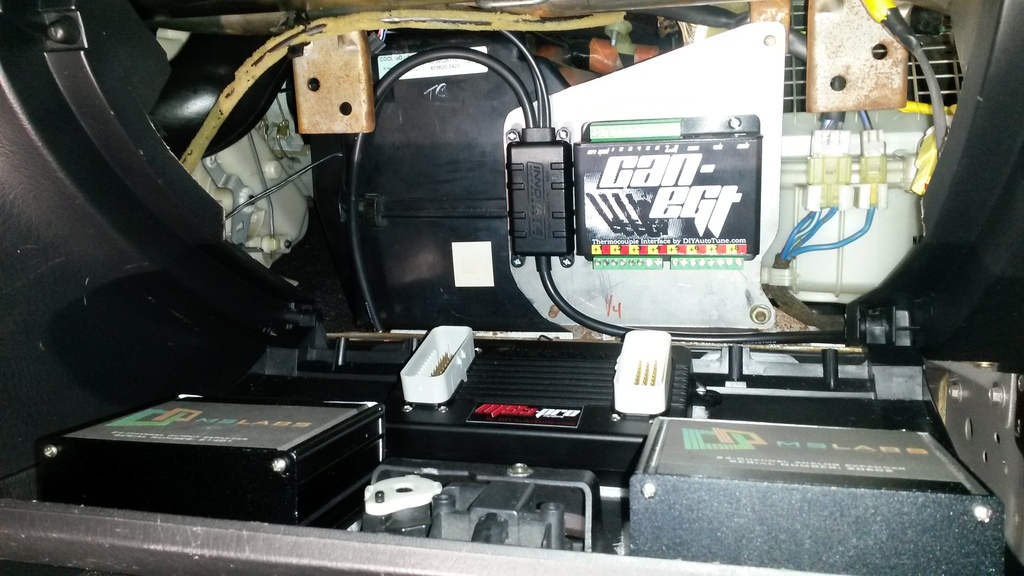
Today, I have so far gotten the electronics that are going in the glove box area mounted. Behold!

Then decided to mount the other 2 pieces up under the dash.
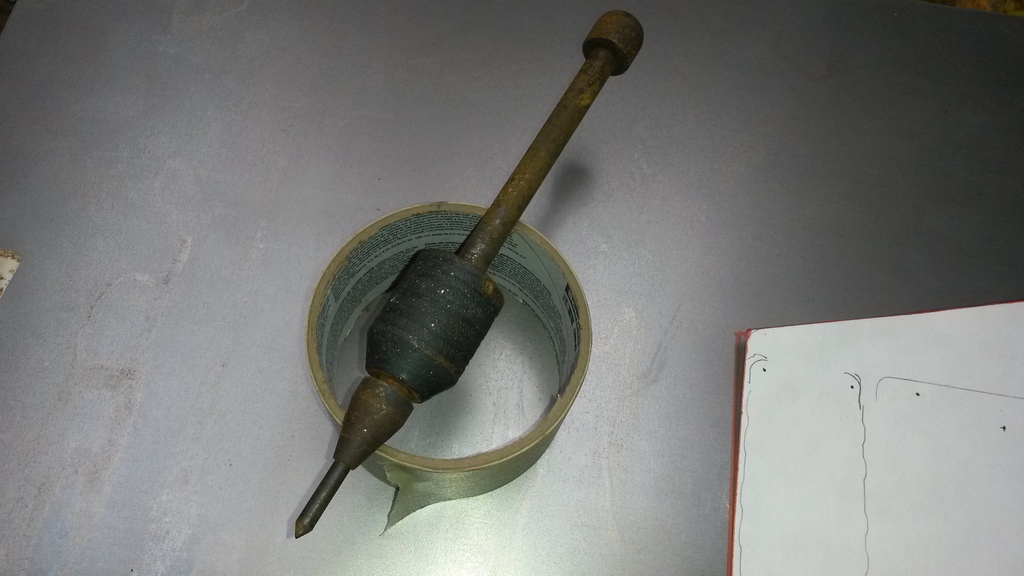
I made this punch back in Highschool! Has an oil hardened tip too that i heat treated myself. Weight moves up and down so no hammer required.
It fits! Even has 3 mounting points.
With electronics

Open the glove box and....
Close it...
Ordered the grease that m.net says is awesome for fixing my super slow windows, will be here friday, so friday I should be tearing those apart and hopefully making my windows work again/no go 0.003 miles/year.
Today, I have so far gotten the electronics that are going in the glove box area mounted. Behold!


Then decided to mount the other 2 pieces up under the dash.


I made this punch back in Highschool! Has an oil hardened tip too that i heat treated myself. Weight moves up and down so no hammer required.


It fits! Even has 3 mounting points.


With electronics

Open the glove box and....

Close it...


Reply
1
1
 03-12-2015, 01:52 AM
#108
Elite Member
Thread Starter
iTrader: (16)
Join Date: Aug 2007
Location: Houston, TX
Posts: 9,297
Total Cats: 477
Update...
See pics, got a bit more done. Bought some wiper blades for the car too. Might see if I can get it running on friday with the stock ecu/no SC. Thinking about doing that to make sure all the stock wiring/sensors work before i mix them into my complicated wiring harness I'm about to build. Also could go get the inspection done too, and get it legal. I'm waiting on a few stock parts to show up. But I was just thinking that IF I could get it running friday, I MIGHT could take it to the drag strip that night! Probably a longshot, but who knows! Wouldn't be fast on stock ecu, but would be a lot more fun to run than my C63.
Pics!
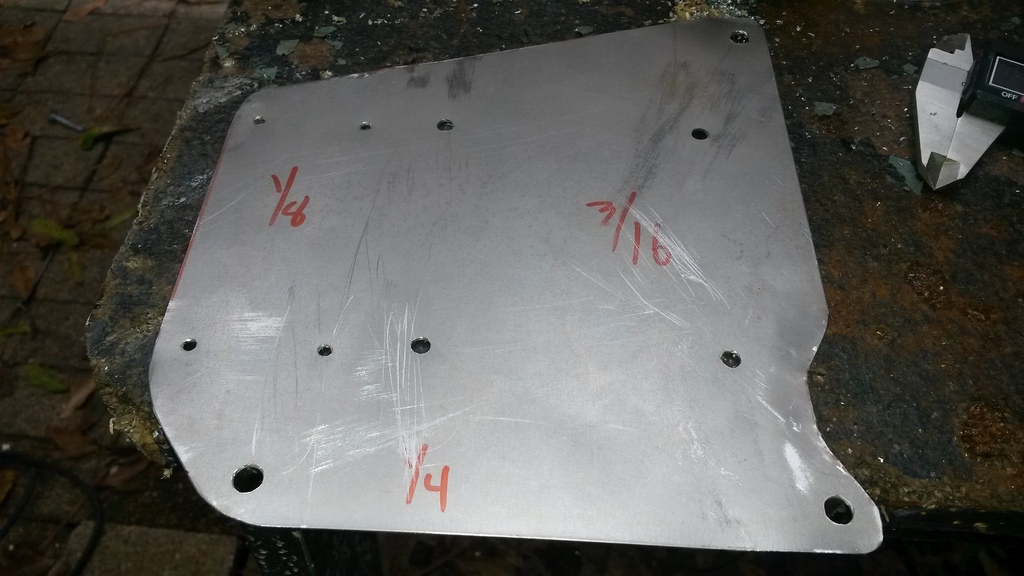
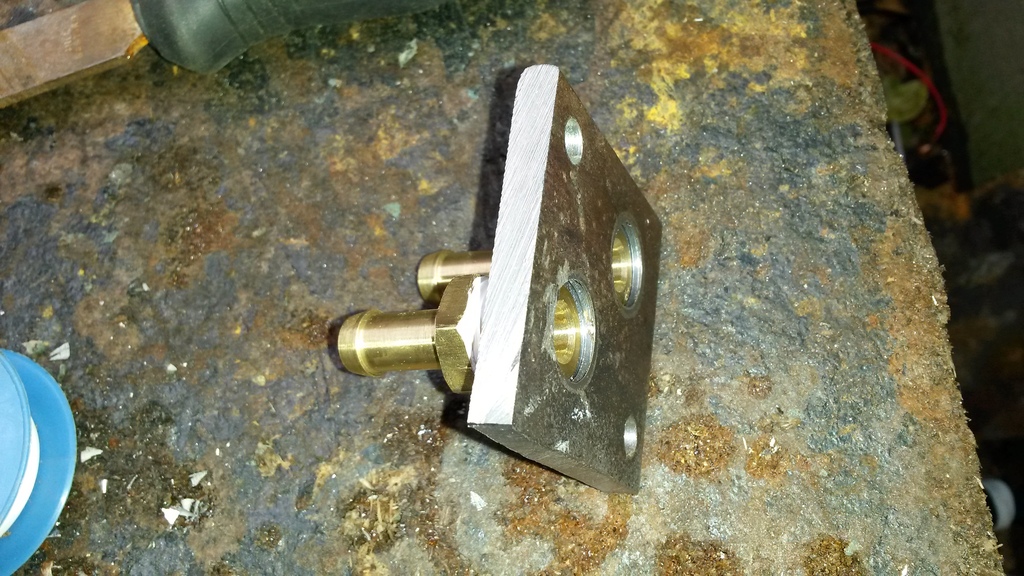
I lightweighted this bracket at the bottom to give space for the 8 thermocouple wires to come up to it.
I paid a company to build me this hose, but they screwed it up, so reluctantly I bought the stuff from Summit and made it myself. Pain, but it's done. It's nylon on outside but sitll has braided SS inside to make it a pain to cut....
More importantly..... Got the new tensioner pulley on! Actually not sure if it's perfectly lines up with the SC or not, I'll check later, but it's for sure really close, and adjusting it will just be a shim at this point.

Damn this build is taking forever! Little stuff just takes so long to iron out... Every day I have to order some little something, a fitting, a clamp, a part I lost, something! Or buy a tool I don't have. Oh well one day it's gonna be worth it...
See pics, got a bit more done. Bought some wiper blades for the car too. Might see if I can get it running on friday with the stock ecu/no SC. Thinking about doing that to make sure all the stock wiring/sensors work before i mix them into my complicated wiring harness I'm about to build. Also could go get the inspection done too, and get it legal. I'm waiting on a few stock parts to show up. But I was just thinking that IF I could get it running friday, I MIGHT could take it to the drag strip that night! Probably a longshot, but who knows! Wouldn't be fast on stock ecu, but would be a lot more fun to run than my C63.
Pics!
I lightweighted this bracket at the bottom to give space for the 8 thermocouple wires to come up to it.


I paid a company to build me this hose, but they screwed it up, so reluctantly I bought the stuff from Summit and made it myself. Pain, but it's done. It's nylon on outside but sitll has braided SS inside to make it a pain to cut....


More importantly..... Got the new tensioner pulley on! Actually not sure if it's perfectly lines up with the SC or not, I'll check later, but it's for sure really close, and adjusting it will just be a shim at this point.

Damn this build is taking forever! Little stuff just takes so long to iron out... Every day I have to order some little something, a fitting, a clamp, a part I lost, something! Or buy a tool I don't have. Oh well one day it's gonna be worth it...
Reply
0
0
03-13-2015, 02:20 AM
#109
Elite Member
Thread Starter
iTrader: (16)
Join Date: Aug 2007
Location: Houston, TX
Posts: 9,297
Total Cats: 477
Little update.
So today was not very productive. I gotta order a gasket I don't have, found out today I'm not gonna have some parts I'm waiting on for a while, so now changing plans again!
I was going to get the car running on stock ECU, get it through emissions, then go back and rewire the car. Now it looks like it will be probably 1.5 to 2 weeks before I actually have the last pieces I need to get it passable on stock ECU. Too long.
So now I guess I'm back to fabrication and wiring. If possible, I think I'm going to build the new harness such that it is removable from the factory harness vs making them together. Maybe, not sure. Thoughts?
Benefit is they are separate, so easier to service one, and I could then remove the MS harness for inspection if needed. Downside is extra harness runs fans, so I'd have to do something for that.
My plan is to just leave the wiring the in the vehicle, and hope if they check under the hood they don't say anything. I really don't know what to expect, my other 2 cars, one they did pop the hood during inspection, other they did not.
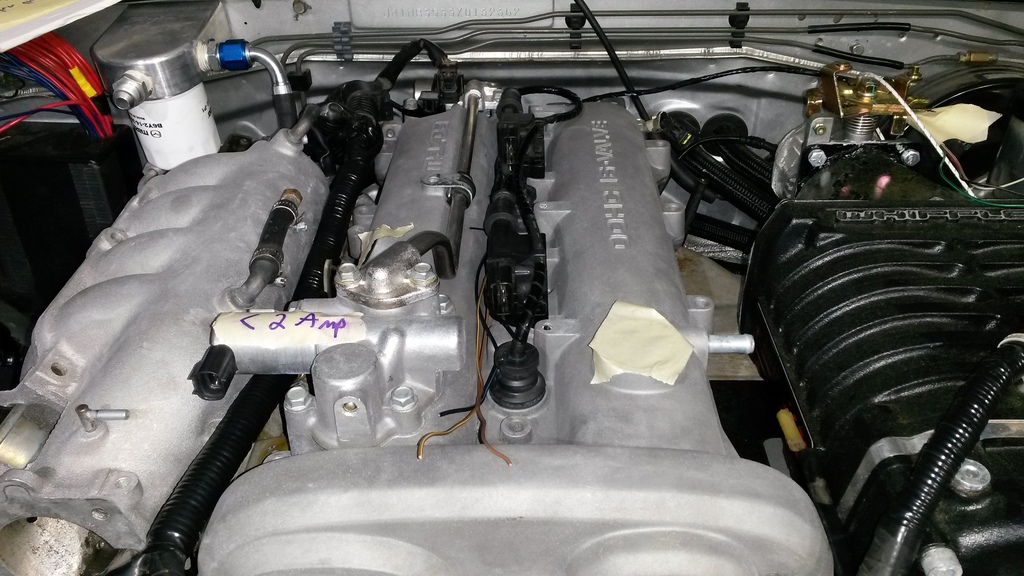
I did spend/waste a few hours trying to clean the intake manifold and then valve cover. They now look 100 thousand times better than before. First I used degreaser, that gets them oil-free but there's still a little oil in the metal, and it's still oxidized. Then phosphoric acid (found in certain types of wheel cleaner) to get the oxidation off. They look about new now! I'll post some pics of that tomorrow when I have something more to show off than a stupid valve cover!
So today was not very productive. I gotta order a gasket I don't have, found out today I'm not gonna have some parts I'm waiting on for a while, so now changing plans again!
I was going to get the car running on stock ECU, get it through emissions, then go back and rewire the car. Now it looks like it will be probably 1.5 to 2 weeks before I actually have the last pieces I need to get it passable on stock ECU. Too long.
So now I guess I'm back to fabrication and wiring. If possible, I think I'm going to build the new harness such that it is removable from the factory harness vs making them together. Maybe, not sure. Thoughts?
Benefit is they are separate, so easier to service one, and I could then remove the MS harness for inspection if needed. Downside is extra harness runs fans, so I'd have to do something for that.
My plan is to just leave the wiring the in the vehicle, and hope if they check under the hood they don't say anything. I really don't know what to expect, my other 2 cars, one they did pop the hood during inspection, other they did not.
I did spend/waste a few hours trying to clean the intake manifold and then valve cover. They now look 100 thousand times better than before. First I used degreaser, that gets them oil-free but there's still a little oil in the metal, and it's still oxidized. Then phosphoric acid (found in certain types of wheel cleaner) to get the oxidation off. They look about new now! I'll post some pics of that tomorrow when I have something more to show off than a stupid valve cover!
Reply
0
0
03-14-2015, 01:09 AM
#110
Elite Member
Thread Starter
iTrader: (16)
Join Date: Aug 2007
Location: Houston, TX
Posts: 9,297
Total Cats: 477
Small update again.
All I got done today, was I fixed my windows so now they go up and down. It took forever.
Before, passengers side was 10s down, 8s up. Drivers side would not go down or up without help, a lot of help.
No pics, boring crap, but it was a mess, took me a while to get all that crap apart, cleaned, greased, reassembled, adjusted correctly. They both work great now though. I used the honda grease recommended for this, it works great. The worst part is cleaning all the crap, it had this nasty nasty dirty grease in it that did not want to let go.
So yeah, that doesn't make my car run, but it's one more thing crossed off the list of things the car needed.
Reply
0
0
03-15-2015, 10:22 PM
#111
Junior Member

Join Date: May 2007
Location: Toronto Area, Ontario
Posts: 327
Total Cats: 95
I WAS going to do a 180 at the throttle body and have it go forward between teh blower and the master cylinder, but there is just not enough space for 3" pipe there, AND, I'd need a 3" bend with a 1.5" radius to make that happen....
So I'm thinking of routing it as I drew in that pic. Basically out of the blower, 90 bend that angles up, then angle it back so it's level/flat and cross over the booster, behind the master cylinder resevoir, OVER the clutch resevoir, , then turn forward and down and after that I dunno but probably an air filter in that area and some kind of ducting to give it cool air.
Any ideas?
The area going over the booster is only about 2.5", not 3", so I'd have to ovalize the 3" tubing a bit, or use 3" silicone and let it just squish there, or step down to say 2.5" tubing for the intake, but I think that's a bad idea given this blower can inhale over 1,100 CFM, that's approaching Mach .4 with a 3" pipe!
Oh, and nice work. Looking forward to the results!
Reply
0
0
03-16-2015, 02:31 AM
#112
Elite Member
Thread Starter
iTrader: (16)
Join Date: Aug 2007
Location: Houston, TX
Posts: 9,297
Total Cats: 477
Any chance of shortening the throttle body? On one of my builds, I was able to remove about .75" from the throttle body itself. The throttle plate can be proud of the housing at full throttle, as long as your silicone hose will accommodate it. If this won't get you there, then how about making a custom part out of fiberglass mtl and epoxy?
Oh, and nice work. Looking forward to the results!
Oh, and nice work. Looking forward to the results!
Today I ordered what appears to be a very tight radius 3" silicone bend. I'm going to try to 90 out of the blower. But if it's too tight, I may do exactly what you just said and shorten the TB. Not sure how much it can be shortened, but surely a little, and hopefully it will be enough if needed. Thanks for the idea, no idea why I didn't think of that! And yes, I know right now I could trim it probably an inch and the throttle blade wouldn't be proud of the housing.
Reply
0
0
03-16-2015, 03:10 AM
#113
Elite Member
Thread Starter
iTrader: (16)
Join Date: Aug 2007
Location: Houston, TX
Posts: 9,297
Total Cats: 477
Update.....
Note: Fuel pressure vs Voltage Drop test results at bottom!
So I have been working, just haven't updated as nothing interesting/worth posting pics of. So today I made a list of everything I could think of that i need to do to get it running on stock ECU. Goal will be go get it running, pass emissions, then finish the wiring for the MS3 and everything else.
I started on modding the factory wiring harness. Basically I will relocate the IACV since SC, so added another connector for it at it's new home (rear of engine). Kept stock plugs for stock purposes. Also did same for TPS. And added 6 wires for 01+ COPS, kept 99' connectors incase I need them ever. Also added new wires for MAF incase I decide to put it in down the road.
I will note that every connection, I did NOT cut the factory harness, pics will show how I spliced into it. Also used OEM mazda wire that's the same color, so all wires extended are accurate to factory diagram. I had a second harness I used to be able to do this.
So I got a solid 1/2 of my list done today. I'm waiting on the upper intake manifold gasket, stock air intake, drivers side tail light, 01+ COPs connectors. Gasket and connectors will prevent me from startup, both should have been here Friday..... So hoping they arrive tomorrow.
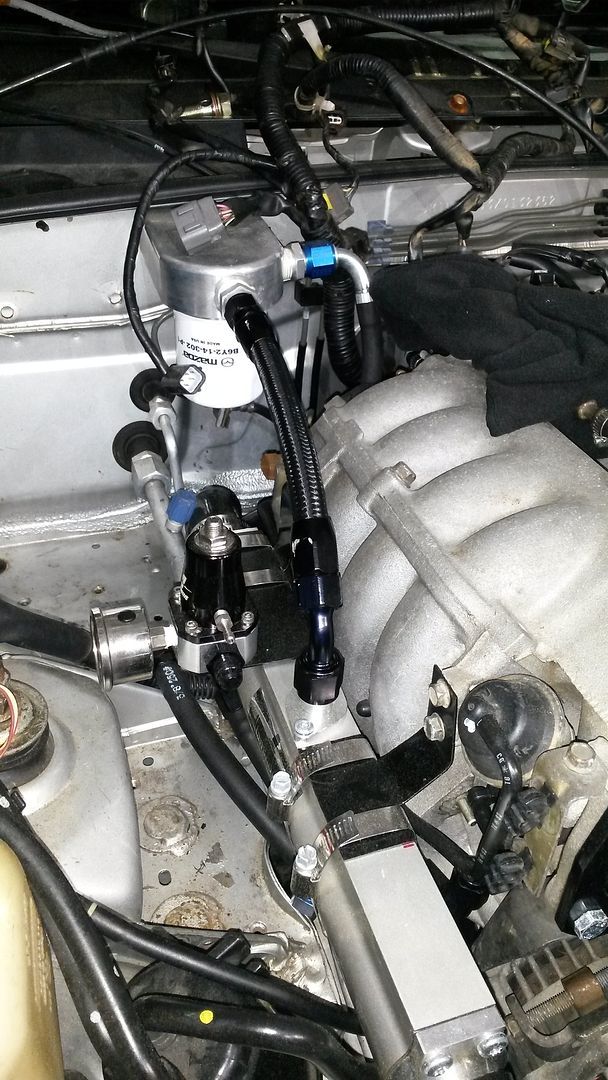
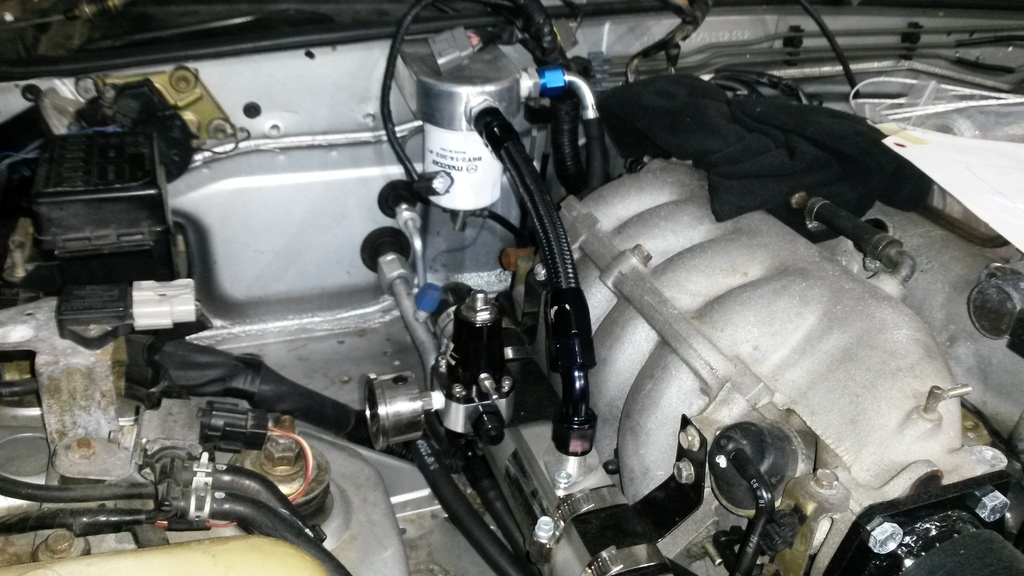
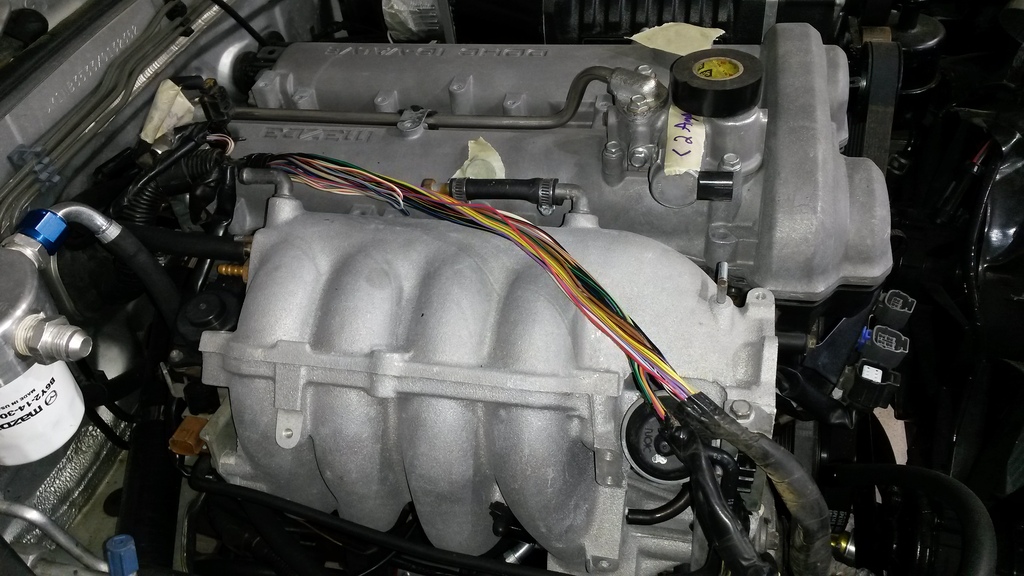
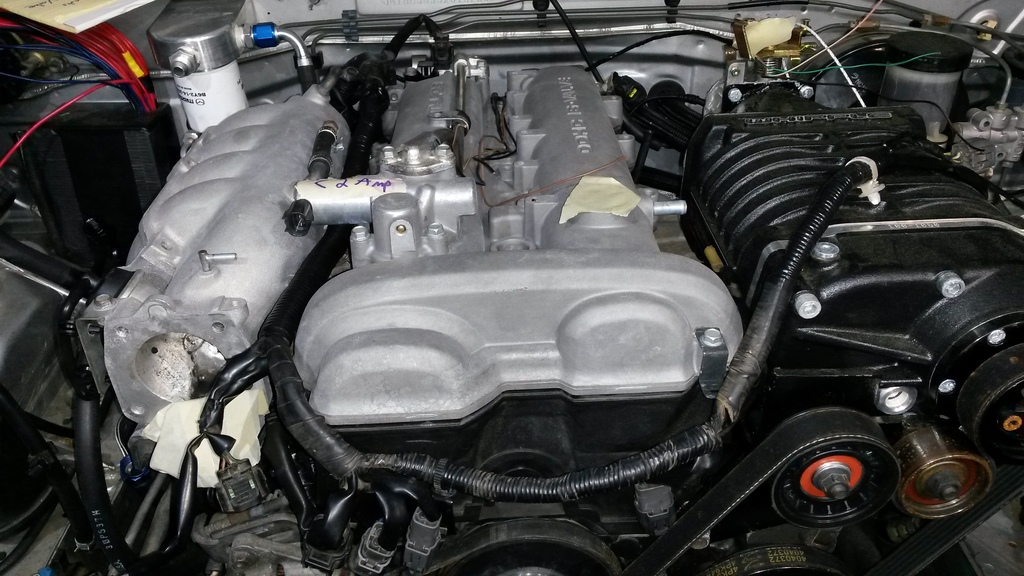
Anyways... I got a lot of little things done. Installed oil cooler hose with heat shrink over braided nylon, torqued all fuel fittings/oil fittings, installed lower intake manifold, installed emissions equipment/vac hoses, Installed exhaust system., bought fuel for the car, added it, set fuel pressure (more on this later), installed thermcouple in lower radiator hose, bought oil for engine, installed valve cover w/new gasket, VVT bolt/crush washer.
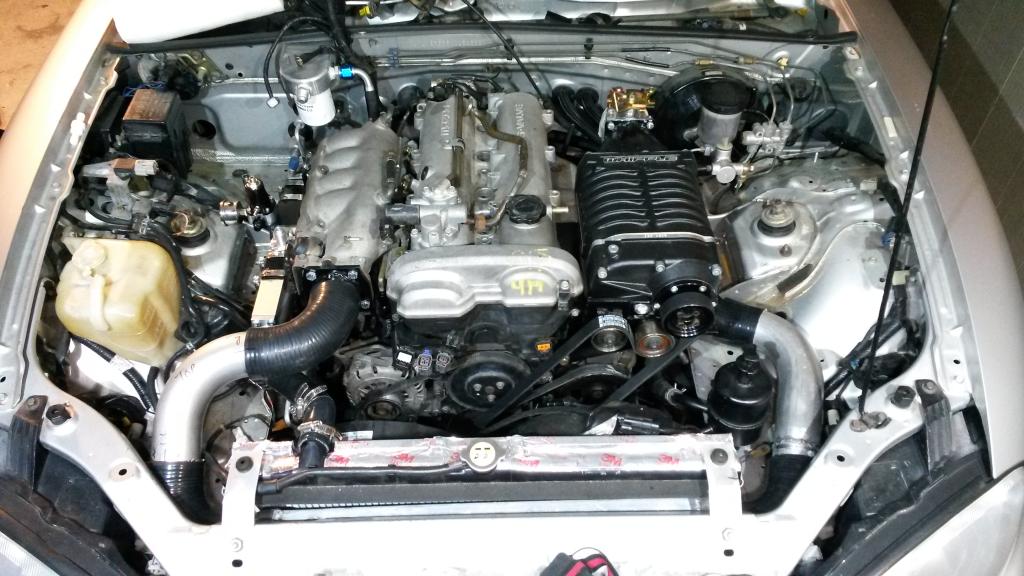
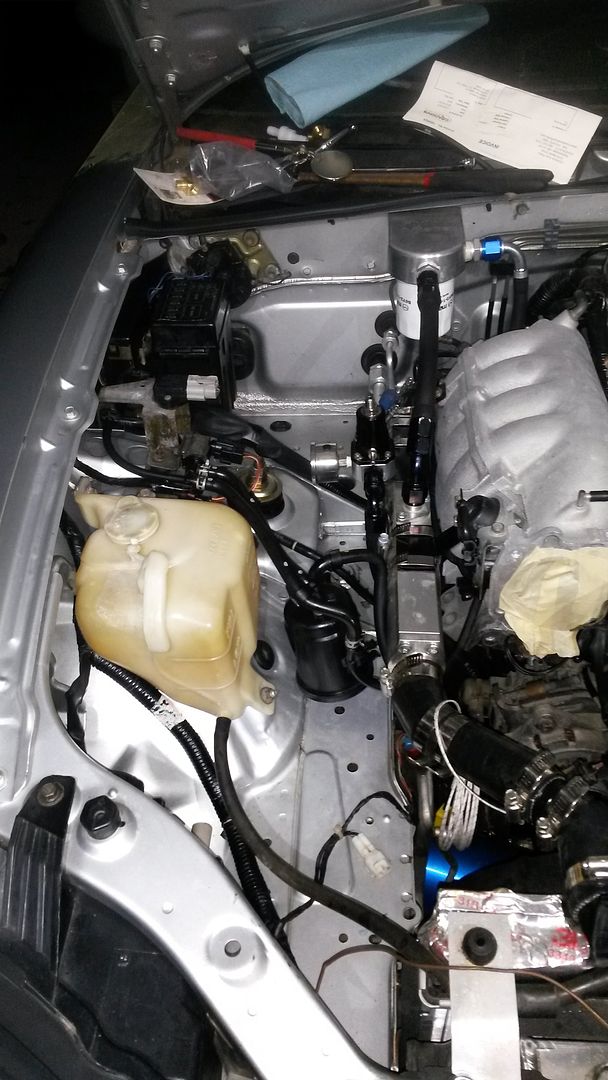
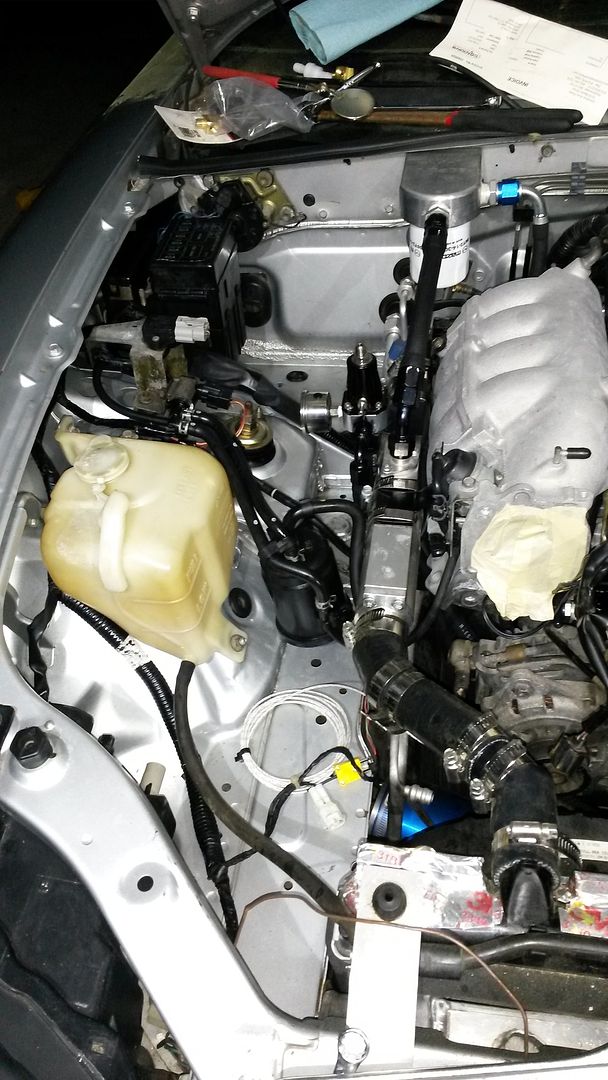
And today, about 1/2 way through my list, I decided to stop everything and start cleaning up the engine bay. I was going to wait till I pull the engine, but it's driving me nuts. It's not finished yet, but I did get the passengers side cleaned. Still gotta do the front and drivers side and fire wall, but hey, it's a start! Can't stop now at least. Will do the rest tomorrow.
Pics!
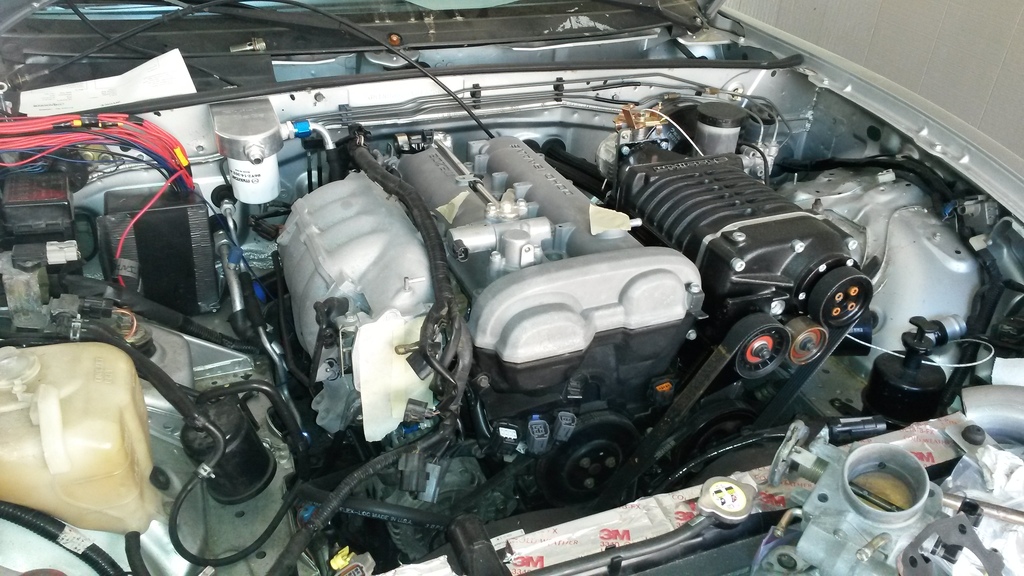
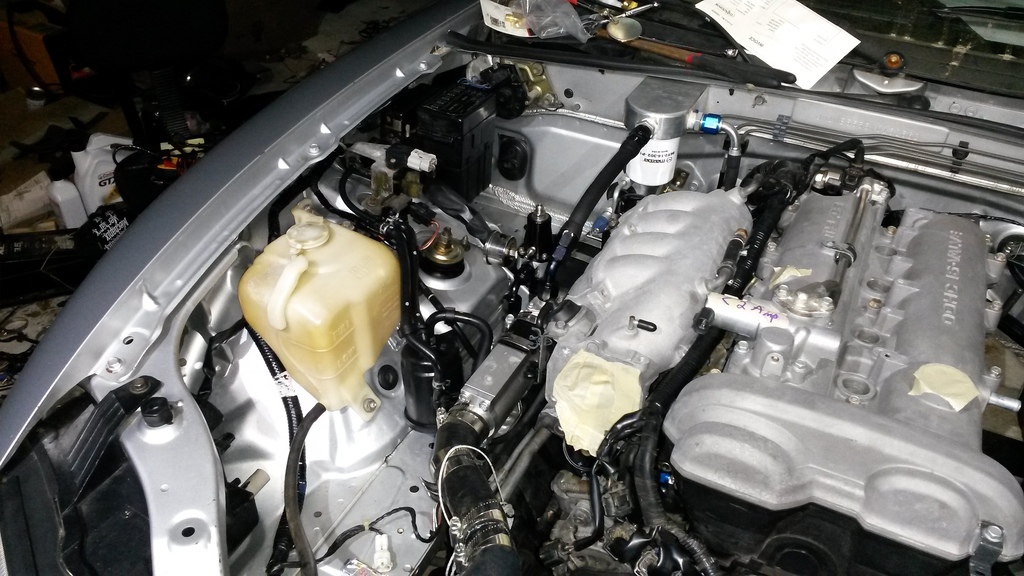
First, a before pic of intake manifold/Valve cover before cleaning them.
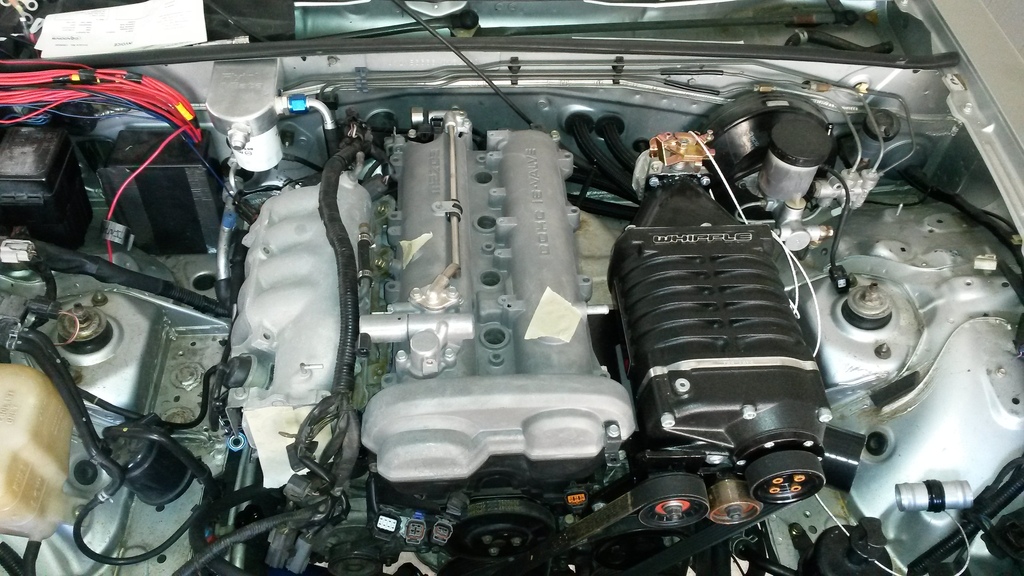
And now...
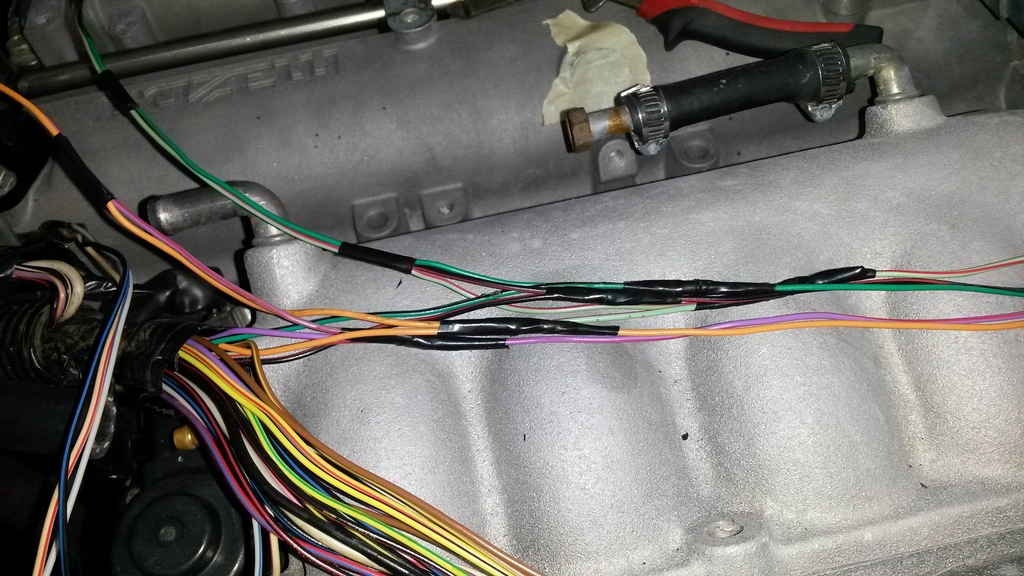
Started on wiring. Factory harness now just needs connectors installed when I get them, but wires for them exist!
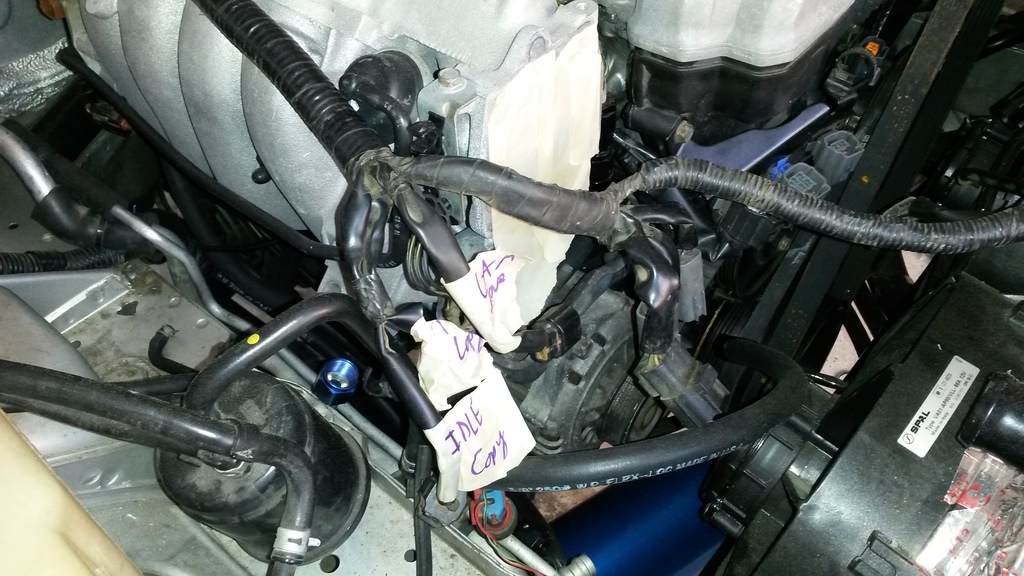
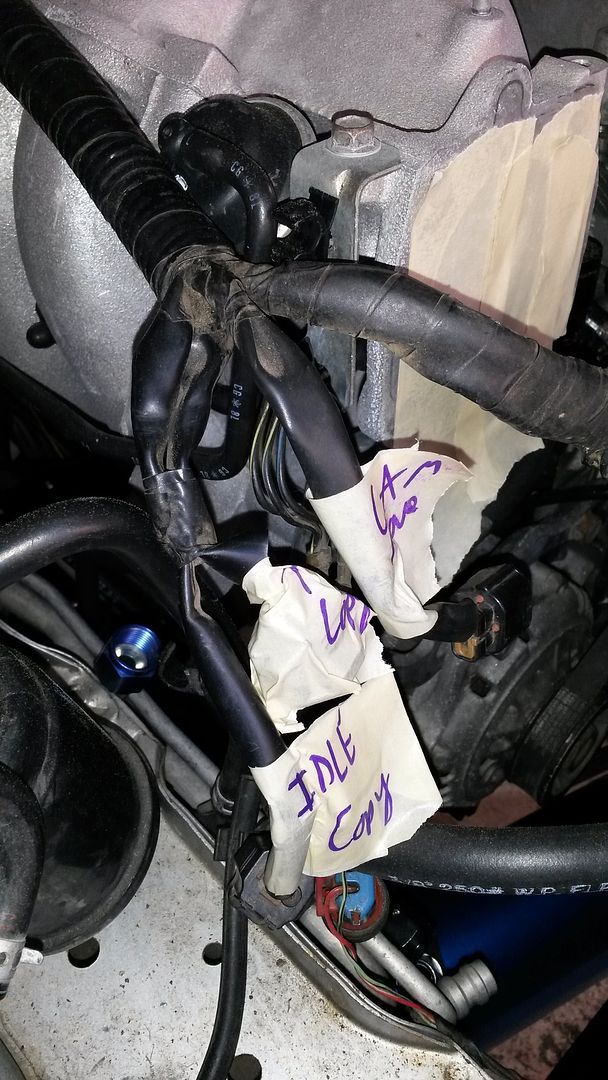
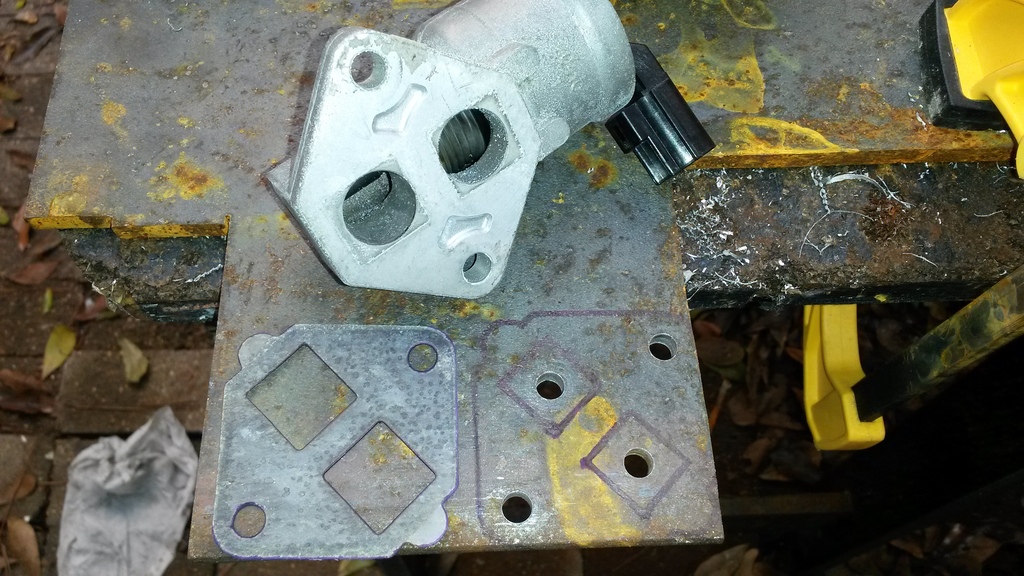
Idle valve stuff

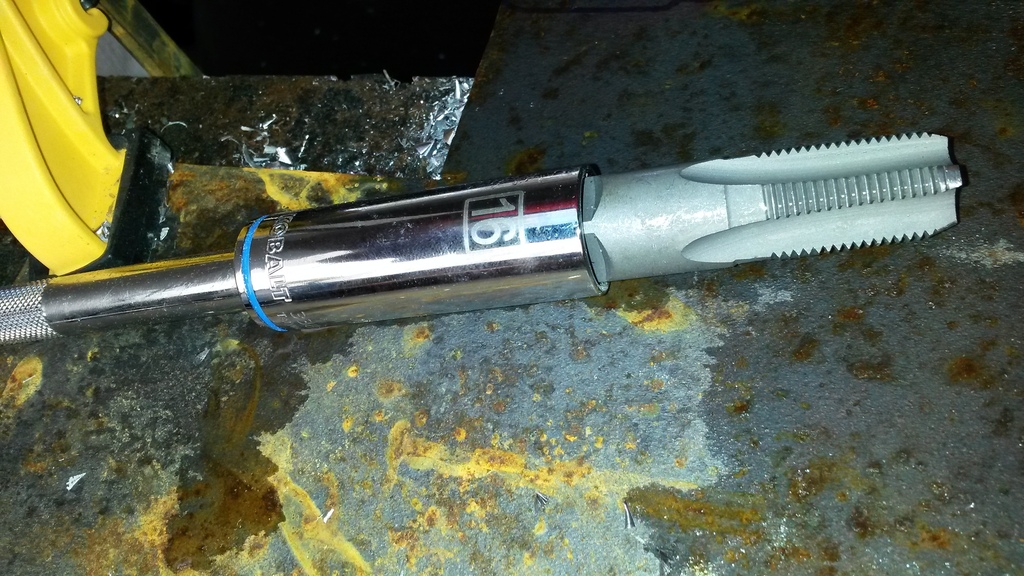
Tap wrench
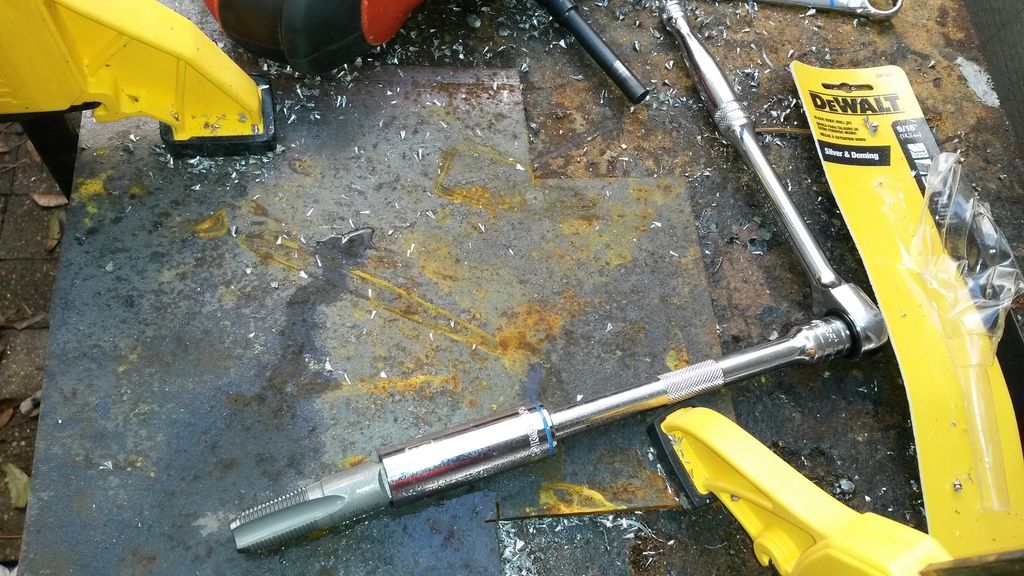
Used this, it sucks, now I'm questioning if I should have used something different when I cut the seats on my head. Ended up switching to motor oil and it worked better! haha.
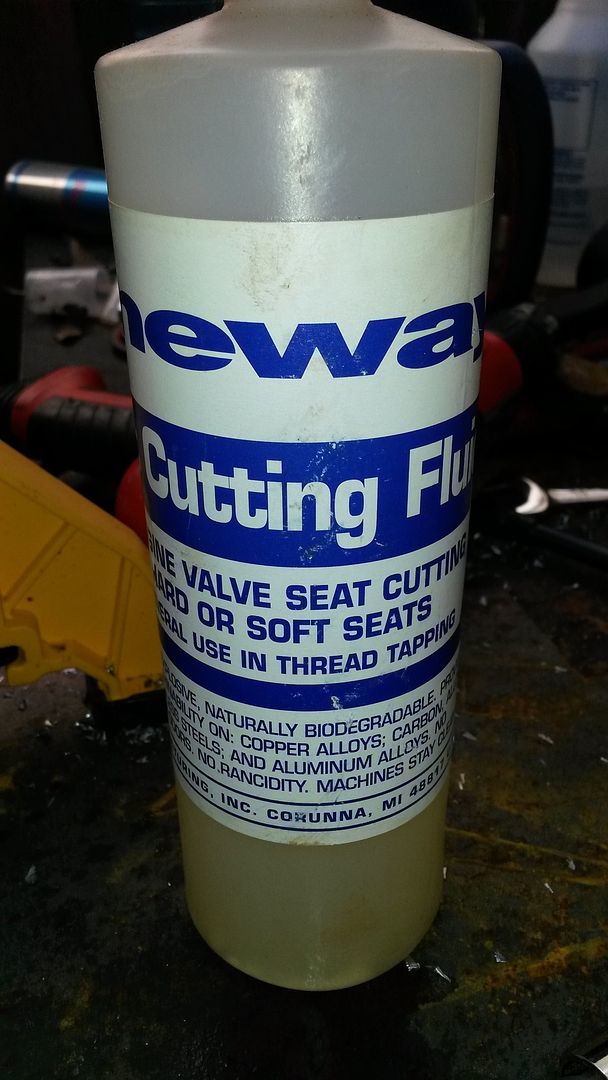
Threads look crapy, this is using Neway fluid
Threads look happier with motor oil!
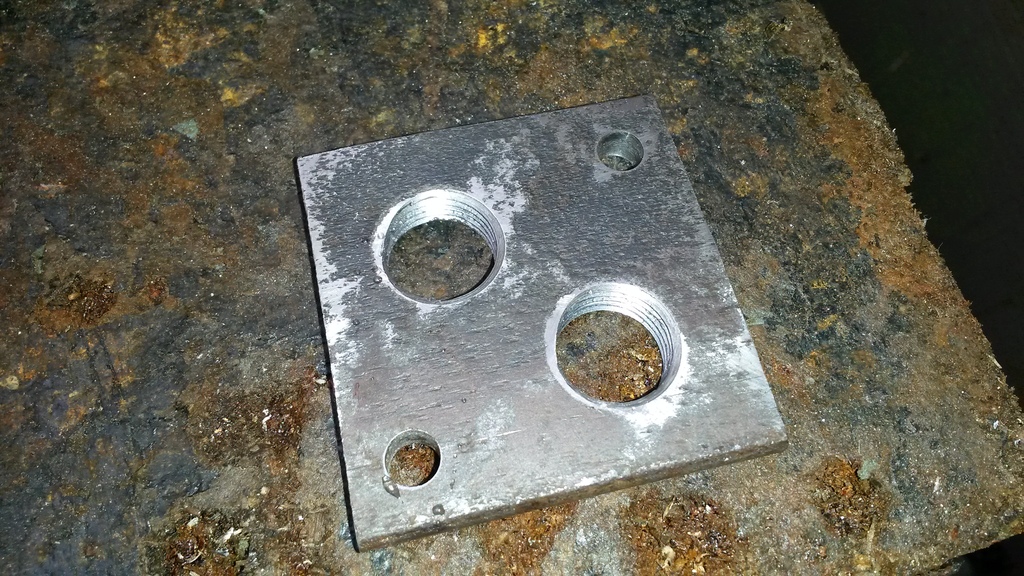
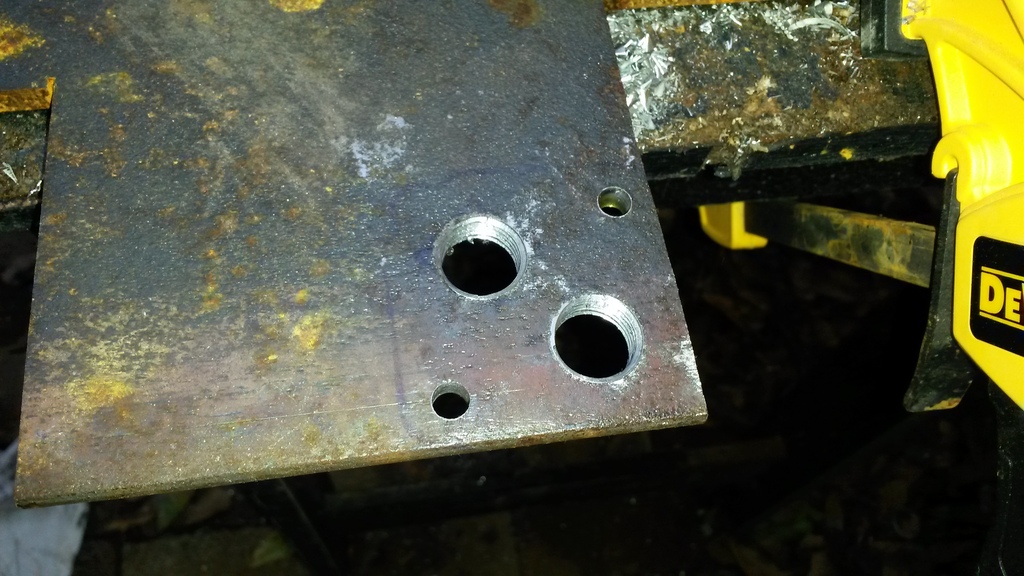
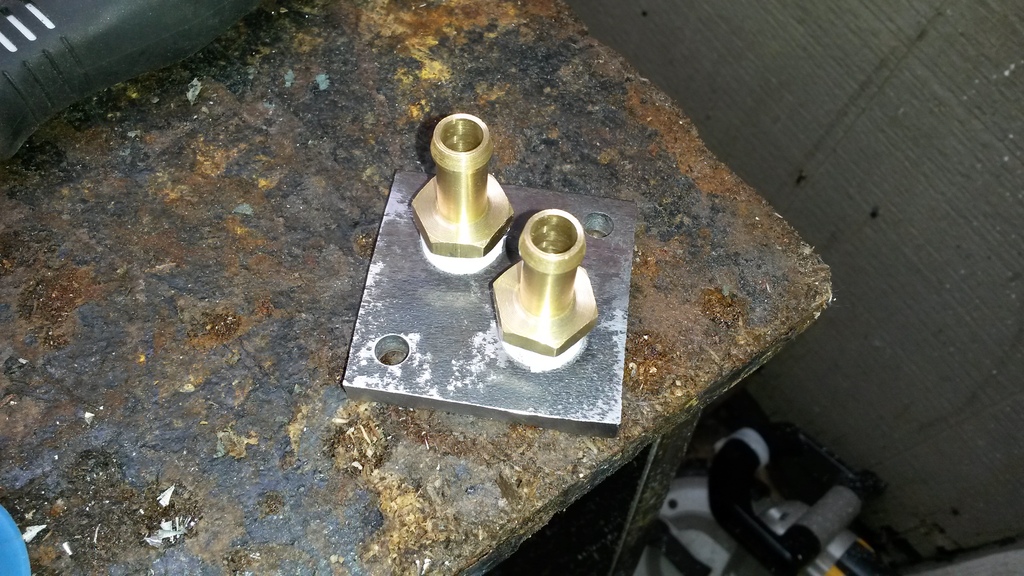
3/8 fittings
Ok now back to wiring
Relocated Cam Position Sensor, just pulled it back, no cutting required.
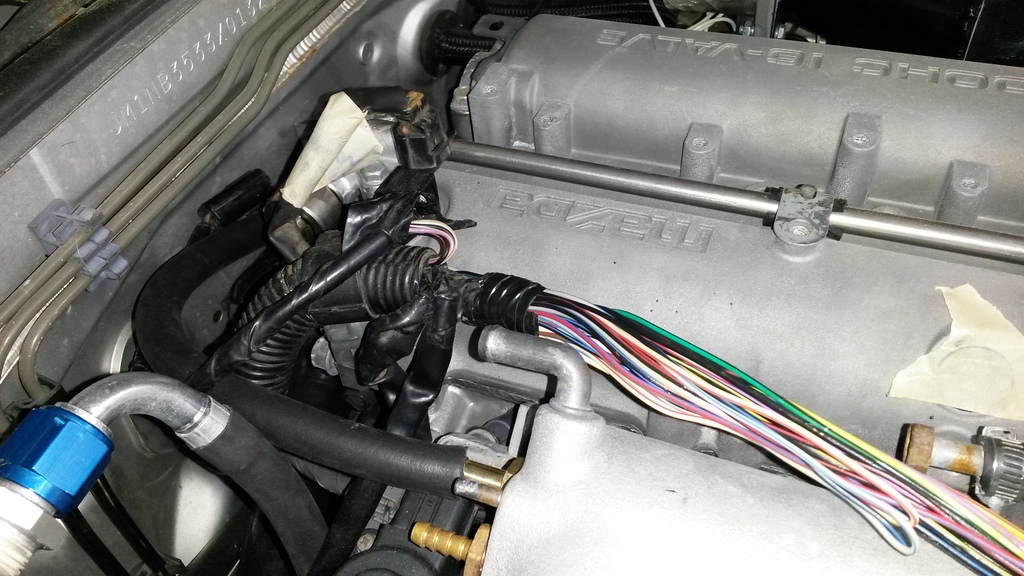
This is how I spliced the wires.
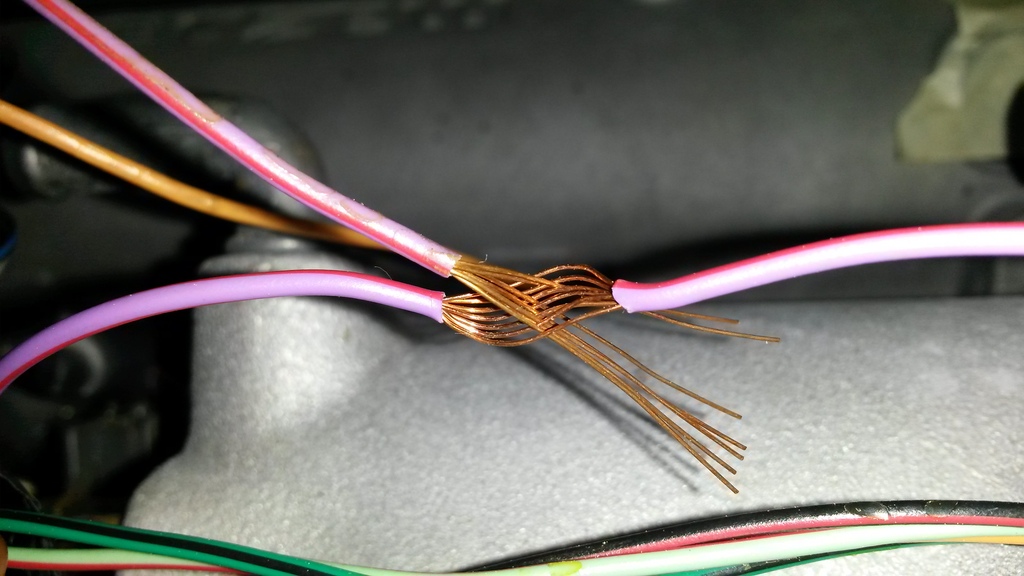
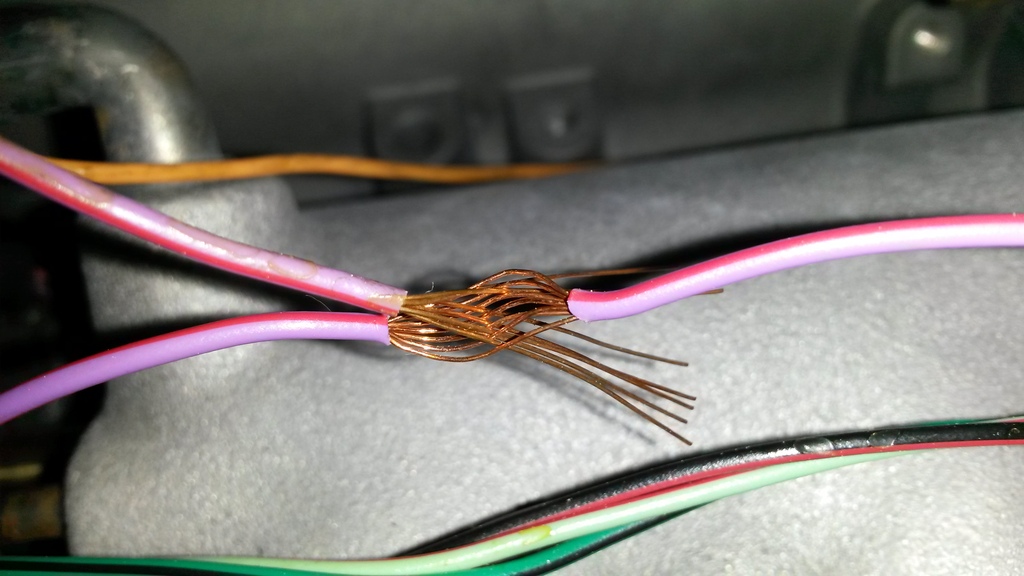
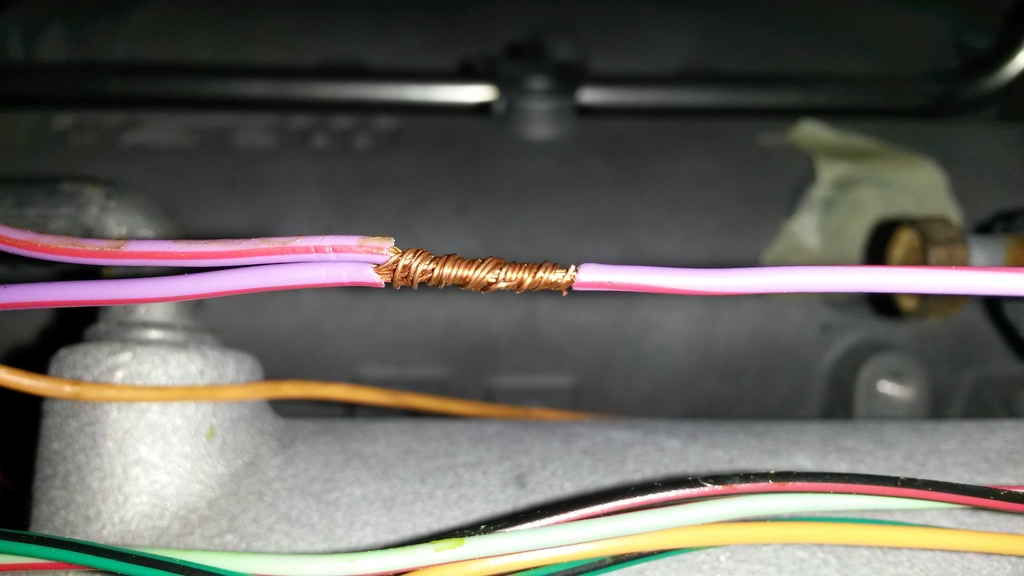
Staggered the joints so they don't all pile up in one spot.
New wires top left
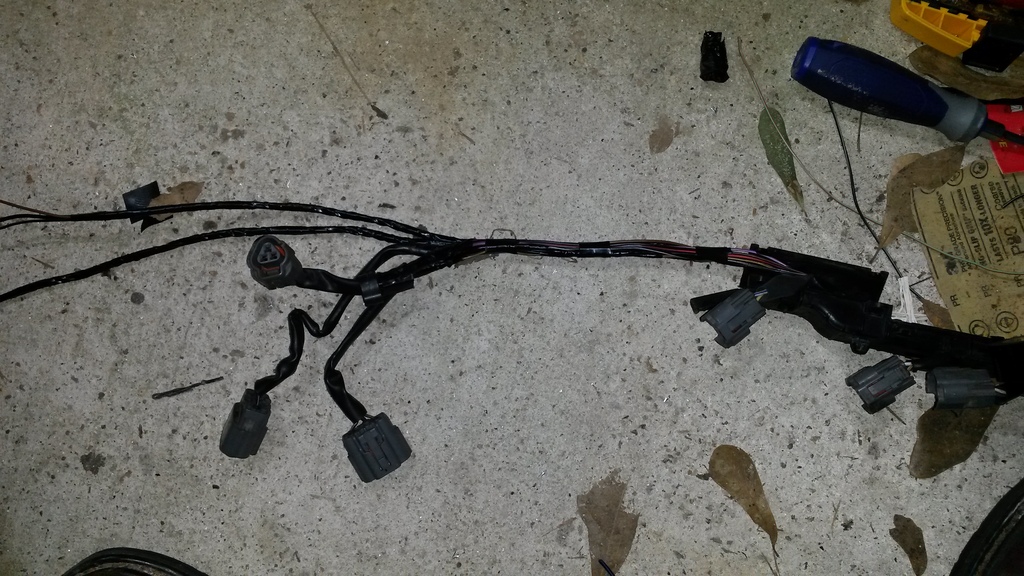
Installed. Looks stock!
01 COPs.
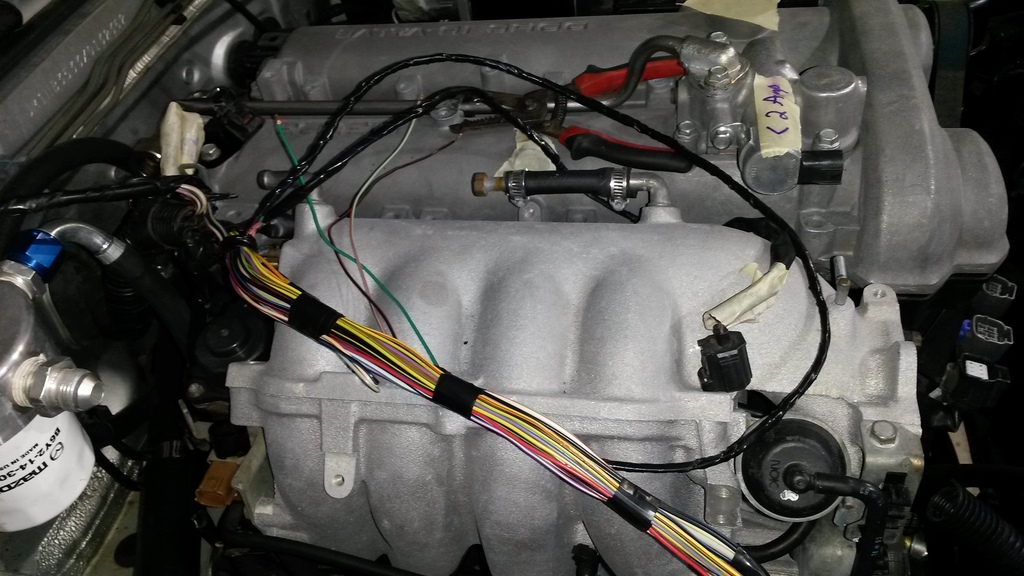
CLEANED some of the engine bay!

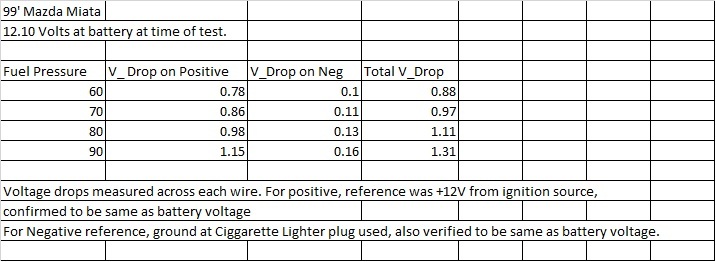
Measured voltage drop in each wire at the pump, results below. Looks like I'll be rewiring the pump! EDIT: I have a Walbro 255HP for clarification
Note: Fuel pressure vs Voltage Drop test results at bottom!
So I have been working, just haven't updated as nothing interesting/worth posting pics of. So today I made a list of everything I could think of that i need to do to get it running on stock ECU. Goal will be go get it running, pass emissions, then finish the wiring for the MS3 and everything else.
I started on modding the factory wiring harness. Basically I will relocate the IACV since SC, so added another connector for it at it's new home (rear of engine). Kept stock plugs for stock purposes. Also did same for TPS. And added 6 wires for 01+ COPS, kept 99' connectors incase I need them ever. Also added new wires for MAF incase I decide to put it in down the road.
I will note that every connection, I did NOT cut the factory harness, pics will show how I spliced into it. Also used OEM mazda wire that's the same color, so all wires extended are accurate to factory diagram. I had a second harness I used to be able to do this.
So I got a solid 1/2 of my list done today. I'm waiting on the upper intake manifold gasket, stock air intake, drivers side tail light, 01+ COPs connectors. Gasket and connectors will prevent me from startup, both should have been here Friday..... So hoping they arrive tomorrow.
Anyways... I got a lot of little things done. Installed oil cooler hose with heat shrink over braided nylon, torqued all fuel fittings/oil fittings, installed lower intake manifold, installed emissions equipment/vac hoses, Installed exhaust system., bought fuel for the car, added it, set fuel pressure (more on this later), installed thermcouple in lower radiator hose, bought oil for engine, installed valve cover w/new gasket, VVT bolt/crush washer.
And today, about 1/2 way through my list, I decided to stop everything and start cleaning up the engine bay. I was going to wait till I pull the engine, but it's driving me nuts. It's not finished yet, but I did get the passengers side cleaned. Still gotta do the front and drivers side and fire wall, but hey, it's a start! Can't stop now at least. Will do the rest tomorrow.
Pics!
First, a before pic of intake manifold/Valve cover before cleaning them.

And now...


Started on wiring. Factory harness now just needs connectors installed when I get them, but wires for them exist!


Idle valve stuff


Tap wrench


Used this, it sucks, now I'm questioning if I should have used something different when I cut the seats on my head. Ended up switching to motor oil and it worked better! haha.

Threads look crapy, this is using Neway fluid

Threads look happier with motor oil!

3/8 fittings


Ok now back to wiring

Relocated Cam Position Sensor, just pulled it back, no cutting required.

This is how I spliced the wires.


Staggered the joints so they don't all pile up in one spot.


New wires top left

Installed. Looks stock!

01 COPs.

CLEANED some of the engine bay!


Measured voltage drop in each wire at the pump, results below. Looks like I'll be rewiring the pump! EDIT: I have a Walbro 255HP for clarification

Last edited by patsmx5; 03-16-2015 at 03:26 AM.
Reply
1
1
03-17-2015, 03:09 AM
#115
Elite Member
Thread Starter
iTrader: (16)
Join Date: Aug 2007
Location: Houston, TX
Posts: 9,297
Total Cats: 477
Update.. Good news bad news.
So.... I knocked out the rest of my list today to start up the car on the stock ecu. I have a few pics up to this point, will post later. I do not have a upper to lower intake manifold gasket, so for now I bolted it together with no gasket. UPS has shown they were going to deliver the part Friday, Sat, MONDAY, and now it still says in transit, check back later for a delivery date as they misrouted the package. Great!
Anyways, I'll post some pics tomorrow, I'm whopped right now. But suffice to say I got every sensor installed, added oil and P/S fluid (no coolant yet) and hit they key.
I would now like to note something. I have installed a FM oil filter relocation kit, oil cooler, and 2 Qt Accusump.
Continuing.
So I hit the key. Now, I could have pulled the plugs and spun it over till it got oil pressure, then started. But I decided screw it. So I hit the key, 5 hits and it fired right up.
Went to 3,000 RPM for about 1.5s, then down to 1,000 for about 1s, then repeat 2 more times. I noticed when it cranked it took about 2s to get oil pressure, I could "hear" when it did though, engine got a tiny spec quieter as it was down closer to 1K when that event occurred.
After doing this cycle above 3 times/about 7-8s of running, i hit the key off to check under the hood in case anything crazy was going on. You know, JUST IN CASE.
As I'm hitting the key I saw the oil PSI gauge drop. Huh, That doesn't seem right. I will add now that I just poured 4qts of new oil in the motor before I started it. 26 dollars worth, plus tax.
So, 4qts of new motor oil is now evenly distributed throughout the passengers side of the engine bay (you know, the side that's been dirty for years that I literally cleaned Yesterday!) and the majority of it has found it way onto the ground, where it has spread into a puddle now large enough that I saw it before i could close the drivers door. I actually laughed out loud, ****'s funny! Totally my luck!!!
3 rolls of paper towels later, I had enough paper towels to contain the mess from spreading and got most of it soaked up. I looked under the car, oil coming from the FM adapter area. All the oil fittings there are dry, looks like its leaking where it screws into the block. I then went and bought speedy dry and got the stain hit with that so I could get under the car without getting soaked in oil still.
So long story short, after checking installation instructions, remembering how many times I tripple checked all the fittings for torque, I figured this out before I took it apart. I bought a subaru adapter thingy that had the right threads to screw into block, and then screw FM adapter to it. Well, that piece has a shoulder on it, and that shoulder got me. When I installed the FM adapter, I spun it till the rubber o-ring hit, then a tiny bit more and it got really really tight. I put some 12" channel lock pliers on it and managed to get about 1/4 a turn total on it. I thought that seemed crazy, and not right, but I thought well the O-ring was dry (bad call) and maybe it was just really stiff (it was cold outside). Wrong.
Adapter jammed against the shoulder. Since I said I figured this out before I took it apart, I used a feeler gauge to measure the distance between the block and the adapter, .050"
Then spent a few hours struggling to get to the fittings and whatnot under the intake manifold, working from below. Ended up getting it apart, sure enough Subaru piece was marred up, so was FM adapter where they hit!
Made a custom piece from old one that was too long, installed it, double checked all the measurements to be 100 percent sure this wouldn't happen again, reassembled. Went normal, now shows .006" between filter and block (so rubber is squished a bunch!) It also took just over 3/4 of a turn this time, and felt normal.
Cleaned a little bit, mainly so oil will stop dripping, and reassembled everything. Poured in what oil I had left from 5qt jug, gotta buy more oil tomorrow and then try again.
Oh, I might spin it over and let it get oil pressure this time, and check for leaks. And then start/kill and check, repeat. I don't anticipate another leak, but damn that sucks to clean up!
TLDR- Good news engine runs, no CEL for first 7-8 seconds of running, bad news I confirmed the OEM VVT oil pump can deliver over 8.5 GPM at an average RPM of 2000. And idle is wonky.
Anybody got any idea on why the idle would fluctuate from 1K to 3K? Obviously could be the upper intake leaking, but I don't think so, it wouldn't vary that much if the leak was constant. Seems like the IACV was doing this, it was rhythmic/controlled and ran fine while doing it.
Also there is a lot of fine metal in the oil, this motor isn't happy! I can't imagine at 700 miles there should still be this level of metal in the oil, right? Or maybe? And to avoid confusion, this is still old motor, new shortblock is in a box. I'm hoping the fine metal that is showing up in the oil on the motor now isn't going to damage the VVT head!
Reply
0
0
03-17-2015, 03:35 PM
#116
Elite Member
Thread Starter
iTrader: (16)
Join Date: Aug 2007
Location: Houston, TX
Posts: 9,297
Total Cats: 477
Tiny update.
Had 2 more leaks, one I forgot to install the pop off valve on the Accusump, so that obviously leaked. Second, I missed tightening one of the P/S fittings on the steering rack. Both minor, easy fixes.
Installed intake manifold gasket.
It cranks/idles correct now. So far nothing is leaking. I need to add coolant now and check that system of course. Bleed P/S system.
So far no CEL, but it hasn't run but just a few seconds each time.
Yeah for progress!!!
Exhaust is kinda loud I see. Not sure how I feel about that yet.
Reply
0
0
03-17-2015, 04:47 PM
#117
Elite Member
Thread Starter
iTrader: (16)
Join Date: Aug 2007
Location: Houston, TX
Posts: 9,297
Total Cats: 477
Ok got coolant in it and brought it up to temp. used heater core and a couple 110V fans to keep it cool since I don't have the SPAL fans wired up yet.
Idle isn't perfect. It hunts around some. Sometimes pretty steady, sometimes down in the 700's and back up to high 800's/low 900s. I have the TORQ App on my phone, so I used that to see the OBDII data.
It shows the ignition timing jumping around. No idea why, but that's what it's doing, and I think that's causing the idle to go up and down.
Any ideas why this would happen?
I don't have the factory air intake hooked up right now. Right now from the TB, it's 90* ell, MAF, 2' of straight 2.5" silicone, then an air filter. All temporary, just to get it running. Maybe that's the cause of the wonky idle, I dunno. I should probably clean the MAF, maybe that's the issue.
Any other ideas? I let it idle around 1hr, then shut it down and ECU shows no codes so far. It passes the O2 sensor heater test, but there's still 4 pending test left (egr, evap, O2 and something else). I know I need to drive it to get those test going.
I'm going to go get a compression tester and retest the engine with it hot, see what it shows. Kinda curious if misfire is related to that, and also curious anyways what the comp is now that it's run a bit.
Reply
0
0
03-17-2015, 05:17 PM
#118
Elite Member

Join Date: Mar 2007
Location: Santa Clara, CA
Posts: 5,165
Total Cats: 855
Every time I've had lousy idle with the factory ECU it's been an air leak, either a vacuum leak or a intake tract leak after the MAF. Did you check for pending codes as well as active ones?
--Ian
Reply
0
0
03-17-2015, 06:09 PM
#119
Elite Member
Thread Starter
iTrader: (16)
Join Date: Aug 2007
Location: Houston, TX
Posts: 9,297
Total Cats: 477
I did not check for pending codes, this app won't do that I don't think. Actually not sure, I'll google it. But it's a phone app and a bluetooth to OBD II adapter. I'll get a real code reader and check as you say, pending codes could exist.
Also found a couple vac leaks, tiny, but still. Cleaned MAF, about to startup and see what happens now. Have comp tester so once it's hot I'll shutdown and do that.
Also found a couple vac leaks, tiny, but still. Cleaned MAF, about to startup and see what happens now. Have comp tester so once it's hot I'll shutdown and do that.
Reply
0
0
03-17-2015, 07:46 PM
#120
Elite Member
Thread Starter
iTrader: (16)
Join Date: Aug 2007
Location: Houston, TX
Posts: 9,297
Total Cats: 477
Fixing vac leaks didn't help, neither did cleaning MAF. Still idles funky, like it tries to idle, then misses once, idle dips, ecu over-corrects, repeat.
After thinking about it, remembered I still have the FM NGK Race plugs in it, and I know they were gapped down a lot. So pulled them. They were gapped down a lot and a bit oily. All looked the same.
Did a compression test while the plugs were out. Hot test throttle open dry numbers. 01+ engine.
Cylinder..... PSI
1..........180
2..........181
3..........179
4..........167
Looks like something is going on with cylinder 4, it's down a bit compared to the others. Not 100% sure (can't find spec, anybody know it?) but pretty sure a VVT motor should test higher than 180, like 210 or so right?
Anyways new plugs more or less fixed idle. I did that, jumpered TEN and GND, set idle speed to around 850, unjumpered, and it now idles between 790 and 820. So not absolutely perfect but you don't notice the variation, it seems to idle fine now.
Reply
0
0


