COMAND write-up
 07-11-2008, 02:36 PM
#1
Junior Member
Thread Starter
iTrader: (1)

Join Date: Apr 2008
Location: Bristol
Posts: 439
Total Cats: 0
A few people have expressed an interest in the COMAND 2.0 installation that I did for my 94 Miata. So I figured I’d do a write-up for people. This info is fairly specific for the Mercedes Benz COMAND 2.0 but the basics are the same for any other VW/Audi satnav (or Lamborghini, Ferrari, BMW, or Porsche) that uses CANBUS.
First lets find our Hitler.
Part numbers to look for and where to find them.
First off we need a COMAND 2 (which is newer than the 2.5 as it refers to the number of DIN slots that the unit occupies)
We also need an original square unit from an ML or older CLK (maybe E-class).
Units from a new CLK, C-class, G-wagon, SL, CL, or S-class all have funny curved fronts and will not fit into our cars.
A163 820 14 89
A163 820 36 89 (This is the one I recommend)
These are part numbers from an ML and are great options for our install as they don’t have CANBUS and will be easier to work with.
A208 820 30 89
A208 820 31 89
A208 820 37 89
A208 820 38 89
A208 820 34 89
A208 820 35 89
A208 820 40 89
A208 820 44 89
These are part numbers from the old CLK some have CAN some not, make sure you know what you are buying before you click that bid button.
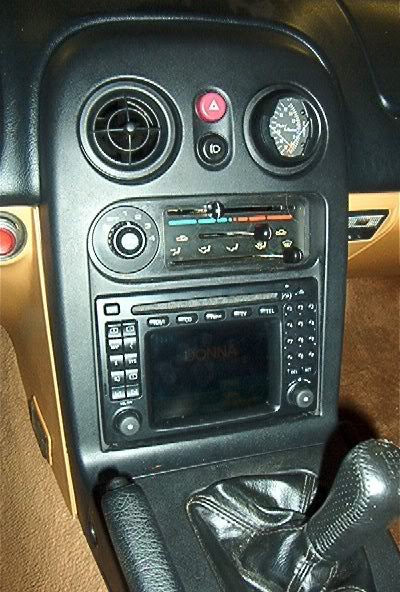
Once we have our COMAND the first thing is to get the damn thing into our car. If you had a double din unit to start with e.g. MSSS then this should be easy. If not then you will have to remove the pocket or blanking plate. Secure the unit anyway you see fit. Mounting holes and bracketry change with different COMAND models. You will have to dremel out a small amount of plastic from the edge of the plastic dash to make room for the COMAND. I highly recommend taking the plastic dash front off for installation as it will make things sooooo much easier.
Once the unit is in you will have to start on the wiring. First you will have to install a commonly available wiring adaptor to convert the MAZDA radio connectors to the standard ISO connectors used by most car radios these days.
Now you can power up the COMAND and it will work in a limited fashion. You should have power and noise from the speakers. But the navigation will not work.
To make the nav work we need to run some more wires to the COMAND. Namely VSS and reverse we also need to send a wire to the ODBII connector if you have one (if you don’t then get one).
First a quick description of all the connectors for the COMAND.
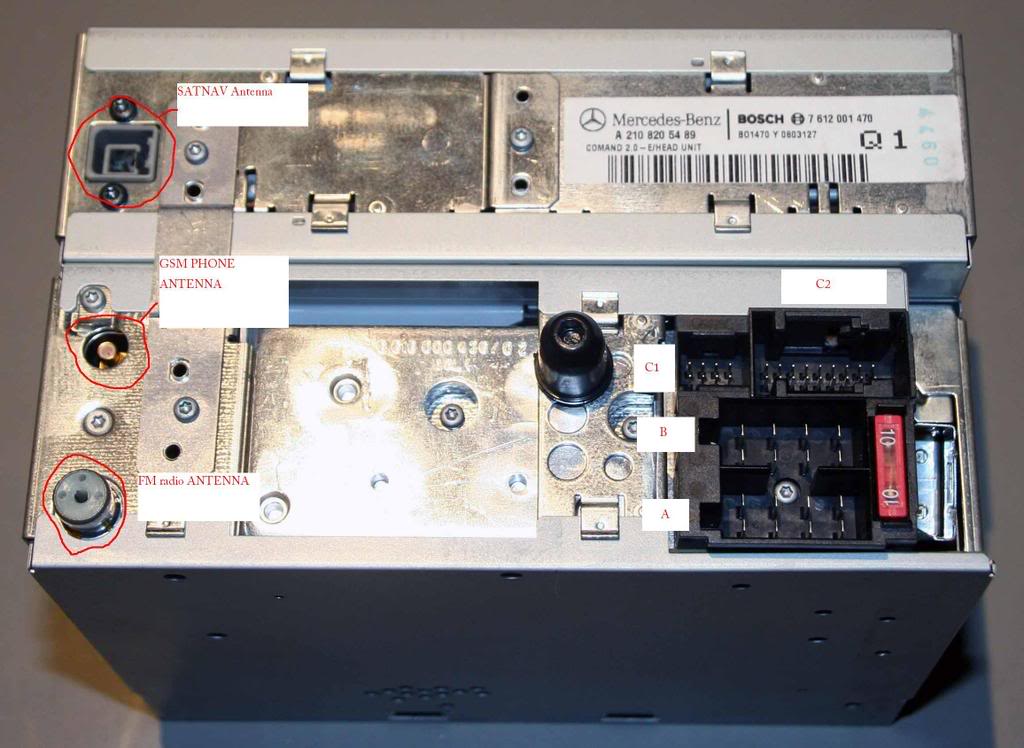
COMAND has the following connectors: -
A Power connector
B Speaker connector
D2B D2B fibre optic connector (Optional)
D Main Antenna connector
F Diverse Antenna connection (small coax connector)
E GPS antenna connector (square grey coax HRS connector)
C1 Mercedes Benz 18-way high density connector (control signals)
C2 Mercedes Benz 8-way high density connector (TV RGB, CD power)
A and B are served by the ISO adaptor we have already fitted but you may want to buy 2 if you need more pins for connector A.
We also need to use connector C to send the VSS and the Reversing signal to the COMAND and add the auxiliary input for our iPod. To use C2 we need the following:
A000 545 42 30 This is the C2 Connector shell
A001 545 48 40 This is the C2 connector block
A008 545 55 26 These are the C1/C2 connector contacts
I got these part numbers off google so for god sake check them with your MB dealer before ordering.
We need to find our VSS signal. On my NA 1.8 I got it from a screw on the back of my speedo labeled RSW. On NBs I think you can get it directly from the sensor on the transmission. Sometimes there is a wire to the ECU and/or cruise control. You can even tie into the ABS VSS. Is up to you to find it on the wiring diagram for your car. Once we have VSS we need to send it to both con. A pin 1 and con. C2 pin 6. Good now the COMAND knows how far we have traveled so it can give instructions at the appropriate times.
The reversing signal is easy, get it from the transmission switch, again find it on the wiring diagram for your own car. Then send it to C2 pin 15. Now COMAND knows which direction we have traveled in.
The AUX input connections for our Ipodz are on the C2 connector and are as follows: -
Right Signal 4
Right Ground 5
Left Signal 13
Left Ground 14
Shielded 3-core cable should be used with the shield connected to pin 14 of connector C2.
Now we need to hook the COMAND up to the OBDII connector, if you have an NB this is easy just wire con. A pin 2 to OBDII pin 13. If you have a NA then you will have to steal a OBDII connector from something and hook +12v to pin 16, GND to pin 4 and the COMAND on pin 13. Now the MB dealer can use his STAR diagnosis machine to configure the COMAND.
Last but not least you will need a GPS antenna www.ebay.com should be a good source for these. COMAND 2 units had different GPS antenna plugs so buy one that is suitable for your unit. Possible mounting locations include under the dash looking up through the windscreen or under the carpet on the parcel shelf looking out of the back window (although this may cause problems when the roof is down) follow the instructions that came with the antenna.
Congrats you should now have a working COMAND you should now use the MY2001 upgrade disk (search online and download) to upgrade the software on the unit and give it a nice MB logo on startup. It also adds predictive street naming and other little bits and pieces.
Make friends with your local MB mechanic, chat him, up and buy him beer because you are going to ask him to hook his stupidly expensive STAR diagnosis box to your MAZDA. This will be like receiving ---- sex for a MB mechanic “Just Wrong!”
Tell him to configure the STAR to think its connecting to a ML (163) once it is connected they need to configure the COMAND to think it is in a ML (163) and the D2B bus to tell COMAND what phones/CD/amplifier etc are connected.
Many Mercedes dealers are not used to detailed configuration of COMAND, here is what the dealer must do (this was done on a W208CLK)
a) Start Star diagnosis, and select the correct vehicle
b) In the Main Groups screen, select Control Units
c) In the Control Unit Groups screen, select Information and Communication
d) In the Information and Communication screen, select D2B – COMAND or Audio
e) In the Cockpit management and data system screen, first select Retrofitting of D2B Components
- run through that process and select YES when it asks whether to actually write the new configuration
f) Return to the screen in (e), and select Control Unit Adaptations
g) Select Read coding and change if necessary
h) Select configuration of components (not D2B)
Enable the following: -
Telephone with enlarged functionality
TV Tuner
Instrument cluster with automatically centering text ***
Analog BOSE (IF YOU HAVE ANALOGUE BOSE only)
SMS transmissions permitted
And save the changes to the COMAND system
(*** I think this is true for all models)
i) Return to the (e) screen, and select Radio parameters
Set the Tuner ident to the correct country for you (Europe/Japan/North America/South America)
k) Return to the (e) screen and select Variant Coding
set the Model/Series correctly, and the FADER ON if your vehicle has front and rear speakers (most vehicles except the SL).
Now we are really getting somewhere NAV should be working but you may find it is giving instructions at the wrong time and having trouble working out where on the map it is this is because it thinks it is running massive rims and our littluns are confusing it. To solve this Ensure you have a map disk in the COMAND unit then press the NAVI key, then select Settings menu, then Calibration. Select new or used tyres and enter the tyre size of one of the rear tyres. Due to different gearing you probably wont be able to just use the real size of your tyres play around with sizes until you have a correctly indicated speed.
This is where we have secret hidden menus FTW. To enter diagnostic mode, press SYS and then select the AUX input by turning the right hand rotary **** to highlight Aux and pressing the rotary ****. Then hold down the following 3 keys for about 10 seconds. MUTE, 1, 3
The most useful menu is infos. It will tell you your speed for calibrating your wheel size.
The second most useful menu is the configuration menu. At the bottom there are various codes stored in hexadecimal format most of these are to do with what speed the TV is locked at and the like. Also on the bottom line is the setting telling the COMAND how many impulses per wheel rotation the car will send the COMAND unit, this is also in hexadecimal. Remember that with some cars the speed is sent over the CAN rather than with a speed signal wire, so in some cars this can be set to 0. If you cannot get the COMAND to register speed properly measure how many pulses you have per wheel rotation and get the MB mechanic to set this using STAR. REMEMBER IT IS HEXADECIMAL.
That concludes the simple installation of COMAND.
First lets find our Hitler.
Part numbers to look for and where to find them.
First off we need a COMAND 2 (which is newer than the 2.5 as it refers to the number of DIN slots that the unit occupies)
We also need an original square unit from an ML or older CLK (maybe E-class).
Units from a new CLK, C-class, G-wagon, SL, CL, or S-class all have funny curved fronts and will not fit into our cars.
A163 820 14 89
A163 820 36 89 (This is the one I recommend)
These are part numbers from an ML and are great options for our install as they don’t have CANBUS and will be easier to work with.
A208 820 30 89
A208 820 31 89
A208 820 37 89
A208 820 38 89
A208 820 34 89
A208 820 35 89
A208 820 40 89
A208 820 44 89
These are part numbers from the old CLK some have CAN some not, make sure you know what you are buying before you click that bid button.
Once we have our COMAND the first thing is to get the damn thing into our car. If you had a double din unit to start with e.g. MSSS then this should be easy. If not then you will have to remove the pocket or blanking plate. Secure the unit anyway you see fit. Mounting holes and bracketry change with different COMAND models. You will have to dremel out a small amount of plastic from the edge of the plastic dash to make room for the COMAND. I highly recommend taking the plastic dash front off for installation as it will make things sooooo much easier.
Once the unit is in you will have to start on the wiring. First you will have to install a commonly available wiring adaptor to convert the MAZDA radio connectors to the standard ISO connectors used by most car radios these days.
Now you can power up the COMAND and it will work in a limited fashion. You should have power and noise from the speakers. But the navigation will not work.
To make the nav work we need to run some more wires to the COMAND. Namely VSS and reverse we also need to send a wire to the ODBII connector if you have one (if you don’t then get one).
First a quick description of all the connectors for the COMAND.
COMAND has the following connectors: -
A Power connector
B Speaker connector
D2B D2B fibre optic connector (Optional)
D Main Antenna connector
F Diverse Antenna connection (small coax connector)
E GPS antenna connector (square grey coax HRS connector)
C1 Mercedes Benz 18-way high density connector (control signals)
C2 Mercedes Benz 8-way high density connector (TV RGB, CD power)
A and B are served by the ISO adaptor we have already fitted but you may want to buy 2 if you need more pins for connector A.
We also need to use connector C to send the VSS and the Reversing signal to the COMAND and add the auxiliary input for our iPod. To use C2 we need the following:
A000 545 42 30 This is the C2 Connector shell
A001 545 48 40 This is the C2 connector block
A008 545 55 26 These are the C1/C2 connector contacts
I got these part numbers off google so for god sake check them with your MB dealer before ordering.
We need to find our VSS signal. On my NA 1.8 I got it from a screw on the back of my speedo labeled RSW. On NBs I think you can get it directly from the sensor on the transmission. Sometimes there is a wire to the ECU and/or cruise control. You can even tie into the ABS VSS. Is up to you to find it on the wiring diagram for your car. Once we have VSS we need to send it to both con. A pin 1 and con. C2 pin 6. Good now the COMAND knows how far we have traveled so it can give instructions at the appropriate times.
The reversing signal is easy, get it from the transmission switch, again find it on the wiring diagram for your own car. Then send it to C2 pin 15. Now COMAND knows which direction we have traveled in.
The AUX input connections for our Ipodz are on the C2 connector and are as follows: -
Right Signal 4
Right Ground 5
Left Signal 13
Left Ground 14
Shielded 3-core cable should be used with the shield connected to pin 14 of connector C2.
Now we need to hook the COMAND up to the OBDII connector, if you have an NB this is easy just wire con. A pin 2 to OBDII pin 13. If you have a NA then you will have to steal a OBDII connector from something and hook +12v to pin 16, GND to pin 4 and the COMAND on pin 13. Now the MB dealer can use his STAR diagnosis machine to configure the COMAND.
Last but not least you will need a GPS antenna www.ebay.com should be a good source for these. COMAND 2 units had different GPS antenna plugs so buy one that is suitable for your unit. Possible mounting locations include under the dash looking up through the windscreen or under the carpet on the parcel shelf looking out of the back window (although this may cause problems when the roof is down) follow the instructions that came with the antenna.
Congrats you should now have a working COMAND you should now use the MY2001 upgrade disk (search online and download) to upgrade the software on the unit and give it a nice MB logo on startup. It also adds predictive street naming and other little bits and pieces.
Make friends with your local MB mechanic, chat him, up and buy him beer because you are going to ask him to hook his stupidly expensive STAR diagnosis box to your MAZDA. This will be like receiving ---- sex for a MB mechanic “Just Wrong!”
Tell him to configure the STAR to think its connecting to a ML (163) once it is connected they need to configure the COMAND to think it is in a ML (163) and the D2B bus to tell COMAND what phones/CD/amplifier etc are connected.
Many Mercedes dealers are not used to detailed configuration of COMAND, here is what the dealer must do (this was done on a W208CLK)
a) Start Star diagnosis, and select the correct vehicle
b) In the Main Groups screen, select Control Units
c) In the Control Unit Groups screen, select Information and Communication
d) In the Information and Communication screen, select D2B – COMAND or Audio
e) In the Cockpit management and data system screen, first select Retrofitting of D2B Components
- run through that process and select YES when it asks whether to actually write the new configuration
f) Return to the screen in (e), and select Control Unit Adaptations
g) Select Read coding and change if necessary
h) Select configuration of components (not D2B)
Enable the following: -
Telephone with enlarged functionality
TV Tuner
Instrument cluster with automatically centering text ***
Analog BOSE (IF YOU HAVE ANALOGUE BOSE only)
SMS transmissions permitted
And save the changes to the COMAND system
(*** I think this is true for all models)
i) Return to the (e) screen, and select Radio parameters
Set the Tuner ident to the correct country for you (Europe/Japan/North America/South America)
k) Return to the (e) screen and select Variant Coding
set the Model/Series correctly, and the FADER ON if your vehicle has front and rear speakers (most vehicles except the SL).
Now we are really getting somewhere NAV should be working but you may find it is giving instructions at the wrong time and having trouble working out where on the map it is this is because it thinks it is running massive rims and our littluns are confusing it. To solve this Ensure you have a map disk in the COMAND unit then press the NAVI key, then select Settings menu, then Calibration. Select new or used tyres and enter the tyre size of one of the rear tyres. Due to different gearing you probably wont be able to just use the real size of your tyres play around with sizes until you have a correctly indicated speed.
This is where we have secret hidden menus FTW. To enter diagnostic mode, press SYS and then select the AUX input by turning the right hand rotary **** to highlight Aux and pressing the rotary ****. Then hold down the following 3 keys for about 10 seconds. MUTE, 1, 3
The most useful menu is infos. It will tell you your speed for calibrating your wheel size.
The second most useful menu is the configuration menu. At the bottom there are various codes stored in hexadecimal format most of these are to do with what speed the TV is locked at and the like. Also on the bottom line is the setting telling the COMAND how many impulses per wheel rotation the car will send the COMAND unit, this is also in hexadecimal. Remember that with some cars the speed is sent over the CAN rather than with a speed signal wire, so in some cars this can be set to 0. If you cannot get the COMAND to register speed properly measure how many pulses you have per wheel rotation and get the MB mechanic to set this using STAR. REMEMBER IT IS HEXADECIMAL.
That concludes the simple installation of COMAND.
Last edited by Duckie_uk; 07-12-2008 at 02:16 AM.

Reply
 0
0

0
07-11-2008, 02:36 PM
#2
Junior Member
Thread Starter
iTrader: (1)
Join Date: Apr 2008
Location: Bristol
Posts: 439
Total Cats: 0
Now for the fun way, if you got a one with CAN.
CAN is used for several things in COMAND, but the ones that concern us are IGN signal, illumination signal, and in some cases VSS.
YOU CAN USE A CANBUS COMMAND WITHOUT MODS
If you don�t mind your buttons not being illuminated when you turn your lights on and having the unit turn off every 45min � 1 hr then just follow the instructions above.
If you want your buttons to illuminate but don�t mind the unit switching off then you can wire the leds to the illumination pin on con. A. (I have a german PDF detailing how to do this easily. It also tells you how to stop it turning off but it is a lot harder)
The easy way of making CAN work is to use an emulator. This will take the analog signals for illumination and IGN and encode them into a CAN.
A suitable device looks like this http://cgi.ebay.de/CAN-BUS-Interface...QQcmdZViewItem
Just search on www.ebay.de for COMAND canbus and you will find adaptors or emulators or simulators.
If you get one for a COMAND 2 it will come with a nice C2 connector which you can then use for your AUX input too!
That pretty much covers most things you will need to install a COMAND 2 into a Miata. Have fun.
Acknowledgements go to Frank Devocht for the idea and some of the pics. Also to www.mercupgrades.com for a lot of technical info. I highly recommend visiting this site for COMAND info if you want to add a phone or TV or CD changer to your COMAND install.
Reply
0
0

 07-11-2008, 04:09 PM
#5
Junior Member
Thread Starter
iTrader: (1)
Join Date: Apr 2008
Location: Bristol
Posts: 439
Total Cats: 0
I'm always changing radio stations with my knuckles. If I ever did it again I would find a way to move the climate controls down and have the radio slot above them so you have a better view of the screen. I may try moving them for my carputer if/when I get round to doing the damn thing.
Reply
0
0

 07-11-2008, 05:49 PM
#8
Junior Member
Thread Starter
iTrader: (1)
Join Date: Apr 2008
Location: Bristol
Posts: 439
Total Cats: 0
Bicycle brake bowden cable to the rescue?
Hit google pay dirt with some more part numbers
210 820 48 89 no CAN
210 820 54 89 CAN
210 820 56 89 CAN
210 820 49 89 UK-Modell no CAN
210 820 51 89 UK-Modell CAN
210 820 55 89 US-Modell no TMC/RDS/TV
208 820 30 89 no CAN
208 820 37 89 with and without CAN (huh?)
208 820 34 89 CAN
208 820 40 89 CAN
208 820 44 89 CAN
203 820 91 89 all CAN
203 820 96 89
203 827 36 42
203 827 52 42
203 820 92 89 US-Modell
203 827 31 42 US-Modell
203 827 37 42 US-Modell
203 827 53 42 US-Modell
203 820 93 89 Japan-Modell
203 827 23 42 Japan-Modell
230 820 05 89 CAN
230 820 05 89 CAN
230 820 06 89 US-Modell
230 820 23 89 Japan-Modell
230 820 29 89 Japan-Modell
163 820 14 89 no CAN
163 820 36 89 no CAN
463 820 10 89 CAN
463 820 15 89 CAN
Reply
0
0

Thread
Thread Starter
Forum
Replies
Last Post
patsmx5
DIY Turbo Discussion
15
01-18-2009 12:37 AM


