Sealed mouth to stock rad (with pics)


So I bought a roll of plastic from BSR Products and sealed up the sides and bottom of the stock radiator to the mouth (the top is already sealed). It made a significant difference in temps. Before with lower boost (about 6psi) the CLT would hit 211+ if I got into boost too much, and the temps did not really drop until the car was shut down. Today in similar weather ~85F hitting 9psi and after driving around for about a half an hour getting into boost as much as traffic would allow the highest the temp ever got was 199Fand that was because I was idling or cruising around town at low speeds towards the end. The average temp seemed to be about 193F. I think once I do the dual fan mod it'll keep the temps from rising at lower speeds more. The only downside I can see is the front end is a little less planted at speeds 80mph+. Don't really want to hack the hood so maybe a splitter and undertray would help that. I'm very pleased so far and I think this will keep me from buying a bigger rad as this car is not getting tracked. Wish I had pics but the GF has been out of town with the camera the last month. Moral of the story is do it.
Reply
 0
0

0
I bought this: http://www.bsrproducts.com/product_i...roducts_id=515
It's thicker and stiffer than it looks in that pic. This is going to be hard to explain without pics but I'll try.
I cut three pieces. I wanted to do one but it would have been too complicated. So, one large flat piece for the bottom that spans the width of the radiator. This is tapered at the front to match the shape of the bumper. It's shoved up to the bumper and attached to the standoffs for the fans on the rad. The front is wedged between the tabs that hold the stock undertray and my #2 Begi intercooler which sits fairly low. It's sealed to the front this way and not moving. I may put self-tapping screws into it through the tabs that hold on the undertray just for good measure. The way I attatched the back was to drill holes in the standoffs for the fans just big enough to pass a zip tie through then holes were made in the sheet plastic in the same areas. Just forward of the holes on the plastic a placed a strip of self adhesive foam weather stripping which you can buy in Home Depot. This seals the plastic to the base of the radiator.
The sides were cut almost identical to each other but the position of the holes for the intercooler pipes are different and the passenger side had A/C lines in my case so slits were cut to let them pass. These slits were also sealed with insulation.
Two sets of holes were drilled in the bracket that support the radiator on the sides. A similar set of holes was drilled in the plastic. Holes were also drilled in the bottom sheet along the sides and similarly on the side pieces. The side pieces overlapped the bottom pieces on the inside and when zip tied up the bottom piece is pulled up and over part of the side piece. All places where either plastic met plastic or plastic met radiator/frame where sealed further with the adhesive weather stripping. The top part of the wing you see on the side piece curves around the side of the mouth while the bottom part of the wing helps hold things in place and maintains tension on the piece.
I guess zip ties might be a little ghetto but they're easily removed without damaging the plastic and I don't have to drive rivets through the rad. And believe me this thing is not going anywhere until I want it to. Hope the crude drawing helps you visualize my rambling. I'll have the camera tomorrow as the GF comes back tomorrow. Maybe this weekend after I'm done having massive amounts of sex with her I can get a pic (not of her ).
).
It's thicker and stiffer than it looks in that pic. This is going to be hard to explain without pics but I'll try.
I cut three pieces. I wanted to do one but it would have been too complicated. So, one large flat piece for the bottom that spans the width of the radiator. This is tapered at the front to match the shape of the bumper. It's shoved up to the bumper and attached to the standoffs for the fans on the rad. The front is wedged between the tabs that hold the stock undertray and my #2 Begi intercooler which sits fairly low. It's sealed to the front this way and not moving. I may put self-tapping screws into it through the tabs that hold on the undertray just for good measure. The way I attatched the back was to drill holes in the standoffs for the fans just big enough to pass a zip tie through then holes were made in the sheet plastic in the same areas. Just forward of the holes on the plastic a placed a strip of self adhesive foam weather stripping which you can buy in Home Depot. This seals the plastic to the base of the radiator.
The sides were cut almost identical to each other but the position of the holes for the intercooler pipes are different and the passenger side had A/C lines in my case so slits were cut to let them pass. These slits were also sealed with insulation.
Two sets of holes were drilled in the bracket that support the radiator on the sides. A similar set of holes was drilled in the plastic. Holes were also drilled in the bottom sheet along the sides and similarly on the side pieces. The side pieces overlapped the bottom pieces on the inside and when zip tied up the bottom piece is pulled up and over part of the side piece. All places where either plastic met plastic or plastic met radiator/frame where sealed further with the adhesive weather stripping. The top part of the wing you see on the side piece curves around the side of the mouth while the bottom part of the wing helps hold things in place and maintains tension on the piece.
I guess zip ties might be a little ghetto but they're easily removed without damaging the plastic and I don't have to drive rivets through the rad. And believe me this thing is not going anywhere until I want it to. Hope the crude drawing helps you visualize my rambling. I'll have the camera tomorrow as the GF comes back tomorrow. Maybe this weekend after I'm done having massive amounts of sex with her I can get a pic (not of her
).
Last edited by johndoe; Aug 7, 2008 at 09:24 AM.
Reply
0
0
 what's there looks good to me

I'll look at the sketch I made (which I don't have on hand at the moment) and give you the numbers, but the sides were further trimmed or reshaped after I had made measurements so I'd recommend mocking it up with cardboard first.
Reply
0
0
Alright, finally got off my *** to take some pics. They won't be of great help because some parts are just impossible to see tucked away.
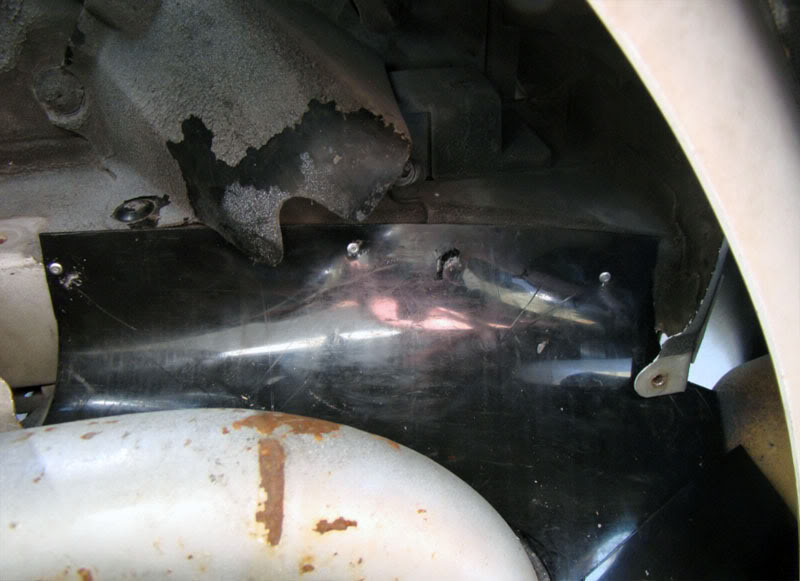
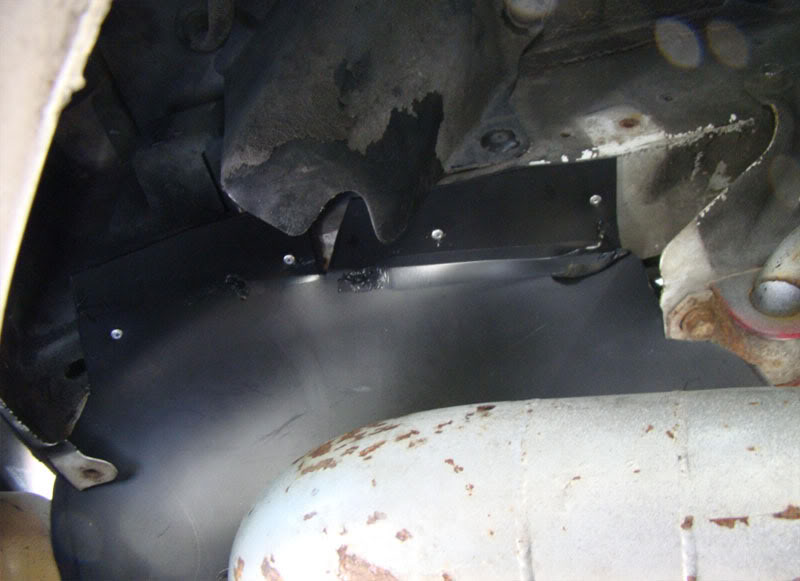
In this first pic you see the bottom sheet. The front is tapered and tucked up below the mouth against the inside of the bumper:

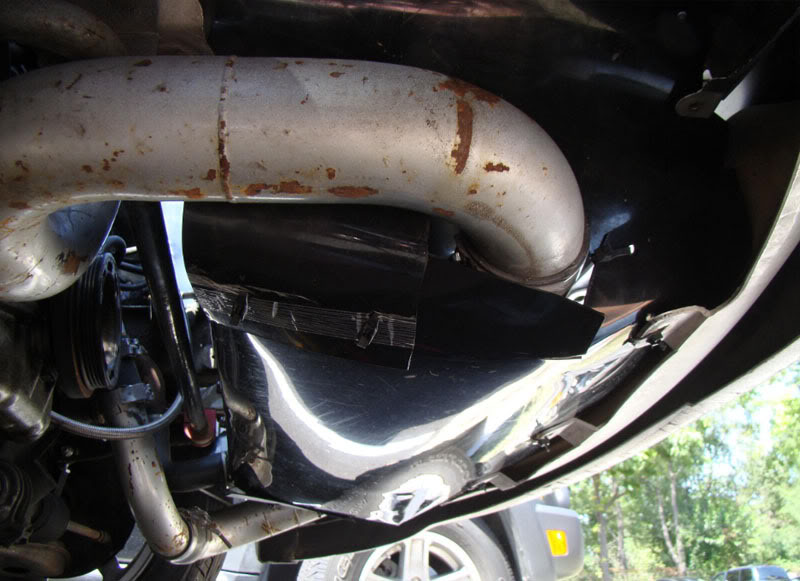
This is the rear of that same piece. You can see here that it is zipped tied tightly to the bottom of the rad. I drilled tiny holes in the standoffs for the fan just big enough to pass the zip tie through. The bottom of the rad is sealed with self adhesive weatherstripping:

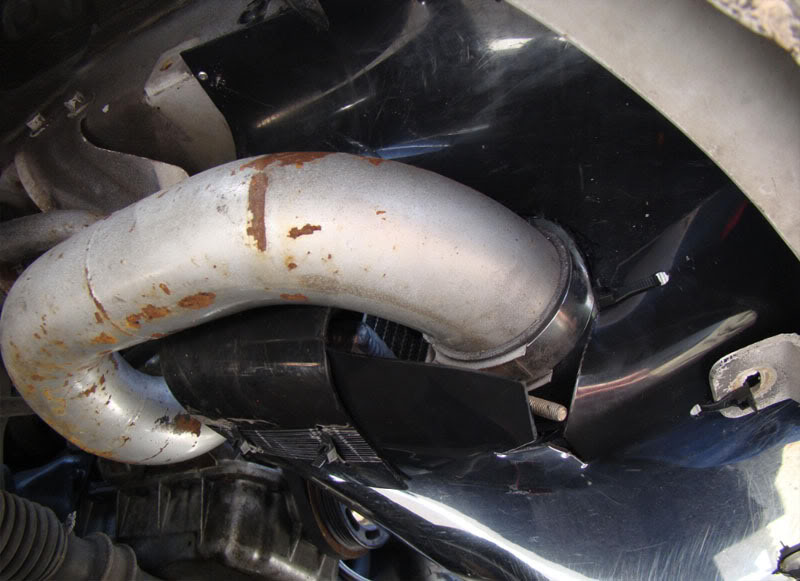
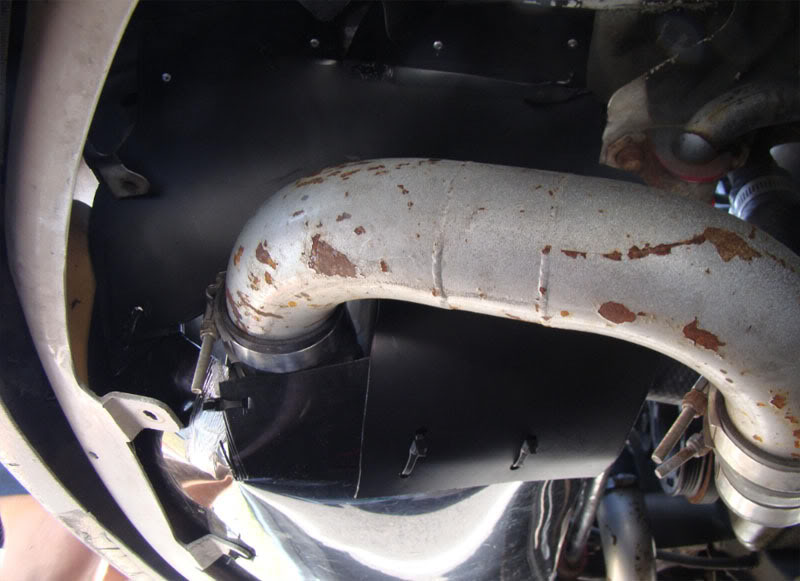
This pic is where the side piece meets the bottom piece on the drivers side. The side piece overlaps the inside of the bottom piece about 4 inches or so. It is also sealed with self-adhesive weatherstripping where they meet just below the zip ties. The side piece is tied to the side of the rad by drilling holes in the metal rad support and passing the zip ties through them. It is again sealed with weatherstripping. The hole for the interooler piping is just large enough to pass it through.

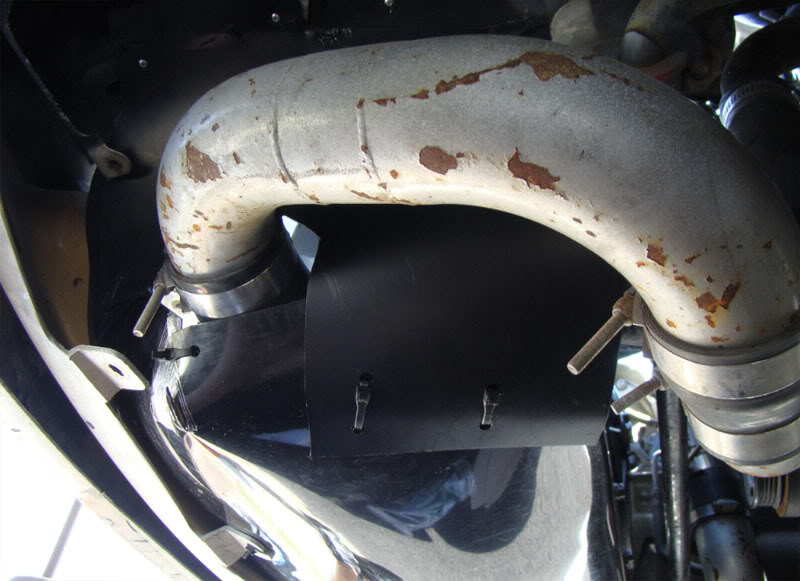
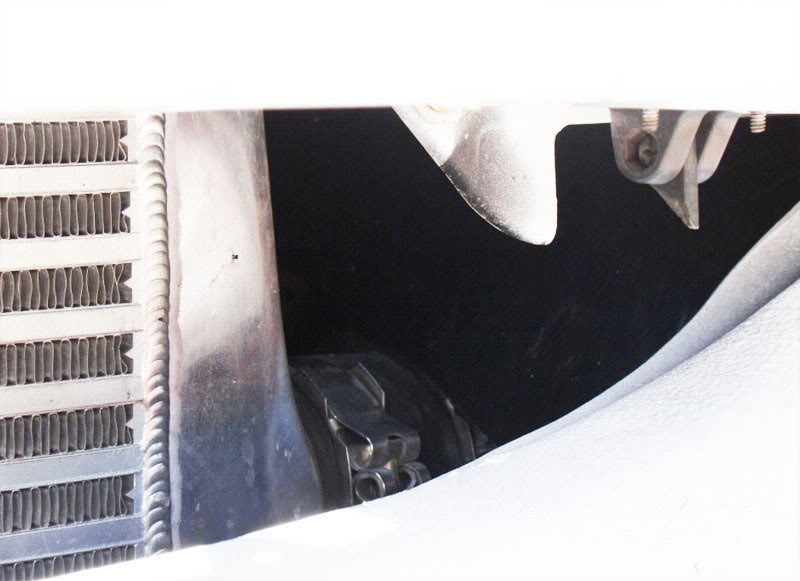
This is a pic of the side piece on the passengers side. I have A/C so slits had to be cut to allow the lines to pass through. They are sealed tightly with weatherstripping as well.

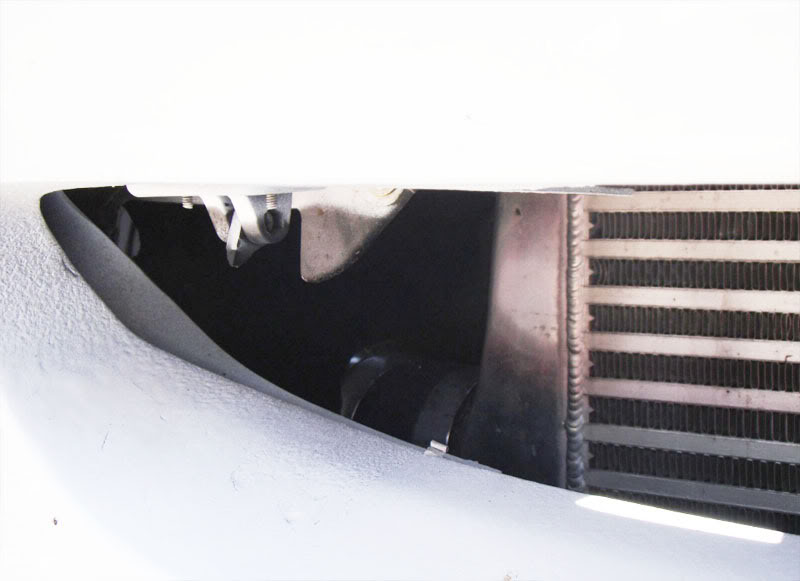
This is a shot from the front looking at how the side piece seals the side of the mouth. As you can see the tab (as illustrated in the drawing above) folds up along the side of the mouth and hooks over that bolt to give it a little extra security (it's not hooked over in the pic) even though the tension of the stiff plastic is probably enough to hold it in place on it's own.

That's it! It just takes some time to make things fit properly, but if you buy the roll of plastic mentioned above you'll have plenty to spare if you need to make a couple tries. Hope the pics help clarify things slightly. It works great and it's easy to remove without damaging the car or the shrouding.
edit: Also, maybe a mod could change the title of the thread.
In this first pic you see the bottom sheet. The front is tapered and tucked up below the mouth against the inside of the bumper:
This is the rear of that same piece. You can see here that it is zipped tied tightly to the bottom of the rad. I drilled tiny holes in the standoffs for the fan just big enough to pass the zip tie through. The bottom of the rad is sealed with self adhesive weatherstripping:
This pic is where the side piece meets the bottom piece on the drivers side. The side piece overlaps the inside of the bottom piece about 4 inches or so. It is also sealed with self-adhesive weatherstripping where they meet just below the zip ties. The side piece is tied to the side of the rad by drilling holes in the metal rad support and passing the zip ties through them. It is again sealed with weatherstripping. The hole for the interooler piping is just large enough to pass it through.
This is a pic of the side piece on the passengers side. I have A/C so slits had to be cut to allow the lines to pass through. They are sealed tightly with weatherstripping as well.
This is a shot from the front looking at how the side piece seals the side of the mouth. As you can see the tab (as illustrated in the drawing above) folds up along the side of the mouth and hooks over that bolt to give it a little extra security (it's not hooked over in the pic) even though the tension of the stiff plastic is probably enough to hold it in place on it's own.
That's it! It just takes some time to make things fit properly, but if you buy the roll of plastic mentioned above you'll have plenty to spare if you need to make a couple tries. Hope the pics help clarify things slightly. It works great and it's easy to remove without damaging the car or the shrouding.
edit: Also, maybe a mod could change the title of the thread.
Last edited by johndoe; Aug 27, 2008 at 09:22 PM. Reason: Gayness
Reply
0
0


 (actually I was too lazy to remove it from the roll when I cut it open)