The e-bike thread.

 04-03-2013, 02:08 PM
#523
Boost Pope


Thread Starter
iTrader: (8)
Join Date: Sep 2005
Location: Chicago. (The less-murder part.)
Posts: 33,049
Total Cats: 6,608
Yes. It's about 3/8"- a seriously beefy piece of metal. I should have realized this potential conflict when I installed it, but I didn't really consider the fact that, being hollowed-out and with a huge cutout on one side, the axle would be likely to deform in the specific area where I'm squeezing on it with the nut.
I will post pictures of the problem and the repair once I have the materials in hand. I don't anticipate that this will be a complicated fix.
I will post pictures of the problem and the repair once I have the materials in hand. I don't anticipate that this will be a complicated fix.

Reply
 0
0

0
 04-06-2013, 09:07 PM
#525
Boost Pope
Thread Starter
iTrader: (8)
Join Date: Sep 2005
Location: Chicago. (The less-murder part.)
Posts: 33,049
Total Cats: 6,608
So, time for an update:
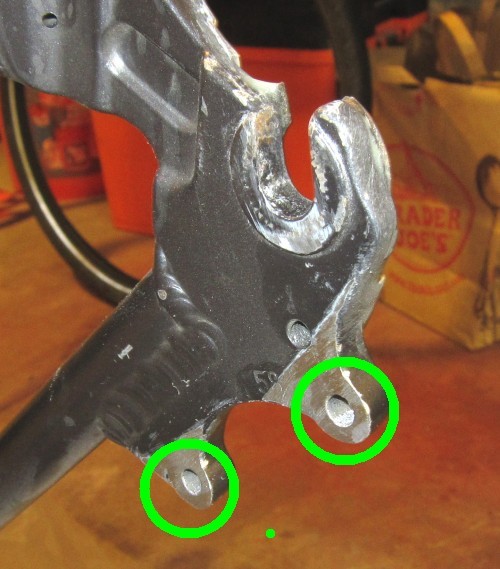
You may remember this image of my rear axle, showing the substantial steel plate which I attached to the frame with 3M DP-420 epoxy to reinforce the dropout:

Turns out that the thickness of that plate was causing me some trouble. Here's a picture of what the axle looks like under the nut and plastic cover:
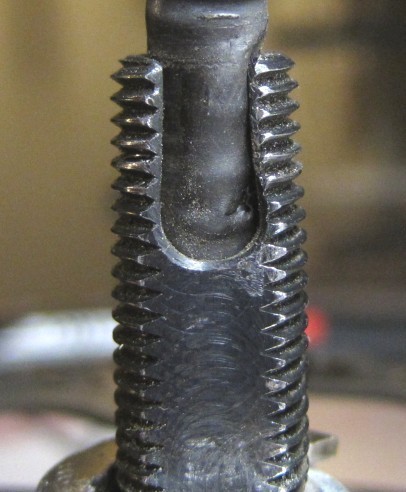
Not only is the axle hollow, but there's a big U-shaped cutout in one side. The intended function of that cutout is to allow thinner wire bundles than mine to exit at a 90 degree angle.
Well, the added thickness of the plate meant that the nut was engaging the axle directly over that cutout. And when the nut is torqued down, the axle is deformed (literally squeezed inwards), with the result that the fit wasn't very secure. When I went to re-install the wheel early this week, moderate amounts of torque caused the nut to squeeze the axle so much that it literally skipped the threads like a needle on a warped record.
You can see in the image above how, in the area of the cutout, the axle is narrower than it used to be.
So I need to get the nut closer to the hub and back onto the solid portion of the axle.
Step 1: add thinness to the plate. One angle grinder, one metal cutoff wheel. I decided to shave the plate like a ham, aiming for a 50% reduction. Here's an in-process shot:
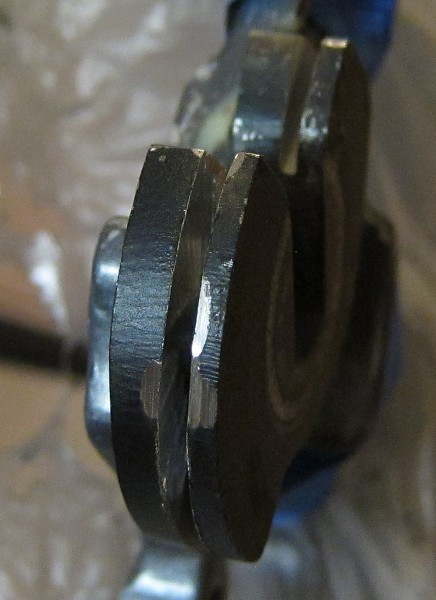
When I was just about all the way through, I decided to see how much the not-inconsiderable heat of the grinding operation had affected the DP-420. Stuck a flat screwdriver into the groove which I'd created, and while it took some effort, I was able to pry the plate off of the frame. I forgot to bring home the infrared thermometer this weekend so I don't know how hot it actually was, but when I sprayed some water onto it with a little squirt bottle, the water sizzled. So it was at least 100 degrees C, and probably quite a bit more.
This actually turned out to be of benefit, as after finishing the cut in the vise on the workbench, I was able to use my micrometer to accurately measure the thickness of the plate in different areas, and use this as a guide to doing some light finishing work to make it properly flat and true.
Starting thickness was .380 inches, and finished thickness was .175-.180 inches. So I've successfully reduced the thickness by a little over 50%, picking up almost exactly 5mm, which translates to 3.3 threads.
I found another way to pick up a little more thread engagement. Previously, I'd had to install a shim about 1.5mm thick between the inside of the dropout and the hub, to prevent the brake caliper from rubbing on the hub. Turns out that the part of the frame to which the caliper was mounted had raised features a little over 1mm in height, spacing the caliper inwards (towards the wheel.) So by grinding those flush, I can eliminate the shim and gain back that thickness as well.
Anyway, the plate is now back on and curing. Removing the residual epoxy from the dropout took quite a bit of work with the 80 grit abrasive-bristle wheel, so I still have a fairly high degree of confidence in this stuff.

The other problem is that in the shouldered nut which came with the wheel, the thread doesn't actually go all the way down to the bottom. There's about 2 threads' worth of empty space where thread ought to be:

So, how to solve that?
A different nut isn't going to make a difference once I put a washer under it. Unless...
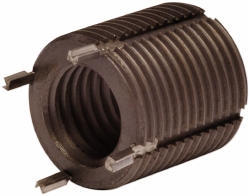
Yes, there we are. A keylocking threaded insert. Like a helicoil, but solid. Found one with a 14x1.5 ID and a 20x1.5 OD. I will shave the end of that down to ensure that it goes all the way to the "bottom", and then install a 20mm washer and a 20x1.5 nut over top of it.
The combination of all of these things should get me back onto the solid portion of the axle and get me about 5 more threads' worth of engagement.
Waiting for parts to arrive. Probably no progress until next weekend, as I'll be out of town most of this coming week.
You may remember this image of my rear axle, showing the substantial steel plate which I attached to the frame with 3M DP-420 epoxy to reinforce the dropout:
Turns out that the thickness of that plate was causing me some trouble. Here's a picture of what the axle looks like under the nut and plastic cover:
Not only is the axle hollow, but there's a big U-shaped cutout in one side. The intended function of that cutout is to allow thinner wire bundles than mine to exit at a 90 degree angle.
Well, the added thickness of the plate meant that the nut was engaging the axle directly over that cutout. And when the nut is torqued down, the axle is deformed (literally squeezed inwards), with the result that the fit wasn't very secure. When I went to re-install the wheel early this week, moderate amounts of torque caused the nut to squeeze the axle so much that it literally skipped the threads like a needle on a warped record.
You can see in the image above how, in the area of the cutout, the axle is narrower than it used to be.
So I need to get the nut closer to the hub and back onto the solid portion of the axle.
Step 1: add thinness to the plate. One angle grinder, one metal cutoff wheel. I decided to shave the plate like a ham, aiming for a 50% reduction. Here's an in-process shot:
When I was just about all the way through, I decided to see how much the not-inconsiderable heat of the grinding operation had affected the DP-420. Stuck a flat screwdriver into the groove which I'd created, and while it took some effort, I was able to pry the plate off of the frame. I forgot to bring home the infrared thermometer this weekend so I don't know how hot it actually was, but when I sprayed some water onto it with a little squirt bottle, the water sizzled. So it was at least 100 degrees C, and probably quite a bit more.
This actually turned out to be of benefit, as after finishing the cut in the vise on the workbench, I was able to use my micrometer to accurately measure the thickness of the plate in different areas, and use this as a guide to doing some light finishing work to make it properly flat and true.
Starting thickness was .380 inches, and finished thickness was .175-.180 inches. So I've successfully reduced the thickness by a little over 50%, picking up almost exactly 5mm, which translates to 3.3 threads.
I found another way to pick up a little more thread engagement. Previously, I'd had to install a shim about 1.5mm thick between the inside of the dropout and the hub, to prevent the brake caliper from rubbing on the hub. Turns out that the part of the frame to which the caliper was mounted had raised features a little over 1mm in height, spacing the caliper inwards (towards the wheel.) So by grinding those flush, I can eliminate the shim and gain back that thickness as well.
Anyway, the plate is now back on and curing. Removing the residual epoxy from the dropout took quite a bit of work with the 80 grit abrasive-bristle wheel, so I still have a fairly high degree of confidence in this stuff.
The other problem is that in the shouldered nut which came with the wheel, the thread doesn't actually go all the way down to the bottom. There's about 2 threads' worth of empty space where thread ought to be:
So, how to solve that?
A different nut isn't going to make a difference once I put a washer under it. Unless...
Yes, there we are. A keylocking threaded insert. Like a helicoil, but solid. Found one with a 14x1.5 ID and a 20x1.5 OD. I will shave the end of that down to ensure that it goes all the way to the "bottom", and then install a 20mm washer and a 20x1.5 nut over top of it.
The combination of all of these things should get me back onto the solid portion of the axle and get me about 5 more threads' worth of engagement.
Waiting for parts to arrive. Probably no progress until next weekend, as I'll be out of town most of this coming week.
Reply
1
1
 04-07-2013, 05:19 PM
#528
Boost Pope
Thread Starter
iTrader: (8)
Join Date: Sep 2005
Location: Chicago. (The less-murder part.)
Posts: 33,049
Total Cats: 6,608

Que?
This is actually pretty straightforward stuff. You should see some of the fancy, high-end solutions the folks at ES come up with. Example:
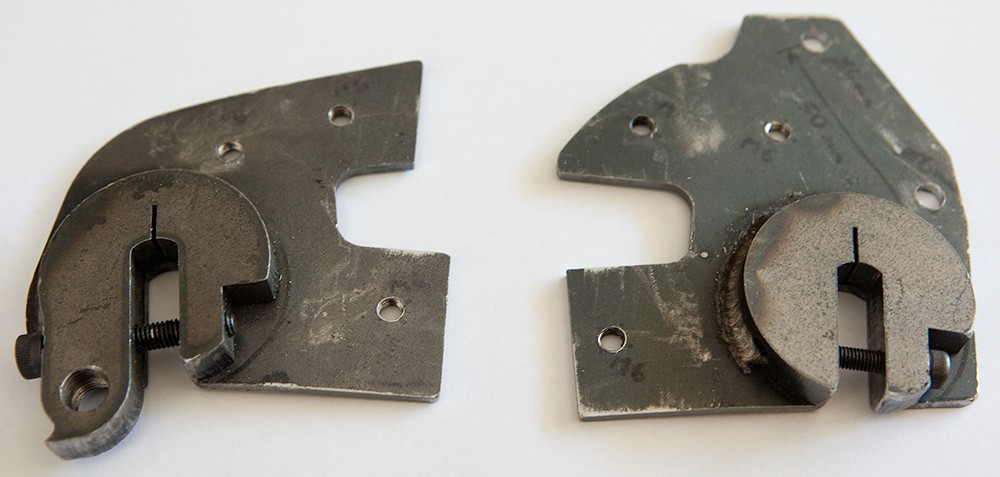
Here, the torque plates have been converted to a clamp style, eliminating the need for axle nuts altogether. They have in turn been welded to flat steel plates which will be bolted to custom trailing arms.
Reply
0
0
04-08-2013, 02:55 AM
#529
I was just meaning that that's a lot of work. I plan to just use a torque arm and hopefully avoid what you're having to do here.
Just waiting for Paul to finish his R&D with the batteries so I can order. He needs to hurry before I blow any more money on parts for my new (to me) Honda...
Just waiting for Paul to finish his R&D with the batteries so I can order. He needs to hurry before I blow any more money on parts for my new (to me) Honda...
Reply
0
0
04-08-2013, 12:37 PM
#530
Boost Pope
Thread Starter
iTrader: (8)
Join Date: Sep 2005
Location: Chicago. (The less-murder part.)
Posts: 33,049
Total Cats: 6,608
And it's honestly not that much work. A couple hours tops. Mostly I'm just waiting for parts to arrive in the mail.
Reply
0
0
04-08-2013, 03:35 PM
#532
Boost Pope
Thread Starter
iTrader: (8)
Join Date: Sep 2005
Location: Chicago. (The less-murder part.)
Posts: 33,049
Total Cats: 6,608
That's sort of what I am doing by combining a threaded insert with a conventional nut.
The insert arrived this morning. It's a very beefy piece of hardened steel- not at all like the Helicoils that we're all familiar with. And as a bonus, the thread goes all the way to the end of the barrel, so it will be able to bottom out and fully engage all available thread on the axle without needing to be cut down:
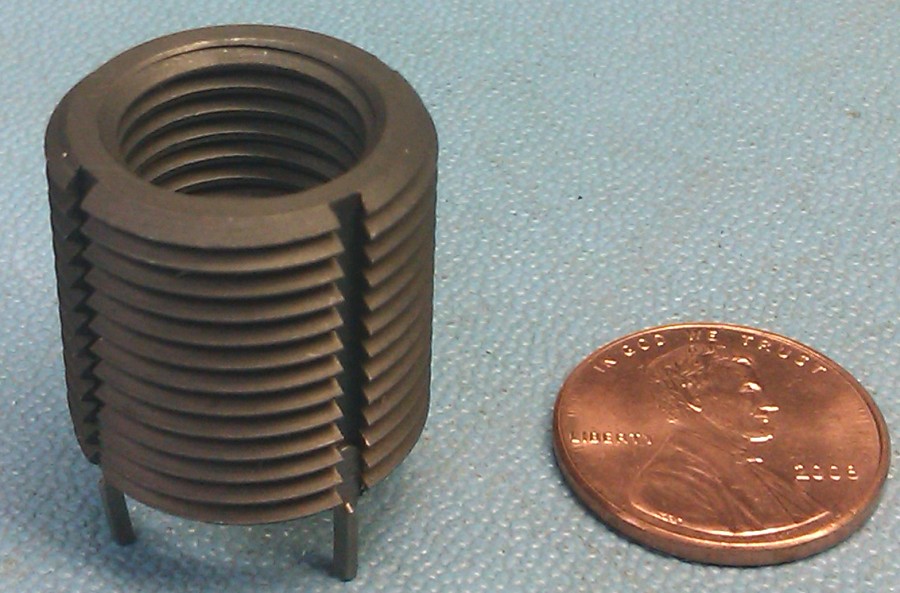
The advantage to doing it this way is that I can still use a lockwasher under the nut without having the washer reduce the available thread engagement- the washer will go over and around the barrel.
The insert arrived this morning. It's a very beefy piece of hardened steel- not at all like the Helicoils that we're all familiar with. And as a bonus, the thread goes all the way to the end of the barrel, so it will be able to bottom out and fully engage all available thread on the axle without needing to be cut down:
The advantage to doing it this way is that I can still use a lockwasher under the nut without having the washer reduce the available thread engagement- the washer will go over and around the barrel.
Reply
0
0
04-10-2013, 04:27 PM
#535
mkturbo.com

iTrader: (24)
Join Date: May 2006
Location: Charleston SC
Posts: 15,177
Total Cats: 1,681
Joe about how far distance wise do you get on a battery? I would have roughly a 30mile round trip commute to and from work and was wondering if that is doable on a single charge? It would be mostly flat terrain.
Reply
0
0
 04-11-2013, 04:43 AM
#537
Your 30 miles is a bit less than my commute, which includes a few hills. So if it's all flat you should be fine if you follow the battery size advice Joe's given me so far in this thread.
Additionally, if it's all flat, you might consider a motor with fewer turns (8 or 6) for a higher top speed since without hills torque won't be as important to you.
How stop-and-go is the route? That could matter if it's at one extreme or the other. If it's all through downtown and you're stopping every block, then torque might again be a priority as you might be using the motor from a stop often to get going and would rarely get up to any sort of speed. If it's all WFO, then you could build for speed, using a 6T and one of the 11-tooth freewheels, perhaps?
Howsoever you go about it, pedaling would probably be required, if only to assist the motor.
Reply
0
0
04-11-2013, 07:24 AM
#538
mkturbo.com
iTrader: (24)
Join Date: May 2006
Location: Charleston SC
Posts: 15,177
Total Cats: 1,681
I know I'm not Joe, but it's the middle of the night where he is so I'll give answering a shot and he can let us know if I'm close later.
Your 30 miles is a bit less than my commute, which includes a few hills. So if it's all flat you should be fine if you follow the battery size advice Joe's given me so far in this thread.
Additionally, if it's all flat, you might consider a motor with fewer turns (8 or 6) for a higher top speed since without hills torque won't be as important to you.
How stop-and-go is the route? That could matter if it's at one extreme or the other. If it's all through downtown and you're stopping every block, then torque might again be a priority as you might be using the motor from a stop often to get going and would rarely get up to any sort of speed. If it's all WFO, then you could build for speed, using a 6T and one of the 11-tooth freewheels, perhaps?
Howsoever you go about it, pedaling would probably be required, if only to assist the motor.
Reply
0
0
04-11-2013, 08:18 AM
#539
Yup, exactly.
When I was commuting in Monterey before, my 8.33 (by the bike computer's odo) ride would take around 45 minutes. It was mostly flat, with a few rolling hills along the way and then a 10% grade for the last bit. I'm hoping to shave it down to 30 minutes or less this time with battery assistance.
And from a fitness standpoint, my last tour in Monterey was some of the best shape I've been in, and I only started the bike commute in the last few months I was there. This time I'll be out there for 3 years and going into it knowing the route and everything. It would be a bit of an understatement to say I'm looking forward to it.
http://www.mtycounty.com/pgs-parks/bike-path.html
Reply
0
0


