Replace gauges with Double-Din Android with Shadow Dash?
 01-09-2017, 03:21 AM
#41
Elite Member

Join Date: Mar 2006
Location: Schwarzenberg, Germany
Posts: 1,554
Total Cats: 101
Yes it will - even via USB OTG - I got one of these in my 99 Miata with MS3Pro - running Shadowdash perfectly fine.
Though you should be warned - I got a different Android 4.2(?) unit before and it only lasted 1.5 years...
This can be bad luck but you never know...
Greets
Though you should be warned - I got a different Android 4.2(?) unit before and it only lasted 1.5 years...
This can be bad luck but you never know...
Greets

Reply
 0
0

0
01-09-2017, 07:28 AM
#42
Junior Member

Join Date: Jan 2016
Location: Munich
Posts: 362
Total Cats: 93
Great info, thanks!
side note: funny to see once again both of us doing the same builds. I'm currently waiting for my EFR 6258 kit from SPS. Once it it built, along with the elise seats, the android head unit and other parts our cars will look like twins :-D
side note: funny to see once again both of us doing the same builds. I'm currently waiting for my EFR 6258 kit from SPS. Once it it built, along with the elise seats, the android head unit and other parts our cars will look like twins :-D
Reply
0
0
01-10-2017, 08:24 AM
#43
All-round "Good Guy"

Join Date: Dec 2009
Location: Brisbane, AUSTRALIA
Posts: 993
Total Cats: 245
After a few days, I'd cooled down over the Double-DIN Android fiasco and got on eBay to see what else was available and found this 1024x600 Joying Single-DIN unit:
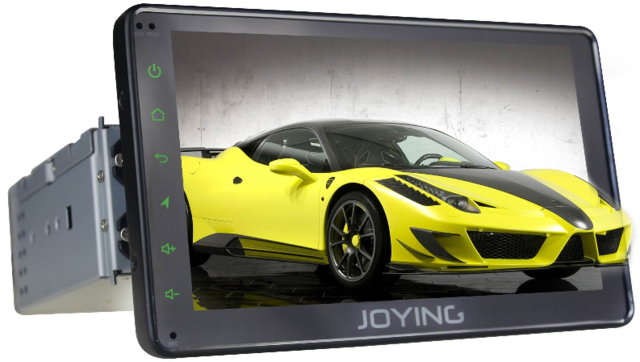
The screen is detachable, has multiple vertical mounting points and is shallower than most Double-DIN units so I figured I should be able to fit it - somehow.
The unit has a single-DIN mounting cage which latches onto the OEM fascia.
Unfortunately because of this, the detachable screen sticks out too far, I wanted it flush with the fascia.
Luckily the screen fits inside the NB's Double-DIN cavity so I figured I should be able to come up with something:
DIY mounting braces:
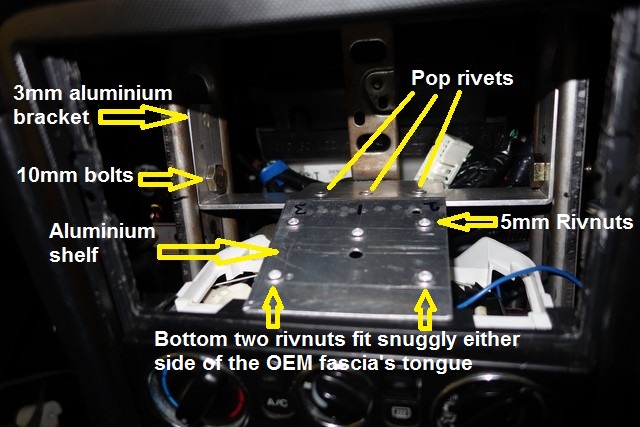
- that rear 3mm aluminium bracket is an absolute bitch to get in since those OEM side vertical braces have rolled edges and the brace fits flush against the recessed flat centre section.
Head Unit bracket:
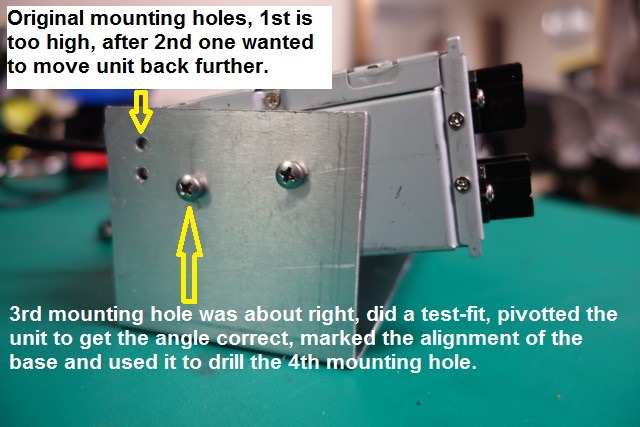
- getting the angle correct was time-consuming, the unit needs to be solidly mounted to get it right
- the unit must be inserted sideways into the cavity, then rotated into place
Here's how the brackets connect:
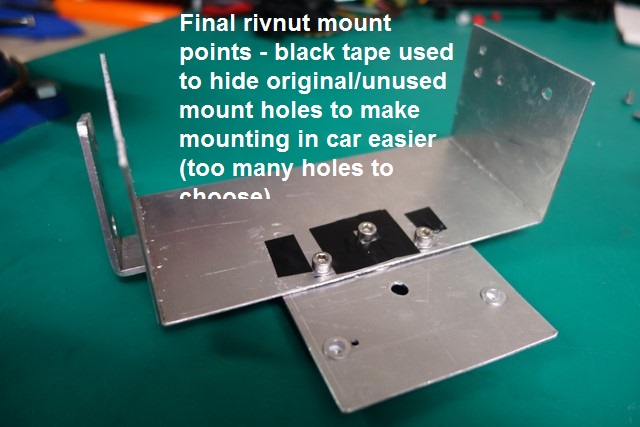
- getting the depth correct was time-consuming, once again, the unit needs to be solidly mounted to get it right
- I used Allen bolts since they were the only 5mm bolts I had on hand
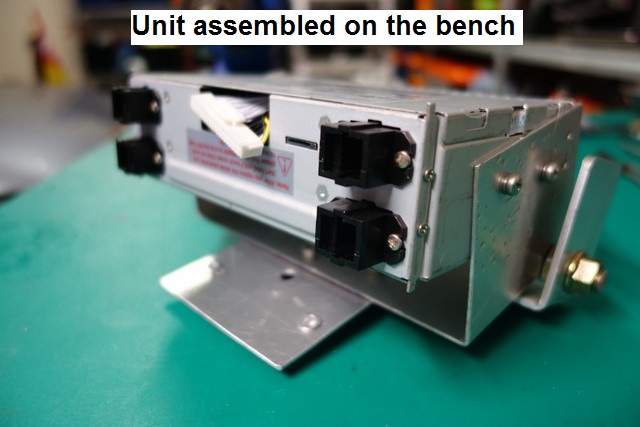
To tighten those three Allen bolts when the single-DIN unit was in place, I needed to mod a spare Allen key to shorten it:

- I've got heaps of these from various kits in the past, glad I didn't just throw them out.
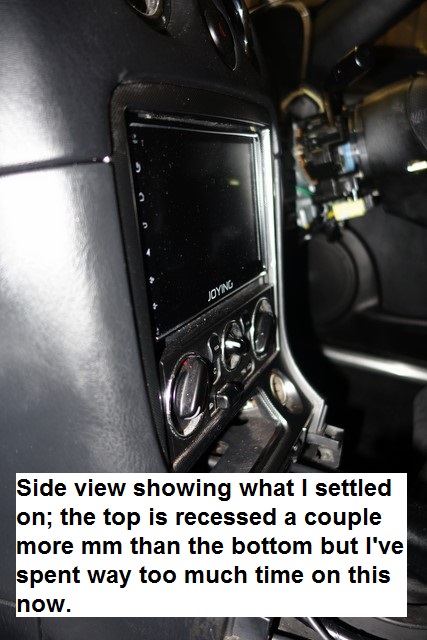
Side view with the screen attached:
Front view, no bezel:
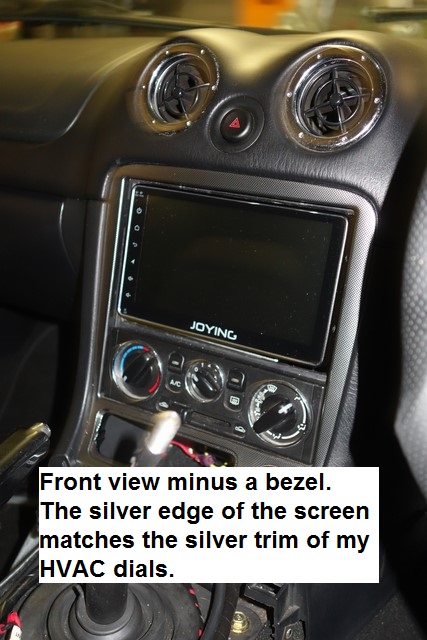
- I really like this look so might just mask the unsightly gaps behind the screen (ie. a DIY bezel behind the screen)
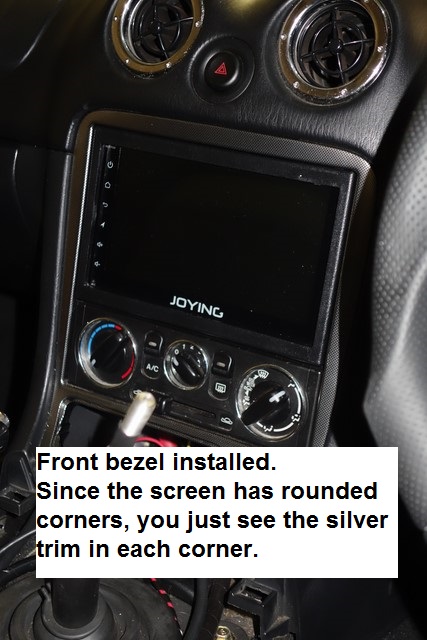
Front view with bezel:
I spent a lot of time figuring out where to mount the GPS unit.
On my SP23 there's a hidden flat shelf above the centre console, underneath the dashboard that seems just made to place a GPS unit.
There's nothing like this in an NB so I toyed with the idea of placing it on the rear parcel shelf or mounted on the dashboard as far forward as possible, near the driver's A-pillar.
Didn't like any of these options so pulled apart the instrument cluster to feel if there was any space under the dashboard (there's none on the passenger side with the airbag in the way).
The best place I could actually access was on top of the right centre air vent tunnel - picture the rounded instrument cluster hood, it's forward of the hood at about the 10 o'clock position.
I used velcro to mount the GPS on top of the air vent tunnel - if you don't think that's strong enough I say BOLLOCKS! Trying to get the GPS unit positioned correctly was a pain in the **** in that cramped space, every time the velcro surfaces touched they'd lock tight and I'd have to get them apart again.
I found using an old credit card between the velcro surfaces worked well, once the GPS was in about the right spot, I slid the credit card out.
That GPS unit isn't going anywhere.
Still not sure about where to put the microphone - very useful for Andoid voice commands.
The A-Pillar seems to be the most common place but that would look odd since it looks like a small round foam ball - like a "booger".

The screen is detachable, has multiple vertical mounting points and is shallower than most Double-DIN units so I figured I should be able to fit it - somehow.
The unit has a single-DIN mounting cage which latches onto the OEM fascia.
Unfortunately because of this, the detachable screen sticks out too far, I wanted it flush with the fascia.
Luckily the screen fits inside the NB's Double-DIN cavity so I figured I should be able to come up with something:
DIY mounting braces:

- that rear 3mm aluminium bracket is an absolute bitch to get in since those OEM side vertical braces have rolled edges and the brace fits flush against the recessed flat centre section.
Head Unit bracket:

- getting the angle correct was time-consuming, the unit needs to be solidly mounted to get it right
- the unit must be inserted sideways into the cavity, then rotated into place
Here's how the brackets connect:

- getting the depth correct was time-consuming, once again, the unit needs to be solidly mounted to get it right
- I used Allen bolts since they were the only 5mm bolts I had on hand

To tighten those three Allen bolts when the single-DIN unit was in place, I needed to mod a spare Allen key to shorten it:

- I've got heaps of these from various kits in the past, glad I didn't just throw them out.
Side view with the screen attached:

Front view, no bezel:

- I really like this look so might just mask the unsightly gaps behind the screen (ie. a DIY bezel behind the screen)
Front view with bezel:

I spent a lot of time figuring out where to mount the GPS unit.
On my SP23 there's a hidden flat shelf above the centre console, underneath the dashboard that seems just made to place a GPS unit.
There's nothing like this in an NB so I toyed with the idea of placing it on the rear parcel shelf or mounted on the dashboard as far forward as possible, near the driver's A-pillar.
Didn't like any of these options so pulled apart the instrument cluster to feel if there was any space under the dashboard (there's none on the passenger side with the airbag in the way).
The best place I could actually access was on top of the right centre air vent tunnel - picture the rounded instrument cluster hood, it's forward of the hood at about the 10 o'clock position.
I used velcro to mount the GPS on top of the air vent tunnel - if you don't think that's strong enough I say BOLLOCKS! Trying to get the GPS unit positioned correctly was a pain in the **** in that cramped space, every time the velcro surfaces touched they'd lock tight and I'd have to get them apart again.
I found using an old credit card between the velcro surfaces worked well, once the GPS was in about the right spot, I slid the credit card out.
That GPS unit isn't going anywhere.
Still not sure about where to put the microphone - very useful for Andoid voice commands.
The A-Pillar seems to be the most common place but that would look odd since it looks like a small round foam ball - like a "booger".
Reply
0
0
01-10-2017, 01:13 PM
#44
Junior Member
Join Date: Jan 2016
Location: Munich
Posts: 362
Total Cats: 93
Great job, looks clean and very OEM-like! Now get shadow dash and MSdroid running in case you run the Megasquirt ECU!
is the GPS unit very positioning-sensitive? I would have glued it anywhere underneath the plastic dash, without giving it much thought
re: mic position - why not simply stick it onto the wiper stalk/steering column surround, above the steering hub/below the gauge cluster? Voice command and calls will probably not work anyway, at least at speeds beyond 50 kph
Reply
0
0
01-10-2017, 01:29 PM
#45
Junior Member

Join Date: Oct 2016
Posts: 86
Total Cats: 12
I opted for a slightly more DIY but less obvious approach and used a RaspberryPi with a custom python script and 1.3" OLED display mounted in a 52mm gauge blank to read live data from my MS2 over the RS232 port. In an ideal world I would have used done this using CAN but I was trying to spend as little as possible.
Reply
0
0
01-10-2017, 03:01 PM
#46
Elite Member
iTrader: (2)

Join Date: Aug 2016
Location: New Fucking Jersey
Posts: 3,890
Total Cats: 143
Lokiel, that is so awesome. Can't wait to see what it looks like with shadow-dash!
Any idea what the unit was called? I'm going to try seeing if it's available via amazon/ebay here!
Any idea what the unit was called? I'm going to try seeing if it's available via amazon/ebay here!
Reply
0
0
01-10-2017, 05:38 PM
#47
All-round "Good Guy"
Join Date: Dec 2009
Location: Brisbane, AUSTRALIA
Posts: 993
Total Cats: 245
If it's loose when you do your measurements they will be out of whack when everything is tightened up.
If I was to do this again, I'd want to find a wrecked NB's front console, remove its side plastic trim so that I could get at the sides and behind it.
I'd make that rear U-Brace and lower shelf all one piece of aluminium too.
Model/Manufacturer Part Number: JY-ULS03N2
7'' 2GB Universal 1 Din Android 5.1 Car Stereo Head Unit GPS SAT Navi Navigation | eBay
Reply
0
0
01-10-2017, 06:20 PM
#48
All-round "Good Guy"
Join Date: Dec 2009
Location: Brisbane, AUSTRALIA
Posts: 993
Total Cats: 245
I opted for a slightly more DIY but less obvious approach and used a RaspberryPi with a custom python script and 1.3" OLED display mounted in a 52mm gauge blank to read live data from my MS2 over the RS232 port. In an ideal world I would have used done this using CAN but I was trying to spend as little as possible.
:
:

See Lokiel's "Gina" (2004 Titanium SE) - Page 53 - mx5cartalk.com and onward for full details.
Reply
0
0
08-19-2017, 03:23 AM
#50
Junior Member

Join Date: Jul 2014
Location: Vancouver BC
Posts: 106
Total Cats: -11
I did something similar with an Arduino and two blue OLEDs mounted in the instrument cluster's fuel and water temperature gauge slots:
See Lokiel's "Gina" (2004 Titanium SE) - Page 53 - mx5cartalk.com and onward for full details.
See Lokiel's "Gina" (2004 Titanium SE) - Page 53 - mx5cartalk.com and onward for full details.
This looks awesome. How is the visibility from the driver position? Is it good in bright light? Ideally I want something I can read on the straightaway even in direct sunlight.
Reply
0
0

Thread
Thread Starter
Forum
Replies
Last Post
Zaphod
MEGAsquirt
47
10-26-2018 11:00 PM


