
DIY Urethane Motor Mounts
 01-08-2010, 12:43 PM
#21
Elite Member

Thread Starter
iTrader: (51)
Join Date: Nov 2008
Location: Spring, TX
Posts: 7,257
Total Cats: 26
I did...not realizing the intentional offset in the OEM design. I'm not going to say it doesn't matter, but I've seen no ill effects in almost 10K miles.
Then again they didn't come out perfectly straight, much like how when I play golf if I want to avoid a hazard I purposely aim for it. Proper orientation would have only been a 50% chance when installed.
Glad someone is using the write up, and thanks for that tip for those that plan on doing this in the future.

Reply
 0
0

0
 01-08-2010, 01:44 PM
#23
Elite Member
Thread Starter
iTrader: (51)
Join Date: Nov 2008
Location: Spring, TX
Posts: 7,257
Total Cats: 26
In current outside temps I'd definitely try and oven cure the urethane. I did mine in the heat of summer and left them on 110* asphalt.
It's 23* here right now, and godknowswhat where you're at. They take about a week to cure in decent temps...
Reply
0
0
03-29-2010, 10:32 AM
#25
Elite Member
Thread Starter
iTrader: (51)
Join Date: Nov 2008
Location: Spring, TX
Posts: 7,257
Total Cats: 26
UPDATE:
Mount failed.
Driver's side mount was completely gone. Motor started moving around a lot last week, and I actually missed a dyno day yesterday because of it. I didn't want to miss all family time by replacing it AND spending half the day with the HMC homos, so I had to pick one. Instead of failing on the dyno and driving it like a beater til next weekend I decided to properly repair it with the MC/MMR hybrids I had on the shelf.
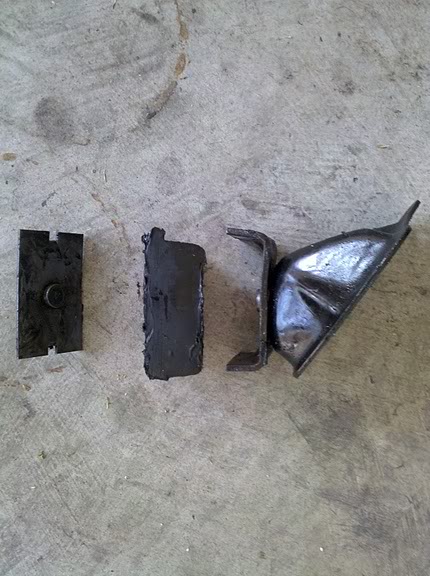
I'm also partially blaming this for my downpipe failure, since I'm sure it was moving around a lot.
Admittedly, we were very hard on the mounts during the motor swap. The threads must have gotten caught, and we resorted to rocking the chassis when it wouldn't come out, and the motor jumped up 6" when it finally let go. This did break the passenger side urethane mount, but I attributed that to us being idiots. I really thought the motor would come straight up with the mounts installed.
Also, the arm on the hoist wasn't quite long enough, and during reinstall we were pushing back and down on the motor, with all the weight resting on and pushing against the threaded rod of the mount. I'm pretty sure we started a crack then, which propogated over the last few weeks.
Either way, you can't expect these to stay in one piece like the OEM parts. Again, I highly recommend buying one of the proven solutions out there from our vendors. I'm very happy even with just the Mazdacomp mount in on the driver's side, and rocking a backup OEM on the passenger side. I didn't have time to do both, and that OEM one went in during the swap when we had completely ripped the pass side urethane mount.
The two parts from McMaster may adhese better, and could probably be selected stiffer. This material never really felt like it hardened, and is still malleable by hand.
Mount failed.
Driver's side mount was completely gone. Motor started moving around a lot last week, and I actually missed a dyno day yesterday because of it. I didn't want to miss all family time by replacing it AND spending half the day with the HMC homos, so I had to pick one. Instead of failing on the dyno and driving it like a beater til next weekend I decided to properly repair it with the MC/MMR hybrids I had on the shelf.
I'm also partially blaming this for my downpipe failure, since I'm sure it was moving around a lot.
Admittedly, we were very hard on the mounts during the motor swap. The threads must have gotten caught, and we resorted to rocking the chassis when it wouldn't come out, and the motor jumped up 6" when it finally let go. This did break the passenger side urethane mount, but I attributed that to us being idiots. I really thought the motor would come straight up with the mounts installed.
Also, the arm on the hoist wasn't quite long enough, and during reinstall we were pushing back and down on the motor, with all the weight resting on and pushing against the threaded rod of the mount. I'm pretty sure we started a crack then, which propogated over the last few weeks.
Either way, you can't expect these to stay in one piece like the OEM parts. Again, I highly recommend buying one of the proven solutions out there from our vendors. I'm very happy even with just the Mazdacomp mount in on the driver's side, and rocking a backup OEM on the passenger side. I didn't have time to do both, and that OEM one went in during the swap when we had completely ripped the pass side urethane mount.
The two parts from McMaster may adhese better, and could probably be selected stiffer. This material never really felt like it hardened, and is still malleable by hand.
Reply
0
0
 03-29-2010, 10:41 AM
#27
Elite Member
Thread Starter
iTrader: (51)
Join Date: Nov 2008
Location: Spring, TX
Posts: 7,257
Total Cats: 26
I think it was just as much work anyhow....and I could have paid a day earlier.
If I ever do another swap I'll probably set the mounts in the K-frame and lower the motor down until the bolt holes line up. That was WAY too much stress on the mounts.
If I ever do another swap I'll probably set the mounts in the K-frame and lower the motor down until the bolt holes line up. That was WAY too much stress on the mounts.
Reply
0
0


Thread
Thread Starter
Forum
Replies
Last Post
Zaphod
MEGAsquirt
47
10-26-2018 11:00 PM
StratoBlue1109
Miata parts for sale/trade
21
09-30-2018 01:09 PM


