
Back From the Dead Build Thread

Thread Starter

Joined: Aug 2014
Posts: 1,462
Total Cats: 389
From: Bainbridge Island, WA
Don't be fooled. It's all held together with zap straps and chewing gum 
I haven't thought too much about that. I'm just going to run wastegate pressure for a while (7-8psi) until I get bored with that. Do I need a PCV and catch can at that level?
I haven't thought too much about that. I'm just going to run wastegate pressure for a while (7-8psi) until I get bored with that. Do I need a PCV and catch can at that level?

__________________

Reply
 0
0

0
Thread Starter
Joined: Aug 2014
Posts: 1,462
Total Cats: 389
From: Bainbridge Island, WA
I've still got some tuning and fiddling to do, but the broad strokes are there. This thing is seriously quick. On wastegate only, I'm getting a solid 10 psi and no creep.
__________________
Reply
1
1


Reply
0
0
Thread Starter
Joined: Aug 2014
Posts: 1,462
Total Cats: 389
From: Bainbridge Island, WA
4400 
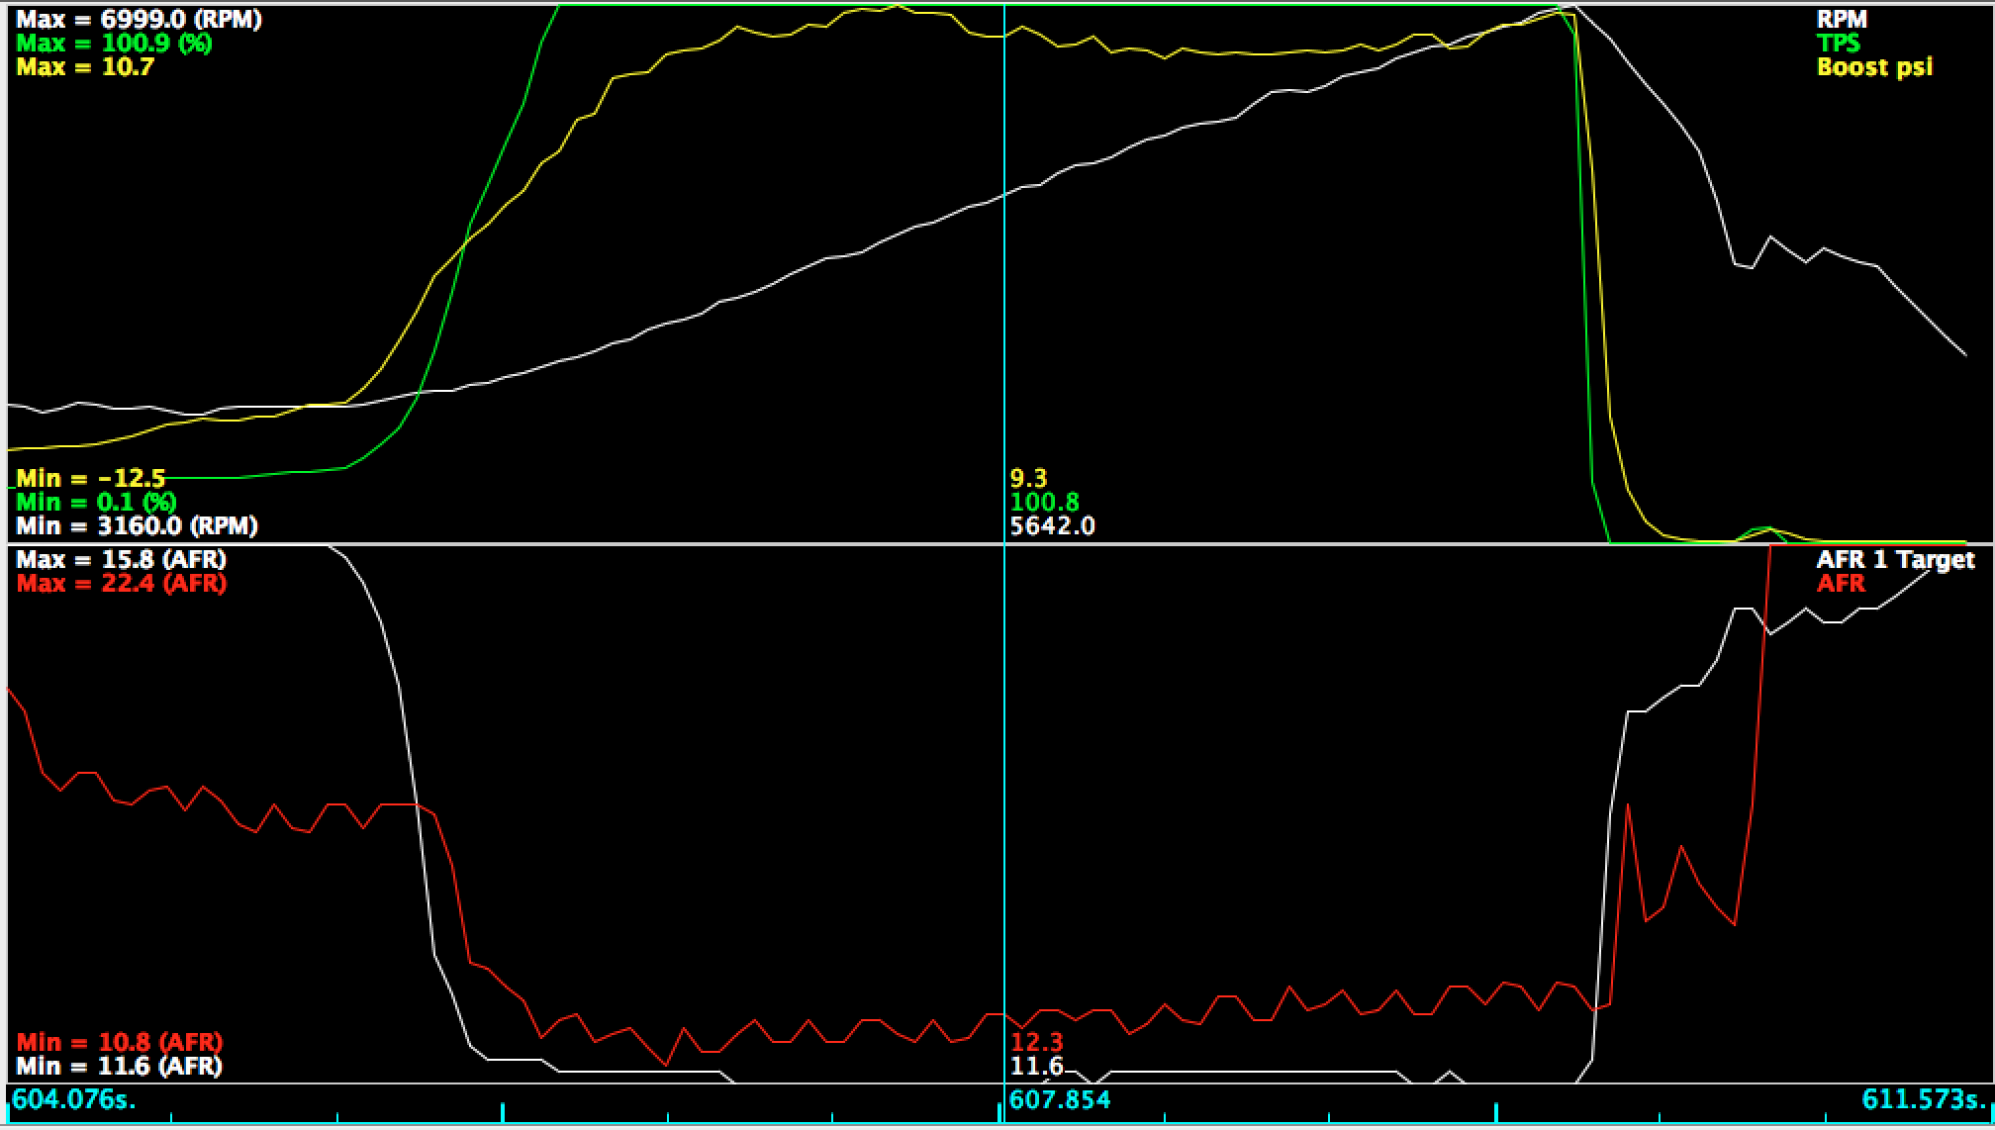
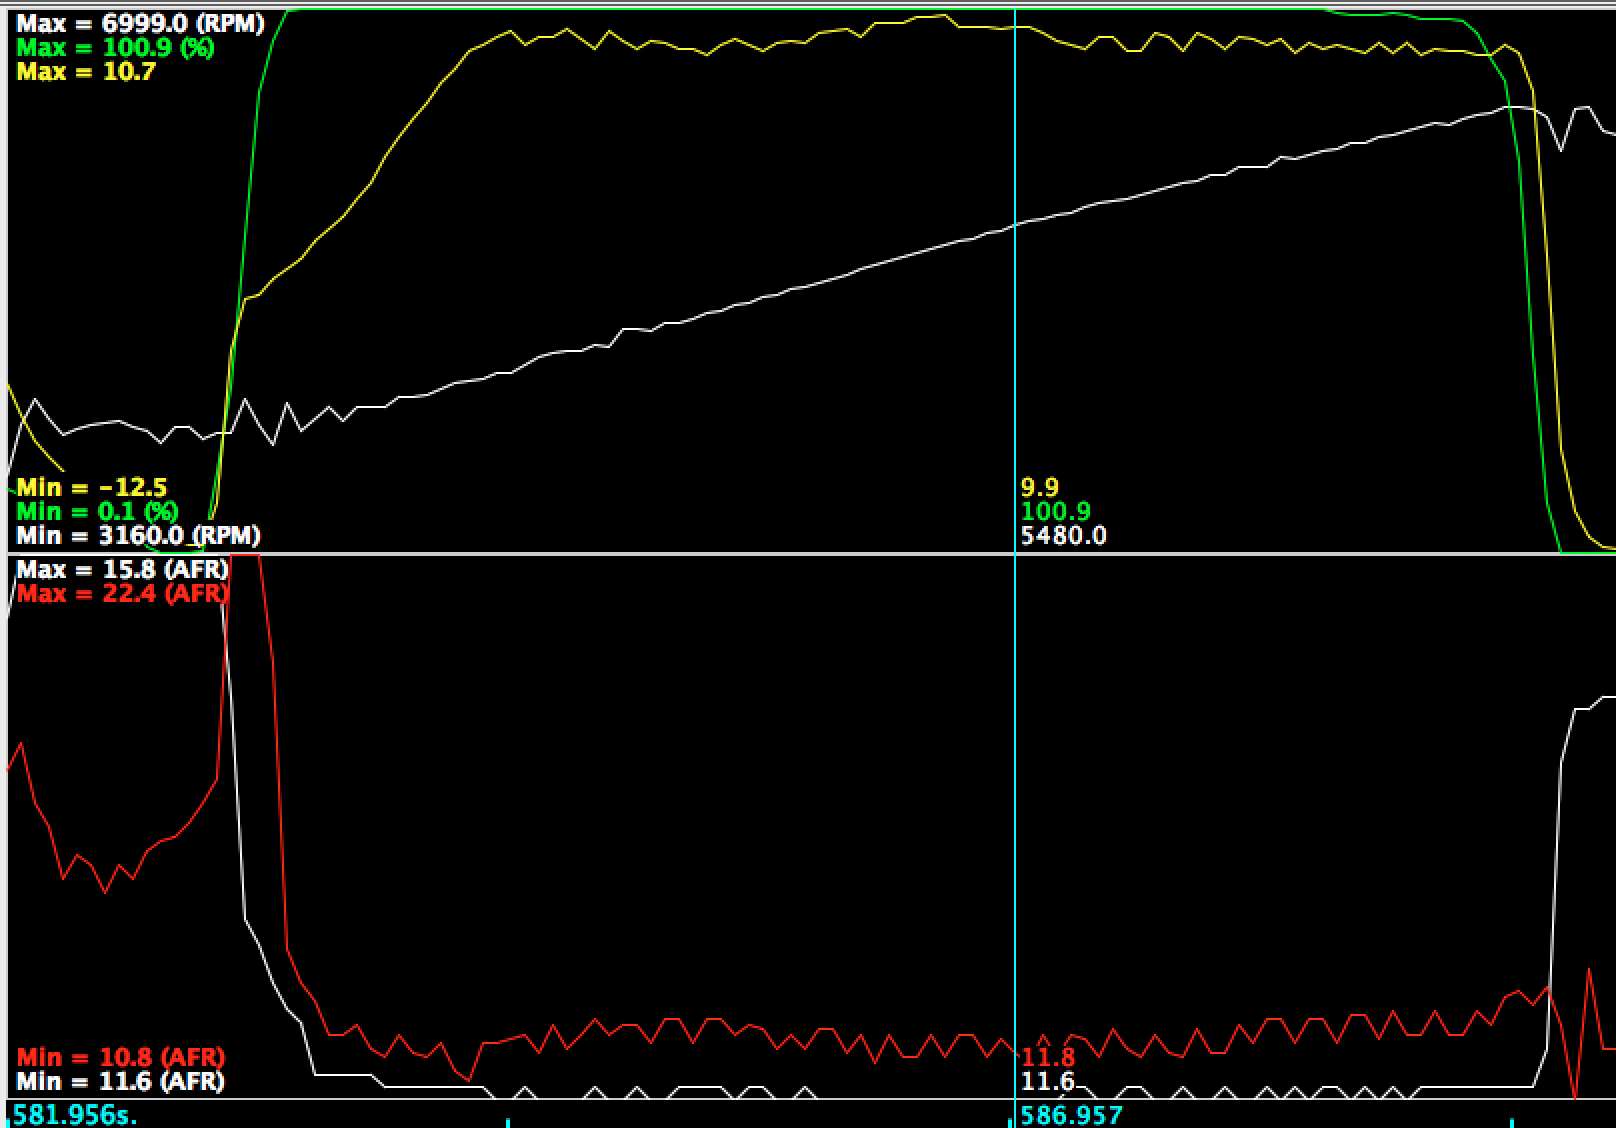
See in my log where I get a spike of lean when I lay down the throttle. Is that normal?
See in my log where I get a spike of lean when I lay down the throttle. Is that normal?
__________________
Reply
0
0

Joined: Apr 2014
Posts: 18,643
Total Cats: 1,870
From: Beaverton, USA
Reply
0
0
EBC should be next. Make sure you are on the 1.4.0 firmware for your MS3X. You should be able to get it to spool a good bit better, or somehow Carlos has a badass motor that is better then everyone else's.
Reply
0
0

If you're using the original pcv,
 who knows until you've tested it 'if' it's holding that 7-8psi back and keeping it out of your crankcase. I had horrible oil consumption issues and a new FM pcv stopped the majority of it, car ran heaps better.
As for the catch can, I'd just keep it simple. I believe deezums maybe used a clear catch can that can hold gobs amount of psi?
Looks sorta like dis...
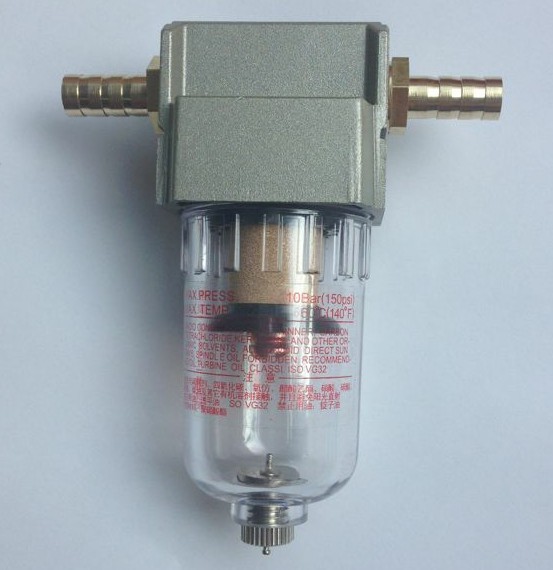
You would be eliminating any chance of oil vapors going back into the intake, mixing with your fuel and skewing your AFR
Efficiency!
 And it'd be neat to see what vapor soup your motor is venting.
Last edited by Girz0r; Jan 6, 2016 at 11:25 AM. Reason: deeeeeeezums, got it.
Reply
0
0
Thread Starter
Joined: Aug 2014
Posts: 1,462
Total Cats: 389
From: Bainbridge Island, WA
I'm running a pretty conservative timing map, which might have something to do with it.
Girz0r - Thanks for the suggestions. I'll get that going
Girz0r - Thanks for the suggestions. I'll get that going
__________________
Reply
0
0
Thread Starter
Joined: Aug 2014
Posts: 1,462
Total Cats: 389
From: Bainbridge Island, WA
Is there a reason why every post of yours in this thread is all effed up?
The deezums Catch Can - Miata Turbo Forum -Boost cars, acquire cats.
Makes it super hard to follow.
The deezums Catch Can - Miata Turbo Forum -Boost cars, acquire cats.
Makes it super hard to follow.
__________________
Reply
0
0


The EBC makes it spool much faster
Nigel, the lean spike means you need to increase your acceleration enrichment, I am happy to help. Still playing with mine though.
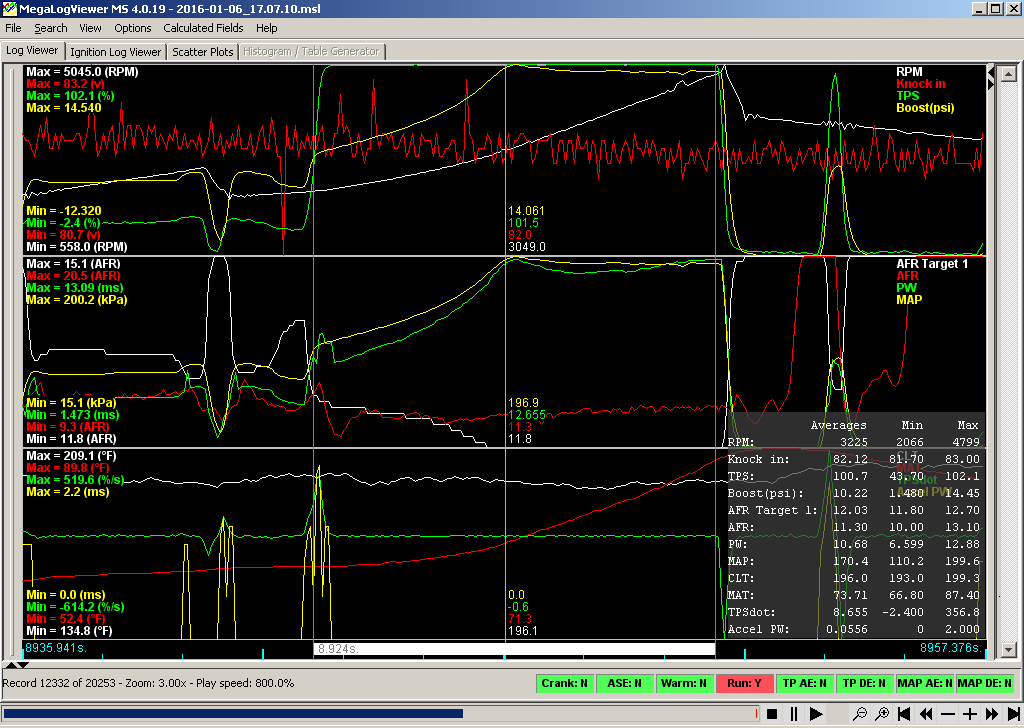
This was with a passenger and I have been playing the timing a bit around the spool area. I can reliably spool in 4th between 3000 and 3200. When I first installed my EBC the hose popped off and I swear it spooled by 2800 and hit overboost. Not sure if I have a log because my hard drive died a while back, I will look.
Reply
0
0
Joined: Apr 2014
Posts: 18,643
Total Cats: 1,870
From: Beaverton, USA
Is there a reason why every post of yours in this thread is all effed up?
The deezums Catch Can - Miata Turbo Forum -Boost cars, acquire cats.
Makes it super hard to follow.
The deezums Catch Can - Miata Turbo Forum -Boost cars, acquire cats.
Makes it super hard to follow.
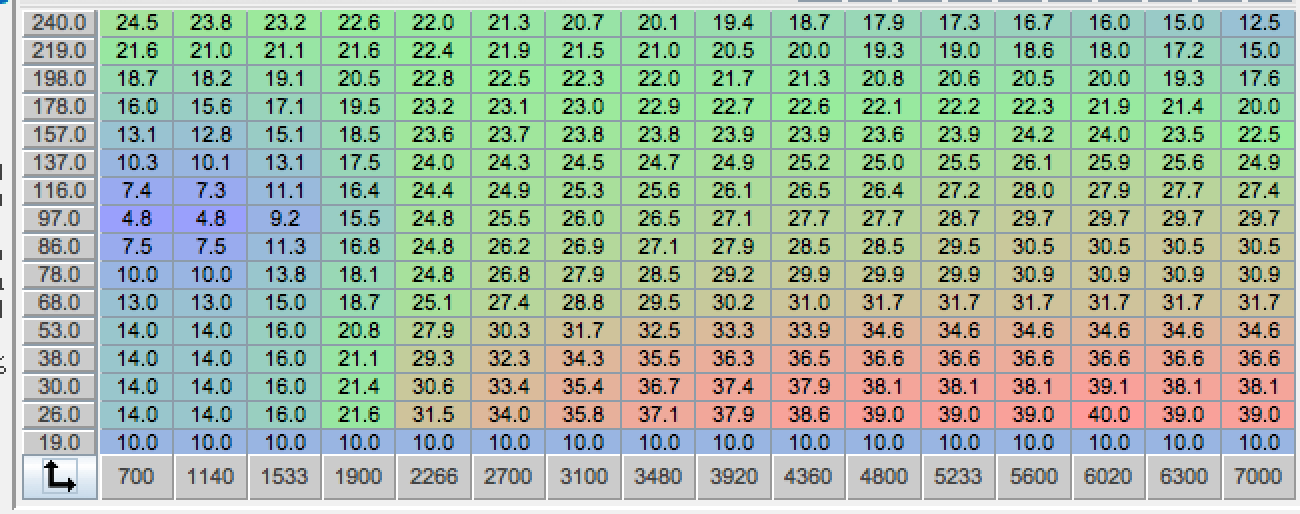
Sonofthehill. Set EBC to open loop and duty cycle to 100% see how fast it spools. The lower until spool slows down, thats your max duty cycle.
Reply
0
0
I am pretty sure the max duty cycle of my solenoid is 82% but I will play with open loop a bit. Now that I am no longer scared of overboost, took me a while to realize I wasn't breaking stuff. I was hoping to not use open loop anymore.
Reply
0
0
Thread Starter
Joined: Aug 2014
Posts: 1,462
Total Cats: 389
From: Bainbridge Island, WA
Update time!
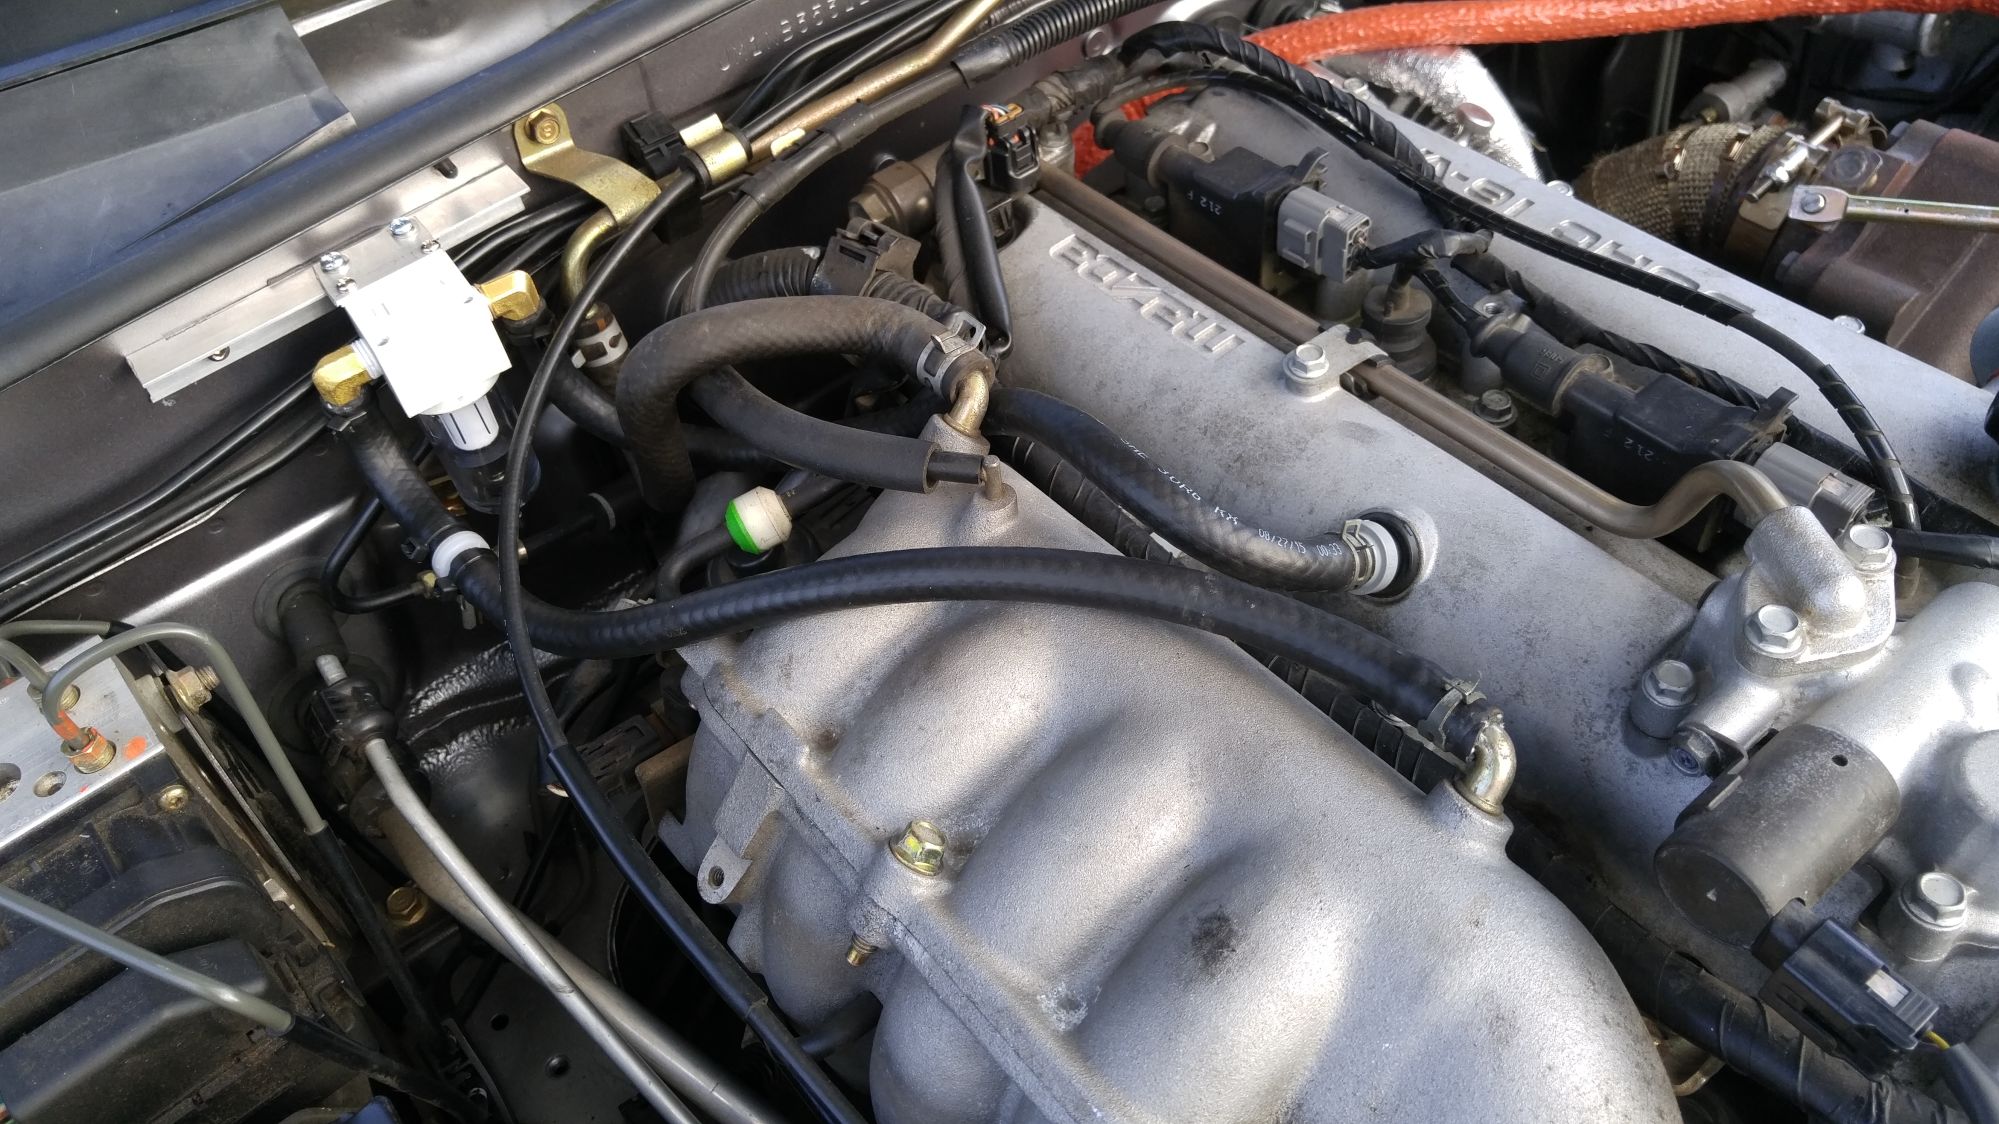
I added a new PCV valve and a Deezums-style oil catch can. Sweet.
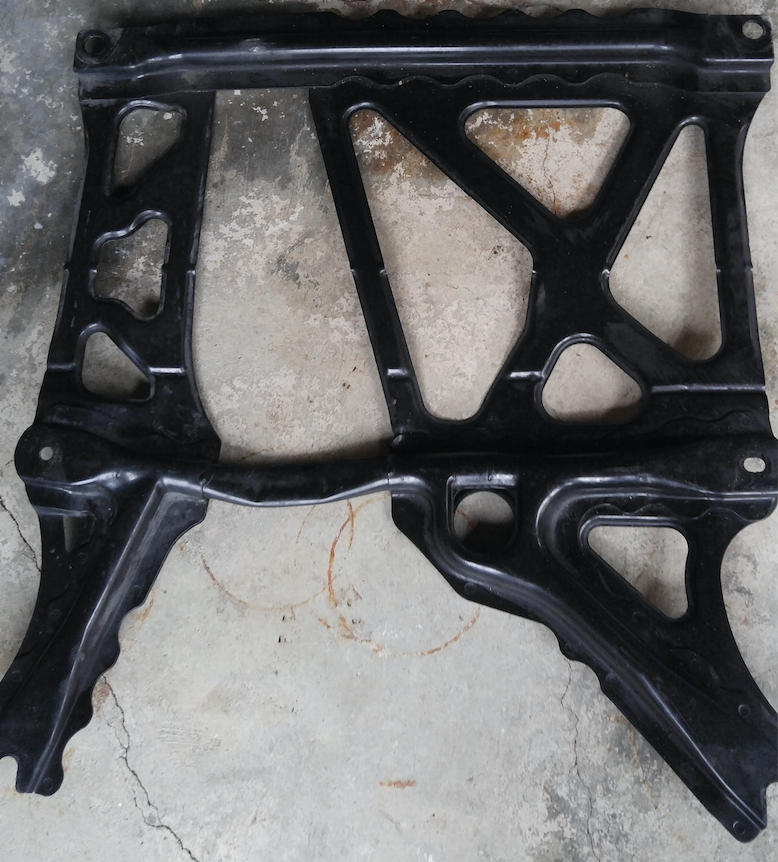
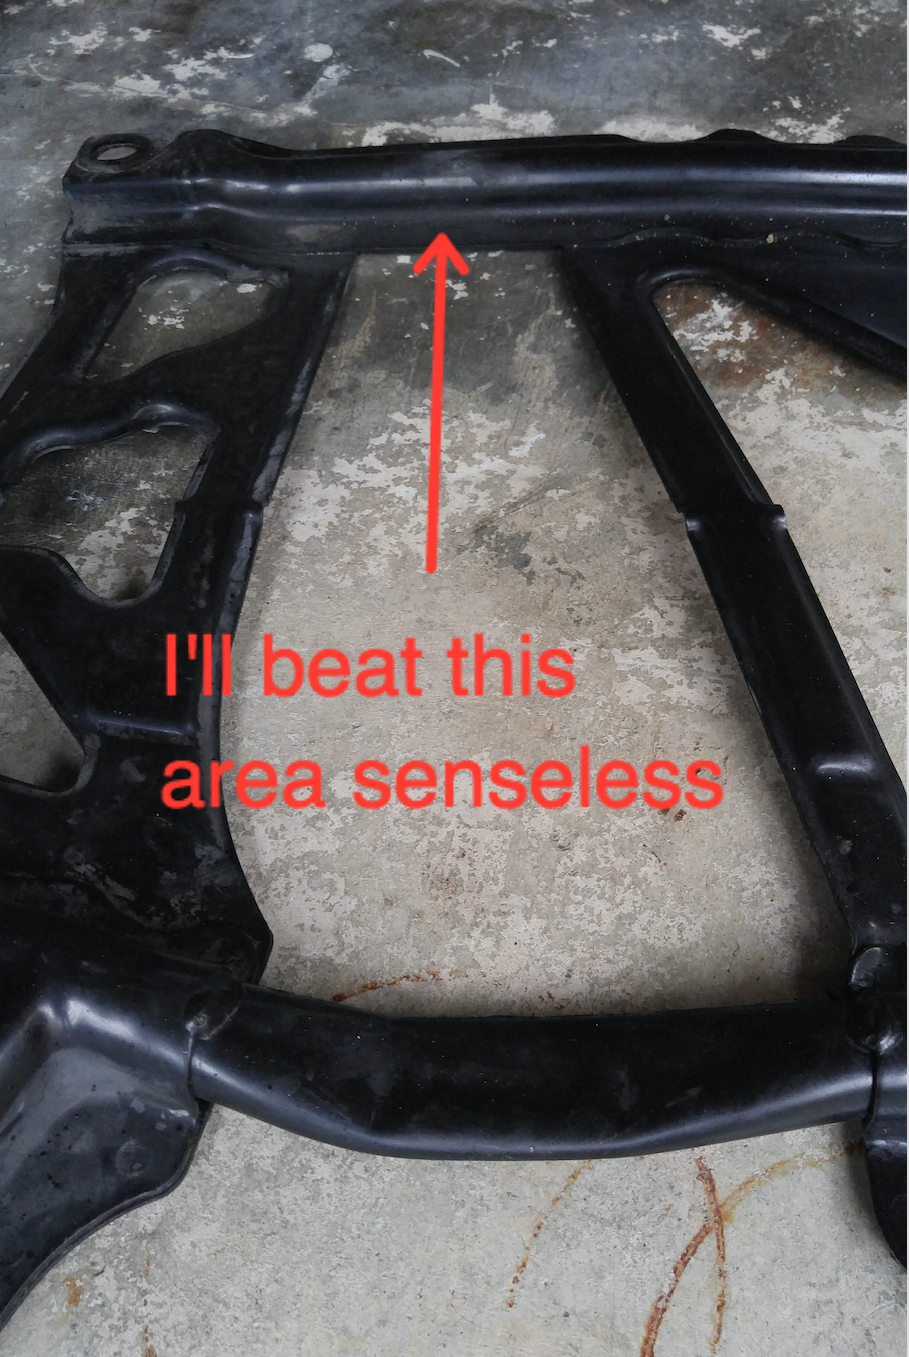
Also, while the MK kit does a great job at keeping the whole exhaust nice and high so the 3 inch fits all the way back without rubbing, the flex pipe on the DP is right at the front of the NB2 front cross brace. Looks like the section at the back of the brace is flattened and bent lower, so I'm going to try beating it with a BFH and I'll see if I can bend it down a bit to make room. Otherwise, I'll either just run without it or cut that section out.
That's all for now. Driving down to LA on Monday (~800 miles round trip) so It will be a good test of reliability...
I added a new PCV valve and a Deezums-style oil catch can. Sweet.
Also, while the MK kit does a great job at keeping the whole exhaust nice and high so the 3 inch fits all the way back without rubbing, the flex pipe on the DP is right at the front of the NB2 front cross brace. Looks like the section at the back of the brace is flattened and bent lower, so I'm going to try beating it with a BFH and I'll see if I can bend it down a bit to make room. Otherwise, I'll either just run without it or cut that section out.
That's all for now. Driving down to LA on Monday (~800 miles round trip) so It will be a good test of reliability...
__________________
Reply
1
1
Also, while the MK kit does a great job at keeping the whole exhaust nice and high so the 3 inch fits all the way back without rubbing, the flex pipe on the DP is right at the front of the NB2 front cross brace. Looks like the section at the back of the brace is flattened and bent lower, so I'm going to try beating it with a BFH and I'll see if I can bend it down a bit to make room. Otherwise, I'll either just run without it or cut that section out.
That's all for now. Driving down to LA on Monday (~800 miles round trip) so It will be a good test of reliability...
That's all for now. Driving down to LA on Monday (~800 miles round trip) so It will be a good test of reliability...
Reply
0
0
Thread Starter
Joined: Aug 2014
Posts: 1,462
Total Cats: 389
From: Bainbridge Island, WA
Not a big deal. I think the only way you could make it fit the unmodified brace would be to move the flex pipe like 6 inches forward. I'll make it work and when I do I'll give clear instructions for others.
__________________
Reply
0
0
Thread Starter
Joined: Aug 2014
Posts: 1,462
Total Cats: 389
From: Bainbridge Island, WA
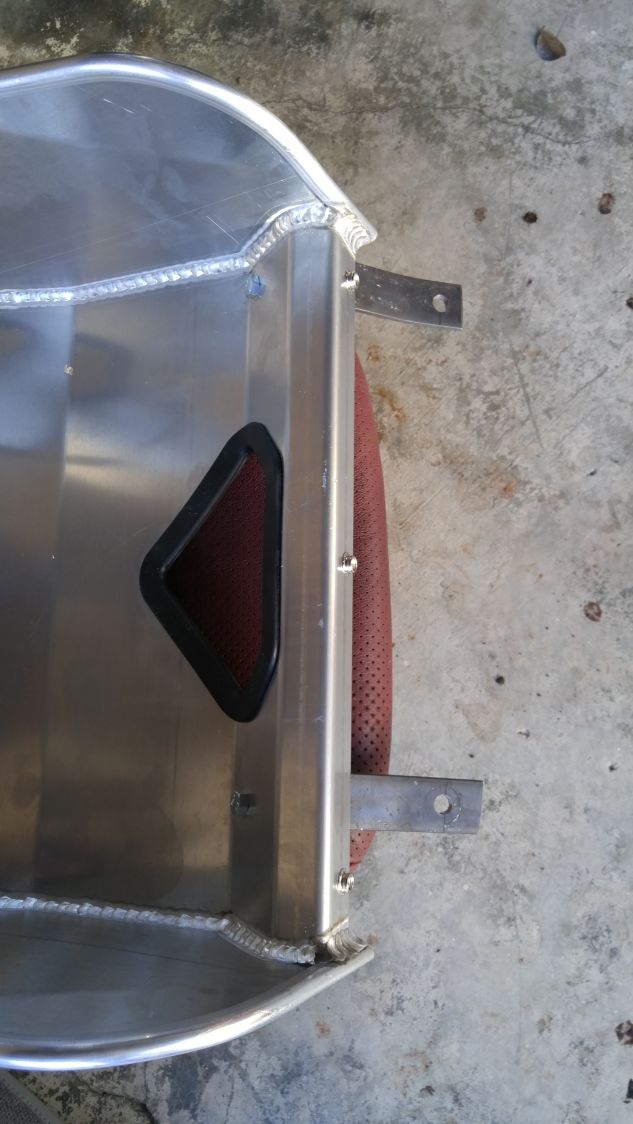
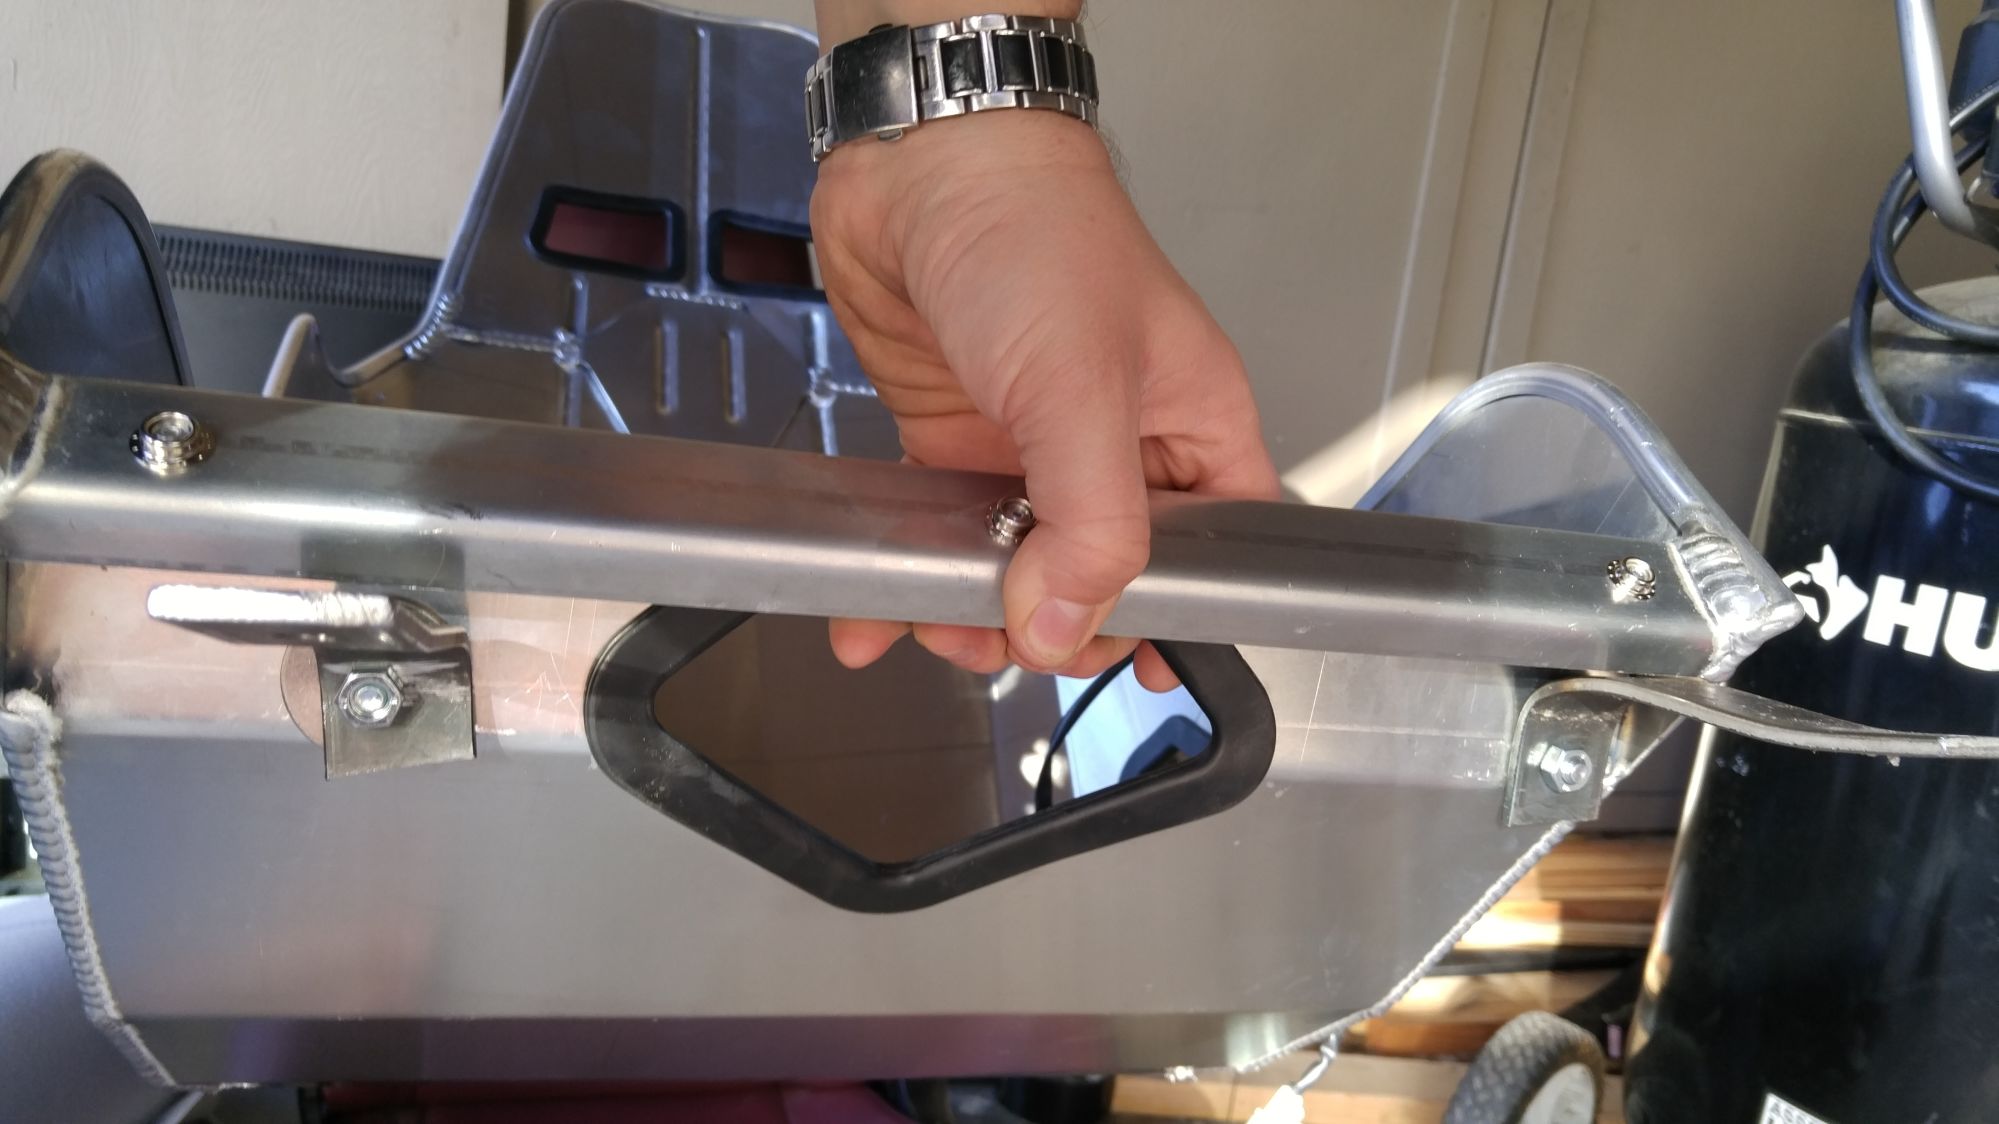
I finally think I've found a solution to fitting myself into this little car. I'm installing a Kirkey Pro Drag seat, bolted to the floor with the rear humps removed.
Hump removal was easy with a $5 spot weld removal bit from harbor freight.
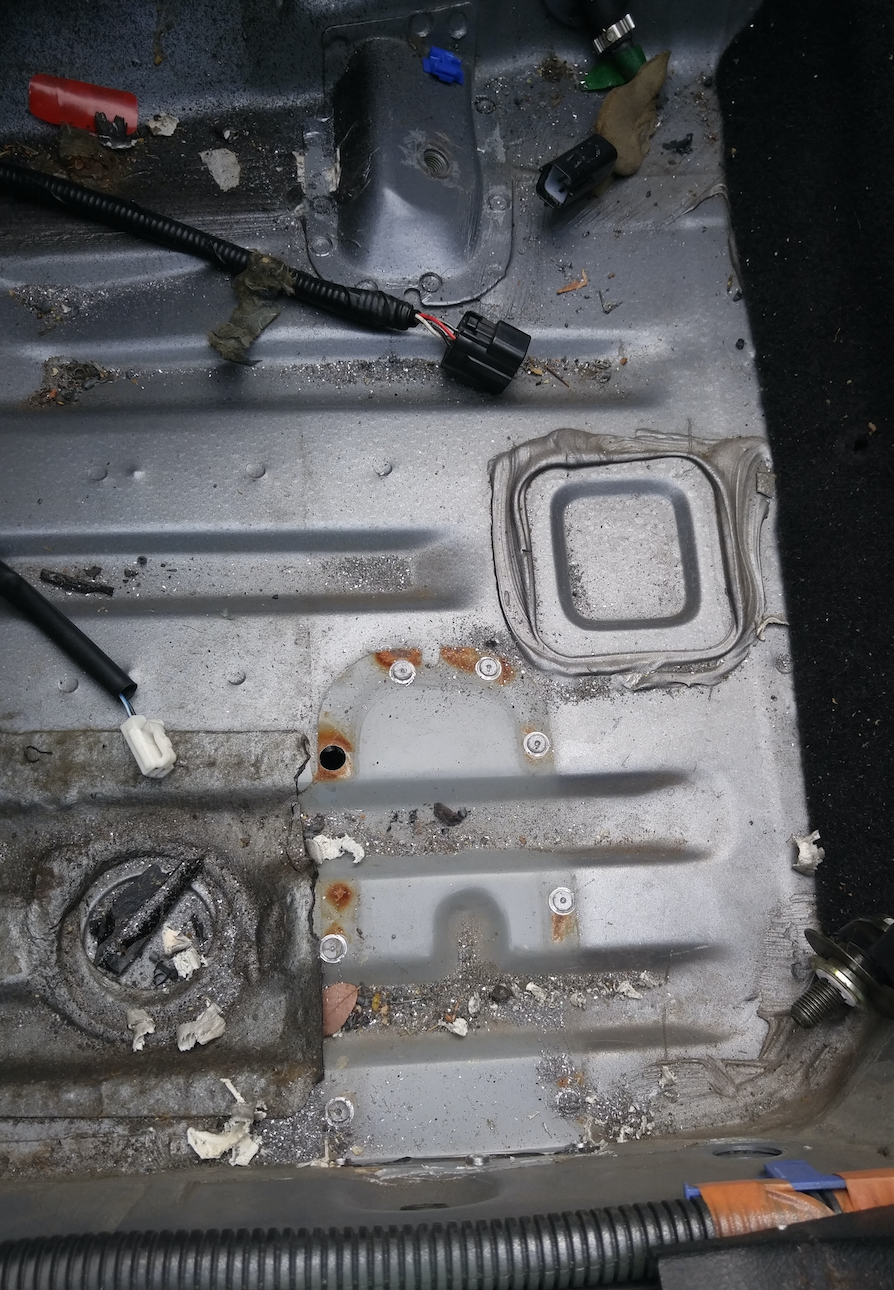
I accidentally went through in one spot
I'll bolt these suckers back in place if I want to run my stock seat again. Either that, or I'll work up some other solution.
Next up was to mount the front side. I found that the most comfortable seating position was to have the front edge of the seat about 2 inches off the front hump. I used some thick steel bar stock to make mounts that attach to the stock locations. I bolted them into the seat in a spot that won't cause me any discomfort when I run on the track without padding.
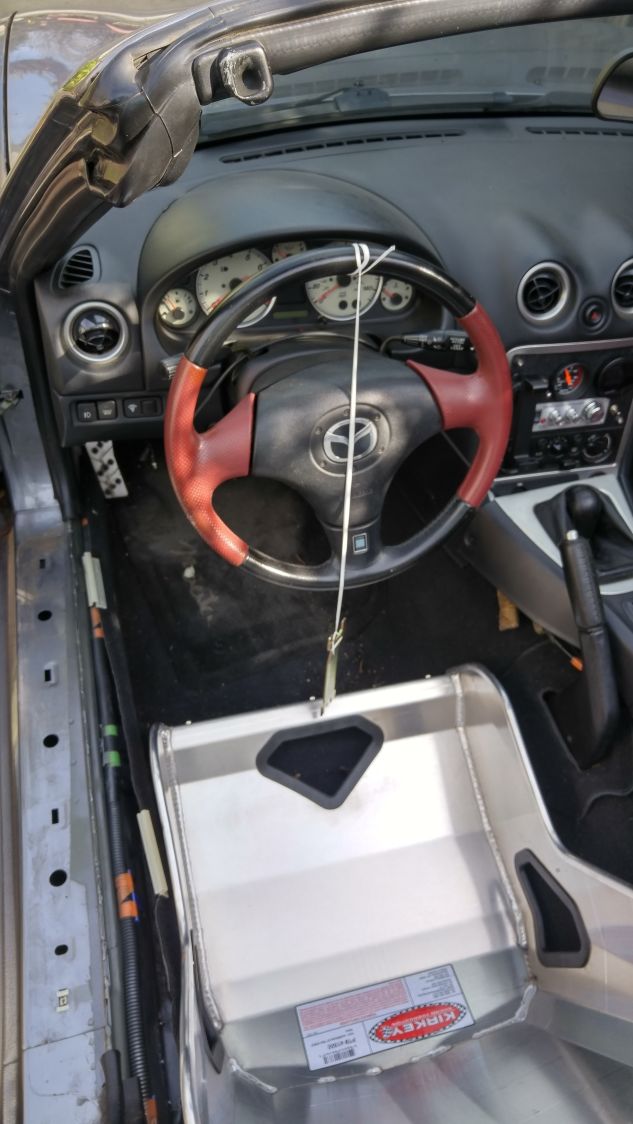
Used a make-shift plumb bob to get the seat centered.
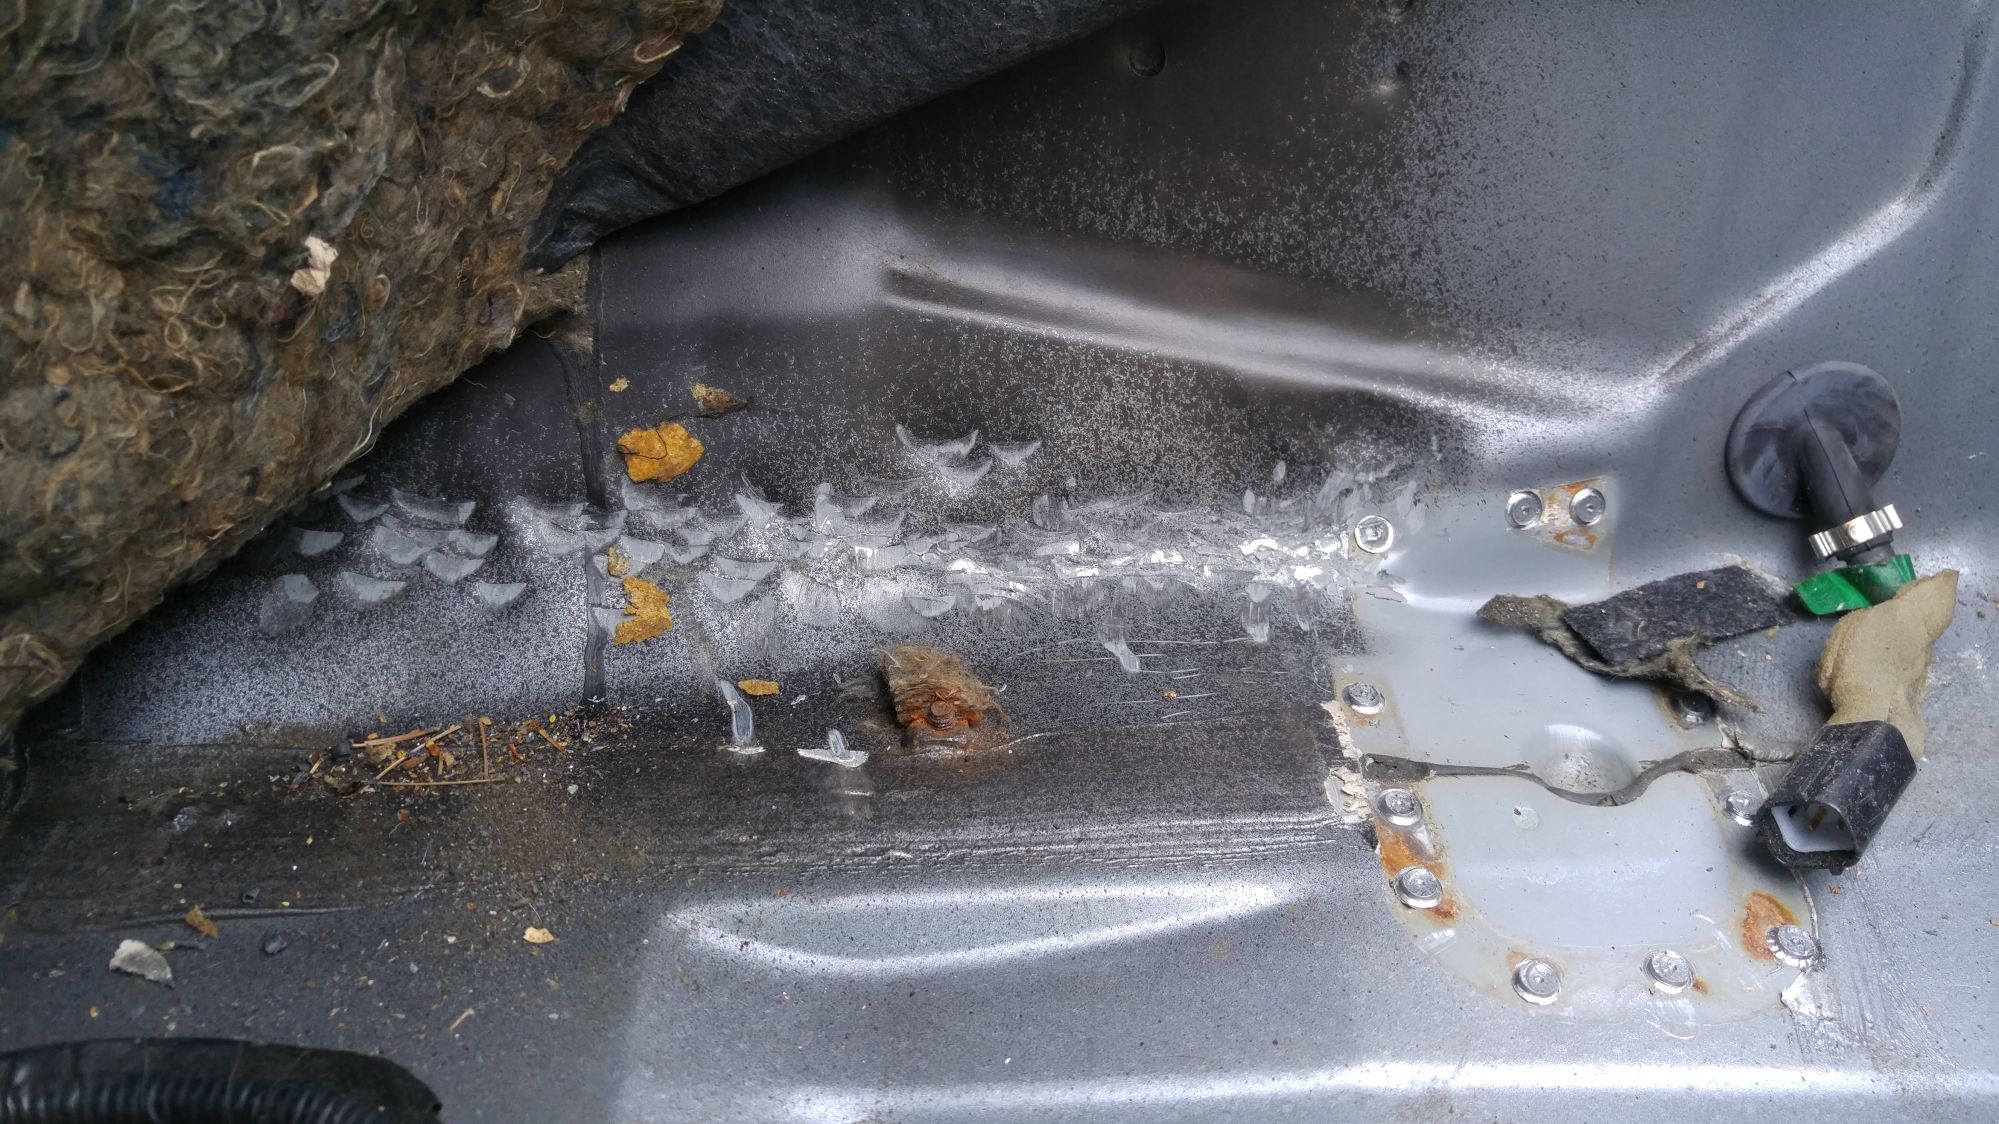
I beat the transmission tunnel senseless. This is about half way. I really wanted to be perfectly centered to the wheel, which means the seat need to be pretty far to the middle of the car.
steel tabs.
I had to heat them up super hot with a blowtorch in order to bend them, so I think they will be strong enough.
I'm working on the seatbelt install now. I'm going to use the same bar stock, bent 90 degrees, to tie a seatbelt mounting point into the floor and transmission tunnel, and use an NA seatbelt receiver.
Hump removal was easy with a $5 spot weld removal bit from harbor freight.
I accidentally went through in one spot
I'll bolt these suckers back in place if I want to run my stock seat again. Either that, or I'll work up some other solution.
Next up was to mount the front side. I found that the most comfortable seating position was to have the front edge of the seat about 2 inches off the front hump. I used some thick steel bar stock to make mounts that attach to the stock locations. I bolted them into the seat in a spot that won't cause me any discomfort when I run on the track without padding.
Used a make-shift plumb bob to get the seat centered.
I beat the transmission tunnel senseless. This is about half way. I really wanted to be perfectly centered to the wheel, which means the seat need to be pretty far to the middle of the car.
steel tabs.
I had to heat them up super hot with a blowtorch in order to bend them, so I think they will be strong enough.
I'm working on the seatbelt install now. I'm going to use the same bar stock, bent 90 degrees, to tie a seatbelt mounting point into the floor and transmission tunnel, and use an NA seatbelt receiver.
__________________
Reply
0
0


