When you click on links to various merchants on this site and make a purchase, this can result in this site earning a commission. Affiliate programs and affiliations include, but are not limited to, the eBay Partner Network.
I waterjetted a plate for the Camaro pedal and got it welded up.
Welded in the mazdacomp subframe braces.
I've read about 1 or 2 people having problems with the motor mounts sagging over time and causing the oil pan to touch the steering rack. It seems to be a really rare problem, but it's easy to see why it could happen when you look at the motor mount design. The driver's side has to have this shape to clear the starter, and I guess the passenger side is shaped the same just for symmetry and ease of fab. I already had the subframe on the bench and the welder out, so I decided to add some supports underneath the mounts.
I drew up my reinforcements in CAD and made an 8.5x11 PDF file for anyone that wants to copy them. PDF attached below. Just print it with scale set to 100% and then measure the dimensioned lines to confirm that the scaling is correct.
Last edited by jpreston; Mar 28, 2018 at 05:54 PM.
I kind of had a plan for the cooling system based on internet pictures and reading, and I finally got that finalized once the motor arrived and I could see how things work in person. I'm deleting all of the water stuff on the back of the head and installing a block off plate with sensors. It's a semi-common mod with the dune buggy guys that use this motor, so I'm not worried about ******* up the flow routing.
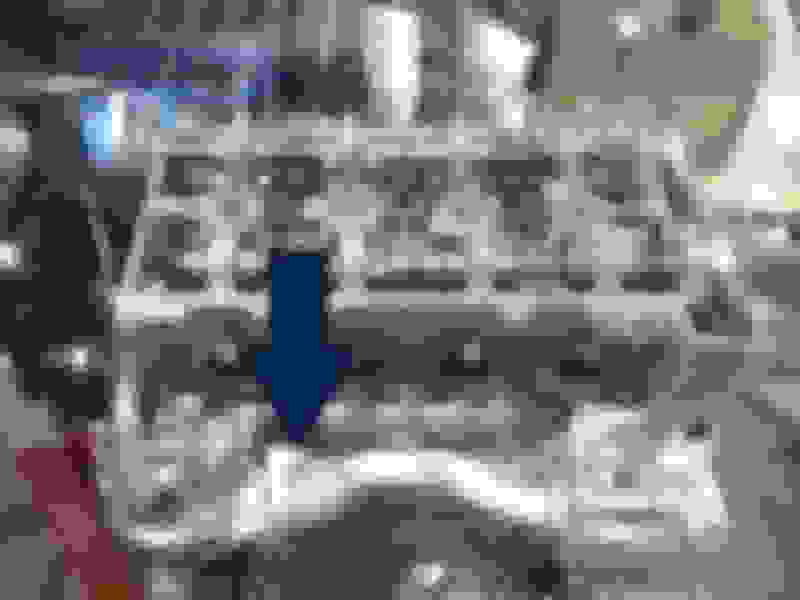
I forgot to take a picture of mine, but here's the OEM ecotec routing for reference. The standard miata setup is to use a really long hose that routes around the back of the head toward the driver's side, under the intake mani, and into the normal miata radiator lower port. So if you include the OEM GM hardpipe, you're literally going all the way around the motor to get to the INLET of the water pump.
In that picture you can see the FWD chevy coolant pipe on the back of the head, which is coming from the radiator outlet. The heater core connector on the right is the hot water outlet from the block, which just passes through that aluminum housing without connecting to anything else. The one on the left is the return from the heater core, and then that flows back into the water pump. Thermostat is located at the arrow. So as far as I can tell, the thermostat only ever sees cold water from the radiator, and partially cooled water from the heater core. Weird. The temp sensor is mounted in the hot water section of the housing.
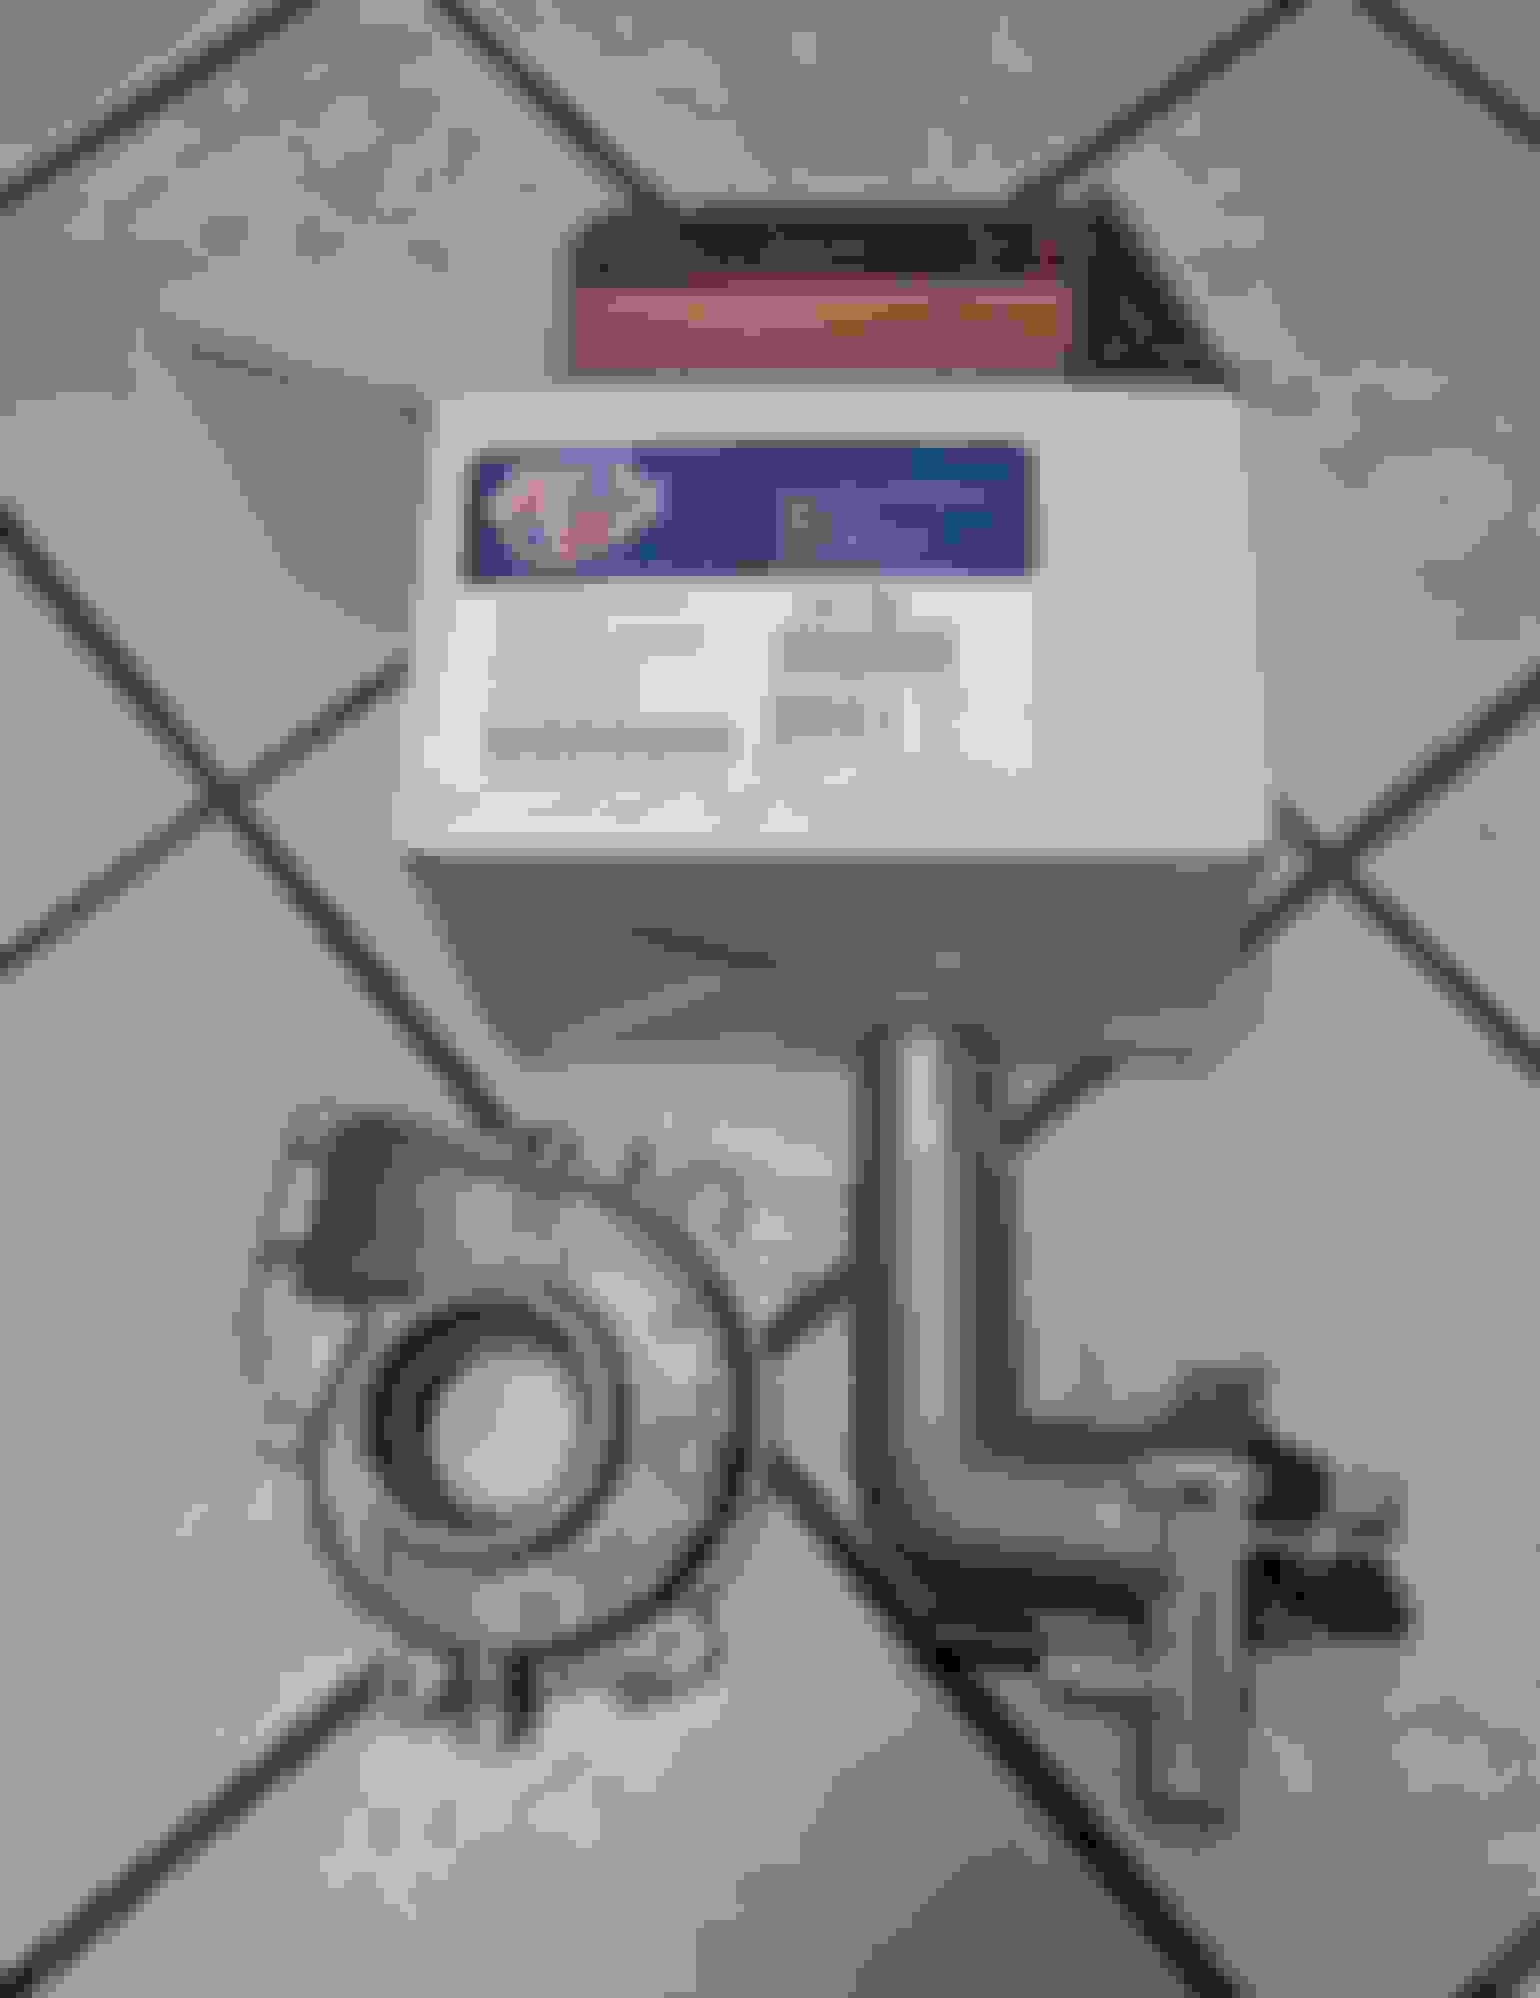
Here's my original blockoff plate with the OEM coolant temp sensor and a 1/8NPT port for a 15psi SMi water pressure sensor.
As I was going to install the blockoff plate, I realized that there was going to be zero flow around the water temp sensor. The port that I'm blocking off doesn't run straight into any cooling passages inside the block... it gets supplied by that cast-in rectagular channel with the imprinted QR code. I stuck a bore scope in there and couldn't see any intersecting passages all the way to the front of the head. My borescope isn't that great so there may be passages somewhere along the path, but there definitely aren't any within a few inches of the blockoff plate, so definitely no flow immediately around the temp sensor. So I decided to remake the blockoff plate with two 1/8NPT ports instead. One will be a bleeder nipple, and the other will be the SMi pressure gauge.
On top of the water outlet at the front of the block, there's a coolant nipple that doesn't get used in the miata swap. It was originally M8x1.25 with a crush washer, but there was plenty of meat around it so I drilled and tapped it to M12x1.5 for the factory temp sensor.
I started searching for an OEM-application radiator that was roughly miata sized but with ports on the opposite sides. Scion TC and EP3 Civic Si were the two closest I could find. The scion radiator dimensions appeared to be a little too wide to fit inside hte miata frame rails, but I found an all aluminum CSF crossflow mis-priced on Amazon for $75 and I couldn't say no! It took a small amount of cutting and a lot of hammering, but I got it to fit. No in-car pictures yet until I can get some brackets made, which I can't do until the motor is in and I figure out final radiator placement.
And the final piece of the puzzle... I'm going to weld a 90 degree elbow on the back of the water pump housing for the radiator hose connection. It took a lot of rockauto, amazon, and google image searches, but I finally found a 2004 Maxima V6 thermostat housing that has an elbow shape that's almost perfect with the correct hose diameter for the Scion radiator. I'll chop the elbow off of the housing and then make a circular aluminum adapter that goes from the water pump ID down to the coolant neck OD, and then have a friend TIG it up for me.
Last edited by jpreston; Mar 28, 2018 at 05:49 PM.
I decided I'm going to do a (partial) PPF delete to make more room for exhaust and to keep from having to do a crossover pipe under the transmission, which would make the exhaust the lowest point of the car. My test fitting says I can definitely fit a 2.5" pipe on the passenger side once the PPF is gone, maybe larger. Getting past the trans is the hard part and then there's tons of room to cross back over to driver's side under the driveshaft. I have parts drawn in CAD for the trans mount but haven't started on them yet. A friend was in serious need of a diff mount for his J-series V6 swapped enduro car that recently got a BMW trans-swap and has a race in 2 weeks, so I went ahead and made 2 sets of my diff mounts.
I debated on a bunch of different designs and finally settled on this one. I could have probably saved a few more pounds by doing a simple bracket that welds to the rear subframe, but I like the simplicity and super easy install of this design. It bolts to the double-thickness lap joint of the trans tunnel where the tunnel and rear bulkhead sheetmetal come together, so it should be super strong. I don't know if mazda made multiple PPF variants with different cutout shapes, so I left the PPF bolt holes out of CAD and intend for them to be transferred and drilled on the car. The PPF will get chopped off right in front of the bracket, after the holes are drilled. I'm also replacing my old poly diff bushings with Miataroadster delrin diff bushings.
Last edited by jpreston; Mar 28, 2018 at 05:58 PM.
I've been putting together a Google spreadsheet with with all of my part numbers and info related to the swap, just so that I can keep track of all this GM stuff that's new to me. I decided to just go ahead and make the spreadsheet public. I'm also going to encourage the ecotecmiata guys to make their own public google spreadsheet to make it easier to find this kind of stuff. The swap manual is pretty good but still leaves out a ton of small details about which parts work best.
Just saw this thread for the first time. Awesome to see someone else going through with this swap with some new solutions to some of the common issues that arise. Look forward to seeing the future progress! maybe my ecotec swap will be done in the near future lol. Iv'e been slowly working on it for the past few months with very limited time available.
PS - PPF mount installed this weekend and looks great, drives great around the neighborhood and is old race tire street burnout approved. The real test is this weekend's enduro at NCM
The part that I posted is the diff mount, not the trans mount. The trans will get its own separate mount. It will be a horizontal crossmember style mount bolted to the floor pan right inside of the frame rails, similar to what the v6 and v8 guys use.
Bolted the oil pan up without sealant for the first time and dropped it in without the transmission. Need to clearance the frame rail lip beside the oil filter housing, as expected. Looks like the LEA intake manifold can't be removed with the engine in the car, and it's going to be really hard to get the starter out without pulling the motor. Not super excited about either of those but oh well. Also got a chance to mock up the Scion radiator. Looks like it's going to work great.
GM uses a cheap oil pressure switch with M12x1.75 coarse threads, which is apparently super uncommon in the switch/sensor world. I could only find two 1/8NPT adapters available with that thread pitch and they're both really thin wall brass with a terrible reputation for breaking, so I bought some 3/4" stainless hex stock and made my own.
It's a Race Technology sensor that I paid way too much for a few years ago and then never installed. I probably would have used a Longacre SMi sensor if I hadn't already had this one. I just bought a $60 15psi SMi sensor to use for coolant pressure and externally I can't tell it apart from this expensive Race Technology sensor.
Yeah I don't remember how or why I convinced myself it was worth the money. I had a Race Technology dash at the time so maybe I just wanted the easy button for calibration.
The AEM is probably just as good as the Longacre. I don't have any personal experience with either.


 2
2