The Project
 11-27-2017, 08:18 PM
#1
Junior Member
Thread Starter

Join Date: Nov 2017
Location: Bay Area
Posts: 57
Total Cats: 7
Disclaimer: I've debated whether to do this and I've finally decided to move my build thread to this forum.
A quick introduction.
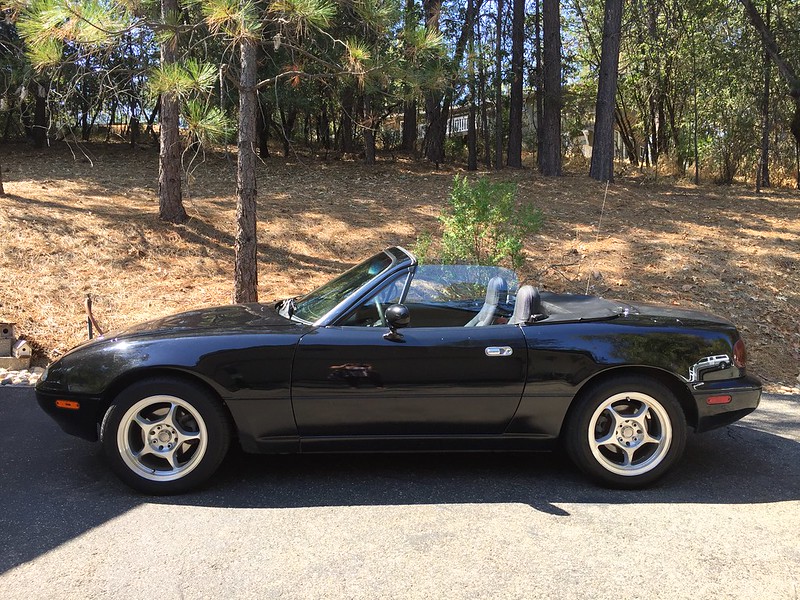
Minnie (I know it's a dopey name) is a 1995 MX-5 which I purchased a few months ago. The car came mainly stock, with 209k miles on the clock. The only aftermarket parts are a set of wheels (not sure what they are) and an upgraded radio receiver and speakers.
I purchased the car as my project to basically learn to DIY and eventually enjoy some track HPDE events. For now I'm teaching my gf how to drive manual, while I'm adding mainly handling mods.
The final goal would be to turbo the car. I initially planned for an LS swap, but it would require way too much knowledge, money and time... and I might not have none of the above.
Ok cool but now, can you show us some pics?
Here is Minnie on day 1.
The good
A quick introduction.
Minnie (I know it's a dopey name) is a 1995 MX-5 which I purchased a few months ago. The car came mainly stock, with 209k miles on the clock. The only aftermarket parts are a set of wheels (not sure what they are) and an upgraded radio receiver and speakers.
I purchased the car as my project to basically learn to DIY and eventually enjoy some track HPDE events. For now I'm teaching my gf how to drive manual, while I'm adding mainly handling mods.
The final goal would be to turbo the car. I initially planned for an LS swap, but it would require way too much knowledge, money and time... and I might not have none of the above.
Ok cool but now, can you show us some pics?
Here is Minnie on day 1.
The good
- Car drives, no overheating, passes SMOG
- Every job done is documented
- Tires in acceptable state (for a while)
- Transmission, clutch and timing belt were replaced fairly recently
- Fairly new soft top in great condition
- Working A/C and stereo
- Engine leak. While the engine bay was fairly clean, the underneath was a complete mess of fresh oil and old black grime
- Lots of vibrations. May be the tier alignment, the exhaust (see below) or something else
- Hood doesn't latch completely. This is mainly due to a minor accident the car had been into. Apparently this wasn't reported or wasn't enough to get the car a salvage title
- Front passenger fender is bent
- Brake pads are done, possibly the shocks may be done too (some clunking is coming from the rear shocks)
- Exhaust rusty, one hanger is missing, possibly making it wiggle too much
- A bunch of minor things: paint imperfections, some broken parts, aftermarket fuel cap not fitting under the lid

Reply
 2
2

2
11-27-2017, 08:34 PM
#2
Junior Member
Thread Starter
Join Date: Nov 2017
Location: Bay Area
Posts: 57
Total Cats: 7
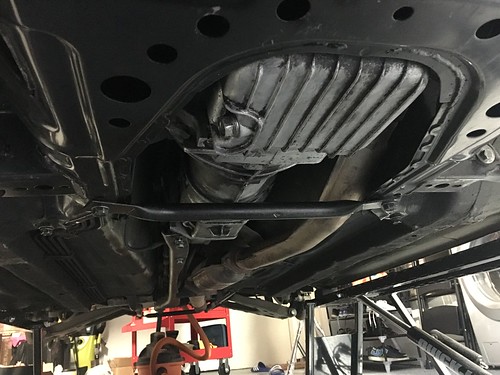
After the first inspection, I was surprised with a big leak and a great amount of old gunk underneath the car, mostly towards the front of the car. Transmission, oil pan, cross-member, etc were covered in this sticky pitch black grime. So I decided to arm myself of elbow grease and start tackling this.
First step was to pressure wash the engine. I used an engine degreaser first and just dish soap after. Thinking back, I don't think I used the engine degreaser correctly but oh well, time to move to the bottom of the car.
I used a combination of heavy duty wipes, carb cleaner and plastic bristle brush. It took me two days, but fairly happy with the results.

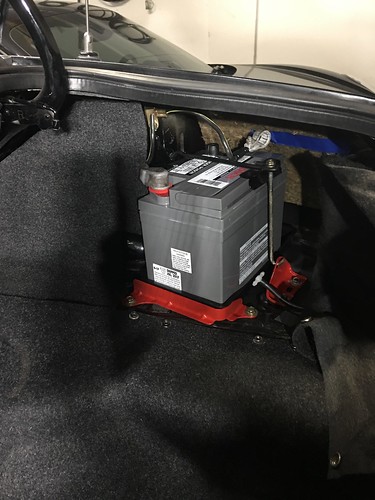
I then decided to swap the battery (no idea how old it was) and clean up the trunk. Again, here found a lot of dry mud... not really sure where that came from. Heavy duty wipes, shop towels and the usual elbow grease did the trick again.

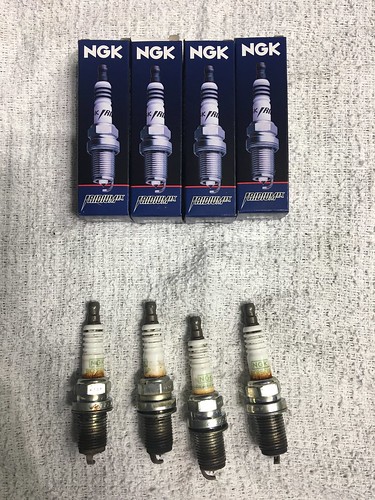
Next, I tackled swapping the spark plugs and spark plug wires with the recommended NGK setup. Not sure when the spark plugs were last changed but the car didn't seem to run fine, the engine was pretty jerky. This could have possibly been caused by pressure-washing the engine bay though. Anyway, this is where I had surprise no. 2... spark plug one had oil on its threads and in its well... All the spark plugs don't seem in great shape, either.
First step was to pressure wash the engine. I used an engine degreaser first and just dish soap after. Thinking back, I don't think I used the engine degreaser correctly but oh well, time to move to the bottom of the car.
I used a combination of heavy duty wipes, carb cleaner and plastic bristle brush. It took me two days, but fairly happy with the results.
I then decided to swap the battery (no idea how old it was) and clean up the trunk. Again, here found a lot of dry mud... not really sure where that came from. Heavy duty wipes, shop towels and the usual elbow grease did the trick again.
Next, I tackled swapping the spark plugs and spark plug wires with the recommended NGK setup. Not sure when the spark plugs were last changed but the car didn't seem to run fine, the engine was pretty jerky. This could have possibly been caused by pressure-washing the engine bay though. Anyway, this is where I had surprise no. 2... spark plug one had oil on its threads and in its well... All the spark plugs don't seem in great shape, either.
Reply
0
0
11-27-2017, 08:56 PM
#3
Junior Member
Thread Starter
Join Date: Nov 2017
Location: Bay Area
Posts: 57
Total Cats: 7
Well, while I'm waiting for parts to come, I decided to do some more cleaning and prep.
This in-the-middle update is going to be titled: Fuel lid and undercoat.
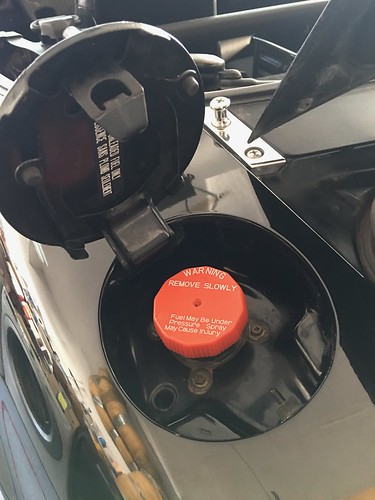
There was a problem with my fuel lid and fuel tank cap. The previous owner installed an aftermarket cap that was way too tall to fit under the lid. Of course, instead of doing some researched they just decided to force close the lid. This bent the OEM lid and almost broke the open/close latch... and here's how I fixed it.
New (Used) OEM lid (Ebay) + OEM fuel tank cap (Amazon):
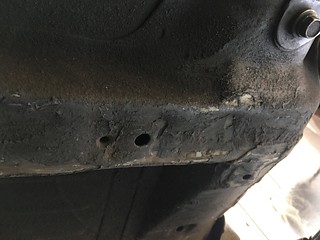
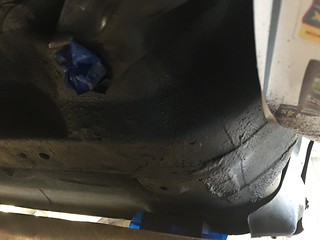
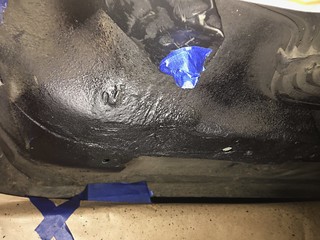
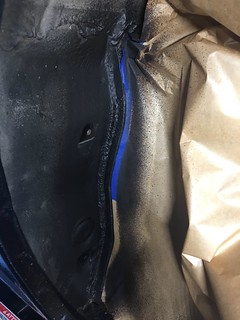
Then I moved under the car and recoated some parts with 3M Rubberized Undercoat.
Before:

After:
Btw... this makes me think of installing frame rails... mhm...
And now, more restoring. Found a bunch of the same dry mud in the trunk in the rear wheel wells
Before:
After:
Ok and now, a preview on what's coming next
This in-the-middle update is going to be titled: Fuel lid and undercoat.
There was a problem with my fuel lid and fuel tank cap. The previous owner installed an aftermarket cap that was way too tall to fit under the lid. Of course, instead of doing some researched they just decided to force close the lid. This bent the OEM lid and almost broke the open/close latch... and here's how I fixed it.
New (Used) OEM lid (Ebay) + OEM fuel tank cap (Amazon):
Then I moved under the car and recoated some parts with 3M Rubberized Undercoat.
Before:
After:
Btw... this makes me think of installing frame rails... mhm...
And now, more restoring. Found a bunch of the same dry mud in the trunk in the rear wheel wells
Before:
After:
Ok and now, a preview on what's coming next
Reply
0
0
 11-28-2017, 05:04 PM
#6
Junior Member
Thread Starter
Join Date: Nov 2017
Location: Bay Area
Posts: 57
Total Cats: 7
Thanks! Yeah, I was surprised of the little amount of rust that I found. The messiest part was the 25 year of road grime and oil, which I attempted to clean. I still have to remove seats and carpet and see how the bottom of the car is doing rust-wise. I've gotten FM frame rails on "Brace for Monday", which I'll be using as an excuse to pull out the interior.
Reply
0
0
 11-28-2017, 06:35 PM
#8
Junior Member
Thread Starter
Join Date: Nov 2017
Location: Bay Area
Posts: 57
Total Cats: 7
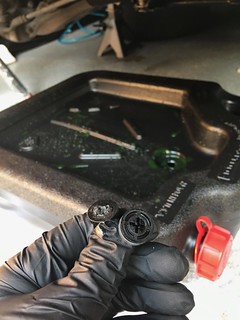
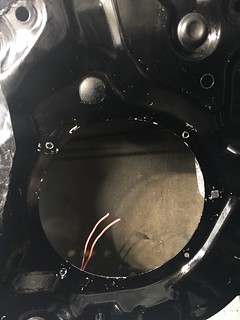
After bunch of elbow grease, I finally got to open the VC and change the CAS o'ring. But first things first...
Finding the leak
I did found where the leak is coming from... the transmission "weep hole":

Advanced troubleshooting skills helped me find the infamous leak. Paper towel to the rescue!!
Action item here will be to use some engine oil dye to identify if the oil is leaking from the engine or transmission. I already believe it's the engine as I've been told transmission oil would stink.
Awesome peeps pointed me to a possible cause: the engine rear seal. For this job, I'd have to pull the transmission off. Ok, so that ain't happening right now. At some point I'll get to change the clutch as pre-step for an eventual turbo, so for now I'll keep an eye on the oil level.
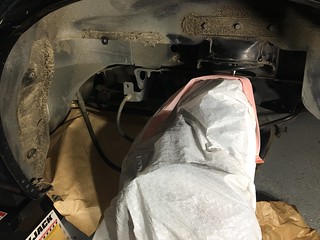
Cleaning the fenders
And now, moar elbow grease pics!
I found again a hole bunch of mud in the front fenders. So I decided to take them off, clean-up and revive the undercoating. Here's the Before // After:
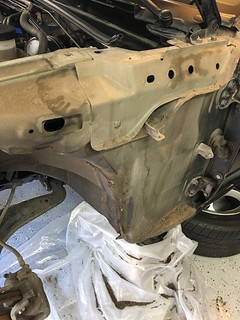

I guess I might have to use more undercoating in case when I'll roll the fenders and take the plastic wheel well mud protection off.
VC and CAS
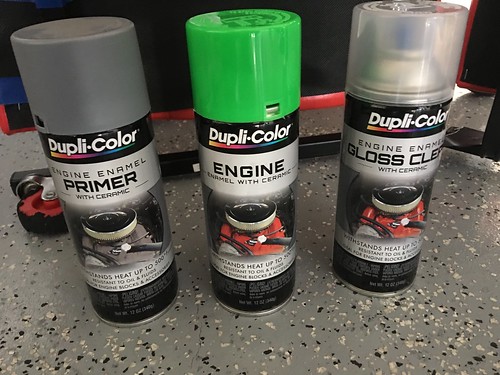
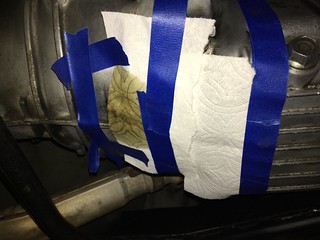
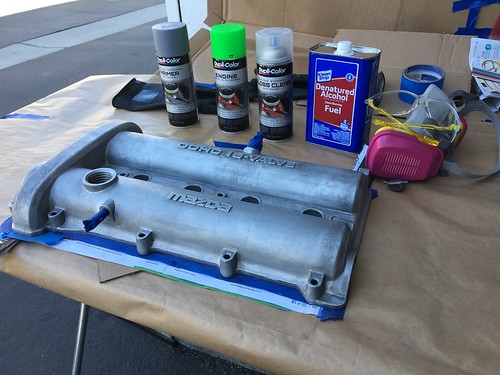
I decided to remove the VC cover, paint it lime green, change the gasket and the CAS o'ring since I was already there.
VC sanded and ready to be painted:
Changing the Cam sensor o'ring was a I struggled to remove the CAS from behind the engine and I could not put it back in. Well, until I found a post, on a different forum, that made everything easier.
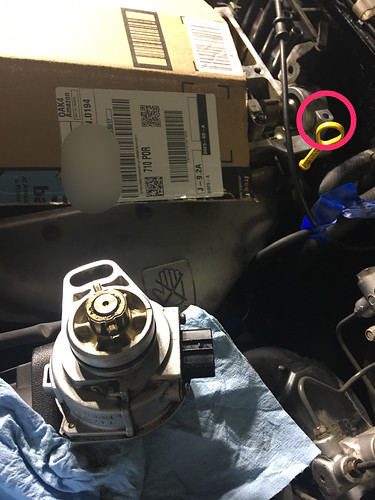
See the circled piece? Removing that made the re-installation a breeze. No more wiggling between the engine block and the firewall!
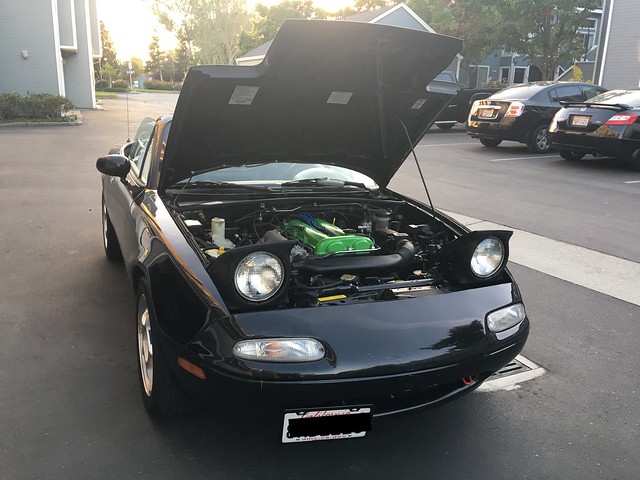
Here's Minnie with her new green VC
Finding the leak
I did found where the leak is coming from... the transmission "weep hole":
Advanced troubleshooting skills helped me find the infamous leak. Paper towel to the rescue!!
Action item here will be to use some engine oil dye to identify if the oil is leaking from the engine or transmission. I already believe it's the engine as I've been told transmission oil would stink.
Awesome peeps pointed me to a possible cause: the engine rear seal. For this job, I'd have to pull the transmission off. Ok, so that ain't happening right now. At some point I'll get to change the clutch as pre-step for an eventual turbo, so for now I'll keep an eye on the oil level.
Cleaning the fenders
And now, moar elbow grease pics!
I found again a hole bunch of mud in the front fenders. So I decided to take them off, clean-up and revive the undercoating. Here's the Before // After:
I guess I might have to use more undercoating in case when I'll roll the fenders and take the plastic wheel well mud protection off.
VC and CAS
I decided to remove the VC cover, paint it lime green, change the gasket and the CAS o'ring since I was already there.
VC sanded and ready to be painted:
Changing the Cam sensor o'ring was a
I struggled to remove the CAS from behind the engine and I could not put it back in. Well, until I found a post, on a different forum, that made everything easier.See the circled piece? Removing that made the re-installation a breeze. No more wiggling between the engine block and the firewall!
Here's Minnie with her new green VC
Reply
1
1
11-28-2017, 07:42 PM
#10
Cpt. Slow

iTrader: (25)
Join Date: Oct 2005
Location: Oregon City, OR
Posts: 14,215
Total Cats: 1,140
If you have no history of a timing belt/water pump replacement, id also suggest doing that. Although your RMS may be leaking, oil doesn't travel forward. So if you had a lot of grime on the bottom of the oil pan, it's most likely cam seals and front main seal.
Reply
0
0
11-28-2017, 09:05 PM
#11
Junior Member
Thread Starter
Join Date: Nov 2017
Location: Bay Area
Posts: 57
Total Cats: 7
I actually do have a Carfax that came with the car, which strangely stopped at some point, and I did get also all the receipts for work done to the car. Timing belt was not done so long ago that I should be worried; I checked it when I opened the VC and it seemed to be in good shape. I might tackle this in a few months, just to be on the safe side. I saw that TCM has some Timing belt and water pump kits with OEM components for a reasonable price.
Reply
0
0
11-30-2017, 04:31 PM
#12
Junior Member
Thread Starter
Join Date: Nov 2017
Location: Bay Area
Posts: 57
Total Cats: 7
Radiator flush
Before changing the oil, I decided to go ahead and do a radiator flush, following one of the many online tutorials that use distilled water and a specific cleansing fluid. Is is effective? Time will tell.
I also took the opportunity to swap the stripped drain plug.
And this is what's waiting for me to reflush and add proper 50/50 coolant:
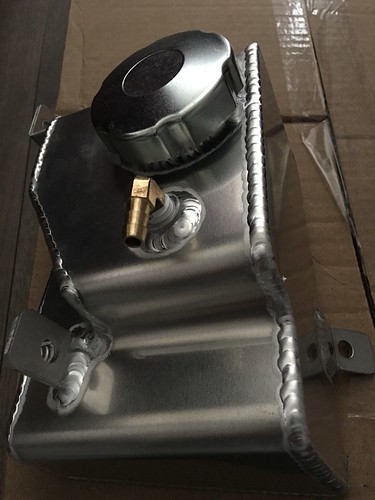
Canton Racing alumnum coolant overflow tank, because racecar.
Idle drop
Then, yes, I got hit by the infamous idle drop. Basically I would come to a stop and the engine RPMs would drop below 500 and even stall at times.
After some reading, I decided to change the air filter and clean up the MAF... see if that helped. I also used this time to replace the four bolts holding the filter box together with new ones, as the old ones weren't the same... (again, an OCD thing..)

Cleaning the MAF helped, although the RPM would stay still low. At least car would not stall. Tuning-up the idle helped bringing the idle up to the recommended 950 RPM, just below the 1k marker. Issue removed.
Before changing the oil, I decided to go ahead and do a radiator flush, following one of the many online tutorials that use distilled water and a specific cleansing fluid. Is is effective? Time will tell.
I also took the opportunity to swap the stripped drain plug.
And this is what's waiting for me to reflush and add proper 50/50 coolant:
Canton Racing alumnum coolant overflow tank, because racecar.
Idle drop
Then, yes, I got hit by the infamous idle drop. Basically I would come to a stop and the engine RPMs would drop below 500 and even stall at times.
After some reading, I decided to change the air filter and clean up the MAF... see if that helped. I also used this time to replace the four bolts holding the filter box together with new ones, as the old ones weren't the same... (again, an OCD thing..)
Cleaning the MAF helped, although the RPM would stay still low. At least car would not stall. Tuning-up the idle helped bringing the idle up to the recommended 950 RPM, just below the 1k marker. Issue removed.
Reply
0
0
11-30-2017, 05:44 PM
#13
Junior Member
Thread Starter
Join Date: Nov 2017
Location: Bay Area
Posts: 57
Total Cats: 7
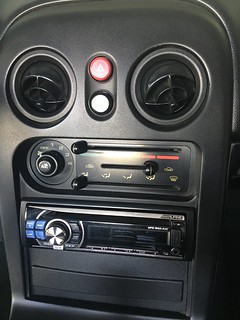
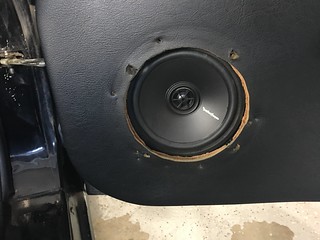
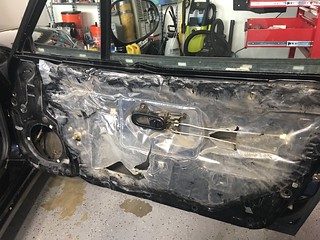
Bluetooth and new speakers install.
Btw, this was a totally unnecessary upgrade, but my geeky side wanted me to plug my phone via Bluetooth. So, why not upgrade the speakers too, right?
Initial status:
Here's some new gear:

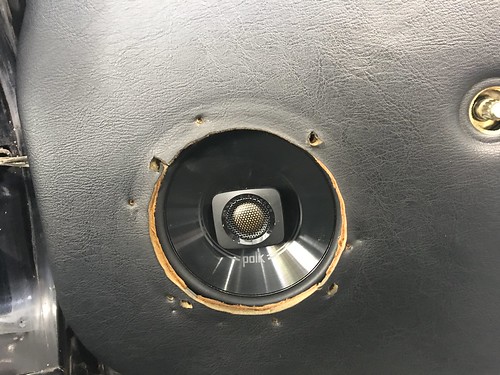
I first tackled the speaker installation, made sure they worked and then swapped the radio. Speakers were "relatively" easy to install except that I needed to re-drill holes on the doors.
Being a 95, I had to pull the door panel off to do this job. So what better moment to grease the manual window hardware than this?
Polk Audio DB652. 100 Watts RMS with a nice low frequency of 40Hz
Some work in progress for the new radio.

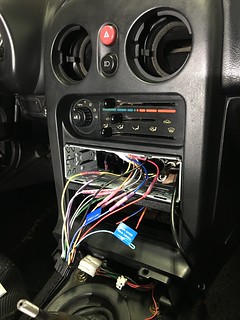
JVC KD-R88BT. 50 Watt RMS on 4x channels. Bluetooth support (yay).

Btw, this was a totally unnecessary upgrade, but my geeky side wanted me to plug my phone via Bluetooth. So, why not upgrade the speakers too, right?
Initial status:
Here's some new gear:
I first tackled the speaker installation, made sure they worked and then swapped the radio. Speakers were "relatively" easy to install except that I needed to re-drill holes on the doors.
Being a 95, I had to pull the door panel off to do this job. So what better moment to grease the manual window hardware than this?
Polk Audio DB652. 100 Watts RMS with a nice low frequency of 40Hz
Some work in progress for the new radio.
JVC KD-R88BT. 50 Watt RMS on 4x channels. Bluetooth support (yay).
Reply
0
0
 12-16-2017, 11:34 PM
#15
Junior Member
Thread Starter
Join Date: Nov 2017
Location: Bay Area
Posts: 57
Total Cats: 7
Quick update on what's going on, so this thread doesn't look dead. I've recently received a premium Timing Belt kit from Treasure Coast Miata with Water Pump, cam seals, front seal, Mazda competition engine mounts and fuel filter.
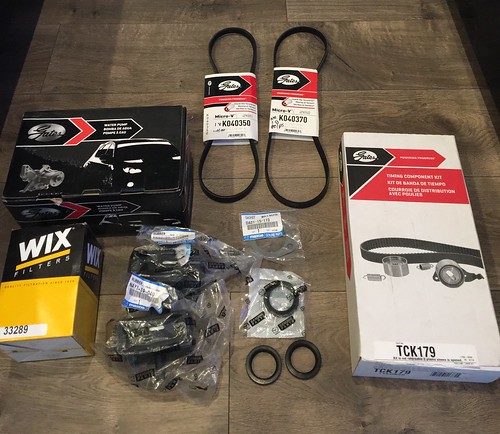
Hopefully I won't mess anything up, doing the job. I suspect my FMS is leaking as I just found traces of fresh oil in the front of the oil pan.
On top of this, I'll be swapping the OEM radiator for an eBay aluminum one. Since at some point I'll go turbo, I figure I'll invest in the right radiator when the time comes, and for the time being just go eBay. I will also be swapping vacuum hoses with a set from Silicon Intakes (red), radiator and cooling system hoses (some of them look fairly dry).
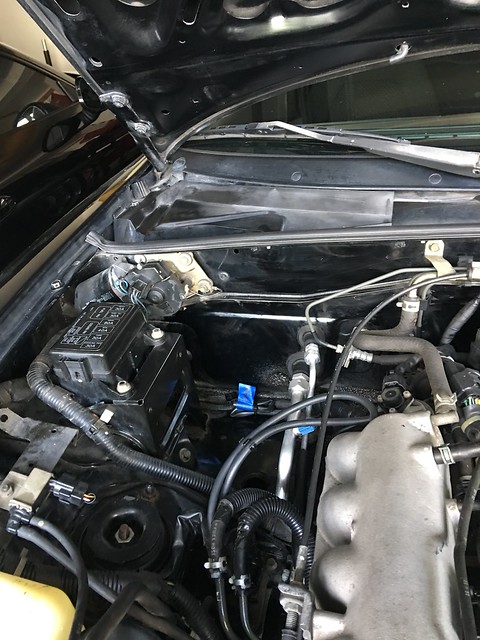
Here is an easy mod I decided to go for since I was at it. Window wiper wash tank removal. Wow, much space.
Hopefully I won't mess anything up, doing the job. I suspect my FMS is leaking as I just found traces of fresh oil in the front of the oil pan.
On top of this, I'll be swapping the OEM radiator for an eBay aluminum one. Since at some point I'll go turbo, I figure I'll invest in the right radiator when the time comes, and for the time being just go eBay. I will also be swapping vacuum hoses with a set from Silicon Intakes (red), radiator and cooling system hoses (some of them look fairly dry).
Here is an easy mod I decided to go for since I was at it. Window wiper wash tank removal. Wow, much space.
Last edited by Leuz; 01-17-2018 at 02:00 PM.
Reply
0
0
12-19-2017, 08:25 PM
#16
Junior Member
Thread Starter
Join Date: Nov 2017
Location: Bay Area
Posts: 57
Total Cats: 7
Interim update. As I started removing things, I've been bitten by the bug of hey since I'm there let me also do ...
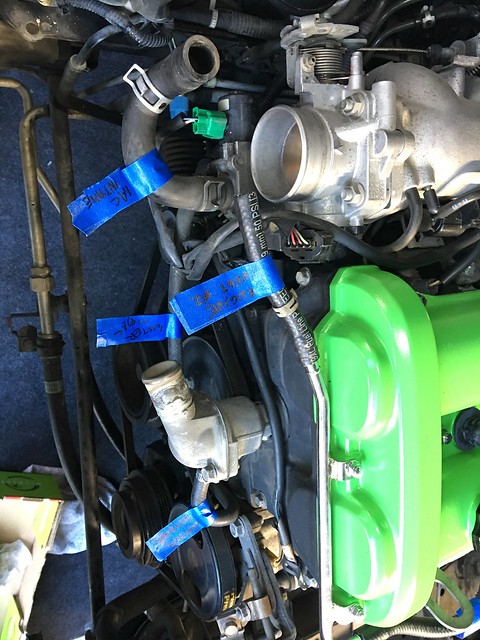
So together with all the previous stuff, I decided to paint my headers with "VHT Flame proof" and refresh the whole exhaust and gaskets there, since at least one bolt is missing the head and I'll have to drill it out or something.
Also, I hope my tagging game is strong
Btw... those water bypass hoses under the intake manifold are
Some Work In Progress pics.
Last edited by Leuz; 01-17-2018 at 02:00 PM.
Reply
0
0
01-08-2018, 02:15 PM
#17
Junior Member
Thread Starter
Join Date: Nov 2017
Location: Bay Area
Posts: 57
Total Cats: 7
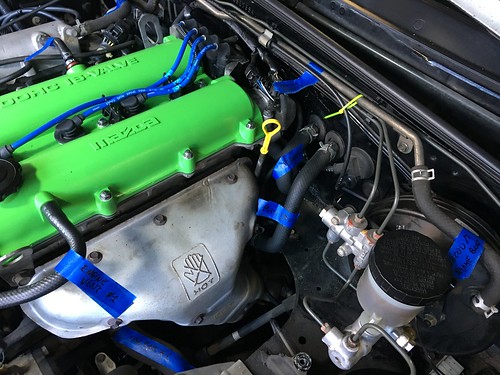
Finally some over-due updates. After having taken apart lots of engine accessories, I've started cleaning and rebuilding the intake side of the engine.
Intake manifold was cleaned outside and inside, and repainted green to match the VC. Still waiting on some new gaskets to rebuild the T/B + IAC... hopefully coming soon.
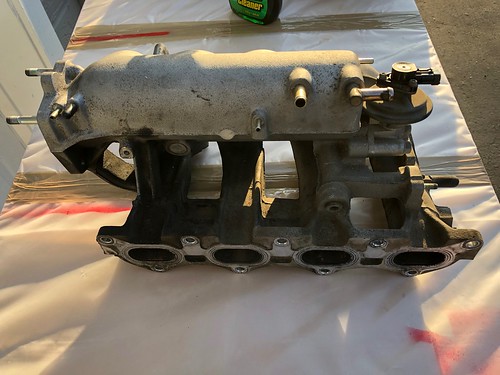
(before)
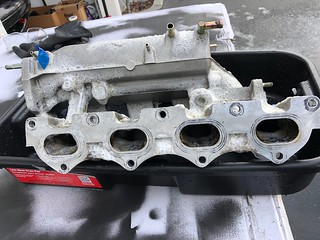
(cleaning)
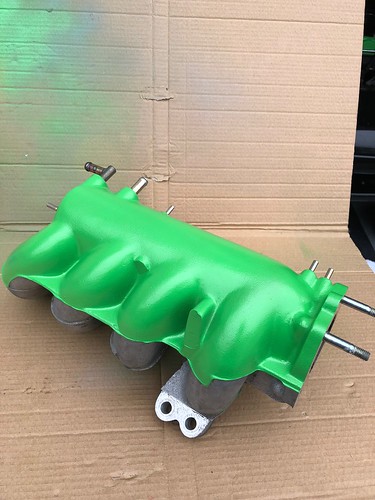
(after)
Fuel rail was cleaned and repainted red. Replaced fuel hoses and hose clamps with some new Jegs fuel hose and clamps.
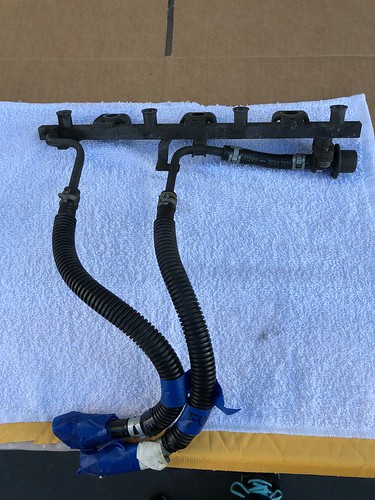
(before)
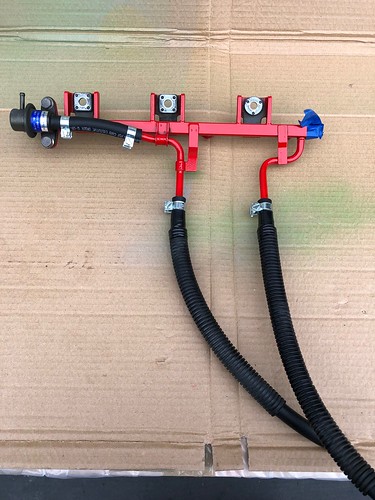
(after)
Intake manifold was cleaned outside and inside, and repainted green to match the VC. Still waiting on some new gaskets to rebuild the T/B + IAC... hopefully coming soon.
(before)
(cleaning)
(after)
Fuel rail was cleaned and repainted red. Replaced fuel hoses and hose clamps with some new Jegs fuel hose and clamps.
(before)
(after)
Last edited by Leuz; 01-17-2018 at 02:00 PM. Reason: adding pics
Reply
0
0
01-17-2018, 01:53 PM
#18
Junior Member
Thread Starter
Join Date: Nov 2017
Location: Bay Area
Posts: 57
Total Cats: 7
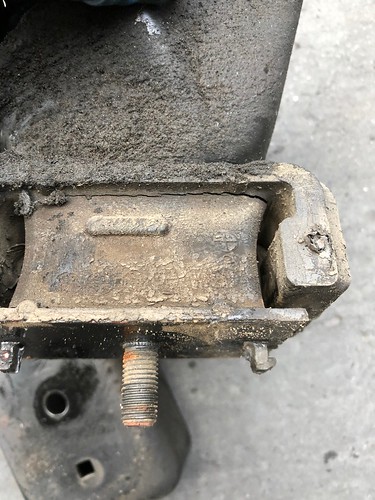
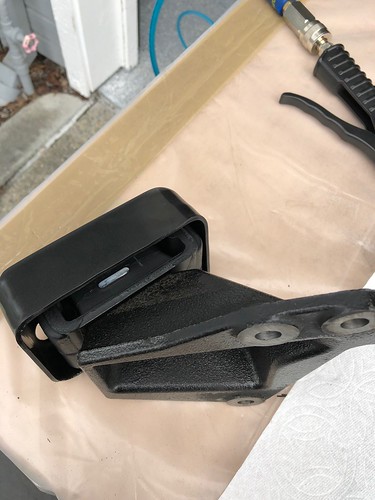
I finally got to take enough parts out that I could easily access and swap the motor mounts. I picked a set of Mazda Competition motor mounts to swap the old ones that were in a bad shape:
Some scrubbing and respraying later...

Last week I also picked up a set of OEM injectors with almost half the mileage of mines (125k vs 210k)... not too bad considering I will be upgrading them in the future.
I used my home made cleaning kit to clean them up (the amazing Simple Green is missing from the pic).
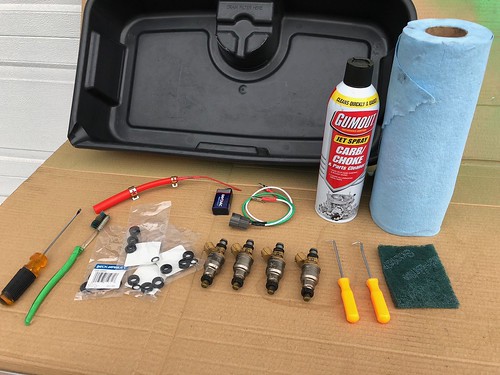
And changed the seals with some new ones coming from Amazon.

Next on my list is: change the oil cooler gasket, do an oil filter reroute (waiting on the FM kit to arrive) and replace the water bypass hoses to the oil cooler with new OEM ones. That should be enough for me to start assembling the intake back, unless I keep going crazy and finding more potential stuff to swap...
Some scrubbing and respraying later...
Last week I also picked up a set of OEM injectors with almost half the mileage of mines (125k vs 210k)... not too bad considering I will be upgrading them in the future.
I used my home made cleaning kit to clean them up (the amazing Simple Green is missing from the pic).
And changed the seals with some new ones coming from Amazon.
Next on my list is: change the oil cooler gasket, do an oil filter reroute (waiting on the FM kit to arrive) and replace the water bypass hoses to the oil cooler with new OEM ones. That should be enough for me to start assembling the intake back, unless I keep going crazy and finding more potential stuff to swap...
Reply
0
0
01-31-2018, 08:04 PM
#19
Junior Member
Thread Starter
Join Date: Nov 2017
Location: Bay Area
Posts: 57
Total Cats: 7
Oil sender and gauge.
I decided that the stupid 94-97 on/off gauge wasn't really for me, luckily Craigslist brought the opportunity to get a used 90-93 sender and gauge.
A minute of silence for our cluster gauge hood that'll never see the car anymore.
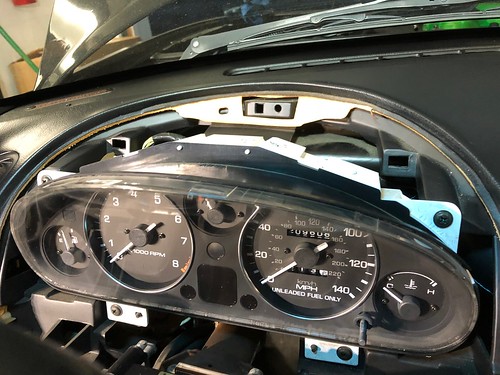
New oil pressure gauge going in!
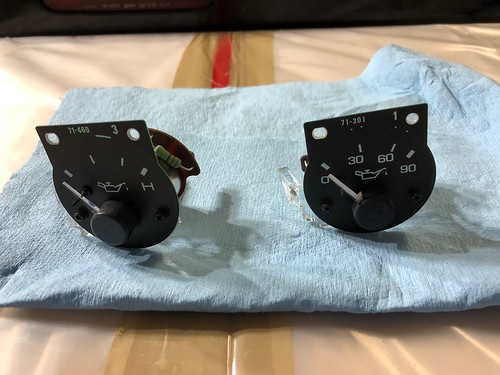

The cluster will stay like that for a while anyway, as I have a set of new Revlimiter gauges ready to go in (at some point...)
To my surprise, I realized I did not take any pic of the sender... but there's nothing special about it. Just an old unit taken off from an older Miata.
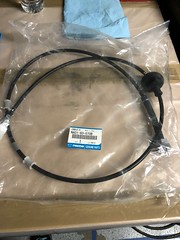
After that, since I had the cluster off I went ahead and swapped the speedometer cable, which was making the speed indicator bounce around. Btw, it seems that new OEM Mazda cables have plastic in the connector on the gauge side, instead of metal.
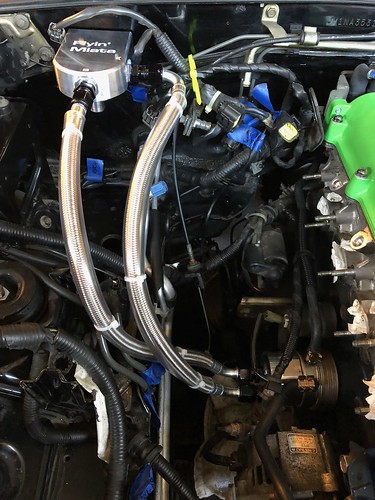
Flyin' Miata oil filter relocation kit
I changed the oil once, and it was enough to make me go ahead and get a relocation kit. In order,
Intake manifold goes back in!
This is the part I'm genuinely the happiest about. The intake manifold going back in. First though, I had to repair some connectors that broke when taking them off , a Denso injector connector and the CAS one.
Removed the manifold bracket which won't go back in.
I think it looks pretty good. I'm sure the green paint is at least +6HP.

I am not sure what I'll be working next, probably replace the timing belt while there is still some good space in the engine bay, before I put the rest back in. We'll see.
I decided that the stupid 94-97 on/off gauge wasn't really for me, luckily Craigslist brought the opportunity to get a used 90-93 sender and gauge.
A minute of silence for our cluster gauge hood that'll never see the car anymore.
New oil pressure gauge going in!
The cluster will stay like that for a while anyway, as I have a set of new Revlimiter gauges ready to go in (at some point...)
To my surprise, I realized I did not take any pic of the sender... but there's nothing special about it. Just an old unit taken off from an older Miata.
After that, since I had the cluster off I went ahead and swapped the speedometer cable, which was making the speed indicator bounce around. Btw, it seems that new OEM Mazda cables have plastic in the connector on the gauge side, instead of metal.
Flyin' Miata oil filter relocation kit
I changed the oil once, and it was enough to make me go ahead and get a relocation kit. In order,
- swapped the water bypass hoses that go through the oil cooler with an OEM kit from GoMiata
- changed oil cooler gasket
- mounted the FM filter relocation kit
Intake manifold goes back in!
This is the part I'm genuinely the happiest about. The intake manifold going back in. First though, I had to repair some connectors that broke when taking them off
, a Denso injector connector and the CAS one.Removed the manifold bracket which won't go back in.
I think it looks pretty good. I'm sure the green paint is at least +6HP.
I am not sure what I'll be working next, probably replace the timing belt while there is still some good space in the engine bay, before I put the rest back in. We'll see.
Reply
0
0


