Ze Potato Build
 01-12-2016, 07:41 PM
#62
SADFab Destructive Testing Engineer


iTrader: (5)
Join Date: Apr 2014
Location: Beaverton, USA
Posts: 18,642
Total Cats: 1,866
advance auto. not vatozone.
Return that **** and get the new ones!
http://shop.advanceautoparts.com/p/c...590/10419415-P
Return that **** and get the new ones!
http://shop.advanceautoparts.com/p/c...590/10419415-P

Reply
 2
2

2
01-12-2016, 08:08 PM
#63
Junior Member
Thread Starter
iTrader: (7)

Join Date: May 2014
Location: Denver, Co.
Posts: 458
Total Cats: 40
Sonofabitch. Reading comprehension fail. For whatever reason I always mix up the Autozone and the Advance Auto. No idea why.
Well. They were $70 bucks and *should work. Not the absolute end of the world.
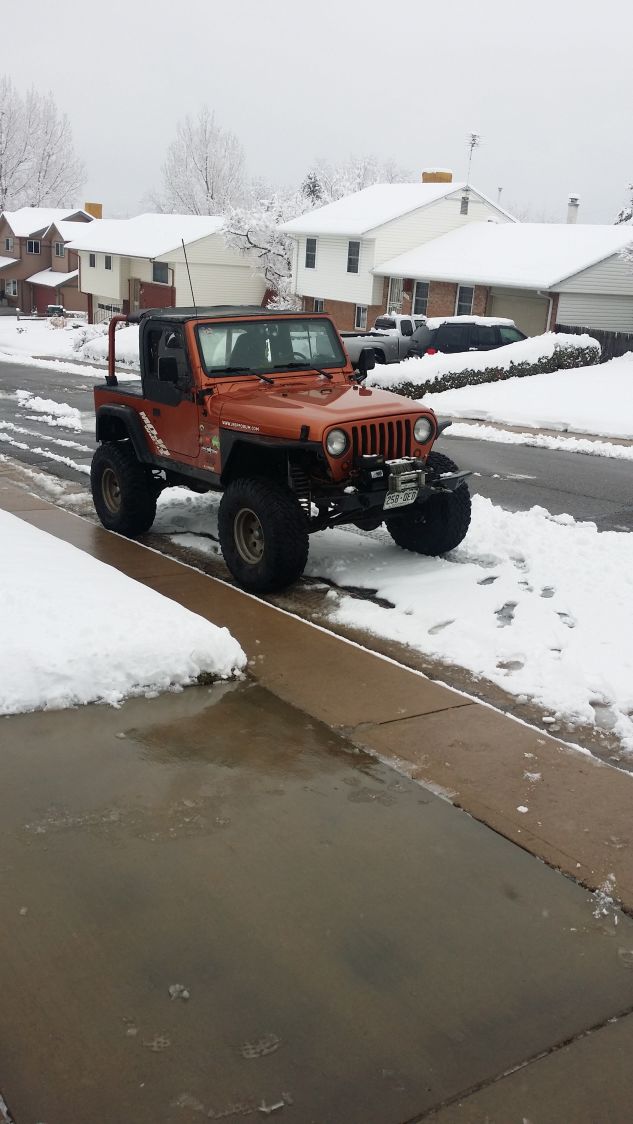
Jeep is/was rad. 2001 TJ, Rubicon express lift of some sort, Dynatrac Dana 44s, 35x12.5", proper manuel transmission. It's my friend's who moved to Whistler BC and left it with me for a year. I used it as a winter vehicle last winter (and beat the living **** out of it), but he came back to the states and picked it up this past summer. It now lives in the land of amazing mountain biking and ski-boarding. Shocking the only decent picture I have of it:
Well. They were $70 bucks and *should work. Not the absolute end of the world.
Jeep is/was rad. 2001 TJ, Rubicon express lift of some sort, Dynatrac Dana 44s, 35x12.5", proper manuel transmission. It's my friend's who moved to Whistler BC and left it with me for a year. I used it as a winter vehicle last winter (and beat the living **** out of it), but he came back to the states and picked it up this past summer. It now lives in the land of amazing mountain biking and ski-boarding. Shocking the only decent picture I have of it:
Reply
0
0
01-14-2016, 05:20 PM
#64
Junior Member
Thread Starter
iTrader: (7)
Join Date: May 2014
Location: Denver, Co.
Posts: 458
Total Cats: 40
BFH to the Rescue
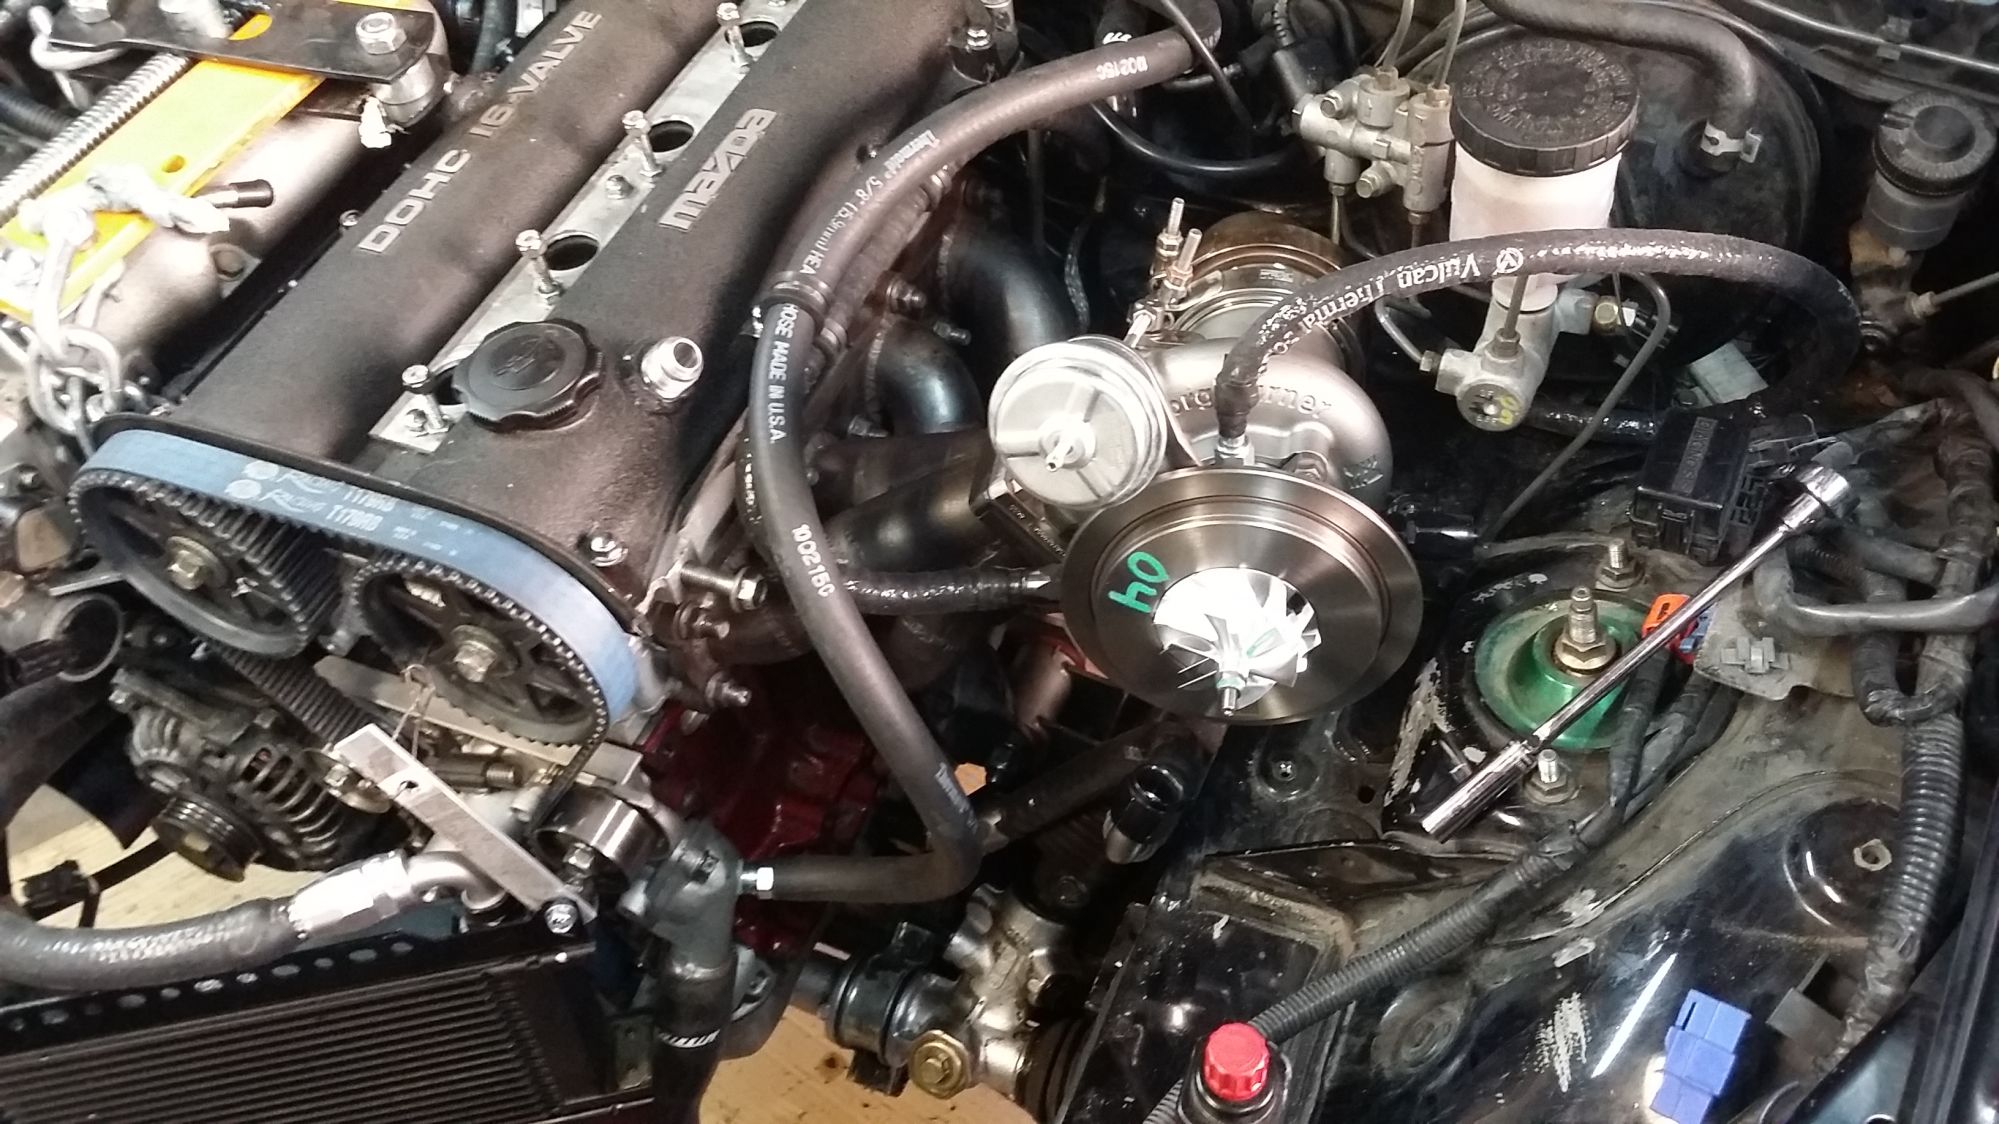
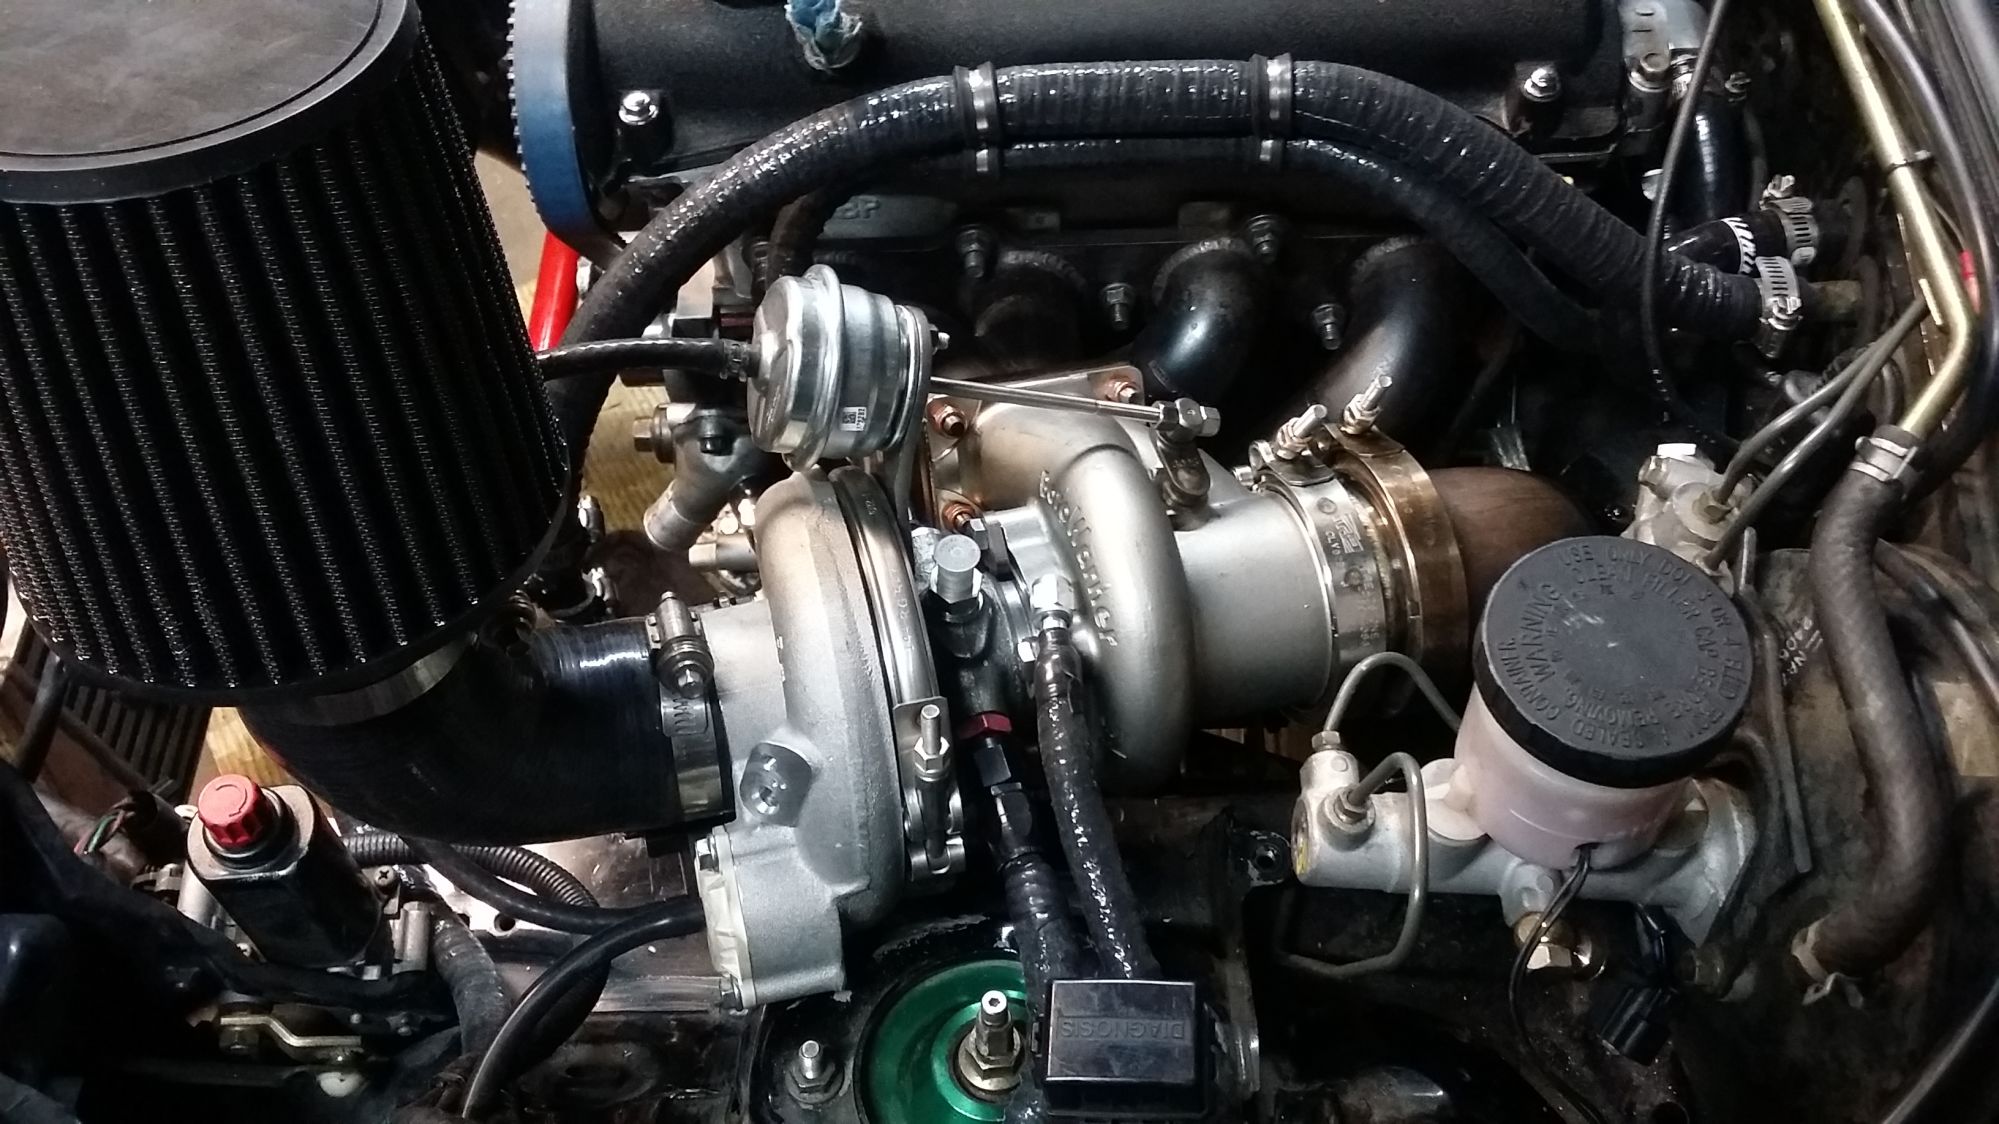
Beat the **** out of the shock tower. Unsurprising, it was a very strong point on the car. Gained about 5-6mm of clearance of compressor cover clocked appropriately.
Bad News
Waste gate will for sure not clear hood. Will cut out the bracing on the hood in that area and see if she fits. No clue what to do if that doesn't work.
Help me choose Heater-core return routing!
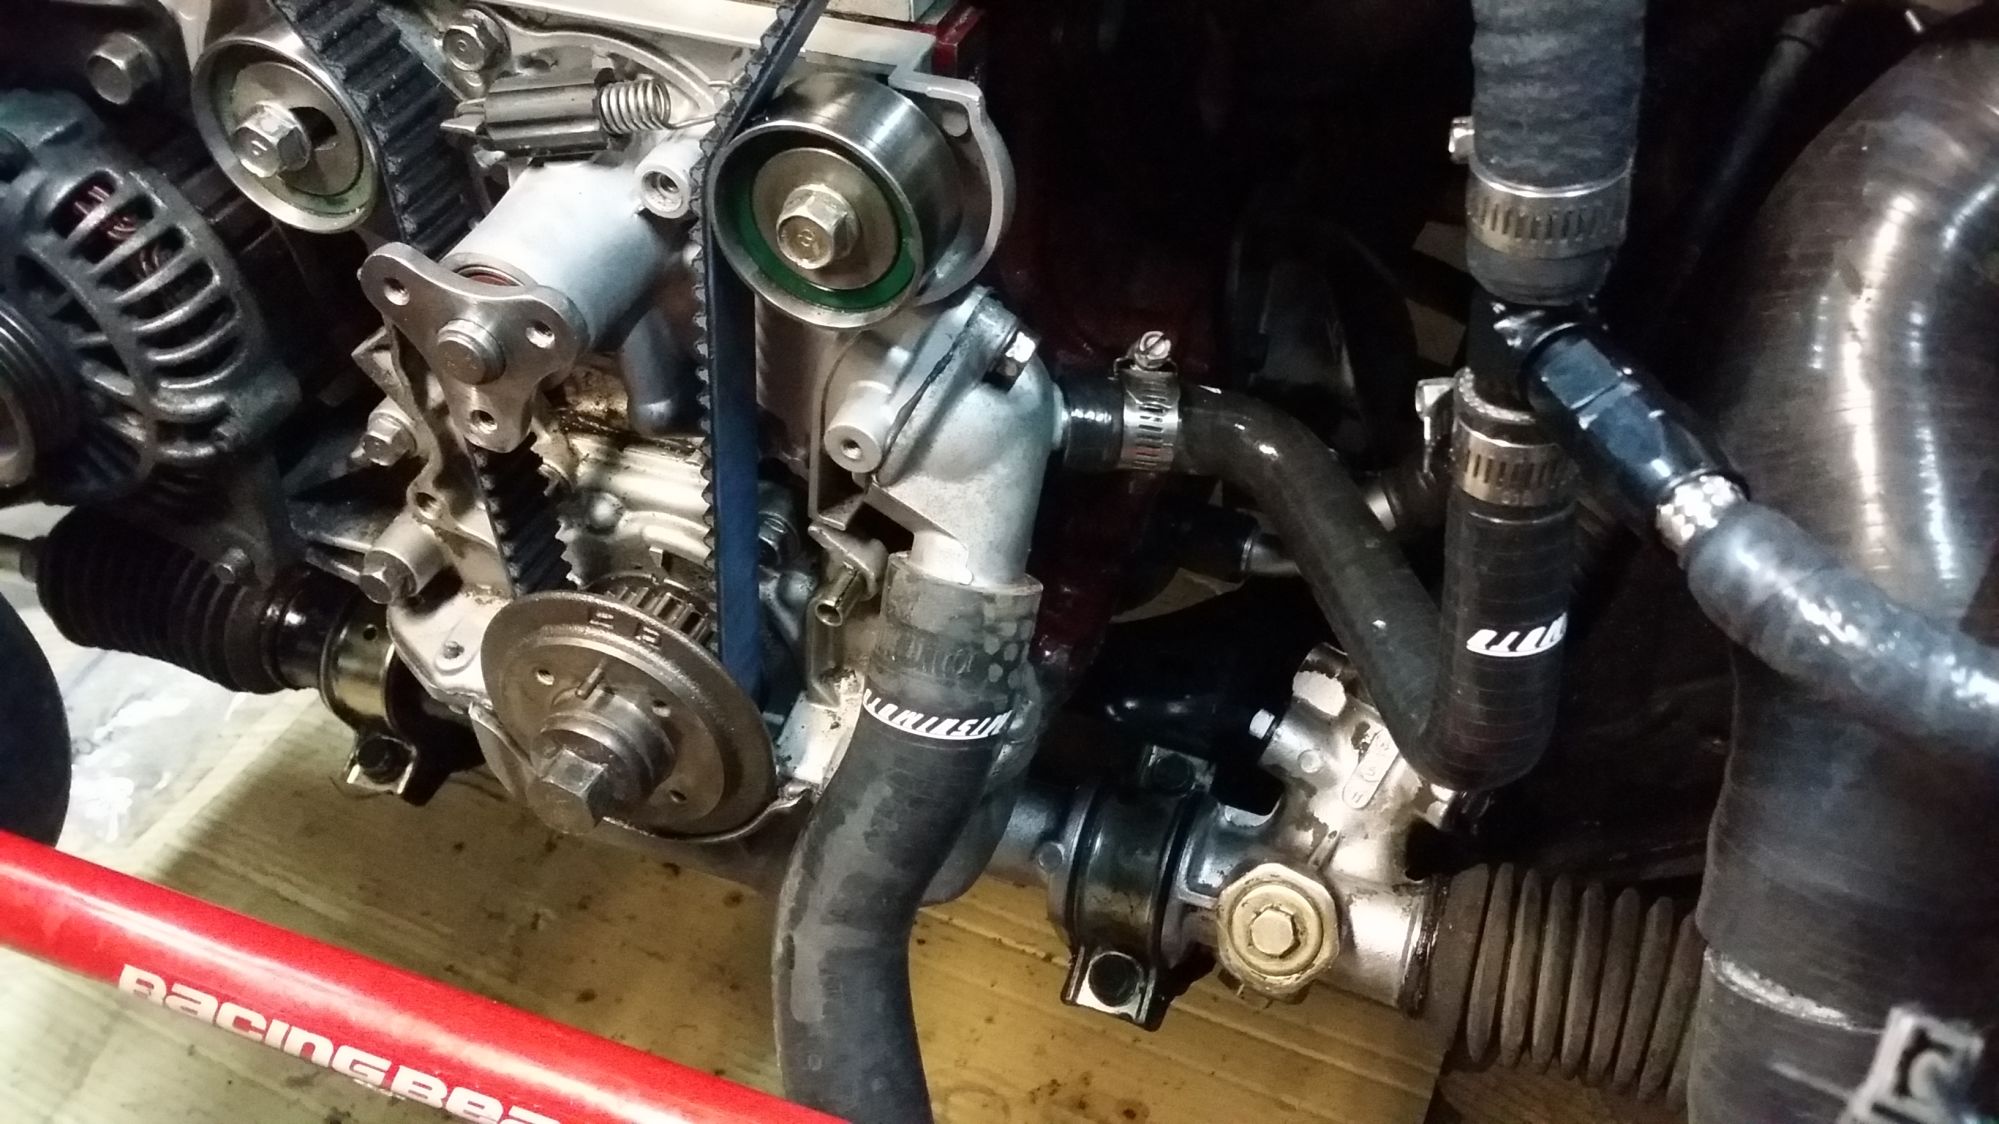
Option 1: The Scenic route :
Option 2: Up N Over :
Use 2 cushion clamps and mount it directly on-top of the turbo coolant feed. It would be fire-sleeved and all that jazz too. In picture I only used one cushion clamp to get an idea. Leaning towards this plan.
Still turning out to be a **** show of an install.
Beat the **** out of the shock tower. Unsurprising, it was a very strong point on the car. Gained about 5-6mm of clearance of compressor cover clocked appropriately.
Bad News
Waste gate will for sure not clear hood. Will cut out the bracing on the hood in that area and see if she fits. No clue what to do if that doesn't work.
Help me choose Heater-core return routing!
Option 1: The Scenic route :
Option 2: Up N Over :
Use 2 cushion clamps and mount it directly on-top of the turbo coolant feed. It would be fire-sleeved and all that jazz too. In picture I only used one cushion clamp to get an idea. Leaning towards this plan.
Still turning out to be a **** show of an install.
Reply
0
0
01-14-2016, 05:24 PM
#65
SADFab Destructive Testing Engineer
iTrader: (5)
Join Date: Apr 2014
Location: Beaverton, USA
Posts: 18,642
Total Cats: 1,866
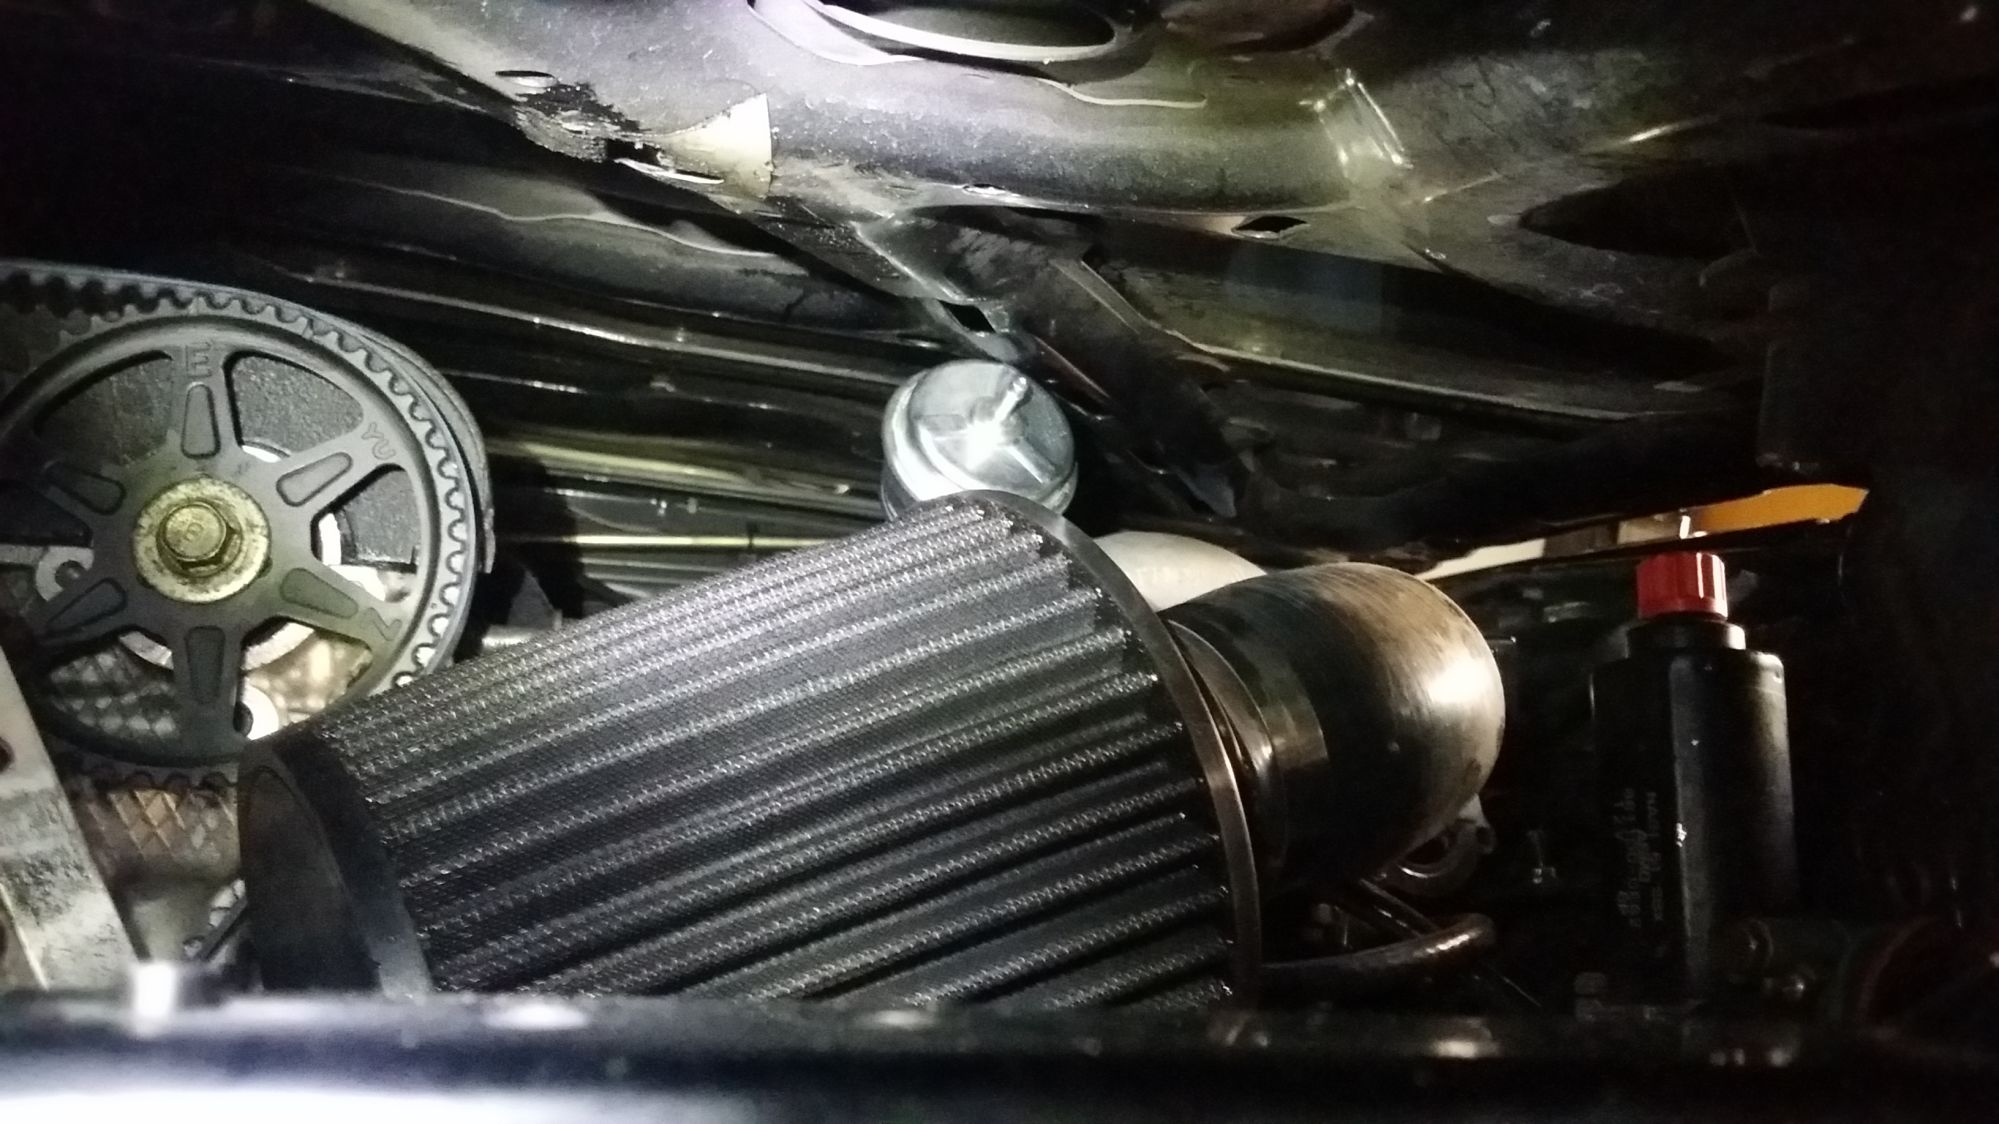
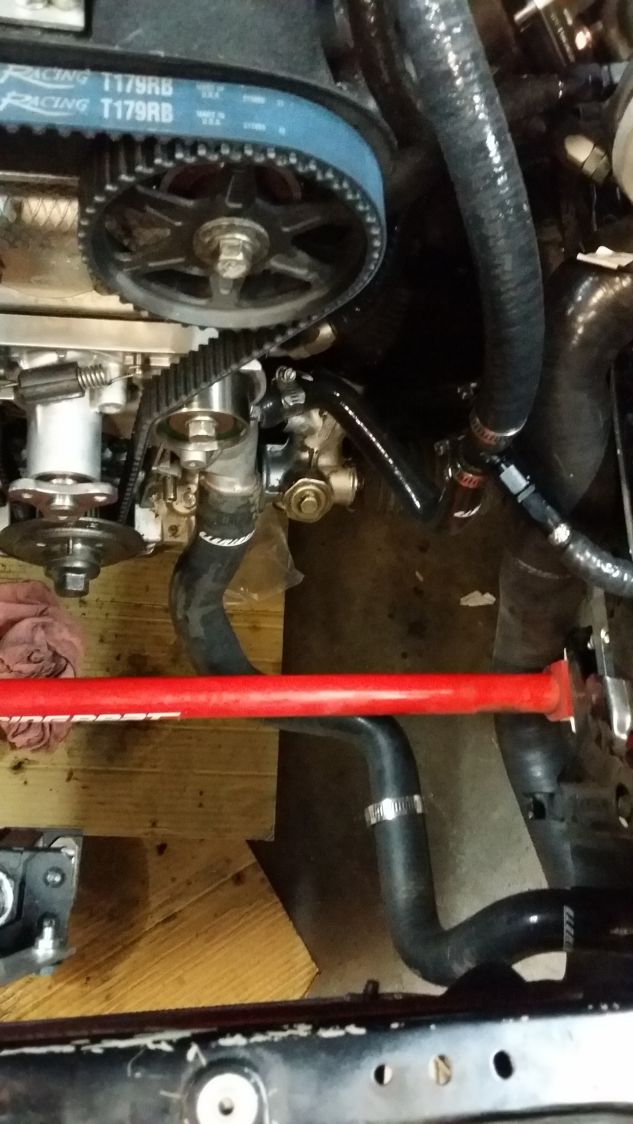
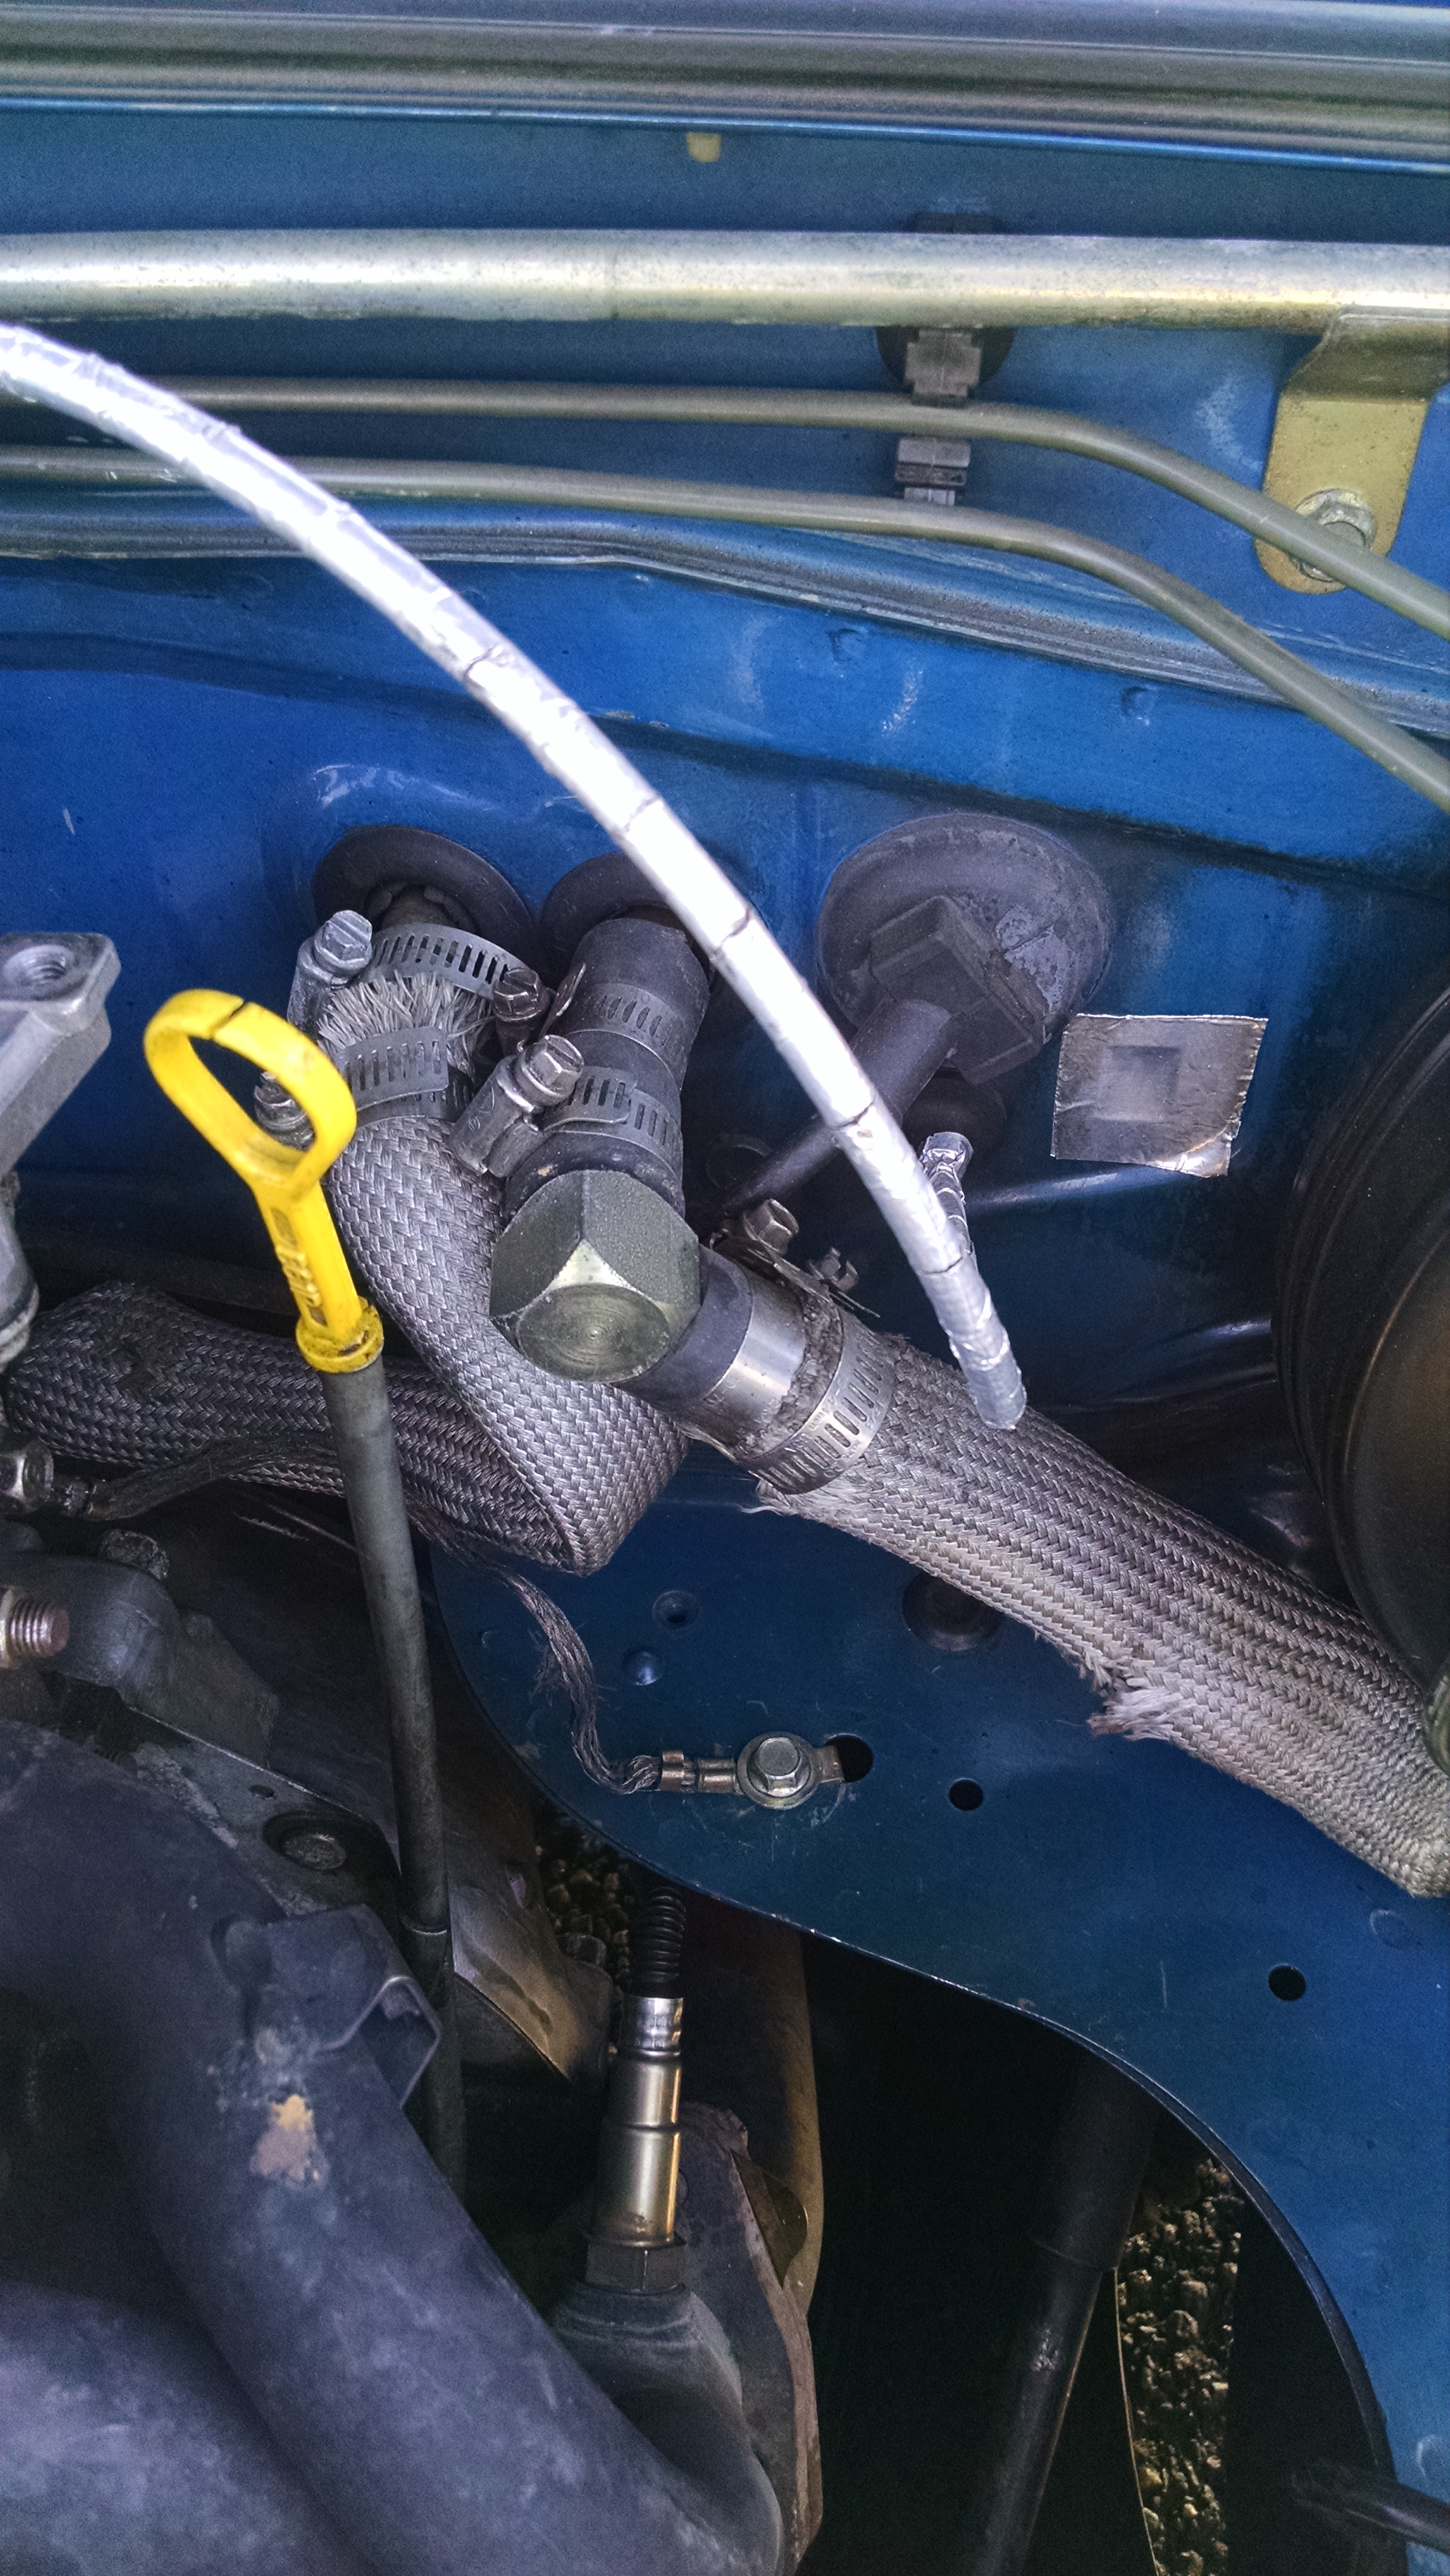
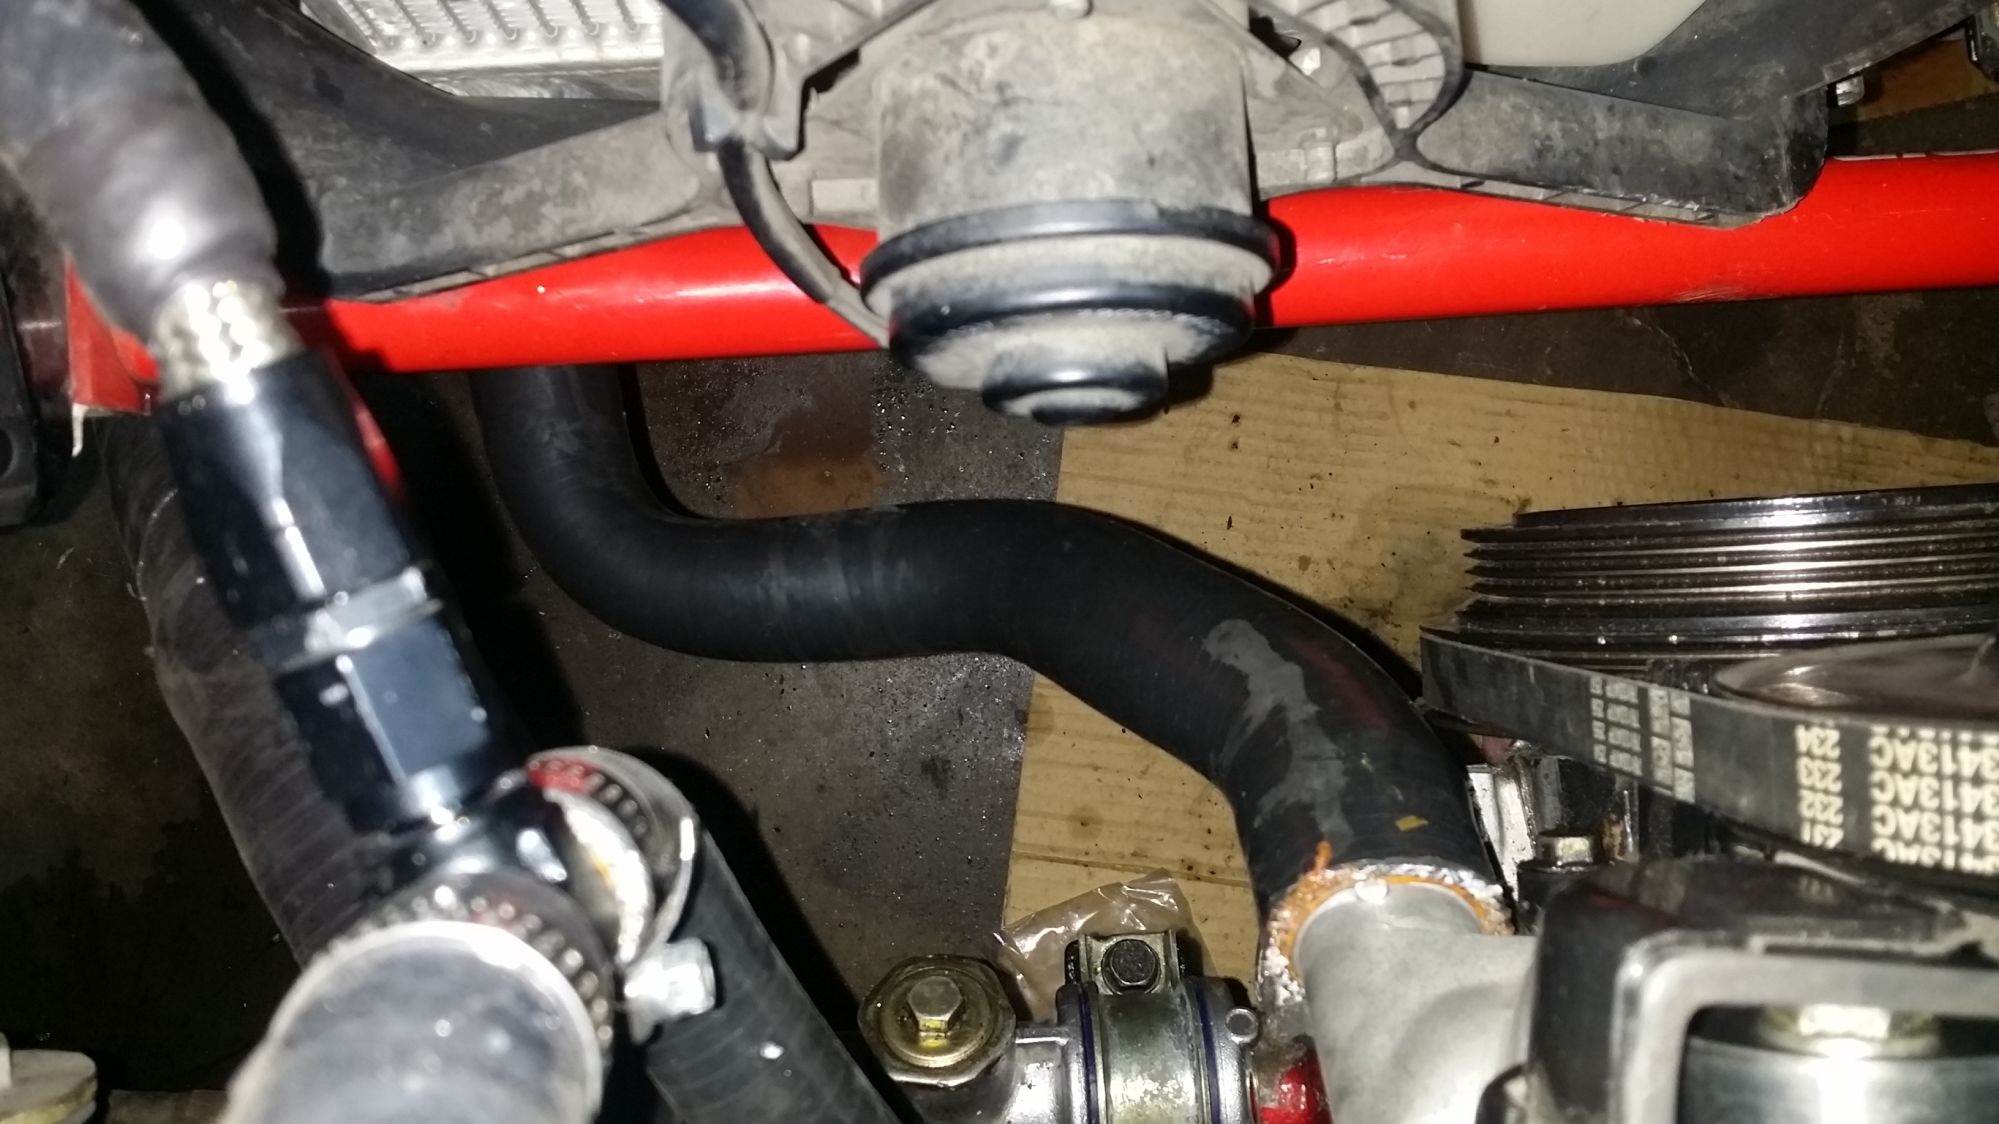
I rock the scenic route, but I tucked it under the diag port bracket behind the shock, and wrapped it in heat sleeve. I'll try and get a picture.
This picture kinda show it:
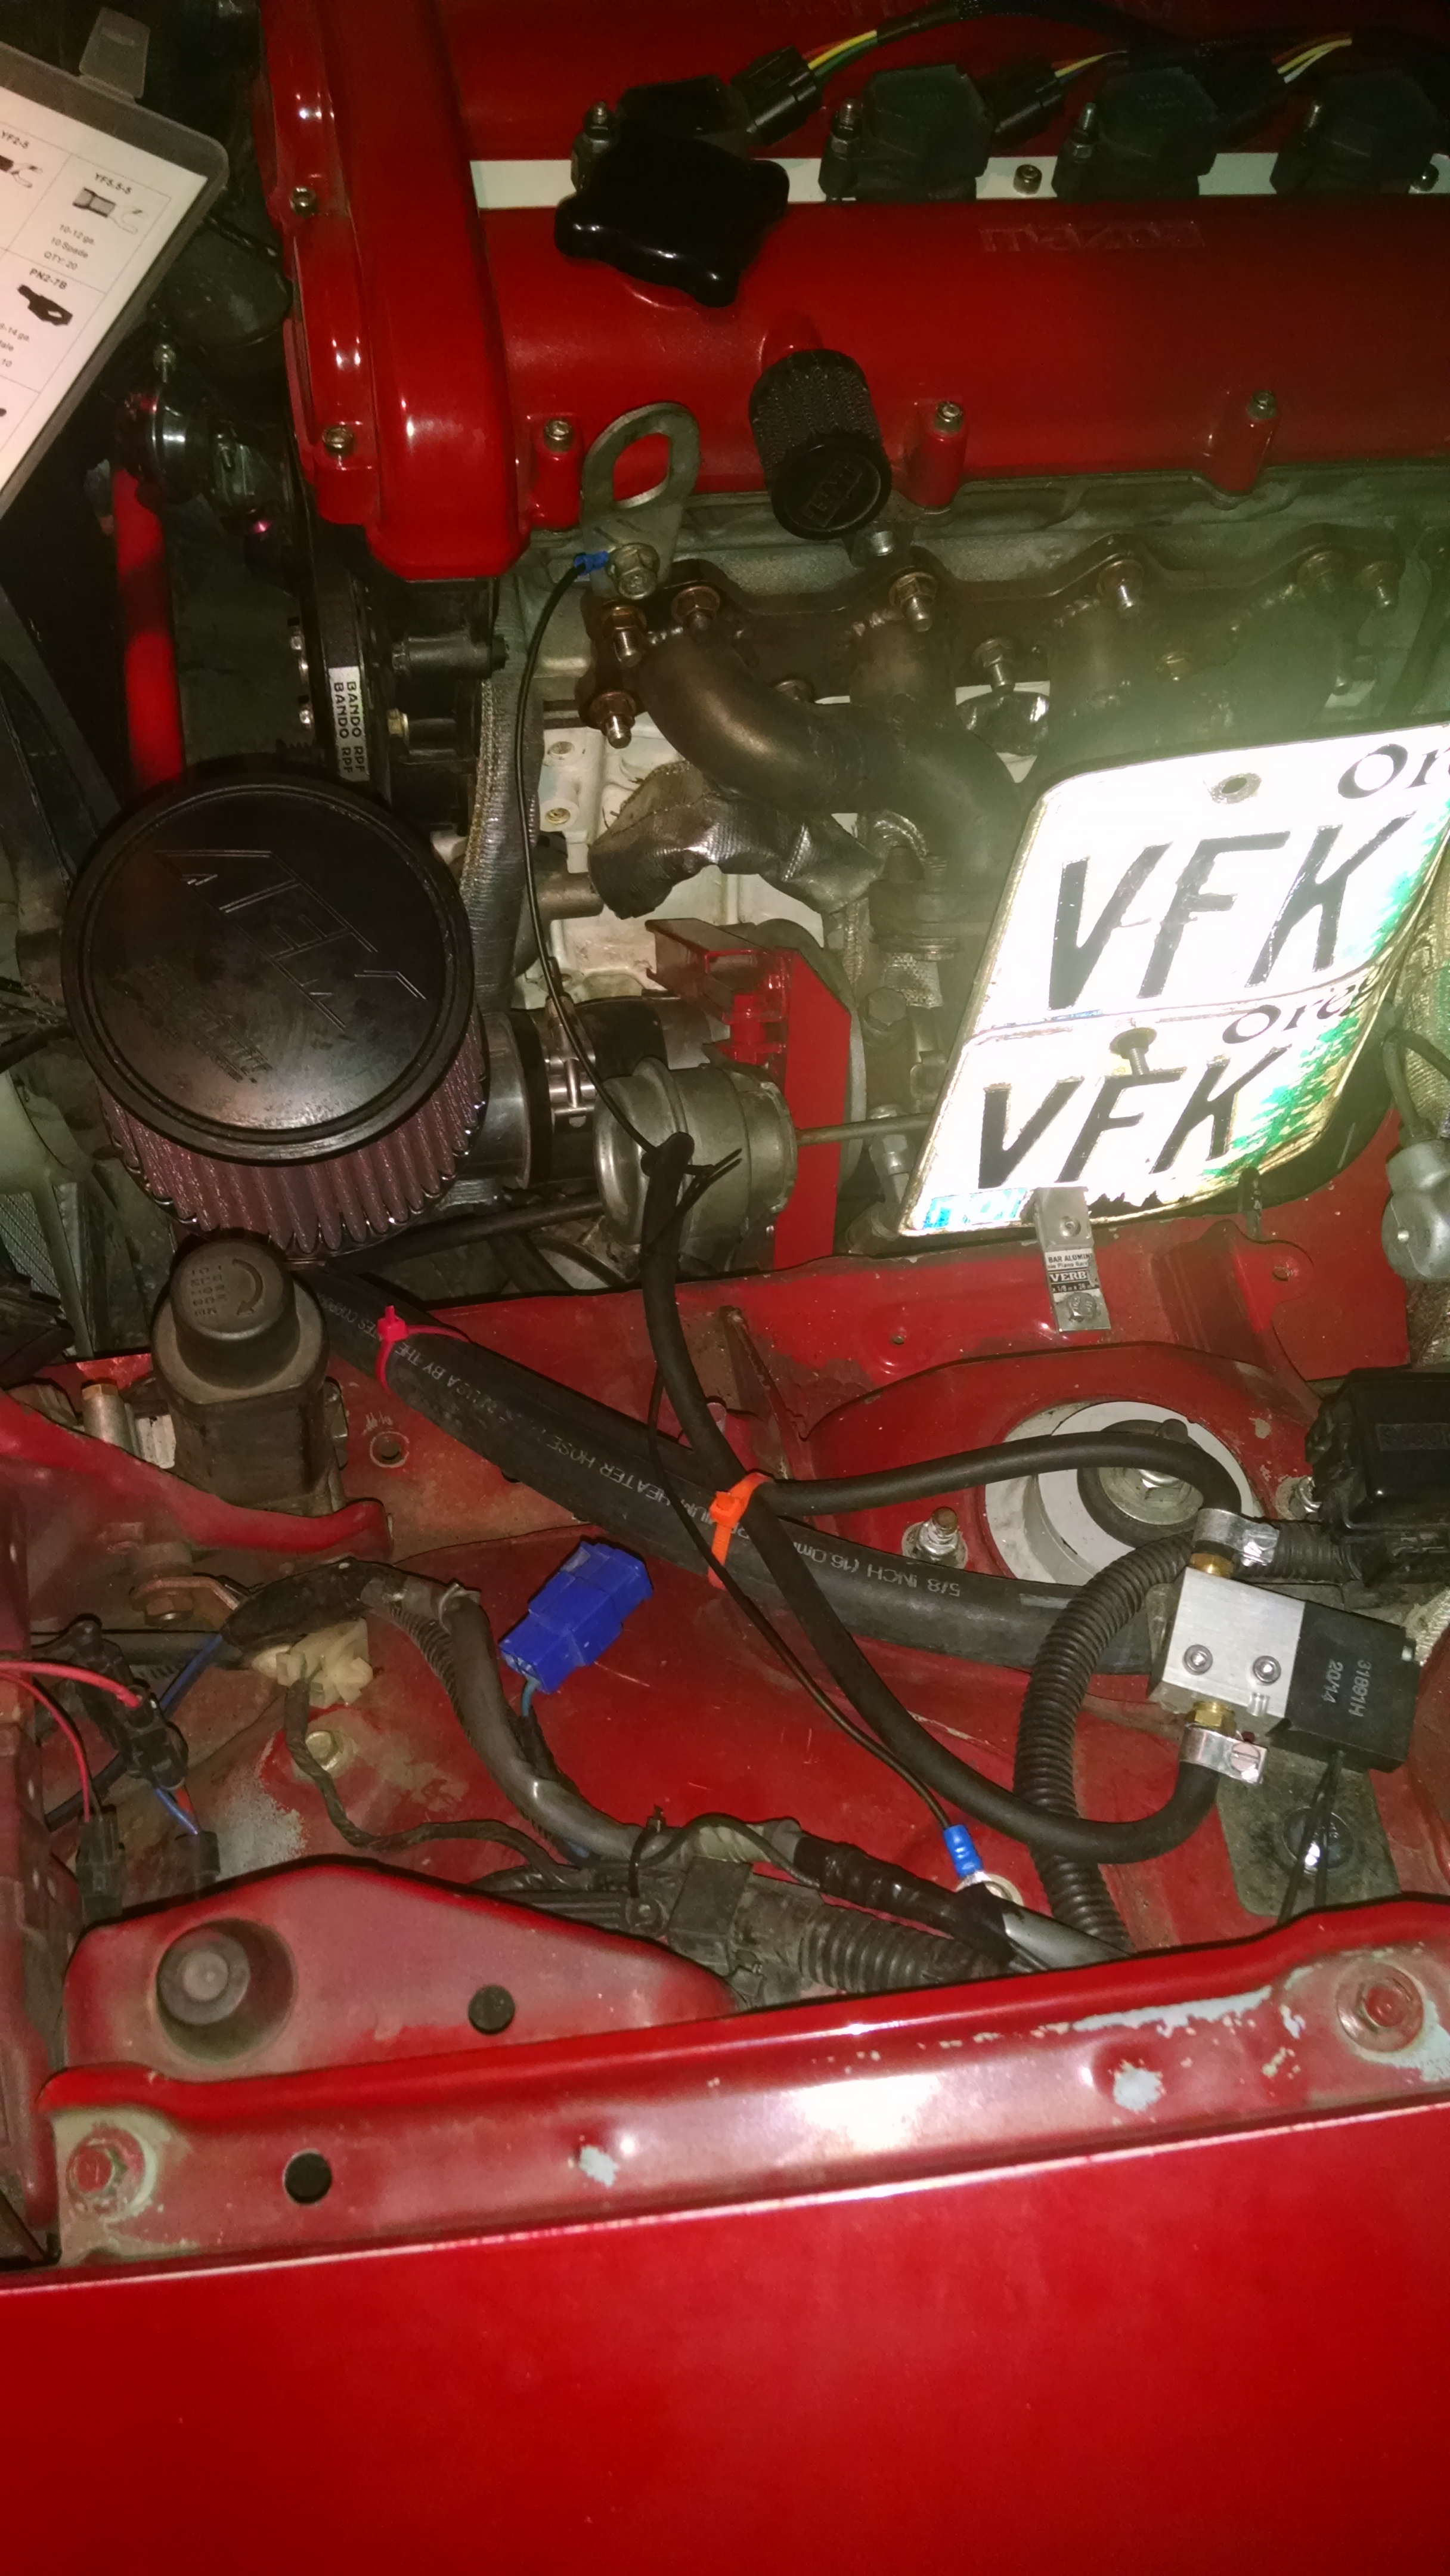
This picture kinda show it:
Reply
0
0

 01-14-2016, 11:20 PM
#67
Junior Member
Thread Starter
iTrader: (7)
Join Date: May 2014
Location: Denver, Co.
Posts: 458
Total Cats: 40
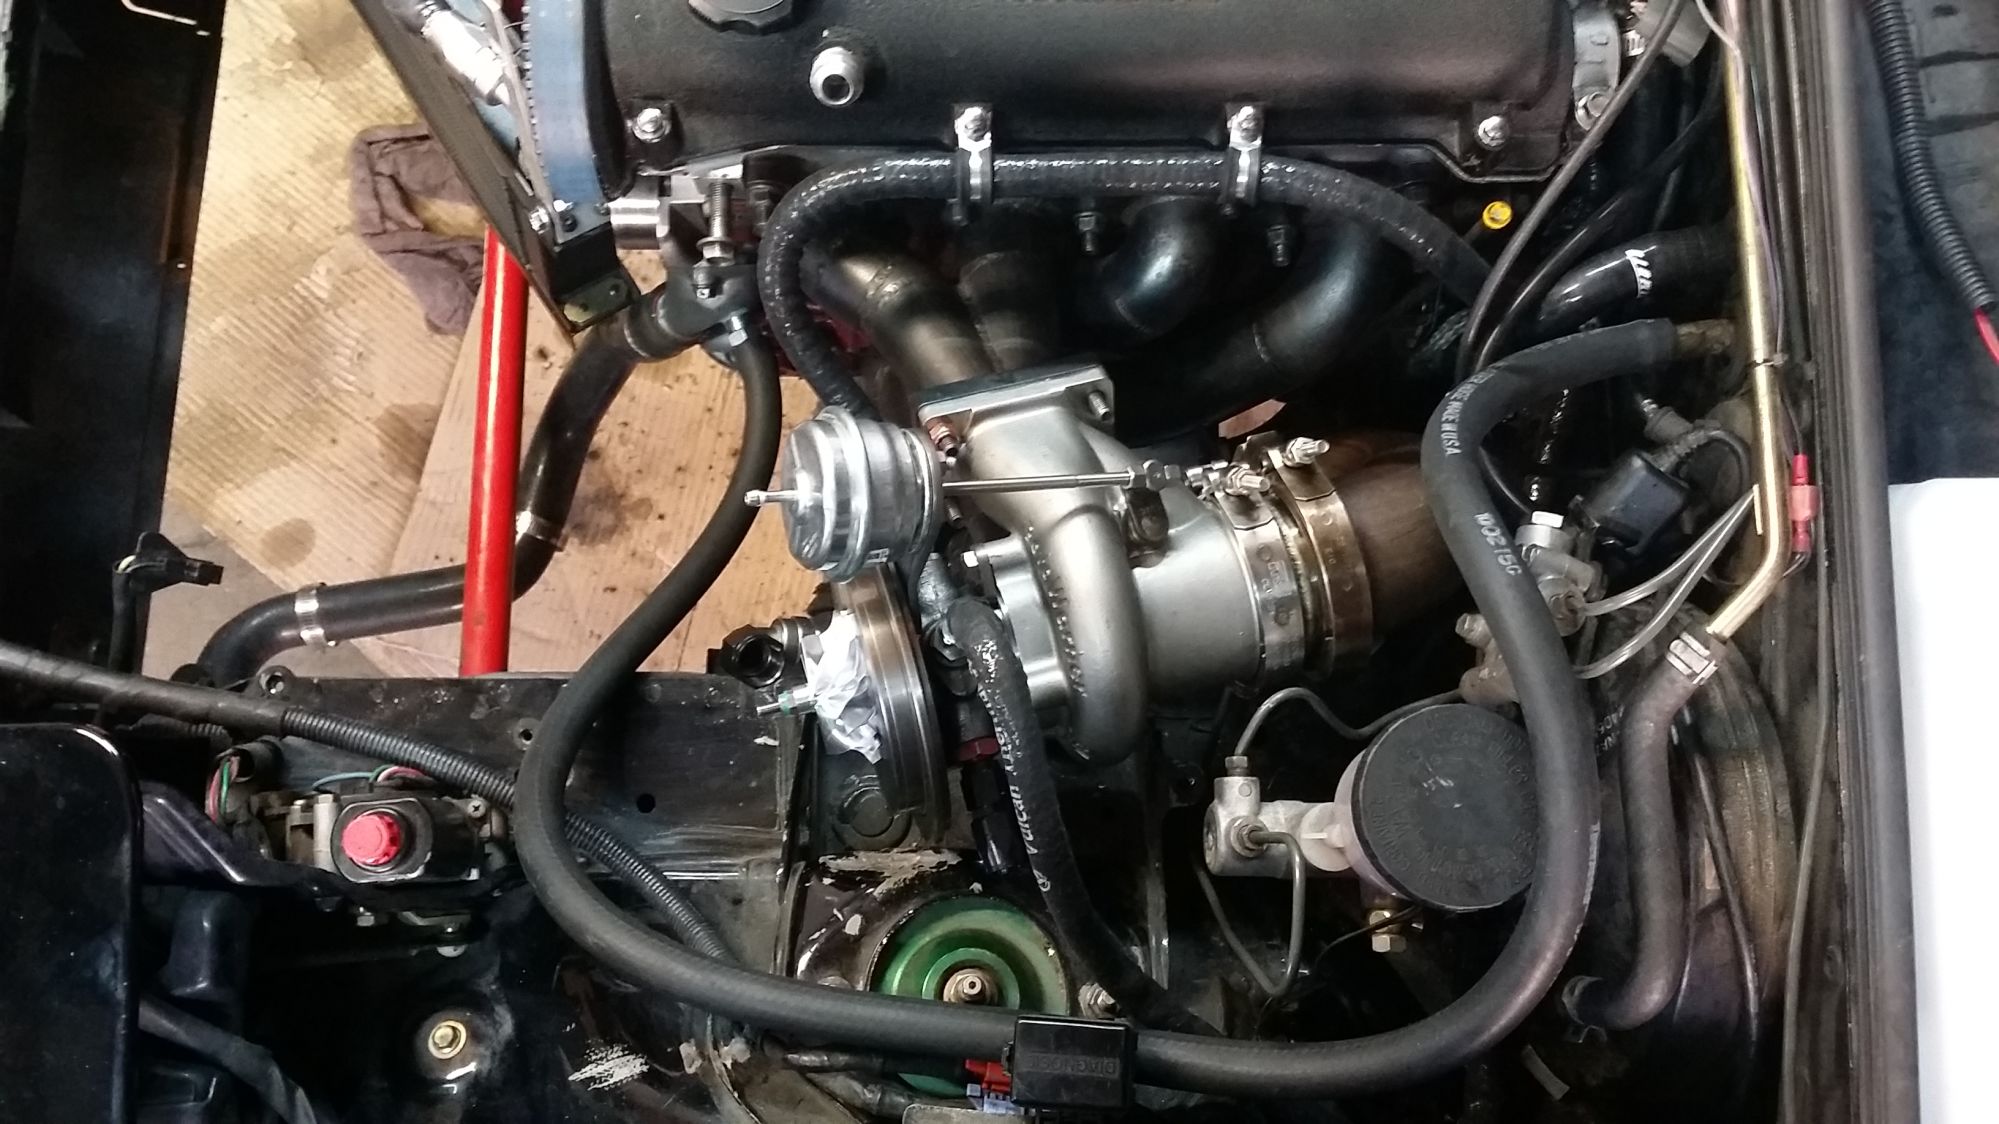
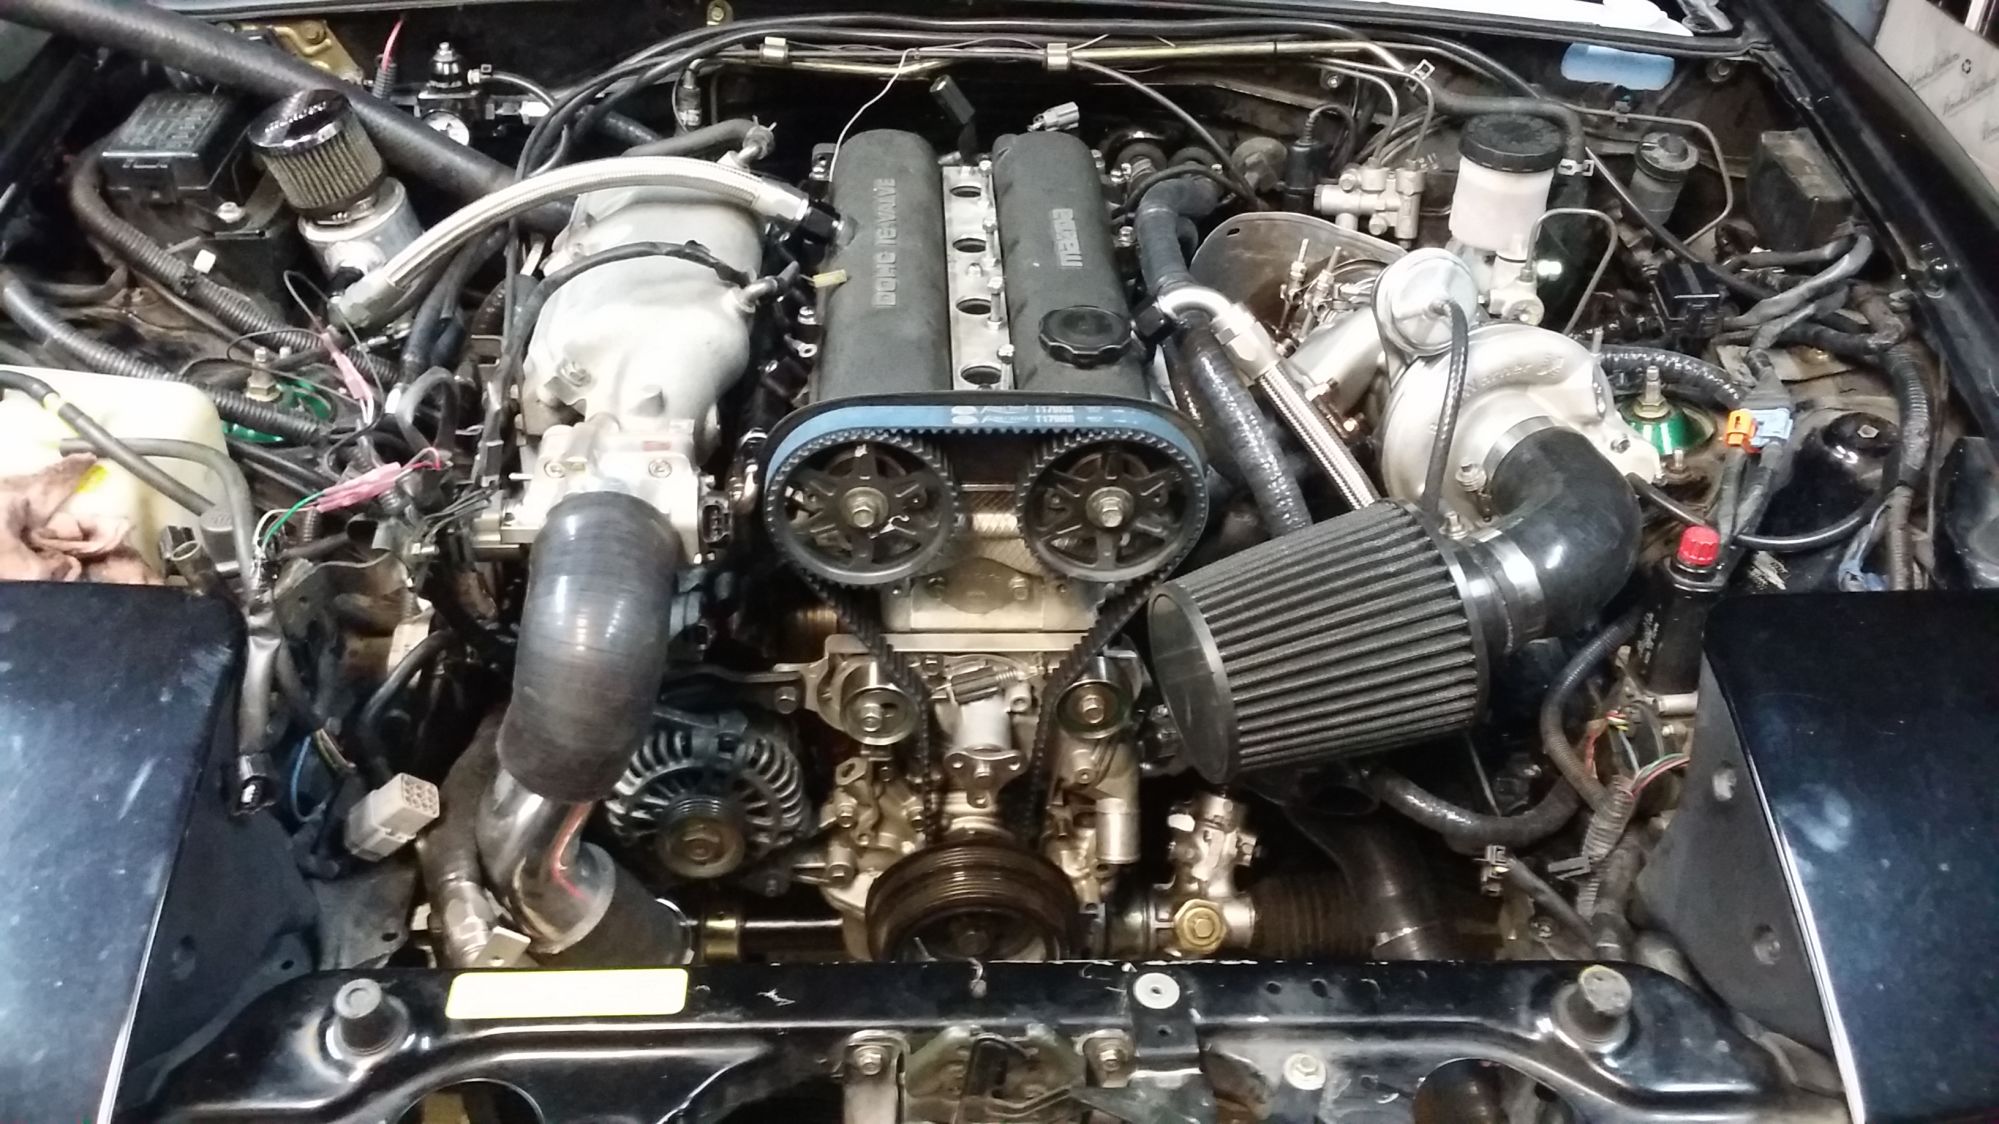
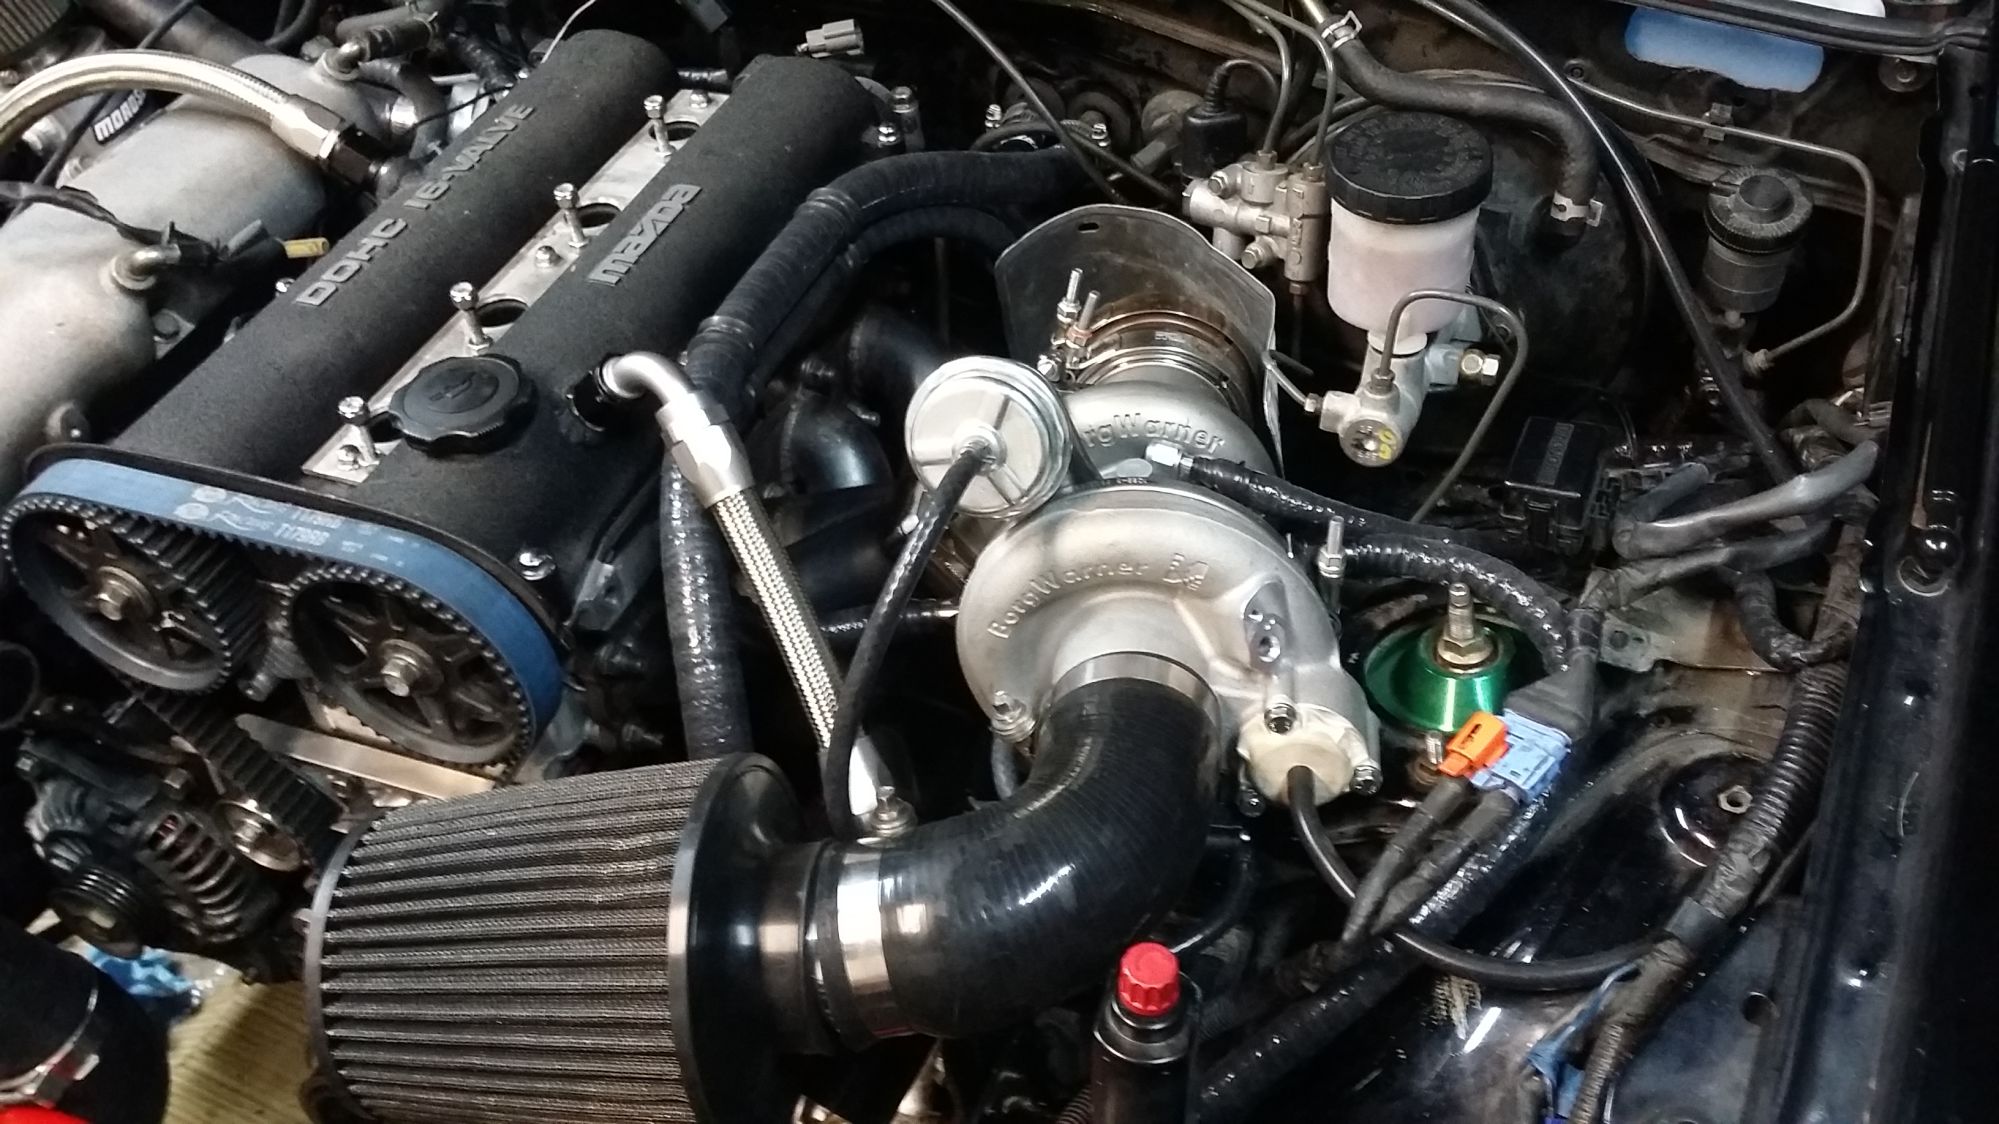
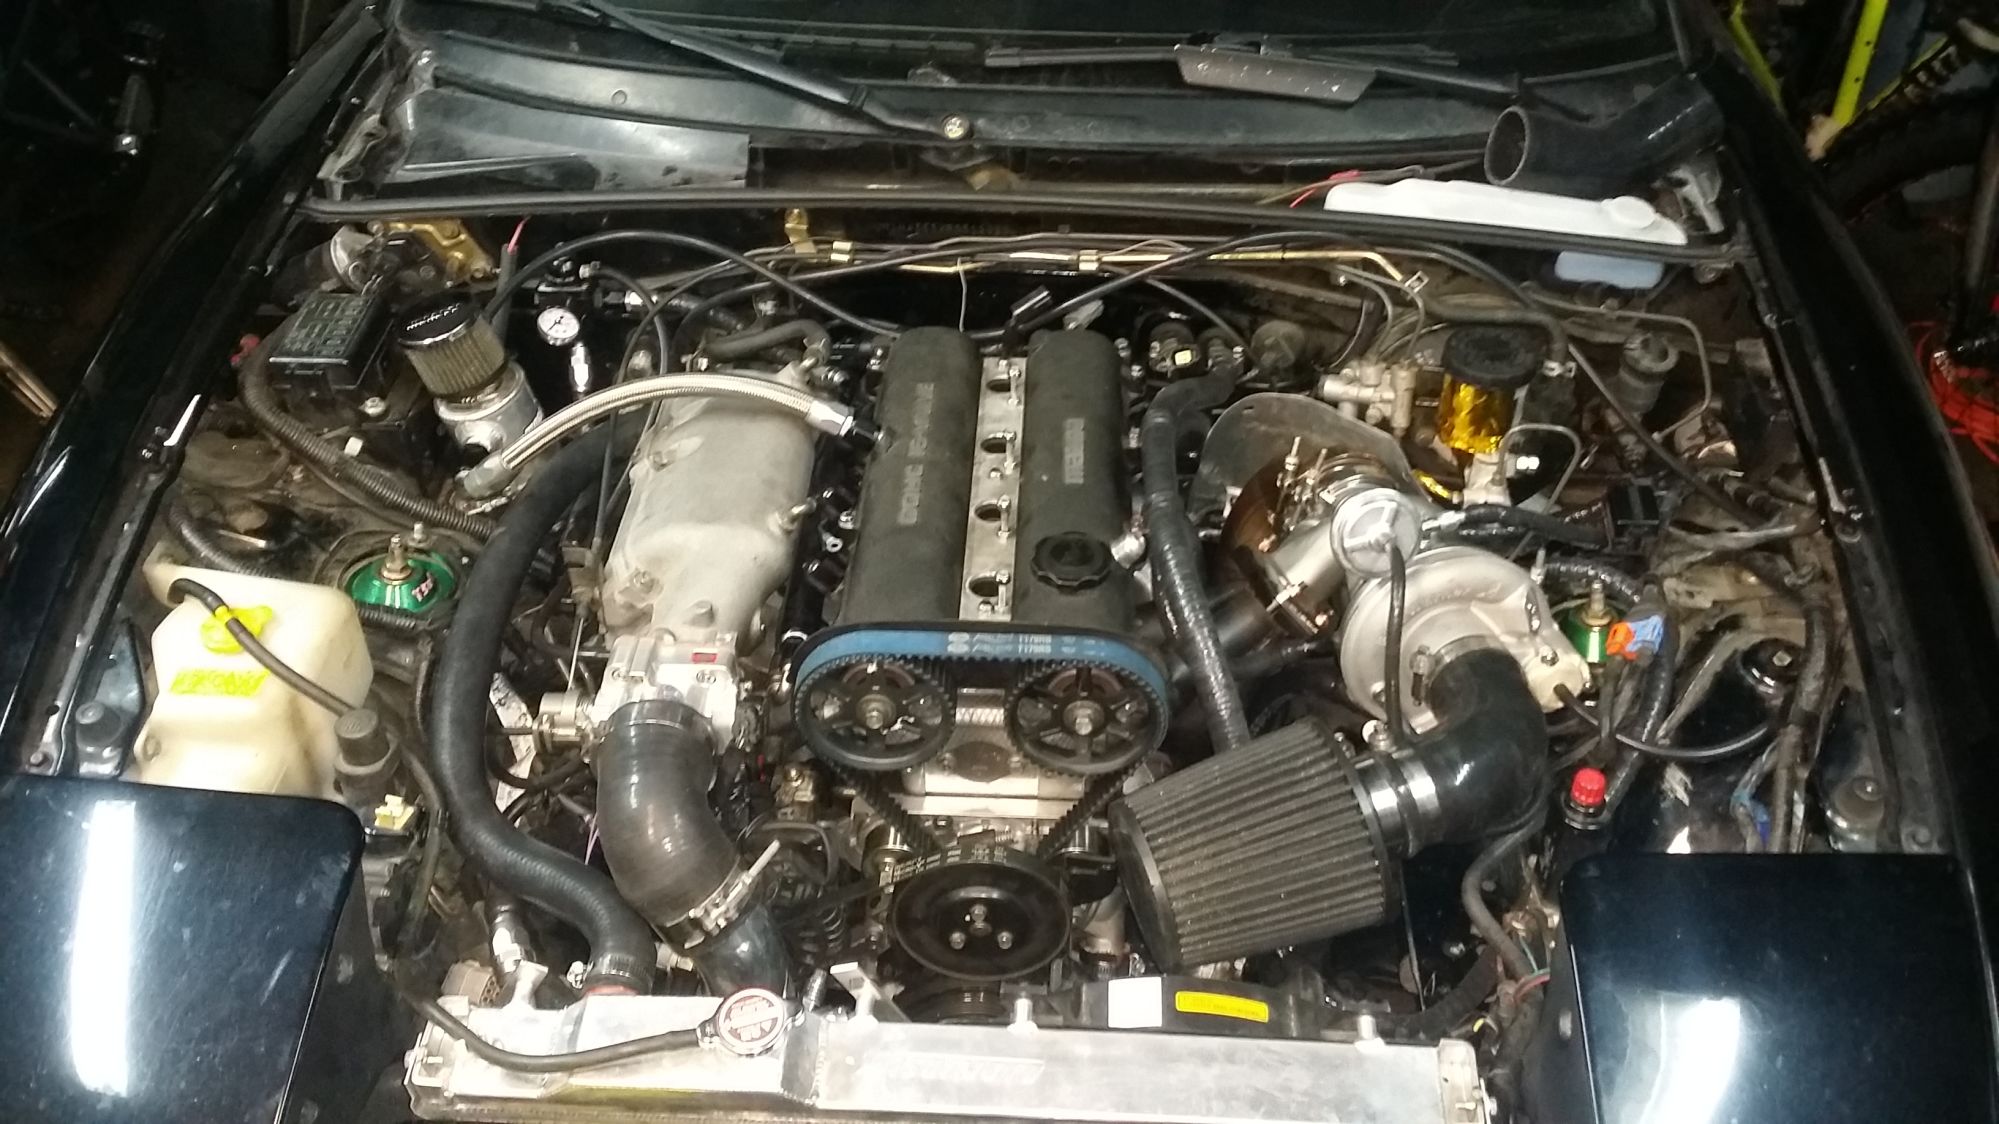
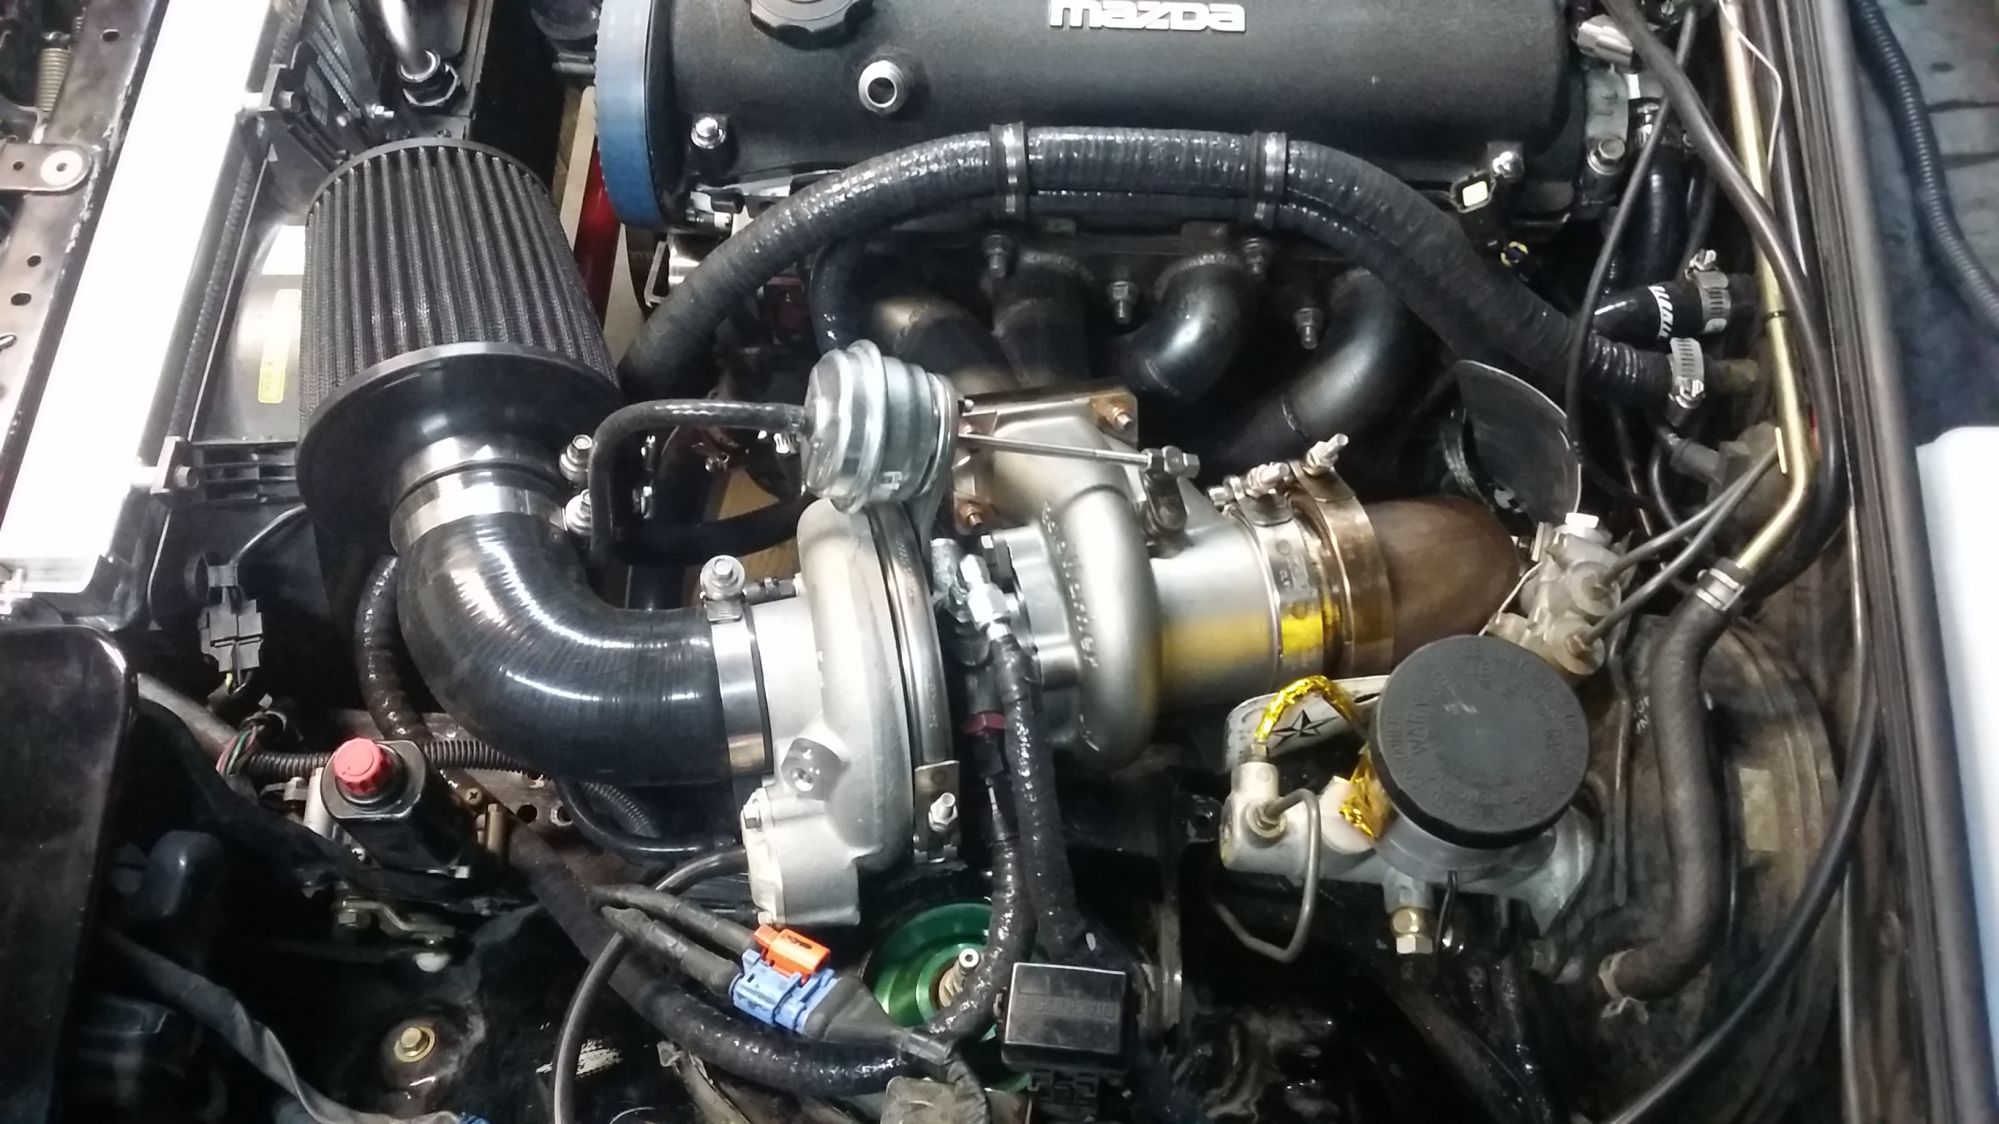
Just noticed almost all pictures I posted earlier were with the compressor housing off. In reality the housing was off for all of 10 min today as I checked for clearances of the housing. It's safely buttoned up now. Sure does look pretty though.
Reply
0
0
 01-17-2016, 09:31 PM
#69
Junior Member
Thread Starter
iTrader: (7)
Join Date: May 2014
Location: Denver, Co.
Posts: 458
Total Cats: 40
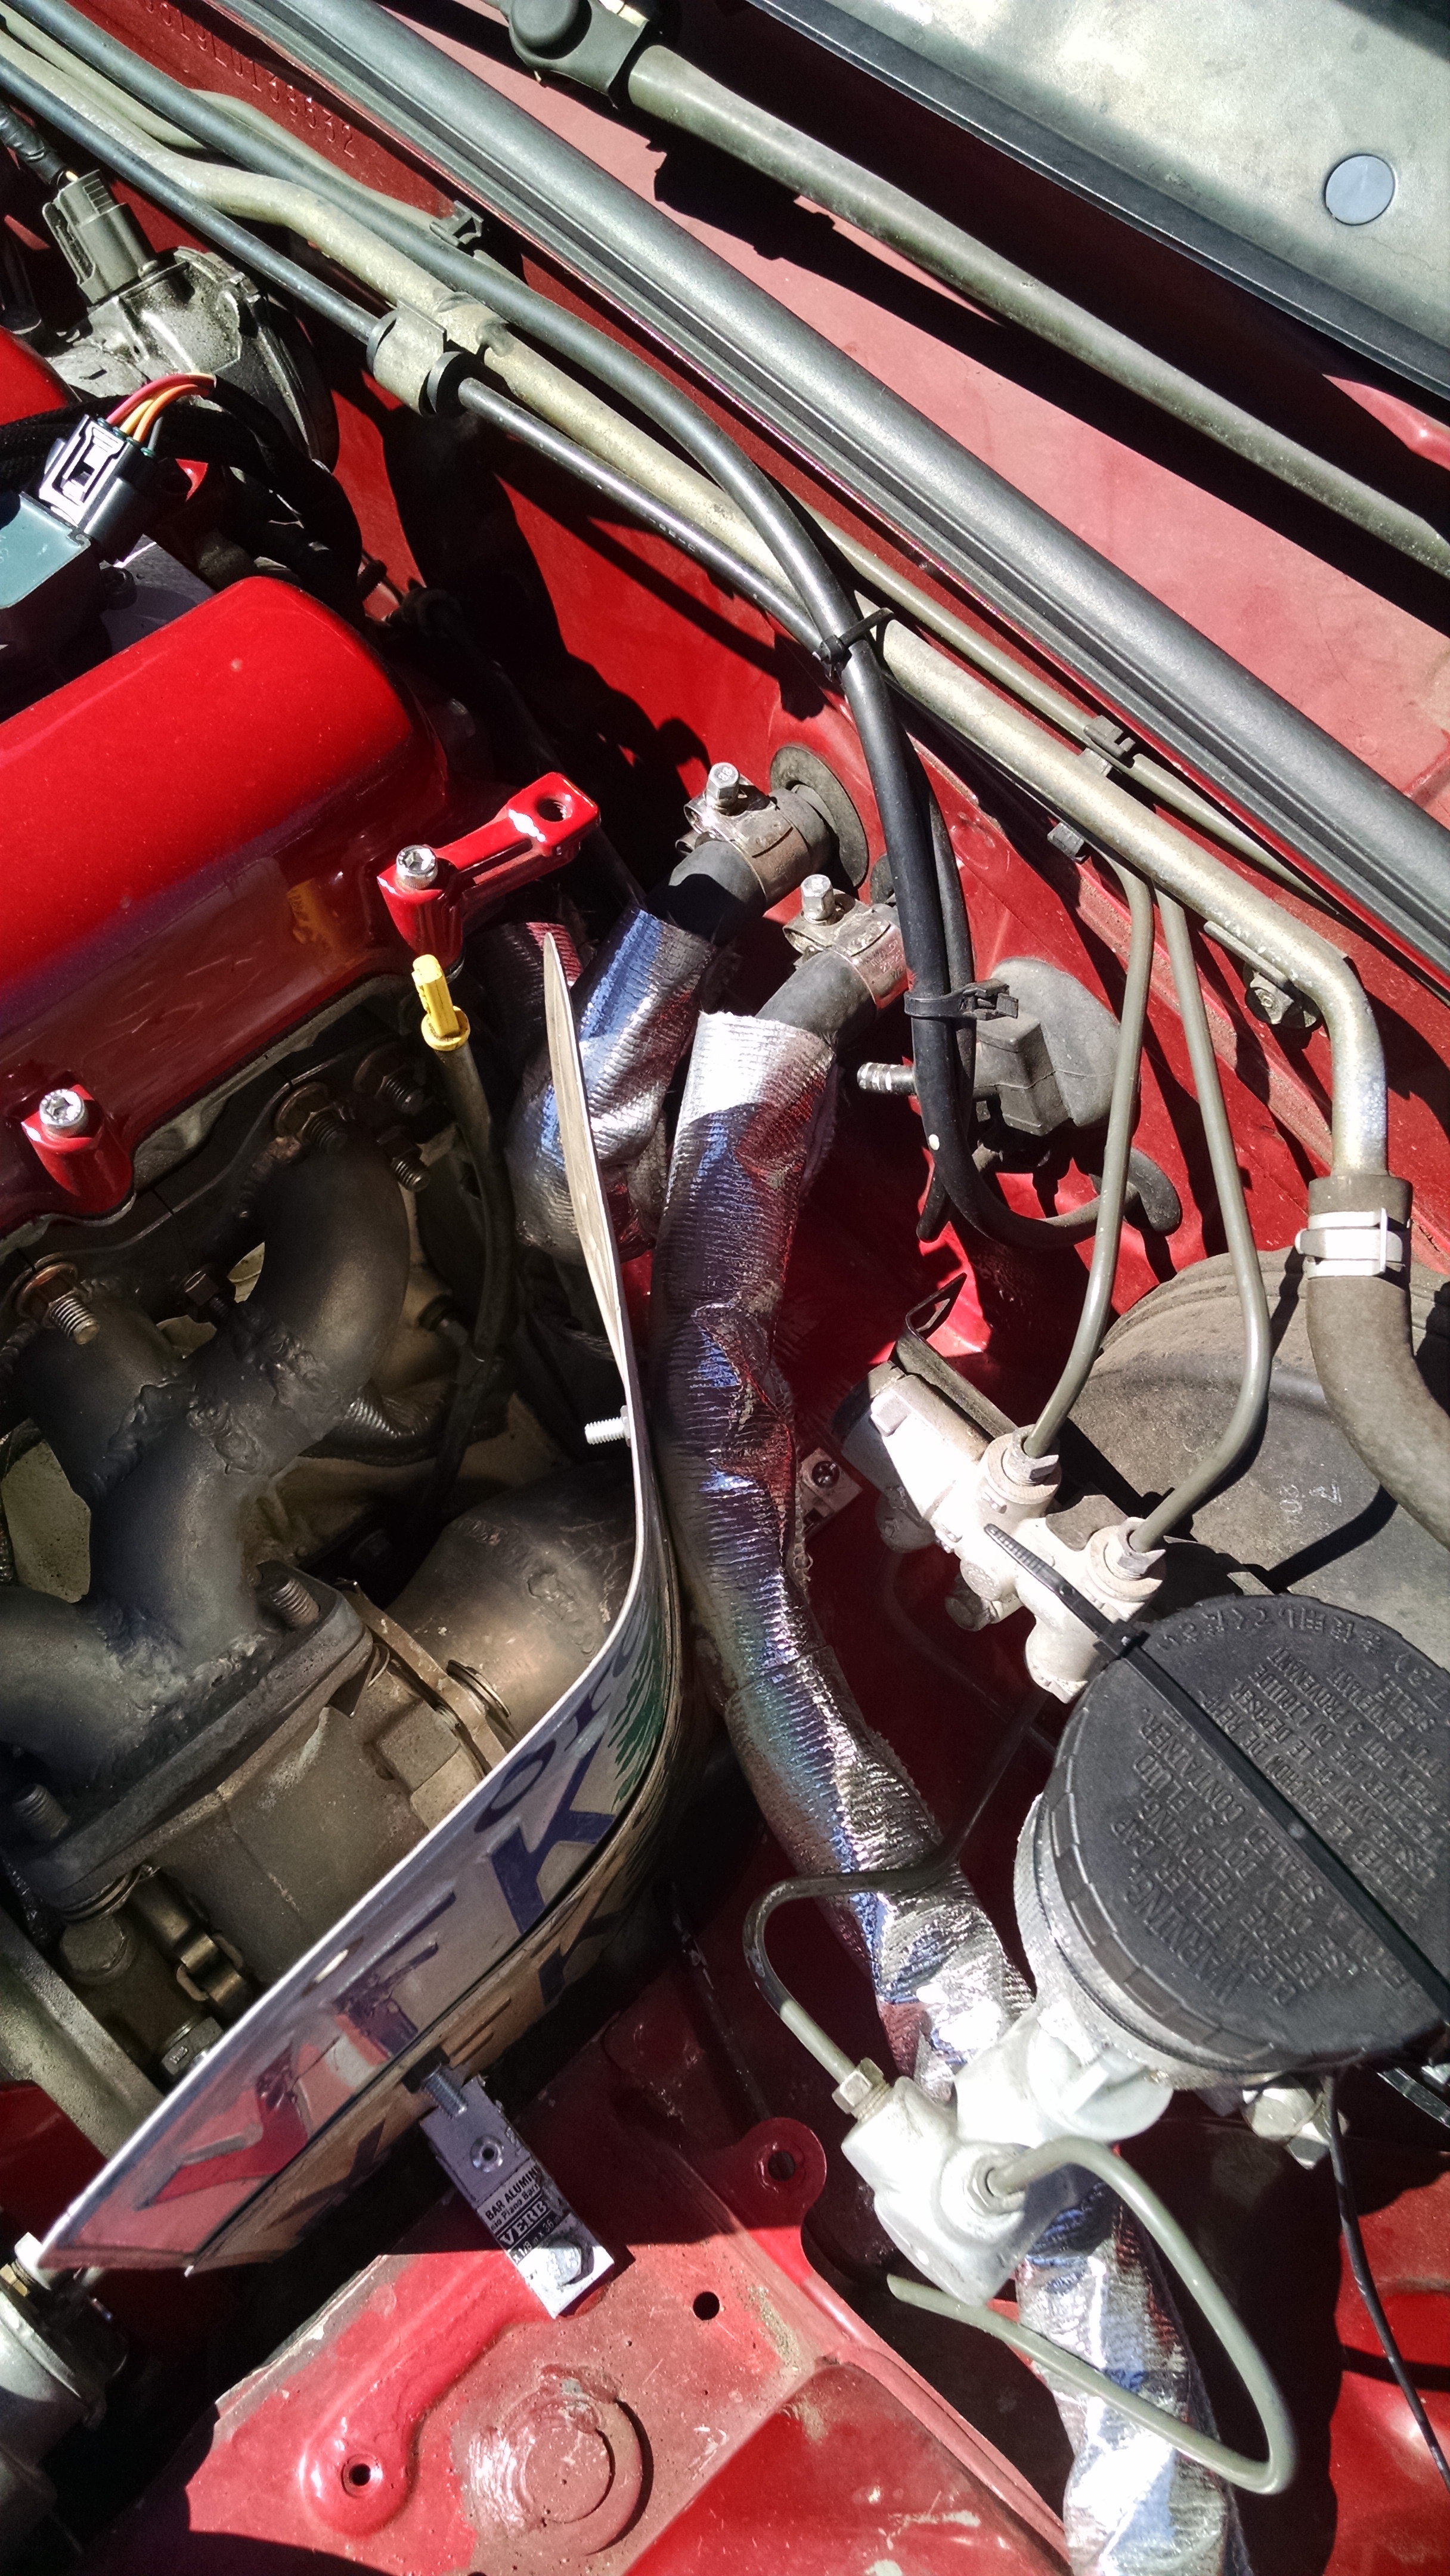
Small Plumbing Work
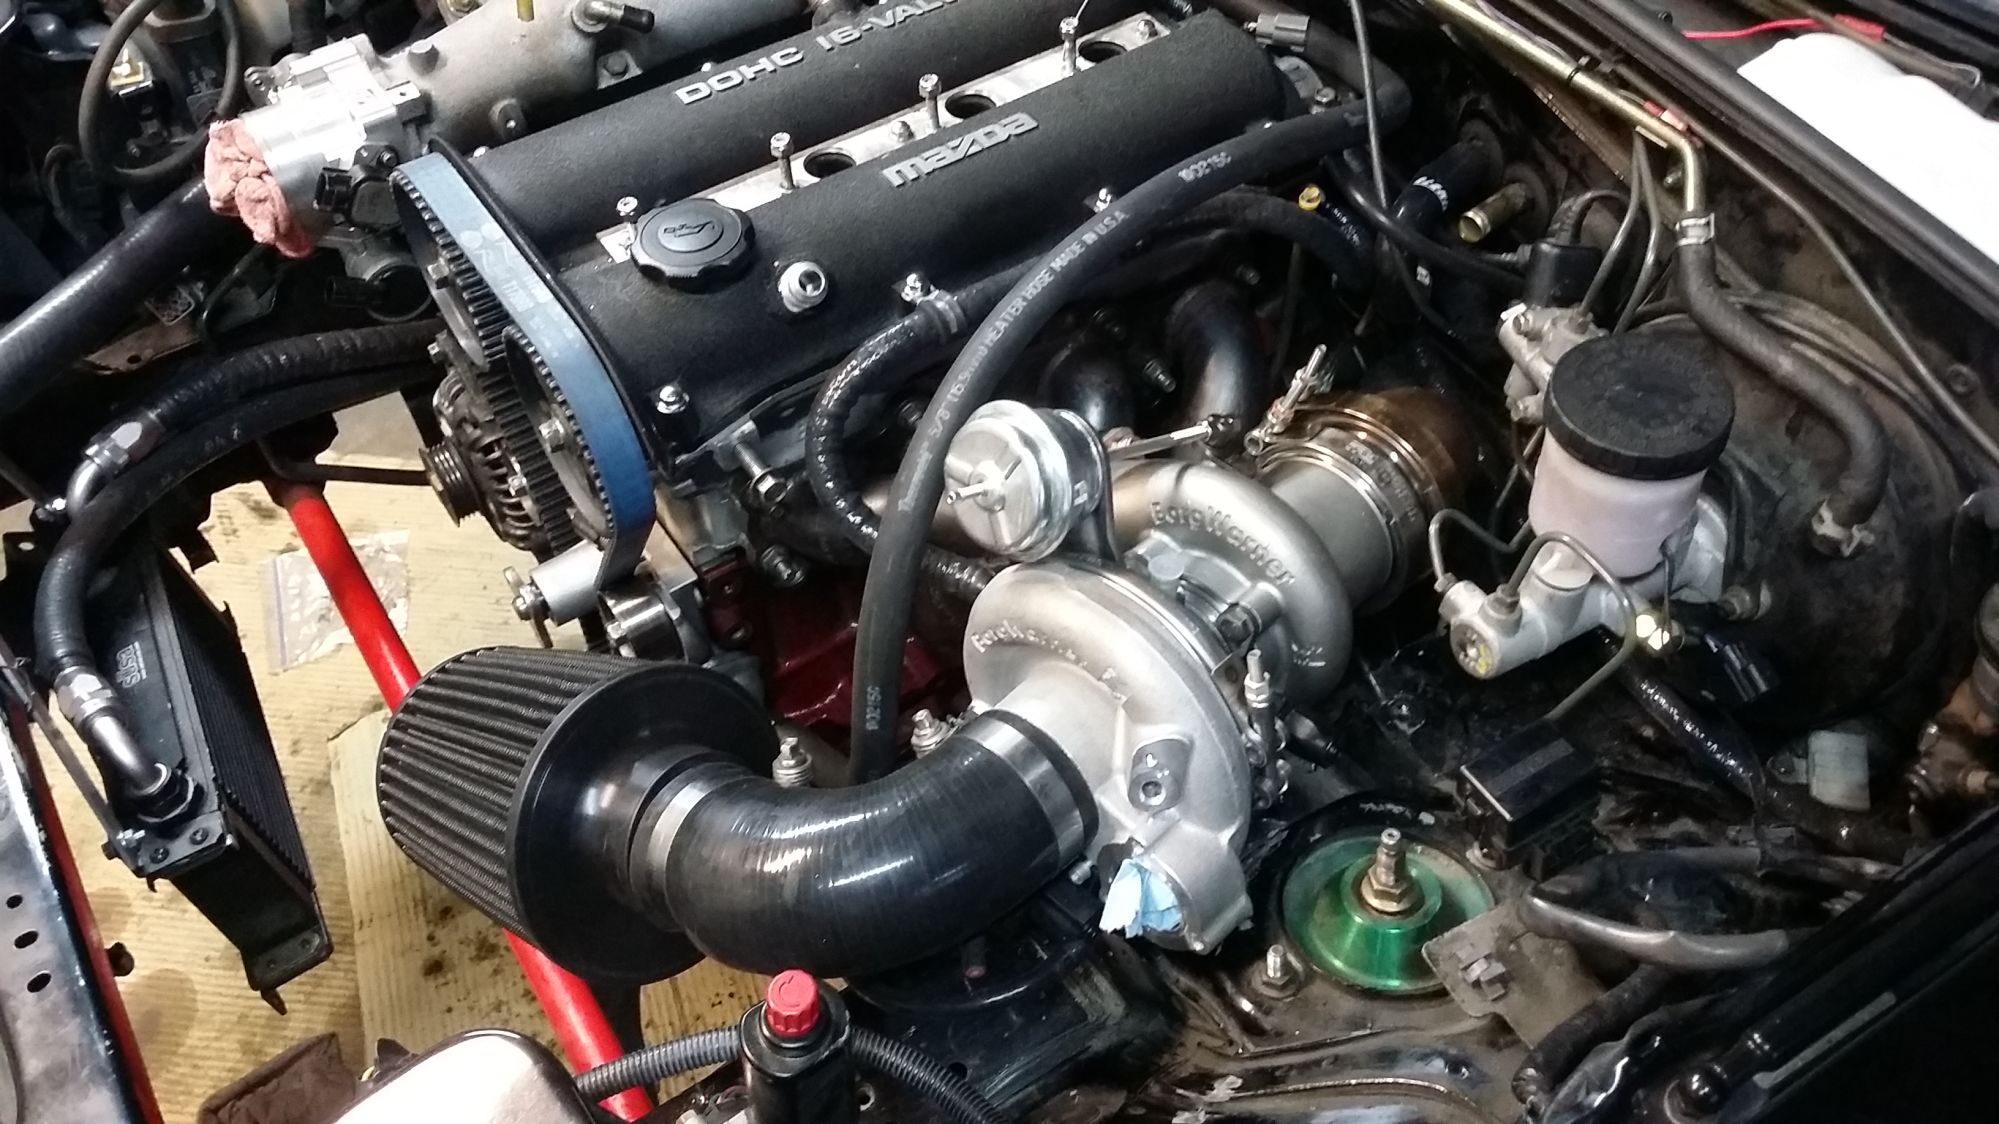
-Had about two hours to work on car this afternoon post-work. Boring update really, I made the turbo coolant return hose, and the heater return to mixing-manifold. I chose the Up N Over option due to very little space to route the hose going The Scenic Route as well as hose to down-pipe proximity with that option. Also took a handful of pictures to show my new mixing manifold design/routing. Works well. In hindsight I wish I had drilled/tapped the heater-core return in a better spot/angle. Meh.
-I also found some random Texas license plate by the side of the road and made the base of a heat shield out of it. Probably off some Texas transplant that doesn't know how to drive in Colorado winters. Bet they smashed it off somehow as it was pretty beat up. I'll be picking up some sort of a heat-shield blanket to add and heat-wrapping the master cylinder/brake lines with some gold stuff.
All in all I hate the way my everything looks so far. I imagined it so much cleaner in my head .
.
Pics :
-Had about two hours to work on car this afternoon post-work. Boring update really, I made the turbo coolant return hose, and the heater return to mixing-manifold. I chose the Up N Over option due to very little space to route the hose going The Scenic Route as well as hose to down-pipe proximity with that option. Also took a handful of pictures to show my new mixing manifold design/routing. Works well. In hindsight I wish I had drilled/tapped the heater-core return in a better spot/angle. Meh.
-I also found some random Texas license plate by the side of the road and made the base of a heat shield out of it. Probably off some Texas transplant that doesn't know how to drive in Colorado winters. Bet they smashed it off somehow as it was pretty beat up. I'll be picking up some sort of a heat-shield blanket to add and heat-wrapping the master cylinder/brake lines with some gold stuff.
All in all I hate the way my everything looks so far. I imagined it so much cleaner in my head
. Pics :
Reply
0
0
01-18-2016, 12:23 AM
#70
SADFab Destructive Testing Engineer
iTrader: (5)
Join Date: Apr 2014
Location: Beaverton, USA
Posts: 18,642
Total Cats: 1,866
Just ran out and took some pics of mine for reference. Also here is a picture of how curly kept it away from the downpipe.
Imgur: The most awesome images on the Internet
Imgur: The most awesome images on the Internet
Reply
0
0
01-18-2016, 02:50 PM
#71
Junior Member
Thread Starter
iTrader: (7)
Join Date: May 2014
Location: Denver, Co.
Posts: 458
Total Cats: 40
Hmm. That 90 degree barb option looks good. I still think It's too damn crowded and am relatively-ok with the Up N Over execution.
In other news myremanufactured NEW Axles showed up. New as hell. Win.
Also need to find a way to mount these bitches up to the Miata. Have a stack of them to play with.
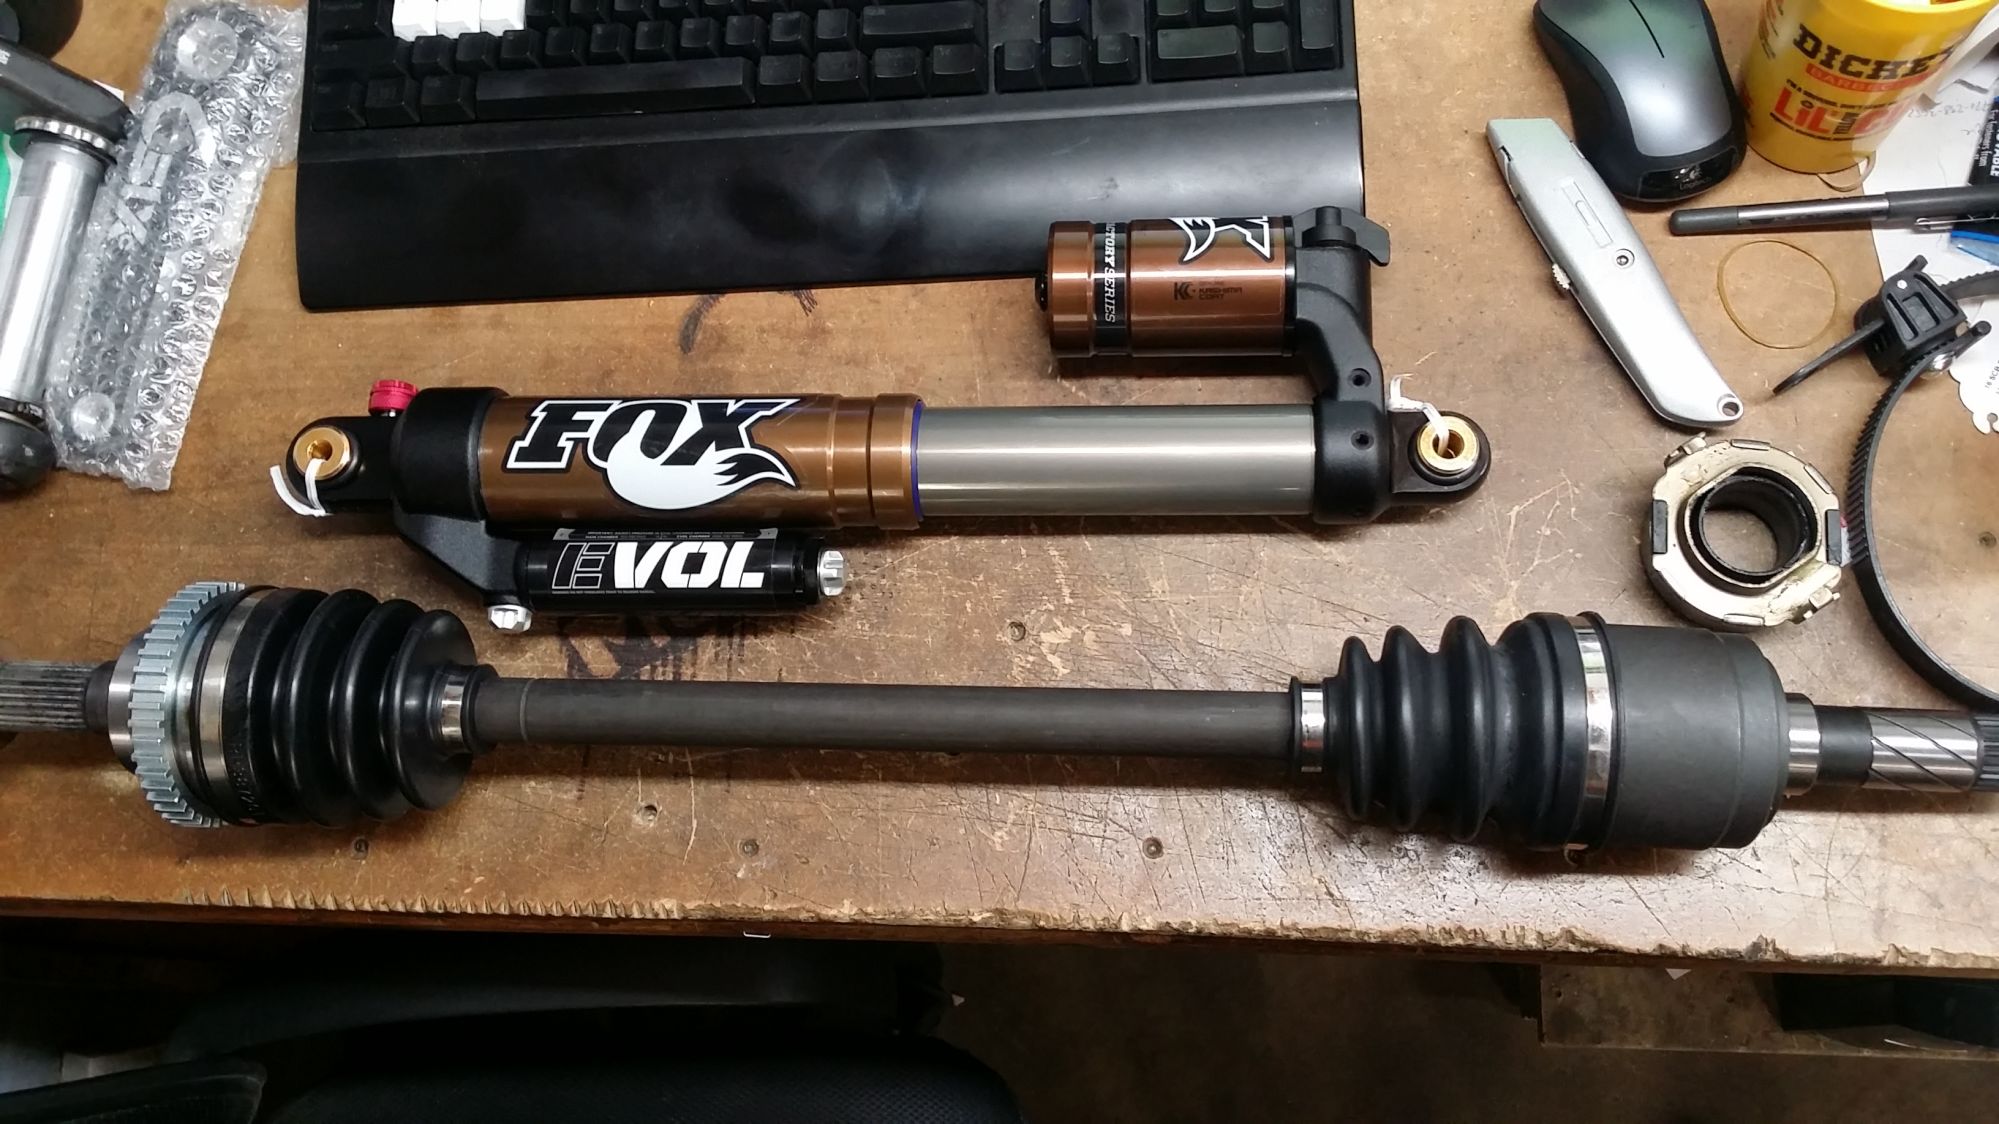
In other news my
Also need to find a way to mount these bitches up to the Miata. Have a stack of them to play with.
Reply
1
1
01-28-2016, 04:48 PM
#72
Junior Member
Thread Starter
iTrader: (7)
Join Date: May 2014
Location: Denver, Co.
Posts: 458
Total Cats: 40
Non-Update Update
Since we spoke last I have had a whopping 4hrs to work on poor potato.
accomplished :
-Installed 1-piece axles. Love working on this car. Not a single bolt has given me grief ever. Both axle to spindle nuts came off without any drama, and old axles slid out with ease. New diff seals and the new ones slid in just as nicely.
-Mocked up intercooler routing - I have a new-found appreciation for how tight these engine bays are to do anything in. Everything mocks up nicely, just need to start t-bolting things in place. I did order a 15* pipe to try on the cold-side up to the Throttle body to replace the 45* I have now. It may work, but it might push the TB coupler into the radiator hose too much.. Or I may just buy a crossflow so the damn inlet isn't pointed right at the TB.
Last Items on list of crap to do for first start:
-Drill + tap cold-side intercooler pipe for IAT and Meth nozzle.
-Clamp intercooler piping together.
-Wire in IAT more-better.
-Redo up-n-over heater return with silicone hose instead of shitty recalcitrant rubber hose.
-Fill fluids
-Wrestle with exhaust to clamp together (25mm too short somewhere along the line)
-Prime + Start?!?
Reply
0
0
02-03-2016, 07:49 PM
#73
Junior Member
Thread Starter
iTrader: (7)
Join Date: May 2014
Location: Denver, Co.
Posts: 458
Total Cats: 40
Did some stuff
Well, as this 'build' drags on and on and on I have most things hooked up and am damn-close to start her up.
-Finalized intercooler routing and clamped all them bitches down.
-Made a lower radiator hose for my custom mixing manifold.
Still need to do :
-Install exhaust
-Fill with fluids
-Wire up IAT
-Zip-tie all my vac lines
-Double and triple check ALLTHETHINGS.
Reply
1
1
 02-03-2016, 07:59 PM
#75
Junior Member
Thread Starter
iTrader: (7)
Join Date: May 2014
Location: Denver, Co.
Posts: 458
Total Cats: 40
I bought a go-pro hero 4 black for exactly this purpose. And a gazillion mounts.
I even plan to stuff that bitch in the engine bay and see if I can get glowing turbine goodness... Hopefully the lens won't melt. I'll DEI the rest of the case for good measure.
Reply
0
0
 02-07-2016, 04:33 PM
#77
Junior Member
Thread Starter
iTrader: (7)
Join Date: May 2014
Location: Denver, Co.
Posts: 458
Total Cats: 40
Welp...
She didn't start. Having a hard time figuring out why.
Everything together and figured she'd start right up with prior known-good tune.
Symptoms are as follows :
-Cranked with CAS unplugged to prime oil
-Plugged CAS back in, cranked for 2-3s then flood-cleared cranked for another 2-3s.
-Cranked again and POW the loudest backfire i've heard. I actually checked the block because it sounded like I ventilated my block at first. Scary loud.
-This happened 2 more times. Thought the neighbors were going to call the police with all these loud gun-shots happening.
Pulled a plug, it smelled of gas, but wasn't wet. FPR shows correct fuel psi, vac-guage shows I have vacuum while cranking (compression), and so I would think that I have spark due to back-fires.
-The one thing I thought of last night was that I may have mixed-up the COP connectors to the factory coil connectors. Would having 1/4 & 2/3 firing order mixed up cause the loud backfires?? Will pull off sheathing tonight and check wire color to verify correct triggers.
At any rate, I haz sad.
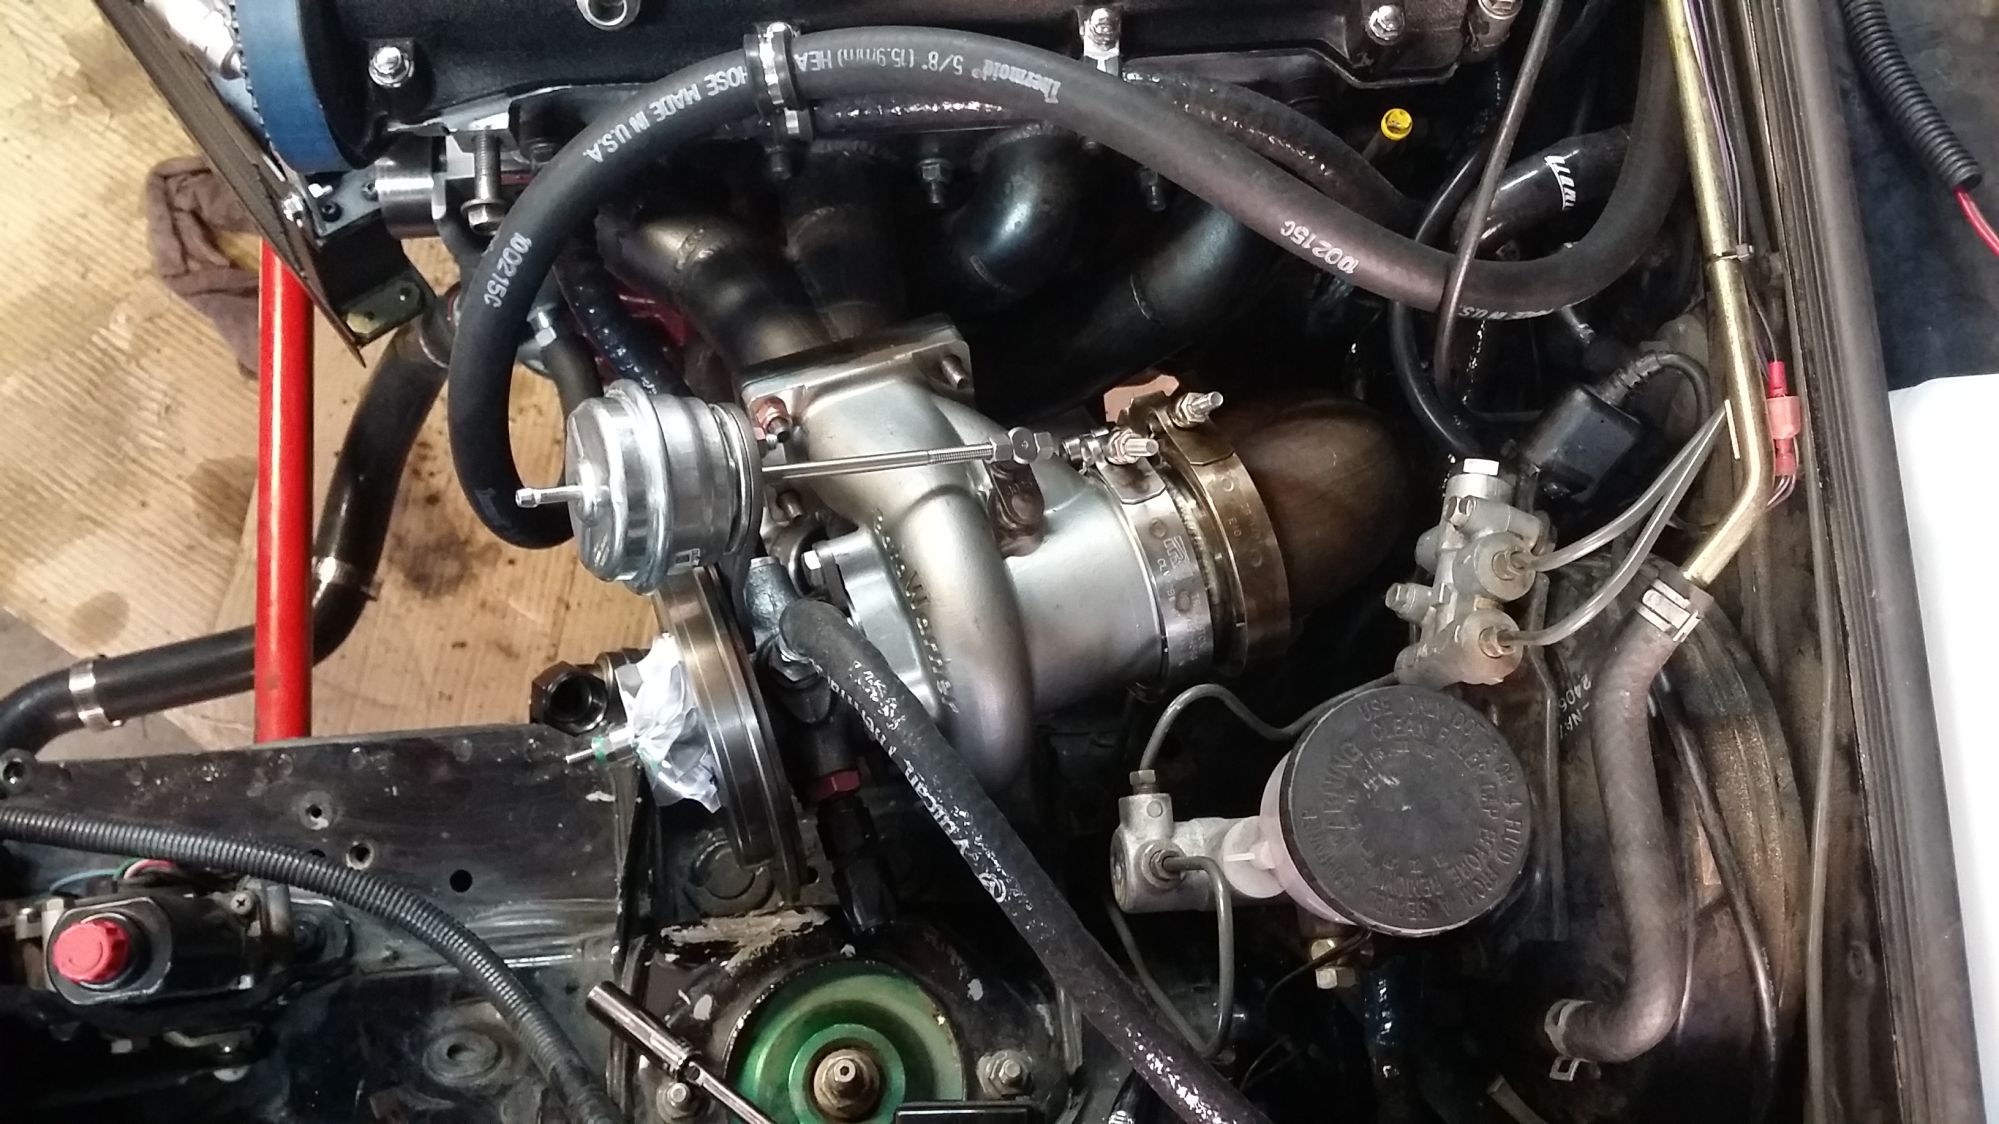
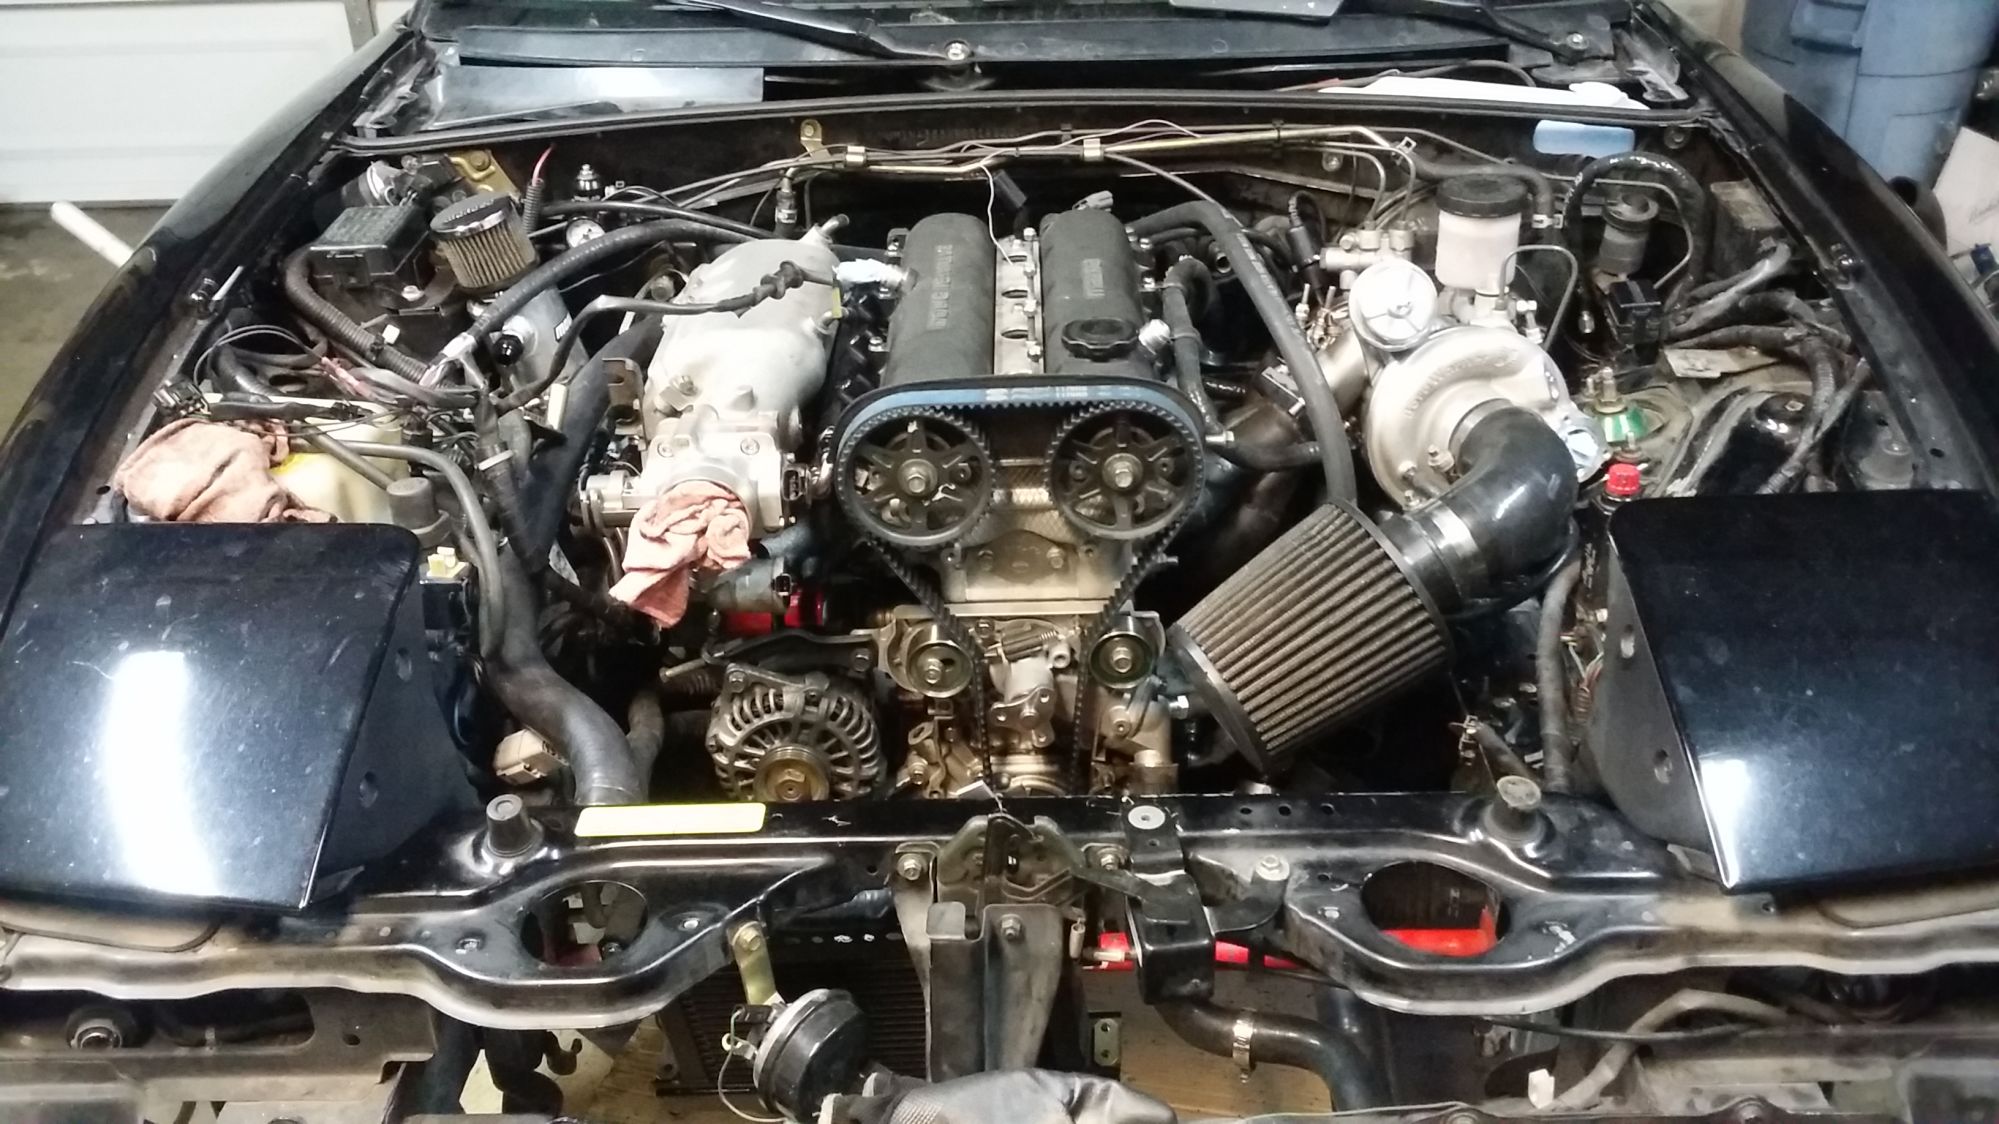
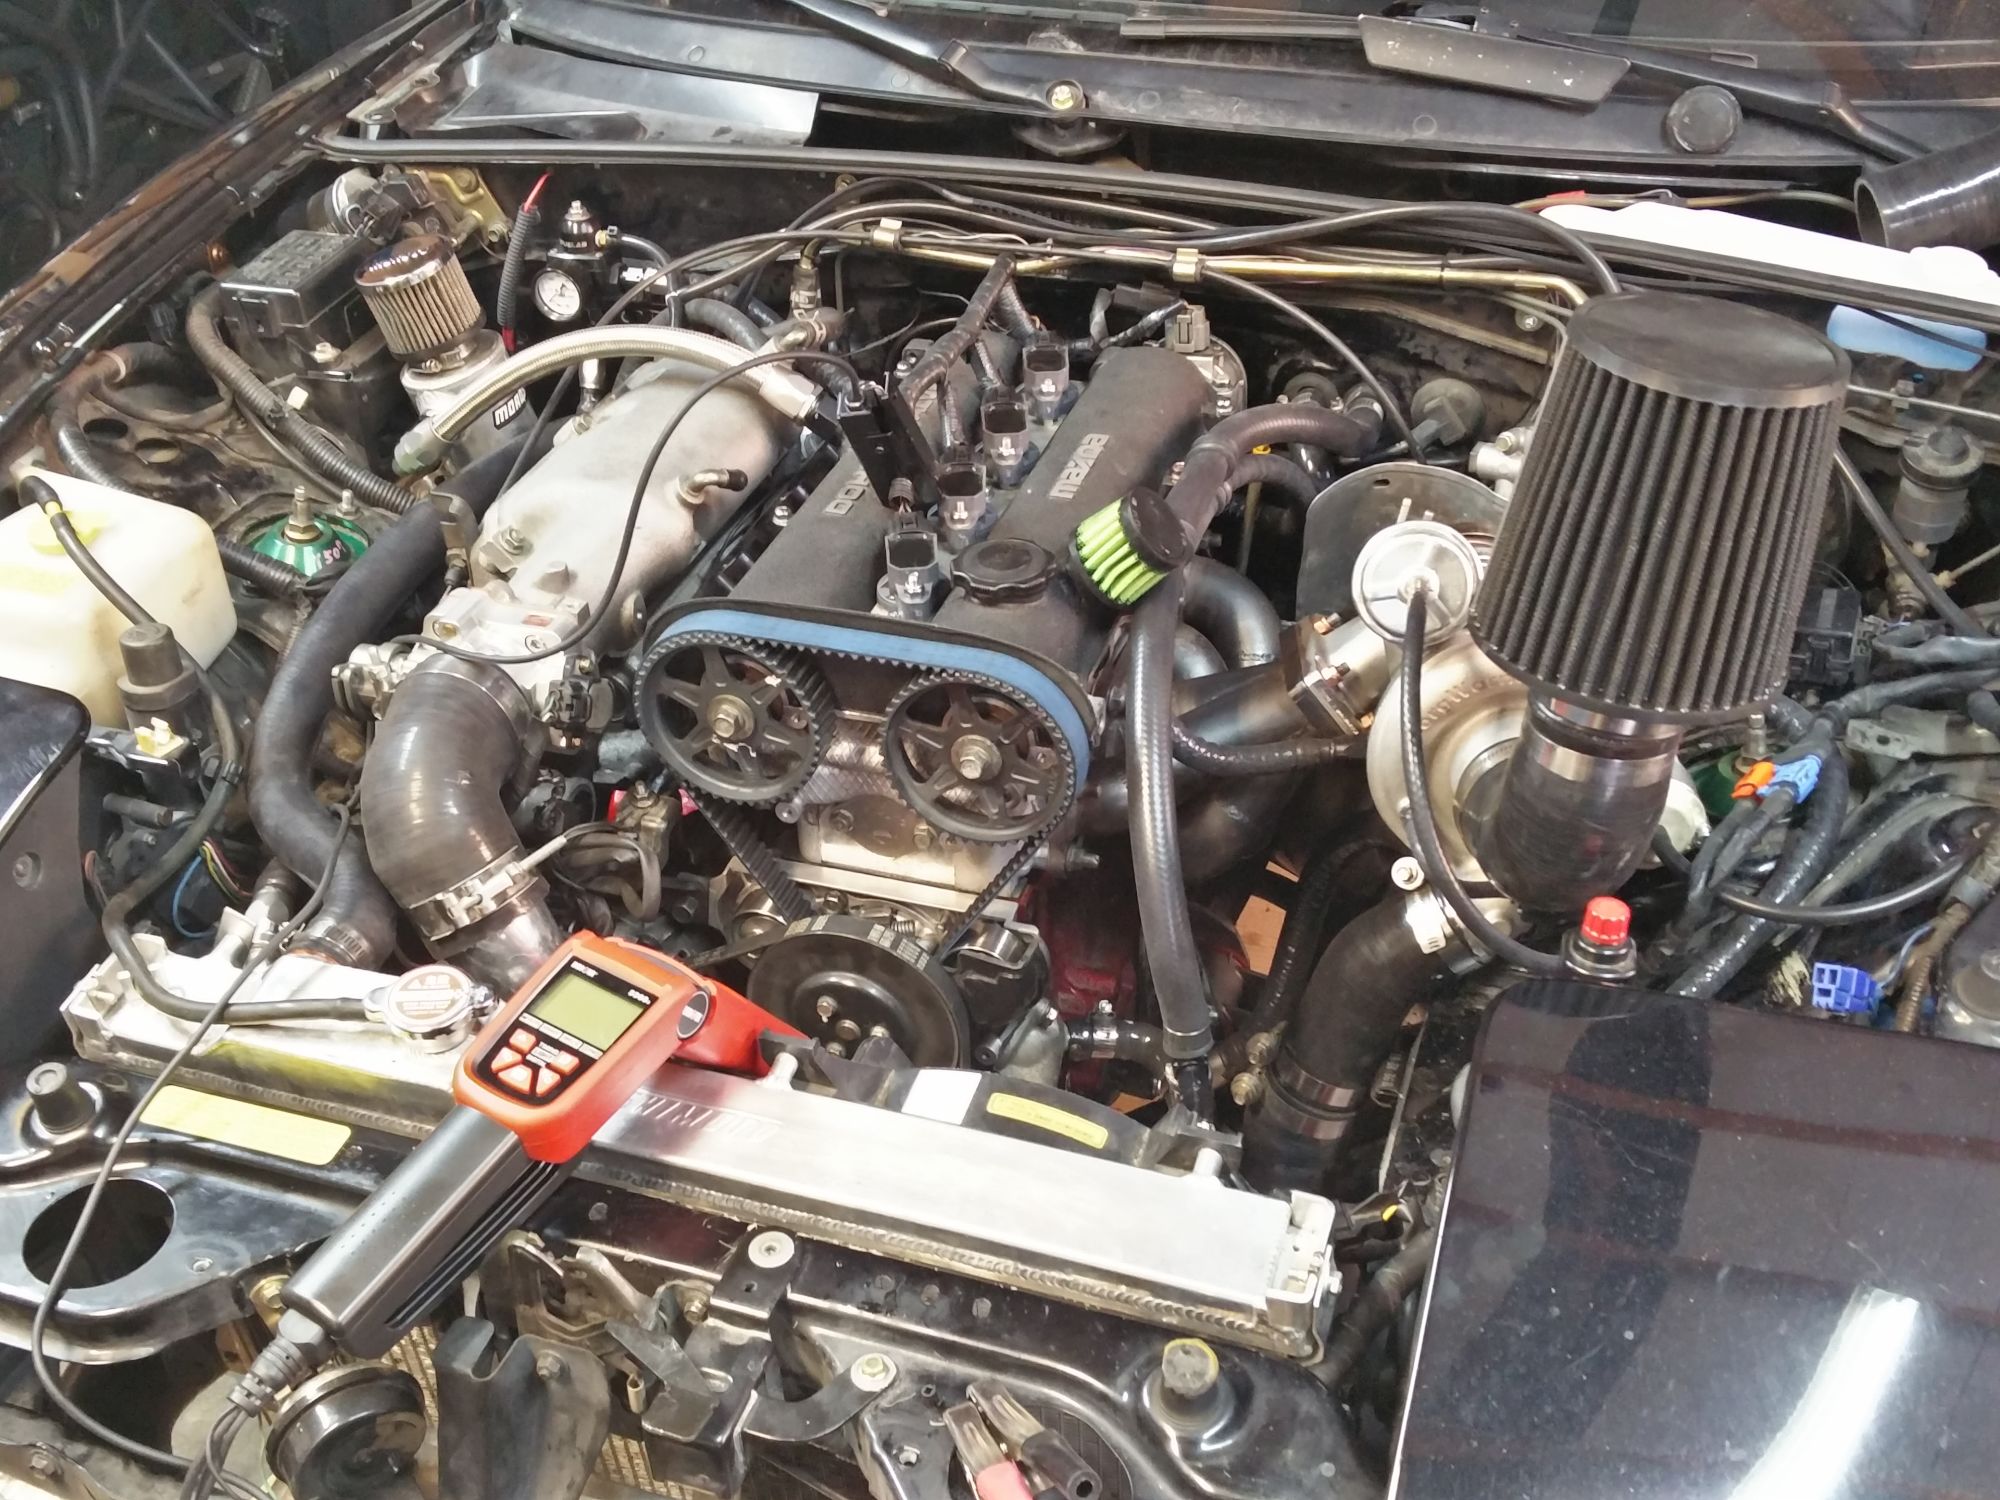
The ugliest engine bay of all time :
She didn't start. Having a hard time figuring out why.
Everything together and figured she'd start right up with prior known-good tune.
Symptoms are as follows :
-Cranked with CAS unplugged to prime oil
-Plugged CAS back in, cranked for 2-3s then flood-cleared cranked for another 2-3s.
-Cranked again and POW the loudest backfire i've heard. I actually checked the block because it sounded like I ventilated my block at first. Scary loud.
-This happened 2 more times. Thought the neighbors were going to call the police with all these loud gun-shots happening.
Pulled a plug, it smelled of gas, but wasn't wet. FPR shows correct fuel psi, vac-guage shows I have vacuum while cranking (compression), and so I would think that I have spark due to back-fires.
-The one thing I thought of last night was that I may have mixed-up the COP connectors to the factory coil connectors. Would having 1/4 & 2/3 firing order mixed up cause the loud backfires?? Will pull off sheathing tonight and check wire color to verify correct triggers.
At any rate, I haz sad.
The ugliest engine bay of all time :
Reply
0
0
 Incorrect firing order wouldn't be optimal
  02-07-2016, 04:38 PM
#80
SADFab Destructive Testing Engineer
iTrader: (5)
Join Date: Apr 2014
Location: Beaverton, USA
Posts: 18,642
Total Cats: 1,866
Put the timing light on each coil wire and use the megasquirt coil testing to see how they are wired.
It should be:
If sequential:
Spark A - coil 1
Spark B - coil 3
Spark C - coil 4
Spark D - coil 2
If batch:
Spark A - coil 1/4
Spark B - coil 3/2
It should be:
If sequential:
Spark A - coil 1
Spark B - coil 3
Spark C - coil 4
Spark D - coil 2
If batch:
Spark A - coil 1/4
Spark B - coil 3/2
Reply
1
1


