
My Turbo Miata Budget Build


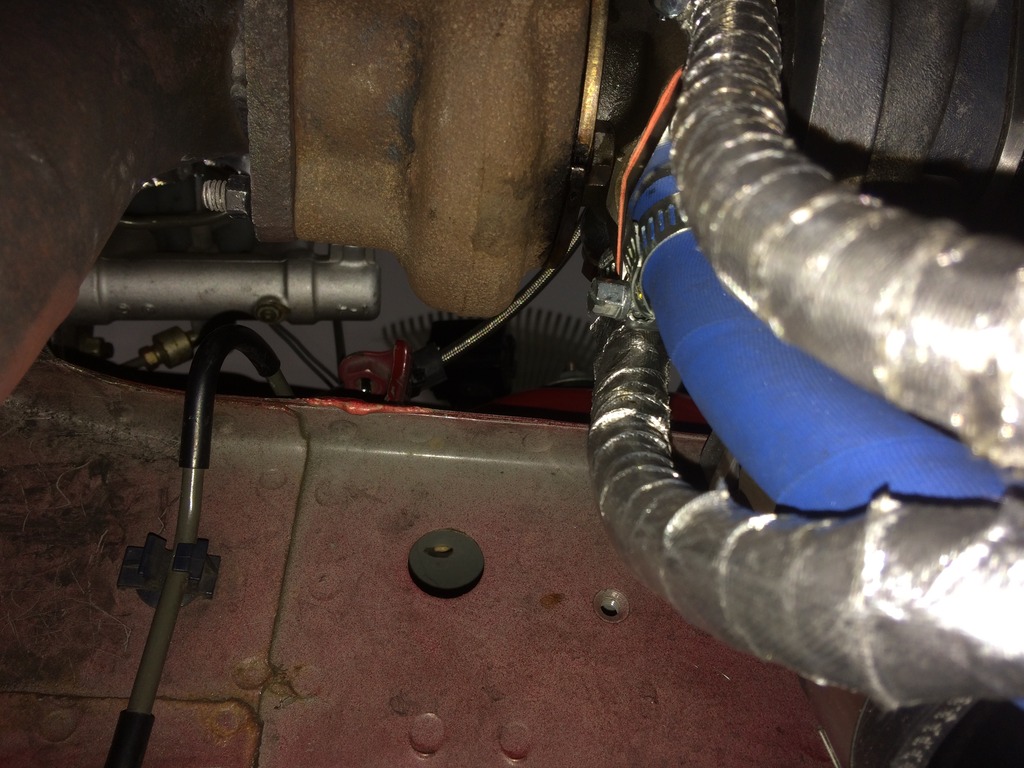
Looks nice and neat. I have the very same turbo and manifold (SR20 GT2560R and TacoTacoTaco) lying on a shelf awaiting install. When I measured things out (sloppily, with stock exhaust still in car) it seemed like I would not quite be able to run the compressor outlet downwards and would have to go sideways or up, but I guess your build is counter-proof to that. How much clearance is there between the compressor housing and the car body? It looks like it's somewhere around 6-8mm, and in that case I'd be worried it could hit when the engine moves around. Have you noticed any such issues?
Reply
 0
0

0

Thread Starter
Junior Member
iTrader: (1)
Joined: Dec 2015
Posts: 143
Total Cats: 41
From: Fairfax, VA
Yea the 2560 should be larger than my turbo which is why you need to cut the shelf. I haven't been able to drive the car in a way that will expose contact issues yet but I will report back when I do. I do have mazdaspeed motormounts which should help.
Reply
0
0

Junior Member
Joined: Oct 2015
Posts: 89
Total Cats: 11
From: Stockholm, Sweden
Ah, so it's not the same turbo. I admit to knowing ****-all about Nissans and the different turbos they came with (only know mine has been in a Nissan with a SR20DET, and is a GT2560R).
I would prefer to have the turbine outlet pointing downwards (easier to get past the power-steering that way) and I'll do that if I can fit things with a reasonable cut in the shelf. Otherwise it's the long way around for me.
I would prefer to have the turbine outlet pointing downwards (easier to get past the power-steering that way) and I'll do that if I can fit things with a reasonable cut in the shelf. Otherwise it's the long way around for me.
Reply
0
0


It is normal on any Begi/FM/TacoTaco manifold to have to beat the shelf near the shock tower brace. You can point at the T2 flanged Garretts downwards. Now getting the turbo on and off can be a PITA.
Reply
0
0

Thread Starter
Junior Member
iTrader: (1)
Joined: Dec 2015
Posts: 143
Total Cats: 41
From: Fairfax, VA
And you can use my garage...but you have to get rid of that quote from braineack in your sig ripping on my turbo/manifold question

Reply
1
1

Thread Starter
Junior Member
iTrader: (1)
Joined: Dec 2015
Posts: 143
Total Cats: 41
From: Fairfax, VA
Alright guys, had my exhaust made today. Went to a shop called Roberts Custom Exhaust in Stafford, VA. had to trailer the car there but I wasnt too thrilled with the local shops I talked to. I am glad I chose to go to this guy. He did an awesome job and is very reasonably priced. As a recap, we went with a 2.5 inch mandrel system using an Eastern Industries 200 cell metallic core cat and the big 5x11x22 Magnaflow that seems to come highly recommended here. I had him cut my first gen FM downpipe right where it levels out under the car and expand it to 2.5 there. He also welded a bung for the O2. The system is aluminized steel except for the exit pipe which is stainless.
After i got home i calibrated the Hydra O2 sensor. I was relieved to see that it was functioning properly as those things are crazy expensive to replace. took the car for a short drive after that to test the exhaust. I havent confirmed the base timing is synced up yet so didn't really get into any boost, maybe a couple psi for a second . The exhaust is ridiculously quiet, probably on par with the stock system. When you consider its a 2.25 downpipe to 2.5 in exhaust with a cat I supposed that makes sense. I will try to get a soundclip up at some point. I'm not into loud exhausts so this setup is going to be perfect for me.
However, because the exhaust is so quiet, the turbo sounds are all crazy loud. Its all i can hear, and I love it.


After i got home i calibrated the Hydra O2 sensor. I was relieved to see that it was functioning properly as those things are crazy expensive to replace. took the car for a short drive after that to test the exhaust. I havent confirmed the base timing is synced up yet so didn't really get into any boost, maybe a couple psi for a second
. The exhaust is ridiculously quiet, probably on par with the stock system. When you consider its a 2.25 downpipe to 2.5 in exhaust with a cat I supposed that makes sense. I will try to get a soundclip up at some point. I'm not into loud exhausts so this setup is going to be perfect for me.However, because the exhaust is so quiet, the turbo sounds are all crazy loud. Its all i can hear, and I love it.
Reply
1
1

Thread Starter
Junior Member
iTrader: (1)
Joined: Dec 2015
Posts: 143
Total Cats: 41
From: Fairfax, VA
Alright well now i need some advice. It looks like I have a pretty good amount of oil seeping out from somewhere and I'm thinking it might be the barb in the oil pan. No drips on the floor but if I rub my fingers along the side of the pan i will have a drop or two on my fingers.
Just to recap, when I installed the barb, i don't think i prepped adequately and the JB weld around the fitting never fully cured and I was able to scrape it off. Now there is likely still some left in the threads but the chances are that stuff probably didn't cure properly either. If i determine the weeping is coming from the fitting, would you try to break lose the NPT barb and reapply the JB weld or just clean the area around the barb and try to apply JB weld to outter portion of where the barb sticks out of the pan?
My only concern is trying to remove the fitting and causing issues if the JBweld screws up the threads in the pan or something.
Reply
0
0
I would drain the oil, thoroughly clean the thread with all sorts of chemicals. Then reapply the jb weld to the fitting and install it. Follow the NPT tightening instructions. Technically, they are a sealing thread, so it should work even without the JB. But that stuff is cheap insurance.
Test your mixure, make sure you are getting it right and it is curing completely.
Test your mixure, make sure you are getting it right and it is curing completely.
Reply
0
0
Thread Starter
Junior Member
iTrader: (1)
Joined: Dec 2015
Posts: 143
Total Cats: 41
From: Fairfax, VA
Well ****. Took the undertray off. Oil always weeped a bit from the area above where i drilled for the drain plug but not this much. Its enough to drip off the bottom of the pan after only around 30 miles of driving. Hard to tell but the heads of the two oil pan bolts above the fitting actually have oil pooled in them (cant really see the extent of it in the pictures). I cant tell if it could be coming from the NPT fitting and blowing up while driving or if its coming down from where the pan meets the block. Also there is a bolt missing from the pan. Bolt head broke off. I will need to get it out and put a new bolt in. Not sure if i should redo the NPT fitting or not now. I dont want to mess with it if that's not the problem, but also not sure how to address the oil pan if its in fact the culprit. Certainly don't want to have to pull the motor. to redo the pan seal.
Im going to pick up some UV dye and see if I can actually pinpoint whats happening rather than just guessing and doing unnecessary work.

Also found this. Panicked for a minute. Pulled the downpipe and intake and both turbine and compressor sides were totally dry. Then I remembered when i first installed it i tried to prime it some by pouring a little oil into the inlet. Of course some spilled on the CHRA. Im guessing it collected on the bottom and has just been sitting there burning for the past 100 miles. If there is something going on here, the dye should show me that as well
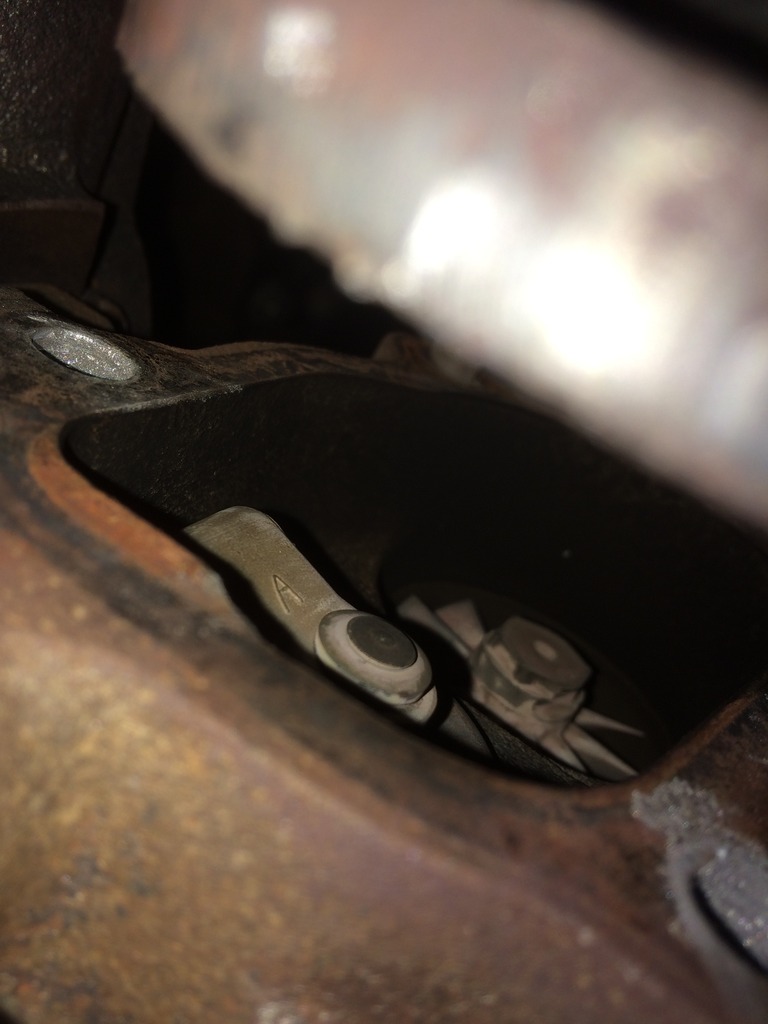


Last edited by kmo25; Aug 17, 2016 at 08:41 AM.
Reply
0
0

You could duct tape some cardboard to the drain hose. Get a couple sheets of cardboard, sandwich some foil between them for waterproofing, tape it above the drain hose. If you get oil on the bottom cardboard, your fitting is leaking and blowing upward. If you get oil on the top, your oil pan seal is leaking.
Reply
0
0
Thread Starter
Junior Member
iTrader: (1)
Joined: Dec 2015
Posts: 143
Total Cats: 41
From: Fairfax, VA
You could duct tape some cardboard to the drain hose. Get a couple sheets of cardboard, sandwich some foil between them for waterproofing, tape it above the drain hose. If you get oil on the bottom cardboard, your fitting is leaking and blowing upward. If you get oil on the top, your oil pan seal is leaking.
The car did already have the 323 GTX PCV valve but I'm not sure of its condition so I'm just going to replace it. Pressurized crankcase may explain why I seem to be leaking oil from the same places but in greater volume than when I was NA. Would also explain the turbine oil leak. Cant imagine it would be a seal considering I just rebuilt the damn turbo.
I need to put some more miles on the car and see what else the dye tells me. Should be able to do that this weekend. I will post back.
Reply
0
0
Thread Starter
Junior Member
iTrader: (1)
Joined: Dec 2015
Posts: 143
Total Cats: 41
From: Fairfax, VA
Alright I have some updates. First, the Ebay Greddy Type S wasn't really cutting it for me. It held boost fine and actually sounded pretty good but it was always leaking at idle and under partial load no matter what i did with the adjustment screw. It would leak under load to the point where it would be randomly whistling. It was annoying as hell so i said screw it. Went on Ebay and found a nice Forge 004 Blow of Valve for $60. As I wanted to keep the section of intercooler piping I had because it already had my wastegate line and IACV i started looking for Greddy to 1 inch tube adapters. Most of the ones I was finding were in the $35-45 range with shipping which I was having a hard time stomaching considering that was over half the cost of the valve itself.
Stubbled on a picture from another forum where someone found a water outlet from an old Plymouth the mounted perfectly to the greddy flange. I found it on Amazon for $8 shipped ( Four Seasons 85107 Water Outlet). I also cleaned and re-greased the BOV before installation. I spray painted the piping and outlet black to make things look a little cleaner. ended up working perfectly, BOV sounds great. Its got the yellow spring in it (15-23 psi) but I'm not getting any compressor surge so I'm just going to stick with that.
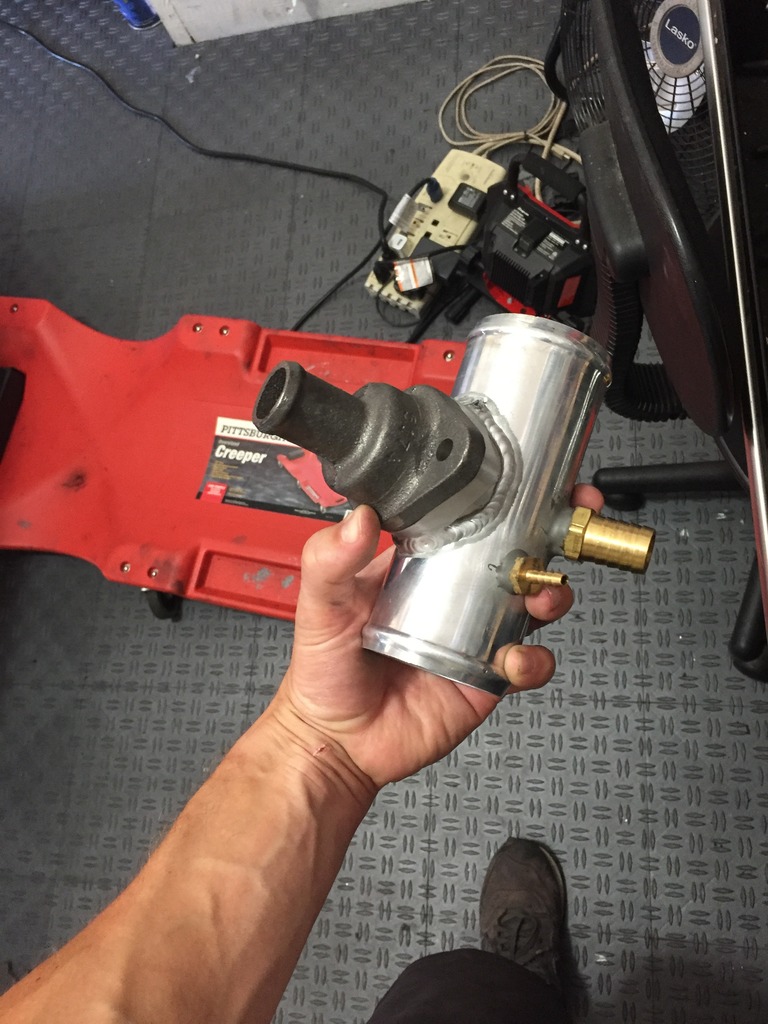
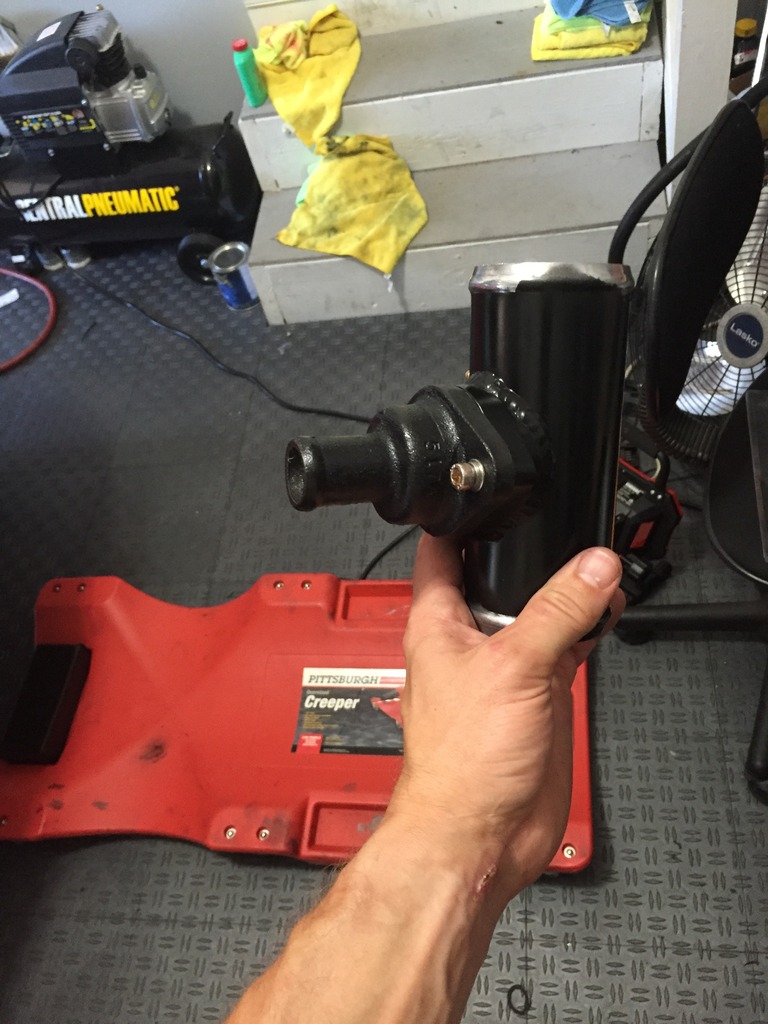
Stubbled on a picture from another forum where someone found a water outlet from an old Plymouth the mounted perfectly to the greddy flange. I found it on Amazon for $8 shipped ( Four Seasons 85107 Water Outlet). I also cleaned and re-greased the BOV before installation. I spray painted the piping and outlet black to make things look a little cleaner. ended up working perfectly, BOV sounds great. Its got the yellow spring in it (15-23 psi) but I'm not getting any compressor surge so I'm just going to stick with that.


Reply
0
0
Thread Starter
Junior Member
iTrader: (1)
Joined: Dec 2015
Posts: 143
Total Cats: 41
From: Fairfax, VA
As for the oil. That Dye is pretty cool stuff. Showed me exactly whats happening. Based on what i was seeing with the dye I thought for sure my pan gasket was leaking. However, I did a lot more research and realized that I am missing the front bolt for the A/C bracket. The leaking I'm experiencing seems to fit perfectly with that missing bolt as the cause. Im going to get a new bolt and see if that doesnt fix my issue.
Update: Success! bought a new bolt through the front AC brack mount location and that stopped the leak entirely. Now Im just dealing with the leak from the turbo which i have no idea whats causing it. Ive gone through most all the checks and I cant find a reason.
On a positive note my NPT fitting looks to be nice a sealed.

Also put in a fresh PCV valve. The other one definitely seemed worn when i was shaking both of them together. Interesting though, the one that was in there was an E301A however the second code was not the same as the 323GTX PCV it was 1B16 which I have not been able to figure out. Doesnt seem to have helped anything though. Still have oil weeping around where the turbine housing meets the CHRA
Update: Success! bought a new bolt through the front AC brack mount location and that stopped the leak entirely. Now Im just dealing with the leak from the turbo which i have no idea whats causing it. Ive gone through most all the checks and I cant find a reason.
On a positive note my NPT fitting looks to be nice a sealed.


Also put in a fresh PCV valve. The other one definitely seemed worn when i was shaking both of them together. Interesting though, the one that was in there was an E301A however the second code was not the same as the 323GTX PCV it was 1B16 which I have not been able to figure out. Doesnt seem to have helped anything though. Still have oil weeping around where the turbine housing meets the CHRA
Last edited by kmo25; Aug 25, 2016 at 04:35 PM.
Reply
0
0
Thread Starter
Junior Member
iTrader: (1)
Joined: Dec 2015
Posts: 143
Total Cats: 41
From: Fairfax, VA
Well this weekend I had the car dyno tuned by Ken Hill up at APTuning in PA. The day had some serious ups and downs but everything worked out. The baseline run at 7ish psi put down around 160 whp and tq. In the end we were somewhat limited by time but the car ended up making 209 whp and 227 wtq. Boost spike was an issue as I explain more below but we were seeing as much as a 14 psi spike down to 12.8 and leveling off at about 10.5 to about 5k rpm. Was using the grainger valve MBC.On top of that the car made these numbers with a redline of 6200 rpm.
The story on this was that the car was getting bad misfire/breaking up from 6300-6500 but would resume from 6600ish to redline. We could not figure out what was causing it and in the interested of time we focused on tuning below 6200 and interpolating up so that when the issue is resolved the mapping should already be there. Ken felt pretty confident it was due to old/worn coilpacks. We tried gapping the plugs down to .032 and messing with fuel but nothing had an effect. Odd that it picked back up after the misfire and continued on.
As mentioned above we were having issues with boost spike and trouble holding boost above about 10 psi. Well turns out I didn’t realize that one of the wastegate mounting holes on the turbo actually goes all the way into the compressor housing. Found out two days later when I did a boost leak test. Talk about a significant boost leak. Boost was probably erratic and having trouble holding because of that not to mention it was probably overspinning big time as well. Now the car spikes to about 13 psi and settles around 11.
So I still have some work to do to figure out the misfire issue but the car feels great. I never thought I would feel my miata pull in 4th gear but sure enough it does. Cant keep the thing out of boost, its just too much fun. I will get all the dyno charts later but for now here is a picture I took of the last plot. Not sure whats causing the dip after peak tq because again we ran out of time.

Last edited by kmo25; Sep 7, 2016 at 11:06 AM.
Reply
0
0


