
Lexan hard top window install, with pictures!


rain-x sells a solution you bput on the insed of the window that prevents fog. it works pretty well from what i've seen/used, lasts about 2weeks before it needs to be re-applied.
Also if you want to do the DIY way. take some conditioner and put it on the window. the with a squeegee pull it off....it will pull 99% off but will leave a thin film that will prevent fogging. i've seen it done, but never did it myself, it works but for how long, idk.
Also if you want to do the DIY way. take some conditioner and put it on the window. the with a squeegee pull it off....it will pull 99% off but will leave a thin film that will prevent fogging. i've seen it done, but never did it myself, it works but for how long, idk.
Reply
 0
0

0
Thread Starter


Joined: Oct 2005
Posts: 15,239
Total Cats: 1,417
From: Oregon City, OR
well I probably won't be tracking the car in 30 degree weather, and once its warmed up (the car I mean) the heat inside should keep it from fogging, it was just very cold outside and the window was warmed from my shed. Thanks for the ideas though.
I'll be taking some pictures tomorrow for y'all.
I'll be taking some pictures tomorrow for y'all.
Reply
0
0
Thread Starter
Joined: Oct 2005
Posts: 15,239
Total Cats: 1,417
From: Oregon City, OR
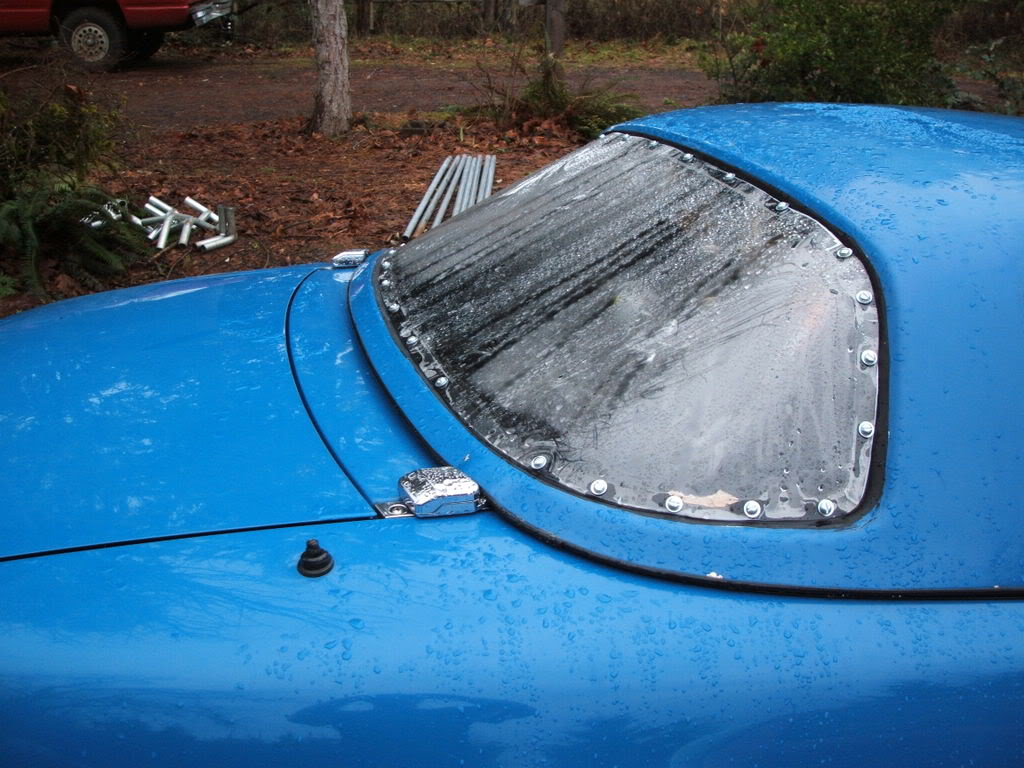
They're not great pictures because of the rain, which makes it hard to tell that its better than the original, but you get the point, better pictures to come once it dries out (aka, June) You can also see my new rear tow hook in this pictures, hopefully I'll never have to use it.
Also last night I made a small list of things I want to finish before my next track day, which will probably be in March. Within 5 minutes I had a dozen items, and only one required money, everything else just needs time. The main thing holding me back is the lack of a garage, it sucks!
I tried to install the front tow hook today, but I couldn't even do that because it would require laying down on the ground and its all wet. After a few minutes I was finally in a semi workable position by kneeling on one of the seat pads I'd removed, and when I stuck my head under the car a huge drop of rain fell in my eye, I want a garage!
Reply
0
0
Thread Starter
Joined: Oct 2005
Posts: 15,239
Total Cats: 1,417
From: Oregon City, OR
Yeah it leaks, but I haven't sealed it yet, so I expected that. It was better then the tarp I had over the cockpit before, which let a lot of moisture and condensation to collect everywhere.
I figured I'd take some pictures now cause its not going to look any different with a bead of silicone under it.
I figured I'd take some pictures now cause its not going to look any different with a bead of silicone under it.
Reply
0
0

Thread Starter
Joined: Oct 2005
Posts: 15,239
Total Cats: 1,417
From: Oregon City, OR
Yeah I'm not as talented in any way shape or form as Keith, so I knew I wouldn't be able to get it the right shape without bolting it on and taking it off multiple times. As it is I still have to take it off again to seal it.
I just need to test some goo-gone, simple green, and glass cleaner on a piece of scrap to make sure it won't ruin it. I know a friend put some goo-gone on a wall clock to get rid of some sticker goo and the alcohol in the goo-gone made it all white and not some much see through.
I just need to test some goo-gone, simple green, and glass cleaner on a piece of scrap to make sure it won't ruin it. I know a friend put some goo-gone on a wall clock to get rid of some sticker goo and the alcohol in the goo-gone made it all white and not some much see through.
Reply
0
0
Thread Starter
Joined: Oct 2005
Posts: 15,239
Total Cats: 1,417
From: Oregon City, OR
Finally shot some pictures of the window when it wasn't foggy or wet, although they're crappy iphone quality, but you get the idea. It looks amazing!

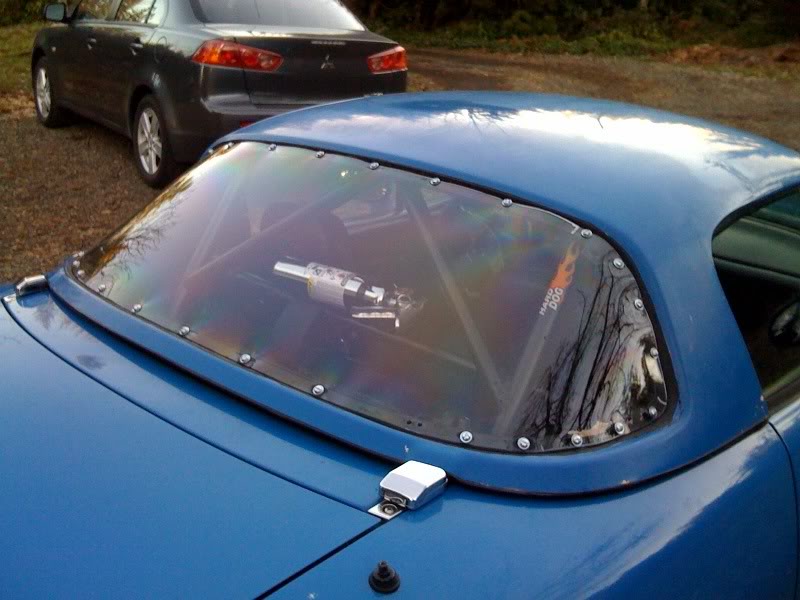
Any foggyness you see in these pictures is a small layer of dust and a bit of reflection, cause the sun is actually out today!
Any foggyness you see in these pictures is a small layer of dust and a bit of reflection, cause the sun is actually out today!
Reply
0
0
Thread Starter
Joined: Oct 2005
Posts: 15,239
Total Cats: 1,417
From: Oregon City, OR
Not yet, it's in the plans though. Either a rubber strip with glue on both sides or just a small bead of silicone. The weathers going to clear up then I won't care, so it'll probably be next winter by the time I do seal it.
Reply
0
0
Thread Starter
Joined: Oct 2005
Posts: 15,239
Total Cats: 1,417
From: Oregon City, OR
So it's just the bolts you guys don't like? I agree they're too big and too flashy, but I didn't think it looked that horrible. I dunno about counter sinking screws cause I'd be worried about cracking or just pulling through. Perhaps black screws and washers? But it's done and it works so I might just make hustler eat this dog **** and leave it
Reply
0
0

Senior Member
iTrader: (10)
Joined: Feb 2007
Posts: 1,274
Total Cats: 0
From: South Eastern Wisconsin
I plan on using those small black button topped bolts with the hex head in the middle (if someone knows the name please tell me), if they are black it will barely be noticeable from a distance.
Did you really crank those bolts down? Seems like the window is deforming badly, or is that normal?
Did you really crank those bolts down? Seems like the window is deforming badly, or is that normal?
Reply
0
0
Thread Starter
Joined: Oct 2005
Posts: 15,239
Total Cats: 1,417
From: Oregon City, OR
No its not really deforming at all. There really was quite a bit of sun light on the window when I took the picture, which is going to show any little imperfection. There is two or three places where it bubbles up slightly because I didn't tighten the bolt properly before drilling the next hole. I put my battery powered drill on ~15 ft/lbs and called it good.
Reply
0
0
Joined: Jun 2006
Posts: 29,085
Total Cats: 375
From: Republic of Dallas
So it's just the bolts you guys don't like? I agree they're too big and too flashy, but I didn't think it looked that horrible. I dunno about counter sinking screws cause I'd be worried about cracking or just pulling through. Perhaps black screws and washers? But it's done and it works so I might just make hustler eat this dog **** and leave it
Reply
0
0
So it's just the bolts you guys don't like? I agree they're too big and too flashy, but I didn't think it looked that horrible. I dunno about counter sinking screws cause I'd be worried about cracking or just pulling through. Perhaps black screws and washers? But it's done and it works so I might just make hustler eat this dog **** and leave it
With those bolts it reminds me of the belts goth's where.
Reply
0
0


