
Momo hub install question


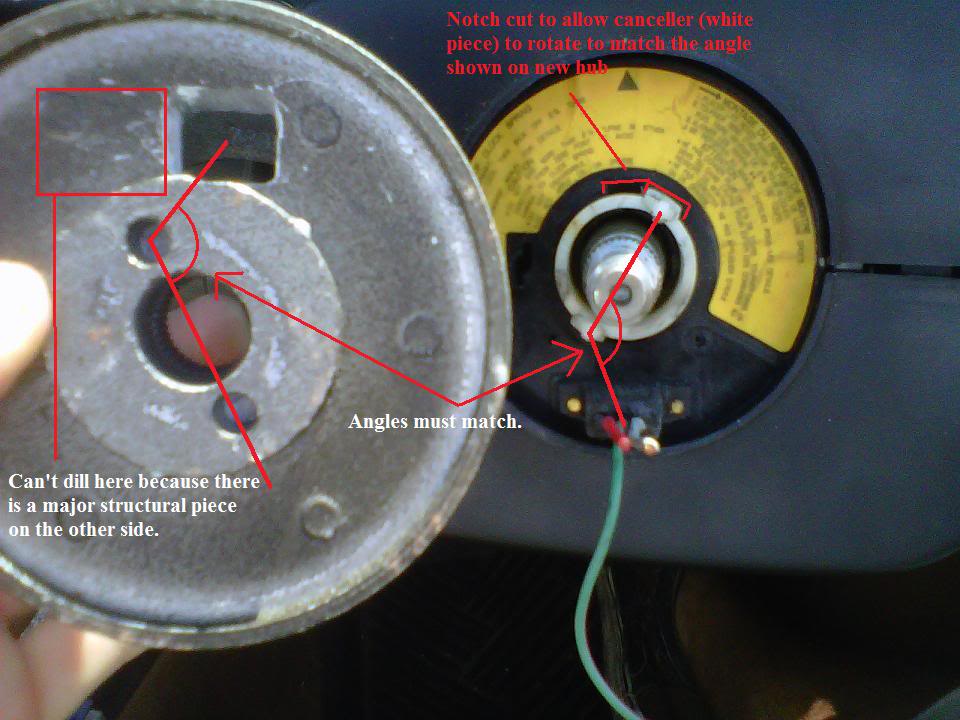
I just picked up a Momo wheel/hub combo and was going to toss it on this morning but ran into a couple issues. The first was what to do with the airbag/horn harness as it exits the clockspring, but I found this page and it essplains how to modify it. Second question arose after reading that install page where the author removes/modifies the white sleeve (turn signal canceler) you see in the photo below:
Needing to modify this part makes no sense to me, as best I can tell nothing inside the spring housing is affected by the new hub. Can anyone verify that this step is actually needed?
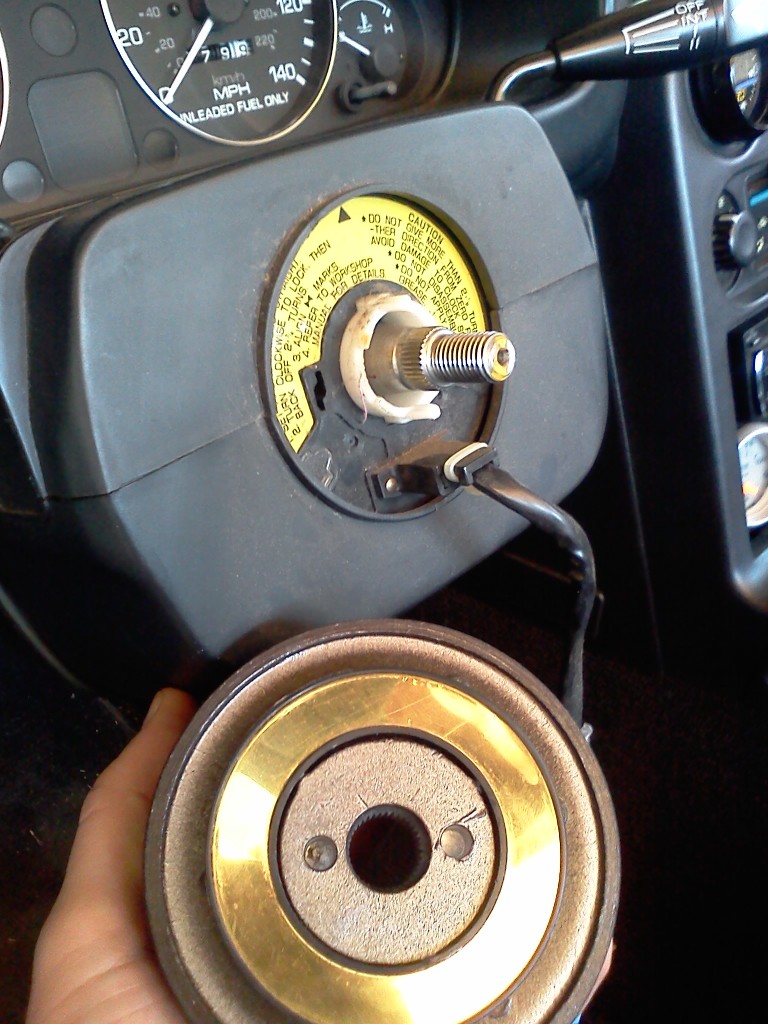
you want to grind just enough on both of the clock spring connector mounting tabs on the turn signal canceller so when you reinstall it the clock spring connector will now rotate 360 degrees around the turn signal canceller. This is very important.
Reply
 0
0

0

OK I remember now. You have to drill a hole for the airbag/horn wire harness. Without the canceller being cut, the harnes is in line with the two tabs on the turn sig canceller. To drill a hole without modifying the canceller, you would have to drill through one of the four supports for the face where the actual wheel is fastened to. To avoid this and drill a clearance hole where there is not a critical piece of framework, you cut a notch in the canceller to "clock" it a little so that the angle formed by the two tabs on the canceller and wire harnes is not a 180* angle but more like 160*. I'll see if I can get pics to explain better.
Reply
0
0
Reply
0
0
On a related note: If you are trying to remove your MOMO hub adapter and it is not coming off by pulling by hand, DO NOT use a breaker bar to pry it against the stering spindle. IT WILL BEND. Use a hammer and tap it in different places. Don't ask how I know ( )
)
)
Reply
0
0
Competition. And thanks again for the help...went relatively smoothly after the tips.
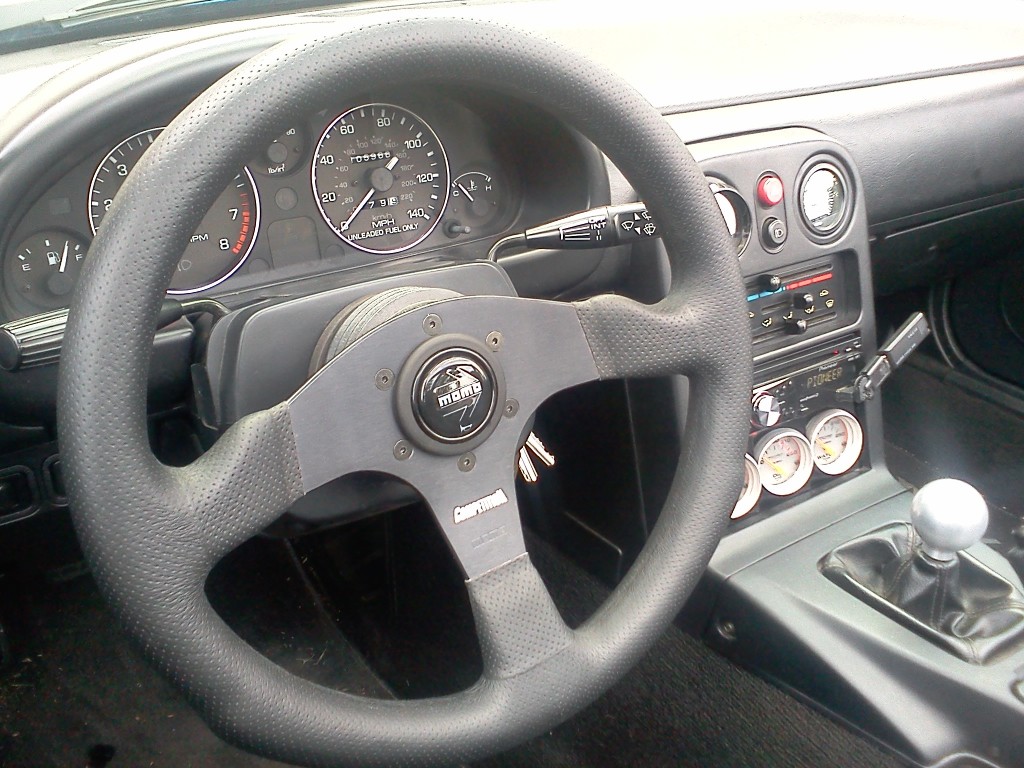
It wasn't my first choice (Mod 78 suede was #1), but I got the deal of the century on this in a day full of Craigslist win. The wheel is mint (1K miles of use...looks brand new), Miata hub adapter that was BNIB, and used Scirocco hub adapter, all for $100 cash. Scirocco hub is for sale so I hope to have about $50-60 in it ultimately. Oh, and to complete my Craigslist lotto smash from yesterday I picked up an RX-7 clutch-type LSD for $25
It wasn't my first choice (Mod 78 suede was #1), but I got the deal of the century on this in a day full of Craigslist win. The wheel is mint (1K miles of use...looks brand new), Miata hub adapter that was BNIB, and used Scirocco hub adapter, all for $100 cash. Scirocco hub is for sale so I hope to have about $50-60 in it ultimately. Oh, and to complete my Craigslist lotto smash from yesterday I picked up an RX-7 clutch-type LSD for $25
Reply
0
0
Nice score. How do you like it and how is the diameter of the wheel and diameter of the tube compared to the stock wheel. I had and accident which blew my airbags and it was actually cheaper to jut put on a new MOMO wheel. I got the Montecarlo wheel. Its not bad, but its a little small in diameter-320mm which doesn't feel right and makes it hard to see the guage cluster- and when you wrap your hands around it the tube of the wheel is more oval (24x33mm) which I'm not a fan of.
Reply
0
0
I like it thus far, and this weekend I hope to put some miles on the car up in the mountains so that I can spend some quality time with it for a final decision. It feels like it's about twice the thickness of the factory wheel which is a big improvement, but is probably a little oval...I have not measured. The diameter is 350 so it's pretty much like stock and I can see the entire gauge cluster but I sit as far back as the seat will go so that helps. What really bugged the **** out of me with the factory wheel is that there were 4 spokes, and very little room between them at 4 and 7 o'clock...it's like I didn't get to use 1/4th of the wheel. The only thing I don't like with this one is that the distance between the wheel and stalks is a little tight, so I ordered a 1/2" spacer for it.
Reply
0
0
Junior Member

Joined: Jun 2016
Posts: 87
Total Cats: 117
From: Houston, Texas
Necro thread, I know. I just did an install video for the momo hub (with momo wheel) and thought this may be useful to people:
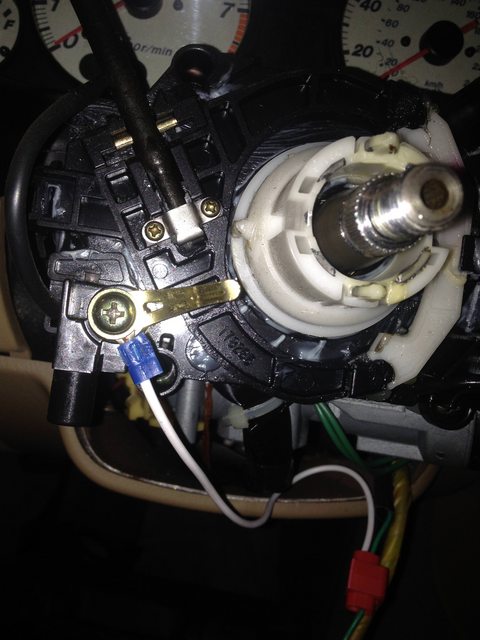
No mods to the hub, just break off (dremel whatever) the connector on the clockspring and solder it. My soldering skills are weak but I did this start to finish in less than 30 minutes because there's no drilling.
No mods to the hub, just break off (dremel whatever) the connector on the clockspring and solder it. My soldering skills are weak but I did this start to finish in less than 30 minutes because there's no drilling.
Reply
0
0

Senior Member
Joined: Jul 2016
Posts: 557
Total Cats: 54
From: San Diego
Not sure if NA is that much different than NB2 or Momo is somehow weirdly designed, but when I installed NRG hub on NB2 - there was no cutting of connectors, grinding plastic or anything like that. The only modification I had to do was to make 2 new holes on the hub for canceler to work as NRG hubs are made for NA (which have them at 0 and 180 instead of NB style at 90 and 270 degrees). Clockspring gets removed completely - you don't need to mod it.
Reply
0
0
Junior Member
Joined: Jun 2016
Posts: 87
Total Cats: 117
From: Houston, Texas
Not sure if NA is that much different than NB2 or Momo is somehow weirdly designed, but when I installed NRG hub on NB2 - there was no cutting of connectors, grinding plastic or anything like that. The only modification I had to do was to make 2 new holes on the hub for canceler to work as NRG hubs are made for NA (which have them at 0 and 180 instead of NB style at 90 and 270 degrees). Clockspring gets removed completely - you don't need to mod it.
So why bother with the momo hub? It's the only one I could find that's designed to crush in an accident. All the others are big and pretty CNC aluminum chunks. The momo hub will bend when your now non-airbag protected head/chest smacks the wheel just like the good old days. The seat belt will help obviously but depending on your size and driving position, it's definitely a possible scenario.
So the easy fix is to just cut the connector off, solder to the ribbon cable and call it a day. In the video I was thinking I could just bend it some direction but on mine the ribbon was too fragile and it started tearing. Been driving on it for a while now and the horn is still fine.
Reply
0
0
Senior Member
Joined: Jul 2016
Posts: 557
Total Cats: 54
From: San Diego
But you don't need to keep the clock-spring, with it goes the connector. Clocksprings are used to as a path for electric current to 1) horn, 2) steering wheel controls, 3)maybe airbags in some cars. With the super simple horn wiring in Miata for AM wheels, there is no reason to retain the clockspring and mess around with it's connector.
Here is how my horn was wired - this brass pin was pushing against the brass ring on the bottom of the hub.
And this is the whole setup installed without clockspring and with horn and turn signal canceler working
Here is how my horn was wired - this brass pin was pushing against the brass ring on the bottom of the hub.
And this is the whole setup installed without clockspring and with horn and turn signal canceler working
Reply
0
0

I've got mine wired the same way, bent up a piece of brass battery contact, tucked the wire through the screw hole and screwed it in with one of the clock-spring screws. Works great, and totally reversible if you need / want that.
Reply
0
0

Newb
Joined: Jun 2023
Posts: 4
Total Cats: -1
But you don't need to keep the clock-spring, with it goes the connector. Clocksprings are used to as a path for electric current to 1) horn, 2) steering wheel controls, 3)maybe airbags in some cars. With the super simple horn wiring in Miata for AM wheels, there is no reason to retain the clockspring and mess around with it's connector.
Here is how my horn was wired - this brass pin was pushing against the brass ring on the bottom of the hub.
Attachment 236823
And this is the whole setup installed without clockspring and with horn and turn signal canceler working
Attachment 236824
Here is how my horn was wired - this brass pin was pushing against the brass ring on the bottom of the hub.
Attachment 236823
And this is the whole setup installed without clockspring and with horn and turn signal canceler working
Attachment 236824
Reply
0
0

Thread
Thread Starter
Forum
Replies
Last Post
StratoBlue1109
Miata parts for sale/trade
21
Sep 30, 2018 01:09 PM
stoves
Suspension, Brakes, Drivetrain
5
Apr 21, 2016 03:00 PM


