
Inconsistent boost, right after 3" exhaust install, BOV, MBC or WG ??


Thread Starter
Senior Member
iTrader: (2)
Joined: Sep 2009
Posts: 1,193
Total Cats: 29
From: Edmonton, AB, Canada
So I finally have a 3" exhaust on the car. The big one as recommended and no CAT or resonators. It's great but I've been having issues lately.
Its a BEGI log, with a 2560 and SGDP I have a brass MBC and it was set to 12psi before I had the exhaust. I set it to about 8 when I dropped the car off in case they drove it, and because I was worried about overboosting with the new exhaust. I slowly moved it up to 12 in increments and it was good for a day or 2.
Now though I sometimes get boost building normally and other times its 5000 rpm before I get 5 psi. I've looked for a pattern but I have not driven it enough to find one. It feels a bit boggy when it doesn't build properly.
In my searching I see that it could be a stuck wastegate, so as in stuck open so it wont let boost build?? Is the new 3" and associated flow putting more pressure on it and its cracked open a touch meaning I should add preload?? Or is it something with the MBC. I have the MBC plummed post intercooler as I was taught here.
What about my BOSCH BOV. It used to make a cool howling owl sound just around a vacuum of 3 just under light loads now it wont talk to me.
I'll search for how to test each one properly but for now I'll engage the minds of all y'all.
Reply
 0
0

0

Thread Starter
Senior Member
iTrader: (2)
Joined: Sep 2009
Posts: 1,193
Total Cats: 29
From: Edmonton, AB, Canada
Plug the inlet side coming from the line before the TB - correct?
I knew I should have bought some hemostats after I lost my old set!!
I'll also do some searching on BOV's, I occassionally like the sound of the atmo ones but it could also get old.
I knew I should have bought some hemostats after I lost my old set!!
I'll also do some searching on BOV's, I occassionally like the sound of the atmo ones but it could also get old.
Reply
0
0

check bov, check wga, check mbc to make sure each is hooked up correctly and is getting a proper vacuum/boost feed. then check that both the bov and the wga aren't "sticking". lubericate the bov if it needs it (if yours comes apart)
if all are hooked up right check to make sure the wga isn't loose. if it is tighten the arm.
start there
if all are hooked up right check to make sure the wga isn't loose. if it is tighten the arm.
start there
Reply
0
0

When i used to have a BEGI kit, the wastegate flapper door had gotten stuck on the inside of the downpipe once. It took me forever to figure it out. I would disconnect the wastegate from the flapper arm and make sure it flaps properly. Mine was getting stuck on its way back (shutting) on the inside of the separated gases dp. I had to take a dremel to the inside and smooth it out a tad and loosen and slightly shift the dp to get it to work properly again.
Reply
0
0
Thread Starter
Senior Member
iTrader: (2)
Joined: Sep 2009
Posts: 1,193
Total Cats: 29
From: Edmonton, AB, Canada
Please no, not unbolting the thing ......oh the humanity
It only started once the 3" was installed so perhaps just more preload.
*** Update: Took some things out of the way and tried the WG, and yes the WG is catching and it seems to catch through the whole range of motion. I guess I'm taking of the DP and we will see what needs to be modded.
It only started once the 3" was installed so perhaps just more preload.
*** Update: Took some things out of the way and tried the WG, and yes the WG is catching and it seems to catch through the whole range of motion. I guess I'm taking of the DP and we will see what needs to be modded.
Last edited by Landrew; Sep 4, 2010 at 02:22 AM.
Reply
0
0

Thread Starter
Senior Member
iTrader: (2)
Joined: Sep 2009
Posts: 1,193
Total Cats: 29
From: Edmonton, AB, Canada
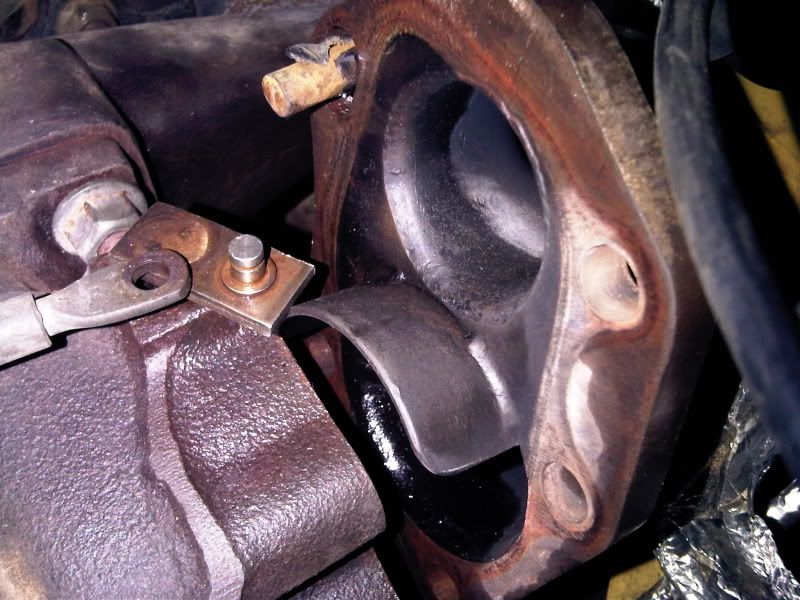
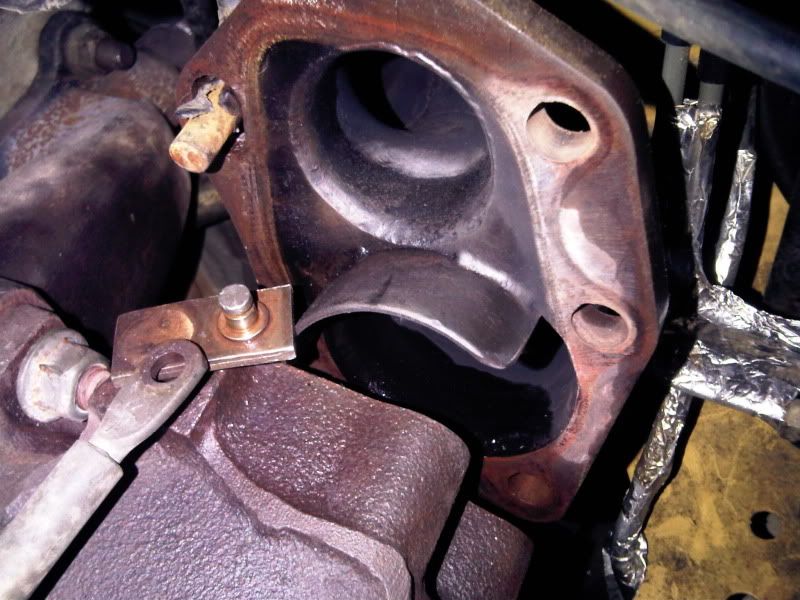
So here is what I found:
IMG00317-20100906-2237.jpg
You can just see some scrape marks on the seperator.
IMG00316-20100906-2237.jpg
I wish I had of known that this was a potential problem since I would have taken care of it before installing !! I took the time to port the WG so I would have certainly been able to set this up.
I'm going to grind it while in the engine bay as you see it hanging there. I will thin out the seperator and take of a mm or 2. Should I also grind the perimeter weld on the ID of the DP WG hole? I'll test fit it and see where and or if it contacts that hole?
PS - when you guys do the clutch is it that much easier to do with the BEGI DP off?? I've never done it and it's going to start slipping soon so if I can save an hour or 2 now I might as well do it.
Reply
0
0

Former Vendor
Joined: Jun 2006
Posts: 1,337
Total Cats: -100
From: Bell Tuning & Performance

Reply
0
0


So here is what I found:
You can just see some scrape marks on the seperator.
I wish I had of known that this was a potential problem since I would have taken care of it before installing !! I took the time to port the WG so I would have certainly been able to set this up.
I'm going to grind it while in the engine bay as you see it hanging there. I will thin out the seperator and take of a mm or 2. Should I also grind the perimeter weld on the ID of the DP WG hole? I'll test fit it and see where and or if it contacts that hole?
PS - when you guys do the clutch is it that much easier to do with the BEGI DP off?? I've never done it and it's going to start slipping soon so if I can save an hour or 2 now I might as well do it.
Reply
0
0
Former Vendor
Joined: Jun 2006
Posts: 1,337
Total Cats: -100
From: Bell Tuning & Performance
I'm going to grind it while in the engine bay as you see it hanging there. I will thin out the seperator and take of a mm or 2. Should I also grind the perimeter weld on the ID of the DP WG hole? I'll test fit it and see where and or if it contacts that hole?
PS - when you guys do the clutch is it that much easier to do with the BEGI DP off?? I've never done it and it's going to start slipping soon so if I can save an hour or 2 now I might as well do it.
PS - when you guys do the clutch is it that much easier to do with the BEGI DP off?? I've never done it and it's going to start slipping soon so if I can save an hour or 2 now I might as well do it.
We do clutches with the downpipe in and out. Which ever is easiest for you...
Stephanie
Reply
0
0
Reply
0
0

Newb
Joined: Jan 2007
Posts: 28
Total Cats: 0
From: New Jersey
Landrew,
Others have already commented on how to deal with the "sticking flapper". Sorry if you already mentioned it but what is the current PSI rating on your actuator? The reason I mention this is because I had all the issues/symptoms you mentioned. I discovered the problem was, in addition to the BEGI "sticking flapper" issue, when I added the 3" exhaust the wastegate actuator was definitely not strong enough to hold the flapper closed no matter how much preload was added. I replaced the actuator from a 6 psi to a 9 psi and the inconsistent boost went away. Just a thought. GL
Others have already commented on how to deal with the "sticking flapper". Sorry if you already mentioned it but what is the current PSI rating on your actuator? The reason I mention this is because I had all the issues/symptoms you mentioned. I discovered the problem was, in addition to the BEGI "sticking flapper" issue, when I added the 3" exhaust the wastegate actuator was definitely not strong enough to hold the flapper closed no matter how much preload was added. I replaced the actuator from a 6 psi to a 9 psi and the inconsistent boost went away. Just a thought. GL
Reply
0
0
Thread Starter
Senior Member
iTrader: (2)
Joined: Sep 2009
Posts: 1,193
Total Cats: 29
From: Edmonton, AB, Canada
I'm not sure which one I have. I will find out
It has about a mm of preload. Perhaps I will add 1 or 2 full turns tighter on the rod as I'm re-assembling everything.
I may do the clutch as well since the DP is loose so it will be a few days until driving it as I have house projects and a motocross trip in the rockies this Fri/Sat !
never enough time...........
Reply
0
0

Thread
Thread Starter
Forum
Replies
Last Post
StratoBlue1109
Miata parts for sale/trade
21
Sep 30, 2018 01:09 PM
stoves
Suspension, Brakes, Drivetrain
5
Apr 21, 2016 03:00 PM


