When you click on links to various merchants on this site and make a purchase, this can result in this site earning a commission. Affiliate programs and affiliations include, but are not limited to, the eBay Partner Network.
This thread will describe the process of adjusting valve clearances on the solid lifter equipped Miata engines using the Mazda Special Service Tool 49T0-12-0A0A (hereafter SST) . I believe this process is the same for all Miata motors from 1999 through 2005. I am sure someone will correct me if I'm mistaken.
For the readers that might not be familiar with the with the solid lifter set-up, shims are used to adjust the clearance. There is a bucket or tappet that sits on top of the valve and a shim is inserted into a recessed area on top of the bucket. The camshaft pushes the shim and the valve is opened. Shims come in a variety of thicknesses to get the tolerances right.
SST Setup and Usage
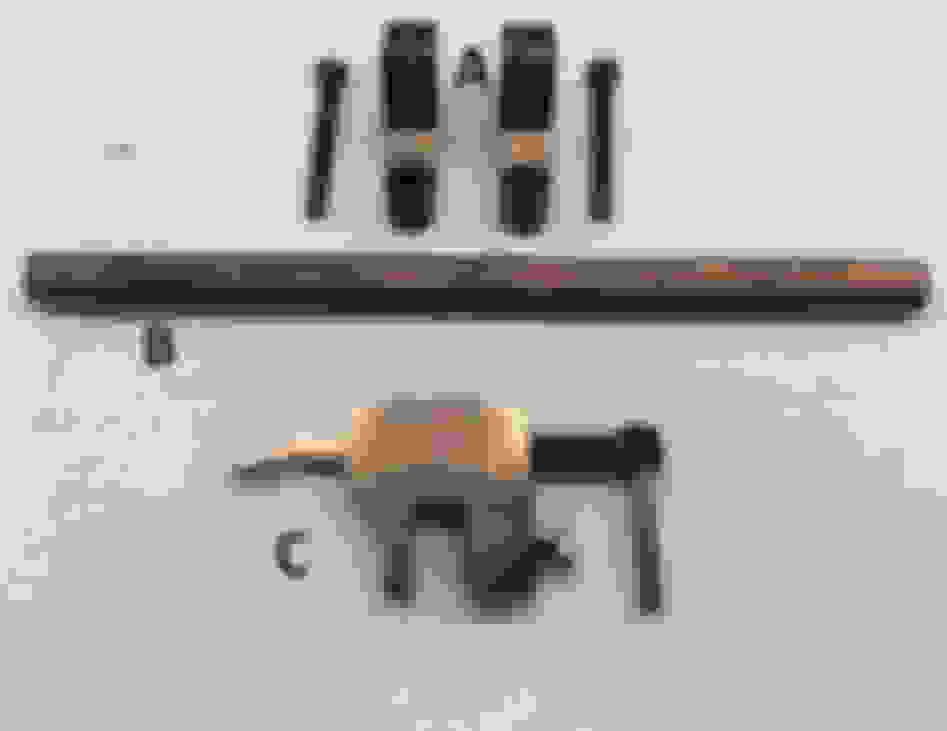
I purchased the tool via the Mazda Motorsports Program for about $300. It was shipped from Wisconsin from IDSC Holdings which appears to be affiliated with Snap On. Here is what you get for your money.
The brackets marked "A" in the image are attached using the supplied bolts in place of the camshaft cap bolts toward the middle of the cylinder head. The shaft "B" is inserted into the brackets and part "C", the spring compressor, is mounted on the shaft. When the screw on the spring compressor is cranked down, the valve spring is compressed allowing the shim to be removed.
This shows the tool installed. As you can see, the tool will only do three cylinders at a time. It must be re-positioned to reach all four. A slightly longer shaft would allow all four cylinders to be done from a single position.
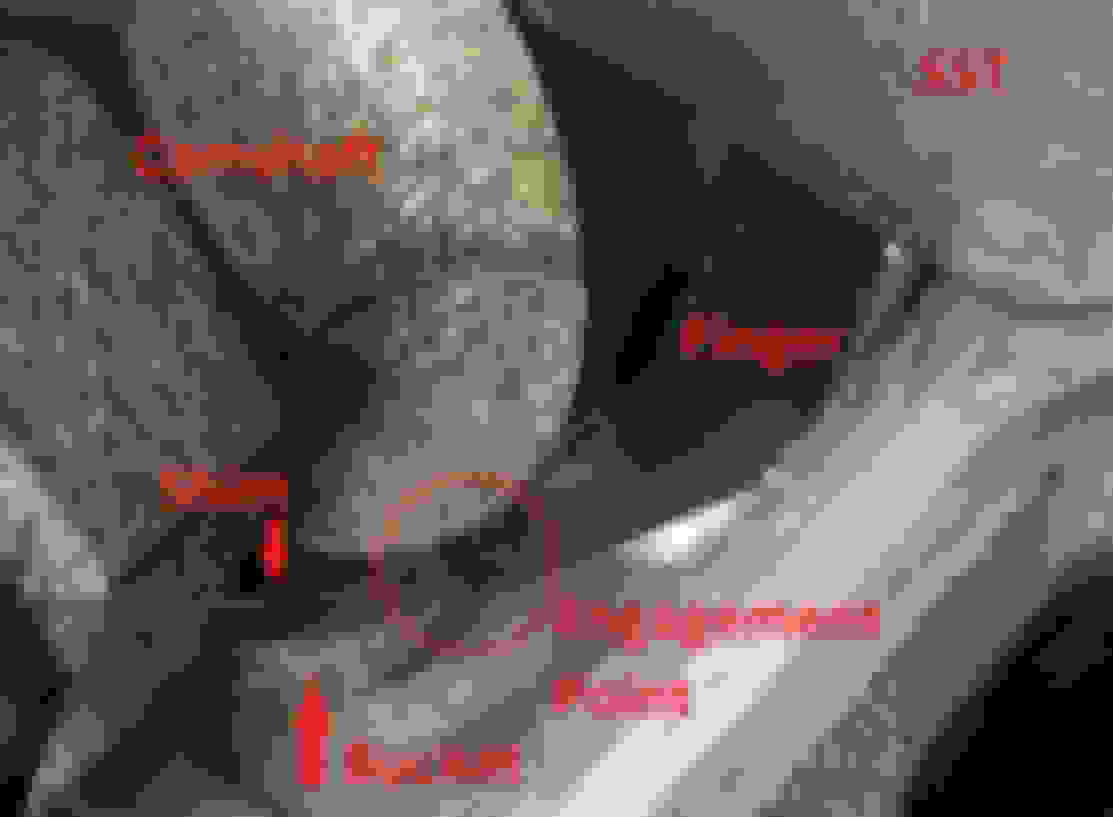
There is a notch at the end of the finger that pushes the valve spring. When positioned properly, it will engage the lip of the recessed area at the top of the bucket. This allows the valve spring to be compressed and the shim to be removed.
Here's a shot of the finger engaged with the bucket.
The instructions in the FSM say to align the marks on the brackets and shaft. This didn't work too well for me. The finger would miss the bucket. I lowered the finger into position and rotated the shaft with a 13mm wrench until the notch was seated on the bucket. I then tighten up the shaft brackets. This alignment only need to be done once per side.
The notch in the bucket and the cylinder head casting should be aligned before the SST is installed. The bucket can be rotated with your finger. This alignment allows for a tool to be inserted to pop out the shim. You can see the amount of space available between the base circle of the cam and the shim here too. Also, note the position of the camshaft, lobe up. The FSM says to put the lobes up for whichever cylinder is being worked. I found as long as the lobe was out of the way of the spring compressor and there was enough room to extract the shim, you are good to go. Rotating the engine with the spring compressor in place is a bad idea. The camshaft will contact it. However, the shaft and brackets can be left in place when rotating the motor.
I used a pointed tool to pop the shim out. It doesn't take too much force. Once out of the recessed area, I used a magnetic pickup tool to remove the shim. When replacing the shim, be sure it snaps into place.
The Process
The basic process of adjusting clearances is:
1. Measure Existing Clearances - Use a feeler gauge to measure the existing clearance and write them down. For my engine, the desired clearances are 0.007 - 0.009 in. on the intake and 0.011 - 0.013 in. on the exhaust. Measurements are taken on a cold engine.
2. If your clearances are within tolerance, go celebrate.
3. Remove Existing Shims and Measure - Use a micrometer preferably. Write down the measurements.
4. Determine Required Shims - For any valves not in tolerance, use the following formula, (Existing Clearance - Desired Clearance) + Existing Shim. This will tell you the required shim size to get the clearance right
5. Determine If Any Shims Can Be Reused - Since the buggers are about $10 a piece, see if any of the shims can be swapped from other out of tolerance valves. On my engine, I was able to move 7 shims to other valves to get the clearances right.
6. Order Required Shims - Shims can be gotten directly from Mazda or from Cylinder Head Supply (CHS) (https://goo.gl/RcE357). Mazda sells shims from 0.108 to 0.148 inches. CHS has .079 to .116 inches. I have attached a spreadsheet with the Mazda part numbers and dimensions
7. Wait Patiently for Delivery- I ordered online from a fairly close Mazda dealer and it took about 10 days to get the shims. I would have ordered from Mazda Motorsports but they where going to shutdown for Christmas and I didn't want to take a chance of not getting them. I didn't ask Santa.
8. Install Shims - Swap any exiting shims that can be reused and install the new ones. Be sure to dunk them in oil prior to installation and be sure they snap into place AKA fully seated in the recessed area of the bucket. Stay organized and being sure the right shim goes in the right place.
9. Recheck Clearances - If they're good, celebrate. Otherwise, use the curse words of your choice. If something is wrong, be sure you didn't bonehead once of the shims like I did.
Discussion
Is the SST worth it? I haven't tried the camshaft removal technique (CRT) but I can certainly see some of the advantages. One seemingly big advantage of the CRT would be taking all the shims out at once. With the SST, I wasn't comfortable rotating the engine with the shims out. The edges of the camshaft lobe would contact the edges of the recessed area of the bucket and that just didn't look good to me. I am sure there are other advantages. The SST is a bit fiddly but I was able to install 8 new shims and move 7 shims to different positions in about 2 hours. This included some time for photos and I already had the valve cover off. Its seems with the SST, there would be a lot less tear down involved and no chance of mistiming the cams but, like I said, I haven't done a timing belt swap so I don't have a feel for the complexity.
We have a thread floating around with part numbers and alternative locations to get shims. I believe you can get nissian shims that fit and are far cheaper. I will see if I can find it and post it.
We have a thread floating around with part numbers and alternative locations to get shims. I believe you can get nissian shims that fit and are far cheaper. I will see if I can find it and post it.
Overall this is very good info.
Thanks shuiend, The Nissan shims I found at Cylinder Head Supply didn't have the same range of sizes that the Mazda shims were available in. There was some overlap in sizes but the Nissan's stopped short of the size I needed. They are cheaper but they are sold only in sets of four for $20. If they would have had my sizes, the price would have been about $20 cheaper. If you have another source, that would be great to have. Thanks again.
Thanks for the info. This is a project I keep meaning to get into, myself.
My perception of this, having done SUB and screw-and-lock-nut valve adjustments on sport motorcycles but never on a car, is that the special tool could save a good bit of time and effort if you wind up only having to change a couple of shims. From my understanding, this is a pretty likely situation on our engines if the mileage isn't crazy. On the other hand, if you have to do more than a few, I could see preferring to mess with the timing belt and removing the cams, although I admit to not being intimately familiar with how fiddly it is to retime the BP. As long as you measure and record carefully (for my bikes I made an Excel spreadsheet), you can keep track of what shims you have, what you need, and what can be swapped around, and then put everything together properly just once.
Unless you plan on doing Miata valves frequently or have some sort of group-buy/group-sharing situation going on, $300 for the special tool strikes me as a tough sell.
Doing a shim job without the tool is a little bit more fiddly, but you don't have to retime as long as you take some precautions and with some finesse - like zip tying the timing belt to the cam, then unbolting the cam caps and just lifting the rear part of the cam up will give you clearance if you need to swap out shims. I have retimed an engine without removing the lower timing covers (being lazy) and aside from the back pain of bending over and shining a light at the right angle to look for the crank marks, it's not too difficult - but I can say it's easy as someone that's done a dozen or so timing belts by now.
Originally Posted by TalkingPie
My perception of this, having done SUB and screw-and-lock-nut valve adjustments on sport motorcycles but never on a car, is that the special tool could save a good bit of time and effort if you wind up only having to change a couple of shims. From my understanding, this is a pretty likely situation on our engines if the mileage isn't crazy. On the other hand, if you have to do more than a few, I could see preferring to mess with the timing belt and removing the cams, although I admit to not being intimately familiar with how fiddly it is to retime the BP. As long as you measure and record carefully (for my bikes I made an Excel spreadsheet), you can keep track of what shims you have, what you need, and what can be swapped around, and then put everything together properly just once.
I always wondered how the mythical sst worked. Now I know. It looks like if you had a stash of shims like the dealer or a large miata shop it could be a time saver. But for us normal people who dont want to have to inventory like a grand worth of shims the cam removal method makes the most sense. When you can measure the clearance on all the lifters, then remove all the shims and measure them, mix and match and hopefully you only need to buy like 3-5 new shims.


 4
4


