Building a blonde young beefcake wearing nothing but skimpy shorts named Rocky

 08-10-2012, 11:43 AM
#622
Senior Member
Thread Starter
iTrader: (7)

Join Date: Sep 2009
Location: Royal Oak Michigan
Posts: 754
Total Cats: 68
MOVED FROM PREVIOUS PAGE:
On the topic of head gaskets - Looks like mine is the 01+ version. From what I'm reading the only disastrous combination is when you use an 01+ gasket on a 99 or older head. I think the re-route still offers a benefit of cooling in all areas, just uneven when used with my gasket. Correct me if I'm wrong.
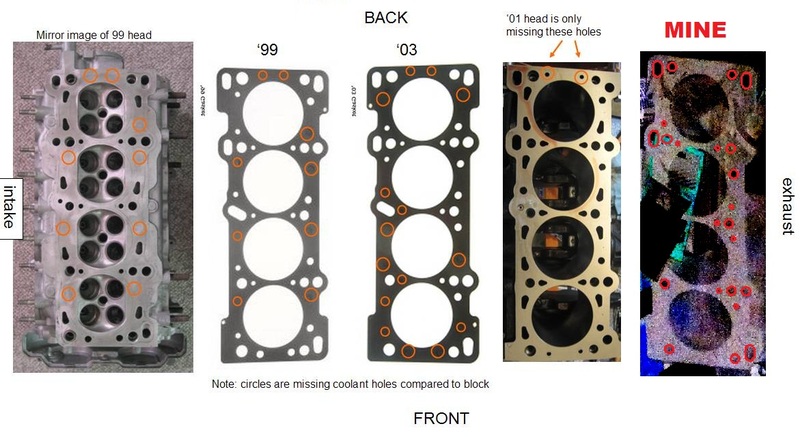
On the topic of head gaskets - Looks like mine is the 01+ version. From what I'm reading the only disastrous combination is when you use an 01+ gasket on a 99 or older head. I think the re-route still offers a benefit of cooling in all areas, just uneven when used with my gasket. Correct me if I'm wrong.


Reply
 0
0

0
08-10-2012, 11:51 AM
#623

Basically. I'm sure you saw my thread discussing this in detail when you searched about the issue. General conclusion is 01+ gasket with re-route is counter productive to what the gasket is trying to accomplish vs what the re-route is trying to accomplish and shouldnt' be used together. Which is why I said I hope you have a 94-00 gasket.
Why not drop a new hg in there while the engine is out though? Its really not much more work and you'll have peace of mind.
Why not drop a new hg in there while the engine is out though? Its really not much more work and you'll have peace of mind.
Reply
0
0
08-10-2012, 12:14 PM
#624
Senior Member
Thread Starter
iTrader: (7)
Join Date: Sep 2009
Location: Royal Oak Michigan
Posts: 754
Total Cats: 68
Basically. I'm sure you saw my thread discussing this in detail when you searched about the issue. General conclusion is 01+ gasket with re-route is counter productive to what the gasket is trying to accomplish vs what the re-route is trying to accomplish and shouldnt' be used together. Which is why I said I hope you have a 94-00 gasket.
Why not drop a new hg in there while the engine is out though? Its really not much more work and you'll have peace of mind.
Why not drop a new hg in there while the engine is out though? Its really not much more work and you'll have peace of mind.
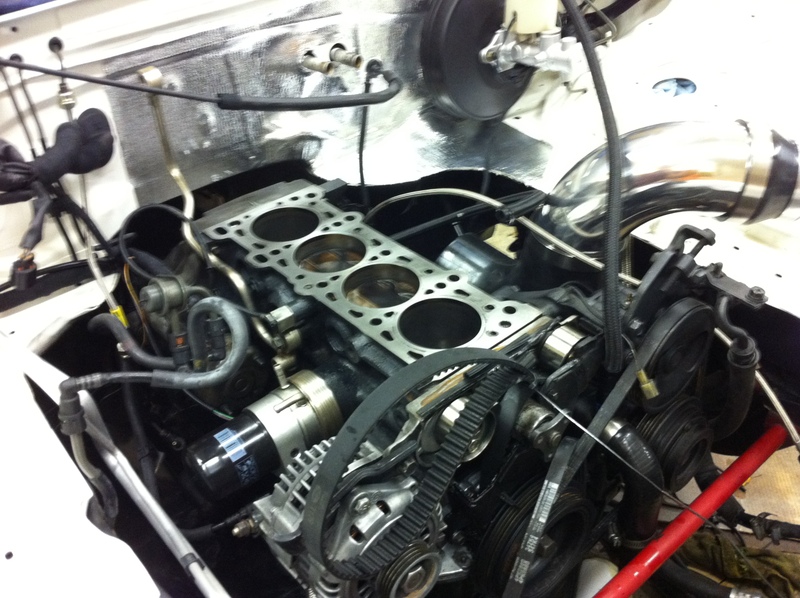
I have the engine in now and really don't feel like messing with the timing belt and all that is involved.
Quote from 949:
"Attention 01-05 owners: Mazda changed the head gasket design for these years to restrict flow to the #1 cylinder. Not a real fix but it does allow the 01-05 to run a tiny bit cooler than the previous years. Because of this change however, the reroute could cause uneven cylinder head temps, even while improving overall cooling. For this reason, M-Tuned recommends using the 94-00 head gasket (BP26-10-271)if installing the reroute on an 01-05 USDM Miata."
Reply
0
0
08-10-2012, 04:54 PM
#625
Elite Member

iTrader: (2)
Join Date: May 2008
Location: Portland, Oregon
Posts: 3,468
Total Cats: 365
Dem - you are wrong. You should not run a reroute with the 01+ head gasket. The #1 cylinder will be starved and will overheat. Especially since you are running ALLOFIT.
Part # BP26-10-271. This is the only head gasket that should be used with a reroute on a 1.8.
reference m.net thread here, see specifically post 104 for making the 94-00 gasket mate optimally to 01+ vvt head coolant passages.
Part # BP26-10-271. This is the only head gasket that should be used with a reroute on a 1.8.
reference m.net thread here, see specifically post 104 for making the 94-00 gasket mate optimally to 01+ vvt head coolant passages.
Reply
0
0
08-14-2012, 11:55 AM
#627
Senior Member
Thread Starter
iTrader: (7)
Join Date: Sep 2009
Location: Royal Oak Michigan
Posts: 754
Total Cats: 68
Purchased the head gasket - I'll have it today.
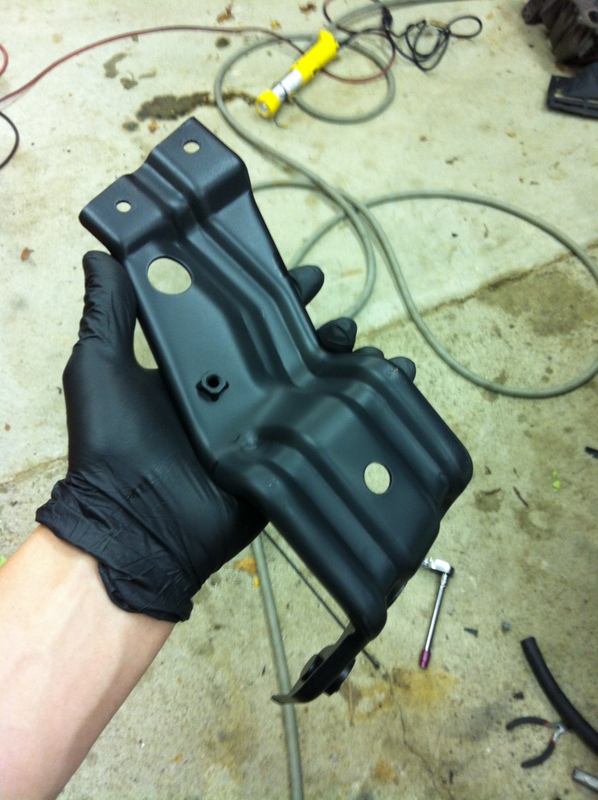
Saturday I spent some time working on some of the little details. I did some under body paint and took care of some of the small things like the Radiator/condenser brackets.
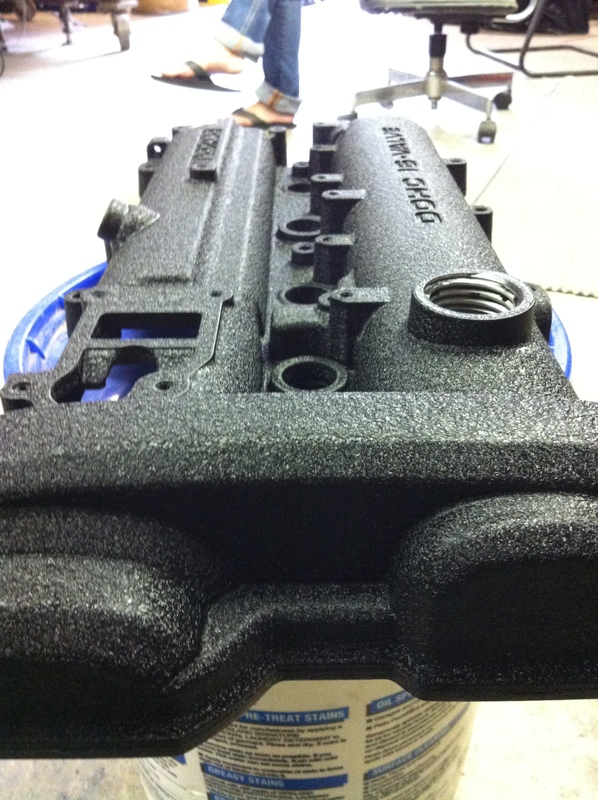
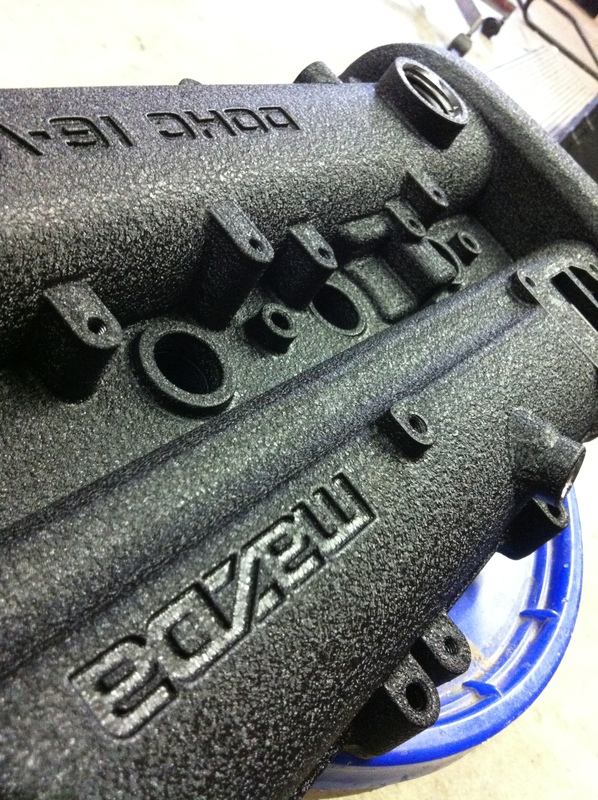
Welded my AN bung onto my valve cover and repainted it - Wrinkle black
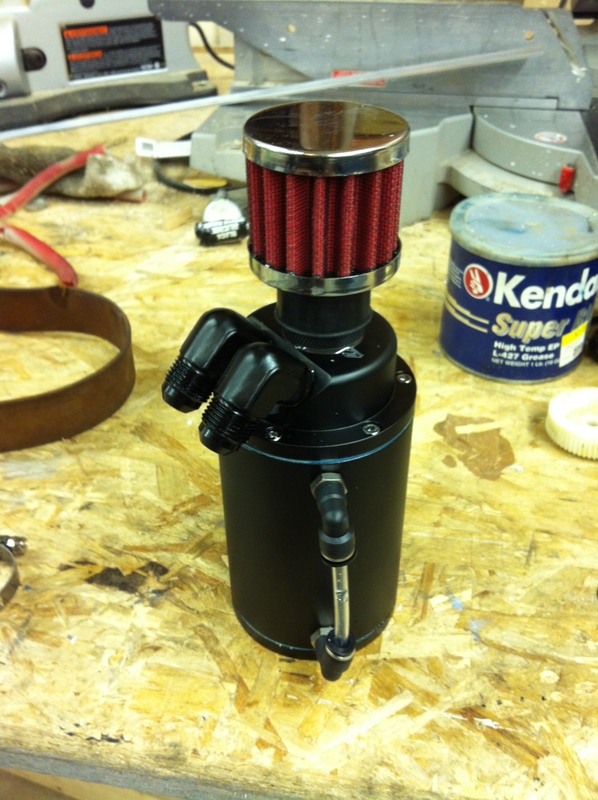
Finished modifying my catch can - Breather mounted, AN fittings ready.
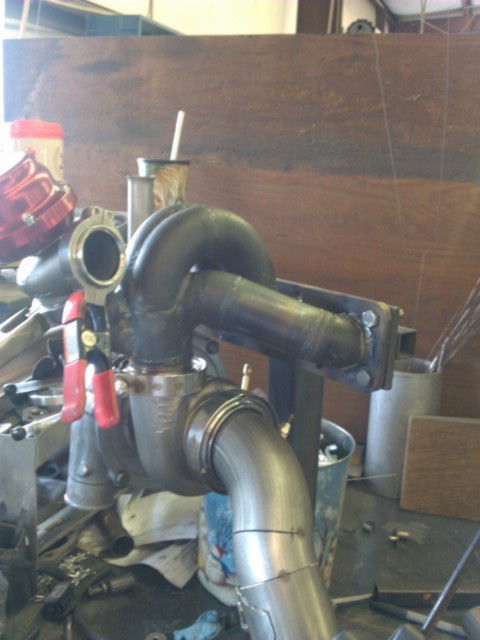
The manifold is about done - Stephanie sent me some update pictures with my turbo and WG mounted up.
Saturday I spent some time working on some of the little details. I did some under body paint and took care of some of the small things like the Radiator/condenser brackets.

Welded my AN bung onto my valve cover and repainted it - Wrinkle black


Finished modifying my catch can - Breather mounted, AN fittings ready.

The manifold is about done - Stephanie sent me some update pictures with my turbo and WG mounted up.


Reply
0
0


 08-14-2012, 04:17 PM
#632
Senior Member
Thread Starter
iTrader: (7)
Join Date: Sep 2009
Location: Royal Oak Michigan
Posts: 754
Total Cats: 68
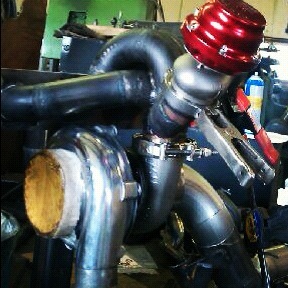
Are you referencing the Merge Collector? By "Merge Angle", I'm not sure what you're trying to call out. If you are talking about the angle of the merge pipes that create the collector, they look great to me.. Not too aggressive, smooth inside and plenty stout looking.
Care to explain?
Care to explain?
Last edited by miatauser123; 08-14-2012 at 04:32 PM.
Reply
0
0
08-14-2012, 04:44 PM
#633
Junior Member

Join Date: Sep 2009
Location: Bergen, Norway
Posts: 128
Total Cats: 12
Are you referencing the Merge Collector? By "Merge Angle", I'm not sure what you're trying to call out. If you are talking about the angle of the merge pipes that create the collector, they look great to me.. Not too aggressive, smooth inside and plenty stout looking.
Care to explain?
Care to explain?
Reply
0
0
 08-15-2012, 12:54 AM
#636
Elite Member
iTrader: (2)

Join Date: Jan 2007
Location: Los Angeles, CA
Posts: 8,682
Total Cats: 130
Thanks curly, for posting that retarded piece of shiz FM/BEGI replacement that someone asked for.
Abe's quality work:
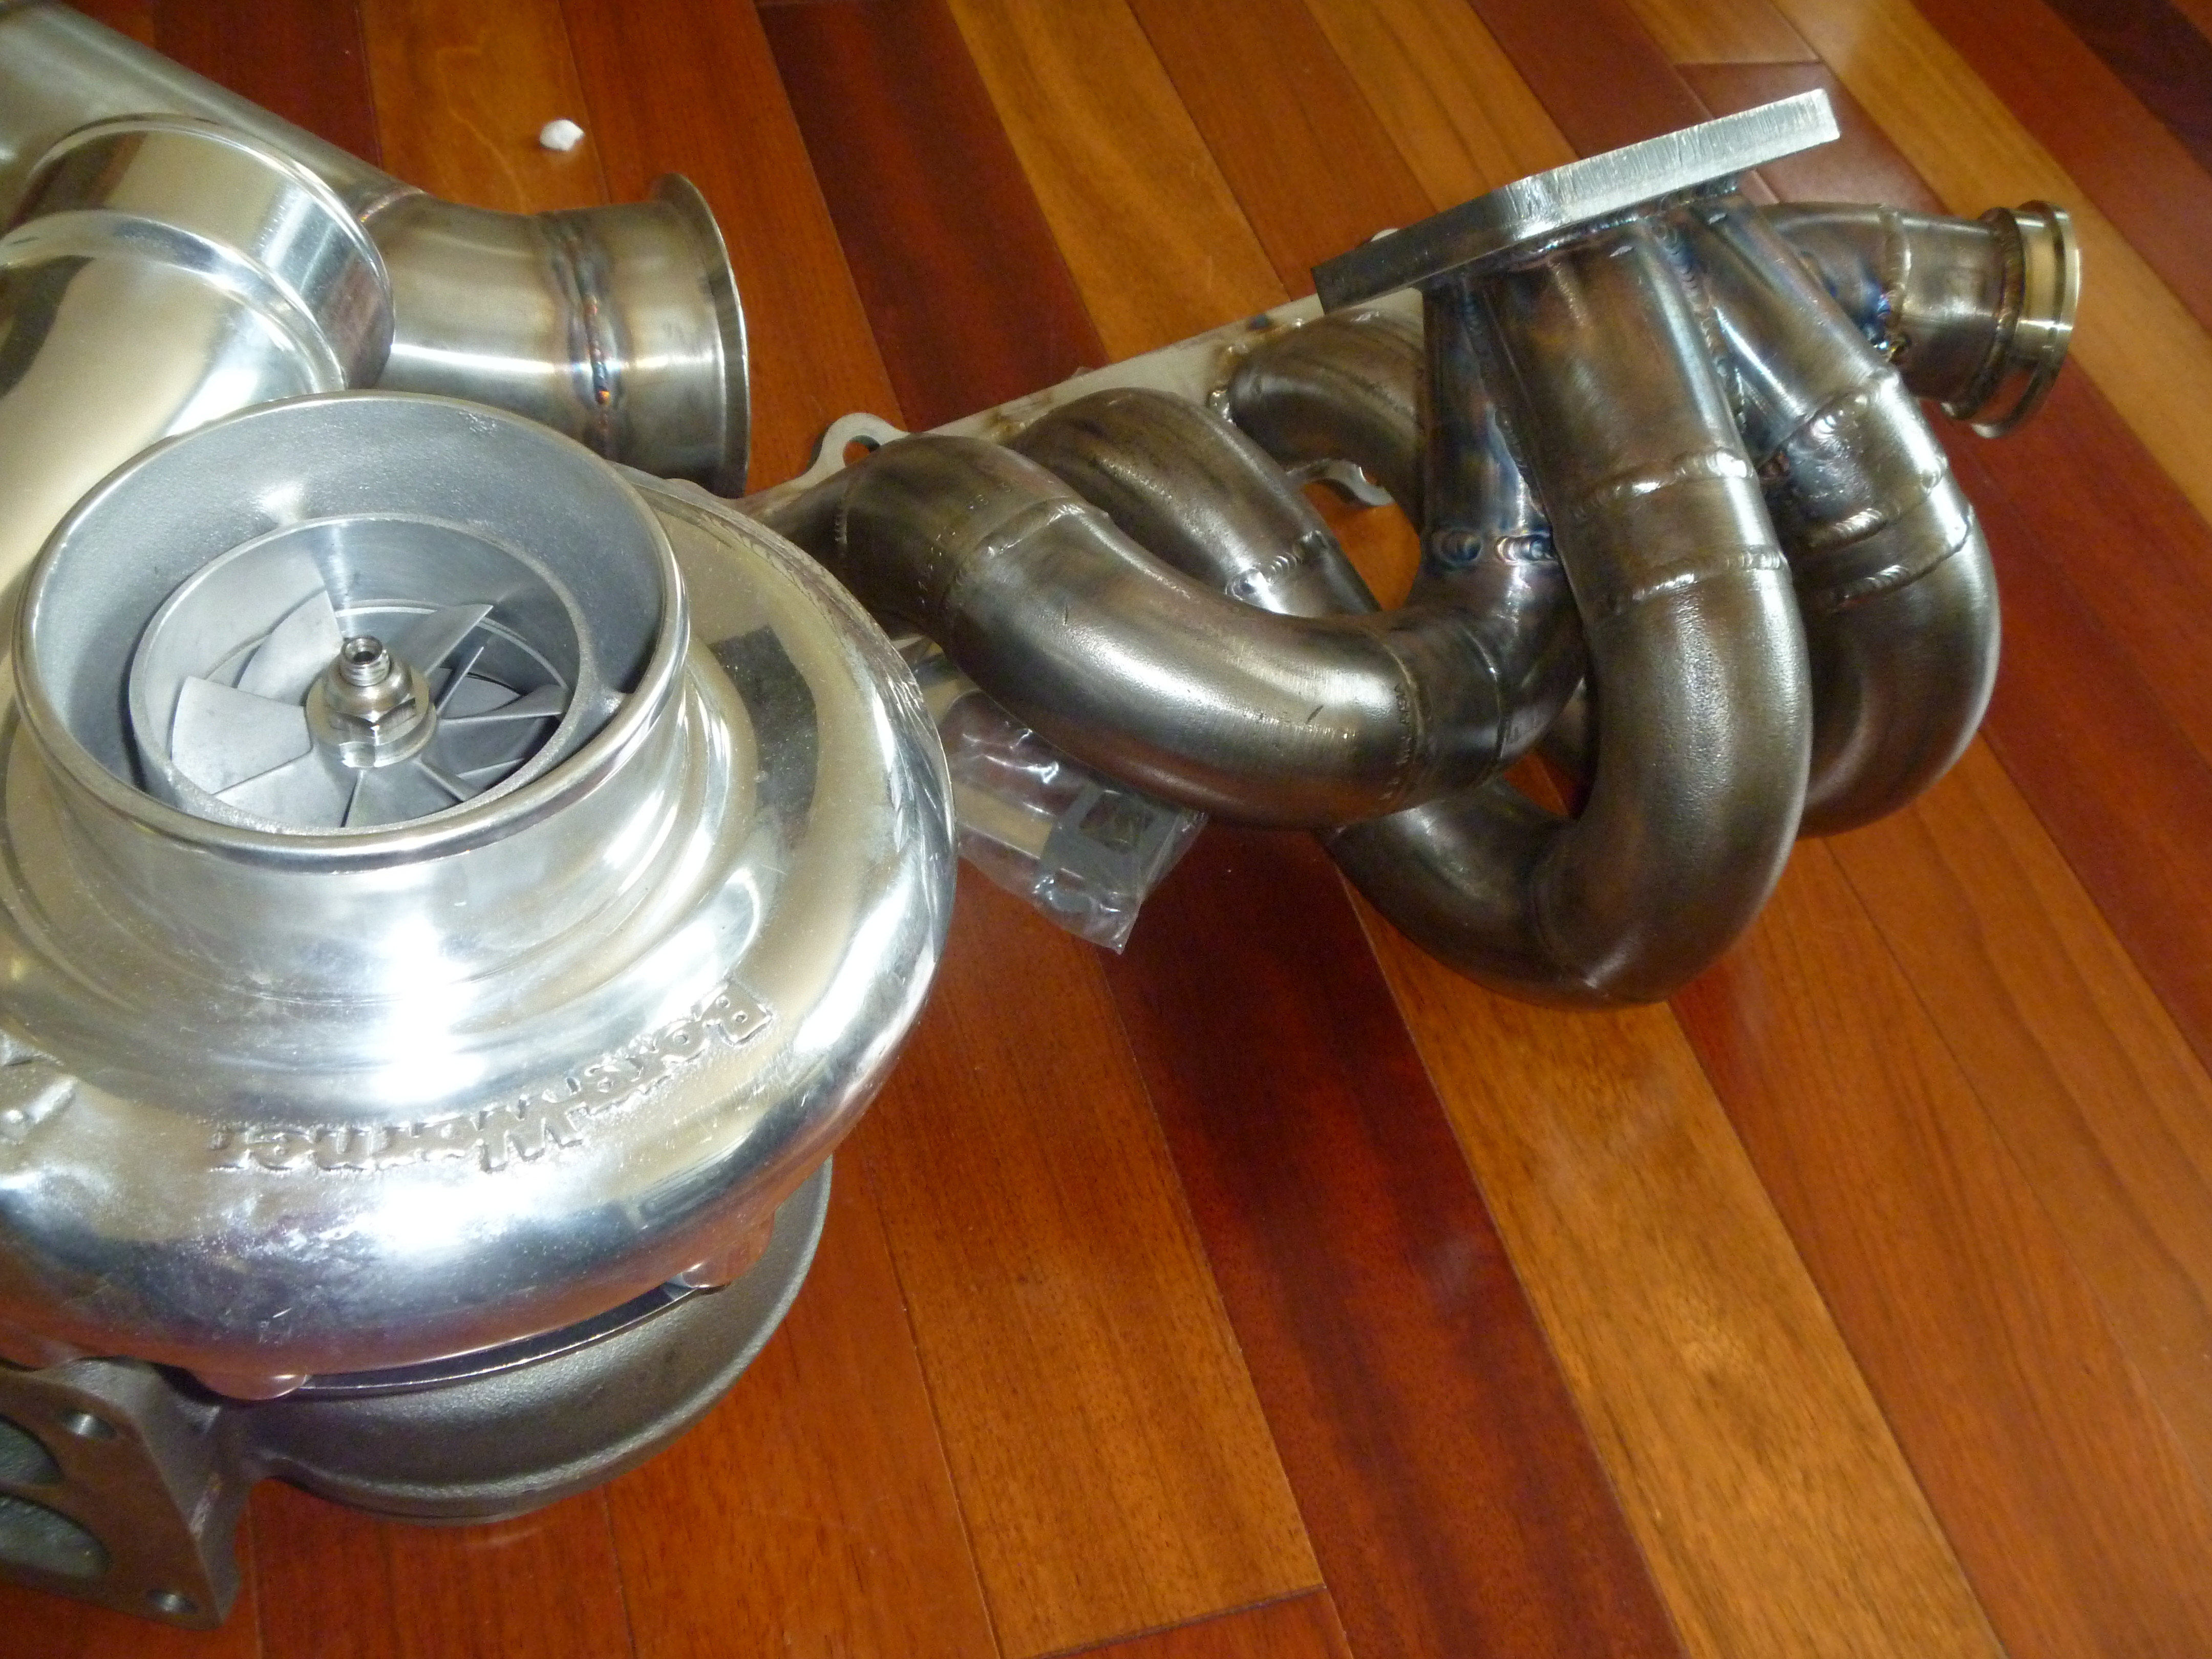
By merge angle, I mean that runners 1 and 4 face each other nearly directly. I bet the collector also looks like shiz.
This is more like what a manifold should look like. All runners pointed into the collector at about the same angle.

But. Who cares. You will probably make 100hp more than me at 25psi less. Shrug. I made 350 or so hp on a crappy begi log and this looks a little better. Still. I have seen DIY shiz here that is much better.
Abe's quality work:
By merge angle, I mean that runners 1 and 4 face each other nearly directly. I bet the collector also looks like shiz.
This is more like what a manifold should look like. All runners pointed into the collector at about the same angle.
But. Who cares. You will probably make 100hp more than me at 25psi less. Shrug. I made 350 or so hp on a crappy begi log and this looks a little better. Still. I have seen DIY shiz here that is much better.
Reply
1
1
08-15-2012, 09:37 AM
#638
Senior Member
Thread Starter
iTrader: (7)
Join Date: Sep 2009
Location: Royal Oak Michigan
Posts: 754
Total Cats: 68
I see what you mean. The two inner 90 elbows look a bit aggressive but I'll wait to see it in person. Looks like it might just be the picture. Either way you look at it, it's a very stout piece and reliability is a huge concern for me. I WILL be beating the **** out of this car on a track.
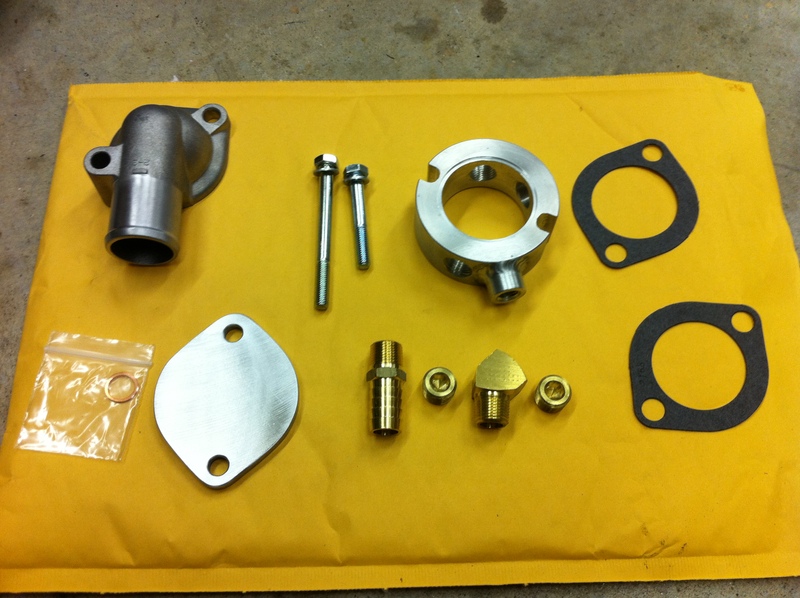
So last night I picked up my new head gasket and got it installed with my new coolant reroute.
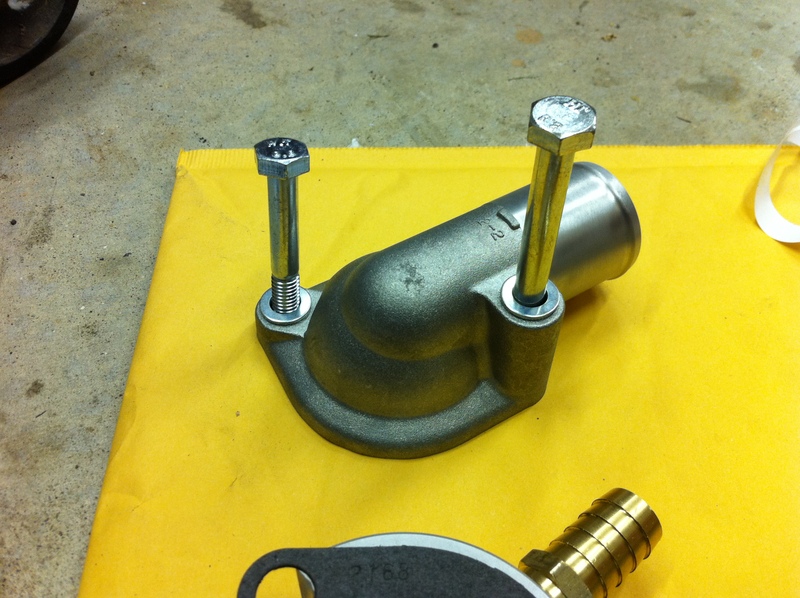
The newest coolant re-route parts below. The kit now includes a 45 degree adapter piece to leave the heater core lines in a more natural position.
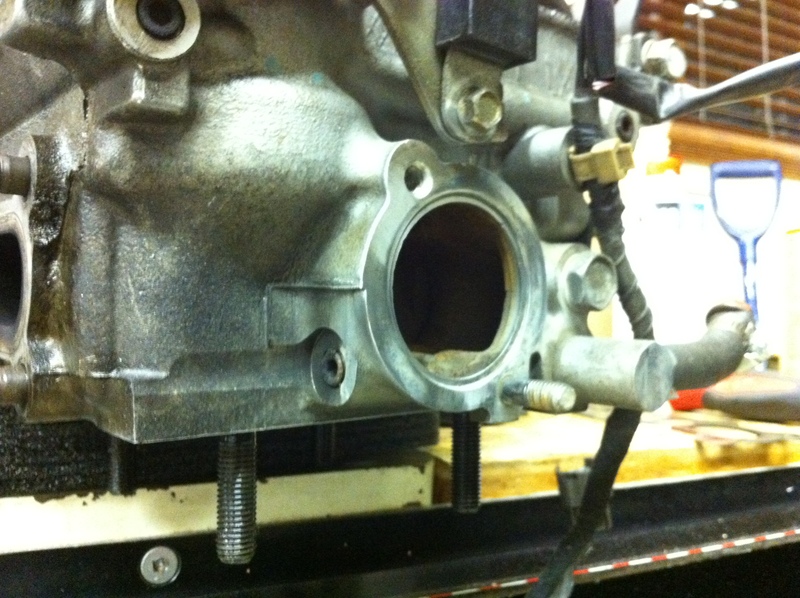
I started by popping off the back sensor housing.
Cleaned up the mating surface.
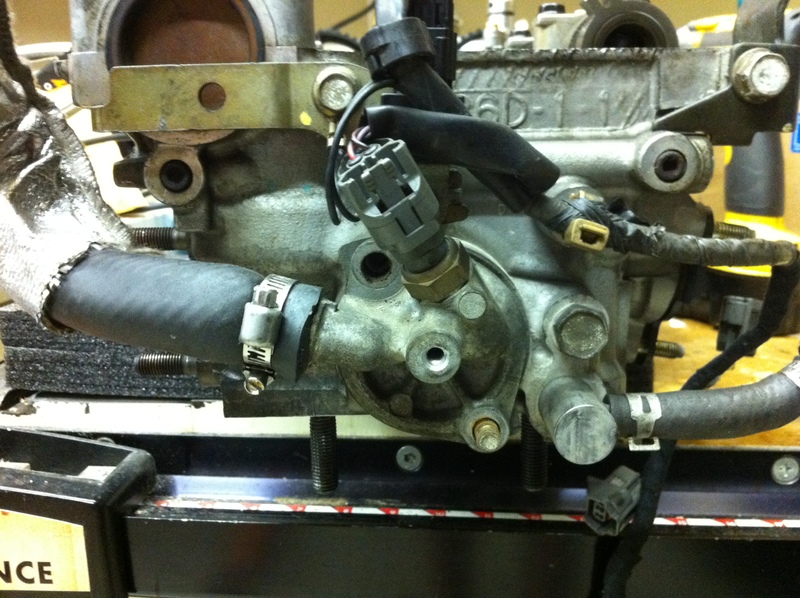
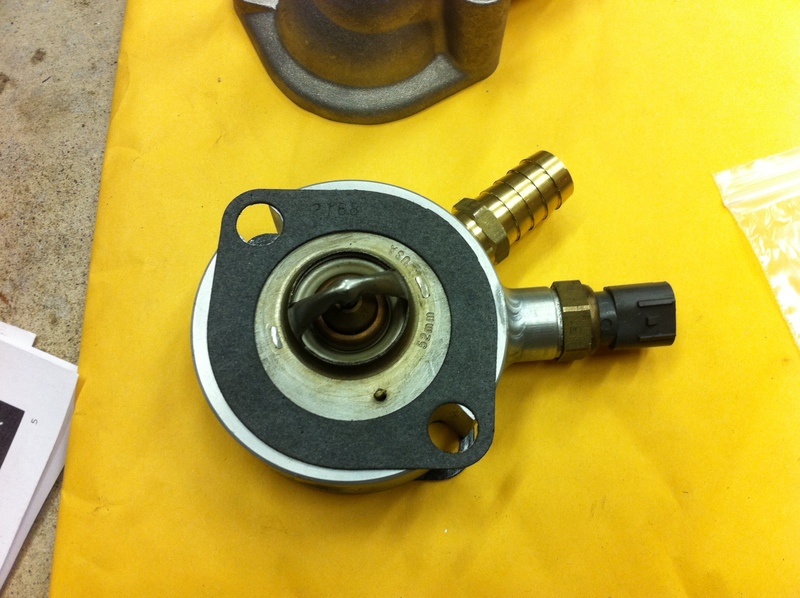
Installed my thermostat, sensor and hose barb without the sensor just to take a photo to demonstrate why BEGi has included the 45 degree elbow adapter.
The KIA housing that's included in the kit is coupled with new hardware. The old stud must be removed from the head.
You can see that while it's mocked up without the 45 degree adapter the heater core hose is pointed in a slightly different direction than the factory setup.
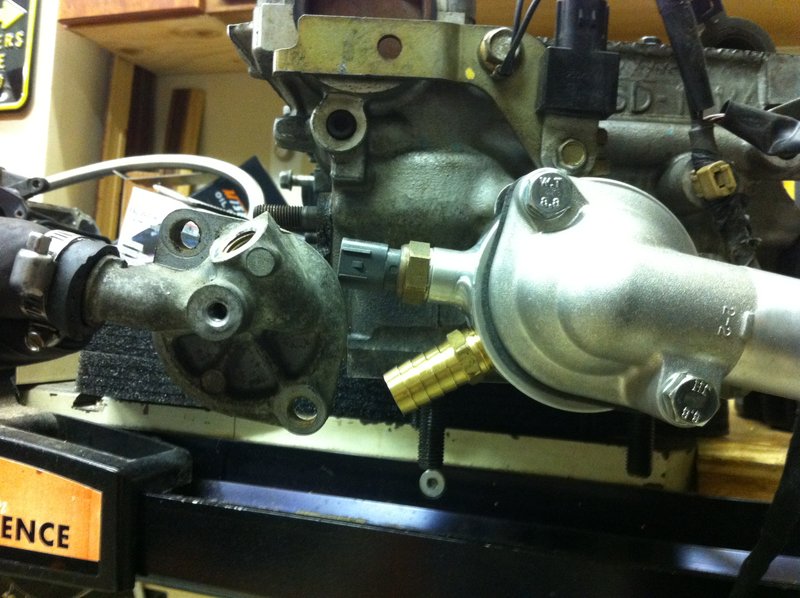
With the adapter it's in the perfect position. It's close to the sensor but with a slight rotation of the hose barb assembly I was able to regain my clearance.
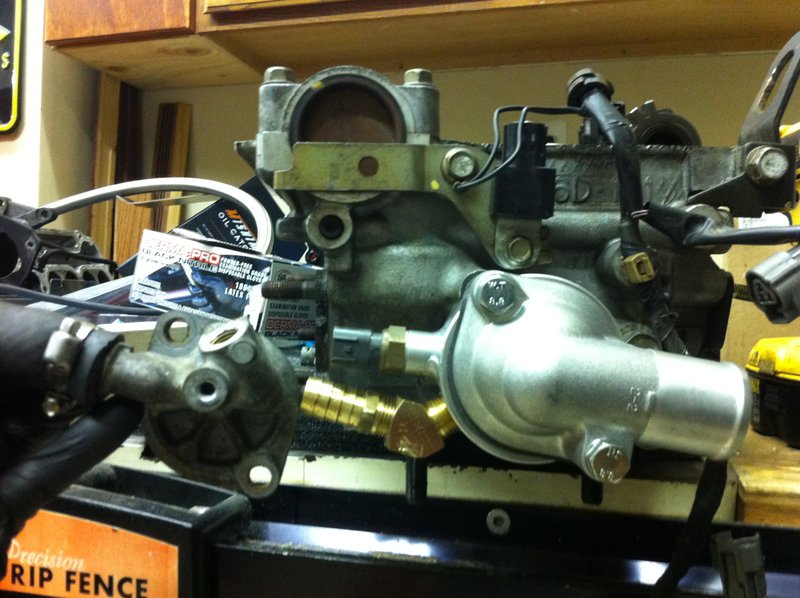
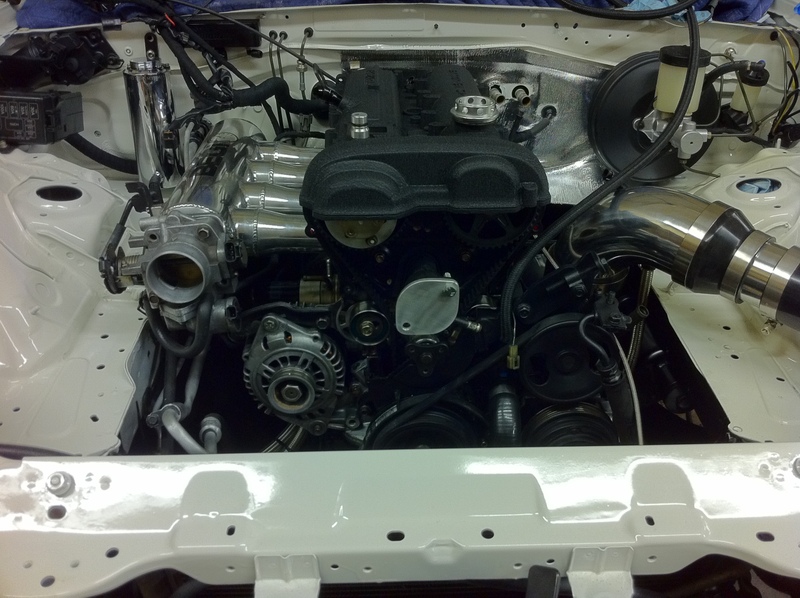
Mocked up the block off plate. The valve cover is just sitting on top to cover it from dust for now, but you get the idea. This bish is gonna look nice!
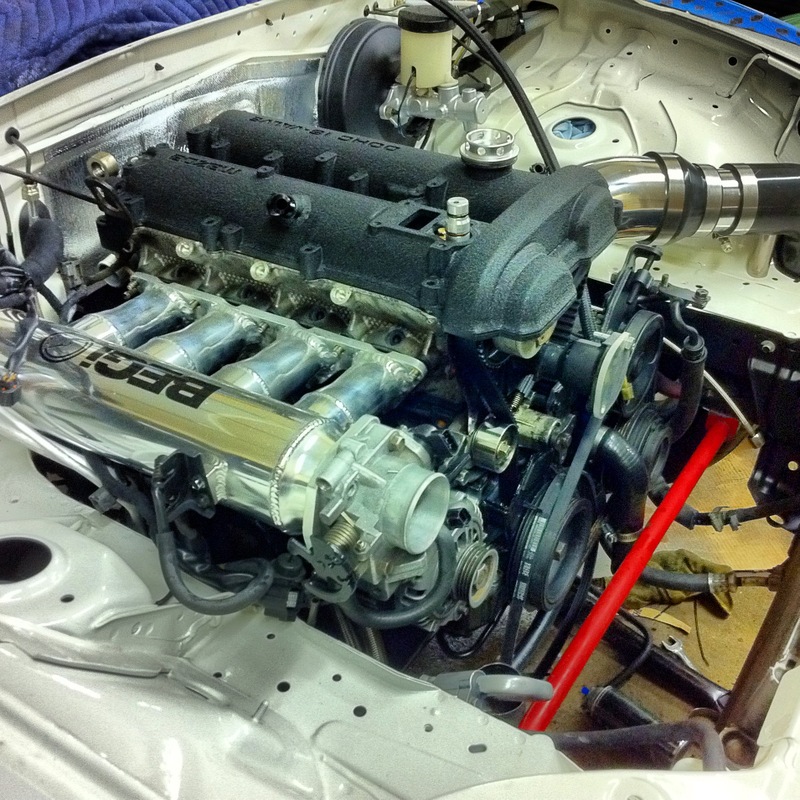
For my fuel system I've got something a bit special in store for you kids
So last night I picked up my new head gasket and got it installed with my new coolant reroute.

The newest coolant re-route parts below. The kit now includes a 45 degree adapter piece to leave the heater core lines in a more natural position.

I started by popping off the back sensor housing.

Cleaned up the mating surface.

Installed my thermostat, sensor and hose barb without the sensor just to take a photo to demonstrate why BEGi has included the 45 degree elbow adapter.

The KIA housing that's included in the kit is coupled with new hardware. The old stud must be removed from the head.

You can see that while it's mocked up without the 45 degree adapter the heater core hose is pointed in a slightly different direction than the factory setup.

With the adapter it's in the perfect position. It's close to the sensor but with a slight rotation of the hose barb assembly I was able to regain my clearance.

Mocked up the block off plate. The valve cover is just sitting on top to cover it from dust for now, but you get the idea. This bish is gonna look nice!


For my fuel system I've got something a bit special in store for you kids
Reply
0
0


