Scaxx builds an E46
 04-29-2016, 11:10 PM
#241
Elite Member

Thread Starter
Join Date: Sep 2015
Location: Seattle, WA
Posts: 1,651
Total Cats: 884
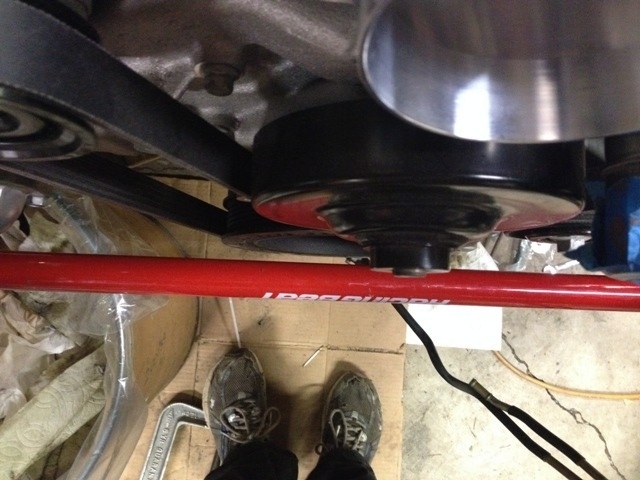
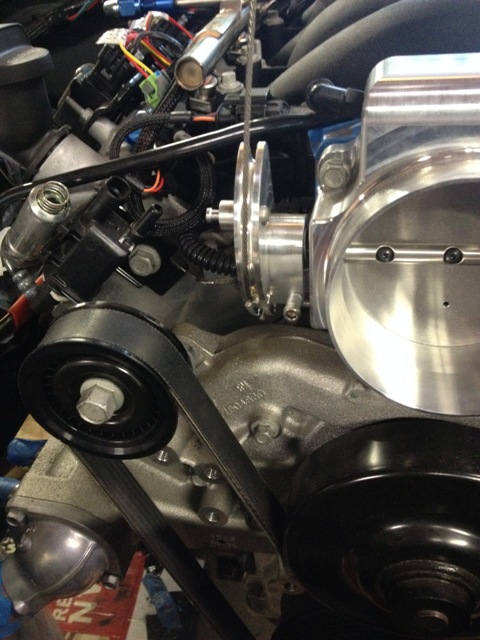
Yesterday was kind of a weird day, did well on my circuits midterm but I was feeling super down afterwards for no real reason. Did some hw and decided to try to end the night on a positive note so I went out to the garage for 45 minutes and got the sway bar position dialed in. I got it as close to the pulley as I could so the end links were as close to 90 as possible. They're a little bit more than I was hoping but I guess I'll have to figure that out in the future, the suspension set up is gonna be all sorts of wrong when I first get this thing to autox anyway. (ignore the extra spacers on in the pics, I didn't want to have them lying around.

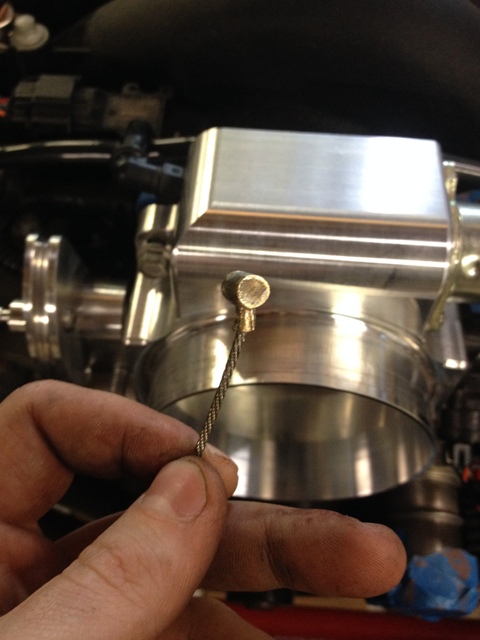
Today when I got home I decided it was gonna be my only chance to work on it for the next week because of finals so I took two hours and dinked around with some ****. First, I decided to try my hand at making a new cable end since a custom cable is expensive. I had a couple fittings laying around from when I was gonna make one for an old go-kart a few years back so checked it with the throttle body and it was just a little too large but that's what files and grinders are for. Actually a pretty easy process, I just frayed the ends a little and then soldered it. Took a bit of grinding to make it work but it fit like a charm after enough massaging. Ended up having to bend it a little so the cable went into the slot a little which cracked the bottom piece of the end but it's not a big deal since it's filled with solder.
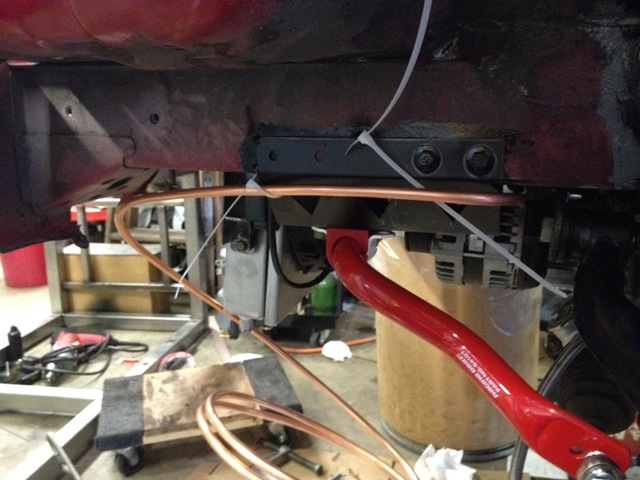
I also stopped by home depot today and grabbed some 3/8" copper tube for the power steering cooler. They had 10-foot rolls so I grabbed some of that and started playing with it today. Did part of the cooler before I decided to throw the radiator back in for checking clearance and called it a day. Also, put the wheel on and checked where it would hit at full lock as well as through the suspension movement. It won't hit the power steering lines which is the important part, I think it'll hit the sway bar first. But that's close to full lock so it doesn't really matter.


Today when I got home I decided it was gonna be my only chance to work on it for the next week because of finals so I took two hours and dinked around with some ****. First, I decided to try my hand at making a new cable end since a custom cable is expensive. I had a couple fittings laying around from when I was gonna make one for an old go-kart a few years back so checked it with the throttle body and it was just a little too large but that's what files and grinders are for. Actually a pretty easy process, I just frayed the ends a little and then soldered it. Took a bit of grinding to make it work but it fit like a charm after enough massaging. Ended up having to bend it a little so the cable went into the slot a little which cracked the bottom piece of the end but it's not a big deal since it's filled with solder.


I also stopped by home depot today and grabbed some 3/8" copper tube for the power steering cooler. They had 10-foot rolls so I grabbed some of that and started playing with it today. Did part of the cooler before I decided to throw the radiator back in for checking clearance and called it a day. Also, put the wheel on and checked where it would hit at full lock as well as through the suspension movement. It won't hit the power steering lines which is the important part, I think it'll hit the sway bar first. But that's close to full lock so it doesn't really matter.


Reply
 1
1

1
05-04-2016, 01:58 PM
#242

that sway bar is going to have some bind in it. just poniey up and get the FM sway bar. i had to. car felt much better after i did.
__________________
OG Racing
Your Source For Motorsports Safety Equipment
WWW.OGRACING.COM
800.934.9112
703.430.3303
info@ogracing.com
OG Racing
Your Source For Motorsports Safety Equipment
WWW.OGRACING.COM
800.934.9112
703.430.3303
info@ogracing.com
Reply
0
0
05-04-2016, 05:09 PM
#243
Elite Member
Thread Starter
Join Date: Sep 2015
Location: Seattle, WA
Posts: 1,651
Total Cats: 884
Damn it Johnny! You're right though, I need to stop being a bitch. That sway bar is way too thick for my set up right now anyway, when I bought my suspension I had planned on being on slicks and have front/rear aero. Now I'm gonna starting the car with no aero whatsoever and on street tires. Extra weight on front end, too high of spring rate in the front, and way too thick of a sway bar up front? Hello understeer. All that said I still may need to start with the bar I currently have, I'm getting pretty low on money currently, although I'm sure I can sell the bar to someone here to make up most the cost. I also have the rb reinforcement bullshit that I don't need anymore cause of the v8r pieces. Maybe I'll post an ad in the for sale section soon.
Also stuff came in the mail the past couple days, pressure plate and disk are on the porch as well as some rear wheel bearings. Throwout bearing is sitting at the post office just waiting to be picked up. The clutch kit from Shandelle came and I must say, the oring that wilwood supplies on the reservoir really needs to be tighter, could have easily gone down an 1/8" in diameter on that thing. It was much too loose and wouldn't stay in its slot because of that, then snapped. This week's been pretty crazy busy with school, having finals and all that. Two finals and one project are done, just one final (the hardest one) and one project left for friday. Then I'll be down to just three classes which will be a big relief.
Also stuff came in the mail the past couple days, pressure plate and disk are on the porch as well as some rear wheel bearings. Throwout bearing is sitting at the post office just waiting to be picked up. The clutch kit from Shandelle came and I must say, the oring that wilwood supplies on the reservoir really needs to be tighter, could have easily gone down an 1/8" in diameter on that thing. It was much too loose and wouldn't stay in its slot because of that, then snapped. This week's been pretty crazy busy with school, having finals and all that. Two finals and one project are done, just one final (the hardest one) and one project left for friday. Then I'll be down to just three classes which will be a big relief.
Reply
0
0
05-04-2016, 05:58 PM
#244
Damn it Johnny! You're right though, I need to stop being a bitch. That sway bar is way too thick for my set up right now anyway, when I bought my suspension I had planned on being on slicks and have front/rear aero. Now I'm gonna starting the car with no aero whatsoever and on street tires. Extra weight on front end, too high of spring rate in the front, and way too thick of a sway bar up front? Hello understeer. All that said I still may need to start with the bar I currently have, I'm getting pretty low on money currently, although I'm sure I can sell the bar to someone here to make up most the cost. I also have the rb reinforcement bullshit that I don't need anymore cause of the v8r pieces. Maybe I'll post an ad in the for sale section soon.
Also stuff came in the mail the past couple days, pressure plate and disk are on the porch as well as some rear wheel bearings. Throwout bearing is sitting at the post office just waiting to be picked up. The clutch kit from Shandelle came and I must say, the oring that wilwood supplies on the reservoir really needs to be tighter, could have easily gone down an 1/8" in diameter on that thing. It was much too loose and wouldn't stay in its slot because of that, then snapped. This week's been pretty crazy busy with school, having finals and all that. Two finals and one project are done, just one final (the hardest one) and one project left for friday. Then I'll be down to just three classes which will be a big relief.
Also stuff came in the mail the past couple days, pressure plate and disk are on the porch as well as some rear wheel bearings. Throwout bearing is sitting at the post office just waiting to be picked up. The clutch kit from Shandelle came and I must say, the oring that wilwood supplies on the reservoir really needs to be tighter, could have easily gone down an 1/8" in diameter on that thing. It was much too loose and wouldn't stay in its slot because of that, then snapped. This week's been pretty crazy busy with school, having finals and all that. Two finals and one project are done, just one final (the hardest one) and one project left for friday. Then I'll be down to just three classes which will be a big relief.
__________________
OG Racing
Your Source For Motorsports Safety Equipment
WWW.OGRACING.COM
800.934.9112
703.430.3303
info@ogracing.com
OG Racing
Your Source For Motorsports Safety Equipment
WWW.OGRACING.COM
800.934.9112
703.430.3303
info@ogracing.com
Reply
0
0
05-04-2016, 09:35 PM
#246
Elite Member
Thread Starter
Join Date: Sep 2015
Location: Seattle, WA
Posts: 1,651
Total Cats: 884
Got home and opened up my stuff, wheel bearings look like wheel bearings and the clutch looks like a clutch. Oh, except there's a chip in the clutch plate surface. Sent spec an email to see if I should be concerned but from a quick search on the web it looks like I should just remove the fraying and then lightly sand over it to smooth it out. We'll see what they say. Other than that I though the whole clutch assembly on the scale, stock is around 53 lb if my memory serves me correctly. Scale read 41 but it's 2lb off so it should be right around 39, seeing as how the flywheel is about 14lb lighter than stock, everything seems to be alright. I was kinda hoping the spec would be a touch lighter than OEM, but I'm not gonna bitch since it wasn't advertised as that. In the future I'd like to knock some more weight off the clutch assembly but for right now a 14 lb weight loss is alright. Also, the ls7 clutch assembly that a lot of people use is 58 lb, damn that's a lot.
Anyway, here's some picture of the damage and then the assembly. Also, the spec clutch came with the pilot bearing (you need to convert to an ls1 style pilot bearing if you're gonna use an ls1 style clutch on a ls2/3/7) and the clutch tool which is nice cause quite a few kits I saw didn't, kind of a drag when you have to buy that stuff extra. Oh and a shim.
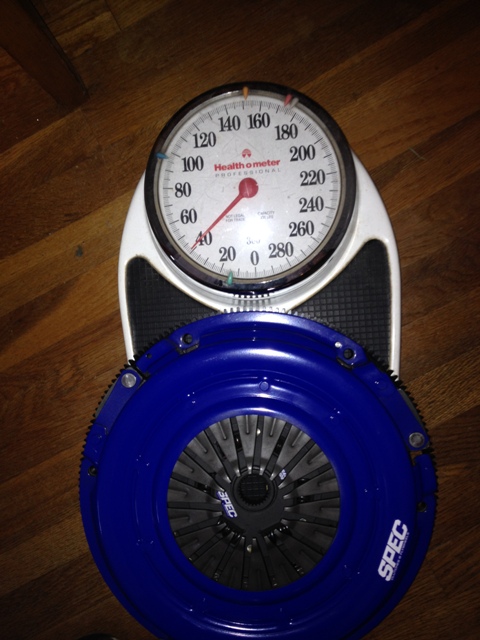
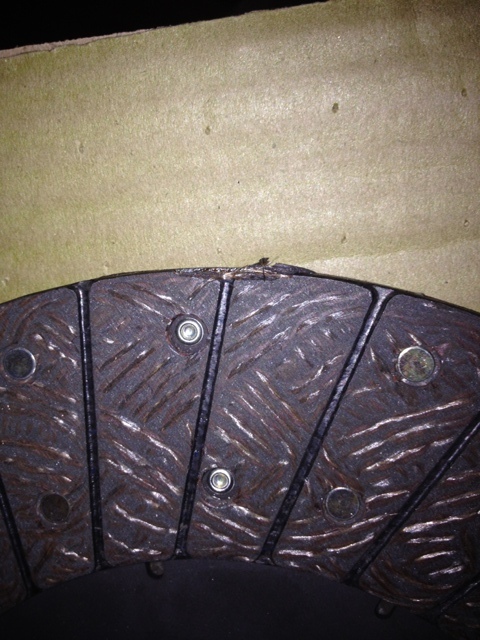
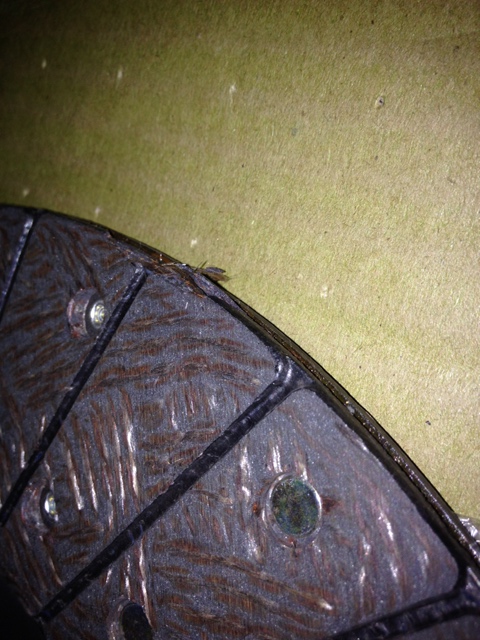
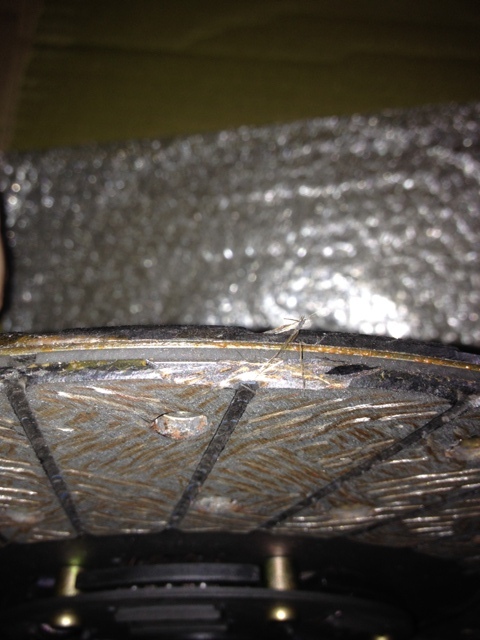
Anyway, here's some picture of the damage and then the assembly. Also, the spec clutch came with the pilot bearing (you need to convert to an ls1 style pilot bearing if you're gonna use an ls1 style clutch on a ls2/3/7) and the clutch tool which is nice cause quite a few kits I saw didn't, kind of a drag when you have to buy that stuff extra. Oh and a shim.


Reply
0
0
05-05-2016, 10:26 AM
#247
the clutch is stupid heavy. but a stock clutch can take 500hp all day long in a camaro. in our cars and if we stay away from heavy launch (drag radials) it should take a ton of abuse.
__________________
OG Racing
Your Source For Motorsports Safety Equipment
WWW.OGRACING.COM
800.934.9112
703.430.3303
info@ogracing.com
OG Racing
Your Source For Motorsports Safety Equipment
WWW.OGRACING.COM
800.934.9112
703.430.3303
info@ogracing.com
Reply
0
0
05-05-2016, 10:44 AM
#248
Senior Member
iTrader: (1)

Join Date: Dec 2010
Location: Farmington Hills, MI
Posts: 1,218
Total Cats: 175
Are you talking about a stock LS3 clutch in a 5th gen, or a stock LS1 clutch in a 4th gen? I've heard the 4th gen clutches give out with just bolt ons, though in a lightweight Miata that may not be the case. I'll be picking up a 80k mile F body engine/trans soon, so I'm trying to decide what to do about a clutch. My three stages I'm looking at are LS7 clutch with aluminum flywheel (~$650, but heavy clutch disk), Monster stage 2 (~$800 with lightweight flywheel), or go all out with a Monster LT1-S (~$1200, twin disc awesomeness).
Reply
0
0
05-05-2016, 11:50 AM
#249
Elite Member
Thread Starter
Join Date: Sep 2015
Location: Seattle, WA
Posts: 1,651
Total Cats: 884
Acedeuce802, Stock f body clutch I'm guessing, with our tiny little wheels/tires and 1000+ lb lighter weight we don't really need a clutch that'll hold gobs of power. The ls3 clutch assembly is even heavier and in an even heavier camaro, plus when I was looking around I had trouble finding decently lightweight flywheels (under 18/19lb) so I decided to go with an ls1 style. Well I found lightweight ones but I wasn't ready to throw near 1K at a flywheel yet. I'd be interested to see how much the LT1-S weighs, or even better what the MOI is, I wish manufacturers actually published that instead of weight. Weight can be so deceiving. But either way, I think that'd be your best option for throttle response.
Edit: Just re-read what Johnny said, don't know which one he was talking about
Spec got back to me very quickly which was nice. They said if I want they can get me a new one but as long as I trim the frayed part it should cause no longevity problems. Basically what I read online, but I just wanted to be sure.
Reply
0
0
05-05-2016, 12:24 PM
#250
Junior Member

Join Date: Sep 2014
Location: Canton, GA
Posts: 153
Total Cats: -84
Acedeuce802, Stock f body clutch I'm guessing, with our tiny little wheels/tires and 1000+ lb lighter weight we don't really need a clutch that'll hold gobs of power. The ls3 clutch assembly is even heavier and in an even heavier camaro, plus when I was looking around I had trouble finding decently lightweight flywheels (under 18/19lb) so I decided to go with an ls1 style. Well I found lightweight ones but I wasn't ready to throw near 1K at a flywheel yet. I'd be interested to see how much the LT1-S weighs, or even better what the MOI is, I wish manufacturers actually published that instead of weight. Weight can be so deceiving. But either way, I think that'd be your best option for throttle response.
Edit: Just re-read what Johnny said, don't know which one he was talking about
Spec got back to me very quickly which was nice. They said if I want they can get me a new one but as long as I trim the frayed part it should cause no longevity problems. Basically what I read online, but I just wanted to be sure.
Edit: Just re-read what Johnny said, don't know which one he was talking about
Spec got back to me very quickly which was nice. They said if I want they can get me a new one but as long as I trim the frayed part it should cause no longevity problems. Basically what I read online, but I just wanted to be sure.
Reply
0
0
05-05-2016, 07:04 PM
#251
Elite Member
Thread Starter
Join Date: Sep 2015
Location: Seattle, WA
Posts: 1,651
Total Cats: 884
That's one nice thing about email for sure. Took some sandpaper to it and sanded it, looks good now. My metal still hasn't been cut yet since some is back ordered but I picked up my slave from the post office today. I think I have all the things I need for the clutch now.
Reply
1
1
05-07-2016, 12:38 AM
#252
Elite Member
Thread Starter
Join Date: Sep 2015
Location: Seattle, WA
Posts: 1,651
Total Cats: 884
Well I'm officially done with finals, got a 94 on my heat transfer one the other day so that was good, not sure how I did on my other ones, system dynamics today was pretty tough but my manufacturing one went well. Also picked up a fleabay knock off of a jackson racing header from craigslist, got it for $30. I was gonna throw it on brad but I'm kinda leaning more towards clean it up with steel wool and see if I can't make $30 off of it. Besides, brad doesn't need any go fast parts unless it's a turbo. Maybe I'll keep it, but probably not. I have to work the stand for the family business at the farmers market tomorrow but after that I'll get some work done on the car hopefully.
Reply
0
0
05-08-2016, 12:47 AM
#253
Elite Member
Thread Starter
Join Date: Sep 2015
Location: Seattle, WA
Posts: 1,651
Total Cats: 884
Well I'm officially having fun with wiring. To start off I figured I'd start with one of the simpler circuits, the alternator. HA! Gm sure got me good this time! Starting in 05 they switched to a 2 pin alternator from their old 4 pin style, so what was the new configuration you ask? It communicates with the oem ecu, guess who doesn't have one of those? This guy!
Yeah. Still looking into if anyone's had luck with getting the holley unit to communicate with it, haven't had much luck so far, and I don't think there's a way to convert it, may have to buy a different alternator. Really hoping I can find a solution though, really not in the budget to buy a new alternator right now.
Found one guy who got his converted to self-exciting, not sure how much it'll cost though. The car will definitely run with 13.8 volts but I'm just worried that it'll have a weak spark or something. Don't wanna half *** things basically. Done for the night, hopefully I'll make some more progress tomorrow.
The signal is a square wave with between a 5% and 90% duty cycle. If it is 0% (disconnected) or 100% (hooked up to resistor) the alternator defaults to its 13.8 volts.
Found one guy who got his converted to self-exciting, not sure how much it'll cost though. The car will definitely run with 13.8 volts but I'm just worried that it'll have a weak spark or something. Don't wanna half *** things basically. Done for the night, hopefully I'll make some more progress tomorrow.
Reply
0
0
 05-08-2016, 06:28 PM
#255
Elite Member
Thread Starter
Join Date: Sep 2015
Location: Seattle, WA
Posts: 1,651
Total Cats: 884
Got some work done today, started to play with a little wiring and then decided to play with the clutch hydraulics stuff. Had to do a little widening of the hole for the new master to fit in but it now sits in the stock location and looks good.


Then I decided to **** with the exhaust a little more and started cutting pieces for it. First I cut a piece that comes from the muffler to a 90* bend I made. I made it a few weeks back but I realized I was making my pie cuts wrong, it didn't matter on the small diameter stuff but with the 4" it did. Basically there were gaps in my fit and welding it just didn't turn out well enough for me. It would have held fine but I want good welds on my exhaust, so I'm doing it over again. That said, that 90* I made works great for mock up! I duct taped it to the end of the piece I cut which made things work out well. I also hung the y pipe where I want it to go with zipties, it'll hang about 1/2" further to the driver side but once again this is just figuring out the lengths I need to cut. Then I started making cuts for the front part of the exhaust, that'll probably be the hardest but nothing crazy. I need to move the muffler further towards the middle but it rests easiest where it's sitting right now which makes mocking up easy. It also hangs lower than it will eventully when it's just resting there, but you get the idea.


Reply
1
1
05-13-2016, 11:54 AM
#256
Elite Member
Thread Starter
Join Date: Sep 2015
Location: Seattle, WA
Posts: 1,651
Total Cats: 884
Been putting in some solid hours the last few days and getting the exhaust built, I'm hoping to have the whole thing tacked by the end of today. Had to modify the crossmember for the exhaust to go through it, got to max out the tig yesterday @210amps, felt pretty badass. The crossmember is slightly uglier now since the reliefs for the exhaust we welded in at a slight angle (on purpose) so that the exhaust would go through them nicely and still follow the path I wanted. I also welded an extension on the bottoms of the reliefs to sit them higher so the exhaust could sit higher as well. I had to put a small dent in the trans tunnel to do that, but what's new? Also a little worried about the proximity of the exhaust to, well, everything. I'm hoping it doesn't move around too much cause the last thing I need is for an exhaust that consistently rattles. On the other hand it's only got about .5-.75" hanging under the frame rail so I'm real happy about that.
Also the alternator situation is figured out, mechman.com will take the alternator and make it self exciting. Waaaaay cheaper than a new one, so that's a big relief. I think that's all I have to report for now, there should be more picture by the end of the night.
Also the alternator situation is figured out, mechman.com will take the alternator and make it self exciting. Waaaaay cheaper than a new one, so that's a big relief. I think that's all I have to report for now, there should be more picture by the end of the night.
Reply
1
1
05-14-2016, 12:46 PM
#257
Elite Member
Thread Starter
Join Date: Sep 2015
Location: Seattle, WA
Posts: 1,651
Total Cats: 884
Spent a solid 15 hours in the garage yesterday, takes a reaaaaaaally long time to prep the cuts right but I'm about one cut away from being finished with the exhaust up to the y pipe. My strategy has been to duct tape everything together for the initial parts and then once the design is finalized to take it over to the bench and tack it up. Almost done tacking the passenger side, just need to do the rest of the pies in the picture. Then I need to make one more cut on the driver side to finalize everything and then that'll get tacked too. The last part is just the 4" which is the easy part, still need to re-do that 90 but other than that it's relatively simple and basically a straight shot other than that.
Edit: Gonna run up to the local paint shop today and see if I can't get some paint for the engine bay and interior. Not gonna get really high quality stuff but I was gonna try to get something better than spray paint.
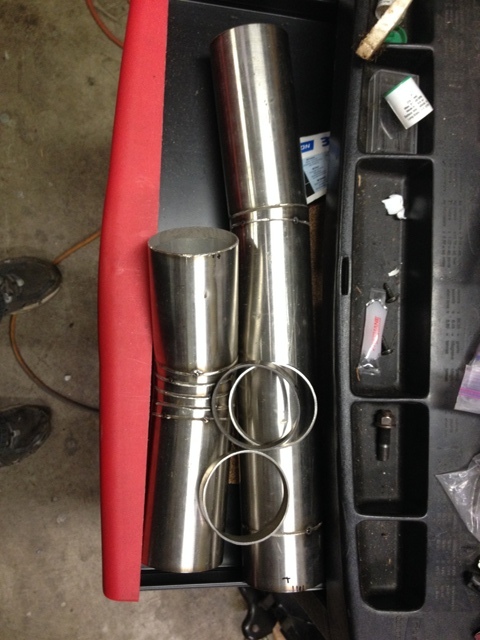
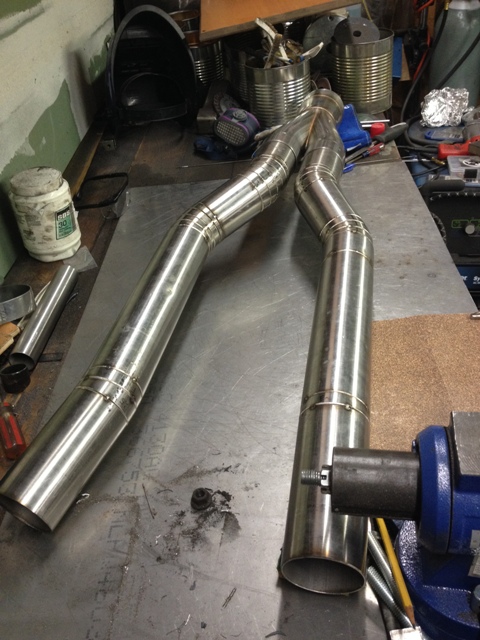
These are the front pieces, driver and passenger
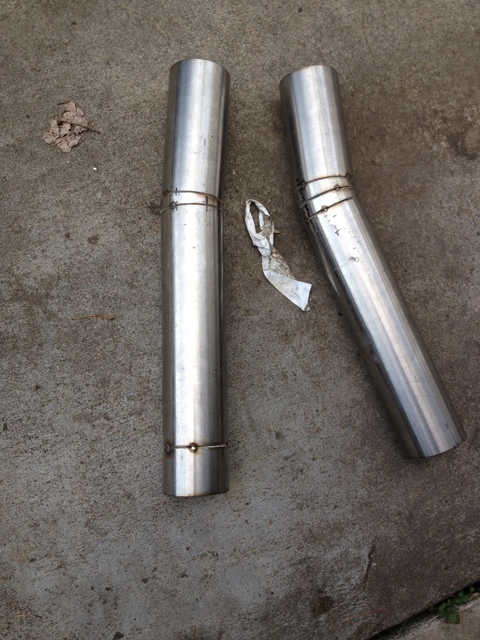
This is one of the middle pieces for the passenger

And this is what makes up the passenger side section
Edit: Gonna run up to the local paint shop today and see if I can't get some paint for the engine bay and interior. Not gonna get really high quality stuff but I was gonna try to get something better than spray paint.
These are the front pieces, driver and passenger

This is one of the middle pieces for the passenger

And this is what makes up the passenger side section

Reply
0
0
05-15-2016, 03:06 PM
#258
Elite Member
Thread Starter
Join Date: Sep 2015
Location: Seattle, WA
Posts: 1,651
Total Cats: 884
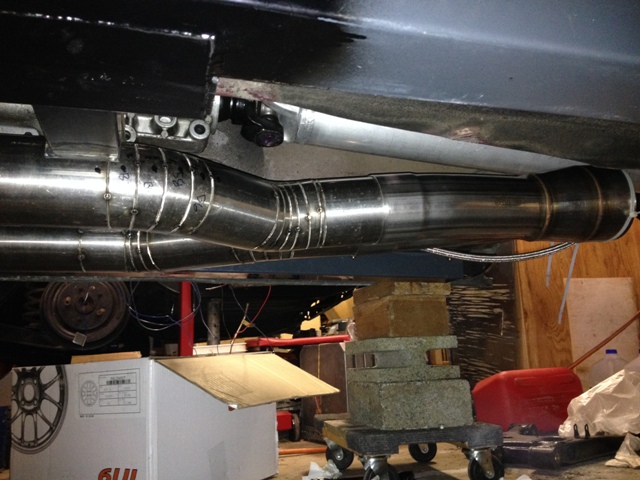
Picture duuuump. Finished the front half last night, or at least tacking it. Need to cut about half an inch off the y pipe outlet piece (the straight part, not the conical part) and then I can push it up another .25" into the trans tunnel. Other than that it fits great and sits alright as is, but I'd like a tiny bit more.
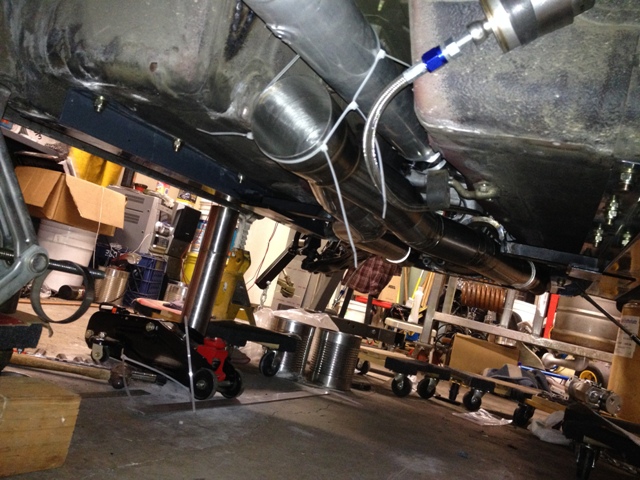
Driver side as of yesterday morning:

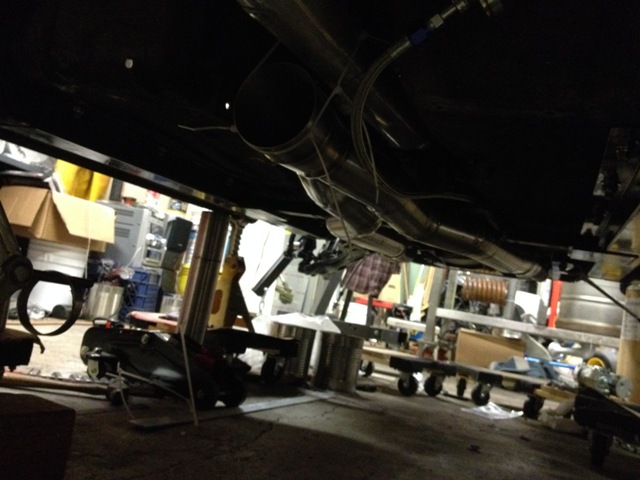
Passenger side which I deemed "the leaning tower of holy **** how did I balance that" as of late last night
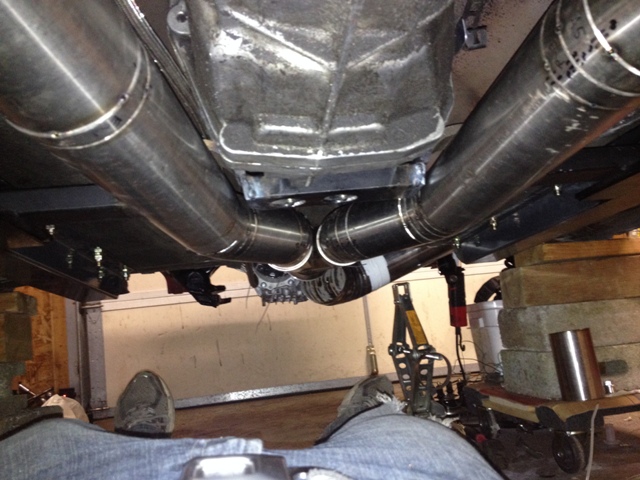
Underneath pictures (ignore copious amounts of zipties, they were for mocking up mounting points), it'll also be a little further to the driver side once it's held in place right
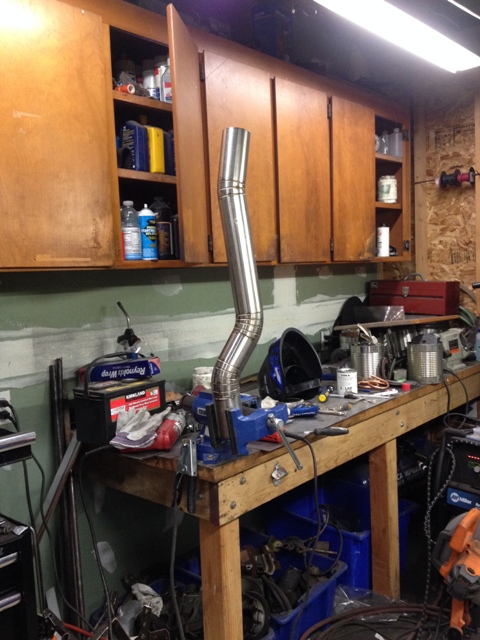
Bench Pictures
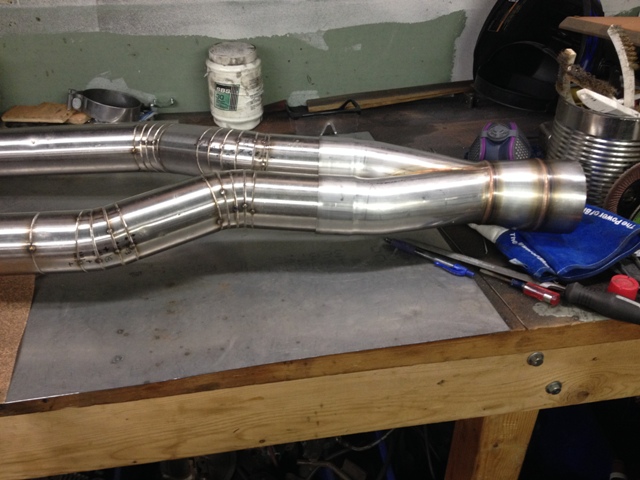
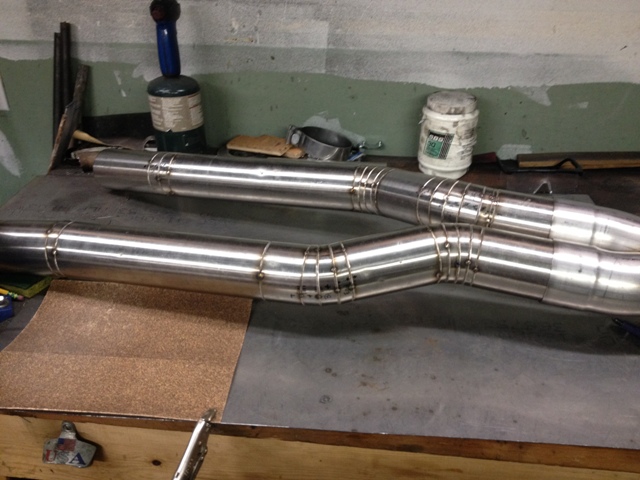
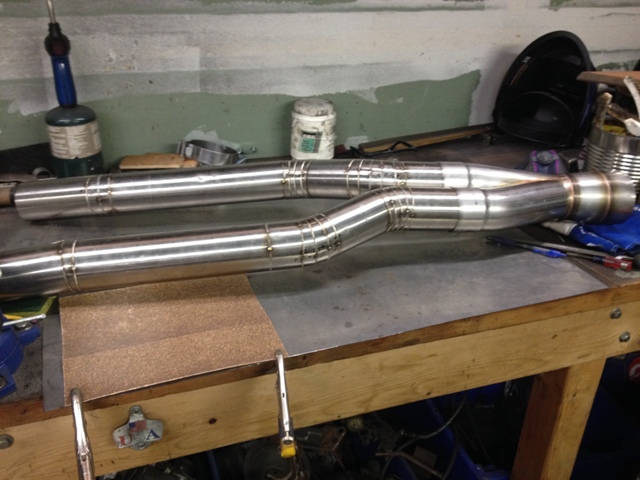
Overall I'm really happy with it, decent ground clearance, exits where I want it too. **** it even looks decent
Driver side as of yesterday morning:

Passenger side which I deemed "the leaning tower of holy **** how did I balance that" as of late last night

Underneath pictures (ignore copious amounts of zipties, they were for mocking up mounting points), it'll also be a little further to the driver side once it's held in place right


Bench Pictures


Overall I'm really happy with it, decent ground clearance, exits where I want it too. **** it even looks decent
Reply
3
3


