Nothing to see here, just project Sisyphus, move along

 05-28-2015, 02:48 AM
#1262

There's been a distinct lack of pictures in this thread for the past few pages, so here:
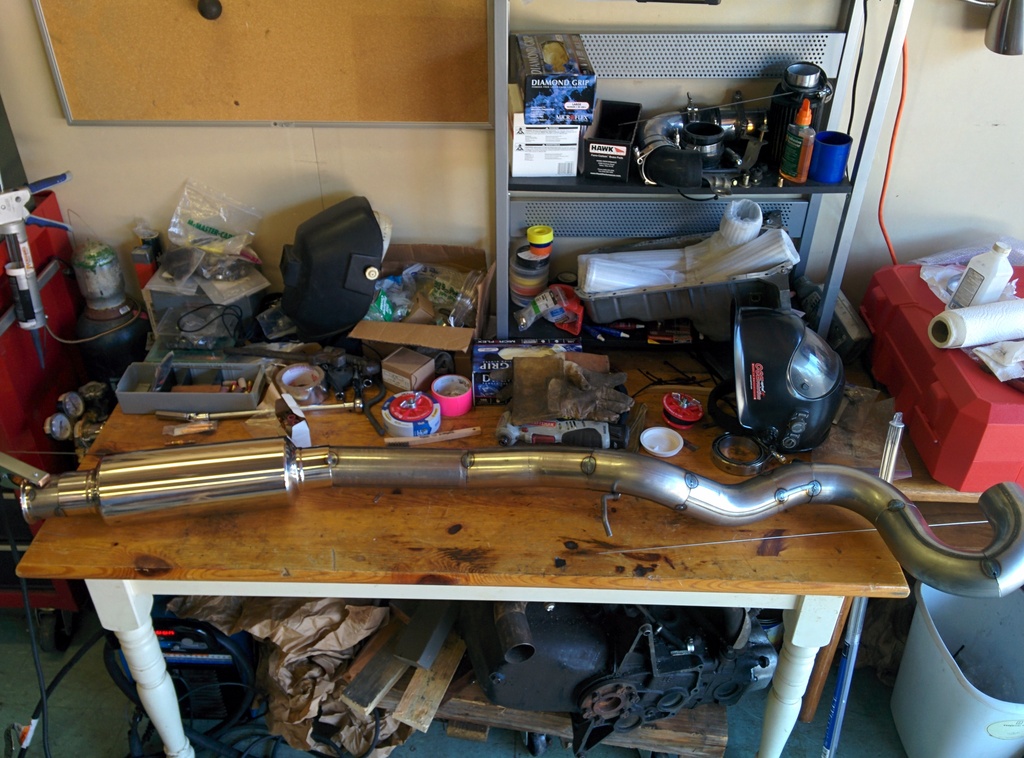
As tacked for assembly and fitting on the car.
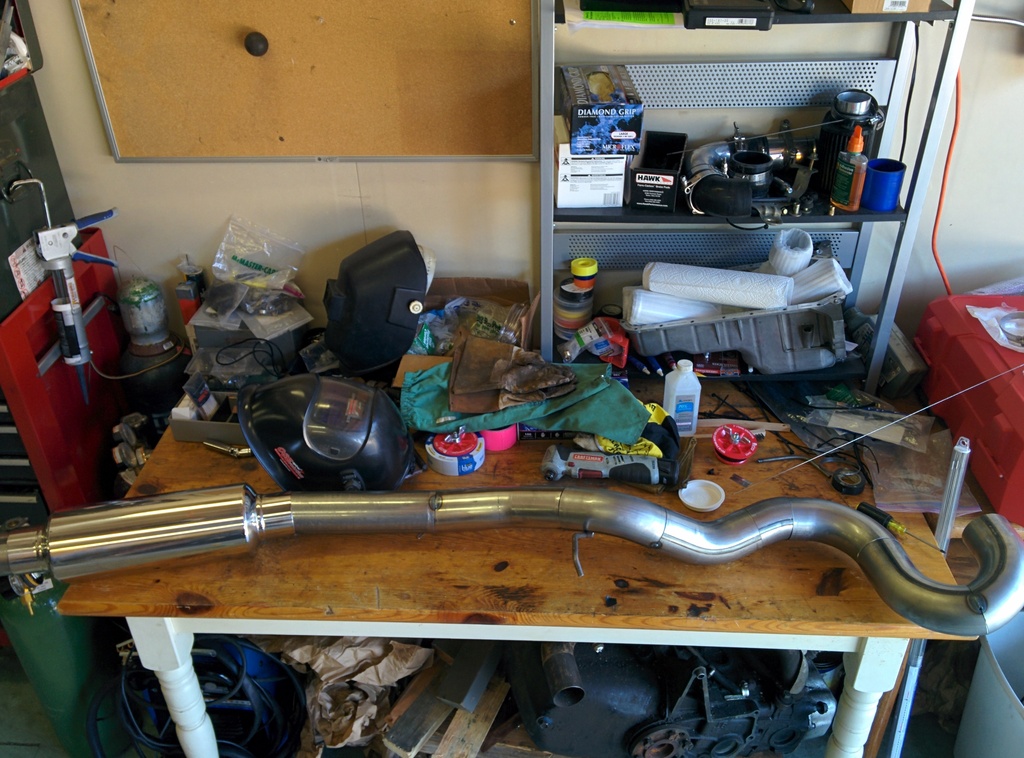
Added tacks so each joint had at least 3-4 to help keep it from moving as it got fully welded.
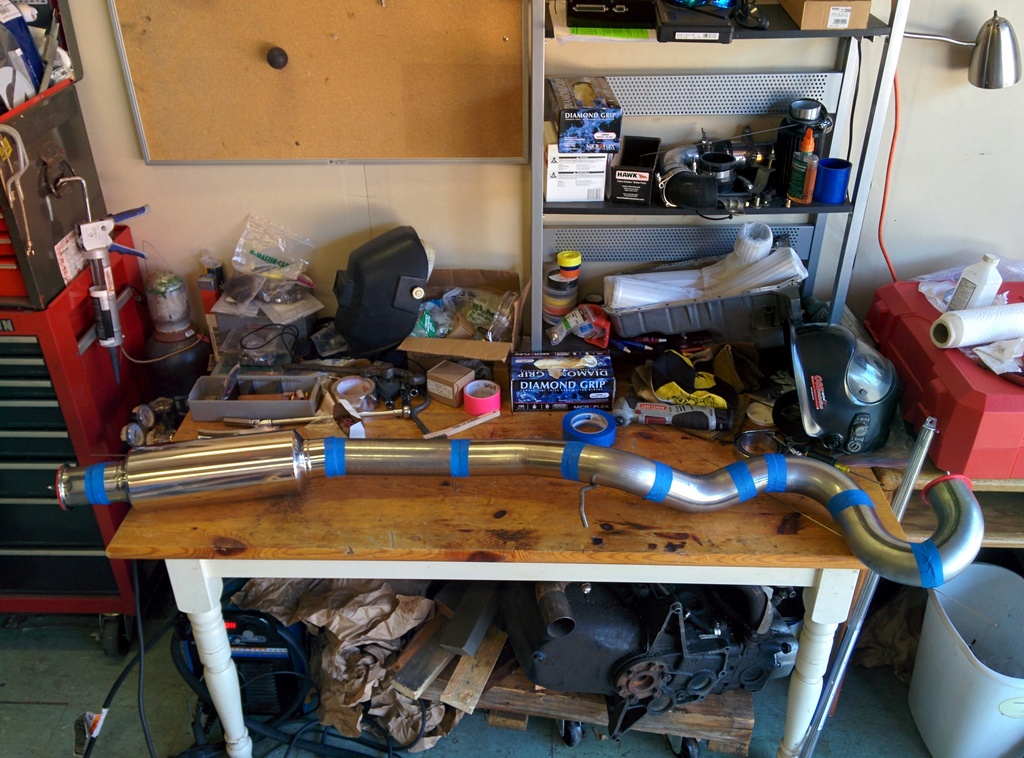
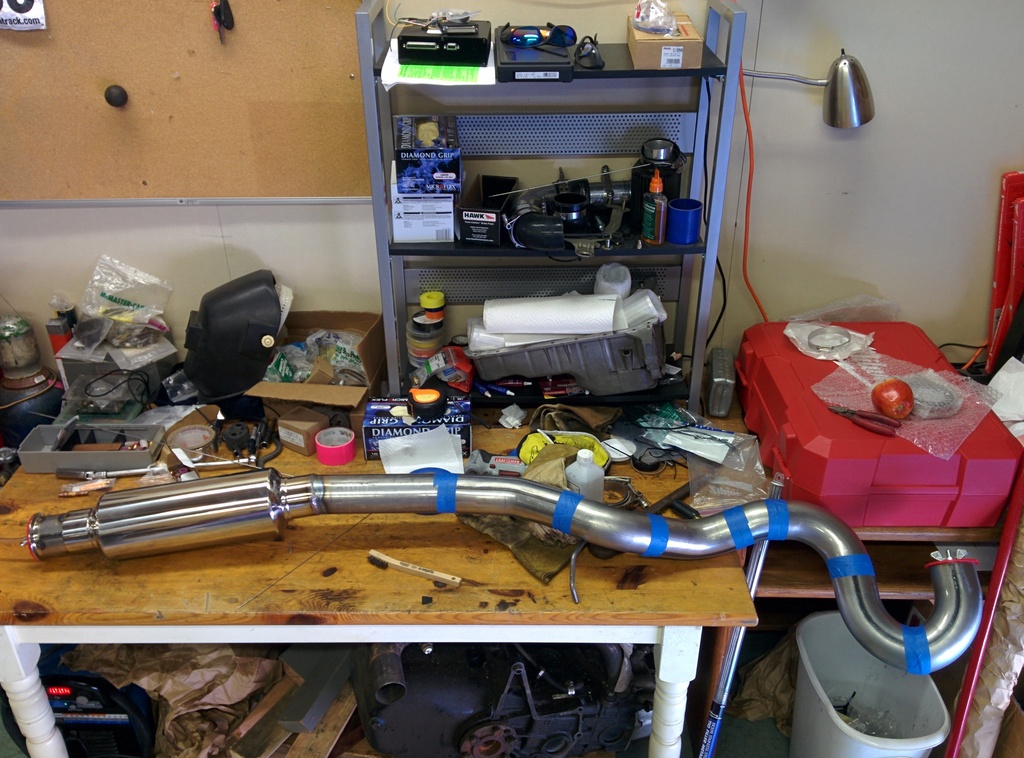
Taped and plugged for filling with argon.
One bead down, a bunch to go!
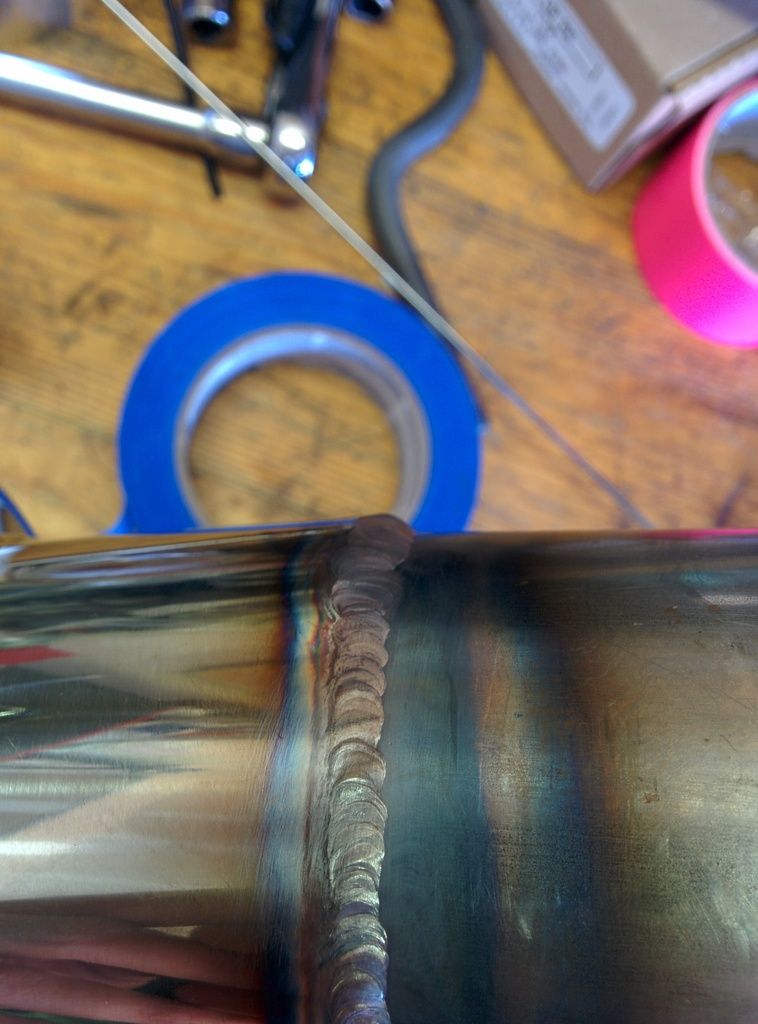
Not my best, but also not my worst welds. This is a mild to stainless joint, welded with 309L filler.
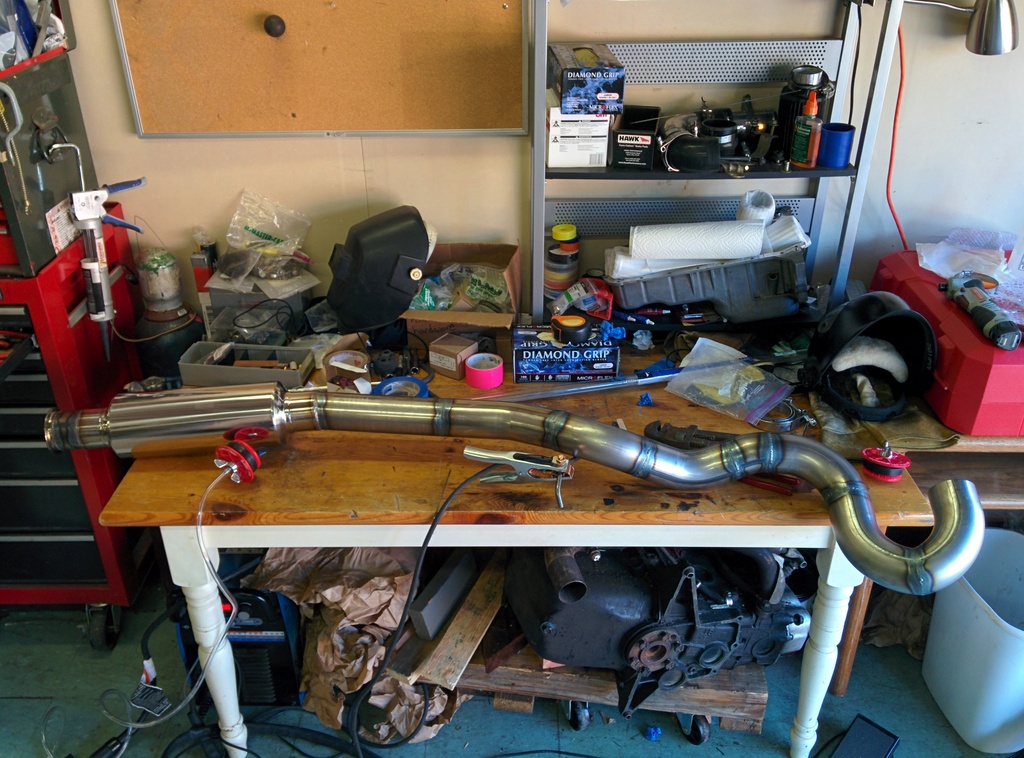
And the "midpipe" fully welded. You can see my back purge plug setup in the foreground. It's a 3" pipe plug with the tightening bolt drilled through the center and the argon hose slid over the end (with the first few threads ground off to help the hose seal).
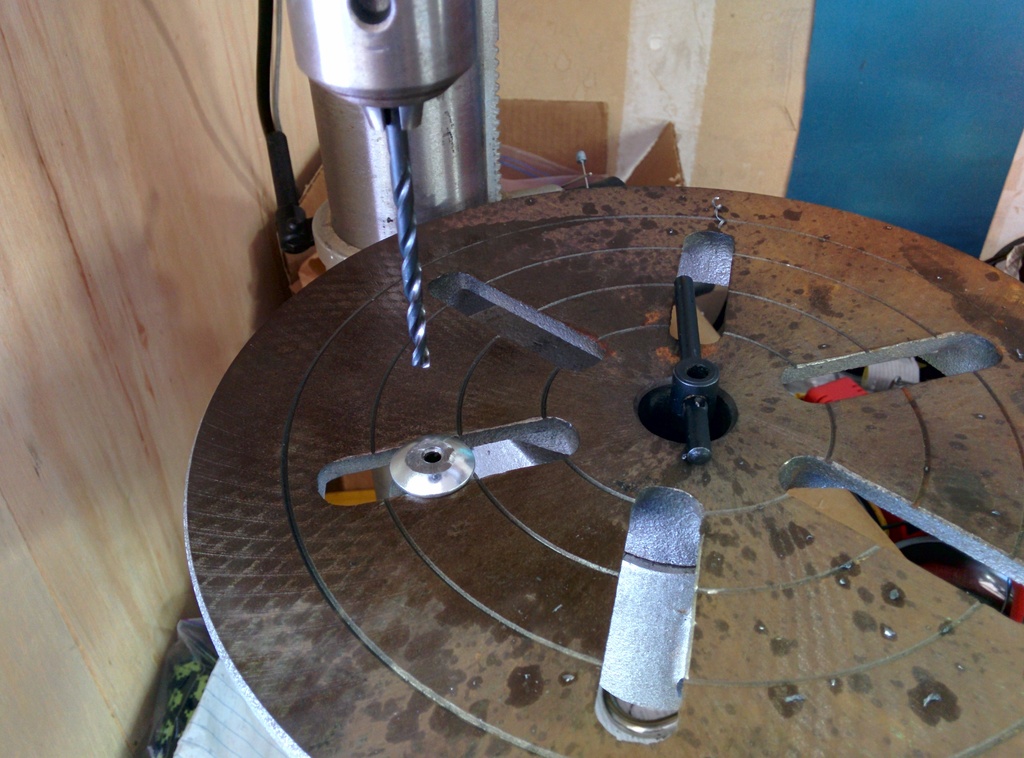
Drilling the bolt.
I still need to weld the muffler section up and then we'll have to figure out where to put the v-band between the two sections.
As tacked for assembly and fitting on the car.
Added tacks so each joint had at least 3-4 to help keep it from moving as it got fully welded.
Taped and plugged for filling with argon.
One bead down, a bunch to go!
Not my best, but also not my worst welds. This is a mild to stainless joint, welded with 309L filler.
And the "midpipe" fully welded. You can see my back purge plug setup in the foreground. It's a 3" pipe plug with the tightening bolt drilled through the center and the argon hose slid over the end (with the first few threads ground off to help the hose seal).
Drilling the bolt.
I still need to weld the muffler section up and then we'll have to figure out where to put the v-band between the two sections.
Last edited by gesso; 05-28-2015 at 03:42 AM. Reason: thightening :)

Reply
 3
3

3
05-28-2015, 03:28 AM
#1266
With a funny shaped part you can build a "cup" with clay or aluminum tape around the back of the weld, as argon is heavier than air and will displace everything in the cup. If that's not possible you can put a paste(solarflux) around the inside of the weld joint and it will help, but it's not quite as good.
Here's a quick video I took of my method of ensuring the exhuast was fully purged. Because the argon is heavier than air, I stood the exhaust on end with the drilled plug on the bottom and filled it until the lighter wouldn't light anymore. I then plugged the open end and kept a small flow of argon going to ensure whatever leaked out the gaps as I was welding would be replaced.
Fun with argon:
Link incase my youtube tags don't work as I'm on my phone and I can't easily check: https://youtu.be/7I16hHqa6pI
Reply
0
0
05-28-2015, 12:04 PM
#1267
Elite Member
Thread Starter
iTrader: (37)

Join Date: Apr 2010
Location: Very NorCal
Posts: 10,441
Total Cats: 1,899

He's been teasing me with pics, this is the first I've seen of the overall. Amazing work as always!
I love how my resonator is the size of some of the ricer cars mufflers

 The clearances are so bloody tight back there I don't know what will work. The middle of the 180� would be perfect but I suspect that'll be a nightmare due to how we sectioned that radius, and then we can't weld the tube to the corner of the muffler.
Reply
0
0
05-28-2015, 12:57 PM
#1268
I was thinking about this the other day... didn't come up with a solution The clearances are so bloody tight back there I don't know what will work. The middle of the 180� would be perfect but I suspect that'll be a nightmare due to how we sectioned that radius, and then we can't weld the tube to the corner of the muffler.
The clearances are so bloody tight back there I don't know what will work. The middle of the 180� would be perfect but I suspect that'll be a nightmare due to how we sectioned that radius, and then we can't weld the tube to the corner of the muffler.
Reply
0
0
05-28-2015, 01:11 PM
#1269
Elite Member
Thread Starter
iTrader: (37)
Join Date: Apr 2010
Location: Very NorCal
Posts: 10,441
Total Cats: 1,899
Unfortunately that 4" radius 180� CRMB carries is the tightest one I can find. Not sure if tighter would actually help us at this point?
Reply
0
0
05-28-2015, 01:41 PM
#1270
mkturbo.com


iTrader: (24)
Join Date: May 2006
Location: Charleston SC
Posts: 15,177
Total Cats: 1,681
I'm down if you are down. If we screw it up badly enough we can always replace it. Do you have another 4" radius 180� in your box o' parts? I'm happy to buy another one if we need it or replace yours if we use it.
Unfortunately that 4" radius 180� CRMB carries is the tightest one I can find. Not sure if tighter would actually help us at this point?
Unfortunately that 4" radius 180� CRMB carries is the tightest one I can find. Not sure if tighter would actually help us at this point?
Reply
0
0
05-28-2015, 01:48 PM
#1271
Elite Member
Thread Starter
iTrader: (37)
Join Date: Apr 2010
Location: Very NorCal
Posts: 10,441
Total Cats: 1,899
Plus I care about Gesso's lungs

Reply
0
0
05-28-2015, 02:09 PM
#1272
mkturbo.com
iTrader: (24)
Join Date: May 2006
Location: Charleston SC
Posts: 15,177
Total Cats: 1,681
They have been out of stock on the aluminized ones for a while. I picked up some around the Jan/Feb time frame and have not seen any since. They keep telling me they are going to be making more soon, but I have not seen them come up on the site yet. I have so many extra 4.5" ones because I ordered a ton of them on accident not realizing they had the 2 different sizes at first.
Reply
0
0
05-28-2015, 11:26 PM
#1273
Retired Mech Design Engr
iTrader: (3)
Join Date: Jan 2013
Location: Seneca, SC
Posts: 5,009
Total Cats: 857
Reply
0
0
05-29-2015, 04:02 AM
#1274
I'm down if you are down. If we screw it up badly enough we can always replace it. Do you have another 4" radius 180� in your box o' parts? I'm happy to buy another one if we need it or replace yours if we use it.
Unfortunately that 4" radius 180� CRMB carries is the tightest one I can find. Not sure if tighter would actually help us at this point?
Unfortunately that 4" radius 180� CRMB carries is the tightest one I can find. Not sure if tighter would actually help us at this point?
Reply
0
0
05-30-2015, 03:02 PM
#1276
Elite Member
Thread Starter
iTrader: (37)
Join Date: Apr 2010
Location: Very NorCal
Posts: 10,441
Total Cats: 1,899
Ok, so here is the plan:
This weekends plan is to get the TSE rad installed and possibly maybe the RB header, depending on how my ankle cooperates. I also need to continue sorting through the stuff in the garage and selling off what I'm not using.
I've got solutions for all the stuff I'm worried about and I've finally got all the parts I need to get the job done. Now its time to work through things and make it happen. I'm getting closer, and I am excite.
- Once the ID1ks get here, install the injectors, MS3, Racing Beat exhaust (gotta save dem cats) ignition and fuel system stuff on the stock motor. Tune for idle and fuel. Troubleshoot as needed.
- Finish assembling built motor. I think I'm down to oil pan, cam & crank seals and timing stuff.
- Finish turbo plumbing stuff on the engine stand while I can actually get to everything.
- Install build motor with N/A hardware, no turbo. Tune as needed for fuel, etc and break in built motor.
- Install turbo and exhaust on built motor.
This weekends plan is to get the TSE rad installed and possibly maybe the RB header, depending on how my ankle cooperates. I also need to continue sorting through the stuff in the garage and selling off what I'm not using.
I've got solutions for all the stuff I'm worried about and I've finally got all the parts I need to get the job done. Now its time to work through things and make it happen. I'm getting closer, and I am excite.
Reply
0
0
05-31-2015, 12:43 PM
#1277
Elite Member
Thread Starter
iTrader: (37)
Join Date: Apr 2010
Location: Very NorCal
Posts: 10,441
Total Cats: 1,899
Im starting to wonder if maybe the advice we have been giving out regarding burping the coolant system with a reroute might be a bit flawed. With the coolant outlet at the back of the head, and usually lower than the top of the rad anyway, it traps a metric shitload of air in the front of the head. When i do my modified front neck i may try to figure out how to incorporate a manual bleed in to the system. I know Honda has been doing this for a while, I seem to remember the B18 had something like this, possibly near the throttle body? Its been a while. Anyway, i figure it cant hurt anything.
Time to go flush my coolant system another eleventybillon times.
Time to go flush my coolant system another eleventybillon times.
Reply
0
0
05-31-2015, 12:51 PM
#1278

Im starting to wonder if maybe the advice we have been giving out regarding burping the coolant system with a reroute might be a bit flawed. With the coolant outlet at the back of the head, and usually lower than the top of the rad anyway, it traps a metric shitload of air in the front of the head. When i do my modified front neck i may try to figure out how to incorporate a manual bleed in to the system. I know Honda has been doing this for a while, I seem to remember the B18 had something like this, possibly near the throttle body? Its been a while. Anyway, i figure it cant hurt anything.
Time to go flush my coolant system another eleventybillon times.
Time to go flush my coolant system another eleventybillon times.
Reply
0
0


