UPDATED REPOST: DIY HOW TO BOOST NB MIATA WRITE UP WITH STEP BY STEP INFO
 05-27-2013, 11:18 PM
#1
Junior Member
Thread Starter
iTrader: (1)

Join Date: Feb 2011
Location: Minot, ND
Posts: 255
Total Cats: 21
HEY MIATATURBONET BUDDIES!
I redid my initial post because I can't update my old one and I feel like I left a lot out. And I've learned a lot more since the install anyways.
2000 Miata LS 1.8L (you can probably use some of this info for 1.8 NA's and 1.6 NA's too
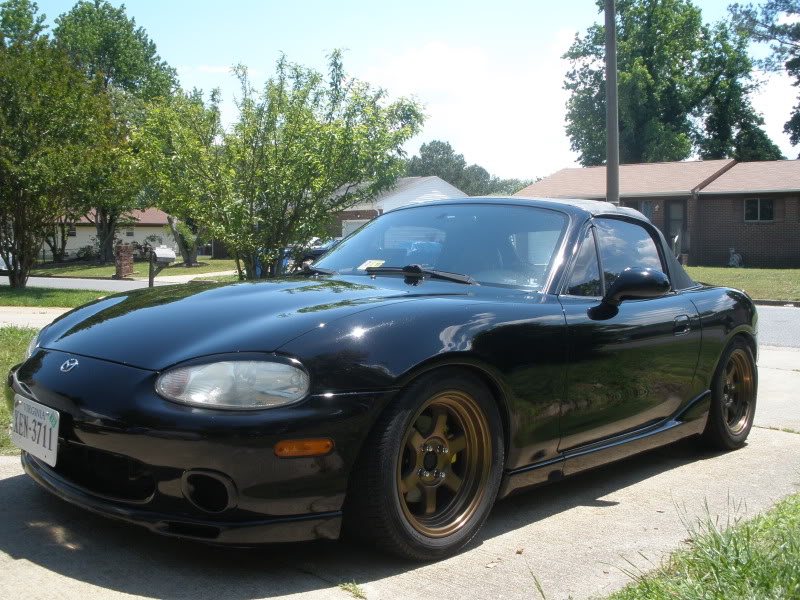
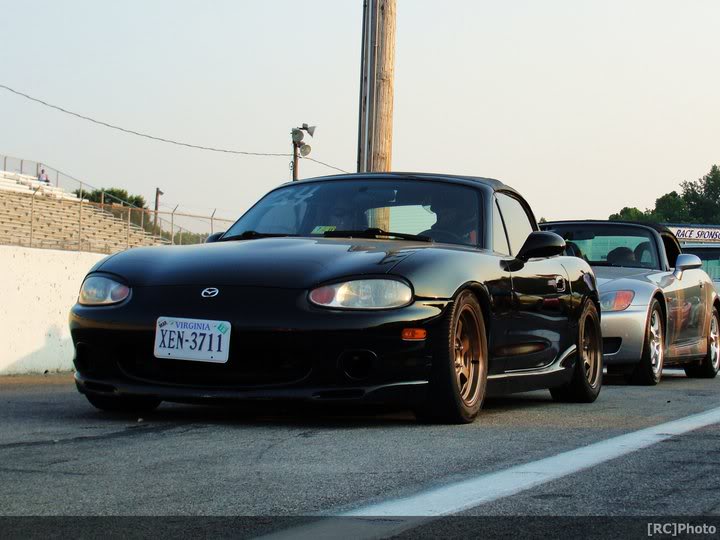
-Long story short, I bought the car bone stock in Feb 2011. Suspension and wheels went on a few months later and then I pieced together this turbo kit in the fall later that year. Here I am, roughly a year and a half later, (turbo kit installed sep 2011and today it is May 26,2013) and the car is still running strong, turbo spools just like it did day 1 and it has NO shaft play at that
Purpose of this thread: Heads up to fellow miata owners looking to boost or modify their current setup. I made mistakes first time around, and have corrected almost all of them. This was done a legit BUDGET, and I dare say it compares to the pricier pre-fabbed kits they may be out of your reach at the time like they were for me. I did lots of research and questioning before taking the journey (not my first rodeo boosting cars as I came from building many 240's before this awesome roadster) Hope I can provide some guidance.
-Rick
1) What you will need and prices:
-Godspeed T3 Super "60" $250 (in most pics you will see a garret t3, ignore this, it went to **** after 2 days of tuning and then i picked up the godspeed and have not been let down at all, it's in the later pics)
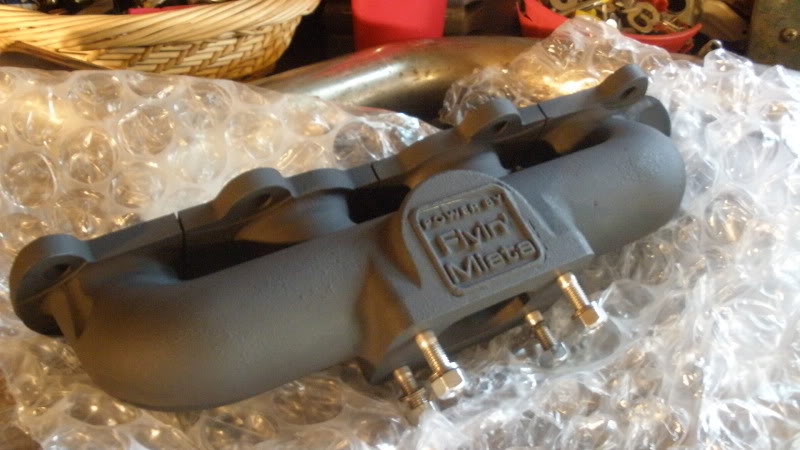
-Flyin' Miata cast turbo manifold $421 (choose your manifold wisely but I love cast iron, and the relief cuts)
-Exhaust manifold gasket $10
-2.5" downpipe $100
-2.5" 5bolt v-band swing valve $35
-Vband clamp with flange $25
-Internal wastegate actuator $42
-NGR Type S BOV $155
-BOV flange $17
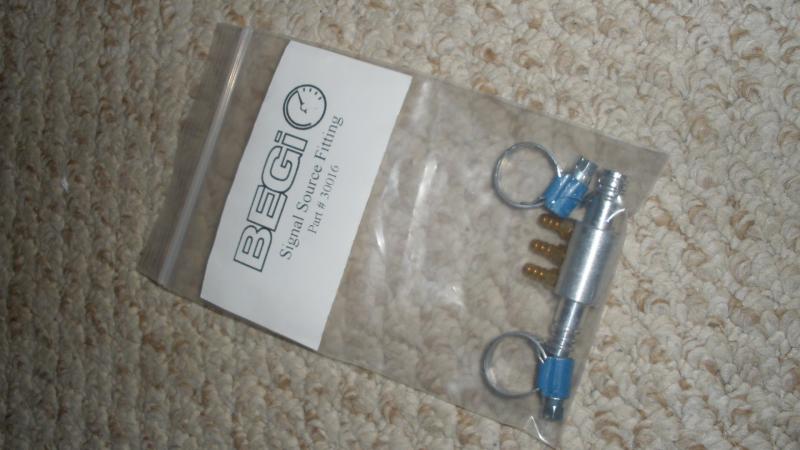
-BEGI vacuum block $43
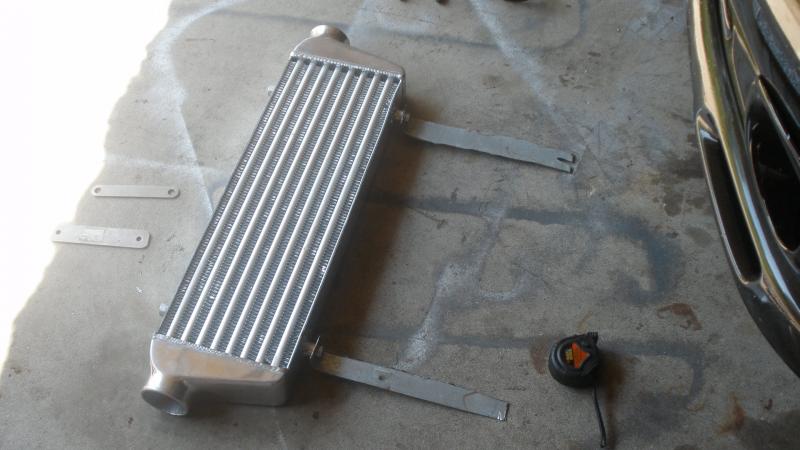
-I/C and Piping (CX Racing) $164
-Oil Feed: Sandwich plate from glowshift.Fittings and line from summit. $77
-Oil pan fitting $6
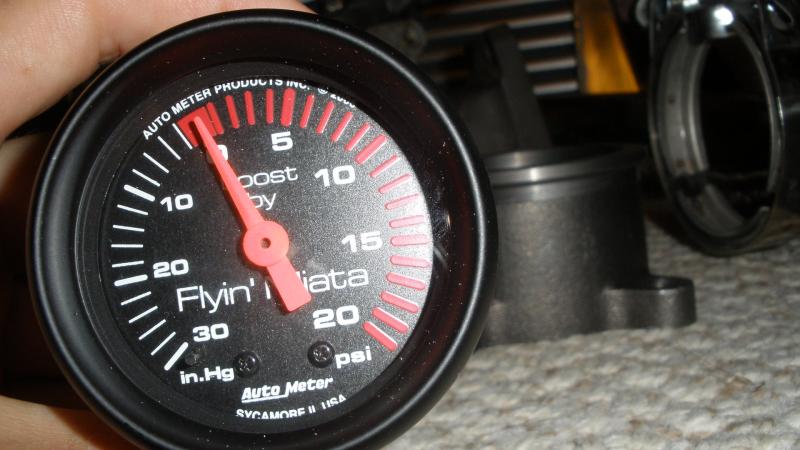
-Flyin miata boost gauge $66
-AEM digital uego wideband $173
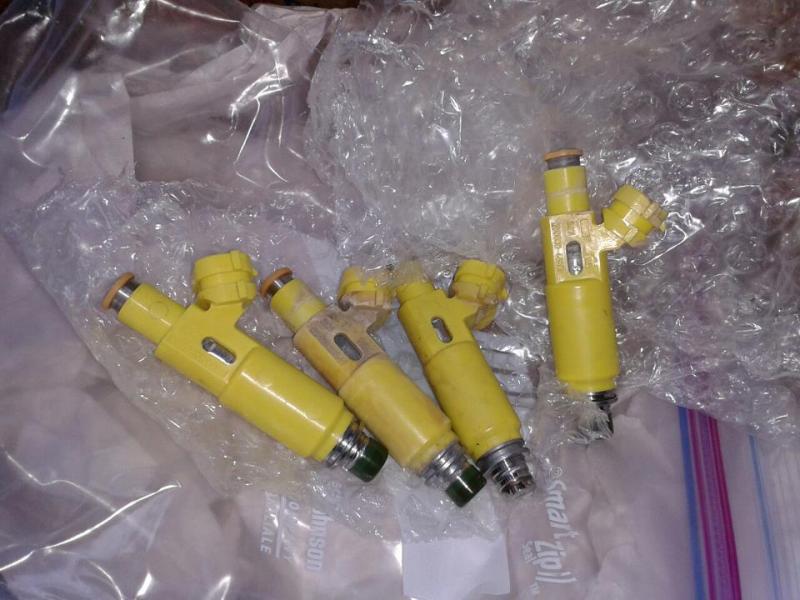
-Rx8 425cc injectors $100
-Brain Built MegaSqurit 2Extra $650
-Penzoil ultra synthetic oil w/ filter $31
-NGK BKR 7E-11 plugs or Champion counterpart spark plugs $11
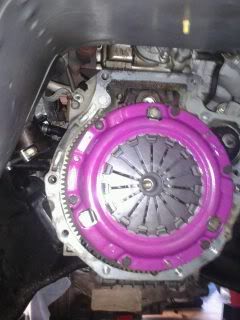
-Flyin Miata Level 1 Clutch $365
-Lots of heat wrap, titanium, wrap, and/or turbo blanket $150
-A-pillar dual guage from flying miata $50
(and ignore the stupid t2-t3 adapter in this, i was oblivious to the fact the fact it was not going to fit until i looked at the bay again, haha. silly me)
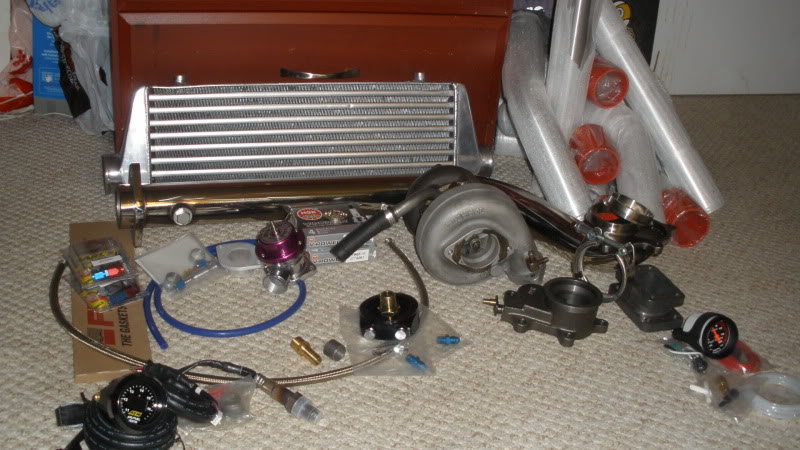
-------Total around $2,941 Now sure you can find some of the parts listed cheaper, or perhaps go a different route on some things to save. Keep in mind; intercooler piping, downpipe, and exhaust are not factored into this estimate. I was able to get all of those for no more than $250 all together. All depends on who you know. But you will have a standalone ECU with plenty of tuning capabilites, A/C will still be in the car, and you have a nice clutch ready to handle all the power (my stock one lasted about 3 months of abuse after boost) for $3,000?? That is not bad at all.
On a hot/humid day. I was able to make 185whp. Tune is very conservative, and the wastegate holds ten for a little bit then drops back to 7psi and holds. I'm investigating correcting this and holding 10, and or 12 psi. The car pulls pretty strong, I've beat some cars I shouldn't but power to weight is an awesome thing. I'm sure after sourcing colder air, and machining out the turbo mani some, I can achieve desired boost levels. I have plenty of fuel to play with.
Purchased and returned (after use) a Unitbit piece from lowe's for $40.
Purchased and returned a tap for the 3/8 NPT for $10
I used a 3/8 hose barb for the fitting. onto pics
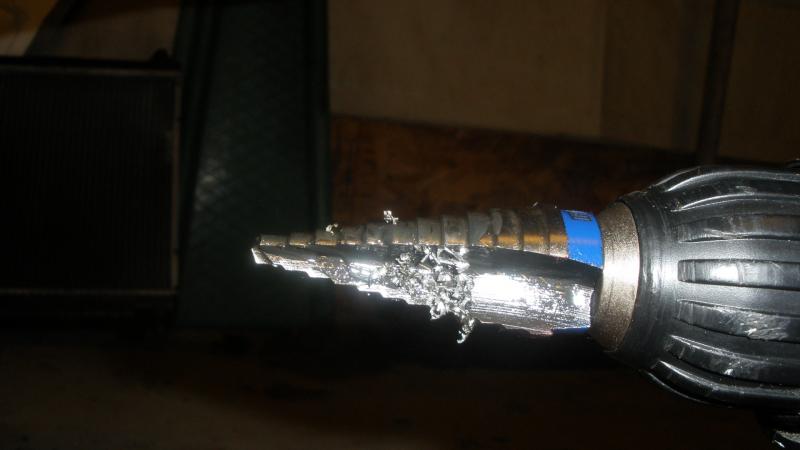
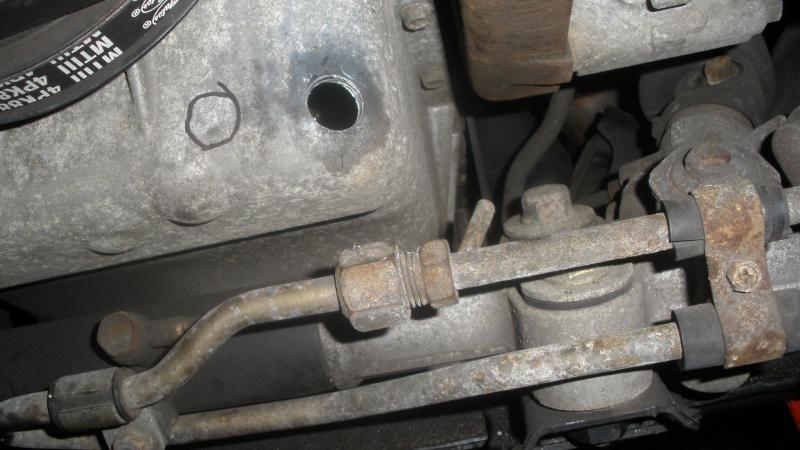
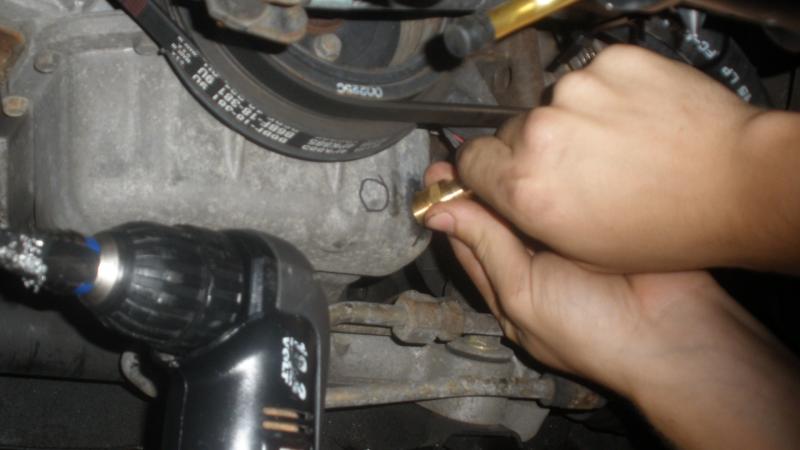
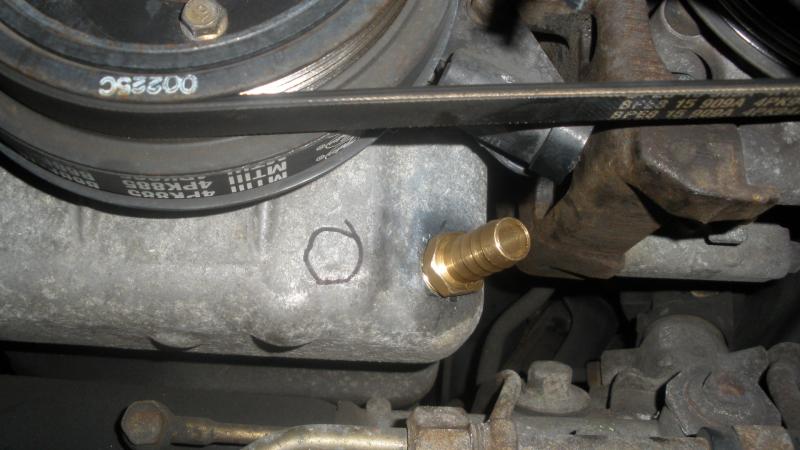
Once the hole is drilled, you can use your pinky to reach in and remove any filings. I kept the bit greased at all times, and would clean off and regrease again often to help control the metal from winding up in the oil pan. The tap works great and jb weld was used on a few of the last threads to seal it off
You now have your oil return taken care of, next post is oil feed
I redid my initial post because I can't update my old one and I feel like I left a lot out. And I've learned a lot more since the install anyways.
2000 Miata LS 1.8L (you can probably use some of this info for 1.8 NA's and 1.6 NA's too
-Long story short, I bought the car bone stock in Feb 2011. Suspension and wheels went on a few months later and then I pieced together this turbo kit in the fall later that year. Here I am, roughly a year and a half later, (turbo kit installed sep 2011and today it is May 26,2013) and the car is still running strong, turbo spools just like it did day 1 and it has NO shaft play at that
Purpose of this thread: Heads up to fellow miata owners looking to boost or modify their current setup. I made mistakes first time around, and have corrected almost all of them. This was done a legit BUDGET, and I dare say it compares to the pricier pre-fabbed kits they may be out of your reach at the time like they were for me. I did lots of research and questioning before taking the journey (not my first rodeo boosting cars as I came from building many 240's before this awesome roadster) Hope I can provide some guidance.
-Rick
1) What you will need and prices:
-Godspeed T3 Super "60" $250 (in most pics you will see a garret t3, ignore this, it went to **** after 2 days of tuning and then i picked up the godspeed and have not been let down at all, it's in the later pics)
-Flyin' Miata cast turbo manifold $421 (choose your manifold wisely but I love cast iron, and the relief cuts)
-Exhaust manifold gasket $10
-2.5" downpipe $100
-2.5" 5bolt v-band swing valve $35
-Vband clamp with flange $25
-Internal wastegate actuator $42
-NGR Type S BOV $155
-BOV flange $17
-BEGI vacuum block $43
-I/C and Piping (CX Racing) $164
-Oil Feed: Sandwich plate from glowshift.Fittings and line from summit. $77
-Oil pan fitting $6
-Flyin miata boost gauge $66
-AEM digital uego wideband $173
-Rx8 425cc injectors $100
-Brain Built MegaSqurit 2Extra $650
-Penzoil ultra synthetic oil w/ filter $31
-NGK BKR 7E-11 plugs or Champion counterpart spark plugs $11
-Flyin Miata Level 1 Clutch $365
-Lots of heat wrap, titanium, wrap, and/or turbo blanket $150
-A-pillar dual guage from flying miata $50
(and ignore the stupid t2-t3 adapter in this, i was oblivious to the fact the fact it was not going to fit until i looked at the bay again, haha. silly me)
-------Total around $2,941 Now sure you can find some of the parts listed cheaper, or perhaps go a different route on some things to save. Keep in mind; intercooler piping, downpipe, and exhaust are not factored into this estimate. I was able to get all of those for no more than $250 all together. All depends on who you know. But you will have a standalone ECU with plenty of tuning capabilites, A/C will still be in the car, and you have a nice clutch ready to handle all the power (my stock one lasted about 3 months of abuse after boost) for $3,000?? That is not bad at all.
On a hot/humid day. I was able to make 185whp. Tune is very conservative, and the wastegate holds ten for a little bit then drops back to 7psi and holds. I'm investigating correcting this and holding 10, and or 12 psi. The car pulls pretty strong, I've beat some cars I shouldn't but power to weight is an awesome thing. I'm sure after sourcing colder air, and machining out the turbo mani some, I can achieve desired boost levels. I have plenty of fuel to play with.
Purchased and returned (after use) a Unitbit piece from lowe's for $40.
Purchased and returned a tap for the 3/8 NPT for $10
I used a 3/8 hose barb for the fitting. onto pics
Once the hole is drilled, you can use your pinky to reach in and remove any filings. I kept the bit greased at all times, and would clean off and regrease again often to help control the metal from winding up in the oil pan. The tap works great and jb weld was used on a few of the last threads to seal it off
You now have your oil return taken care of, next post is oil feed
Last edited by sickmiatabra; 05-27-2013 at 11:55 PM.

Reply
 0
0

0
05-27-2013, 11:29 PM
#2
Junior Member
Thread Starter
iTrader: (1)
Join Date: Feb 2011
Location: Minot, ND
Posts: 255
Total Cats: 21
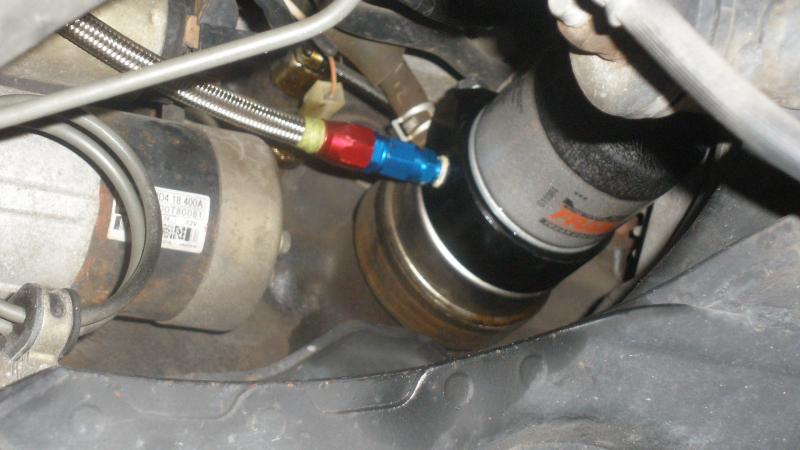
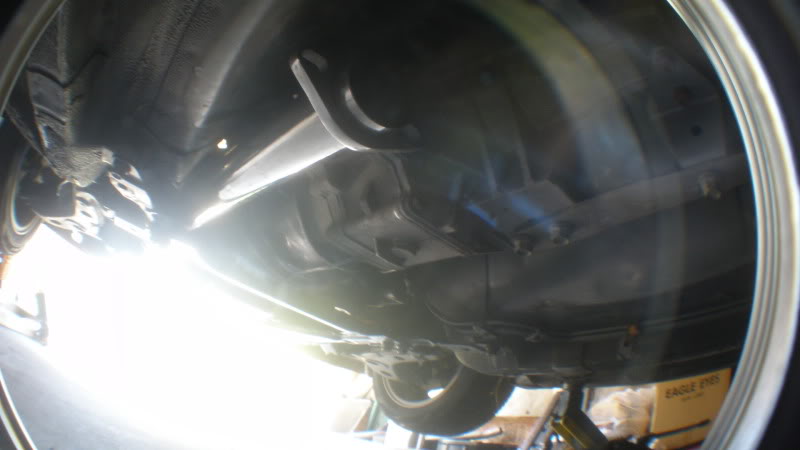
Oil feed time: Glowshift sandwich plate, -4 line with restrictor at the turbo.
pics: this picture was taken after the car had been running some and as you can see, it is dry, not dripping.
Oil feed and return knocked out so onto the turbo install
Getting off the stock manifold is a real pain. You will need extensions and room under the car to get leverage.
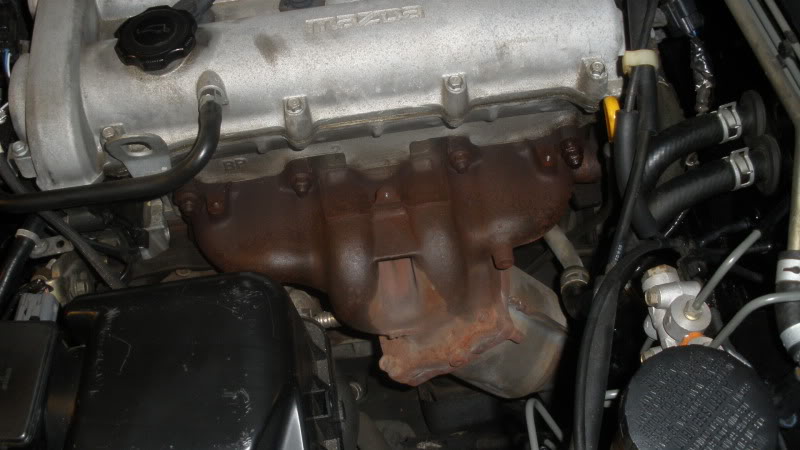
For the egr, I went kinda ghetto and removed it, cut a good portion of the middle of the bar out and then bend the ends and hammered over to seal off. Did the trick nicely and took no time at all.
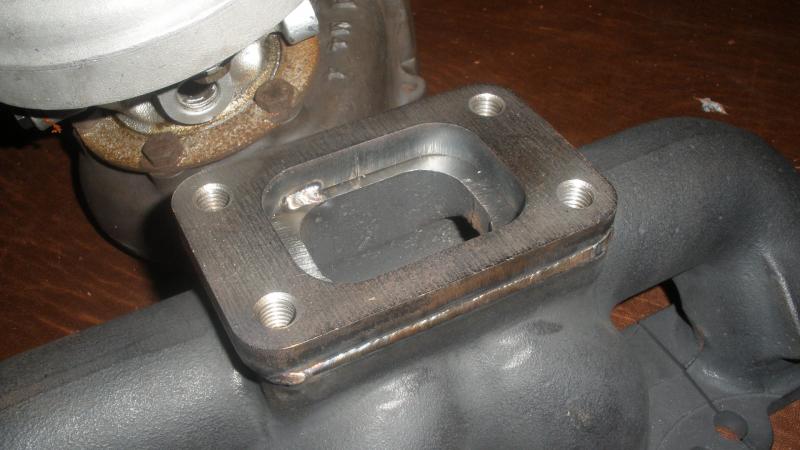
I purchased the flyin miata manifold knowing it was a t2 flange and I had a t3. I love making things complicated. I had a tapped t3 flange welded onto the manifold and studded. (I am going to get the portion that is not needed machined out so I can free up flow to the turbo soon. This should definitely increase spool time I would think) Came out great. A slight bit of the frame rail lip was hammered out for compressor and downpipe area. The downpipe was a pain as the vband adapter left us little space.

Ended up welding the pipe onto the adapter and vbanding the on the straight; real easy access from the wheel well and the adapter just slides right off on removal.
Of course you could just get a sr20 t25 (one of my favs) and use the manifold the way it came. I could not find many t3 manifolds for the 1.8 so whatever.
pics: this picture was taken after the car had been running some and as you can see, it is dry, not dripping.
Oil feed and return knocked out so onto the turbo install
Getting off the stock manifold is a real pain. You will need extensions and room under the car to get leverage.
For the egr, I went kinda ghetto and removed it, cut a good portion of the middle of the bar out and then bend the ends and hammered over to seal off. Did the trick nicely and took no time at all.
I purchased the flyin miata manifold knowing it was a t2 flange and I had a t3. I love making things complicated. I had a tapped t3 flange welded onto the manifold and studded. (I am going to get the portion that is not needed machined out so I can free up flow to the turbo soon. This should definitely increase spool time I would think) Came out great. A slight bit of the frame rail lip was hammered out for compressor and downpipe area. The downpipe was a pain as the vband adapter left us little space.
Ended up welding the pipe onto the adapter and vbanding the on the straight; real easy access from the wheel well and the adapter just slides right off on removal.
Of course you could just get a sr20 t25 (one of my favs) and use the manifold the way it came. I could not find many t3 manifolds for the 1.8 so whatever.
Reply
0
0
05-27-2013, 11:43 PM
#3
Junior Member
Thread Starter
iTrader: (1)
Join Date: Feb 2011
Location: Minot, ND
Posts: 255
Total Cats: 21
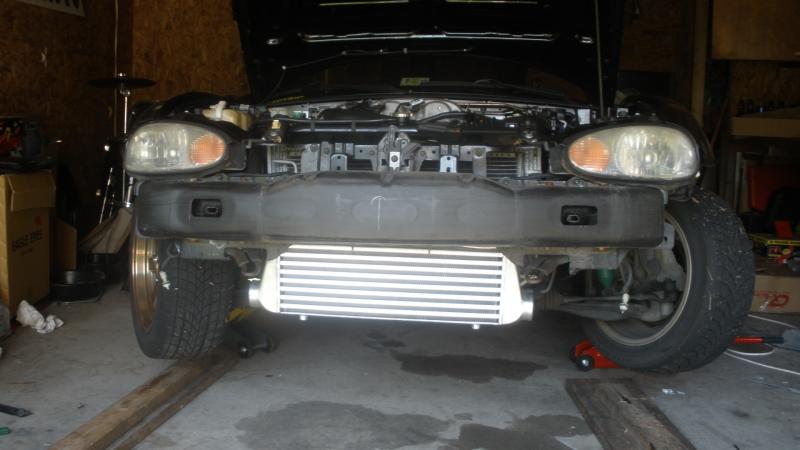
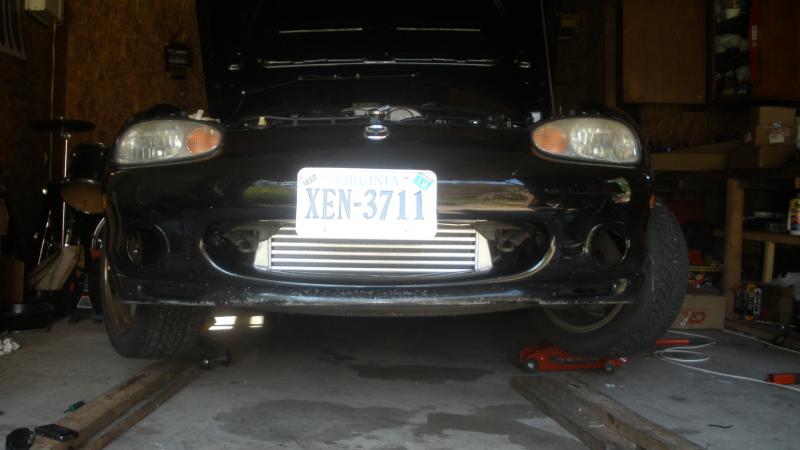
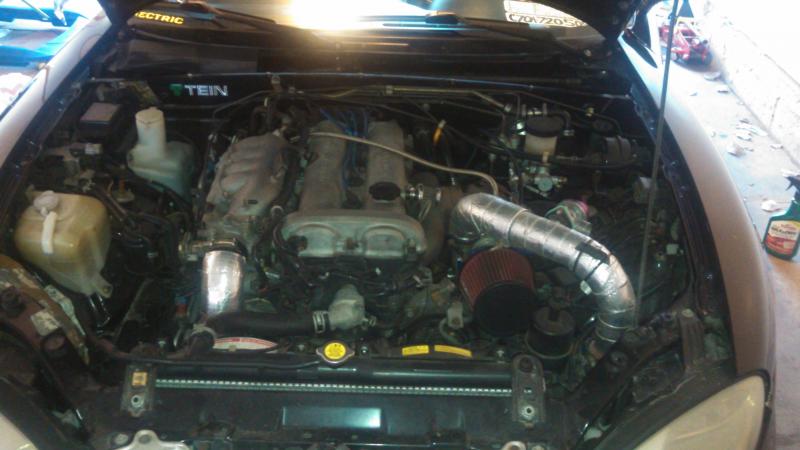
Turbo's on: Intercooler mounting time.
I made some tabs out of angle iron after making some measurements. I go the idea from flyin miata but didn't use the hood latch bolts. I just drilled my own haah
*! DO WHAT YOU HAVE TO DO TO PUT YOUR IAT SENSOR IN THE COLDSIDE ENDTANK OF YOUR INTERCOOLER. DO NOT PUT IT ANYWHERE IN THE ENGINE BAY OR YOU WILL HEAT SOAK THIS SENSOR AND YOUR TUNE WILL BE SO LAME AFTER SOME RUNS/ HOT STARTS. (it will come with your megasquirt and you can reuse the factory iat sensor clip that was in the airbox and clip it right to your new sensor
Mounting was pretty straight forward and I drilled two holes in the bottom of the bumper so i could bolt the i/c right in from the bottom as well. Does not move at all.
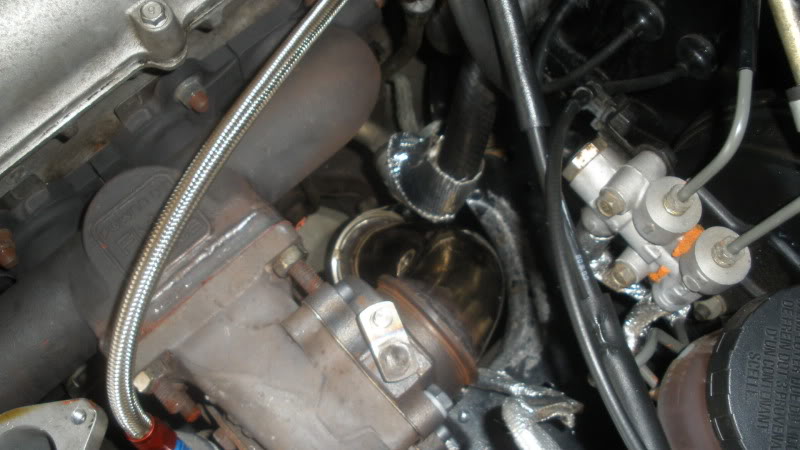
For the pipe routing I used 18psi's idea for the over and out approach. This required some cutting right behind the driver headlight. And a little modification to the trim on the back of the headlight but nothing that affects function. Everything else is pretty straight forward.
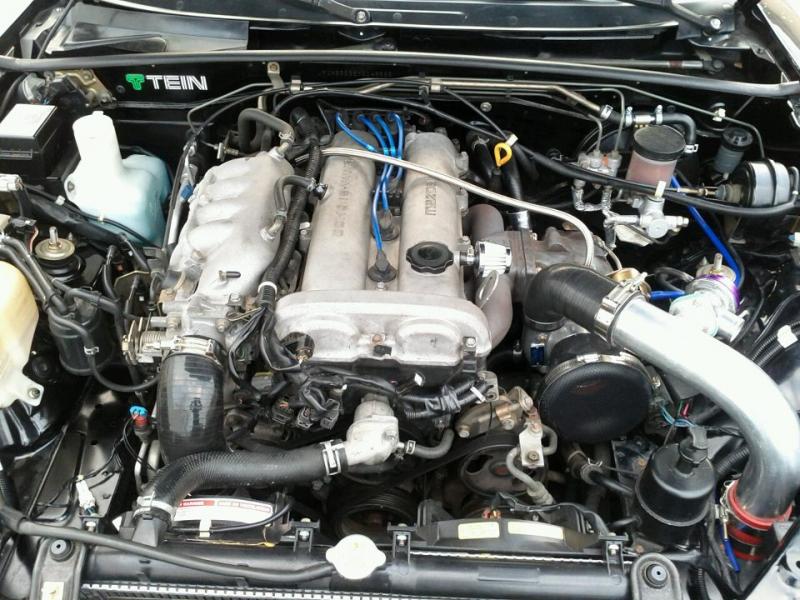
Here's a more recent pic with pipe wrapped a little bit. I have not "prettied" up the bay yet, everything is for function till I feel like it's complete.
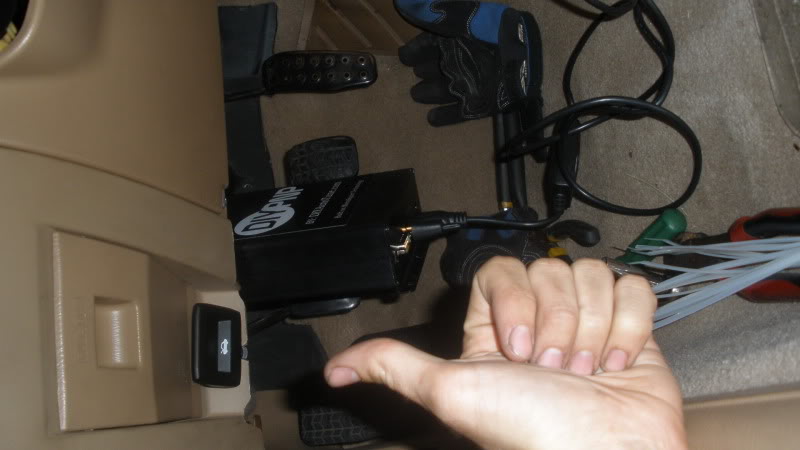
***MS2 install****
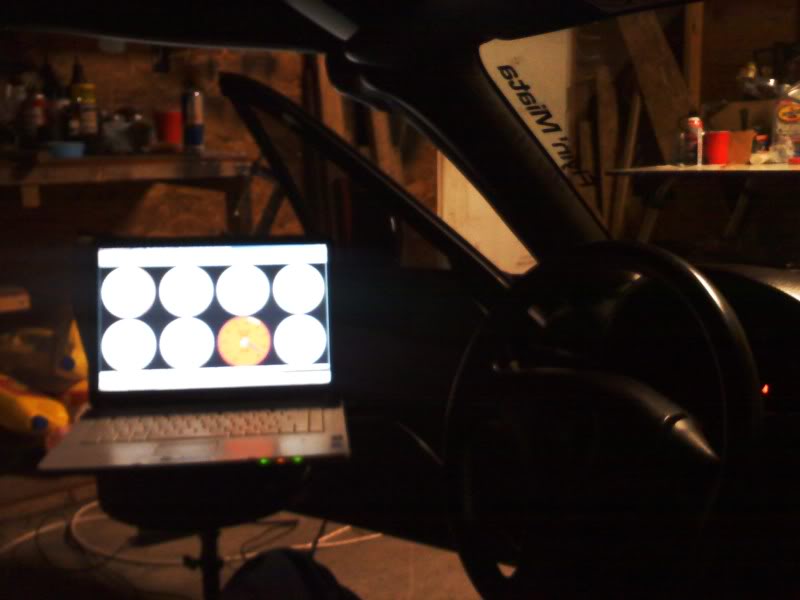
Ready for action. The MS was literally plug and play, had to install the driver for USB on my comp. Megasquirt and the software "tunerstudio" you will use on your laptop is pretty straight forward and takes only a little time to learn. I posted silly threads about startup issues, but I was at fault not adjusting the cranking settings properly for the bigger injectors. I also tried to blame MS for my alternator belt squeel, but that two was me being ignorant, and was fixed after a simple belt swap lol.
I made some tabs out of angle iron after making some measurements. I go the idea from flyin miata but didn't use the hood latch bolts. I just drilled my own haah
*! DO WHAT YOU HAVE TO DO TO PUT YOUR IAT SENSOR IN THE COLDSIDE ENDTANK OF YOUR INTERCOOLER. DO NOT PUT IT ANYWHERE IN THE ENGINE BAY OR YOU WILL HEAT SOAK THIS SENSOR AND YOUR TUNE WILL BE SO LAME AFTER SOME RUNS/ HOT STARTS. (it will come with your megasquirt and you can reuse the factory iat sensor clip that was in the airbox and clip it right to your new sensor
Mounting was pretty straight forward and I drilled two holes in the bottom of the bumper so i could bolt the i/c right in from the bottom as well. Does not move at all.
For the pipe routing I used 18psi's idea for the over and out approach. This required some cutting right behind the driver headlight. And a little modification to the trim on the back of the headlight but nothing that affects function. Everything else is pretty straight forward.
Here's a more recent pic with pipe wrapped a little bit. I have not "prettied" up the bay yet, everything is for function till I feel like it's complete.
***MS2 install****
Ready for action. The MS was literally plug and play, had to install the driver for USB on my comp. Megasquirt and the software "tunerstudio" you will use on your laptop is pretty straight forward and takes only a little time to learn. I posted silly threads about startup issues, but I was at fault not adjusting the cranking settings properly for the bigger injectors. I also tried to blame MS for my alternator belt squeel, but that two was me being ignorant, and was fixed after a simple belt swap lol.
Reply
1
1
05-27-2013, 11:50 PM
#4
Junior Member
Thread Starter
iTrader: (1)
Join Date: Feb 2011
Location: Minot, ND
Posts: 255
Total Cats: 21
That's it for the most part. I'm working on the heat reduction mods in the bay presently. You know heat wrapping the manifold and DP, and probably the turbo blanket route. Really want to source somewhere for cold air intake but it's taking some time to get that going. Please ask any questions you'd like. Critique my setup and so on. I'll edit as things change or I remember other notes.
**obvious things I left out but I assume others would know:
-drill a hole for your vacuum line to run through the firewall for you boost gauge/map sensor for the ecu
-install begi vacuum block right above the brake booster. Great vacuum source
-run your wastegate line to the compressor inlet. NO WHERE ELSE!!
-change your oil and filter at time of install and after maybe 500 miles to make sure you don't have anything in your oil
-install your gauges where you'd like, I originally had them where the cassette player was but i love my gauge pod, running the wires and vacuum line up there is a PITA but oh well
-spend the $50 to register with tunerstudio and have ve analyze so it will tune itself!
-gap your plugs around .030
-if you do use the NGR BOV, use the the vacuum port on the top section of the bov, not the lower one.
-if you can pull off external gate, go that route, feel more confident in your setup.
Her's some random pics. Thanks for looking!!
Reply
1
1
05-28-2013, 09:36 AM
#6

Good for you for taking the time to do a write up. There can never be too many write ups.
I kinda don't get a few things, they seem overly redundant. Some questions/concerns/comments:
-why weld on a t3 flange when you can just get a t3 log?
-why tap the pan at the very front like that?
-why drill the firewall when there's a ton of holes to pass a vacuum line through?
-why run a sandwich plate when you can just tap right off the pressure sender?
-why run the feed line over the top (ugly and interferes with things) when you can run behind head?
-if you're running pump gas then heat soak is a concern, so you may want to reconsider the filter on turbo and make a heat shielded intake/box
-heat shielding on the rest of the bay is a good idea, esp around the turbine/dp area
-the setup should definitely be capable of much more than 7psi/185whp, though be careful as I bent rods on my '00 past 12psi/240whp
Reply
0
0
05-28-2013, 11:42 AM
#7
Junior Member
Thread Starter
iTrader: (1)
Join Date: Feb 2011
Location: Minot, ND
Posts: 255
Total Cats: 21
@thirdgen, total would be around 3300 tops. Give or take
@18psi
-i honestly could not find a t3 log :(
-without pulling the pan there only so many spots i could tap. I took considerate time to make sure the line would not rub belts and still flow. Worked so far.
-i just like extra work i guess. Boost gauge came with a rubber grommet for the line, so i figure why not run it lol
-I've had a friend have a brass tee snap before and heard the horror story that followed.
-feed line was too short to run behind the head. I know in some pics, it was ran that way but i like my feed to be as vertical as possible when lubing turbo. I'll get my lazy *** to get a longer lone one day.
-definitely agree, I'm fabricating a box and doing heat reduction all around
-I'm aware I'm capable of more. The pulls were done before i relocate my iat sensor from pre throttle body to the end tank of the intercooler. That's why I'm doing all the heat reduction mods now, an
trying to get the boost to stay around 10psi throughout the power band. I want to make 225whp
Thanks for the input and thanks for the idea on the intercooler piping plan a while back
Last edited by sickmiatabra; 05-28-2013 at 11:46 AM. Reason: typo
Reply
0
0
05-28-2013, 01:37 PM
#8
mkturbo.com


iTrader: (24)
Join Date: May 2006
Location: Charleston SC
Posts: 15,177
Total Cats: 1,681
BEGI makes a cast t3 manifold just so you know. I also do not like the glowshift sandwich plates. I had one clog last year and cause my engine to not get any oil pressure. Other then those this thread has a been a pretty good how to.
Reply
0
0
05-28-2013, 01:57 PM
#9
Junior Member
Thread Starter
iTrader: (1)
Join Date: Feb 2011
Location: Minot, ND
Posts: 255
Total Cats: 21
@shuiend I'm going to be pretty upset if I overlooked that. I'm going to double check, and the sandwich plate clogged due to what?? The only negatives i've ever heard of is them leaking, but i don't have that problem. I'm tempted to pull it off for an inspection after your input though thanks.
Like I've stated before, the bay is not done to my standards, I'll be cleaning it up in the next month or two. After any issues I feel haven't been addressed are taking care of.
Miataturbo FTW
Like I've stated before, the bay is not done to my standards, I'll be cleaning it up in the next month or two. After any issues I feel haven't been addressed are taking care of.
Miataturbo FTW
Reply
0
0
05-28-2013, 03:30 PM
#10
mkturbo.com
iTrader: (24)
Join Date: May 2006
Location: Charleston SC
Posts: 15,177
Total Cats: 1,681
@shuiend I'm going to be pretty upset if I overlooked that. I'm going to double check, and the sandwich plate clogged due to what?? The only negatives i've ever heard of is them leaking, but i don't have that problem. I'm tempted to pull it off for an inspection after your input though thanks.
Like I've stated before, the bay is not done to my standards, I'll be cleaning it up in the next month or two. After any issues I feel haven't been addressed are taking care of.
Miataturbo FTW
Like I've stated before, the bay is not done to my standards, I'll be cleaning it up in the next month or two. After any issues I feel haven't been addressed are taking care of.
Miataturbo FTW
I am not sure what exactly caused my glow shift plate to clog. I got pissed at it and threw the POS away eventually. I was using mine for oil cooler lines and an oil pressure sensor. One morning I got in the car to drive to work and had no oil pressure. Had machine shop rebuild engine, went to start the car and no pressure still. Traced it to the sandwich plate and pulled it and then I got oil pressure.
Reply
0
0
05-28-2013, 04:24 PM
#11
Junior Member
Thread Starter
iTrader: (1)
Join Date: Feb 2011
Location: Minot, ND
Posts: 255
Total Cats: 21
Well **** me right. Pretty much the same price as the FM one i purchased. I probably didn't notice the drip down box for a different size. Epic fail on my part.
And that is unfortunate it clogged. It seemed pretty free flowing from the design. We live and we learn thanks for your advice
And that is unfortunate it clogged. It seemed pretty free flowing from the design. We live and we learn thanks for your advice
Reply
0
0
06-02-2013, 01:33 PM
#16
Junior Member

Join Date: Sep 2009
Posts: 76
Total Cats: 0
That's funny. I recognized the user name but figured it couldn't be the same guy. I was around at the beginning when we all left the Ultraspeed boards and Sung and Eng started it as Drag757. Since sung sold the board recently the board has gone to ****. IB really has ruined a good local thing.
Reply
0
0
06-02-2013, 02:36 PM
#17
Junior Member
Thread Starter
iTrader: (1)
Join Date: Feb 2011
Location: Minot, ND
Posts: 255
Total Cats: 21
Yeah dragva is old school as hell lol. I'm in the airforce and got stationed in north dakota :( car had no problem making the 1800 mile drive.
And i had a hard time finding a miata crowd back home. Id love to be back though, especially for a dyno day at all aspects. They put out a good rep.
And i had a hard time finding a miata crowd back home. Id love to be back though, especially for a dyno day at all aspects. They put out a good rep.
Reply
0
0
07-09-2013, 02:57 AM
#19
Junior Member
Thread Starter
iTrader: (1)
Join Date: Feb 2011
Location: Minot, ND
Posts: 255
Total Cats: 21
TTT for update: 2 weeks ago, I pulled an all nighter to finish off some of what i've been putting off. I'll list everything as follows
-removed bumper,headlights, and turbo kit
-had a machine shop arc cut most of the old t25 flange that was a restriction at the tig'd t3 flange
-any surface rust from hammering (room for turbo) or the whole cut for hot side IC piping, was sanded down and rustoleum'd.
-removed any extra wiring and harness on the driver side that were unneeded (mainly the fog light crap since I removed them forever ago)
-installed boost controller!!! now instead of hitting 10psi and dropping to 6/7psi, the turbo holds a solid 10/11psi throughout the rpms
-heat wrapped downpipe and manifold
-and redid my fenderliners to work to keep dirt out of the bay
Overall, very very pleased with the results. I almost eliminated the common hot start issue, or hot idle after a few minutes of sitting. ( I'm referring to the IAT sensor getting heated and throwing the tune lean) I drove the car for 2 hours straight, boost and all, and every light I got to I was still around my 14.7 idle
I did top the car out in a few races. Will post vids and pics soon. Completely left a 5.0 mustang that was stroked, cammed, and a few other mods. That was a pretty good feeling.
Now if I can only find someone to buy my car :'(
ttt
Reply
0
0

Thread
Thread Starter
Forum
Replies
Last Post
elesjuan
Build Threads
9
11-14-2018 12:18 PM


