Patsmx5's Mazda Millenia COPs Install
 09-05-2008, 07:15 PM
#1
Elite Member
Thread Starter
iTrader: (16)
Join Date: Aug 2007
Location: Houston, TX
Posts: 9,300
Total Cats: 477
Ok, I'm gonna catch hell for this. I've stood behind the idea that nobody needs to upgrade to COPs forever. Well, they probably don't...
I had hell getting MS2 to read my stock sensors. I switched to a 36-1 trigger wheel setup and a Ford EDIS4 ignition system because I was tired of having stupid ignition system problems. I just wanted something that worked and worked well. Well, EDIS is working, but I have a ******* miss. I loose spark sometimes on 2 different cylinders, but those two are NOT a pair. I've replaced every piece of the ignition system to no avail.
So I'm upgrading to COPs and I'm gonna let MS fire them instead of the EDIS4 module. I'll still keep the trigger wheel setup as MS2 can read that and it's better than the stock input stuff. If I have a miss after this I'm selling the car.
Now yes I could have bought some toyota COPs but these are Mazda, which is cool in its own way. Plus these came off of the Millenia S, which was SC'd to 14PSI stock, so you know these will work with a boosted motor. And their is not much demand for these so they are usually easy to find.
A while back I bought 4 millenia COPs but never got around to installing them. They are the correct length and fit pretty good. I ended up selling them to Magnamx-5 and he's been running them on his car for a while.
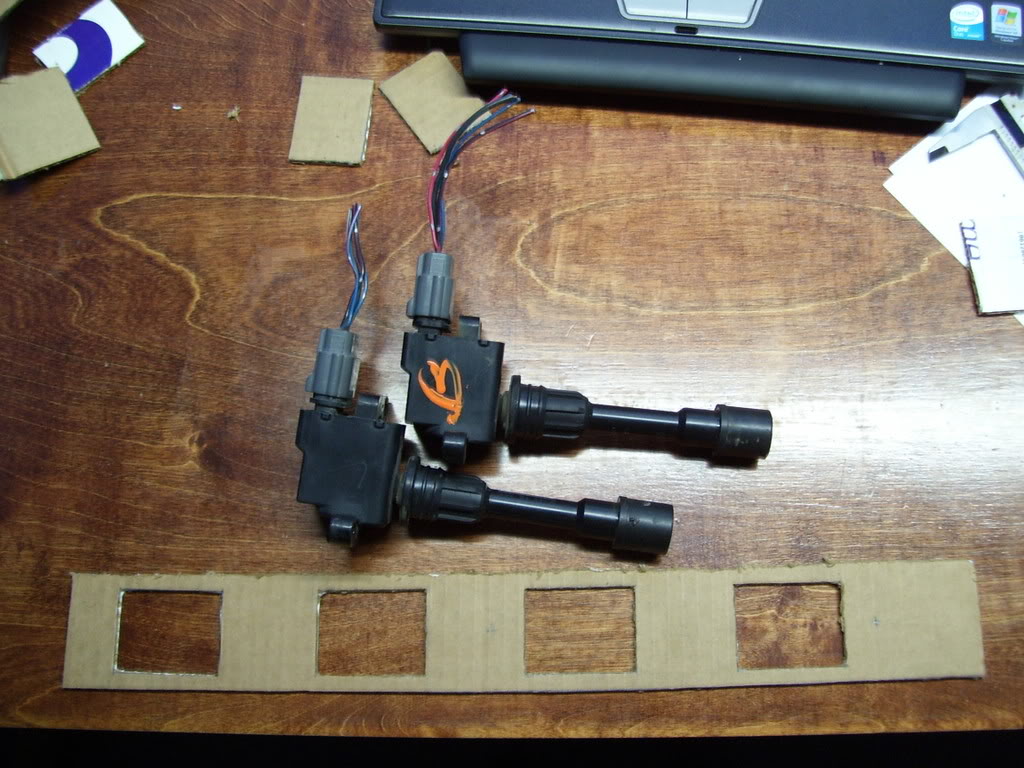
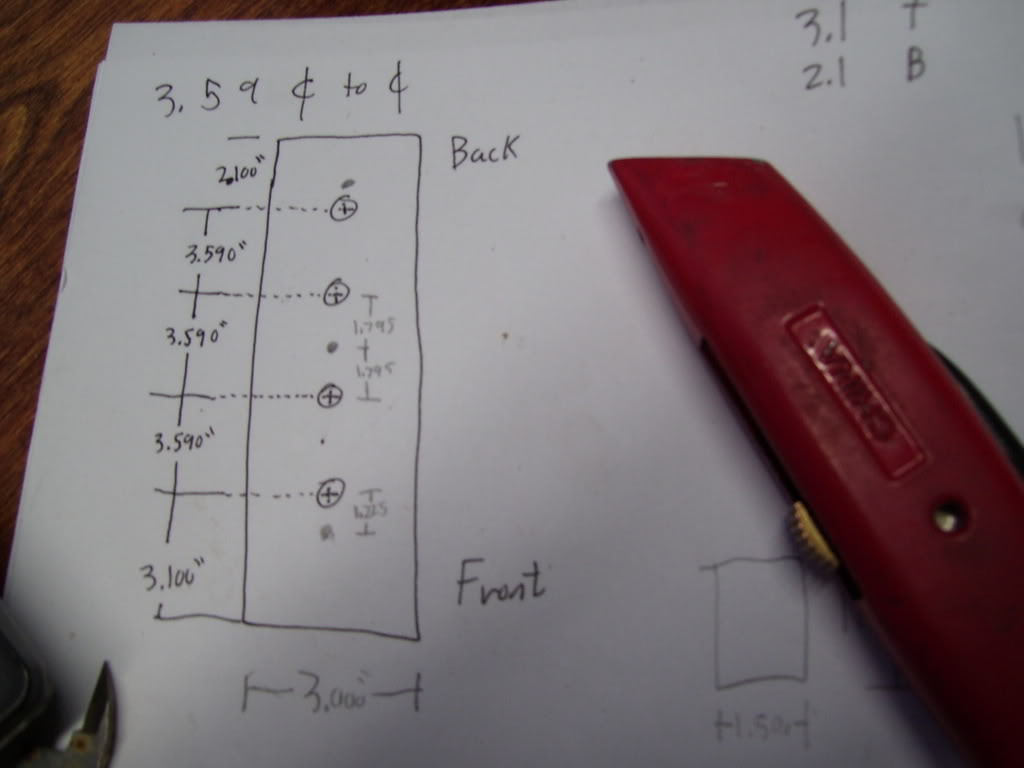
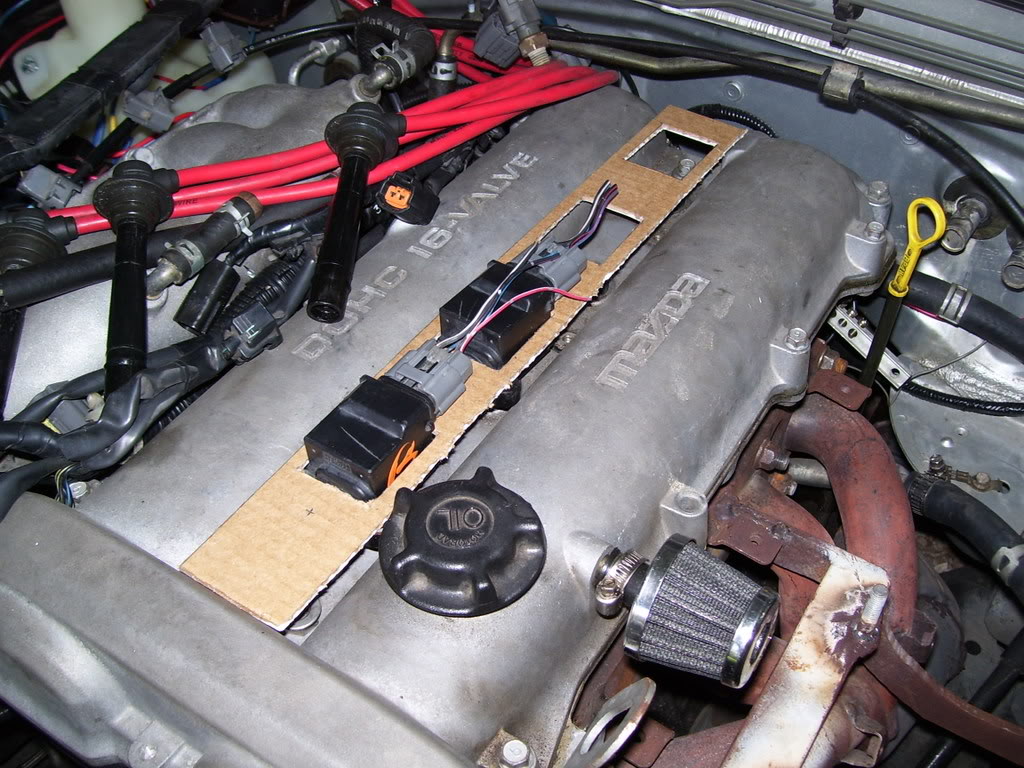
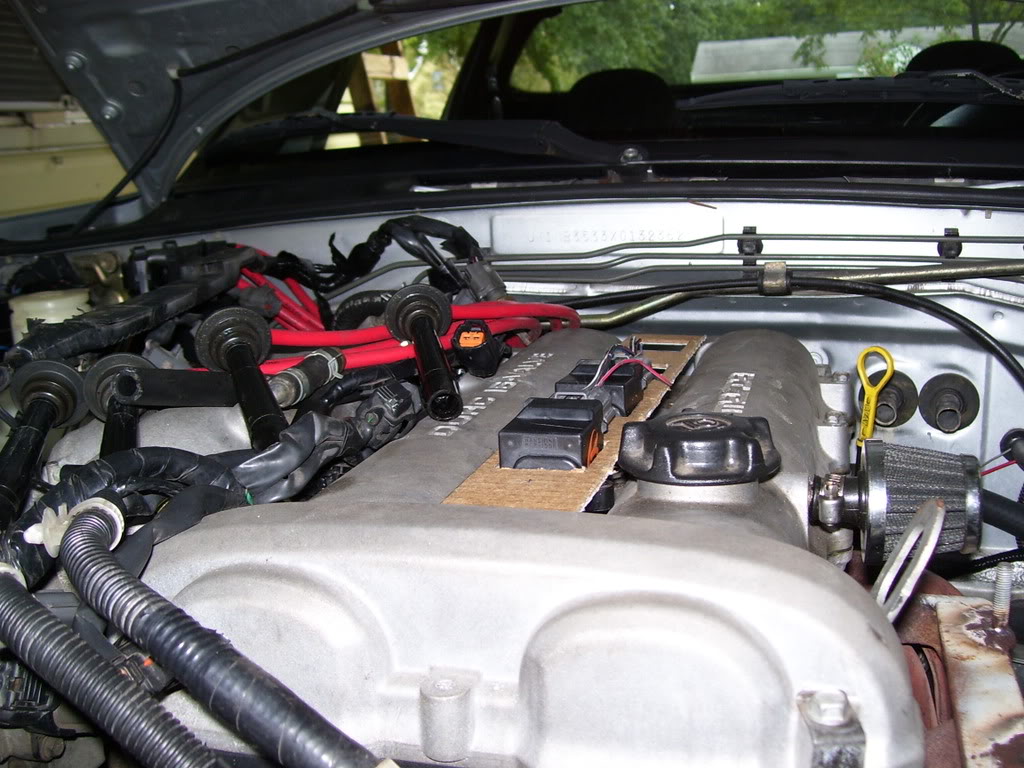
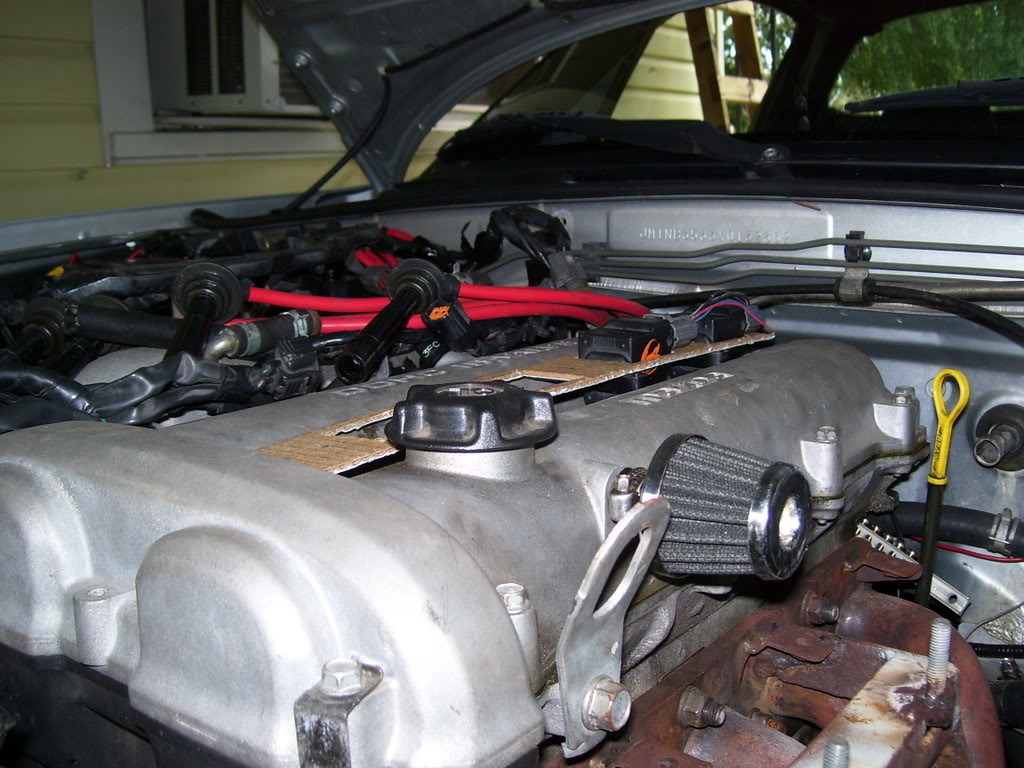
Well I took some measurements and designed the plate that will hold the COPs in place. I made a hold down plate out of cardboard to test fit the design before making on out of aluminum. Now I'm working on making an aluminum version. Oh yeah, and I only have 2 COPs so I can't make the switch till I get two more. Working on that.
Pics of progress.

I had hell getting MS2 to read my stock sensors. I switched to a 36-1 trigger wheel setup and a Ford EDIS4 ignition system because I was tired of having stupid ignition system problems. I just wanted something that worked and worked well. Well, EDIS is working, but I have a ******* miss. I loose spark sometimes on 2 different cylinders, but those two are NOT a pair. I've replaced every piece of the ignition system to no avail.
So I'm upgrading to COPs and I'm gonna let MS fire them instead of the EDIS4 module. I'll still keep the trigger wheel setup as MS2 can read that and it's better than the stock input stuff. If I have a miss after this I'm selling the car.
Now yes I could have bought some toyota COPs but these are Mazda, which is cool in its own way. Plus these came off of the Millenia S, which was SC'd to 14PSI stock, so you know these will work with a boosted motor. And their is not much demand for these so they are usually easy to find.
A while back I bought 4 millenia COPs but never got around to installing them. They are the correct length and fit pretty good. I ended up selling them to Magnamx-5 and he's been running them on his car for a while.
Well I took some measurements and designed the plate that will hold the COPs in place. I made a hold down plate out of cardboard to test fit the design before making on out of aluminum. Now I'm working on making an aluminum version. Oh yeah, and I only have 2 COPs so I can't make the switch till I get two more. Working on that.
Pics of progress.

Reply
 0
0

0
 09-05-2008, 07:29 PM
#3

You know that if your only using two that 2-3 fire together, right??? car might run better using 1,3 or 2,4.
Props for converting the BP to a two cylinder, what kind of MPG's are shooting for?
Personally I would have painted the brackets red or black, brown looks so out of place.
Hope you find your miss...
Props for converting the BP to a two cylinder, what kind of MPG's are shooting for?
Personally I would have painted the brackets red or black, brown looks so out of place.
Hope you find your miss...
Reply
0
0
 09-05-2008, 08:07 PM
#5
Elite Member
Thread Starter
iTrader: (16)
Join Date: Aug 2007
Location: Houston, TX
Posts: 9,300
Total Cats: 477
You're saying paint the coilpacks? I was planning on painting the bracket black when I got it done. Guess I could paint the coils to match. Hmm... Oh, and I'd like to one day paint the valve cover crinkle red, like the MSM motor. Wonder how crinkle red and gloss black would look? I dunno.
Reply
0
0
09-05-2008, 08:14 PM
#6
Elite Member
Thread Starter
iTrader: (16)
Join Date: Aug 2007
Location: Houston, TX
Posts: 9,300
Total Cats: 477
You know that if your only using two that 2-3 fire together, right??? car might run better using 1,3 or 2,4.
Props for converting the BP to a two cylinder, what kind of MPG's are shooting for?
Personally I would have painted the brackets red or black, brown looks so out of place.
Hope you find your miss...
Props for converting the BP to a two cylinder, what kind of MPG's are shooting for?
Personally I would have painted the brackets red or black, brown looks so out of place.
Hope you find your miss...

I hypothesize that my custom MSD low ohm sparkplug wires are the cause of my misfire. I really don't know, but changing everything else didn't fix it, so that's kinda all that's left. But overall I'm not satisfied with EDIS as I can't set a rev limiter, or have launch control or flatshift. Sucks. I miss launch control.
Dunno how well the cardboard will hold up, but it did fine for insulating header.
Reply
0
0
09-05-2008, 10:58 PM
#7
Elite Member
Thread Starter
iTrader: (16)
Join Date: Aug 2007
Location: Houston, TX
Posts: 9,300
Total Cats: 477
Got the aluminum thing made. Took forever. I wanted to make it from 3" x 1/8 aluminum bar stock, 2" was the widest lowes had. So I bought that. What sucks is it's only got a 1/4" of meat on either side where the coils are. But it will probably work. It doesn't do **** really, just sits there and looks good. Well, it didn't turn out pretty so scratch the last part. Oh well, maybe it will look better when I don't have a miss.
Reply
0
0
09-05-2008, 11:04 PM
#8
Elite Member
Thread Starter
iTrader: (16)
Join Date: Aug 2007
Location: Houston, TX
Posts: 9,300
Total Cats: 477
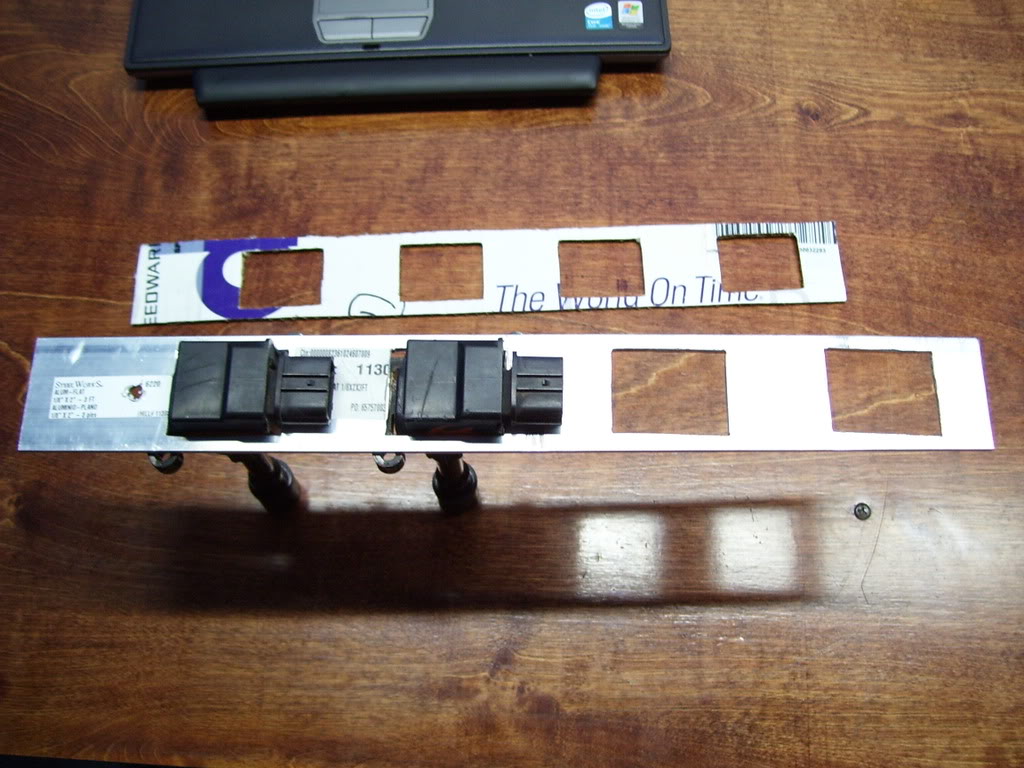
I used a 3/8" drill bit and a jig saw to cut those squares out. Had the work clamped to my desk they are sitting on. Poor desk. I'm definitely gonna make one from 3" eventually. Needs to be bigger I think. Anyone know where to pick up 3" wide aluminum barstock? I know I could buy it on ebay, but hate to.
Reply
0
0
09-06-2008, 01:34 PM
#9
Elite Member
Thread Starter
iTrader: (16)
Join Date: Aug 2007
Location: Houston, TX
Posts: 9,300
Total Cats: 477
Opinions needed: I'm not liking the bracket I made that's pictured above. I could make one from 3" , even that would look dumb IMO. I would rather, and am considering, putting 8 standoffs on the valve cover, drill and tap them, and bolt the coil packs down like they were fastened OEM.
Problem is, like most, I am TIGless. So maybe I could get a welder to do it, but that would be money and I'm trying not to spend a lot of that. So does anyone have any ideas how to mount these things using standoffs?
My thinking is use some 1/2" aluminum square stock. I'll have to cut it into .825" lengths so that the coil packs sits right when bolted to it. Since I don't have a welder, I'm thinking about JB Welding it. I know, ghetto. But it will probably work. What I'm thinking is to JB it, sand it down smooth, so that the shape of looks like it was cast that way, and prime and paint the VC. Then, if done right, it might look OEM, like it was meant to be there. Thoughts?
Problem is, like most, I am TIGless. So maybe I could get a welder to do it, but that would be money and I'm trying not to spend a lot of that. So does anyone have any ideas how to mount these things using standoffs?
My thinking is use some 1/2" aluminum square stock. I'll have to cut it into .825" lengths so that the coil packs sits right when bolted to it. Since I don't have a welder, I'm thinking about JB Welding it.
I know, ghetto. But it will probably work. What I'm thinking is to JB it, sand it down smooth, so that the shape of looks like it was cast that way, and prime and paint the VC. Then, if done right, it might look OEM, like it was meant to be there. Thoughts?
Reply
0
0
09-06-2008, 02:05 PM
#10
Boost Pope


iTrader: (8)
Join Date: Sep 2005
Location: Chicago. (The less-murder part.)
Posts: 33,050
Total Cats: 6,608
Why not just drill & tap the valve cover, then thread the hardware down into it? Use a jam nut technique at the bottom and it should not come undone.
Reply
0
0
09-06-2008, 02:53 PM
#12
Elite Member
Thread Starter
iTrader: (16)
Join Date: Aug 2007
Location: Houston, TX
Posts: 9,300
Total Cats: 477
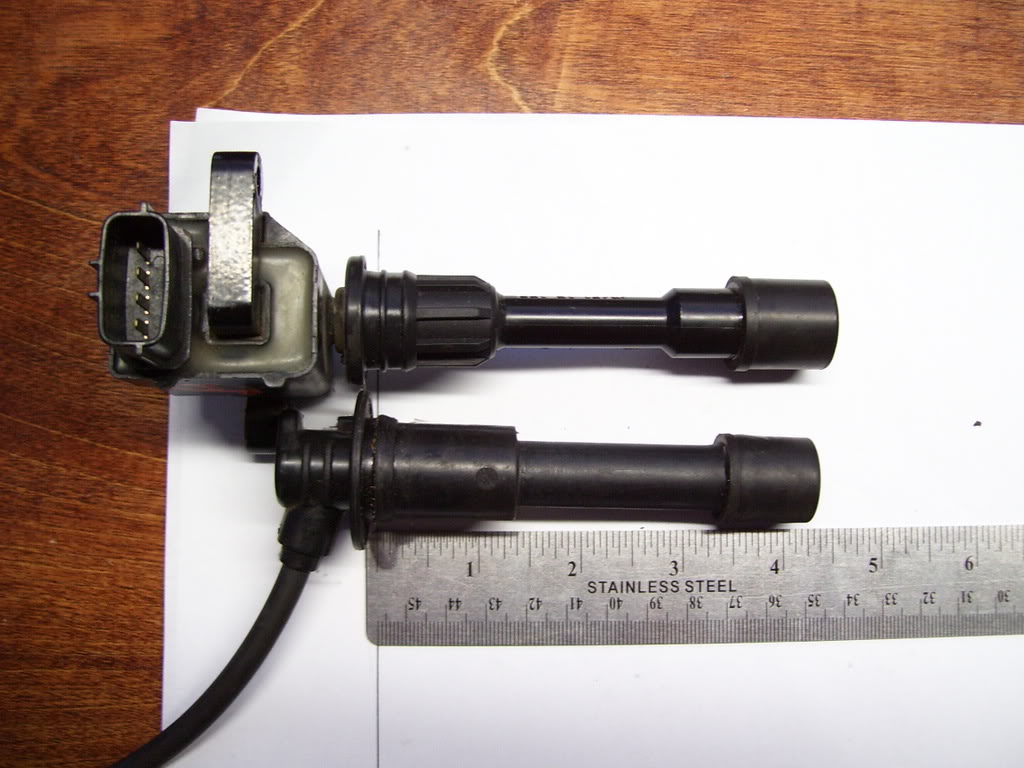
Here's some pics I just took too answer M2cupcar's questions. (what's your name?) I don't know about the dwell aspect. Wait, I think I read these automatically adjust dwell. I think I read that. Let me look it up. FWIW magnamx-5 has been running these on his 1.6 with no problems.
Joe, I thought about that. I dismissed that idea because those 8 threaded holes could leak oil. However, it's looking like dealing with a potential oil leak will be much much easier than making standoffs. Lowes has no square stock.
I don't understand exactly what you were saying though. Are you saying put studs and have them thread in and use a jam nut to keep them from coming out?
Hell, I could do this several ways.
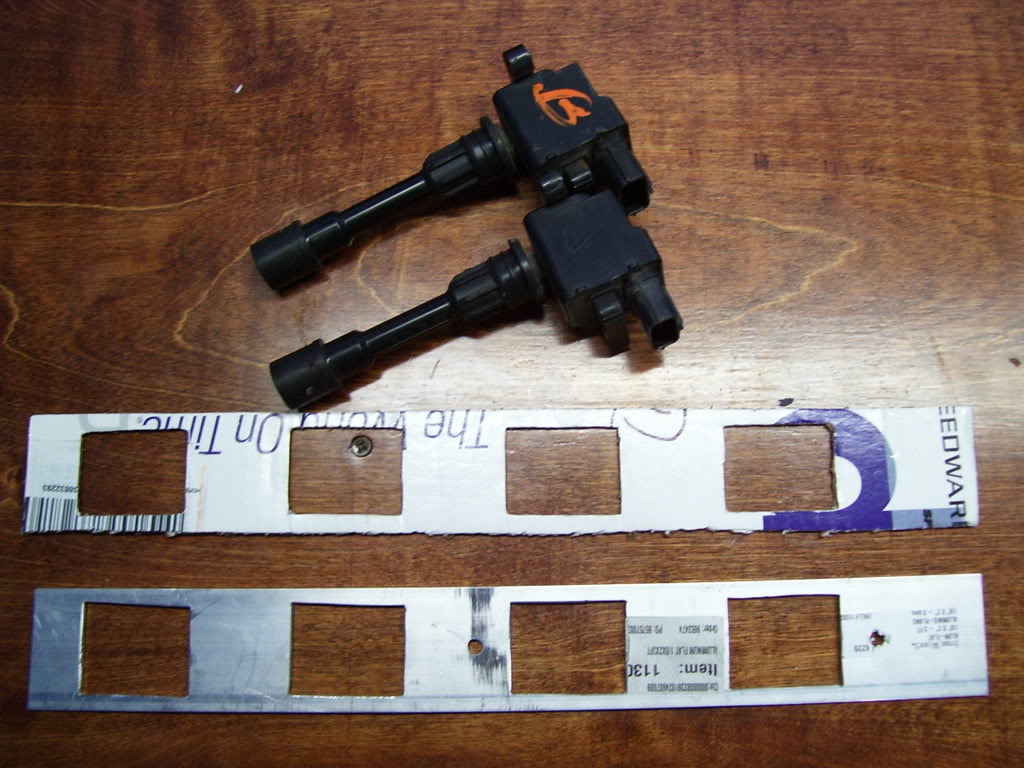
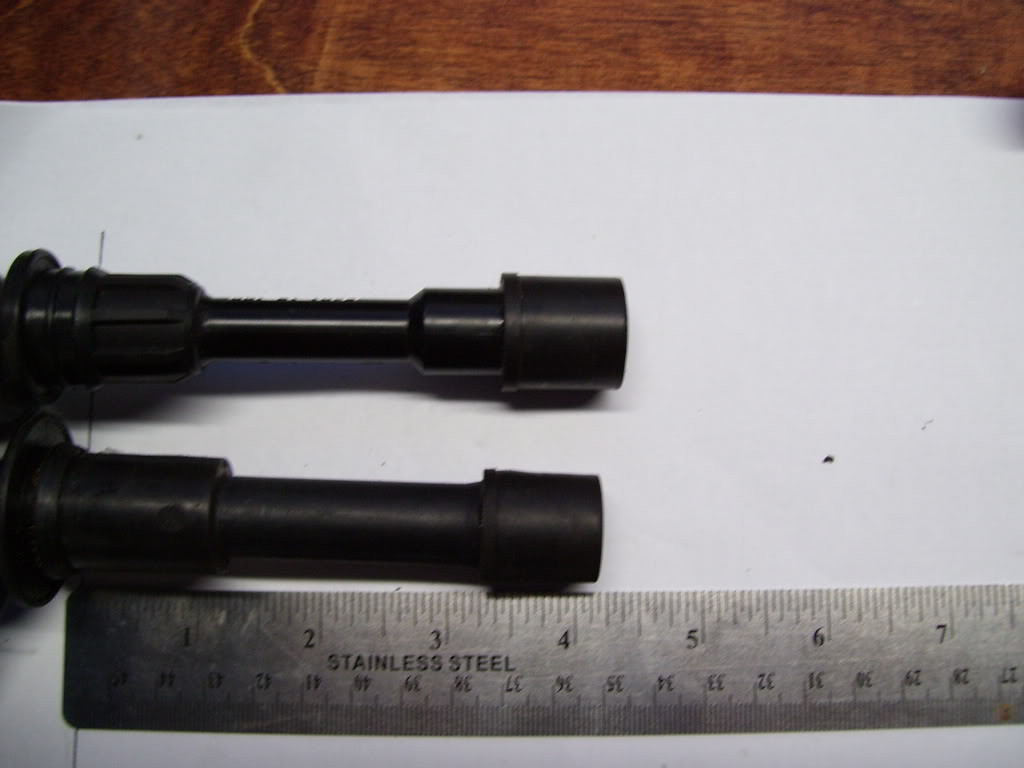
Millenia COP
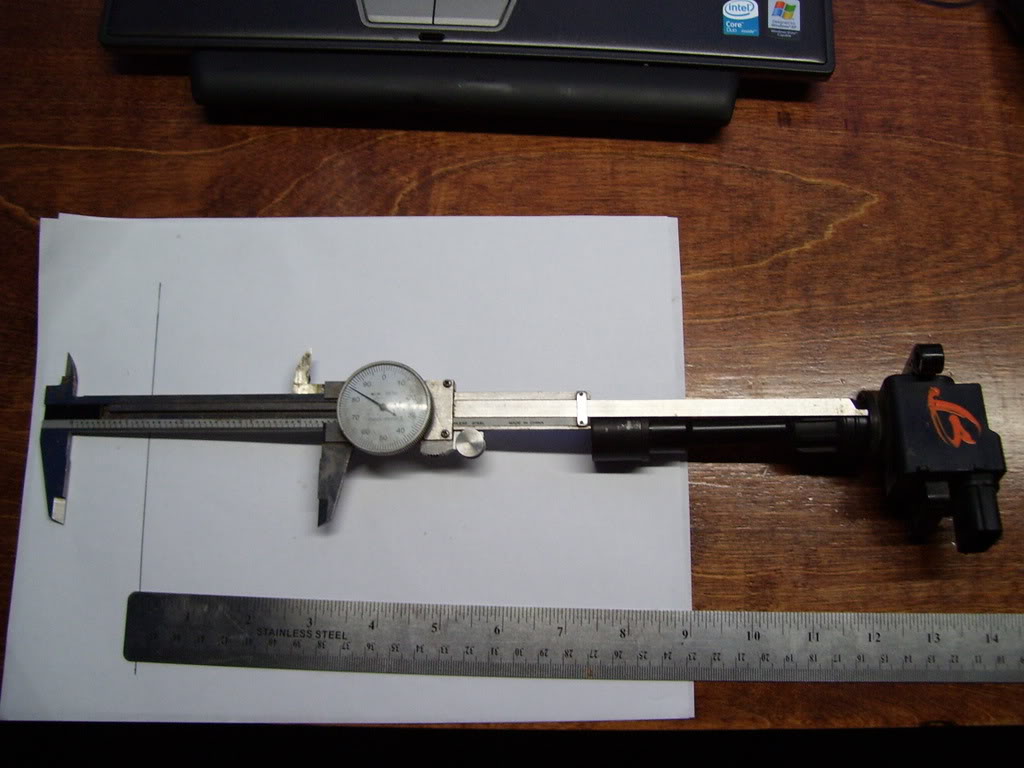
Millenia COP depth
Miata plug
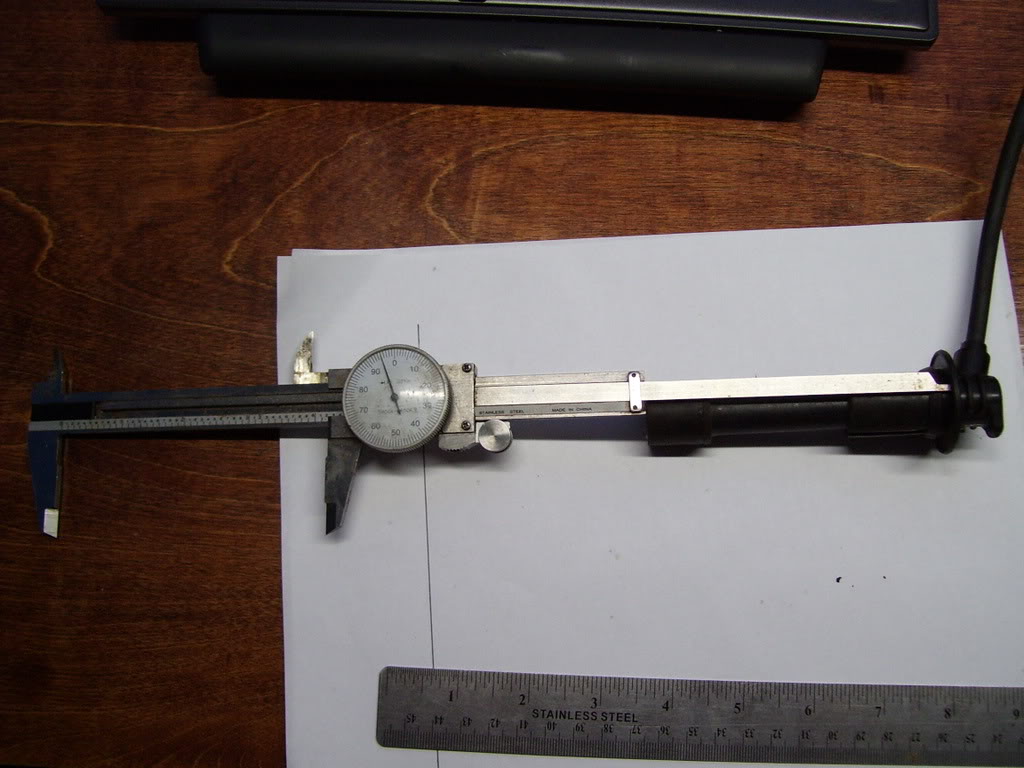
Miata plug depth
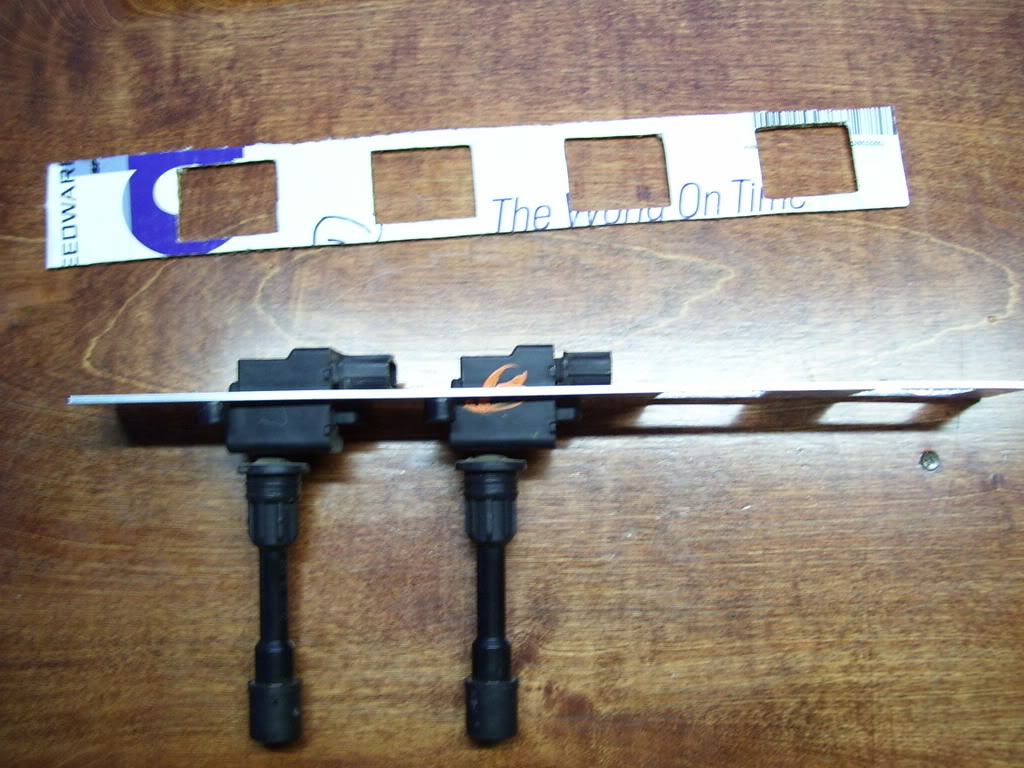
Side by side
Side by side
Joe, I thought about that. I dismissed that idea because those 8 threaded holes could leak oil. However, it's looking like dealing with a potential oil leak will be much much easier than making standoffs. Lowes has no square stock.
I don't understand exactly what you were saying though. Are you saying put studs and have them thread in and use a jam nut to keep them from coming out?
Hell, I could do this several ways.
- Drill a hole, tap it, screw in a stud, jam nut it, drop COP on, use nuts to fasten it.
- Drill a hole, tap it, drop the COP on and screw in a bolt to fasten it.
- Drill a hole, flip the valve cover over and install a bolt so that the threaded part of the bolt sticks up. Then use a washer/jam nut to keep the bolt in place, drop COP on, install nuts to fasten it.
- Drill a hole, tap it, screw in a bolt from the bottom side so that the threaded part of the bolt sticks up, Then screw on a washer/jam nut to keep the bolt in place, drop COP on, install nuts to fasten it.
Millenia COP
Millenia COP depth
Miata plug
Miata plug depth
Side by side
Side by side
Reply
0
0
09-06-2008, 03:44 PM
#15
Elite Member
Thread Starter
iTrader: (16)
Join Date: Aug 2007
Location: Houston, TX
Posts: 9,300
Total Cats: 477
Yeah, it's pretty bad. Need to clean it up. It's only 2 years old. It's had a rough life.
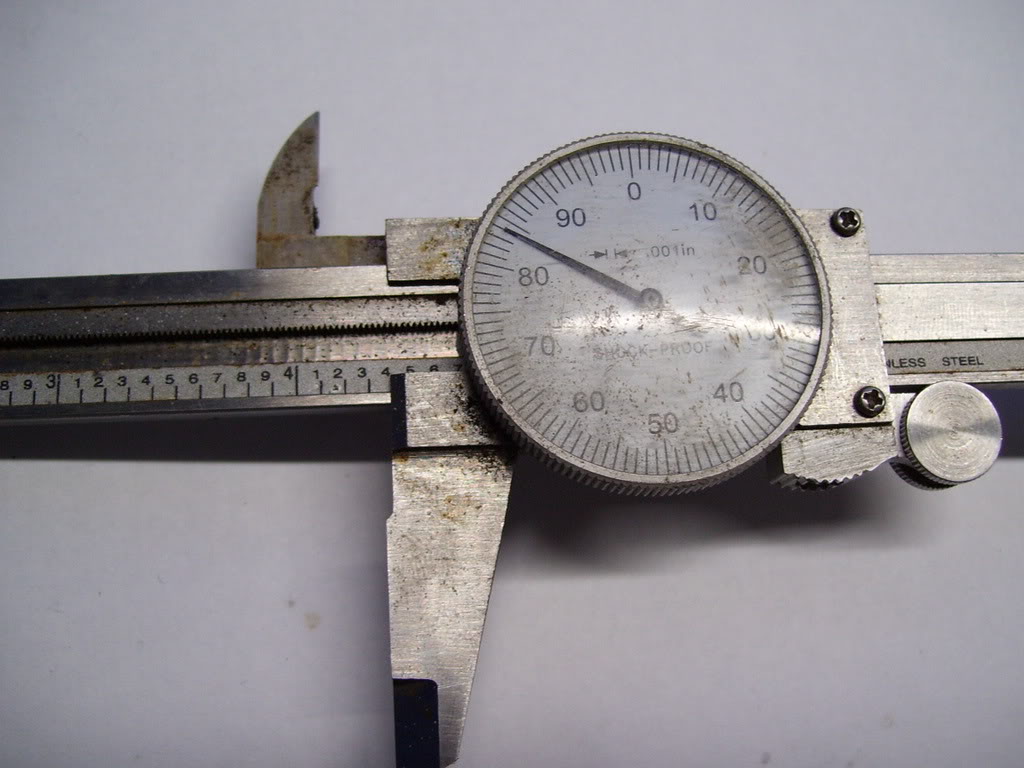
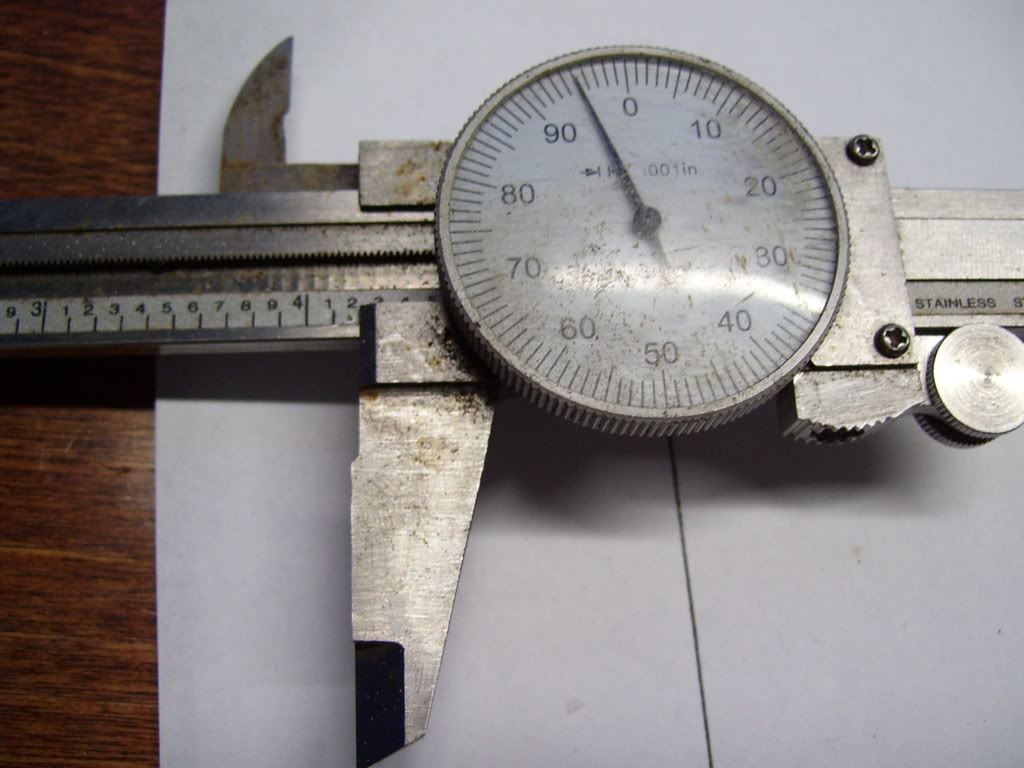
The holes in the COPs for the bolts to pass through measure .253" So a 1/4 x 20 stud would work.
The holes in the COPs for the bolts to pass through measure .253" So a 1/4 x 20 stud would work.
Reply
0
0
09-06-2008, 03:58 PM
#16
Elite Member
iTrader: (21)

Join Date: Jun 2007
Location: Rochester, NY
Posts: 6,598
Total Cats: 1,263
I used a 3/8" drill bit and a jig saw to cut those squares out. Had the work clamped to my desk they are sitting on. Poor desk. I'm definitely gonna make one from 3" eventually. Needs to be bigger I think. Anyone know where to pick up 3" wide aluminum barstock? I know I could buy it on ebay, but hate to.
If aluminum isn't available, would you like stainless? I'm pretty sure there's some .06 or .08 thick ss pieces. A bit harder to work with, but it'll polish up real pretty.
Reply
0
0
09-06-2008, 04:03 PM
#17
Elite Member
Thread Starter
iTrader: (16)
Join Date: Aug 2007
Location: Houston, TX
Posts: 9,300
Total Cats: 477
1/8" x3" x16" would work. SS would work, but definitely harder to work with. Oh, I hate cutting SS. I'm gonna try bolting them I do believe, but if that doesn't work I may need some 3" stock. Thanks!
Reply
0
0
09-07-2008, 12:58 PM
#19
Elite Member
Thread Starter
iTrader: (16)
Join Date: Aug 2007
Location: Houston, TX
Posts: 9,300
Total Cats: 477
"Heeeyyy Joe. I heard you shot your old lady down. Shot her down-to-the-ground."
Hey Joe, you think the stud idea will work? Wanna elaborate on what you said earlier?
Hey Joe, you think the stud idea will work? Wanna elaborate on what you said earlier?
Reply
0
0
09-07-2008, 01:50 PM
#20
Boost Pope
iTrader: (8)
Join Date: Sep 2005
Location: Chicago. (The less-murder part.)
Posts: 33,050
Total Cats: 6,608
I was trying to find a picture that showed that part of it... I can't find any "in-process" pics from my install. But I didn't drill the VC itself.
What I did was to take a piece of aluminum flat stock, about 1.25" wide x 3/16" thick. I got it from Lowes. I drilled out large circular holes for each plug, and then three smaller holes to match the three long bolts that hold the VC onto the head in the center galley.
Ok, now I drilled one small hole beside each plug hole, and then countersunk it from the bottom. Upwards through each hole I ran a 1/4-20 bolt, with a countrsunk socket head. Back on top, two low-profile 1/4-20 nuts hold it in place. Now, the coil slides down over the bolt, and one nut on top locks it in place.
I'll try to draw a picture when I'm back at the big computer. Can't draw for **** on this laptop. This is what it looks like from the top:

Take a look here: https://www.miataturbo.net/forum/sho...&postcount=153 It's basically identical to mine, except I didn't have the capacity to press-fit the stud, hence the bolt and countersink.
What I did was to take a piece of aluminum flat stock, about 1.25" wide x 3/16" thick. I got it from Lowes. I drilled out large circular holes for each plug, and then three smaller holes to match the three long bolts that hold the VC onto the head in the center galley.
Ok, now I drilled one small hole beside each plug hole, and then countersunk it from the bottom. Upwards through each hole I ran a 1/4-20 bolt, with a countrsunk socket head. Back on top, two low-profile 1/4-20 nuts hold it in place. Now, the coil slides down over the bolt, and one nut on top locks it in place.
I'll try to draw a picture when I'm back at the big computer. Can't draw for **** on this laptop. This is what it looks like from the top:
Take a look here: https://www.miataturbo.net/forum/sho...&postcount=153 It's basically identical to mine, except I didn't have the capacity to press-fit the stud, hence the bolt and countersink.
Reply
0
0


