Rover with a turbo, or: How to build a reliable turbo track car. SPM S1, NASA ST3/4
 02-02-2017, 10:50 AM
#21
Supporting Vendor

Join Date: Sep 2012
Posts: 635
Total Cats: 322
Well done guys, I know a ton of hard work has gone into this! I'm sure this class will be very popular.
__________________
KPower Industries
Home of the original KMiata Swap

K24 NC swap is coming in 2024! Learn more
info@kpower.industries
Follow us on Facebook and Instagram
KPower Industries
Home of the original KMiata Swap
K24 NC swap is coming in 2024! Learn more
info@kpower.industries
Follow us on Facebook and Instagram

Reply
 0
0

0
02-02-2017, 12:04 PM
#22
Sonny and I joked that the awesome fireballs that Rover spits out might be written into the rules. "XX% injector D/C with TPS below 5%".
__________________

Reply
3
3

 02-03-2017, 10:14 AM
#25
Supporting Vendor
Join Date: Sep 2012
Posts: 635
Total Cats: 322
To be fair, the entire worldwide Miata community played a contributing role. Andrew, myself a few other locals were busy developing parts but a lot of that design work was based on data points shared here on this forum.
Sonny and I joked that the awesome fireballs that Rover spits out might be written into the rules. "XX% injector D/C with TPS below 5%".
Sonny and I joked that the awesome fireballs that Rover spits out might be written into the rules. "XX% injector D/C with TPS below 5%".
__________________
KPower Industries
Home of the original KMiata Swap
K24 NC swap is coming in 2024! Learn more
info@kpower.industries
Follow us on Facebook and Instagram
KPower Industries
Home of the original KMiata Swap
K24 NC swap is coming in 2024! Learn more
info@kpower.industries
Follow us on Facebook and Instagram
Reply
0
0

 02-05-2017, 05:52 PM
#27
Junior Member

Join Date: Dec 2016
Location: Columbus, OH
Posts: 189
Total Cats: 48
Boy oh boy that looks bloody quick. This S1 class could really pave the way for a stardardized, reliable, track turbo setup (cooling, engine management, engine internals). Also interested to see what the wear rate is on AZ6's, front wheel bearings, brake pads, etc.
I want to step up from DE to TT "soon" and am smacking my lips at TT4. I'm confident this EFR turbo BP setup would handedly beat a n/a Ecotec miata in TT4 with around 210whp average. I drive my car to the track and pull a tire trailer, so my overriding priority is reliability. I know that quite a few guys track their turbo miatas on here, but I've seen quite a lot at NASA events that are not reliable, so I'm still a bit wary. I don't want to be stuck 8 hours from home at Road Atlanta because something broke and I can't find a replacement. The stock BP4W engine has been dead nuts reliable, so I don't want to lose that quality. If only Kmiata was TT4 legal...
I want to step up from DE to TT "soon" and am smacking my lips at TT4. I'm confident this EFR turbo BP setup would handedly beat a n/a Ecotec miata in TT4 with around 210whp average. I drive my car to the track and pull a tire trailer, so my overriding priority is reliability. I know that quite a few guys track their turbo miatas on here, but I've seen quite a lot at NASA events that are not reliable, so I'm still a bit wary. I don't want to be stuck 8 hours from home at Road Atlanta because something broke and I can't find a replacement. The stock BP4W engine has been dead nuts reliable, so I don't want to lose that quality. If only Kmiata was TT4 legal...
Last edited by engineered2win; 02-05-2017 at 10:09 PM.
Reply
0
0
02-05-2017, 08:59 PM
#28

Need some front aero, just do S1 front aero NOW !
The spool of the turbo remind me my old AVO manifold and 2560 combo, no lag full boost below 3k RPM.
The CAD to USD is shitty, thank god .... (I need to save for a TSE turbo kit..)
Reply
0
0
02-06-2017, 12:24 AM
#30
Former Vendor

Thread Starter
iTrader: (31)

Join Date: Nov 2006
Location: Sunnyvale, CA
Posts: 15,442
Total Cats: 2,100
I know that quite a few guys track their turbo miatas on here, but I've seen quite a lot at NASA events that are not reliable, so I'm still a bit wary. I don't want to be stuck 8 hours from home at Road Atlanta because something broke and I can't find a replacement. The stock BP4W engine has been dead nuts reliable, so I don't want to lose that quality. If only Kmiata was TT4 legal...
Reply
2
2
 03-15-2017, 11:25 PM
#32
Former Vendor
Thread Starter
iTrader: (31)
Join Date: Nov 2006
Location: Sunnyvale, CA
Posts: 15,442
Total Cats: 2,100
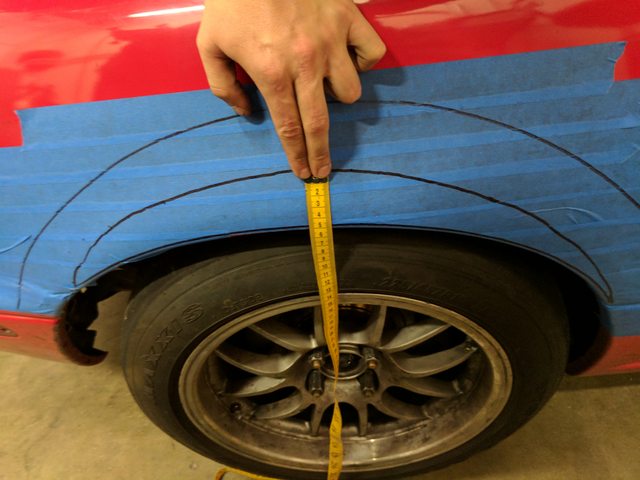
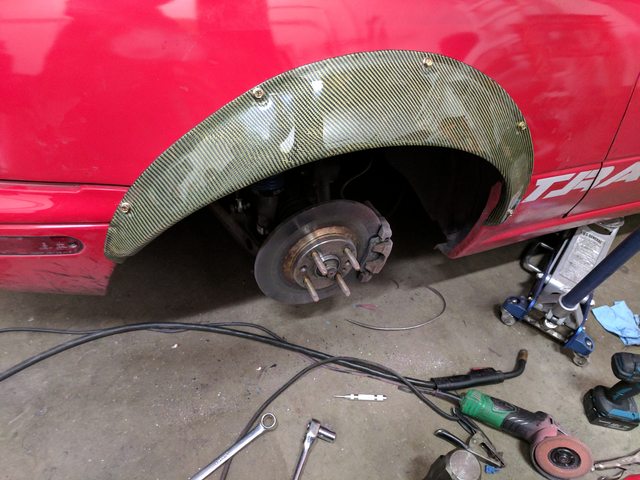
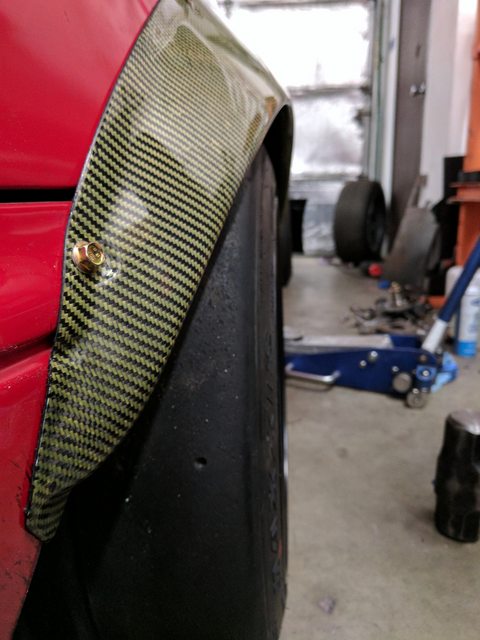
After much hand-wringing and research, I tackled the flares yesterday and today. There's no good writeup online so hopefully this can guide some folks looking to run big rubber on their NA.
These are Carbonmiata Carbon/Kevlar flares, ~$600 shipped to the US. Fitment was pretty good, all things considered, The fender line is not correct in the front (as Emilio mentioned in his K20 build thread), but dropping the rear of the flare by ~1" fixes that. I didn't even snap photos of the front, since it's a pretty simple process. Drill the flare first, hold it in place, centerpunch five holes, drill for rivnuts, install flare, mark upper edge, remove, and trim fender for clearance.
The rears, however, were comparatively far harder. The fronts took me 30min. The first rear quarter took me almost 5hrs because I cut too much off the quarter. The second one was ~2.5hrs, and that's the one I photographed.
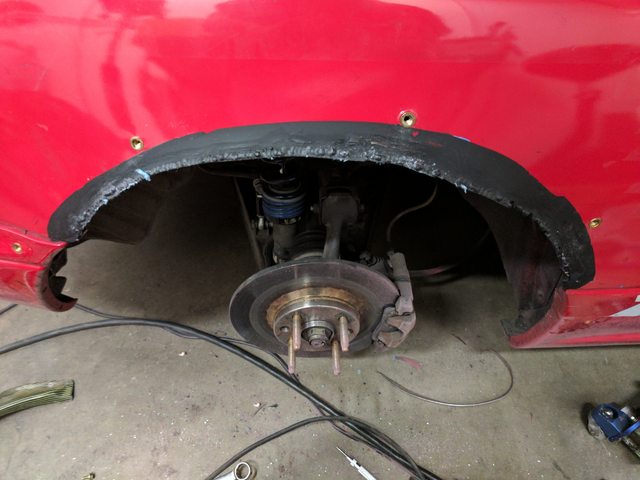
I started by taping off the entire quarter. I opted to cut the quarter first, do all the welding, then install the flare last, since the quarter is going to move and shift slightly during this process. The top line is the outer edge of the flare, so don't cut above that. The middle line is my first cut point. On the left side, I cut too far up, and ended up having to trim a section of the discarded quarterpanel to weld back in. Don't do that. It's hard and time consuming. Measure 50mm up from the fender lip and don't cut anything above that. This will give you a quarterpanel which is just as tall as the stock inner fender is, so you'll have maximum tire clearance.
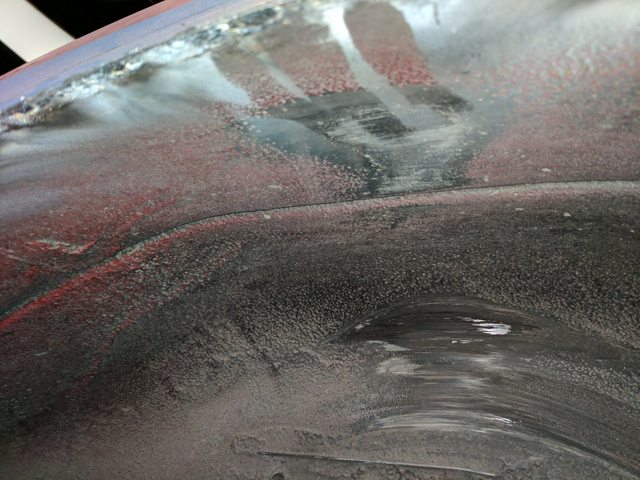
Cut along the middle line. Since the inner fender is RIGHT behind this, you do not want to use anything except a death wheel, and you want to go very slow and make sure you're only cutting through the outer quarterpanel. I cut a little too deep at the front edge of the car which sucked to fix later. You also want to cut through both the inner and outer skins just above the fender lip. This separates the outer skin from the inner skin. Once that cut is done, you can also nip the fender lip off, since it will just be attached at the two corners.
You'll be left with the inner skin not quite pressed up against the outer skin.
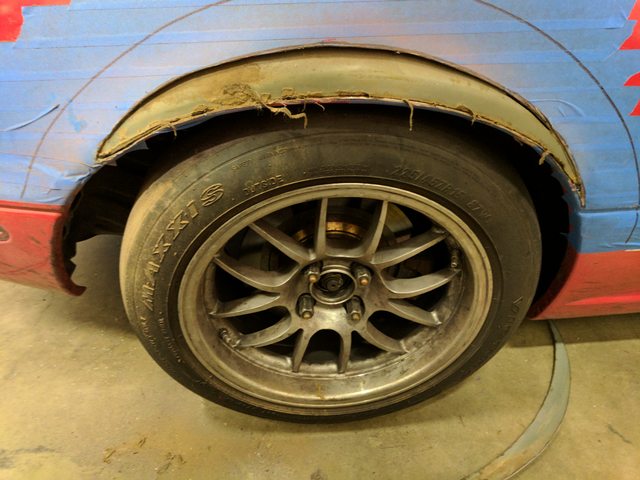
If you cut too far, you'll end up with a big gap between the two. There's no way to make this gap up without adding metal back in (trust me, I tried).
Time to weld. Hammer the inner skin up to meet the outer skin. I started by cutting most of the inner skin off with a Sawzall, leaving ~1/2" to weld to. Grind all the paint and zinc back to bare metal, then tap the skin up, clamp, weld, repeat ~25 times all the way around. Once it's tacked in place, I did the entire thing with tack welds, making sweeps from the rear to the front.
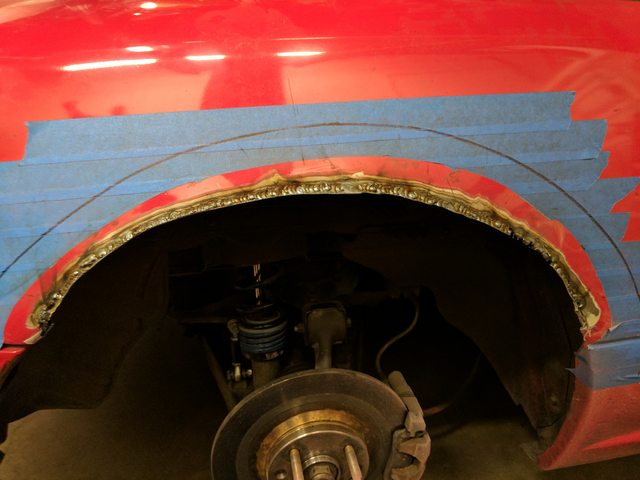
Going 50mm up leaves the inner skin nice and close to the outer, but still gives you as much tire clearance as possible. You can see the polish marks from the tire on the top of the fender. The weld is at the same height as the top of the fender here, although it's a little hard to see.
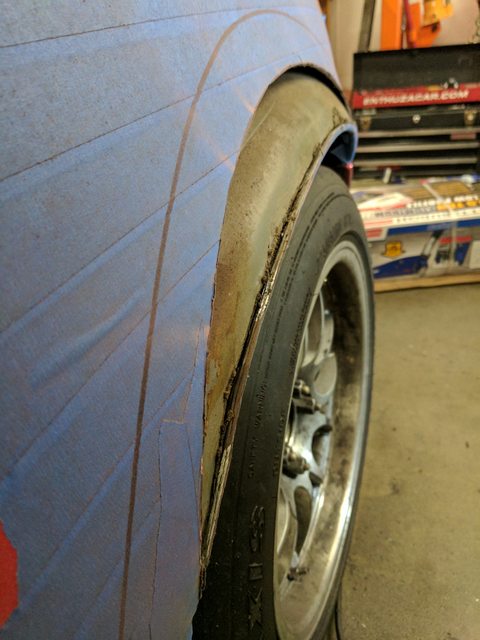
Grinders and paint make me the welder I ain't. (anyone else watch AvE?)
Finished product. A little too much flare for a 245 Maxxis, but I know the Hoosier is wider, and I may decide to trim back the lip of the flare and squeeze a 275 under these at some point.
These are Carbonmiata Carbon/Kevlar flares, ~$600 shipped to the US. Fitment was pretty good, all things considered, The fender line is not correct in the front (as Emilio mentioned in his K20 build thread), but dropping the rear of the flare by ~1" fixes that. I didn't even snap photos of the front, since it's a pretty simple process. Drill the flare first, hold it in place, centerpunch five holes, drill for rivnuts, install flare, mark upper edge, remove, and trim fender for clearance.
The rears, however, were comparatively far harder. The fronts took me 30min. The first rear quarter took me almost 5hrs because I cut too much off the quarter. The second one was ~2.5hrs, and that's the one I photographed.
I started by taping off the entire quarter. I opted to cut the quarter first, do all the welding, then install the flare last, since the quarter is going to move and shift slightly during this process. The top line is the outer edge of the flare, so don't cut above that.
The middle line is my first cut point. On the left side, I cut too far up, and ended up having to trim a section of the discarded quarterpanel to weld back in. Don't do that. It's hard and time consuming. Measure 50mm up from the fender lip and don't cut anything above that. This will give you a quarterpanel which is just as tall as the stock inner fender is, so you'll have maximum tire clearance.Cut along the middle line. Since the inner fender is RIGHT behind this, you do not want to use anything except a death wheel, and you want to go very slow and make sure you're only cutting through the outer quarterpanel. I cut a little too deep at the front edge of the car which sucked to fix later. You also want to cut through both the inner and outer skins just above the fender lip. This separates the outer skin from the inner skin. Once that cut is done, you can also nip the fender lip off, since it will just be attached at the two corners.
You'll be left with the inner skin not quite pressed up against the outer skin.
If you cut too far, you'll end up with a big gap between the two. There's no way to make this gap up without adding metal back in (trust me, I tried).
Time to weld. Hammer the inner skin up to meet the outer skin. I started by cutting most of the inner skin off with a Sawzall, leaving ~1/2" to weld to. Grind all the paint and zinc back to bare metal, then tap the skin up, clamp, weld, repeat ~25 times all the way around. Once it's tacked in place, I did the entire thing with tack welds, making sweeps from the rear to the front.
Going 50mm up leaves the inner skin nice and close to the outer, but still gives you as much tire clearance as possible. You can see the polish marks from the tire on the top of the fender. The weld is at the same height as the top of the fender here, although it's a little hard to see.
Grinders and paint make me the welder I ain't. (anyone else watch AvE?)
Finished product. A little too much flare for a 245 Maxxis, but I know the Hoosier is wider, and I may decide to trim back the lip of the flare and squeeze a 275 under these at some point.
Reply
8
8
03-16-2017, 04:18 AM
#34
Junior Member

Join Date: Jan 2017
Location: Victoria BC
Posts: 149
Total Cats: 3
Nicely done !
I can't fathom the thousands of guys looking for a how to on these.
Probably deserves its own thread for "searchability."
Great write up and pics!
If it took you 8 hours to do this.....I better book a week!
I can't fathom the thousands of guys looking for a how to on these.
Probably deserves its own thread for "searchability."
Great write up and pics!
If it took you 8 hours to do this.....I better book a week!
Reply
0
0
03-16-2017, 12:56 PM
#35
Elite Member
Join Date: Sep 2015
Location: Seattle, WA
Posts: 1,651
Total Cats: 884
I have carbonmiata's long style flares and I can confirm it's just a touch too much flare for a 245 maxxis. I cut my quarter panel a little too high as well, I didn't have to weld any extra material in there but I did have to do a bit pounding with a bfh to get the inner structure to be close enough to weld. Nice job though, they came out nice.
Reply
0
0

 03-16-2017, 01:20 PM
#39
Former Vendor
Thread Starter
iTrader: (31)
Join Date: Nov 2006
Location: Sunnyvale, CA
Posts: 15,442
Total Cats: 2,100
15x10 +25 6UL, 245/40 Maxxis RC-1, stock NA rear uprights, 2.5deg camber. I am going to swap the flange hex bolts for some button cap screws, but the flange hex bolts are what I keep around for assembly stuff.
Reply
1
1


