
'90 Build: Not Really Faster, Just Less Slow


Thread Starter
Junior Member
iTrader: (1)
Joined: Oct 2011
Posts: 412
Total Cats: 78
From: New Hampshire
I finally got everything back together today, with just enough daylight for a quick rip up and down the road before it got dark.
Still no Tecnas to install, so I had to put my old AGX setup back in. The underside of this car hasn't looked this clean in 20 years.
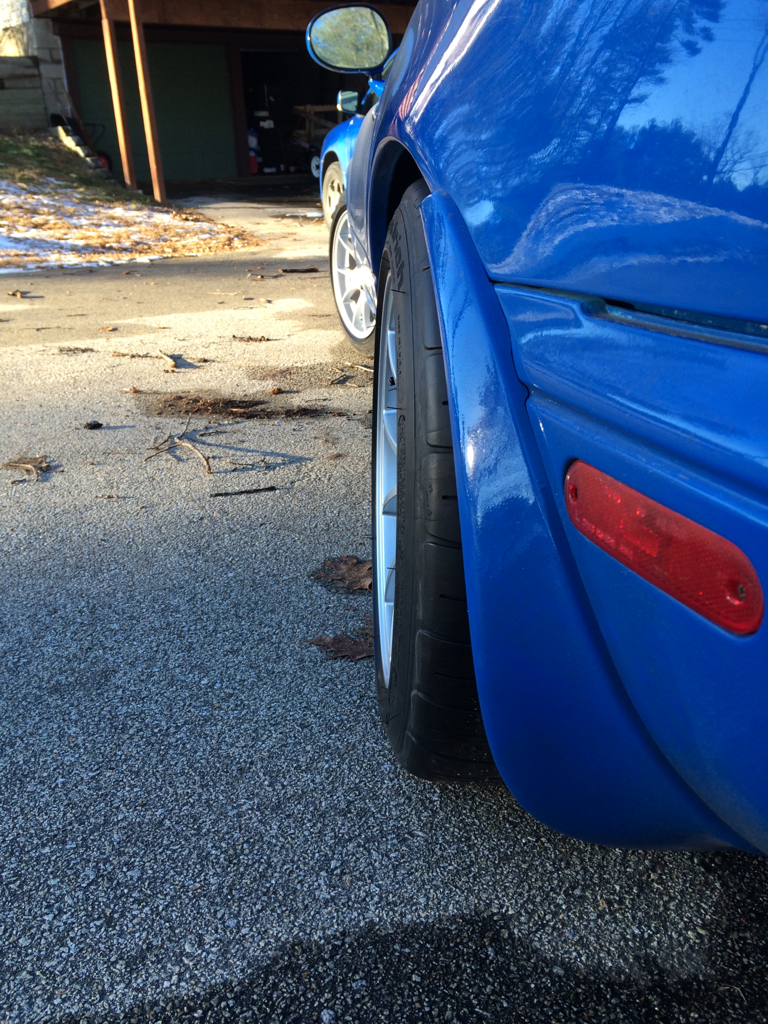
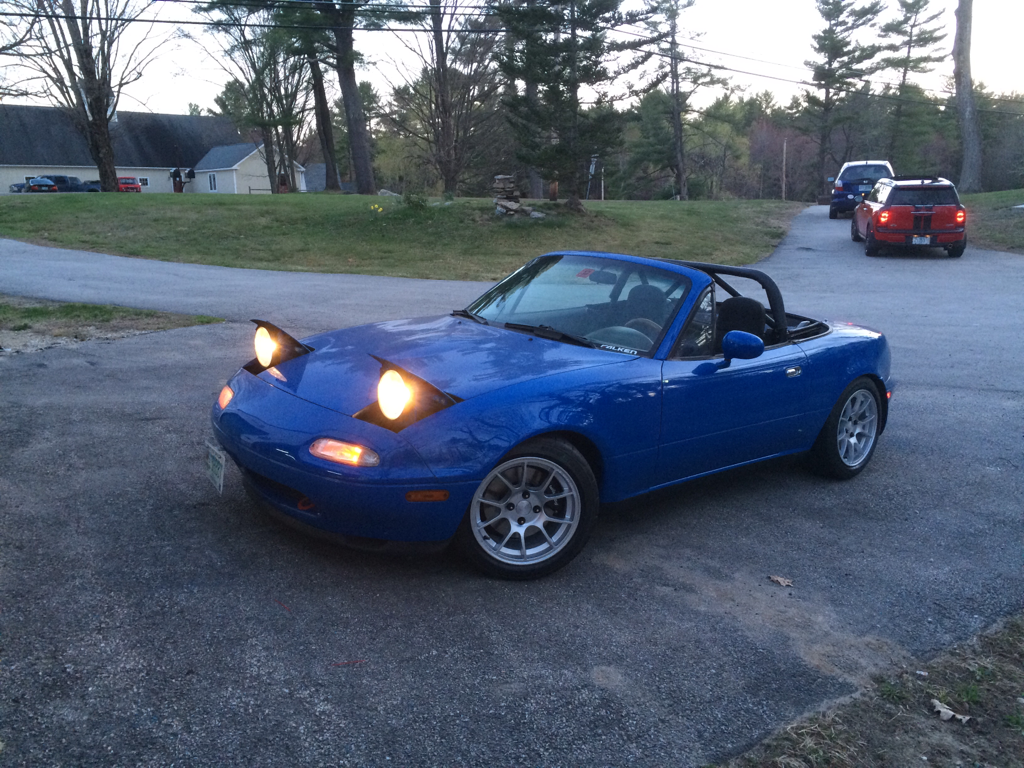
I threw my new Jongbloeds on for the first time, just temporarily to see what they would look like. I'm pretty pleased and I don't feel like I missed out on anything by not going with 6ULs. These should fit my needs just fine.
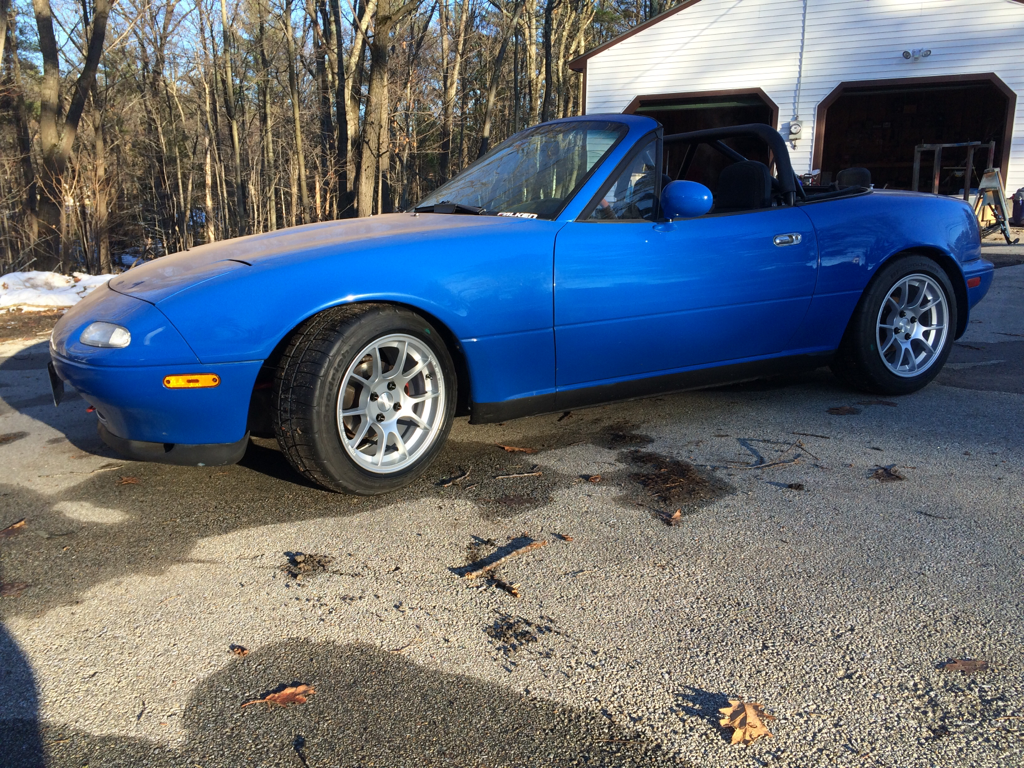
A little beefier than my old 195s on 14x6.
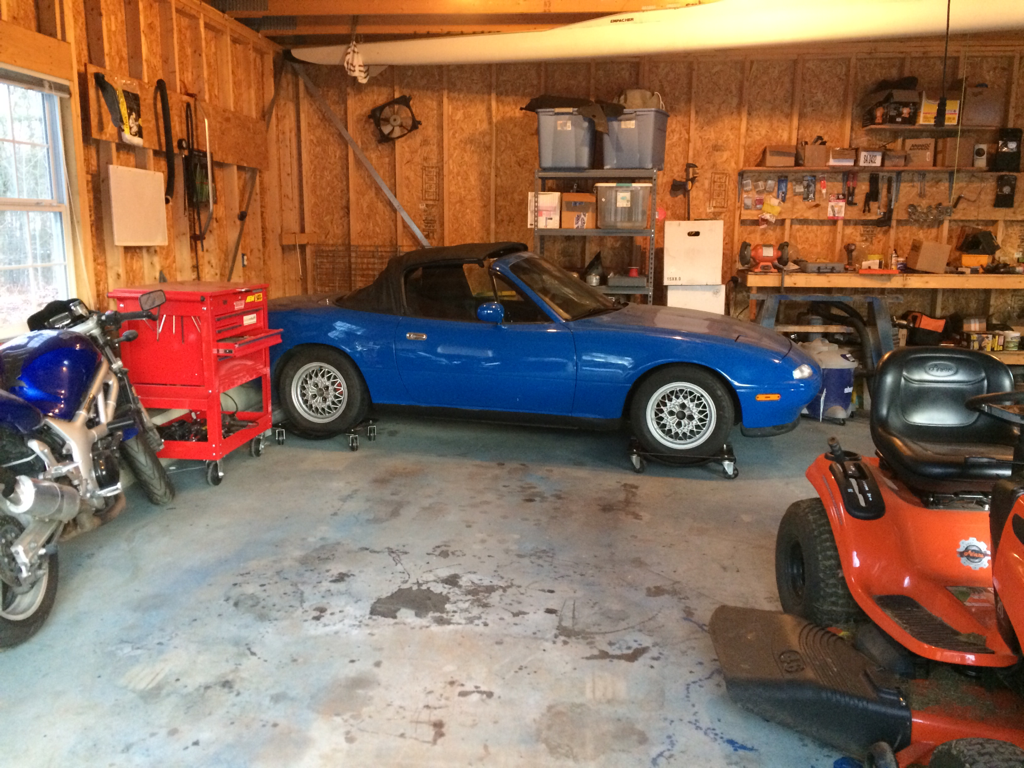
Old wheels back on and car up on dollies for the long winter's nap. With this arrangement I can barely fit my Miata, my Forester, my wife's Honda Fit, the SV650, and the lawnmower plus all my tools in my two car garage. If I were just storing Miatas, I think I could fit six of them in here.
There probably won't be any more updates until spring, though I may work on my COPs harness over the winter.
In other news, I got selected in a lottery to do a long footrace in southwestern Colorado. I'll probably end up selling my bike to pay for the two week trip.
Still no Tecnas to install, so I had to put my old AGX setup back in.
The underside of this car hasn't looked this clean in 20 years.I threw my new Jongbloeds on for the first time, just temporarily to see what they would look like. I'm pretty pleased and I don't feel like I missed out on anything by not going with 6ULs. These should fit my needs just fine.
A little beefier than my old 195s on 14x6.
Old wheels back on and car up on dollies for the long winter's nap. With this arrangement I can barely fit my Miata, my Forester, my wife's Honda Fit, the SV650, and the lawnmower plus all my tools in my two car garage. If I were just storing Miatas, I think I could fit six of them in here.
There probably won't be any more updates until spring, though I may work on my COPs harness over the winter.
In other news, I got selected in a lottery to do a long footrace in southwestern Colorado. I'll probably end up selling my bike to pay for the two week trip.
Reply
 1
1

1
Thread Starter
Junior Member
iTrader: (1)
Joined: Oct 2011
Posts: 412
Total Cats: 78
From: New Hampshire
I discovered something interesting in my weekly googling of "Supermiata Tecna":
Welp, it sounds like 949's Tecna project went **** up. Reading between the lines of the second hand information on M.net, I suspect the production shipment finally arrived in California and didn't pass muster, leaving them with no other option than to refund everyone's money. I've not personally received any contact or a refund on my card, but I'd expect that in another few days. Kudos to 949 for making the right call, but I think I've learned my lesson on pre-ordering with a deposit.
Now I have to figure out what to do for springs and dampers because my old FM/AGX combo is probably the biggest thing that currently hurts my enjoyment of the car. The FM Vmaxx is in a similar price range but I'll need to research it some more. I might be able to swing XIDA Club Sports, but those are listed as out of stock until February, so who knows when they'll really be available?
Originally Posted by [[url http://forum.miata.net/vb/showpost.php?p=7282300&postcount=238
[/url] *The Tecna project is being postponed due to supplier issues in getting serial production up and running to our standards. Being 12 weeks behind delivery schedule already, we have decided to refund each customer with a pre-order in our system. We apologize for any inconvenience the delays may have caused. Those of you with orders for Tecnas will receive a cancellation and refund notice this week.
Our thanks to all those patient enthusiasts that pre-ordered, and apologies to same for not being able to deliver the product we were willing to put our name on in a timely fashion.
As of today, there is no revised ETA for this project. We will continue development offline. New information will be made public only when the full production kits are tested and in stock.*
Now I have to figure out what to do for springs and dampers because my old FM/AGX combo is probably the biggest thing that currently hurts my enjoyment of the car. The FM Vmaxx is in a similar price range but I'll need to research it some more. I might be able to swing XIDA Club Sports, but those are listed as out of stock until February, so who knows when they'll really be available?
Last edited by adamiata; Jan 6, 2015 at 09:04 AM.
Reply
0
0
Thread Starter
Junior Member
iTrader: (1)
Joined: Oct 2011
Posts: 412
Total Cats: 78
From: New Hampshire
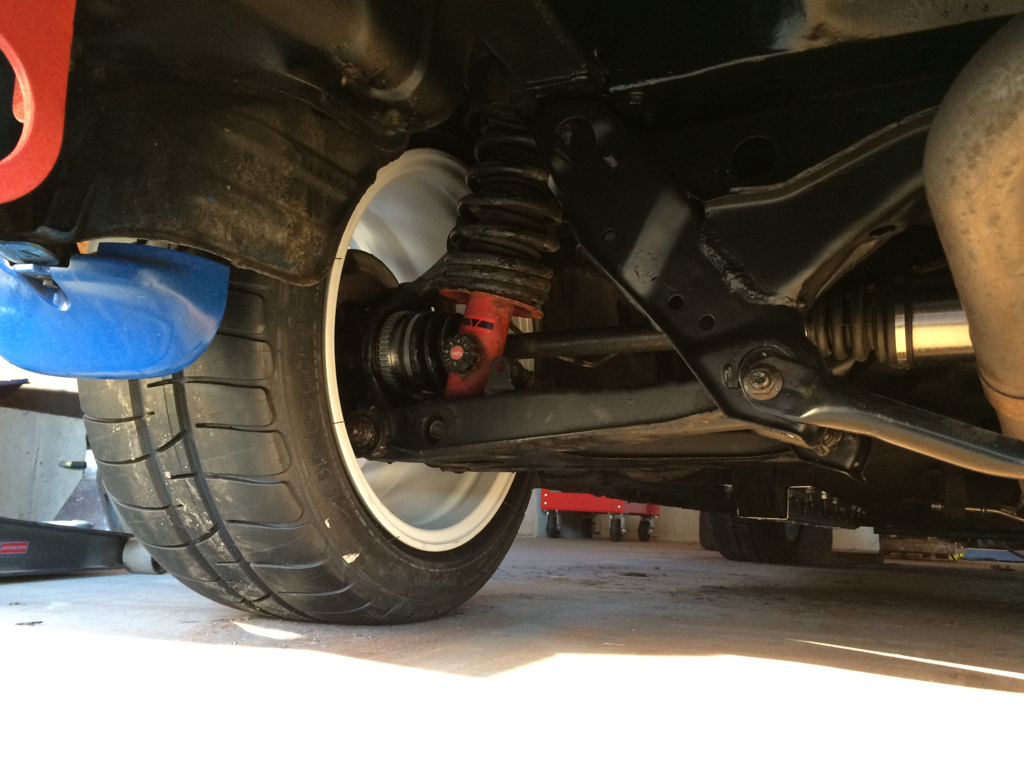
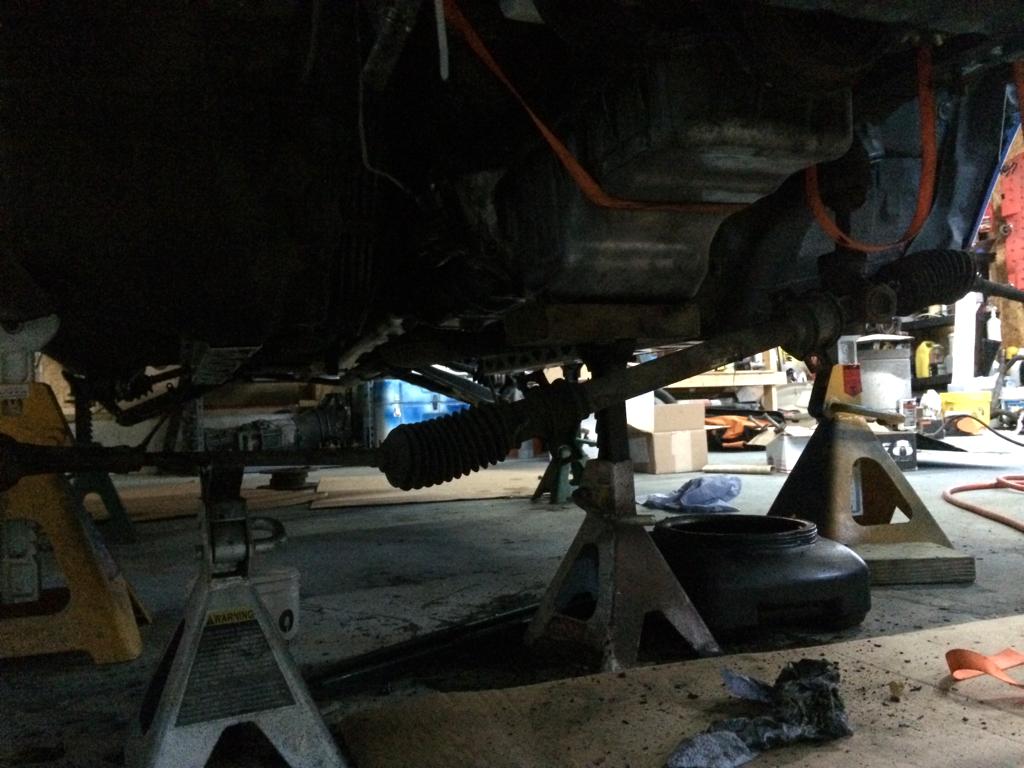
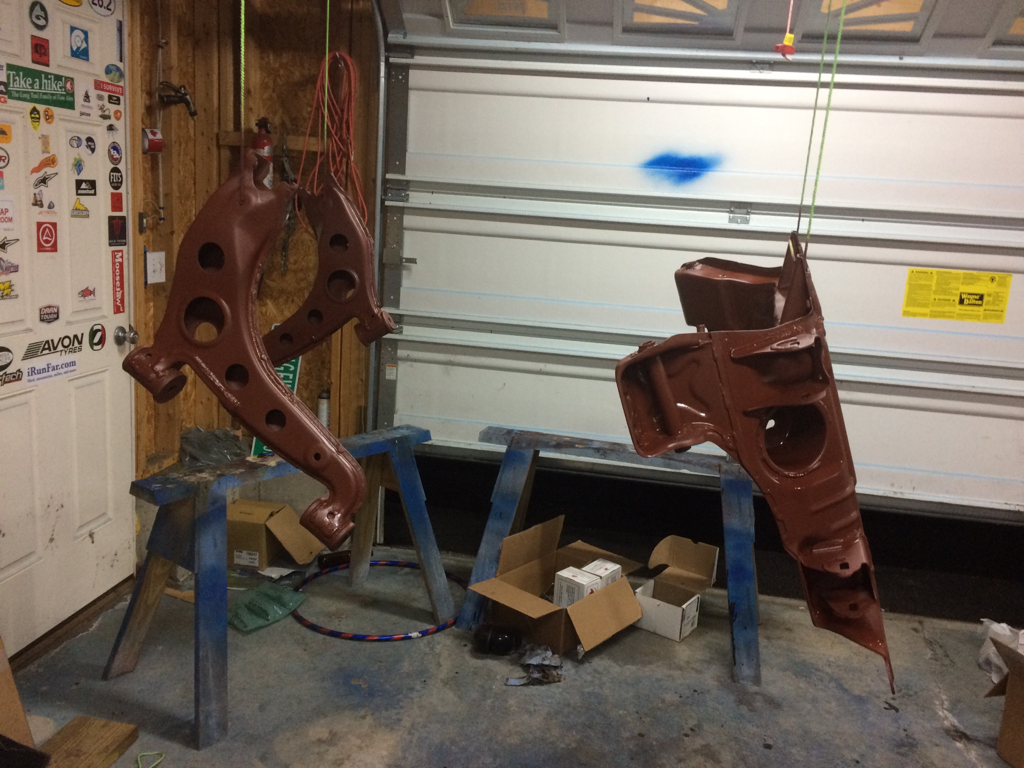
It was a tropical 44 degrees out when I got home from work today, so I started the next stage of my project. I supported the motor from both above and below, then dropped the front subframe and disassembled the suspension.
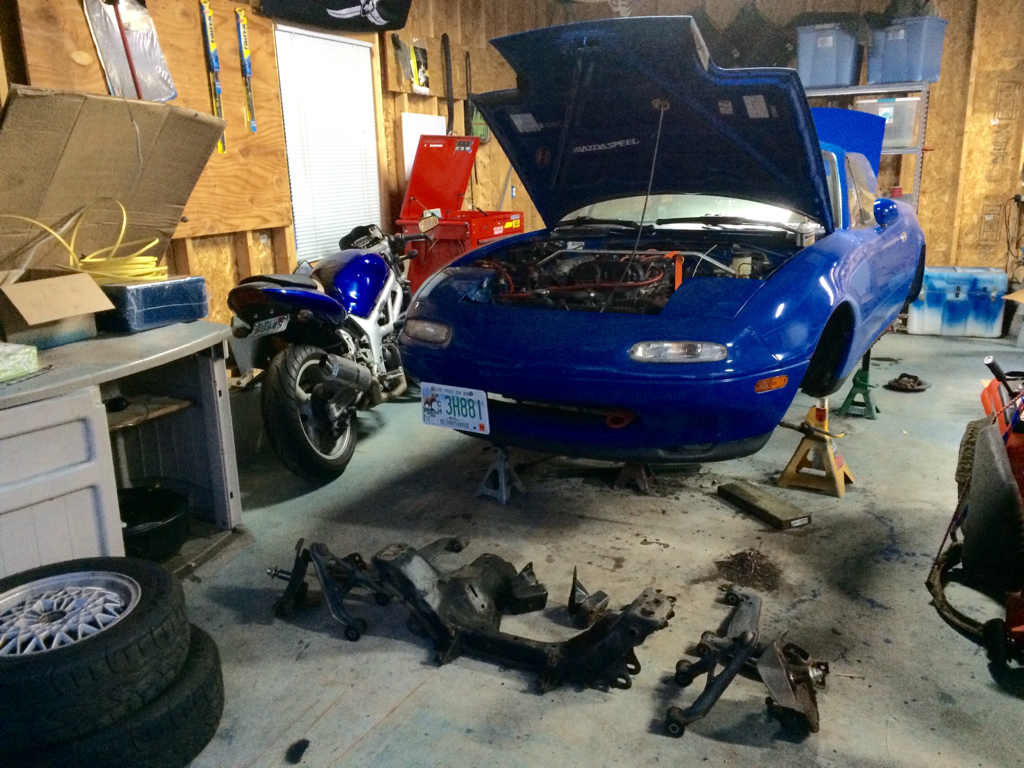
Next steps will be cleaning 25 years of oil smegma and surface rust off everything, then painting and reinstallation. Along the way there will also be new brakes, motor mounts, springs and shocks, as well as the new hubs I repacked over the winter.
Excited to be making progress again.
Next steps will be cleaning 25 years of oil smegma and surface rust off everything, then painting and reinstallation. Along the way there will also be new brakes, motor mounts, springs and shocks, as well as the new hubs I repacked over the winter.
Excited to be making progress again.
Reply
0
0
Thread Starter
Junior Member
iTrader: (1)
Joined: Oct 2011
Posts: 412
Total Cats: 78
From: New Hampshire
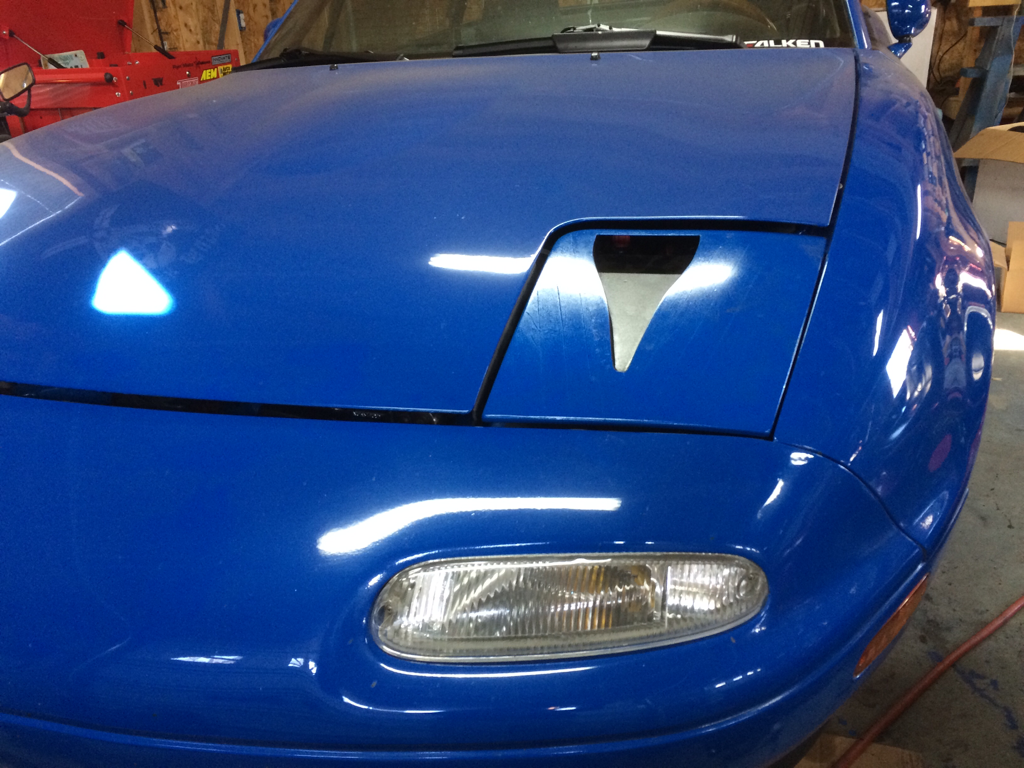
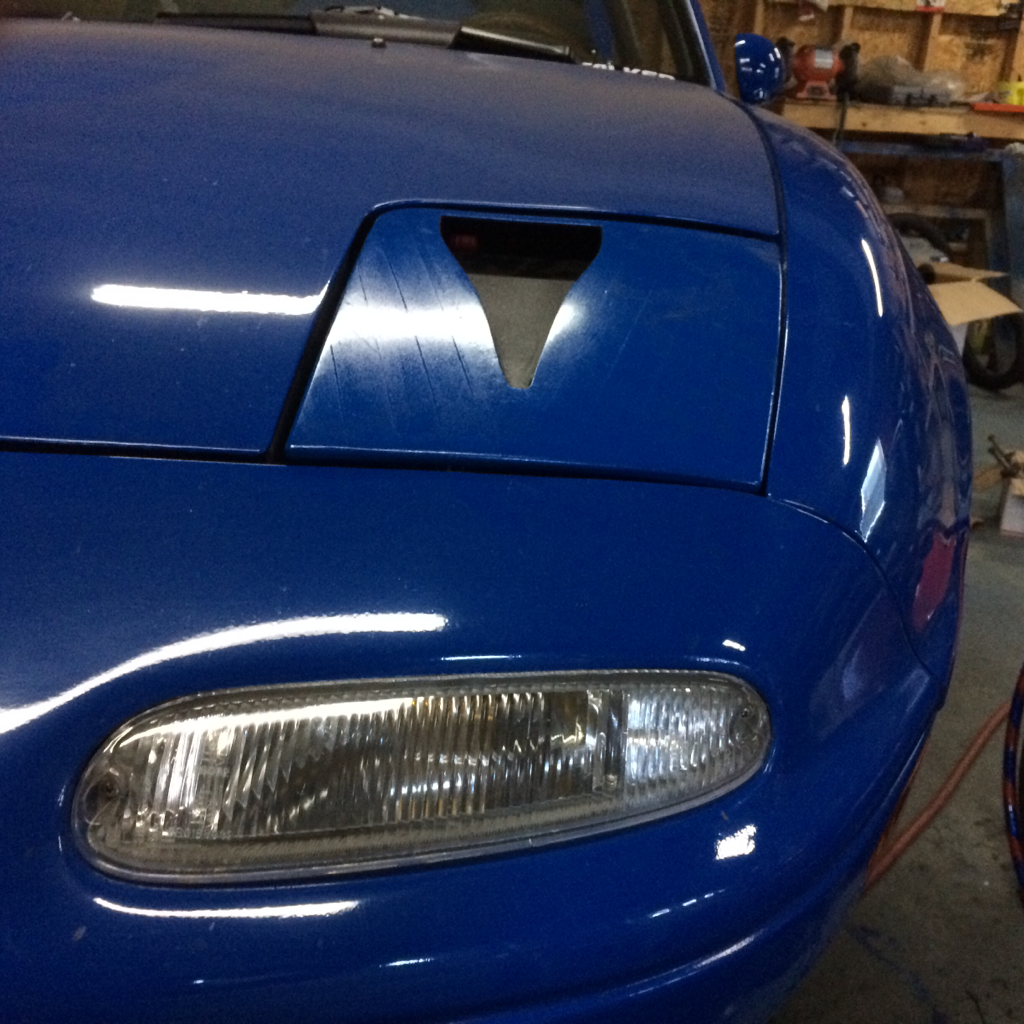
I'm not sure how I'm feeling about the NACA duct; starting to think it's too big and not at quite right angle. I made the rearmost edge parallel to the rear edge of the headlight lid, but now that it's on the car I feel like it should be pointed a little more toward the center. The paint also doesn't quite match. Not sue if I'm just spergin' out here.
I'm considering getting another lid and the smaller 2" duct to try again.
I'm considering getting another lid and the smaller 2" duct to try again.
Reply
0
0
Thread Starter
Junior Member
iTrader: (1)
Joined: Oct 2011
Posts: 412
Total Cats: 78
From: New Hampshire
It's getting warm out and most of the snow is gone locally, so I'm eager to get the car back on the road. I'm hoping for a shipping notice soon on the Xidas I ordered in January so I won't have to put my old setup back in.
Meanwhile, I stripped and primed my subframe and lower control arms. Upper ball joints were being a bitch, so the upper arms and uprights didn't get painted at the same time. Maybe later this week.
Meanwhile, I stripped and primed my subframe and lower control arms. Upper ball joints were being a bitch, so the upper arms and uprights didn't get painted at the same time. Maybe later this week.
Reply
0
0
Thread Starter
Junior Member
iTrader: (1)
Joined: Oct 2011
Posts: 412
Total Cats: 78
From: New Hampshire
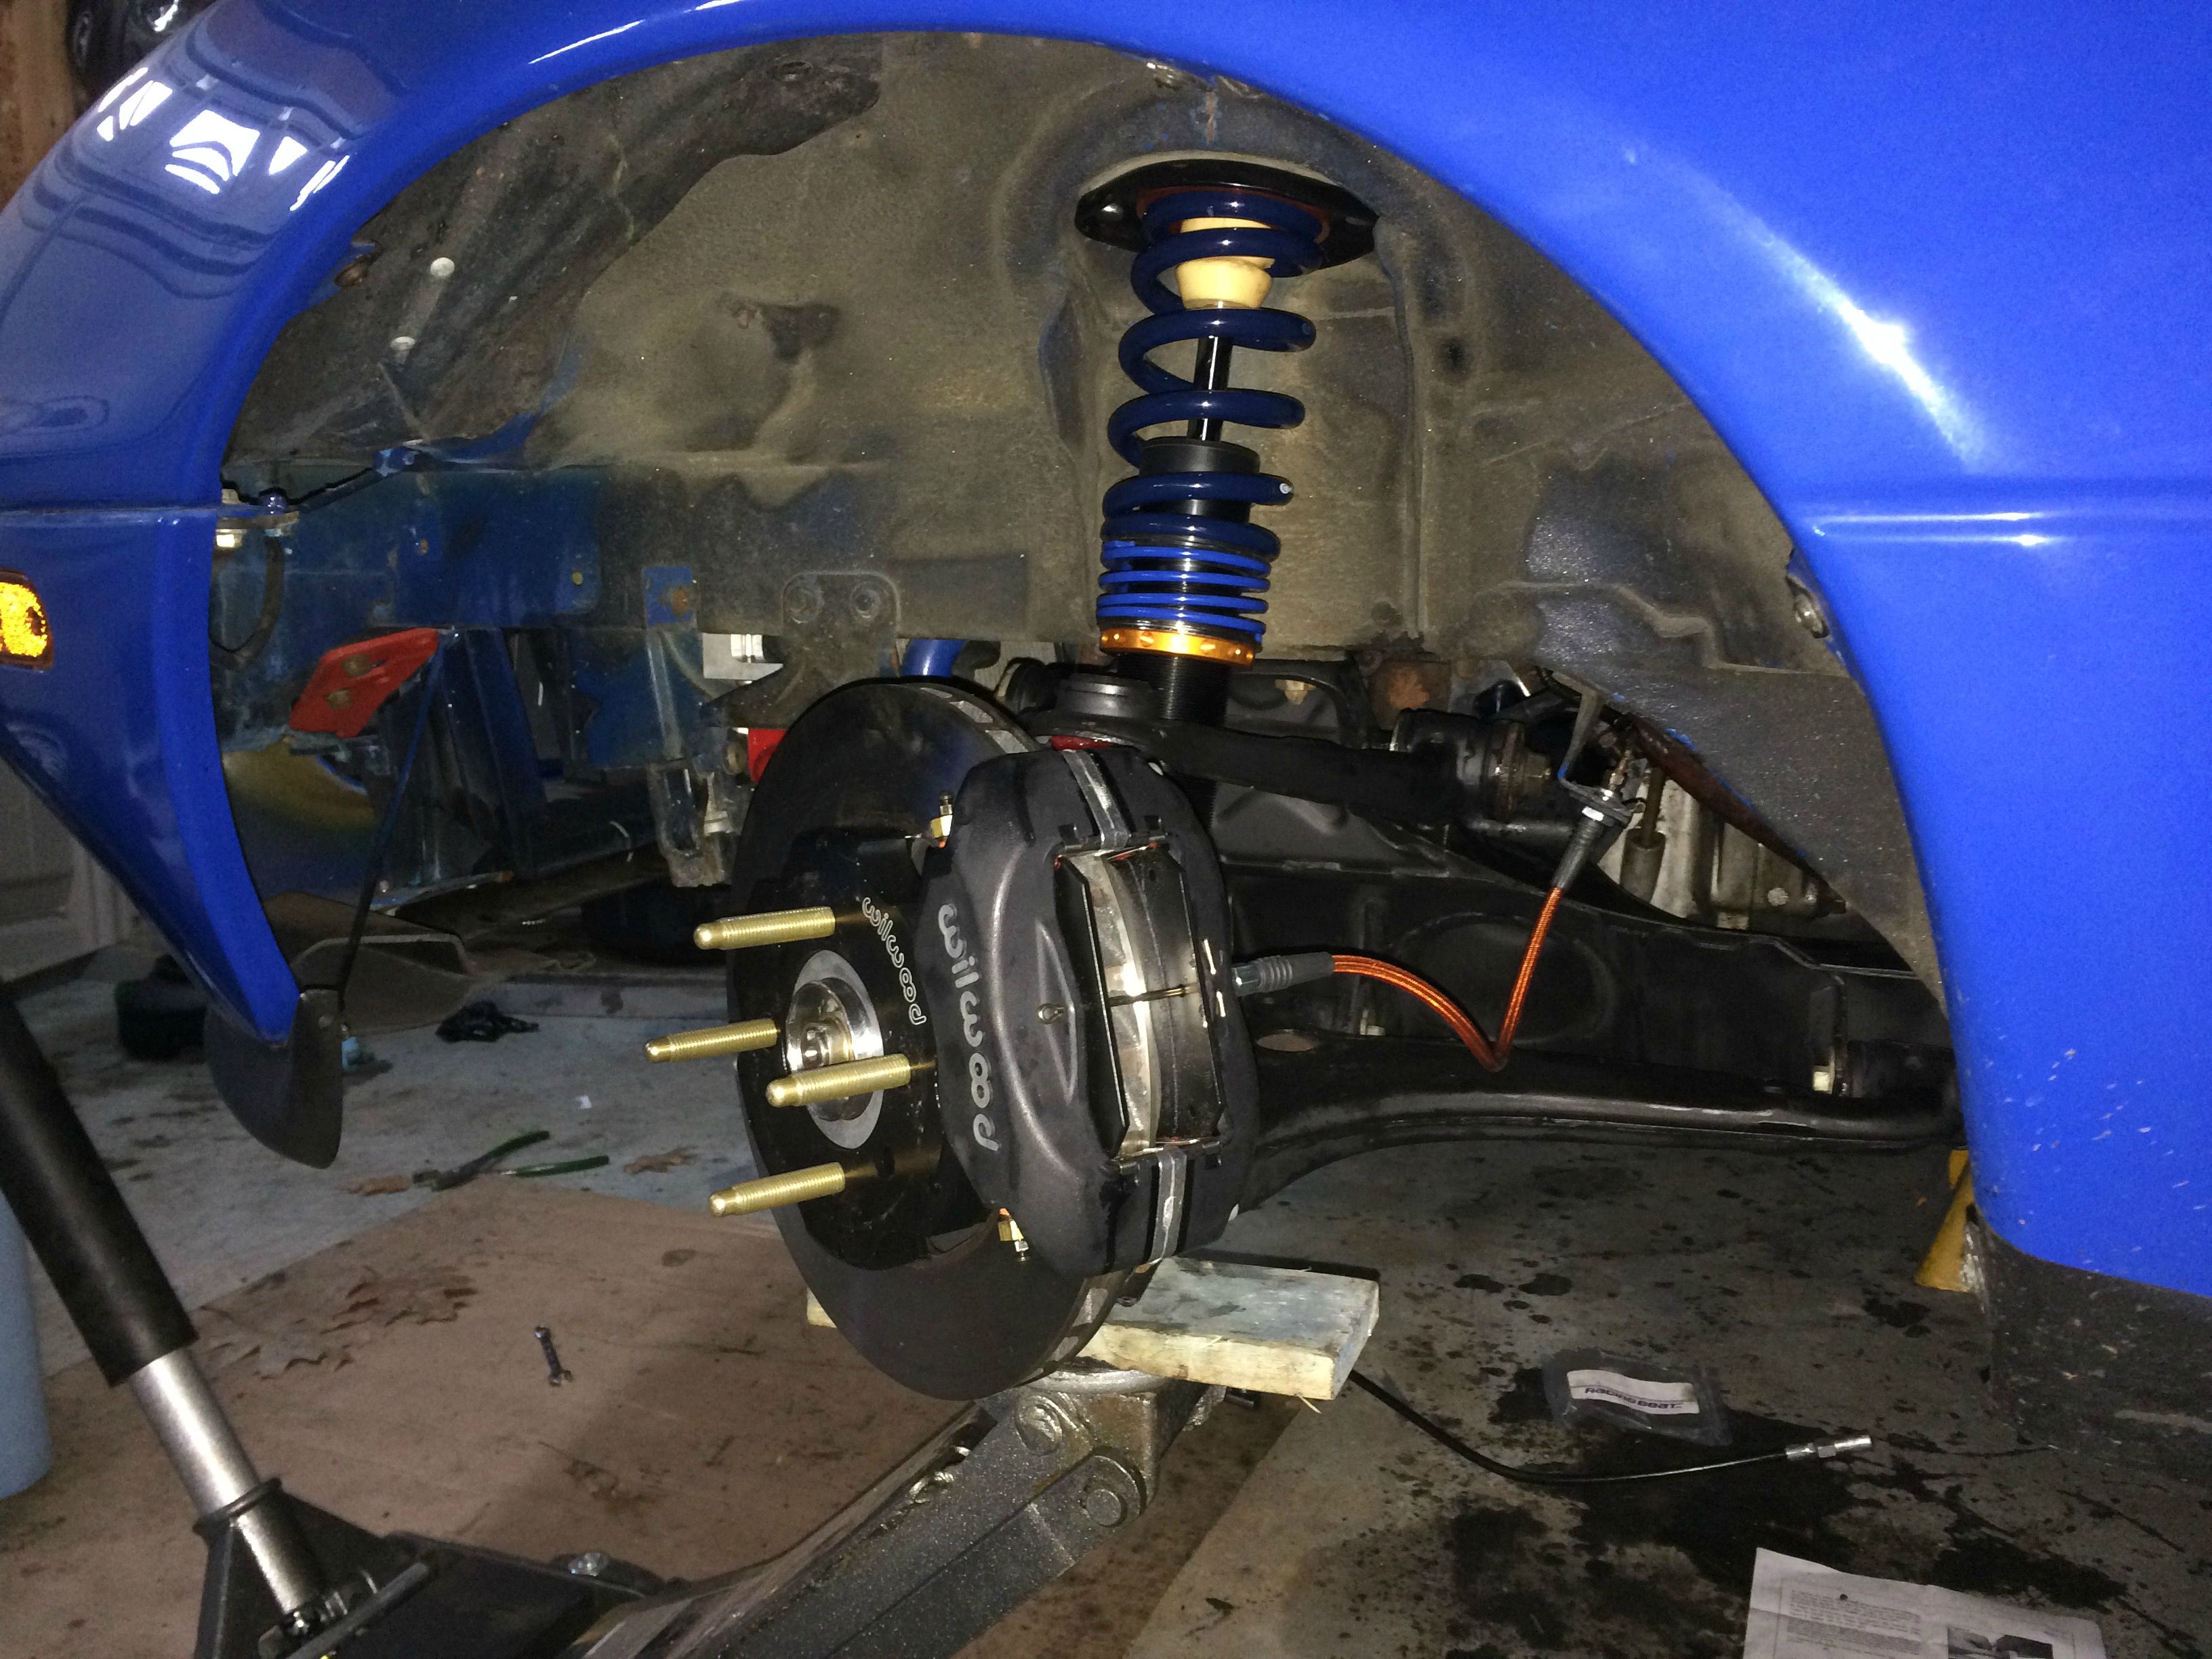
Lots of recent progress, not a lot of pics.
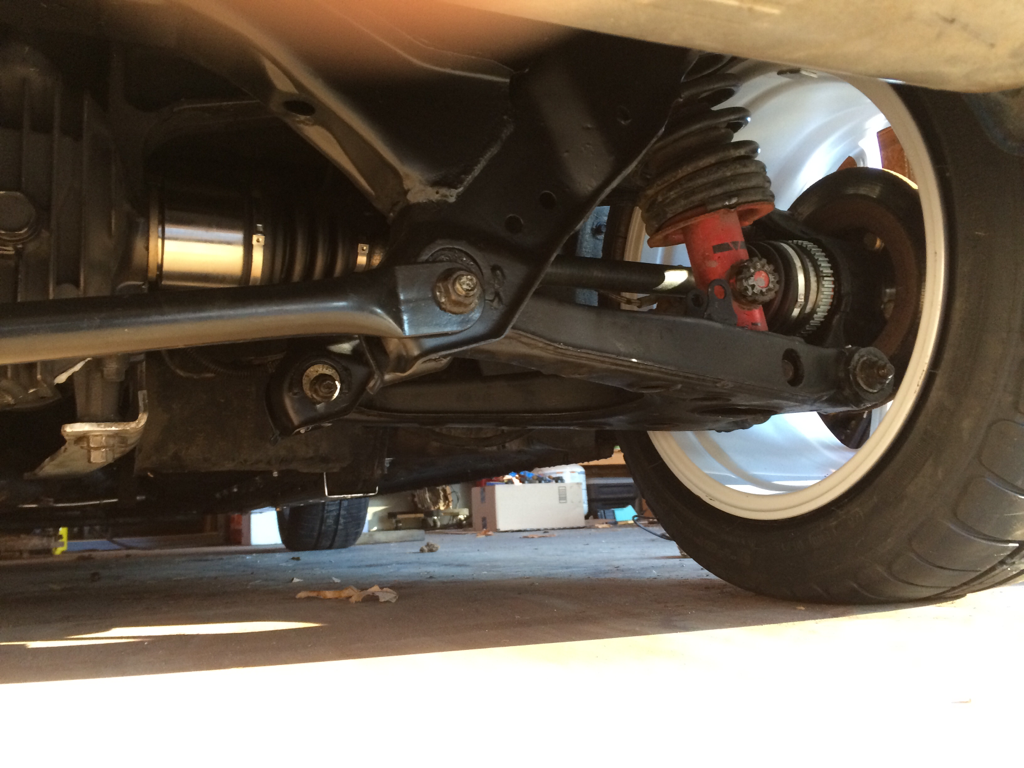
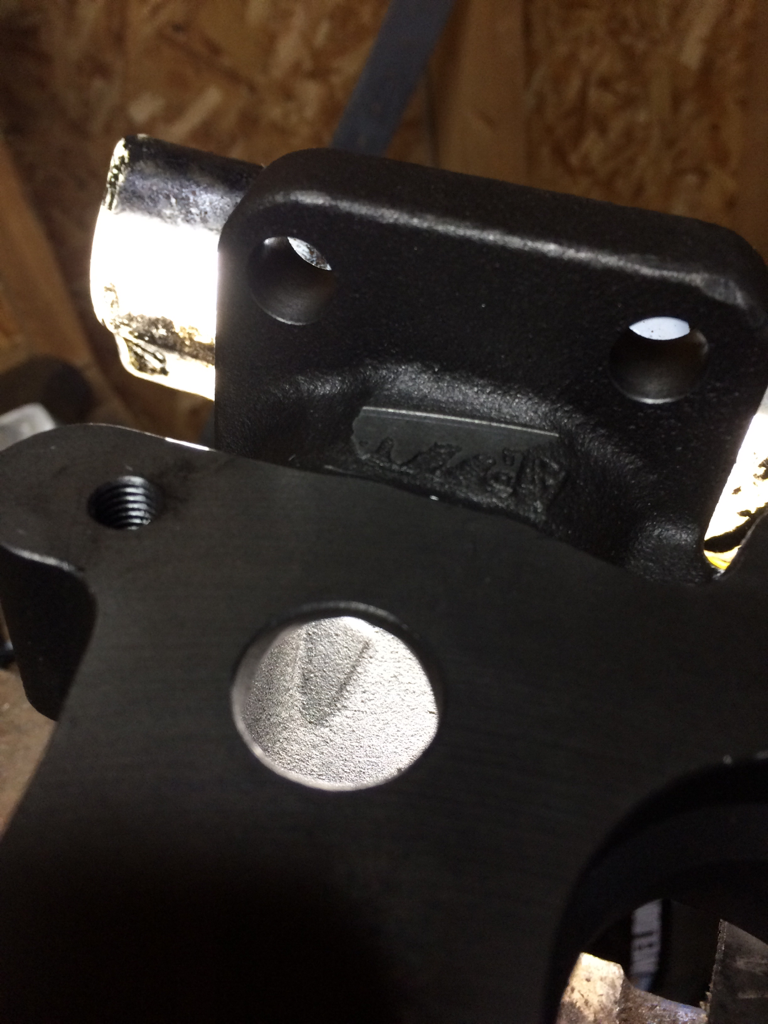
-Painted and re-installed front subframe, spindles, and control arms.
-Installed grease fittings for existing front PU bushings
-Installed new lower ball joints, new upper ball joint boots, and new '93LE tie rods
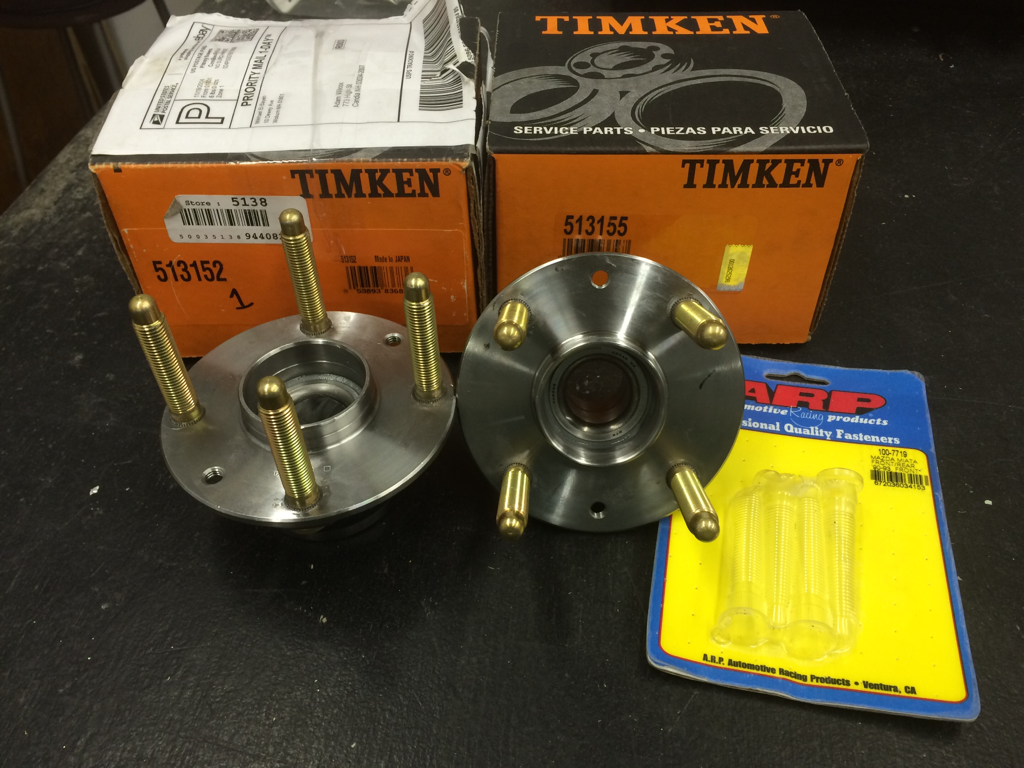
-Installed the Timken hubs that I re-packed over the winter
-Installed 11" Wilwood fron BBK, Xida 700/400 club sports, Racing Beat solid front bar, and 1.8 sized rear brakes.
Things remaining to do before I can try all this stuff out:
-Fix leak at brake proportioning valve. I must have over tightened and stripped one of the adapter fittings.
-Bleed brakes
-Set ride height
-Torque suspension fasteners
-Adjust and install existing RB sway bar end links
-Ghetto alignment with iPhone and tape measure
-Drive car to settle ride and bed pads
-Check and adjust ride height as needed
-Get real alignment and corner weight
-Lots of other miscellaneous junk
Then I just have to save money over the summer for a clutch, radiator, and downpipe and exhaust materials. Once those are in hand, I'll be able to start turbo-ing and stuff.
-Painted and re-installed front subframe, spindles, and control arms.
-Installed grease fittings for existing front PU bushings
-Installed new lower ball joints, new upper ball joint boots, and new '93LE tie rods
-Installed the Timken hubs that I re-packed over the winter
-Installed 11" Wilwood fron BBK, Xida 700/400 club sports, Racing Beat solid front bar, and 1.8 sized rear brakes.
Things remaining to do before I can try all this stuff out:
-Fix leak at brake proportioning valve. I must have over tightened and stripped one of the adapter fittings.
-Bleed brakes
-Set ride height
-Torque suspension fasteners
-Adjust and install existing RB sway bar end links
-Ghetto alignment with iPhone and tape measure
-Drive car to settle ride and bed pads
-Check and adjust ride height as needed
-Get real alignment and corner weight
-Lots of other miscellaneous junk
Then I just have to save money over the summer for a clutch, radiator, and downpipe and exhaust materials. Once those are in hand, I'll be able to start turbo-ing and stuff.
Reply
0
0
Thread Starter
Junior Member
iTrader: (1)
Joined: Oct 2011
Posts: 412
Total Cats: 78
From: New Hampshire
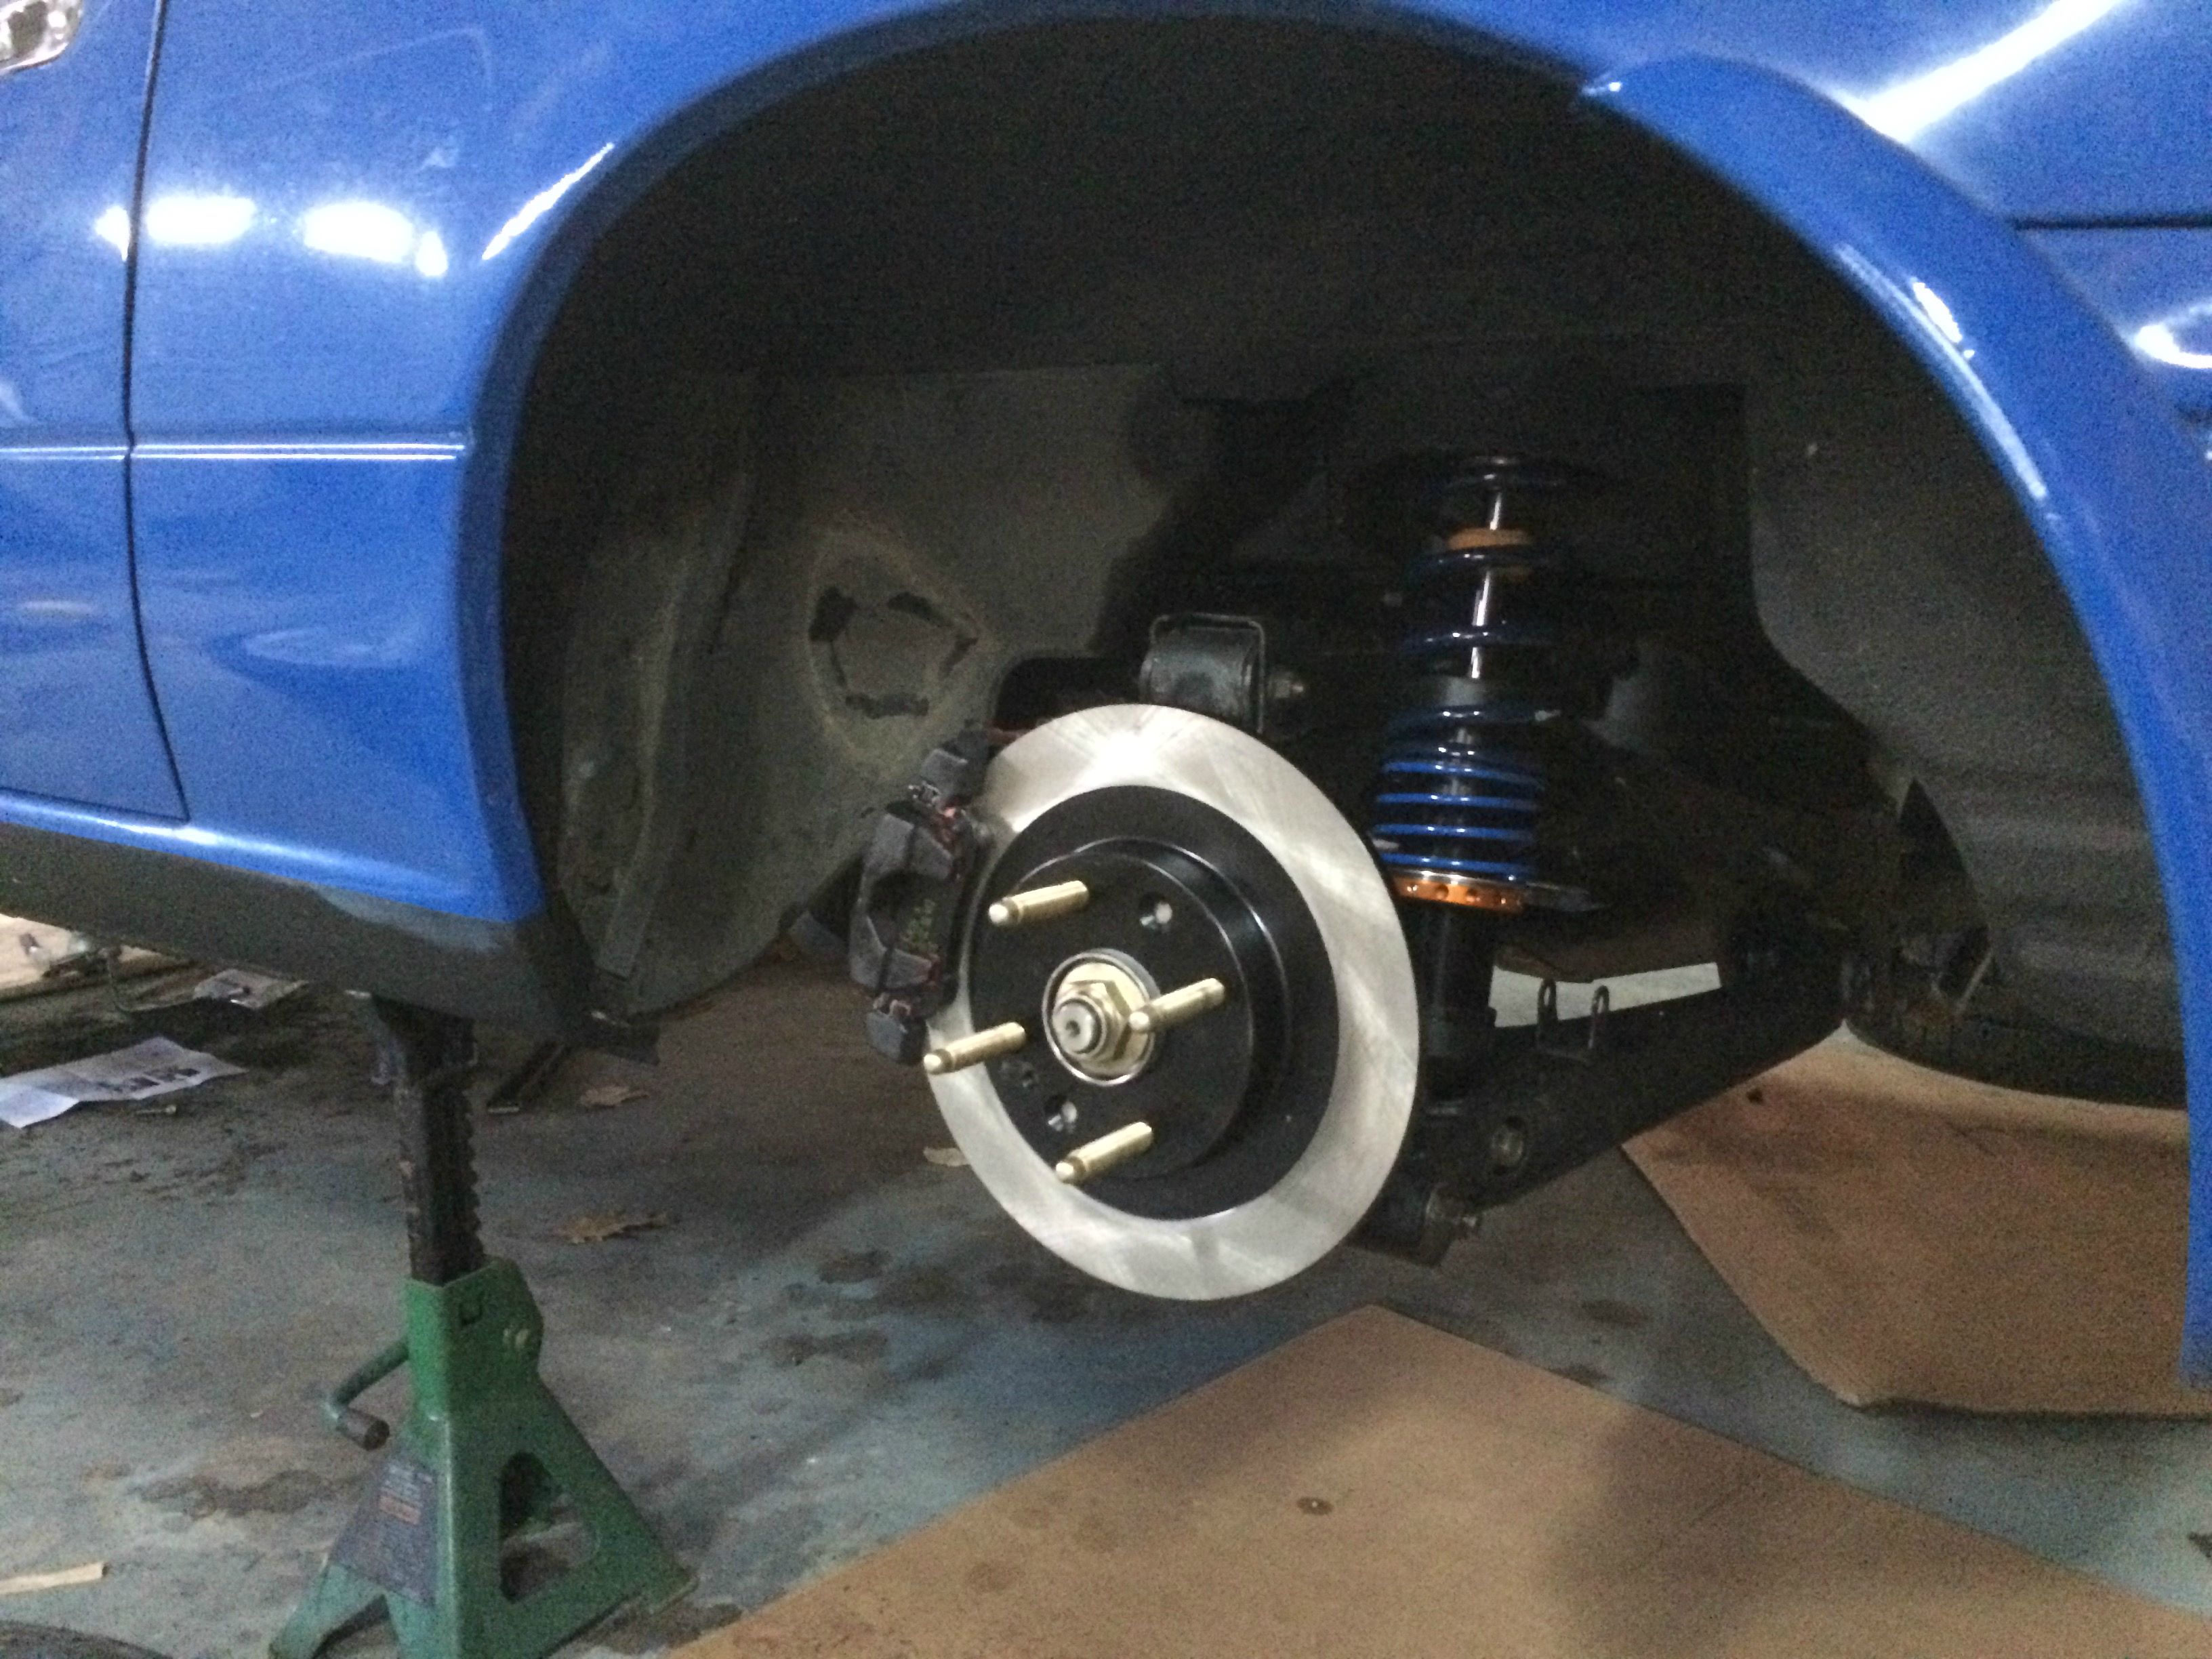
It lives. 
I drove perhaps 15 miles tonight and I'm very happy with the new setup, especially the Xidas. I had a particular bump nearby that was pretty rough on my old FM/KYB setup, the Xidas gave no *****.
I was unable to bed the brakes as my alignment is bad enough that I got some serious pulling to the left under moderate braking, so that'll have to get moved up the list. I also experienced some tire rubbing in the rear on large bumps. My 205 Rivals on 15x8 Jongbloeds made brief contact with my unrolled fender lips. Hopefully the alignment will fix that, otherwise I'll need to do a roll.
Reply
0
0
Thread Starter
Junior Member
iTrader: (1)
Joined: Oct 2011
Posts: 412
Total Cats: 78
From: New Hampshire
Swapped out my 700/400 lb/in springs on the Xidas for 550/350 and it rides sooooo much better. Like buttah. I'm super happy with the setup right now, aside from the wheezy N/A 1.6.
Getting my alignment done tomorrow, then I've got to refine my after-start-enrichment and acceleration enrichment.
Getting my alignment done tomorrow, then I've got to refine my after-start-enrichment and acceleration enrichment.
Reply
0
0
Thread Starter
Junior Member
iTrader: (1)
Joined: Oct 2011
Posts: 412
Total Cats: 78
From: New Hampshire
Got the car setup with 949's dual duty spec, -2.0/-1.7 F/R camber, 0 front toe and 1/8 rear toe. It handles much better now and I'm no longer getting any fender rub with my 205s on 15x8 +36 wheels. The place that did it, Synaptic3 Engineering, is local to me and seems to specialize in rotaries. I've been driving by their shop for years but never really had a reason to stop by. They seemed to know what they were doing and I may have them final tune my Megasquirt once the turbo is on.
In turbo news, I'm getting pretty frustrated trying to weld my log manifold. I'm using a small 110v Lincoln MIG and having a hard time maintaining a good arc while welding the the Els to the head flange. There seems to be two things going on; one, I have hold the feed cable almost perfectly straight to get the wire to feed out of the gun without binding up and two, my wire almost instantaneously melts back to the tip as soon as I start. I remember using the original spool of wire that came on the MIG to pretty easily weld some scrap mild steel together but now that I'm using the 309 wire recommended by my local weld shop to weld SS to SS and SS to mild I'm having a hard time making anything bigger than a tack weld before the wire melts.
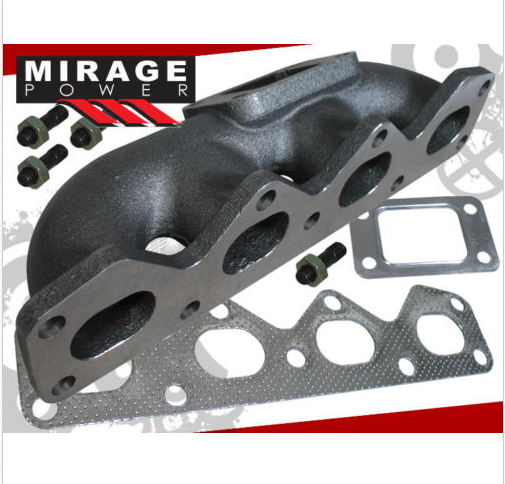
While I want to figure out what I'm doing wrong (undersized welder, poor settings, wrong wire, etc.) because I'll need to make my own down pipe and exhaust, I decided the manifold wasn't worth the frustration and delay, so I ordered a cast ebay unit. It looks the same as the out of stock TacoTaco unit but is sold by MiragePower. For $130, I'm willing to guinea pig this one.
1989 1993 Mazda Miata Eunos Roadster 1 6L B6 Cast Iron Turbo Manifold | eBay
In turbo news, I'm getting pretty frustrated trying to weld my log manifold. I'm using a small 110v Lincoln MIG and having a hard time maintaining a good arc while welding the the Els to the head flange. There seems to be two things going on; one, I have hold the feed cable almost perfectly straight to get the wire to feed out of the gun without binding up and two, my wire almost instantaneously melts back to the tip as soon as I start. I remember using the original spool of wire that came on the MIG to pretty easily weld some scrap mild steel together but now that I'm using the 309 wire recommended by my local weld shop to weld SS to SS and SS to mild I'm having a hard time making anything bigger than a tack weld before the wire melts.
While I want to figure out what I'm doing wrong (undersized welder, poor settings, wrong wire, etc.) because I'll need to make my own down pipe and exhaust, I decided the manifold wasn't worth the frustration and delay, so I ordered a cast ebay unit. It looks the same as the out of stock TacoTaco unit but is sold by MiragePower. For $130, I'm willing to guinea pig this one.
1989 1993 Mazda Miata Eunos Roadster 1 6L B6 Cast Iron Turbo Manifold | eBay
Reply
0
0
Thread Starter
Junior Member
iTrader: (1)
Joined: Oct 2011
Posts: 412
Total Cats: 78
From: New Hampshire
To be a little more clear on the welding problem, I was able to weld the log together out of stainless Els, but my beads looked like crap so I ground and filled them repeatedly until I had a reasonably smooth surface. I'm not sure if this is a robust enough joint, but at least it's physically one piece.
Welding the stainless log to the mild steel head flange is the real bitch. I can't really get beyond a tack weld before the wire melts.
Current 1.25" manifold is pictured in the front:
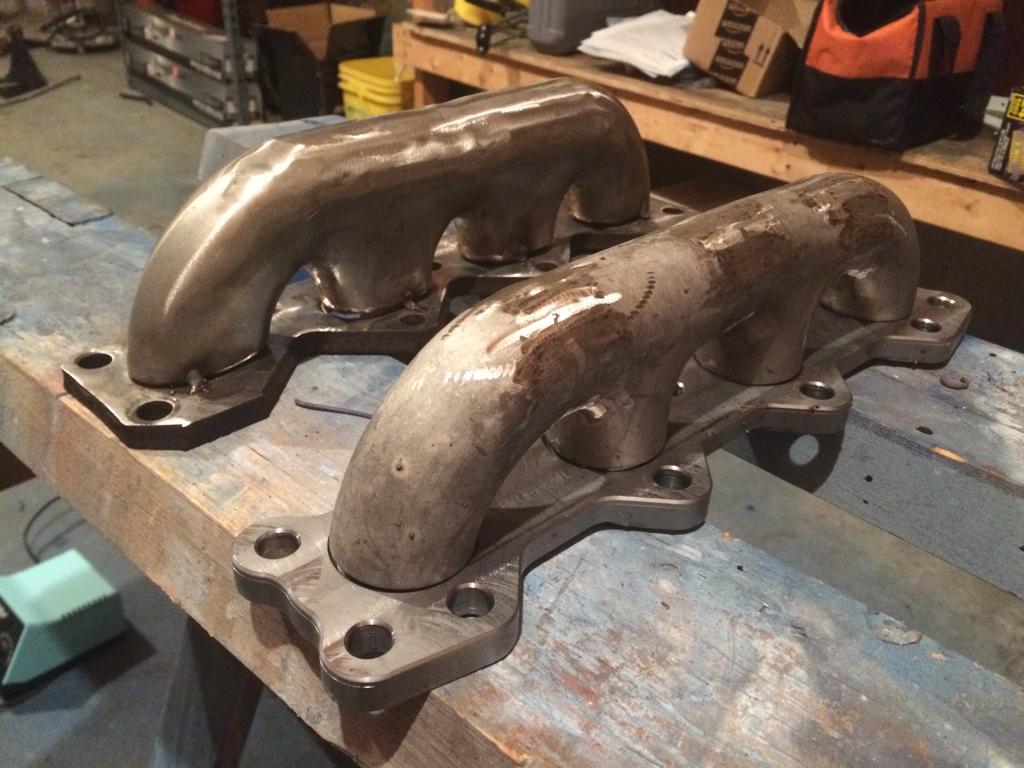
Welding the stainless log to the mild steel head flange is the real bitch. I can't really get beyond a tack weld before the wire melts.
Current 1.25" manifold is pictured in the front:
Reply
0
0

Thread Starter
Junior Member
iTrader: (1)
Joined: Oct 2011
Posts: 412
Total Cats: 78
From: New Hampshire
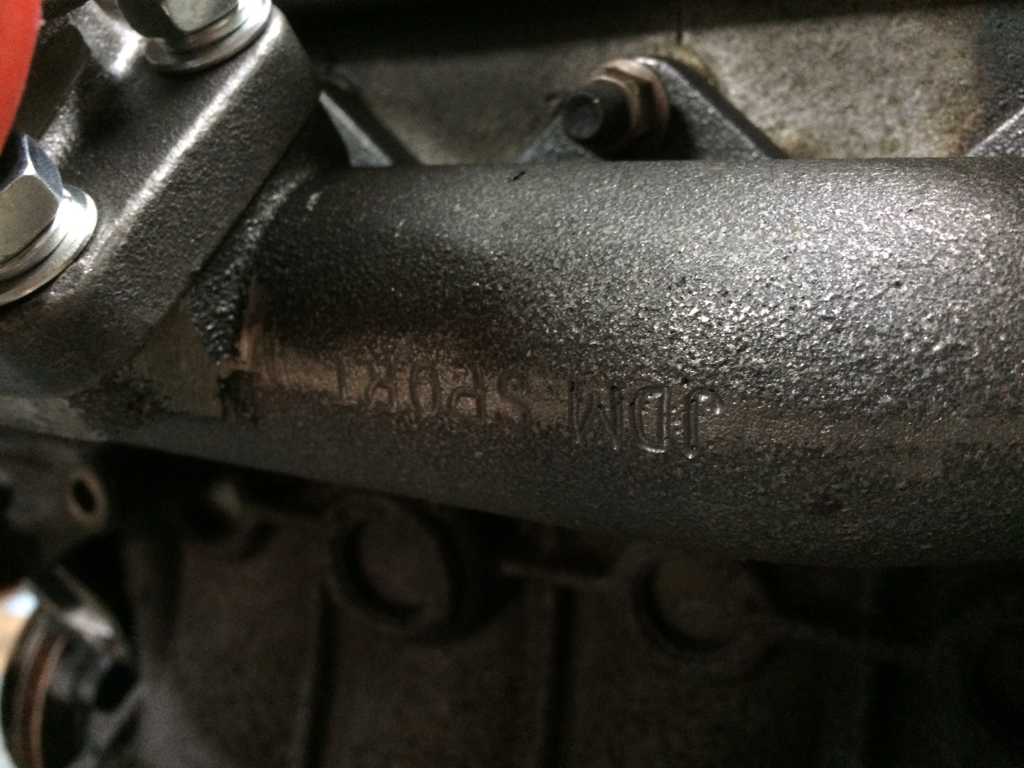
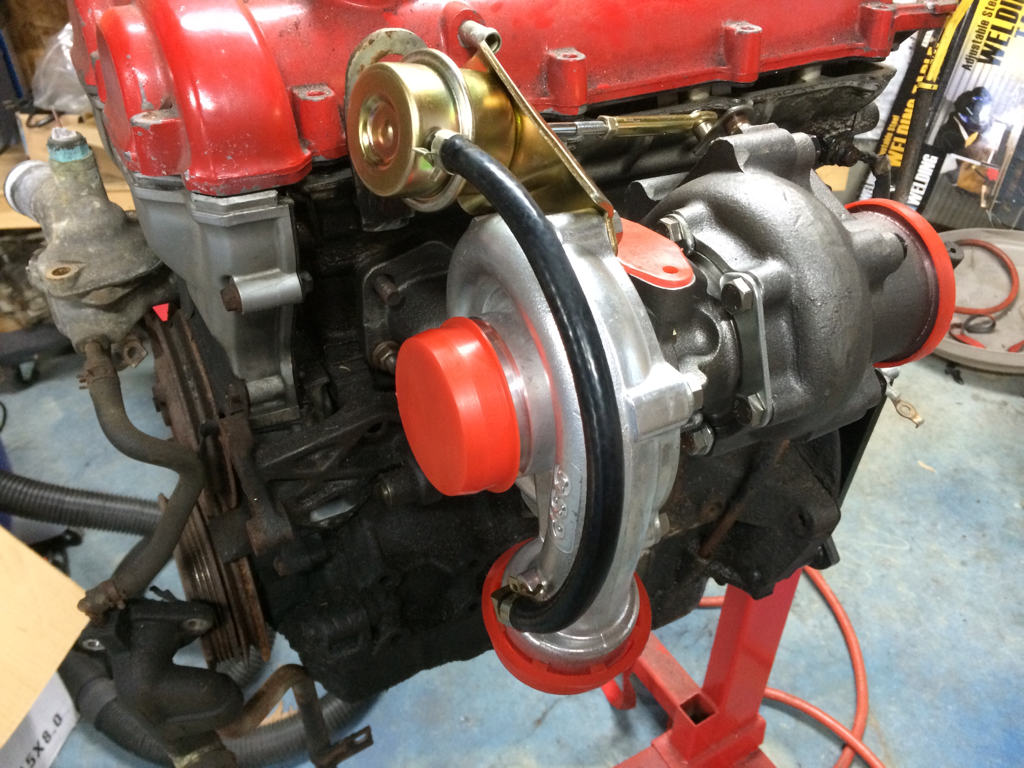
Got my eBay manifold in the other day and test fit it on my spare motor. It's a Mirage Power not TacoTaco, but appears to be essentially the same thing. All the bolt holes line up, so that's step one. The quality of the casting and the gasket surfaces seems adequate.

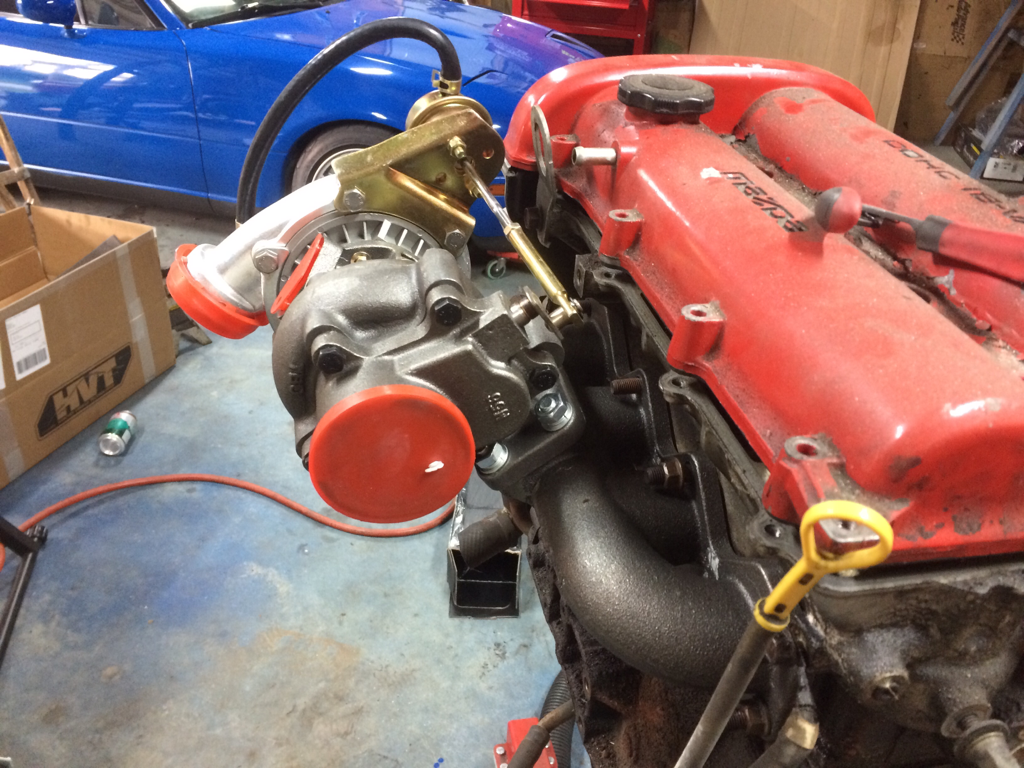
****'s upside down, yo.
I'm currently working on porting the waste gate from my .48 A/R eBay T3. My 1/4" shank Chicago Electric die grinder burrs are laughably inadequate. I have some 1/8" carbide burrs that fit my Dremel, but that's broken at the moment, so I'm stalled until I can resolve that.
****'s upside down, yo.
I'm currently working on porting the waste gate from my .48 A/R eBay T3. My 1/4" shank Chicago Electric die grinder burrs are laughably inadequate. I have some 1/8" carbide burrs that fit my Dremel, but that's broken at the moment, so I'm stalled until I can resolve that.
Reply
0
0
Thread Starter
Junior Member
iTrader: (1)
Joined: Oct 2011
Posts: 412
Total Cats: 78
From: New Hampshire
Progress!
Ported waste gate:

This went more quickly than I expected using a dremel and 1/8" shank carbide burrs. Maybe 20 minutes start to finish.
Clearanced housing for WG flapper rivet:
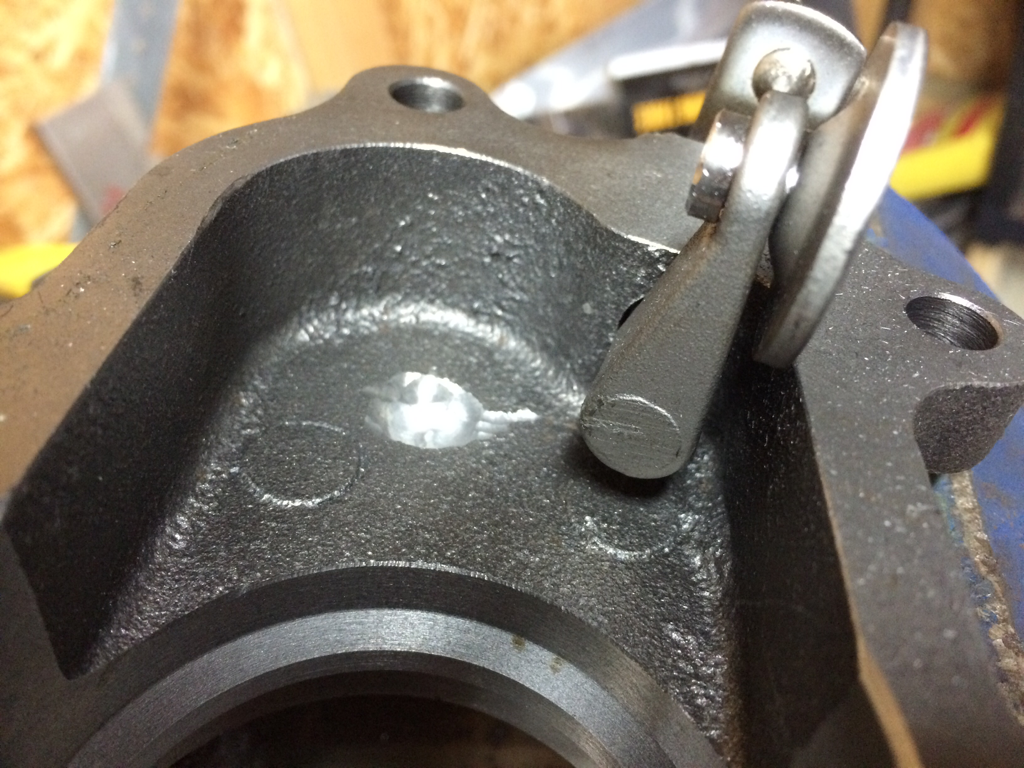
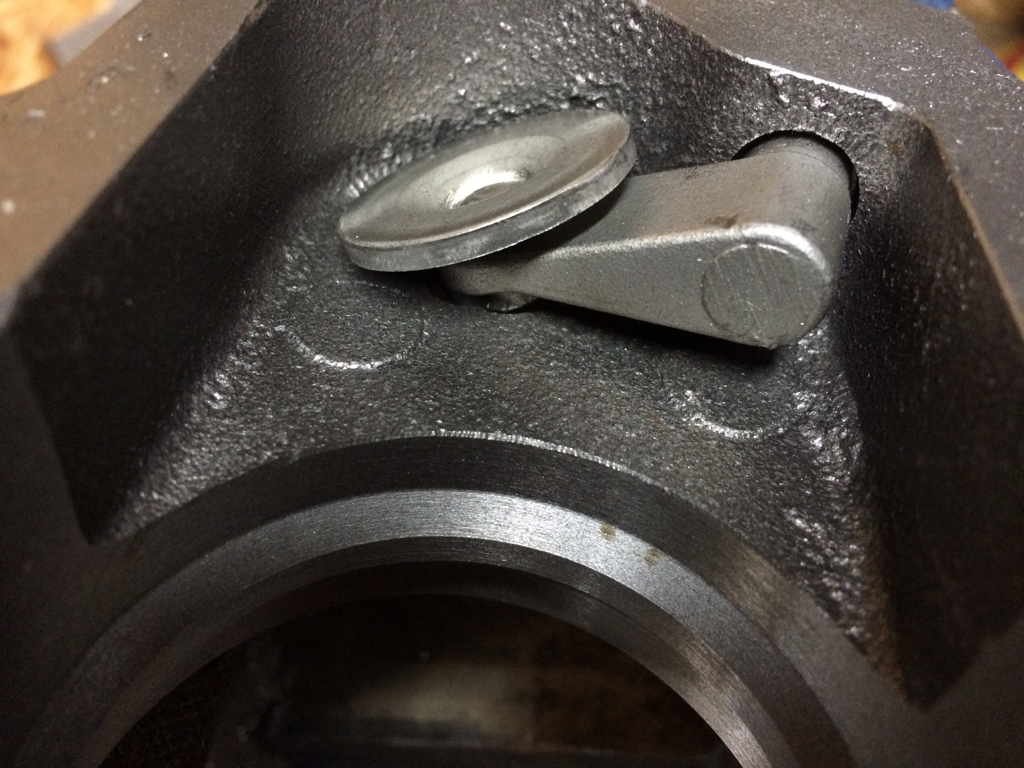
Clocked center housing to point feed/drain vertically, compressor outlet straight down and re-mount WG actuator, which is conveniently easy on this turbo given that there's six different positions you can mount it on the compressor housing.
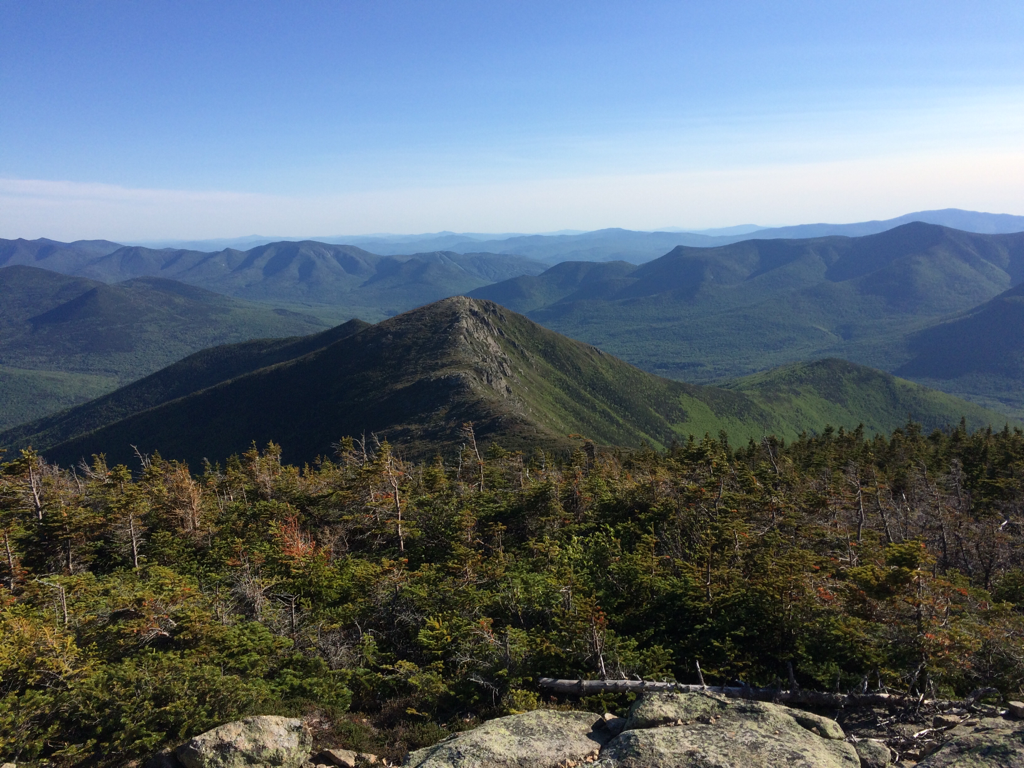
I also did some hiking/trail running:

Ported waste gate:
This went more quickly than I expected using a dremel and 1/8" shank carbide burrs. Maybe 20 minutes start to finish.
Clearanced housing for WG flapper rivet:
Clocked center housing to point feed/drain vertically, compressor outlet straight down and re-mount WG actuator, which is conveniently easy on this turbo given that there's six different positions you can mount it on the compressor housing.
I also did some hiking/trail running:
Reply
0
0
Joined: Sep 2012
Posts: 4,560
Total Cats: 1,143
From: your mom's house phoenix, AZ
<p>what welder are you using? some of the cheaper (HF) ones use plastic feed rollers, which simply will not feed wire correctly, if at all. since most are direct copies of lincolns, ive heard you can swap in the lincoln wheels and have a welder that actually works. you may have to do some research, but something like this</p><p> </p><p>https://weldingsupply.com/cgi-bin/ei...DEF:X:KP1884-1</p>
Reply
0
0
Thread Starter
Junior Member
iTrader: (1)
Joined: Oct 2011
Posts: 412
Total Cats: 78
From: New Hampshire
<p>what welder are you using? some of the cheaper (HF) ones use plastic feed rollers, which simply will not feed wire correctly, if at all. since most are direct copies of lincolns, ive heard you can swap in the lincoln wheels and have a welder that actually works. you may have to do some research, but something like this</p><p> </p><p>https://weldingsupply.com/cgi-bin/ei...DEF:X:KP1884-1</p>
The feed rollers are steel. I think the best thing I can do to troubleshoot at this point is try different wire and go back to practicing on mild steel. I don't remember having nearly so much trouble when I first tried to weld mild with what I was told was the spool of wire that came with the welder when it was new. I don't think I have crummy 309 wire as I bought what was recommended to me by the guy behind the counter at the local weld supply place. They seemed reputable enough, but I guess I just have to go back to my baseline and start over.
Reply
0
0


