When you click on links to various merchants on this site and make a purchase, this can result in this site earning a commission. Affiliate programs and affiliations include, but are not limited to, the eBay Partner Network.
Stripped and cleaned my cylinder head, did some mild clean up of the ports, cleaned and lapped the valves, reassembled with Volvo valve springs and Supermiata stem seals, and checked valve clearance. Only one intake valve was out of spec at 0.010", but I think I can swap shims from another valve that was on the tighter end and end up with happy clearances on both.
My valves were pretty crusty, so I tried soaking them in Seafom overnight. Total fail, did hardly anything.
Berryman's Carb Dip yielded better results, but still required use of a drill and scotch brite pad.
I made an attempt at measuring my cylinder bores with snap gauges and a verniers, but I don't have a lot of faith in these numbers.
And my parts horde continues to grow.
In case you were wondering how the Volvo springs compare to BP6D and NA6 springs.
Great thread! From rusty to a clean turbo is a heck of a lot of work!
Maybe I missed it, but I assume you're still driving on the 1.6 while the BP6D gets built?
Thanks.
The 1.6 is running pretty well at ~11 psi on the eBay T3. I drove it 250 miles the other weekend and it worked flawlessly. My plan is to leave it operable until around November, then swap everything in over the winter. I'll probably see if I can sell the turbo setup locally as a semi-complete package; manifold, turbo, exhaust, BOV, and DIYPNP. I'll have to do some more research to put a price on it.
In other news, I've taken delivery of an EFR 6258 and BE pump. I've also ordered a Kraken low-mount with exhaust, MSPNP Pro, and an ATI damper.
Tasca is taking forever to ship my remaining gaskets and OEM 9:1 pistons - they've been on backorder for a month now. This is going to become the bottle-neck in my build progress before too long. I took a minute the other day to tally up how much I've spent, and forged pistons with machine work are starting to look like a small drop in the bucket like everyone says...
Nice choice on the Kraken. Mines the original side mount and it's fantastic. The low mount looks even better.
Originally I was going to just get the low mount manifold and remake my downpipe to fit, but the full exhaust system was just too good of a price to pass up, and it should fit better than my home made setup.
Originally Posted by der_vierte
Awesome plan!
How is the kitty doing?
Thanks. Kitty has made a full recovery and we're happy she's still a part of the family. She's a very friendly cat and tolerates the kids and dogs well.
I was rummaging through some old papers and found a dyno chart from 2004, when my car was stock but for a homemade intake and Borla exhaust. 105 hoss, boss.
And I still have this sticker on my firewall. Maybe I'll keep for the troll value.
You are going to love the full exhaust, everyone who has been around my car and seen it perform says it's the best sounding turbo miata they've ever heard. Something about the setup as a whole that screams, and still has a touch of rasp to it, and isn't too loud.
You are going to love the full exhaust, everyone who has been around my car and seen it perform says it's the best sounding turbo miata they've ever heard. Something about the setup as a whole that screams, and still has a touch of rasp to it, and isn't too loud.
And I agree, that sticker is awesome.
I'm looking forward to hearing it but I'm running into some delays in getting the Kraken setup shipped. Does yours have the Magnaflow of the off-brand muffler he was using?
Recent progress:
Ball honed the cylinders, painted the block, installed the crank with ARP main studs and ACL race bearings, and set ring gaps. Out of the box, my Sealed Power rings were at 0.020 for the top ring and 0.022 for the bottom, so I left them at that.
There was a dump truck in the horse pasture across the road that looked to be smoking hilariously badly, but it turns out he was using a spreader with some weird white powdery stuff. No idea what that was for...
I'm looking forward to hearing it but I'm running into some delays in getting the Kraken setup shipped. Does yours have the Magnaflow of the off-brand muffler he was using?
off-brand. I forget what it was called, but I love the way it sounds and it's held up to corrosion better than the real Magnaflow that I have on my 323GTX. Would recommend.
off-brand. I forget what it was called, but I love the way it sounds and it's held up to corrosion better than the real Magnaflow that I have on my 323GTX. Would recommend.
Thanks. I'm not sure which muff will present itself to me, but it sounds like either will do.
More progress. Not that I work that fast, just getting the thread up to date.
Cylinder head is mounted up and torqued down with ARP studs. Boundary oil pump and Gates cast-impeller water pump are also installed. I dry fit the Hawley pump inlet and Qmax reroute.
I was pleasantly surprised how the QMax reroute actually makes the thermostat reasonably serviceable with engine still in the car. Access is from the side, rather than working between the head and the firewall.
I'm leaning toward keeping the oil warmer, as I don't think helping oil get up to temp faster is a bad thing (especially on a mostly street car in a cold climate) and neither is even a token amount of cooling. Need to remember to order new formed hoses if I do decide to keep it.
My amateur-hour port work.
Remaining motor to-dos:
Clean garage
Finish shimming valves. I swapped shims around, but I've still got a few that are out of spec.
Install cam gears and timing belt and check leak-down
Clearance and install main bearing support plate
Work out water and oil lines - need my turbo manifold to come in before I can really do much on this.
Oil feed will be Tee'd off the pressure sensor, drain will be the usual.
For water, I'm thinking of putting an NPT fitting in the front block off-plate and routing the heater core line through the turbo. Need to do more reading on this.
Drill and install oil pan
Clean, paint, & install intake manifold and throttle body
Clean, paint, and install valve cover
Install VVT system with new seals
Install LS2 Truck ignition
Select motor mounts - one of the few parts I haven't ordered yet.
Get those formed lines on the oil cooler before the motor goes in. It really sucked to do mine after. I got an entire motor silicone kit on ebay for pretty cheap, it came with those two and everything else. My turbo coolant line feed comes from the TB and returns to the mixing manifold, I skip the front water neck location.
The one I got isn't around anymore, mine didn't come with clamps, and may have had a few more hoses. Looks kind of like this though:
Thanks. I didn't know this was a thing, especially the smaller molded coolant lines. I'm still being wishy-washy about the coolant lines and whether to keep the oil warmer. Currently leaning towards eliminating all the small hoses on the cold side of the bay. On my 1.6 throttle body, a few years ago, I had one of the press-fit elbows pop out on the highway and spew coolant everywhere. Luckily, I noticed the temperature gauge climbing and I shut it off before it overheated. The ricer in me also likes the cleaner, simpler engine bay. Gotta decide pretty quick, since it's time to install the timing belt and I won't be access the front water neck port once that's done. Which makes for a nice dovetail... (Literary genius up in this piece, yo.)
After more attempts than I'd like to admit, I've got my valve clearances all set. I ordered the wrong shims... twice. The first time because one of the shims was mislabeled as the wrong size, the second time because I added when I should have subtracted. Derp.
I also rebuilt the VVT things.
Installed my damper, which went easier than expected, though I'm not looking forward to ever having to take it off, I also found time to clean and paint the valve cover, intake manifold, and throttle body, as well as install a bunch of seals. Right now the valve cover, timing belt, and upper manifold are just resting in place to keep dust and debris out until I get a few other things sorted.
I clearanced my main bearing support plate for the ARP mains as well. Had to remove more material than I expected, but there's ample room now.
Shifting gears back the car itself, with it's still-running 1.6 T3 setup, I replaced my DIYPNP with a MSPNP-Pro and got that working. I'll clean up the wiring once I add everything I need for the BP6D swap.
I experienced some frustration getting it to run right, which turned out to be from an error I made when making my sequential wiring harness years ago. I think I'm just to leave it like this until the motor comes out shortly, then make a new harness.
I bought a t-shirt from a band in Australia that took two friggin' months to arrive, but included this rad holographic kitty sticker, so it was worth it.
I went to upgrade my fuel pump with a DW200 and discovered this. Sadly not the first time I've found mouse nests in my car. There are too many nasty chemicals in the garage to let the cats in there so I'll need to more diligent about setting traps.
One of the culprits already expired.
Back to the fuel pump install. The kit supplied three identical o-rings but there's only room for one on the pump outlet. I put everything back together and went for a drive with no issues. Spares, I guess.
I got a shipping notice from Kraken, so it's full speed ahead in what spare time I've been able to manage.
Originally Posted by Johnny Tran
Let me ask you a question, Ted. Do you see anything wrong here?
Supposing I deleted my oil warmer, there'd be a barb fitting on the rear passenger side of the head. Would this be a bad idea for turbo water feed? Aside from finding a way to cleanly route the long hose hose, it seems fine to me, but I'm often a dummy. I have a strong desire to avoid tapping my water neck block off plate. (My revision in purple).
My turbo water feed is from there and it goes through the oil cooler and TB first. I just ignored the water-neck location.
Did the sleeve that says DW200 come off your pump when you took it out of the package? Kind of hoping it did, since mine and a friend had the same thing happen, it seems best not to leave it on.
And that mouse nest is probably the favorite mouse spot in a NA. I had the same thing, ruined all the phillips heads on the pump cover. Also had to splice in new wire for the sending unit as they had chewed off the insulation.
I cut the sleeve off and threw it out. While I don't think DW would be dumb enough to supply a label that's chemically incompatible with fuel, it seemed poorly attached and the (probably remote) risk of it causing a problem outweighed the need to have the pump labeled. The cover screws came out without too much trouble using an impact driver (not the electric kind), I replaced most of them with stainless socket head cap screws. I'd have replaced them all if I'd had enough on hand.
, but was still seeing some rod deflection that I couldn't get rid of just by clocking the turbine housing.
I was able to get everything perfectly lined up by slotting the holes in my wastegate mounting bracket a little bit. You can only move the wastegate can a little bit closer to the turbo centerline before it starts to bump up against the compressor housing (you can see this in the first pic in this post), but a little bit was all I needed. Now it moves like AidanJ's:
Working on my water line routing, I may be able to reuse the heater hard line that goes behind the manifold. I like this idea because then I could retain shaped OEM-style heater hoses and avoid running a long 5/8" line around the drivers side of the engine bay.
I cut the factory water pump inlet off the hardline and found it lines up very closely with my Hawley billet water pump inlet. If I carefully trim the hardline and tap the Hawley inlet for a barbed fitting, I should be able to just use a short length of hose as a coupler. I'll probably drill and tap another port in the big radiused part of the inlet for my turbo water outlet.
Clearance in the back is better than it looks in the pic.
Clearance up front is good as well.
That looks extremly sexy... You'll gonna have fun with it
Danke sch�n.
It snowed a couple inches, so I got out the neglected winter beater. I still love driving this thing; it's got oodles of grip and torque and the long, soft suspension is hard to upset on mid-corner bumps. I fixed a leaking vacuum hose to shut the CEL off. Now I should, like, register and inspect it or something...
I took the dog for a slushy mountain run.
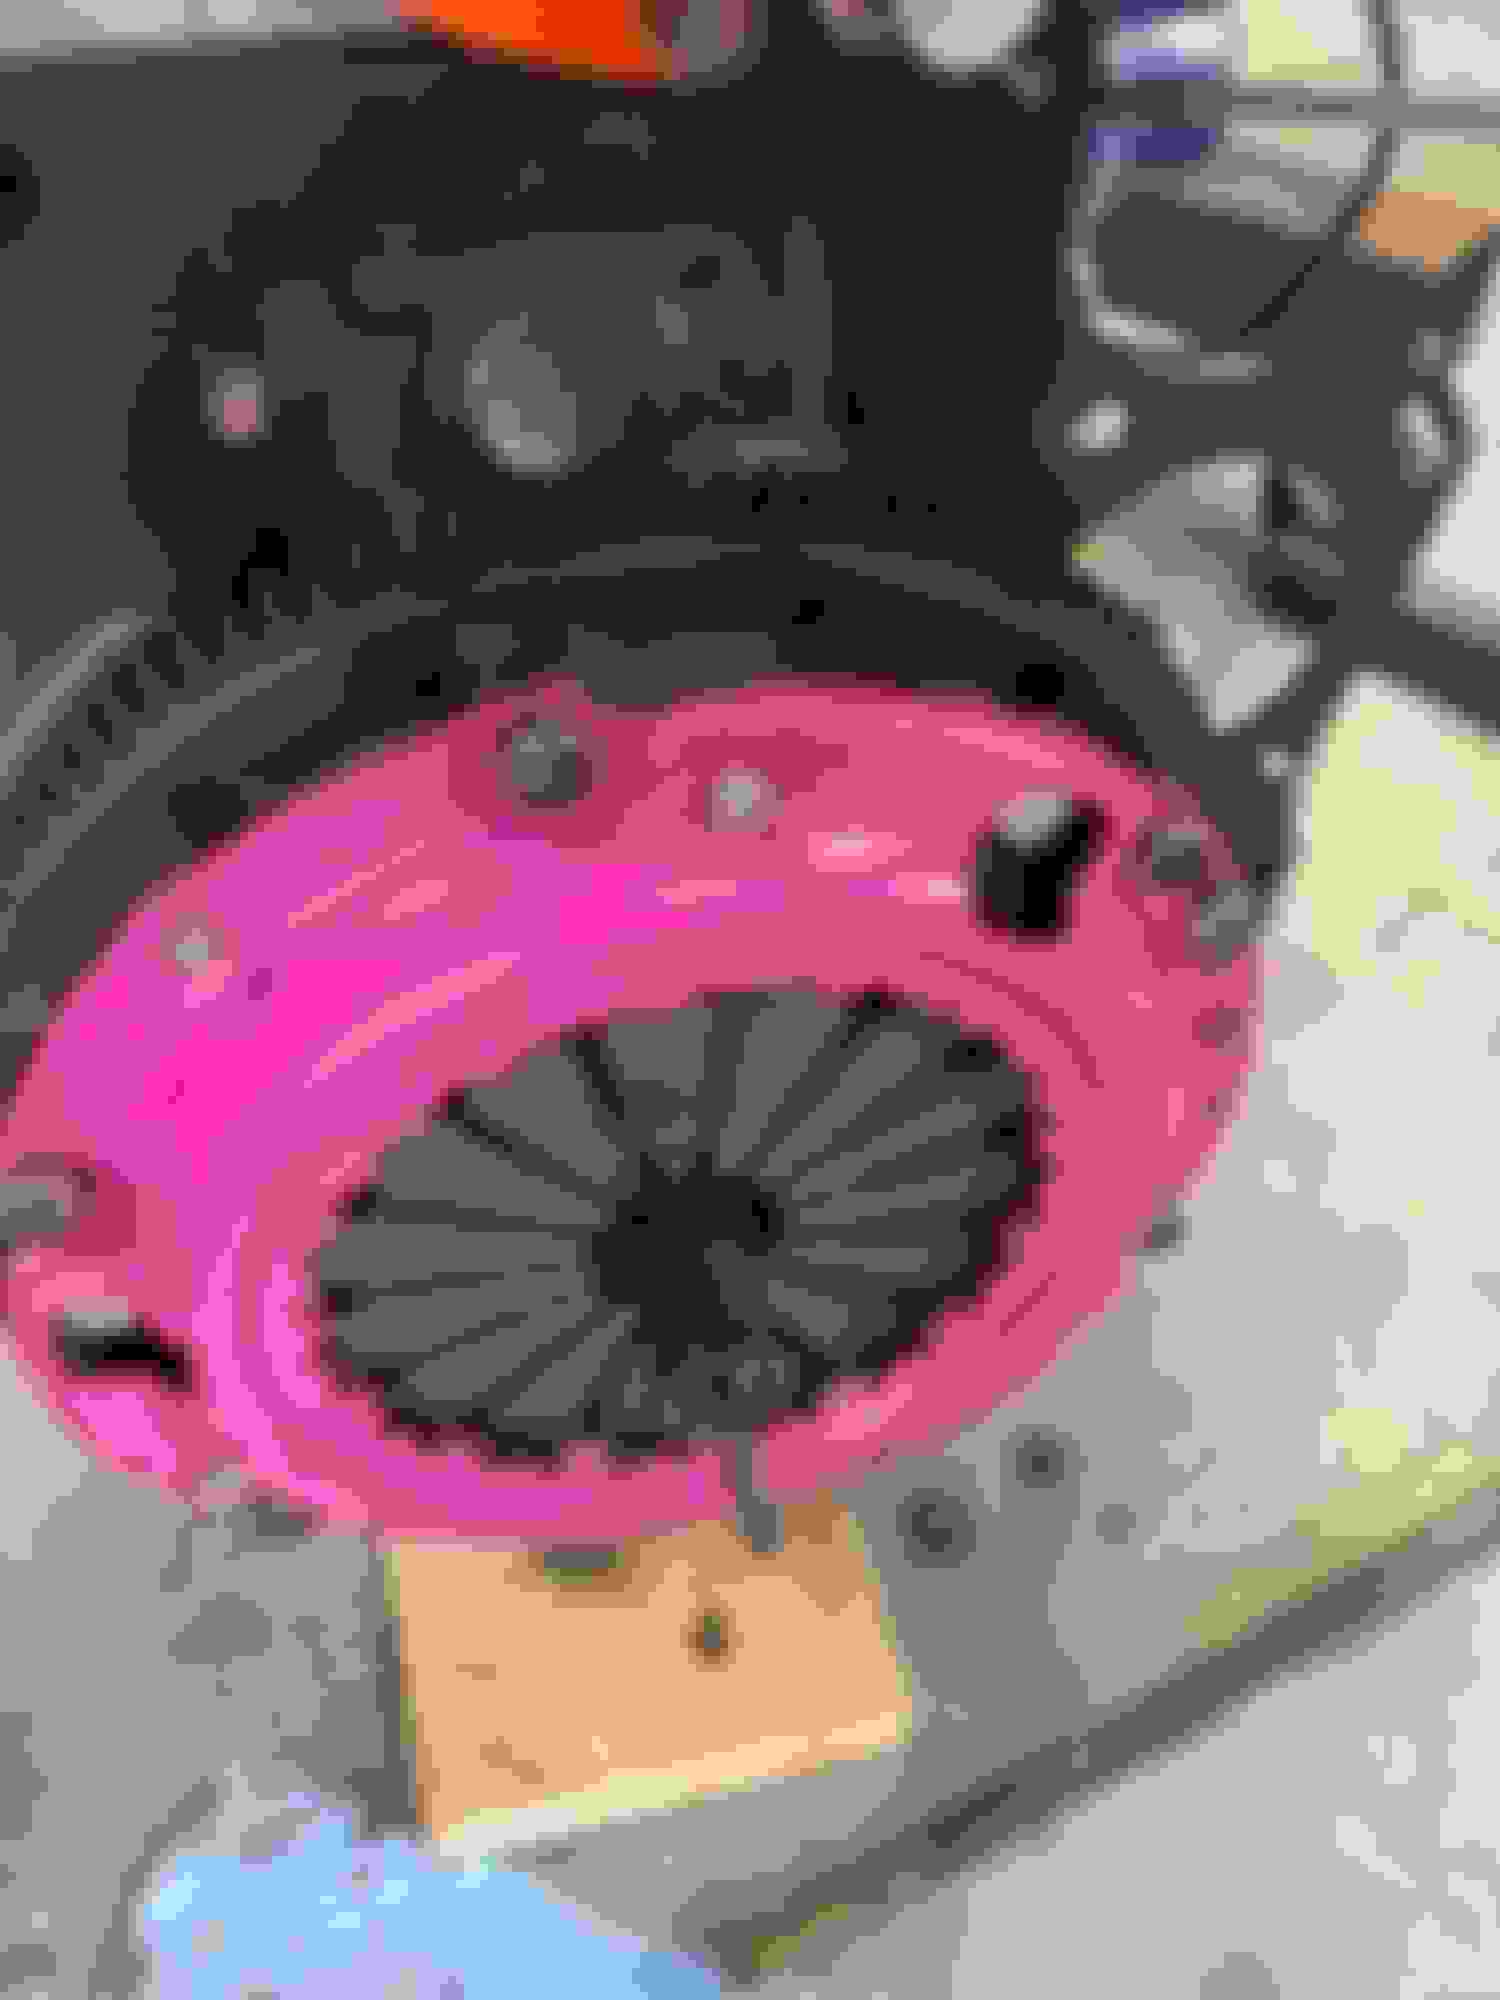
Back to the car. Here's a close up of my FM flywheel after ~5000 turbo miles. There's some funny leopard spot oxidation patterns that I'm not sure how to interpret. I'll admit to some clutch dumps here and there, but I'm generally easy on clutches (the Forester has 203k on the original clutch).
Worst spot on the pressure plate.
Lots of friction material left.
I slapped it together and sent it.
An just like the motor is back in the car.
I'm loving the low mount setup. The downpipe has a much simpler path out of the bay and everything clears. If you look on the left side, you can see where I re-used my cut-down heater hard line. I welded a piece of angle iron to it for another mounting point.
Another morning trail run pic for good measure.
Right now I'm working on the remaining wiring changes and getting all the remaining minor items squared away. I'm hoping to do my first start this weekend. Hopefully the weather will be nice enough that I can can do a shake-down drive and get the engine broken in, at least naturally aspirated
To do list:.
Finish wiring
Adjust PPF
Fill transmission - I'm going to try Motorcraft fluid to see if it helps my tired 5-speed synchros.
Install radiator, check all clamps, fill cooling system
Install new slave cylinder
Finalize intercooler piping (waiting for parts to come in)
Tidy up turbo water lines.
Tighten oil feed line fittings - going to need to pick up a crow foot wrench to reach, I think. I should have done this with the engine out of the car, but I wasn't settled on my line routing and chose to work that out with the motor installed.


 0
0