
AHaidet's '93 1.8 swap with FM kit and MS3x


Thread Starter
Junior Member
Joined: Sep 2011
Posts: 75
Total Cats: 13
From: Akron, OH
I am finally starting a build thread as my build is starting to gain some momentum, almost everything is ordered, new parts are piling up in the garage, 1.8L motor is nearly prepped..
Here is my 93:

It already has Koni Yellows, Ground Controls, Flyin Miata sways, 949 6ULs with RE11 tires, Boss Frog Clearview Roll Bar...
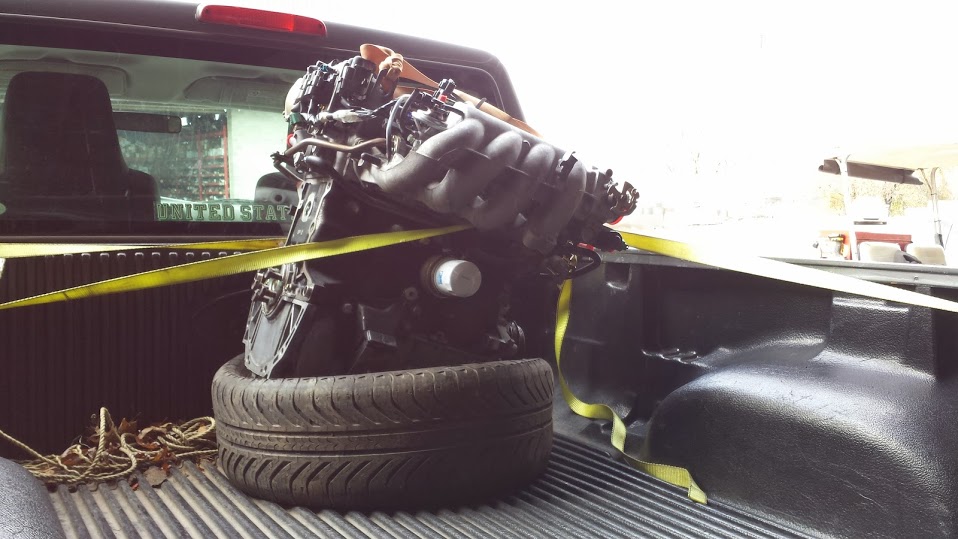
It needs some power so I bought a 96 1.8L motor from a junkyard in Pittsburgh last fall with a reported 77K miles.
Brought it home and threw it on the engine stand:

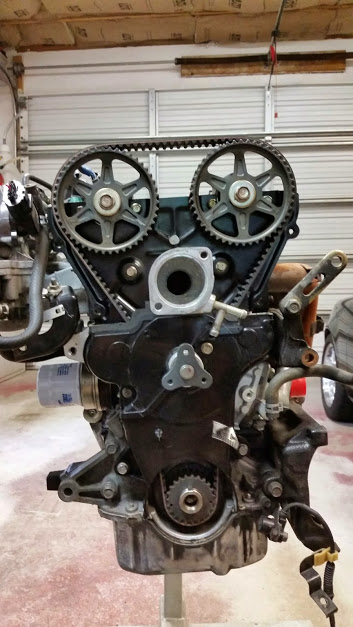
It sat there for a month or so untill after the holidays and I ordered a timing belt kit with water pump and began tearing down the motor. I decided not to do a full rebuild based on how clean the motor was and the low mileage it was reported to have.
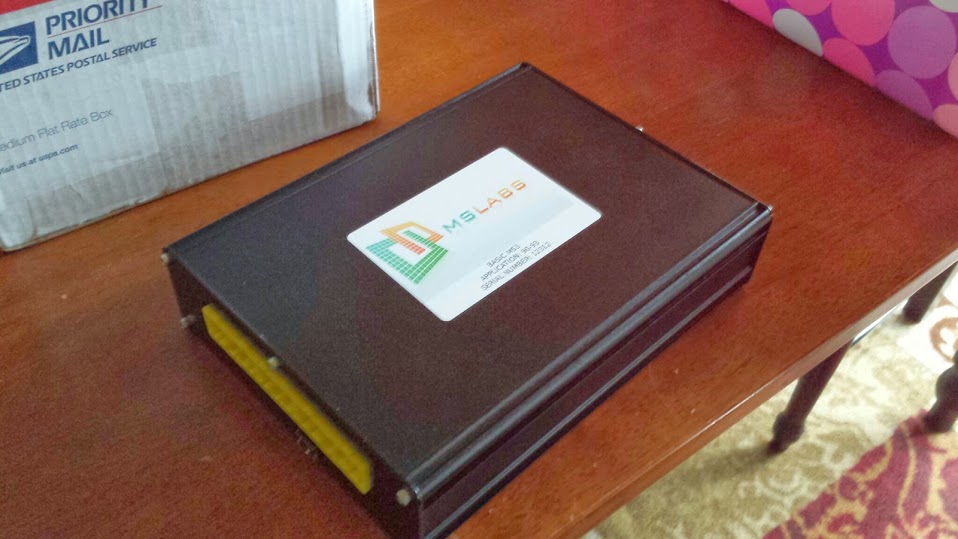
I ordered a MS3x from Reverant as well.
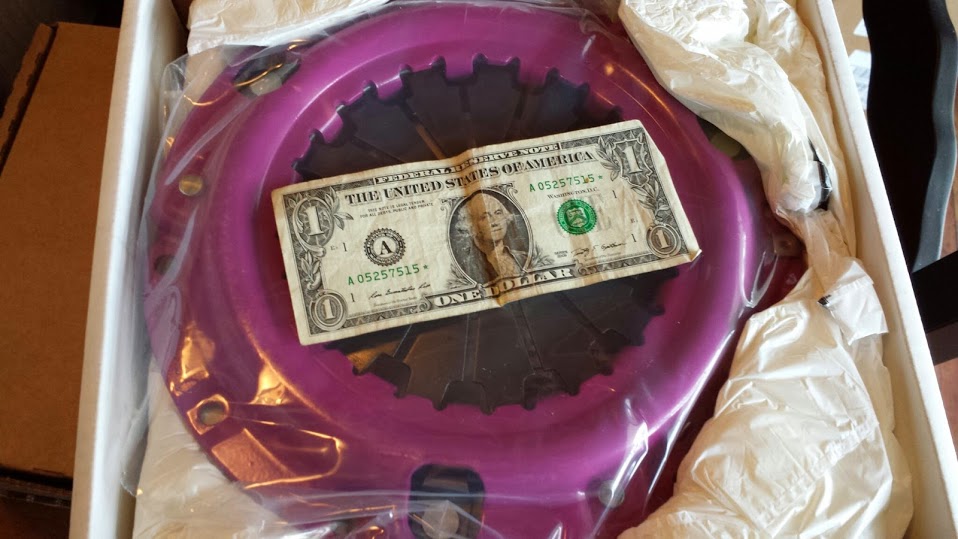
I ordered an FM clutch:
and some of their timing belt tools and seal installers:

That's all for now. Next I will post some pictures of the coolant reroute stuff I ordered and made.
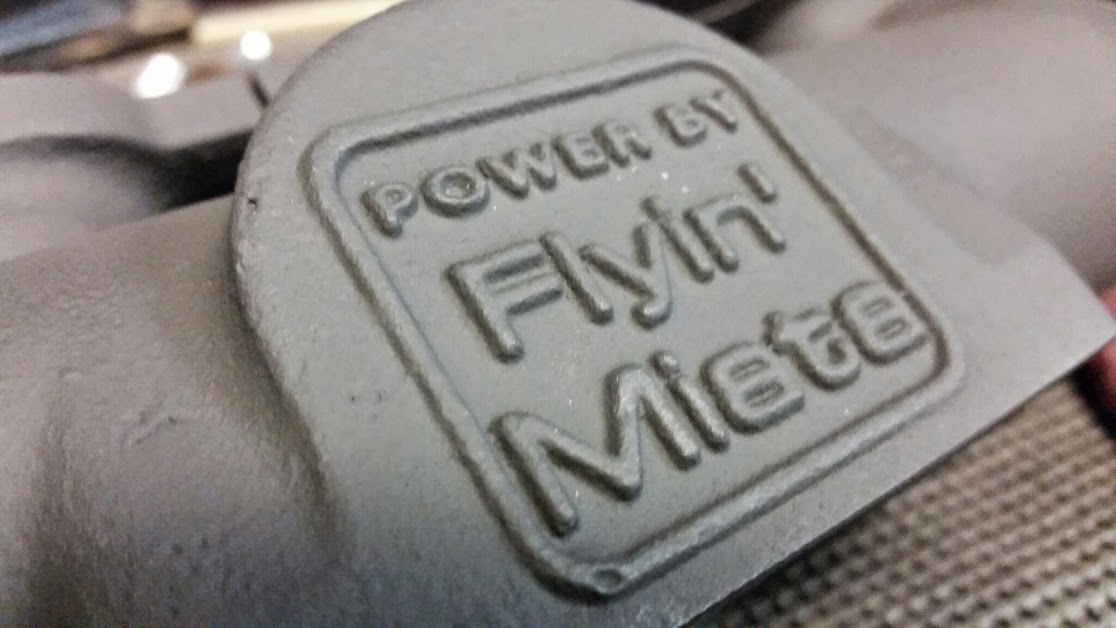
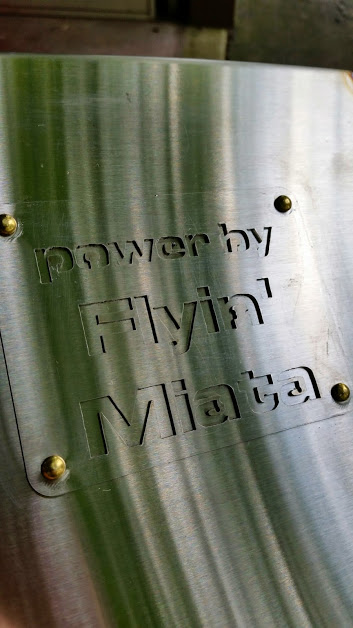
I decided to order an FM turbo kit finally after a few months of deliberation and watching the classifieds. A few parts are on back order so I am waiting for it to arrive.
Here is my 93:
It already has Koni Yellows, Ground Controls, Flyin Miata sways, 949 6ULs with RE11 tires, Boss Frog Clearview Roll Bar...
It needs some power so I bought a 96 1.8L motor from a junkyard in Pittsburgh last fall with a reported 77K miles.
Brought it home and threw it on the engine stand:
It sat there for a month or so untill after the holidays and I ordered a timing belt kit with water pump and began tearing down the motor. I decided not to do a full rebuild based on how clean the motor was and the low mileage it was reported to have.
I ordered a MS3x from Reverant as well.
I ordered an FM clutch:
and some of their timing belt tools and seal installers:
That's all for now. Next I will post some pictures of the coolant reroute stuff I ordered and made.
I decided to order an FM turbo kit finally after a few months of deliberation and watching the classifieds. A few parts are on back order so I am waiting for it to arrive.
Reply
 0
0

0
Thread Starter
Junior Member
Joined: Sep 2011
Posts: 75
Total Cats: 13
From: Akron, OH
I planned on writing more last night but ran out of steam and fell asleep with laptop on lap on couch...(having a kid sometimes takes its toll on my ability to work later )
)
I woke up on couch at 4am summarized what I had and hit post and went to bed.
Few questions/issues I am working through and doing research on now:
Tonight I will try and post another update with photos on my coolant reroute and more current photos of engine status.
)I woke up on couch at 4am summarized what I had and hit post and went to bed.
Few questions/issues I am working through and doing research on now:
- I think I can use the stock 96 1.8 coils with the MS3x? I just need to rewire the 93 harness for the 96 connectors?
- While I am finishing up the timing belt install... is a higher resolution trigger wheel worth upgrading to with the MS3x (non sequential injection and power goal of 250-300 (emphasis on response for Auto-X/street driving))
- With my FM no electronics kit I am using the FM 1.8L downpipe but hoping to at least temporarily reuse my Roadstersport Catback. Car is register in an emissions testing free area. So I need to fab up a test pipe to fit between the two as I have a 1.6L FM Cat now. I have a welder and decent fab skills I need to find a source for flanges. I have the resources to machine them myself but machining steel isn't particularly efficient on my little CNC.
Tonight I will try and post another update with photos on my coolant reroute and more current photos of engine status.
Last edited by ahaidet; Jun 12, 2014 at 08:17 AM.
Reply
0
0
Thread Starter
Junior Member
Joined: Sep 2011
Posts: 75
Total Cats: 13
From: Akron, OH
I ordered some of the parts for my coolant reroute and made some others.
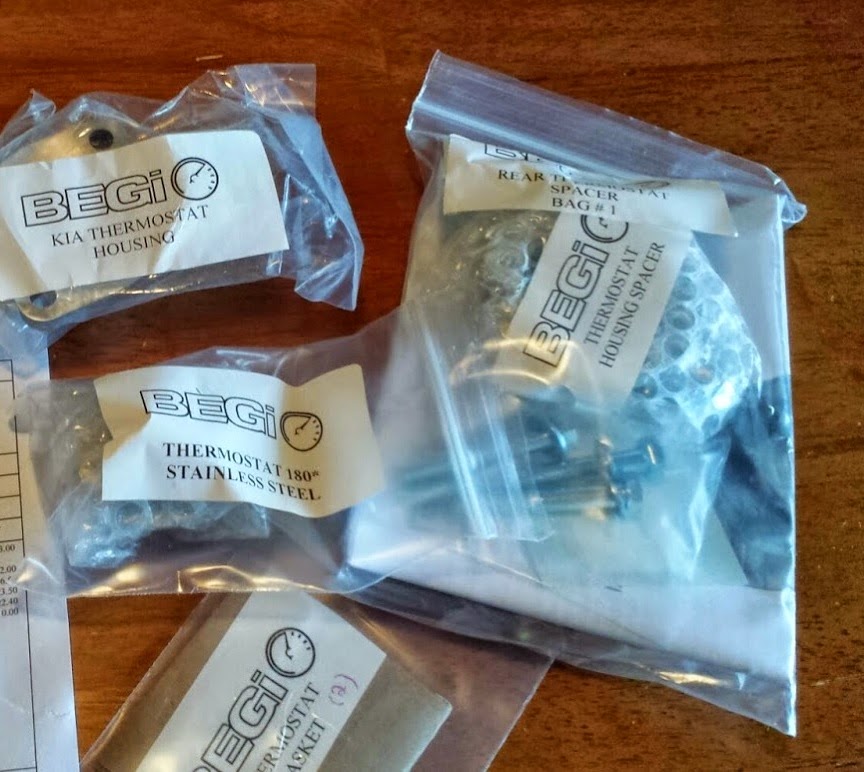
First I ordered the rear thermostat housing, thermostat, and Kia water neck from BEGI as well as some gaskets.
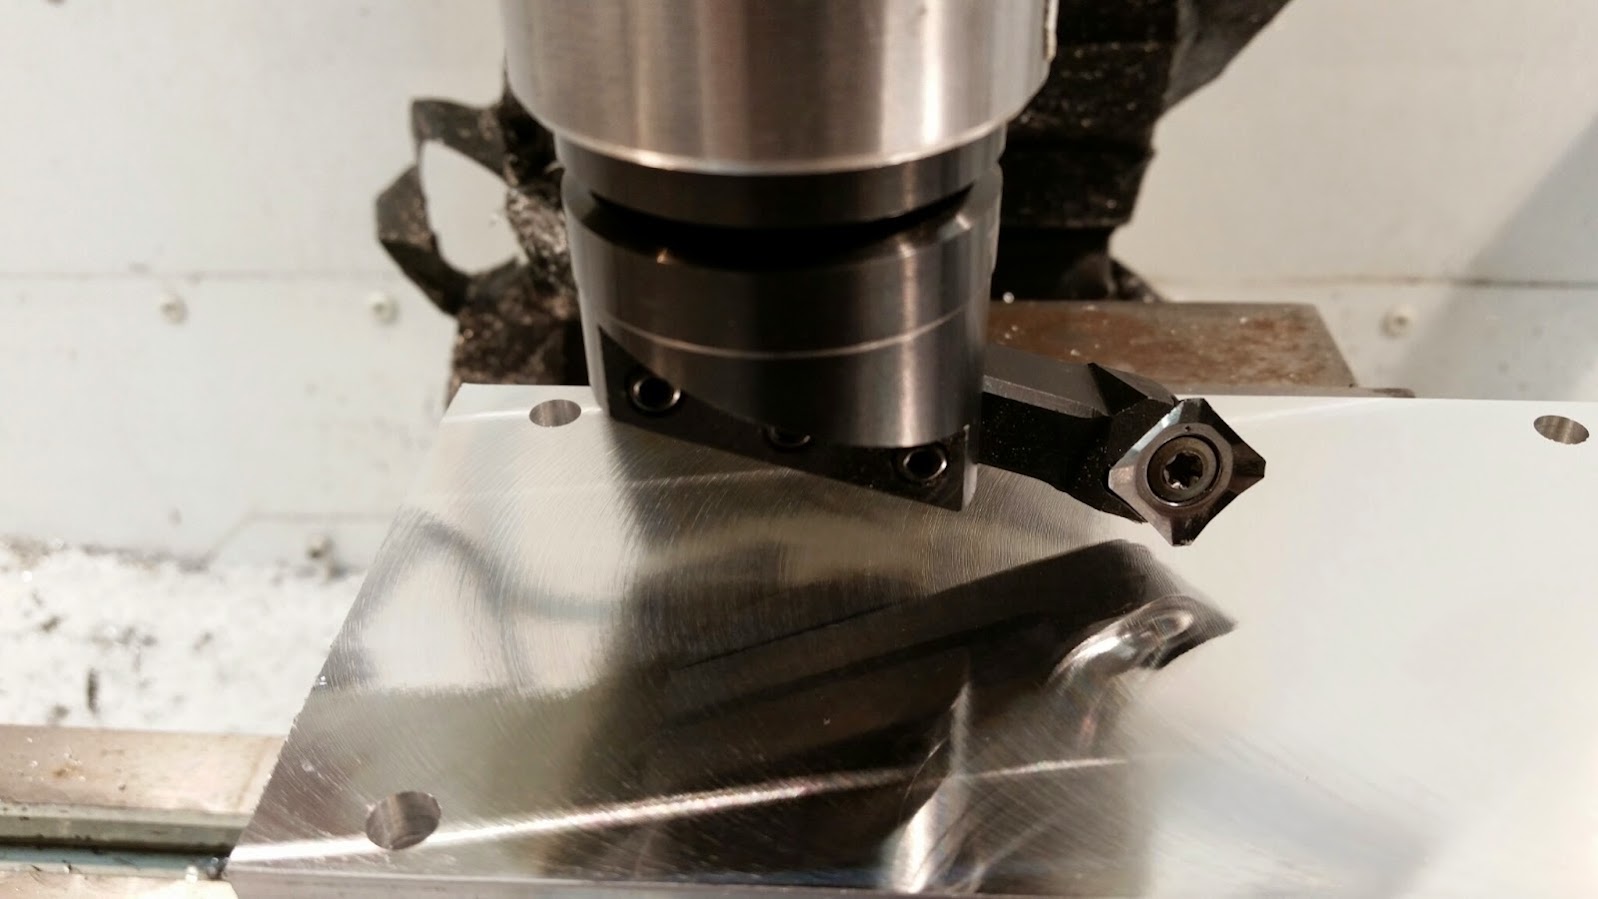
I then took one of the gaskets from BEGI and scanned it on my flatbed scanner. I imported that image into my CAD program and traced around the image to create a DXF file. I took the DXF file and exported it into my CAM (computer aided machining) program and created G-code file to input into my CNC machine.
My machining strategy was as follows.
First I machined both top and bottom of the 6061 aluminum stock with a fly cutter to be sure the sealing surface was perfectly flat:
Then I drilled both holes into the part to attach it to the jig.
Next I cut out the rough profile with a 1/2" roughing endmill.

I followed that up with a 1/2" finishing endmill.

Next I chamfered both edges with a 3/8" 90 chamfer mill:

I flipped the part on the jig and repeated the chamfer code.
Here is the finished product:

I could have just bought this piece from BEGI with the others but I had just upgraded the mills control system and needed a quick simple part to test it out on. I also had a piece of scrap stock the perfect size for this.
To complete my reroute I picked up the GM hose from Autozone that many others have used.
First I ordered the rear thermostat housing, thermostat, and Kia water neck from BEGI as well as some gaskets.
I then took one of the gaskets from BEGI and scanned it on my flatbed scanner. I imported that image into my CAD program and traced around the image to create a DXF file. I took the DXF file and exported it into my CAM (computer aided machining) program and created G-code file to input into my CNC machine.
My machining strategy was as follows.
First I machined both top and bottom of the 6061 aluminum stock with a fly cutter to be sure the sealing surface was perfectly flat:
Then I drilled both holes into the part to attach it to the jig.
Next I cut out the rough profile with a 1/2" roughing endmill.
I followed that up with a 1/2" finishing endmill.
Next I chamfered both edges with a 3/8" 90 chamfer mill:
I flipped the part on the jig and repeated the chamfer code.
Here is the finished product:
I could have just bought this piece from BEGI with the others but I had just upgraded the mills control system and needed a quick simple part to test it out on. I also had a piece of scrap stock the perfect size for this.
To complete my reroute I picked up the GM hose from Autozone that many others have used.
Reply
1
1

You can use the stock 96 1.8 coils with the MS3x. Same signals, the 96 coils will have a 4 position connector with only 3 of the wires populated (they don't produce a tach reference signal). Make sure your MS is setup to provide a tach signal.
Nice build so far and uh... nice CNC mill? Are you with a machine shop in or near Akron?
Nice build so far and uh... nice CNC mill? Are you with a machine shop in or near Akron?
Reply
0
0
Thread Starter
Junior Member
Joined: Sep 2011
Posts: 75
Total Cats: 13
From: Akron, OH
Thanks FAB9.
Does this thread provide the details I need to accomplish this?
https://www.miataturbo.net/ecus-tuni...ecifics-58571/
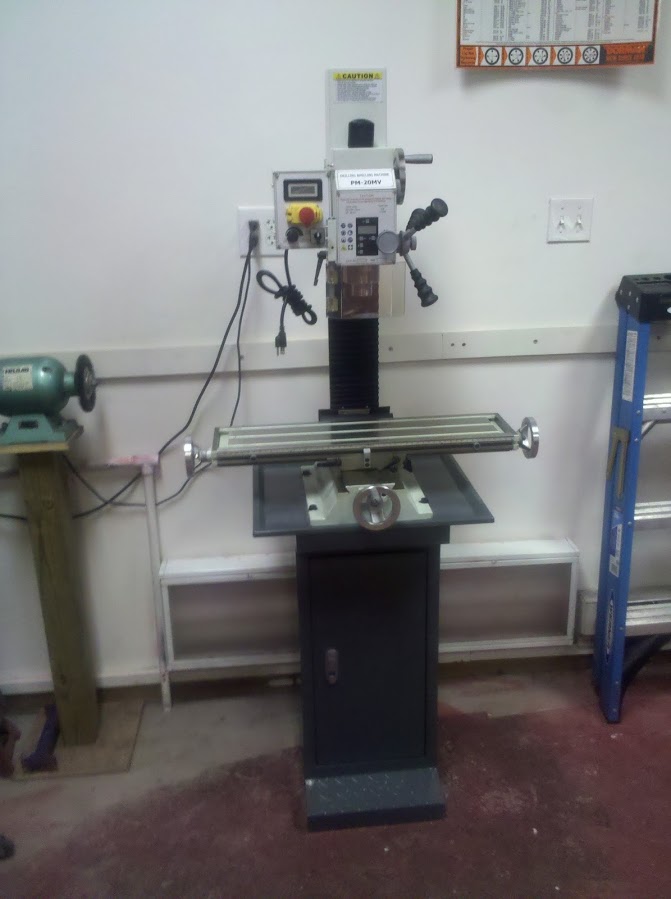
Yes its a CNC Mill. Its a benchtop mill I converted to CNC myself.
It started out like this:
I ordered stepper motors, drivers, and a break out board. Its controlled by a standard windows PC using MACH3 software. I machined most of the mounting brackets and parts by hand. I got tired of chips flying around and wanted a little extra safety so a friend and I built a sheet metal and acrylic enclosure to contain the chips and coolant it now looks like this:
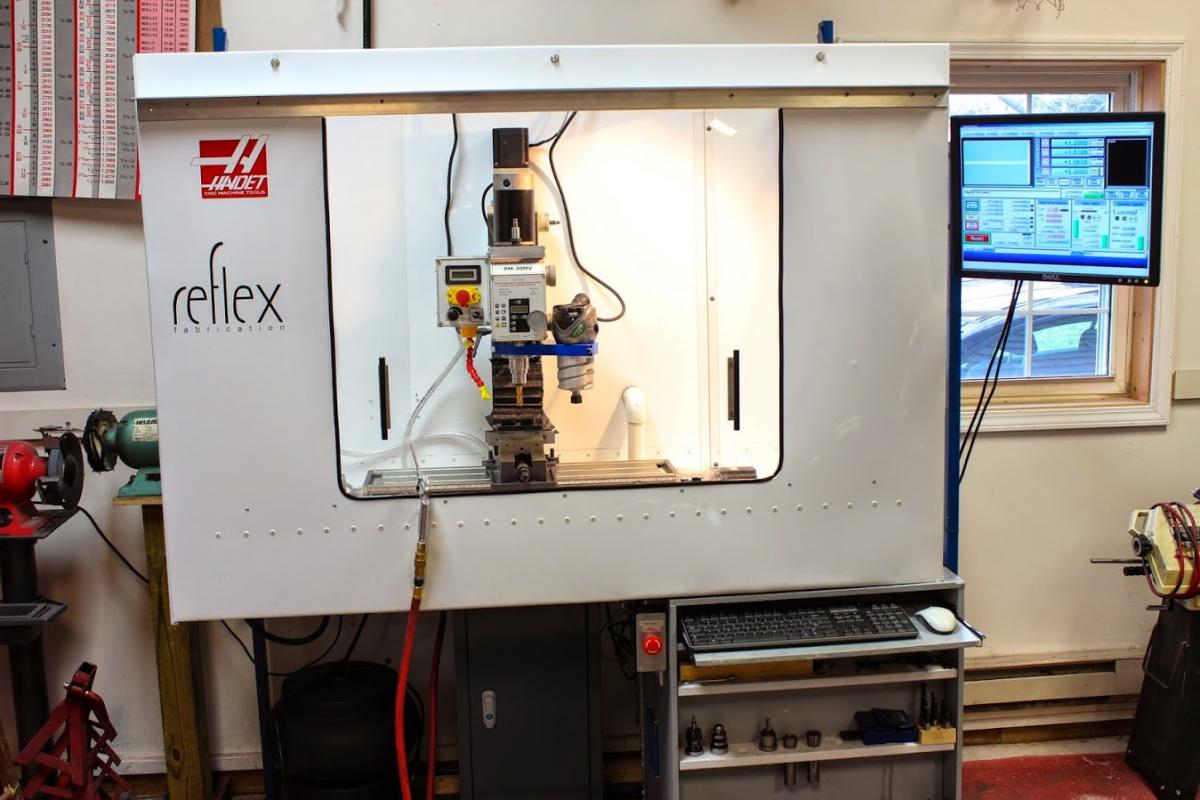
I have done a few other upgrades since then like installing a higher powered motor and adding a belt drive.
I am in the Akron area but I typically do not machine parts for others (I have done a few odds and ends jobs though). Mostly I use the machine for making prototype parts and small production runs for my small business that makes DSLR video accessories.
Does this thread provide the details I need to accomplish this?
https://www.miataturbo.net/ecus-tuni...ecifics-58571/
Yes its a CNC Mill. Its a benchtop mill I converted to CNC myself.
It started out like this:
I ordered stepper motors, drivers, and a break out board. Its controlled by a standard windows PC using MACH3 software. I machined most of the mounting brackets and parts by hand. I got tired of chips flying around and wanted a little extra safety so a friend and I built a sheet metal and acrylic enclosure to contain the chips and coolant it now looks like this:
I have done a few other upgrades since then like installing a higher powered motor and adding a belt drive.
I am in the Akron area but I typically do not machine parts for others (I have done a few odds and ends jobs though). Mostly I use the machine for making prototype parts and small production runs for my small business that makes DSLR video accessories.
Reply
1
1
Thread Starter
Junior Member
Joined: Sep 2011
Posts: 75
Total Cats: 13
From: Akron, OH
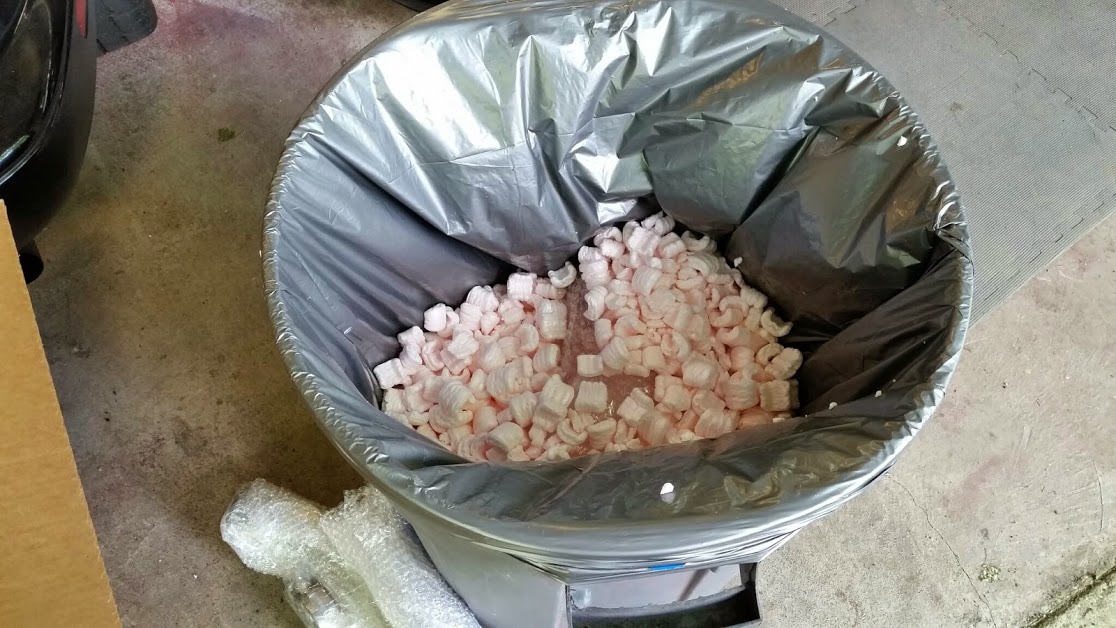
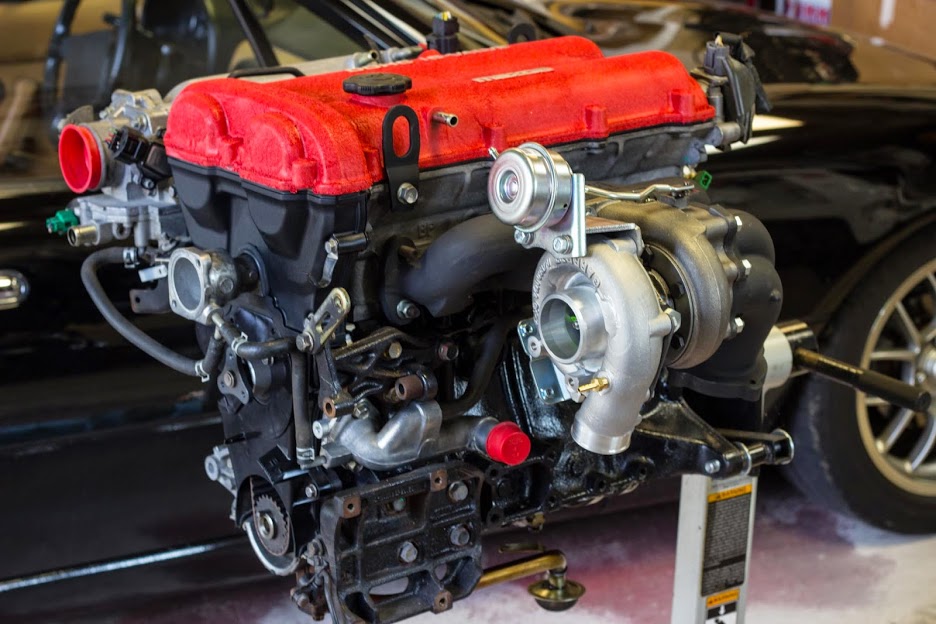
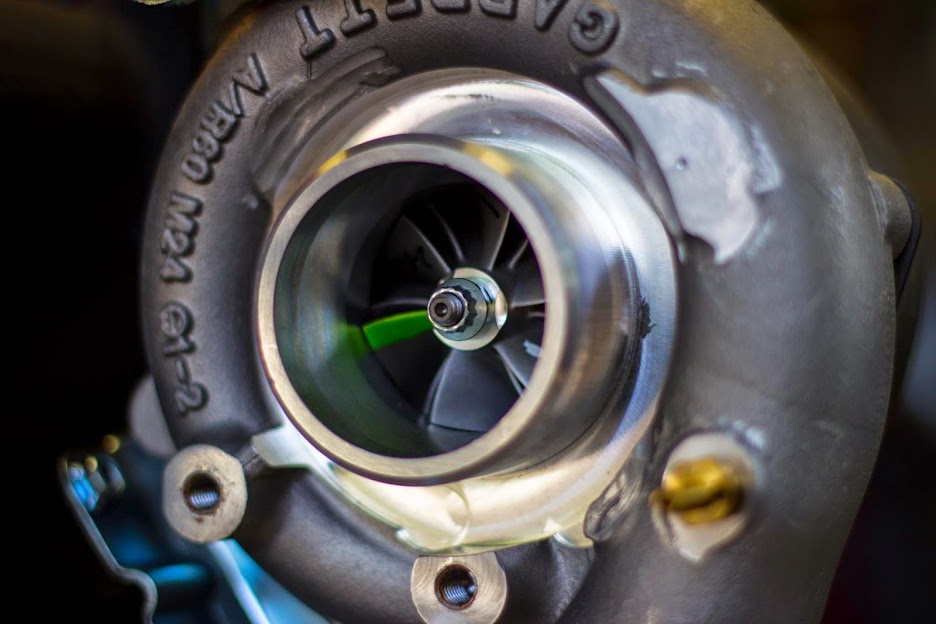
My kit arrived.
It was like digging for treasure...
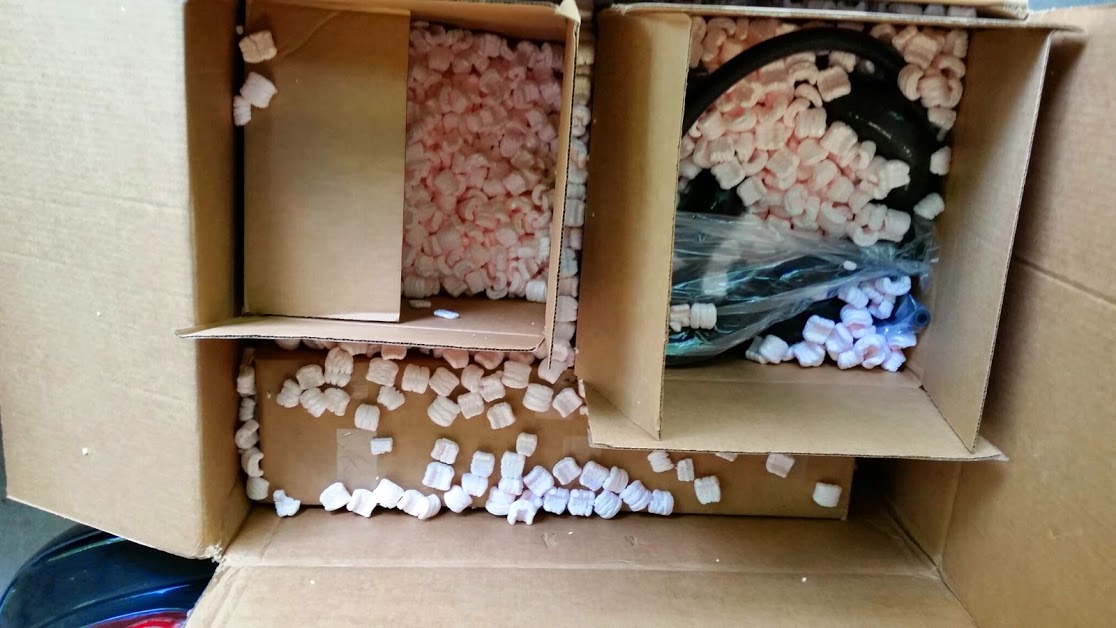
and after I filled up an entire contractor bag of packing peanuts...(this photo was only half way in)
I found this...
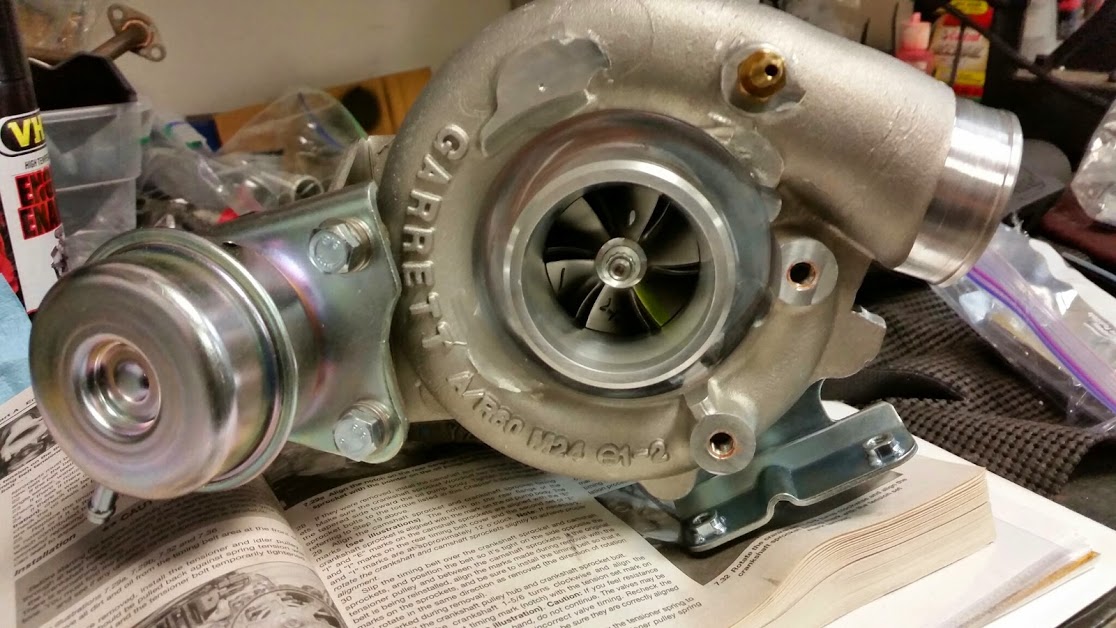
I haven't had such mixed emotions upacking something ever. I hate packing peanuts... like with a passion. They make a mess of everything and are wasteful... but I love turbos. So I went from moments of pure rage as the little pink bastards got stuck to everything to pure joy holding the shiny new parts.
I will post more photos as I go through things and finish unpacking.
My to do list going forward:
It was like digging for treasure...
and after I filled up an entire contractor bag of packing peanuts...(this photo was only half way in)
I found this...
I haven't had such mixed emotions upacking something ever. I hate packing peanuts... like with a passion. They make a mess of everything and are wasteful... but I love turbos. So I went from moments of pure rage as the little pink bastards got stuck to everything to pure joy holding the shiny new parts.
I will post more photos as I go through things and finish unpacking.
My to do list going forward:
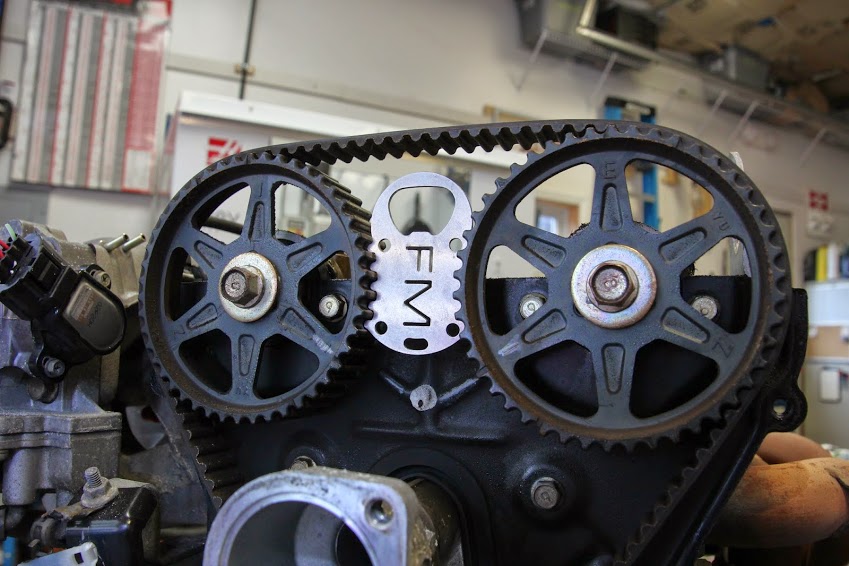
- Finish timing belt install with 32 tooth pickup wheel
- finish cleaning and painting of motor bits and pieces (valve cover, etc)
- install coolant reroute parts
- install turbo and plumbing to motor
- swap motor.. and install Megasquirt..
Reply
0
0
Thread Starter
Junior Member
Joined: Sep 2011
Posts: 75
Total Cats: 13
From: Akron, OH
I have made a good bit of progress since my last post.
Removed the EGR valve and installed the block off plate.


Good thing the block off plate came with instructions. I thought the plate blocked off the hole where the EGR tube attaches. It actually replaces the entire valve which makes sense and then there is no reason to block off the EGR tube hole.
Also my injectors from Fuel Injector Clinic and my NGK AFX wideband arrived.

Removed the EGR valve and installed the block off plate.
Good thing the block off plate came with instructions. I thought the plate blocked off the hole where the EGR tube attaches. It actually replaces the entire valve which makes sense and then there is no reason to block off the EGR tube hole.
Also my injectors from Fuel Injector Clinic and my NGK AFX wideband arrived.
Reply
0
0
Thread Starter
Junior Member
Joined: Sep 2011
Posts: 75
Total Cats: 13
From: Akron, OH
I also installed the BEGI coolant reroute. I used the basic instructions I found on: Easy Coolant Reroute � part 1 � revlimiter.net
I installed the spacer on the rear of the head with all the proper plugs and fittings.
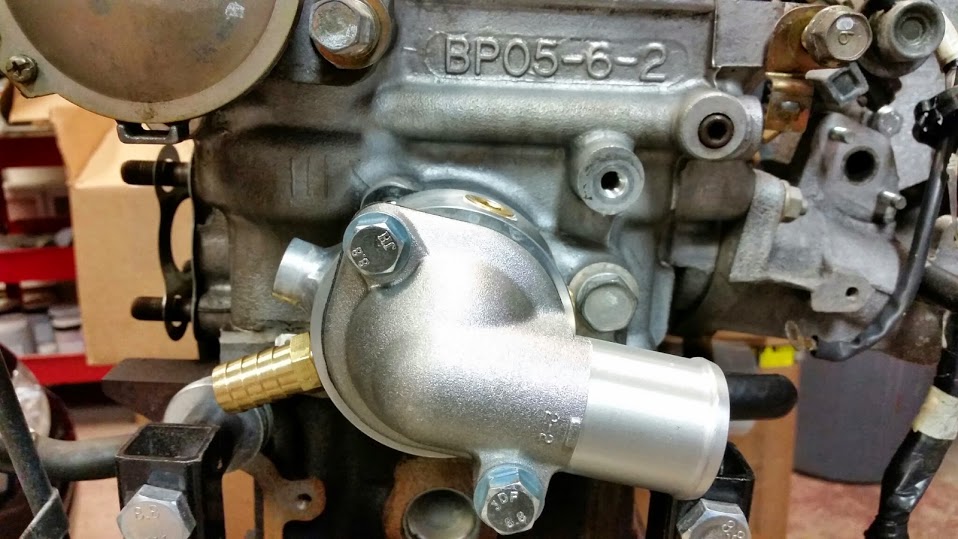
The spacer seems well machined in general. It was super easy on the engine stand but would be a real pain in the *** in the car.

The one issue that the instructions don't seem to cover, the Kia waterneck used for this has a 1.375" OD but the stock radiator has a 1.25" OD inlet. I have found reducers meant for coolant lines at Pegasus racing but others who have done the reroute this way don't use them.
I installed the spacer on the rear of the head with all the proper plugs and fittings.
The spacer seems well machined in general. It was super easy on the engine stand but would be a real pain in the *** in the car.
The one issue that the instructions don't seem to cover, the Kia waterneck used for this has a 1.375" OD but the stock radiator has a 1.25" OD inlet. I have found reducers meant for coolant lines at Pegasus racing but others who have done the reroute this way don't use them.
Reply
0
0
Thread Starter
Junior Member
Joined: Sep 2011
Posts: 75
Total Cats: 13
From: Akron, OH
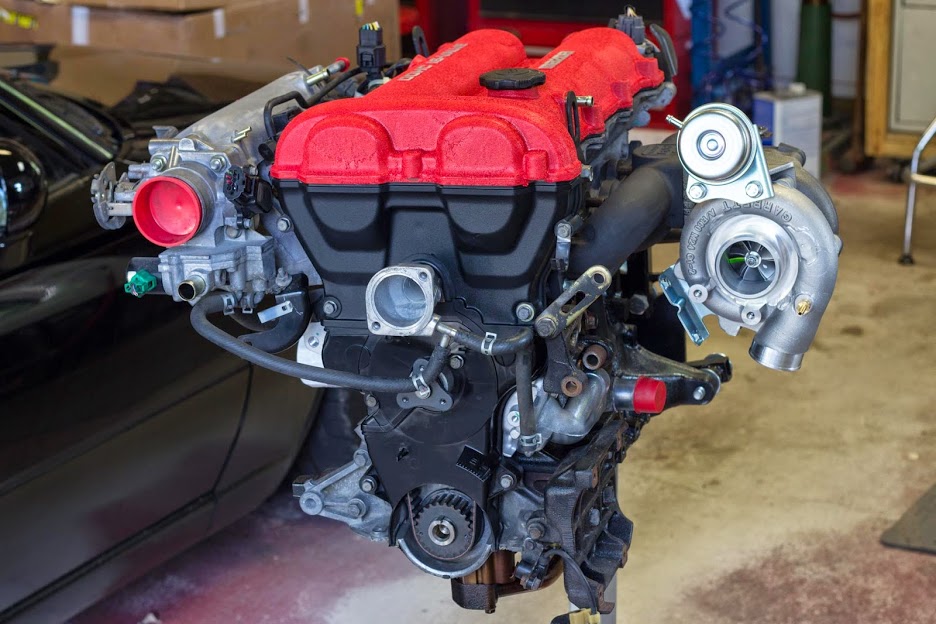
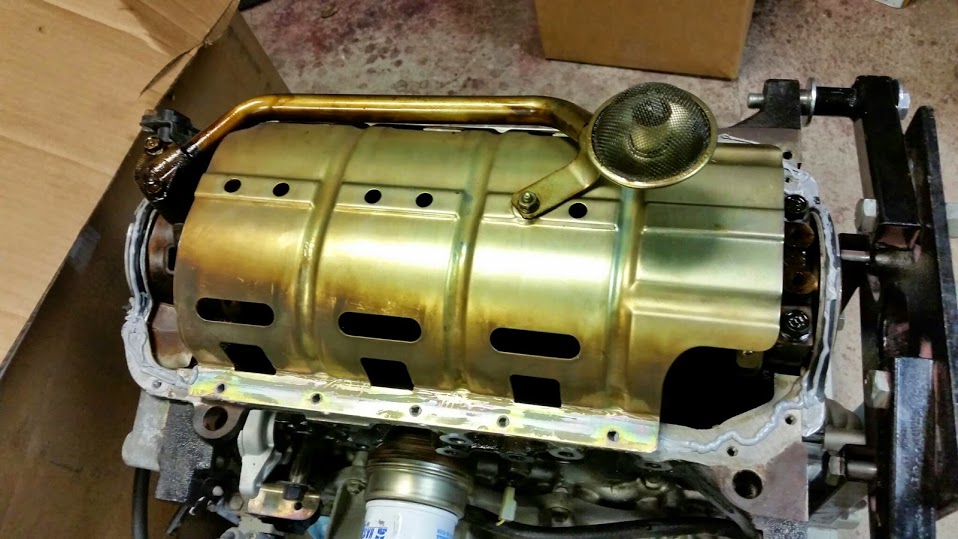
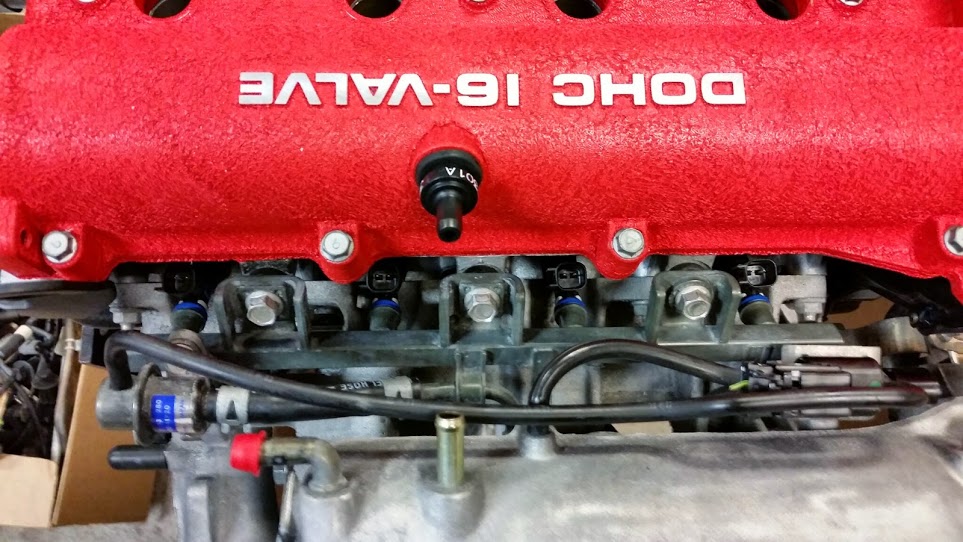
Next I began work on painting the valve cover. I like red valve covers on black cars. A friend convinced me to use wrinkle paint and make it look like a Ferrari valve cover.
I thought about powder coat, I have a small setup in the garage but was concerned about oil in the baffles leaking out during the baking process and making a mess. I have had good luck with VHT paints before and they make a wrinkle red that seemed perfect for this without the need to remove the baffles.
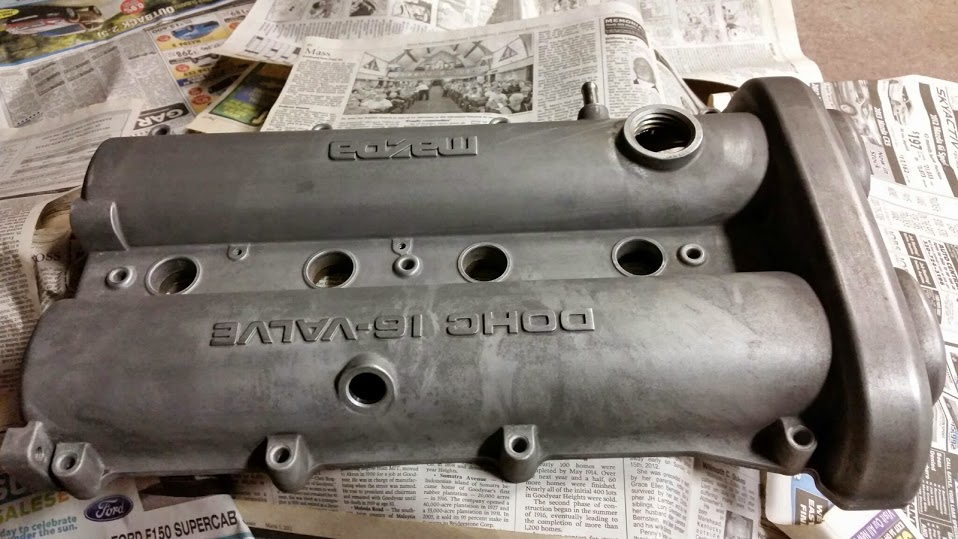
I cleaned the valve cover with mineral spirits at first and then wax and grease remover. I then scuffed it with a red scotch brite pad and wiped it down again with wax and grease remover.
The VHT wrinkle paint has very explicit directions on the requirements for the paint to wrinkle evenly. The directions call for heavy wet coats 5 minutes apart. The first coat in one direction, the next 90 degrees to the first and the third at 45 degrees. I followed the directions perfectly and made sure to lay as wet of coats as possible without creating runs.
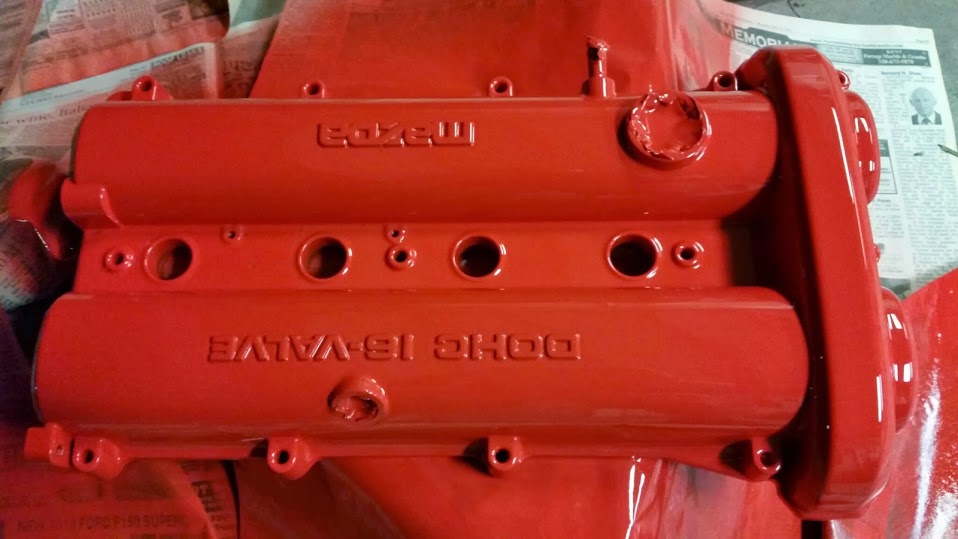
It can take a few hours for the wrinkles to appear. So I went in for the night and returned in the morning.

I think I applied the paint TOO Heavy!... The wrinkles were heavy and in the corners of the part they looked particularly pronounced. I let it cure a little longer as it can take up to 48 hours dry enough to handle it. I then used an exacto knife to carefully trim out the wrinkles from the corners.

It's hard to tell in this image but I was able to remove most of the corner wrinkles and in general clean up the finish.
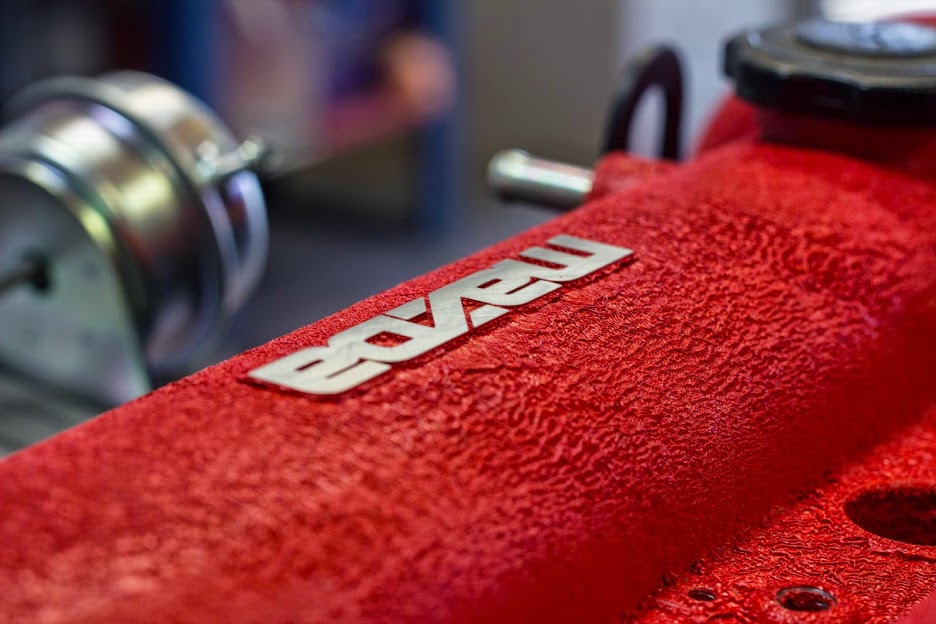
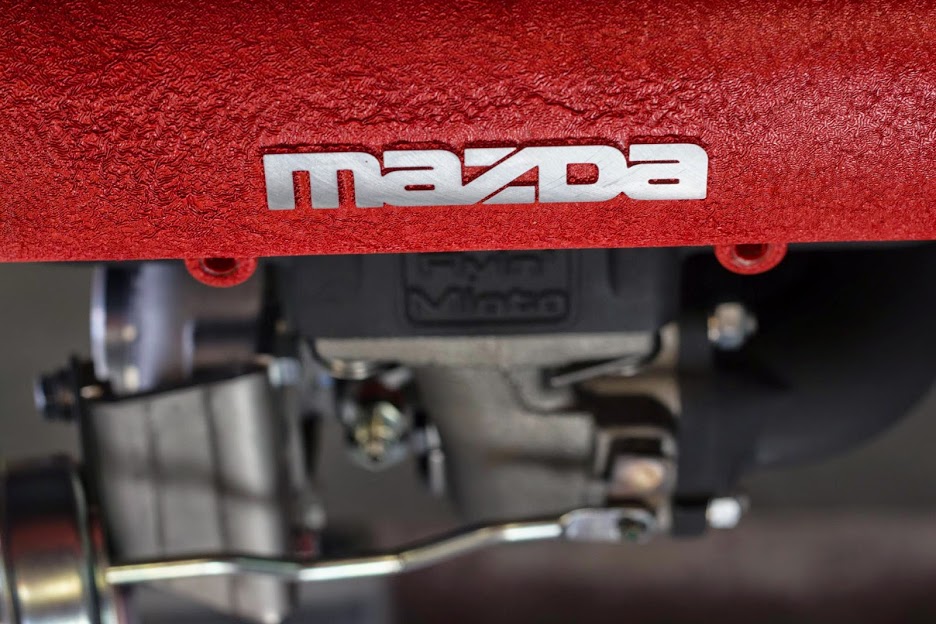
I then wanted to remove the paint from the raised letters. I made a crude jig with a piece of plywood and bolted the valve cover to the mill table.

I used a fly cutter to take a few light 0.020" passes.


It turned out pretty good. I may in the future try and redo the wrinkle finish. But I don't want to spend anymore time for now on cosmetics of the valve cover.
I thought about powder coat, I have a small setup in the garage but was concerned about oil in the baffles leaking out during the baking process and making a mess. I have had good luck with VHT paints before and they make a wrinkle red that seemed perfect for this without the need to remove the baffles.
I cleaned the valve cover with mineral spirits at first and then wax and grease remover. I then scuffed it with a red scotch brite pad and wiped it down again with wax and grease remover.
The VHT wrinkle paint has very explicit directions on the requirements for the paint to wrinkle evenly. The directions call for heavy wet coats 5 minutes apart. The first coat in one direction, the next 90 degrees to the first and the third at 45 degrees. I followed the directions perfectly and made sure to lay as wet of coats as possible without creating runs.
It can take a few hours for the wrinkles to appear. So I went in for the night and returned in the morning.
I think I applied the paint TOO Heavy!... The wrinkles were heavy and in the corners of the part they looked particularly pronounced. I let it cure a little longer as it can take up to 48 hours dry enough to handle it. I then used an exacto knife to carefully trim out the wrinkles from the corners.
It's hard to tell in this image but I was able to remove most of the corner wrinkles and in general clean up the finish.
I then wanted to remove the paint from the raised letters. I made a crude jig with a piece of plywood and bolted the valve cover to the mill table.
I used a fly cutter to take a few light 0.020" passes.
It turned out pretty good. I may in the future try and redo the wrinkle finish. But I don't want to spend anymore time for now on cosmetics of the valve cover.
Reply
0
0

Thread Starter
Junior Member
Joined: Sep 2011
Posts: 75
Total Cats: 13
From: Akron, OH
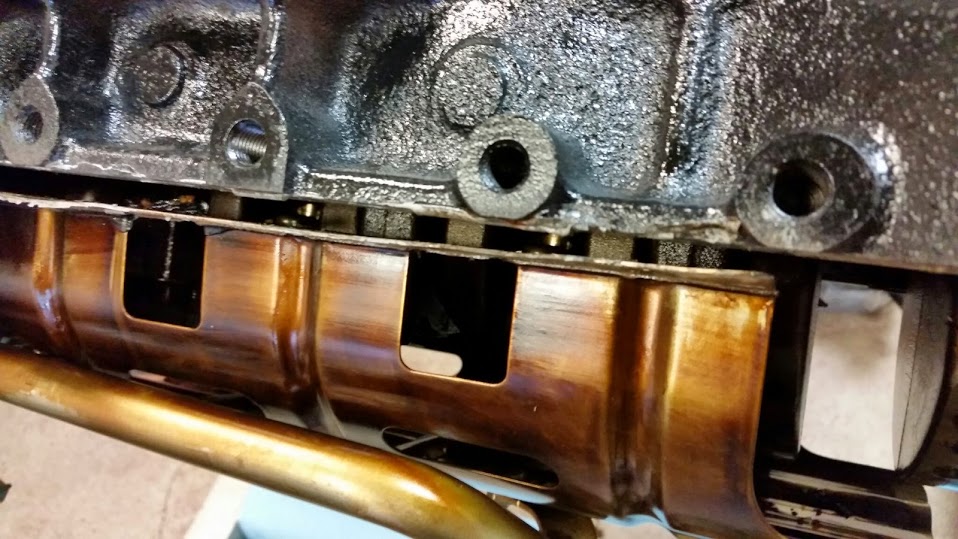
As many of you already know the Flyin Miata kit has two options for the oil return line from the turbo. They have a rubber line and the stainless line. Either oil return line requires drilling/tapping/installing a brass hose barb fitting/ and a little JB weld to attach the return line to the oil pan. They intend for this kit to be installed with the engine in the car.
I am sure this method works great. Flyin Miata has a great reputation and if there were an issue with this method I am sure this forum would call them out and they would devise a new method. I however decided to go a different route... you could say my engineer OCD kicked in...
Removing the oil pan is quiet a chore. Since I had the 1.8L engine on the engine stand I figured it would be fairly simple pulling the pan. If you have pulled the oil pan you know even on the stand its a PITA. I removed all the bolts and carefully pried at the pan until it popped free from the block. But it seemed like something was still holding it...
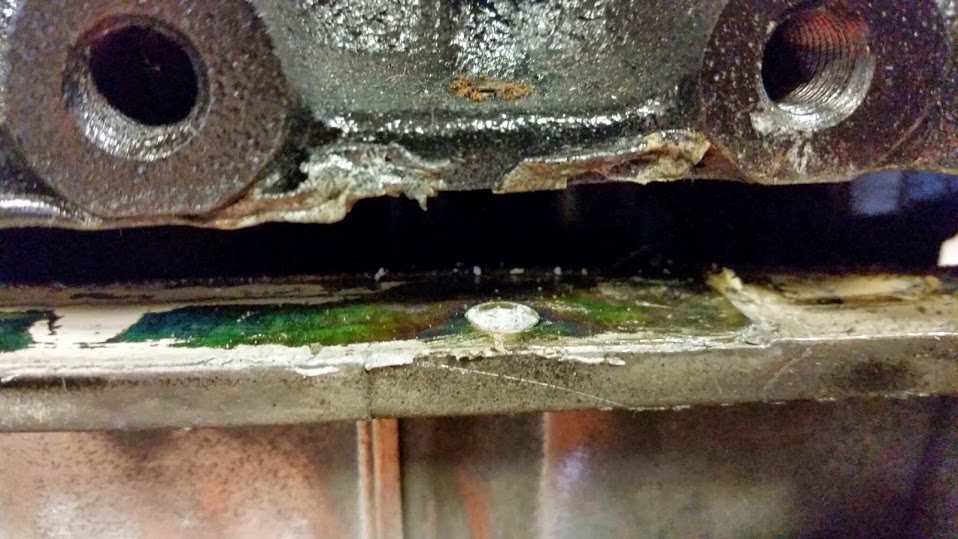
After 15 mins of cursing and searching for a hidden bolt I did a few google searches... I realized the green looking metal tab on the top of the oil pan flange was the windage tray...
I used a utility knife to score and cut the silicone between the windage tray and the oil pan. Carefully prying the pan away from the windage tray as it was easy to bend the tray flange.
After a little over an hour I had the pan off... I then carefully cleaned it up. Using a combination of de-greasers and mineral spirits I cleaned up the all the oil residue.
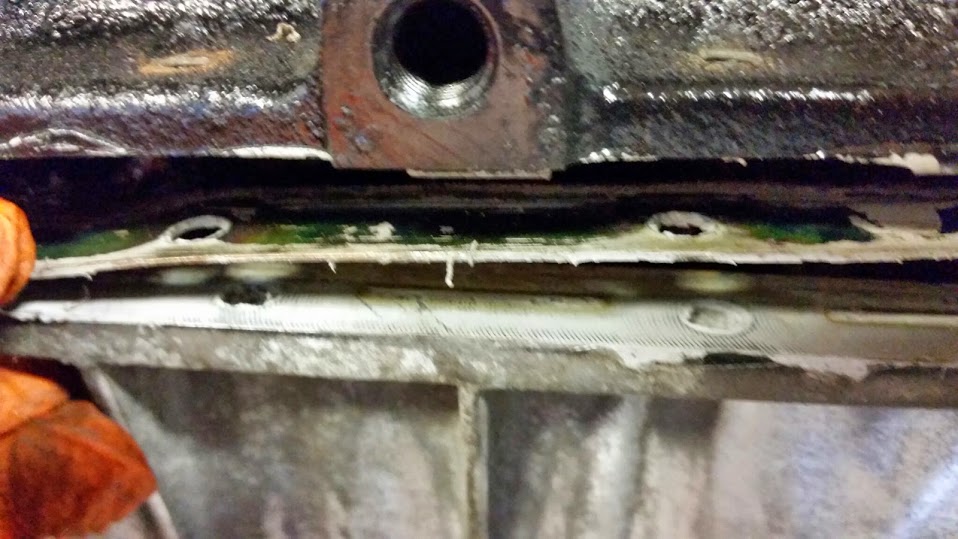
Flyin Miata recommends you drill the pan near the front (under the A/C compressor) to lessen the chance of hitting the oil pick up tube on the inside of the pan. With the pan off this isn't an issue and allows the drain line to have a more direct path from the turbo. I carefully selected the spot to drill based on research on this forum.
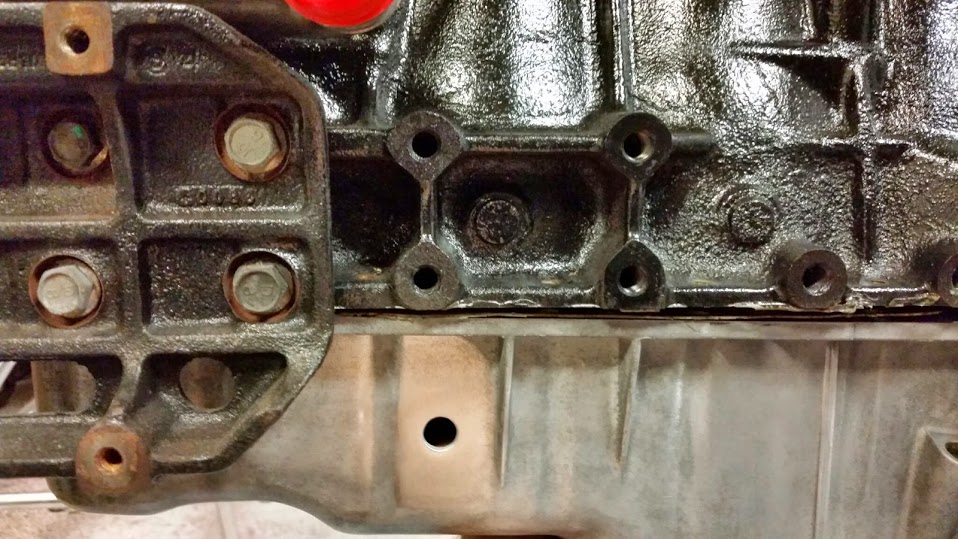
(NOTE: I drilled the pan off the motor!! If you drill it on the motor as shown here you will hit the oil pick up! Which is bad!!)
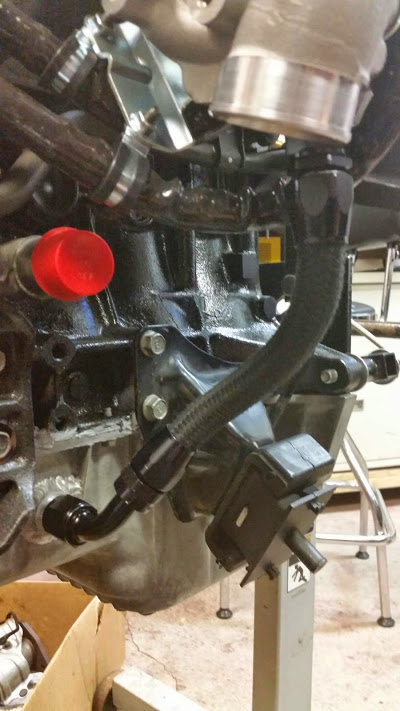
I then called in a favor... to a friend with a TIG welder.
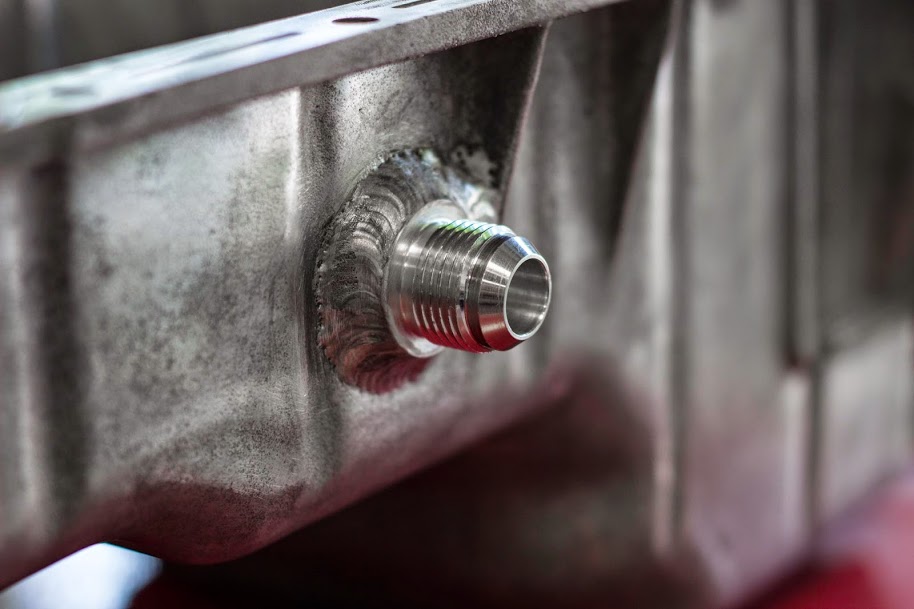
I had him weld a -10AN fitting to the pan. He is a fantastic welder and it turned out really nice. In the next post I will cover how I made the line to attach to the turbo.
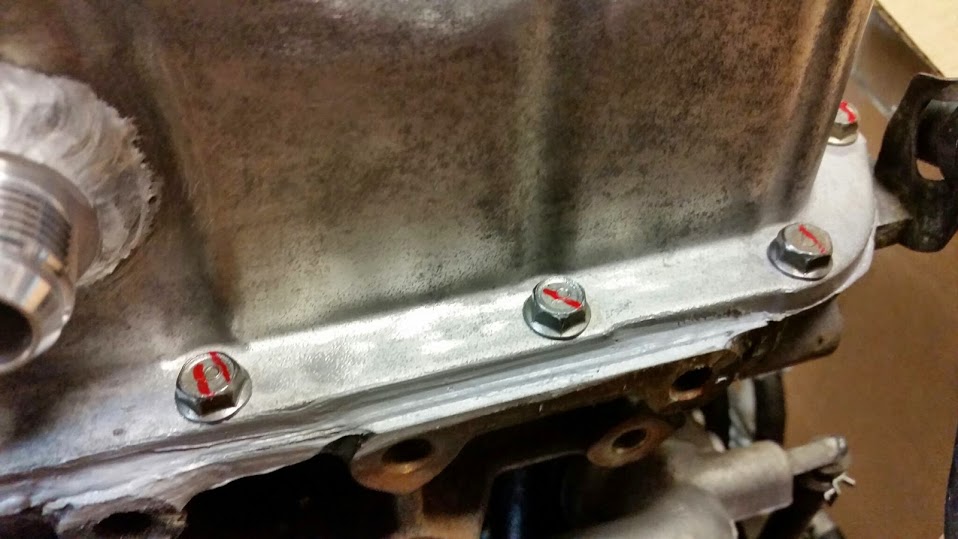
I reattached the pan using Permatex Ultra Grey carefully outlining all the bolts as the factory manual specifies.
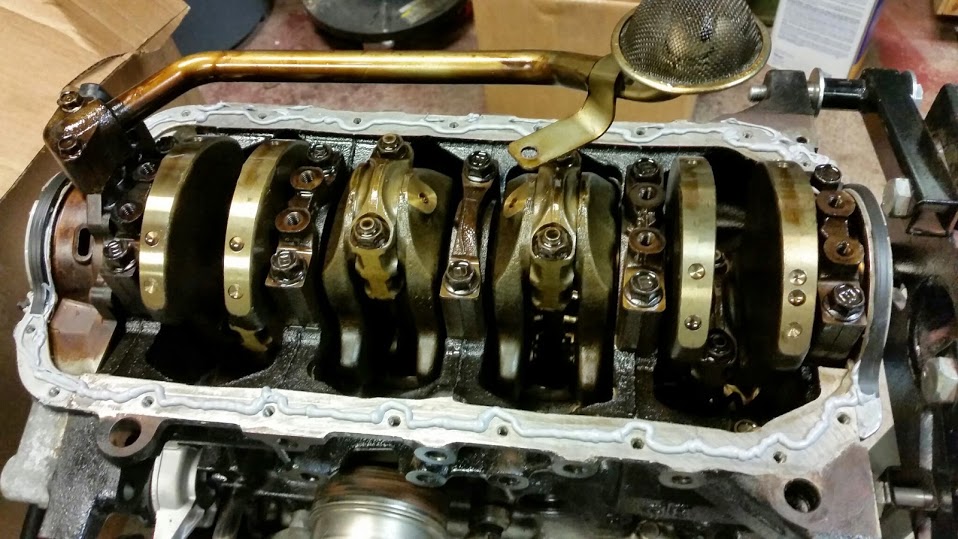
Re-installed the windage tray and new rubber seals at the front and rear of the crank and torqued all the bolts in the specified sequence. I used a red paint marker on the final pass to be sure I didn't miss any.
I am sure this method works great. Flyin Miata has a great reputation and if there were an issue with this method I am sure this forum would call them out and they would devise a new method. I however decided to go a different route... you could say my engineer OCD kicked in...
Removing the oil pan is quiet a chore. Since I had the 1.8L engine on the engine stand I figured it would be fairly simple pulling the pan. If you have pulled the oil pan you know even on the stand its a PITA. I removed all the bolts and carefully pried at the pan until it popped free from the block. But it seemed like something was still holding it...
After 15 mins of cursing and searching for a hidden bolt I did a few google searches... I realized the green looking metal tab on the top of the oil pan flange was the windage tray...
I used a utility knife to score and cut the silicone between the windage tray and the oil pan. Carefully prying the pan away from the windage tray as it was easy to bend the tray flange.
After a little over an hour I had the pan off... I then carefully cleaned it up. Using a combination of de-greasers and mineral spirits I cleaned up the all the oil residue.
Flyin Miata recommends you drill the pan near the front (under the A/C compressor) to lessen the chance of hitting the oil pick up tube on the inside of the pan. With the pan off this isn't an issue and allows the drain line to have a more direct path from the turbo. I carefully selected the spot to drill based on research on this forum.
(NOTE: I drilled the pan off the motor!! If you drill it on the motor as shown here you will hit the oil pick up! Which is bad!!)
I then called in a favor... to a friend with a TIG welder.
I had him weld a -10AN fitting to the pan. He is a fantastic welder and it turned out really nice. In the next post I will cover how I made the line to attach to the turbo.
I reattached the pan using Permatex Ultra Grey carefully outlining all the bolts as the factory manual specifies.
Re-installed the windage tray and new rubber seals at the front and rear of the crank and torqued all the bolts in the specified sequence. I used a red paint marker on the final pass to be sure I didn't miss any.
Reply
0
0
Thread Starter
Junior Member
Joined: Sep 2011
Posts: 75
Total Cats: 13
From: Akron, OH
Time for an update. I've accomplished a good bit and I am going to try and catch up on these over the next few days we will see how it goes.
So I left off with the oil pan modifications and TIG welding an AN -10 bung...
I have a friend that gets good deals on Aeroquip products so I sent him the part numbers and he had everything in a few days. He recommended their Startlite hose for a turbo oil drain line. I used some Kobalt triple cutters to cut the line to size. Then I fit the fittings on both ends. Per a few threads I found I used a 60 degree fitting on one end and straight on the other.
I ended up cutting the line twice (measure once cut twice� right?), the first time I left it a little too long. It still might be a touch long but I am going to try it like this. I still have enough hose to make a few more if I accidentally cut it too short.
Next I removed the old stock injectors�
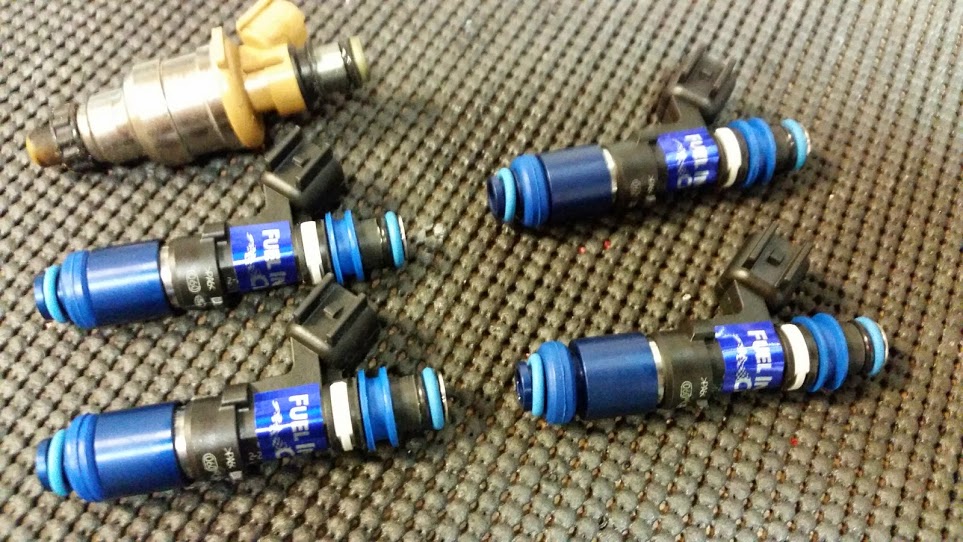
�and replaced them with new Fuel Injector Clinic 650cc units.
They came with pigtails that need to be spliced in. They also offer them with adapters but I wanted to simplify and clean up the wiring versus adding more connections. (It also saves a few bucks going without)
So I left off with the oil pan modifications and TIG welding an AN -10 bung...
I have a friend that gets good deals on Aeroquip products so I sent him the part numbers and he had everything in a few days. He recommended their Startlite hose for a turbo oil drain line. I used some Kobalt triple cutters to cut the line to size. Then I fit the fittings on both ends. Per a few threads I found I used a 60 degree fitting on one end and straight on the other.
I ended up cutting the line twice (measure once cut twice� right?), the first time I left it a little too long. It still might be a touch long but I am going to try it like this. I still have enough hose to make a few more if I accidentally cut it too short.
Next I removed the old stock injectors�
�and replaced them with new Fuel Injector Clinic 650cc units.
They came with pigtails that need to be spliced in. They also offer them with adapters but I wanted to simplify and clean up the wiring versus adding more connections. (It also saves a few bucks going without)
Reply
0
0
Thread Starter
Junior Member
Joined: Sep 2011
Posts: 75
Total Cats: 13
From: Akron, OH
Next I worked on the interior. I needed a space to mount my NGK AFX wideband gauge as well as a some switches (data logging, traction control (possibly), launch control, etc), I also wasn't keen on leaving the USB cable to Megasquirt just dangling under the dash or floor so I wanted to mount a jack on/in the dash somewhere. The MS also has the ability to log data to an SD card. However, the SD card slot is mounted to the side of the MS which gets mounted under the carpet in the passenger footwell. Not very convenient to pull it out to check a quick log.
First I ditched the OEM 1.5 DIN Mazda radio and picked up a modern single DIN Pioneer with bluetooth. I still like to drive the Miata to work most days in the summer so a radio is nice to have. I also ditched the pocket below the radio.
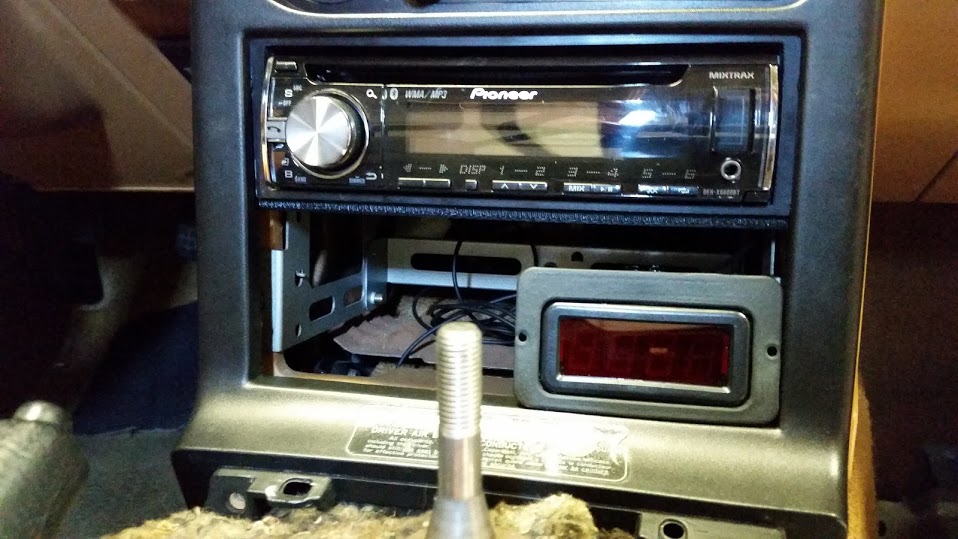
I designed a mount for the NGK AFX controller/display, since it only ships with a piece of velcro (lame). I made a simple bracket and 3d printed it on my Makergear M2 printer using ABS plastic. The design allows for it to be mounted in the dash and be pulled out through the front so I can re-calibrate it from time to time without having to pull the entire dash apart to get to it.
Here is the mount after acetone vapor bathing the printed part, which helps to smooth and strengthen the part.
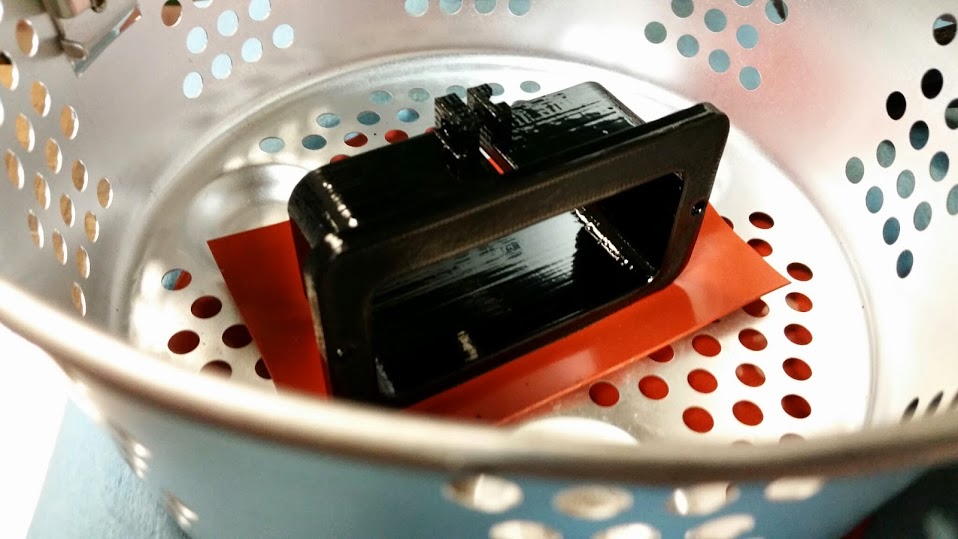
I need to design the mounting plate to fill in the area under the radio that will hold the NGK AFX bracket above, some switches and the microphone for the bluetooth phone. Things started to get a little crowded even with the extra space. So I decided to move the USB jack for the MS and the SD card slot to their own panel. I designed a bracket to mount them under the glove box. This seemed like another fine application for the 3d printer.
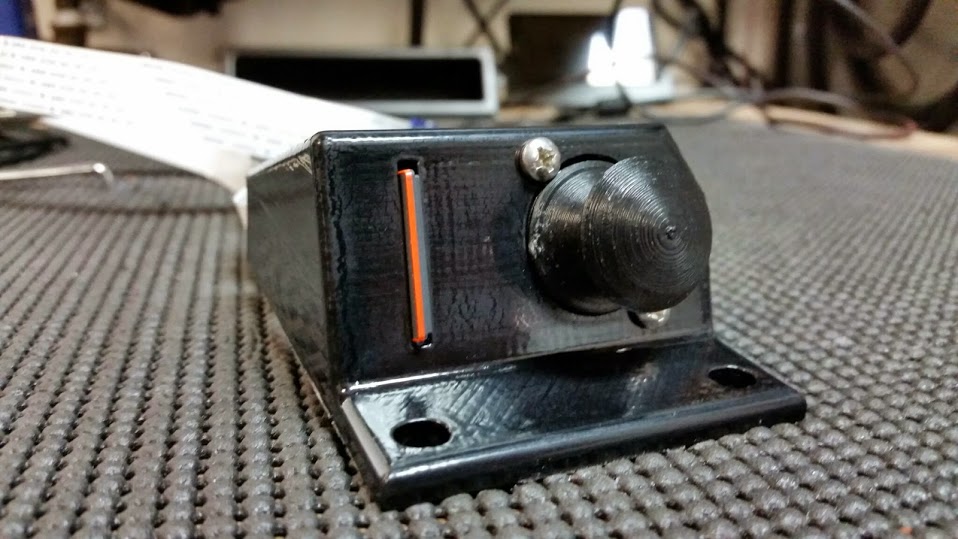
I also printed a simple plug to cover the USB jack when not in use.
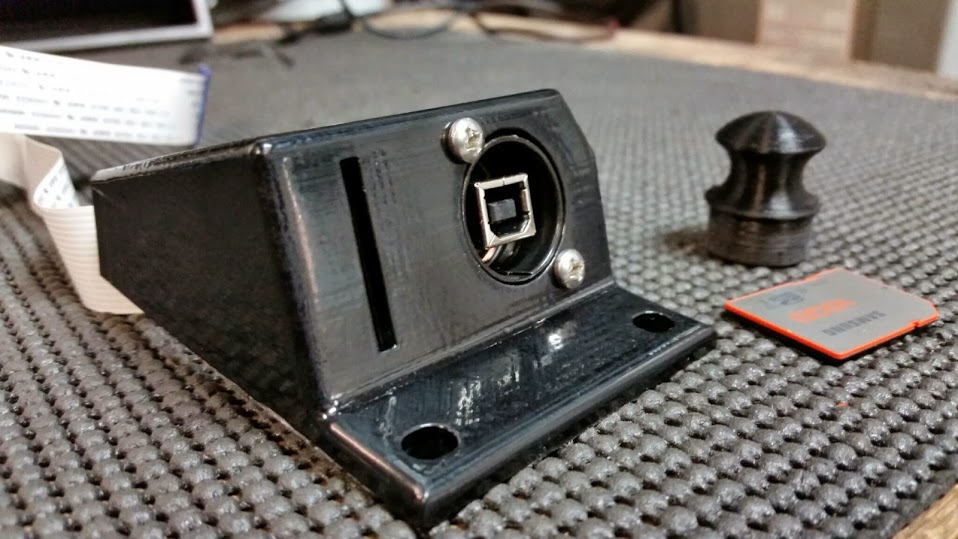
Mounted.


I still need to finish the design for the dash center panel. I think version one I will 3d print and if it works out well I will probably try and machine something nicer.
First I ditched the OEM 1.5 DIN Mazda radio and picked up a modern single DIN Pioneer with bluetooth. I still like to drive the Miata to work most days in the summer so a radio is nice to have. I also ditched the pocket below the radio.
I designed a mount for the NGK AFX controller/display, since it only ships with a piece of velcro (lame). I made a simple bracket and 3d printed it on my Makergear M2 printer using ABS plastic. The design allows for it to be mounted in the dash and be pulled out through the front so I can re-calibrate it from time to time without having to pull the entire dash apart to get to it.
Here is the mount after acetone vapor bathing the printed part, which helps to smooth and strengthen the part.
I need to design the mounting plate to fill in the area under the radio that will hold the NGK AFX bracket above, some switches and the microphone for the bluetooth phone. Things started to get a little crowded even with the extra space. So I decided to move the USB jack for the MS and the SD card slot to their own panel. I designed a bracket to mount them under the glove box. This seemed like another fine application for the 3d printer.
I also printed a simple plug to cover the USB jack when not in use.
Mounted.
I still need to finish the design for the dash center panel. I think version one I will 3d print and if it works out well I will probably try and machine something nicer.
Reply
1
1

I've actually been contemplating getting one of those SD card extension cables for my ms3x lately. Cool to see someone else using one.
Still jealous of the diyCNC mill.
Still jealous of the diyCNC mill.
Reply
0
0


Great work so far. I love how clean and meticulous you're being with everything, it's going to save you some headaches in the future. Is the motor in the car yet or are you waiting to tackle it during the winter?
Reply
0
0
Thread Starter
Junior Member
Joined: Sep 2011
Posts: 75
Total Cats: 13
From: Akron, OH
Thanks guys.
The 1.6L motor is nearly ready to be pulled everything is disconnected but the motor mounts and trans mounts. Trying to line up help to assist with pulling it has been tough (friends have crazy work schedules). I am keeping myself occupied working on details like the wiring and cleaning. If I run out of details before I can get a friend to help I may try pulling it solo. The best way to pull it sounds like engine and Trans together I have a Harbor Freight Puller and load leveler so it should be doable.
Good news is I keep making progress on other things so once the motor goes in it should be that much closer to being ready to run.
Reply
0
0


