
First Shot at Building a Motor


Thread Starter
Junior Member
iTrader: (1)
Joined: Dec 2015
Posts: 143
Total Cats: 41
From: Fairfax, VA
So I had been playing with the idea of building a motor ever since this obsession started. I have a build threat on this forum called my turbo miata budget build in which i successfully turbo'ed my miata as close to "the right way" as I could for around $2300. I was pretty satisfied with that accomplishment but I of course started thinking about what was next. Then the budget build started to wither away and I picked up a GT2560, Flow Force Injectors, and a custom downpipe from Artech. The car made even more power and I was very happy with it. Then i started thinking, this 2560 has more it it that I would like to explore. However, I dont want to blow my motor and that would be getting close to bent rods territory.
I started thinking about building a motor on the side but i could never justify it financially. My thought was if I build a motor and make more power, I will probably have transmission issues. If i buy a 6 speed that should help but ill have a terrible gear ratio (currently running a 4.3 Torsen). Therefore I would need to source at least a 3.9 Torsen. The dollars would always add up way too fast so i always said screw it. Then I found what appeared to be the perfect deal.
I drove 4 hours south and picked up the complete drive line from a 1999 10AE that a guy had pulled out to do a LFX swap. He was just looking to get it out of his garage so he sold it all for a couple hundred more than a 6 speed alone. He said that if had been smoking and burning oil so he had the head rebuilt. Unfortunately it continued afterwards (more on that later)
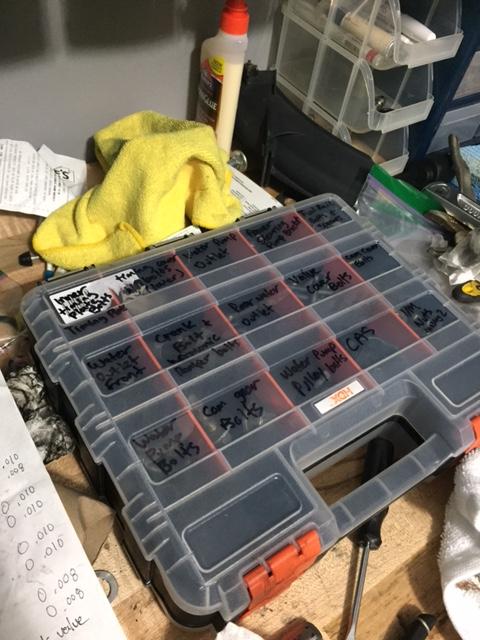
Got it home and onto a motor stand (thanks to my wife who actually lifted it off the floor with me to get it on there) and started tearing it down. Its actually quite fun and relaxing to take a motor apart. I even bought some organizers to keep track of all the bolts and where they go.
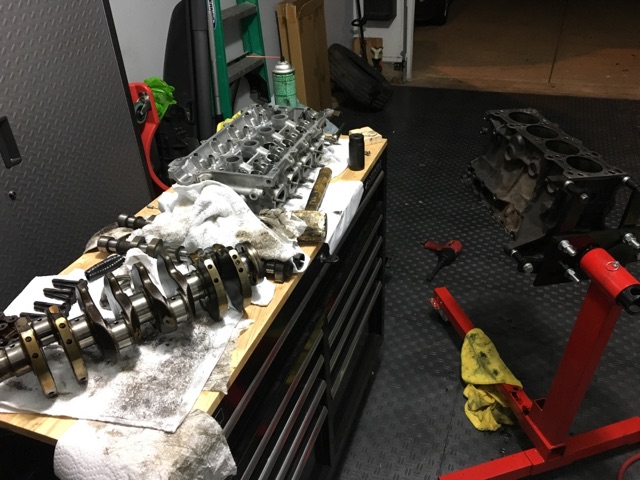
As of now I have it down to the short block.
Im sure my plans will change as this whole thing progresses but I plan to build a motor capable of around 320 whp. I dont want to start replacing all the other supporting mods I have so I don't foresee going higher than a GT2871. Initially I will just use this motor to squeeze every last drop i can out of my current 2560.
Here's where I might lose some of you, but my plan is to do a rods only build. I have talked to a few different folks on this forum who have made big power on OEM pistons and i think thats the way I want to go. Remember my aim is to build a motor capable of 320 or so whp, not 500 hp.
Right now I'm trying to decide if I should keep the 99's current 9.5:1 compression pistons, or source some used 9:1s from an NA8 and run those.
Now lets get to the tear down and some pictures.
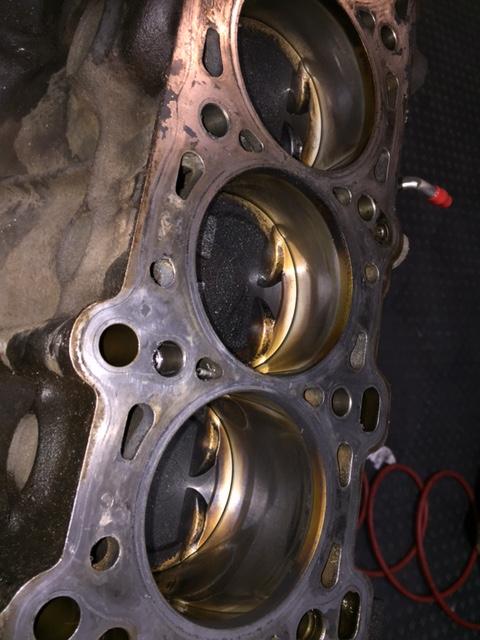
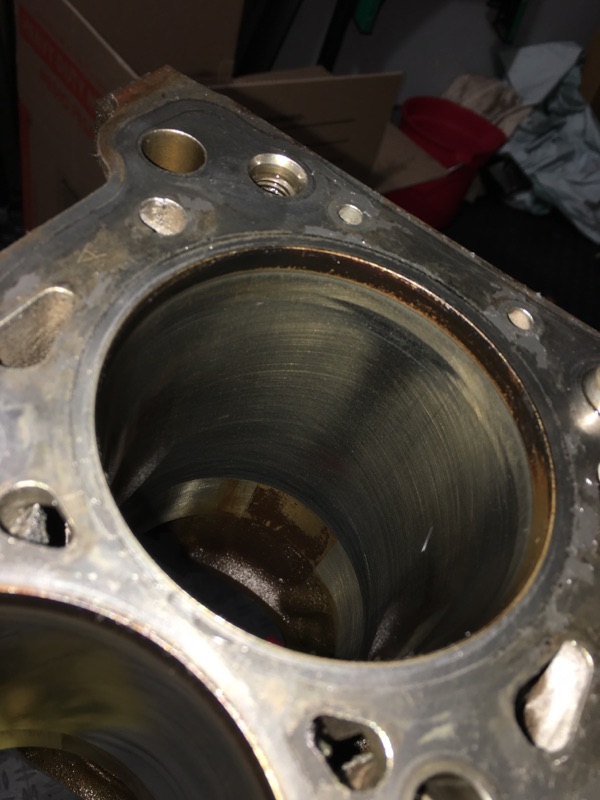
Before i tore the motor down I did a leakdown test on it. the results were freaking terrible. It had upwards of 50% leakage on some cyliners and all were at least 30%. All of it also seemed to be coming from the exhaust valves (easy to hear that with no exhaust manifold on there!
Better still, when i took the head off, I turned it upside down, filled the bowl with water then blocked the exahust port with a block of wood with a small hole and injected compressed air to see if the valves were sealing. Sure enough all the exhaust valves bubbled like crazy when i did this. On one cylinder the intake valves were also leaking. The fact the guy said it was still burning oil leads me to believe that the valve stem seals may also be garbage. Pretty bummed that Im going to have to have a "rebuilt head" rebuilt. But I should expect these things to happen, given the price i paid for all of it.
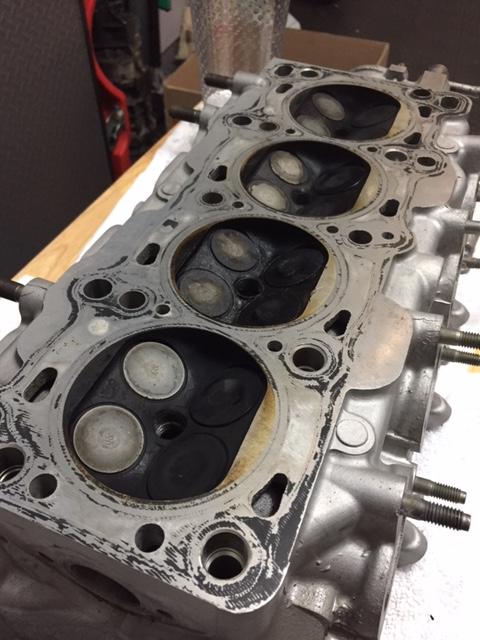
Also it looked like the cylinder 2 spark plug hole had a heli coil or something inserted into it....great. Its also got a good chunk taken out of the aluminum near the intake valves.
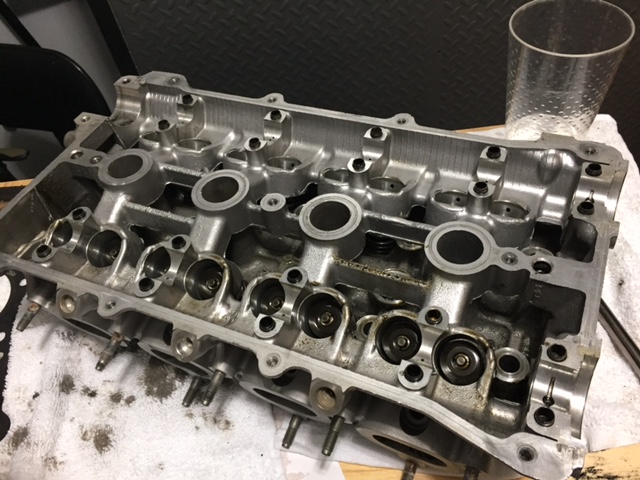
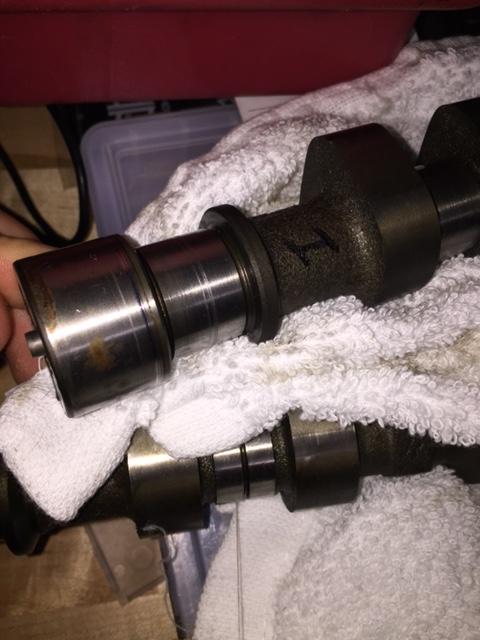
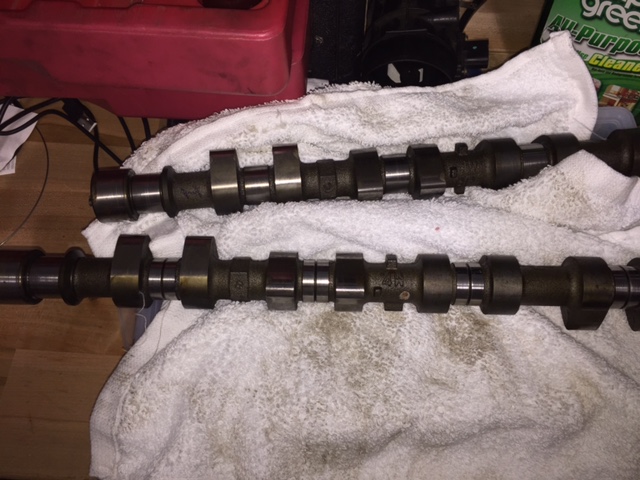
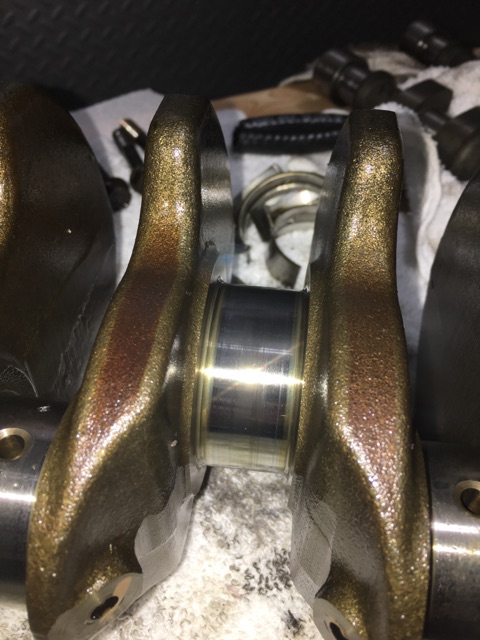
Im not sure what bad cam wear looks like but didnt see any glaring problems. there seemed to be some wear on the front most intake side cam cap and cam journal.
Pistons look ok and the walls don't seem to have any wear. They look glazed but maybe that because they were all sucking in a ton of oil.

If there is anything you all more experienced people see that are big red flag or things i need to look at closer, let me know. Im giving this a shot and hope to come out successful on the other end.
I started thinking about building a motor on the side but i could never justify it financially. My thought was if I build a motor and make more power, I will probably have transmission issues. If i buy a 6 speed that should help but ill have a terrible gear ratio (currently running a 4.3 Torsen). Therefore I would need to source at least a 3.9 Torsen. The dollars would always add up way too fast so i always said screw it. Then I found what appeared to be the perfect deal.
I drove 4 hours south and picked up the complete drive line from a 1999 10AE that a guy had pulled out to do a LFX swap. He was just looking to get it out of his garage so he sold it all for a couple hundred more than a 6 speed alone. He said that if had been smoking and burning oil so he had the head rebuilt. Unfortunately it continued afterwards (more on that later)
Got it home and onto a motor stand (thanks to my wife who actually lifted it off the floor with me to get it on there) and started tearing it down. Its actually quite fun and relaxing to take a motor apart. I even bought some organizers to keep track of all the bolts and where they go.
As of now I have it down to the short block.
Im sure my plans will change as this whole thing progresses but I plan to build a motor capable of around 320 whp. I dont want to start replacing all the other supporting mods I have so I don't foresee going higher than a GT2871. Initially I will just use this motor to squeeze every last drop i can out of my current 2560.
Here's where I might lose some of you, but my plan is to do a rods only build. I have talked to a few different folks on this forum who have made big power on OEM pistons and i think thats the way I want to go. Remember my aim is to build a motor capable of 320 or so whp, not 500 hp.
Right now I'm trying to decide if I should keep the 99's current 9.5:1 compression pistons, or source some used 9:1s from an NA8 and run those.
Now lets get to the tear down and some pictures.
Before i tore the motor down I did a leakdown test on it. the results were freaking terrible. It had upwards of 50% leakage on some cyliners and all were at least 30%. All of it also seemed to be coming from the exhaust valves (easy to hear that with no exhaust manifold on there!
Better still, when i took the head off, I turned it upside down, filled the bowl with water then blocked the exahust port with a block of wood with a small hole and injected compressed air to see if the valves were sealing. Sure enough all the exhaust valves bubbled like crazy when i did this. On one cylinder the intake valves were also leaking. The fact the guy said it was still burning oil leads me to believe that the valve stem seals may also be garbage. Pretty bummed that Im going to have to have a "rebuilt head" rebuilt. But I should expect these things to happen, given the price i paid for all of it.
Also it looked like the cylinder 2 spark plug hole had a heli coil or something inserted into it....great. Its also got a good chunk taken out of the aluminum near the intake valves.
Im not sure what bad cam wear looks like but didnt see any glaring problems. there seemed to be some wear on the front most intake side cam cap and cam journal.
Pistons look ok and the walls don't seem to have any wear. They look glazed but maybe that because they were all sucking in a ton of oil.
If there is anything you all more experienced people see that are big red flag or things i need to look at closer, let me know. Im giving this a shot and hope to come out successful on the other end.
Last edited by kmo25; Aug 31, 2017 at 08:19 PM.
Reply
 1
1

1


Thread Starter
Junior Member
iTrader: (1)
Joined: Dec 2015
Posts: 143
Total Cats: 41
From: Fairfax, VA
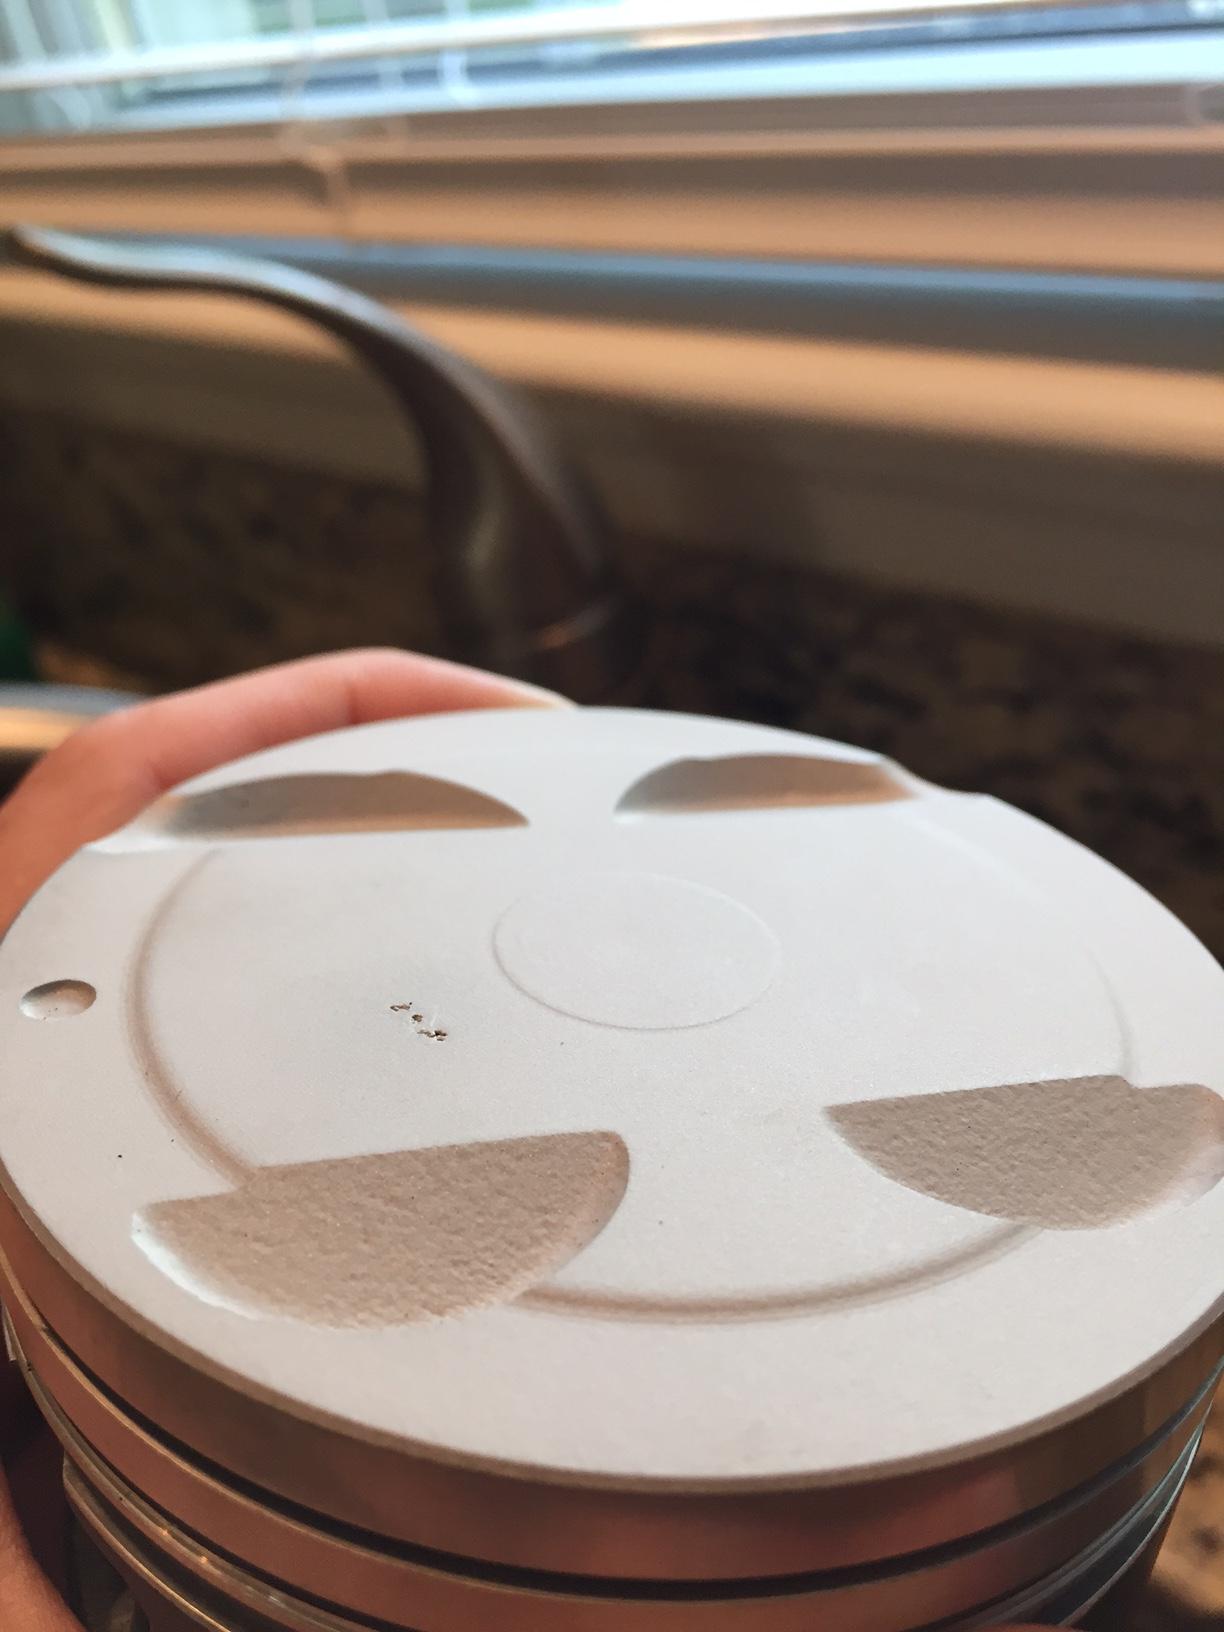
Alright well the motor is officially torn down. things looks pretty decent overall but sure enough, the cylinder with the new spark plug insert and gouge in the head casting over the piston showed the most wear. Piston looked to have some light detonation on the side. Cylinder two had what looked a bit like pitting but I couldnt really feel anything with a fingernail so Im not sure how bad it is.

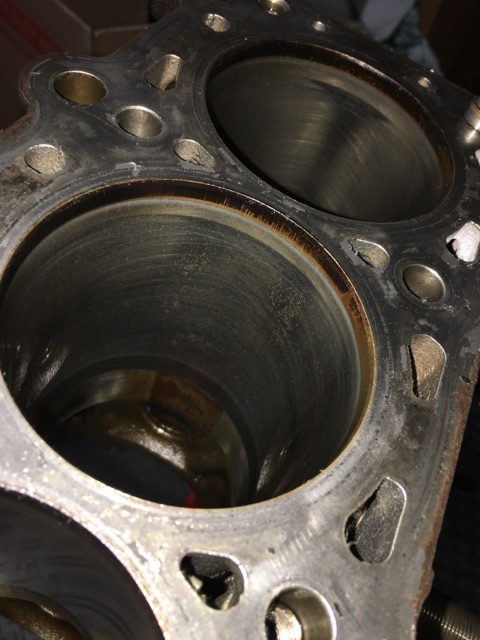
Im planning to use OEM pistons so Im only planning to have the cylinders honed. Hopefully this light damage can be removed with a hone.
All the others look like this.
Here are a few pictures of the crank

Im planning to use OEM pistons so Im only planning to have the cylinders honed. Hopefully this light damage can be removed with a hone.
All the others look like this.
Here are a few pictures of the crank
Reply
0
0
Thread Starter
Junior Member
iTrader: (1)
Joined: Dec 2015
Posts: 143
Total Cats: 41
From: Fairfax, VA
Alright so I picked up some used 9:1 coated pistons. Unfortunately one of them has a defect on the piston top. I've talked to several people (still need to talk to the machine shop) and I have received mixed opinions. Most will agree its not ideal (myself included), but most of these folks have also said it likely wont cause an issue to run these.
I'm interested in the opinions of those of here. Keep in mind, I understand this imperfection is not ideal. At the same time trying to source a single piston in good condition with the same compression and have it coated would start moving towards not being a cost effective solution. Bring in the "your halfway to forged pistons" argument.
The imperfection is in the piston iteself, not the coating. Possible a casting defect, does not appear to be detonation damage based on location and shape but its always possible still.
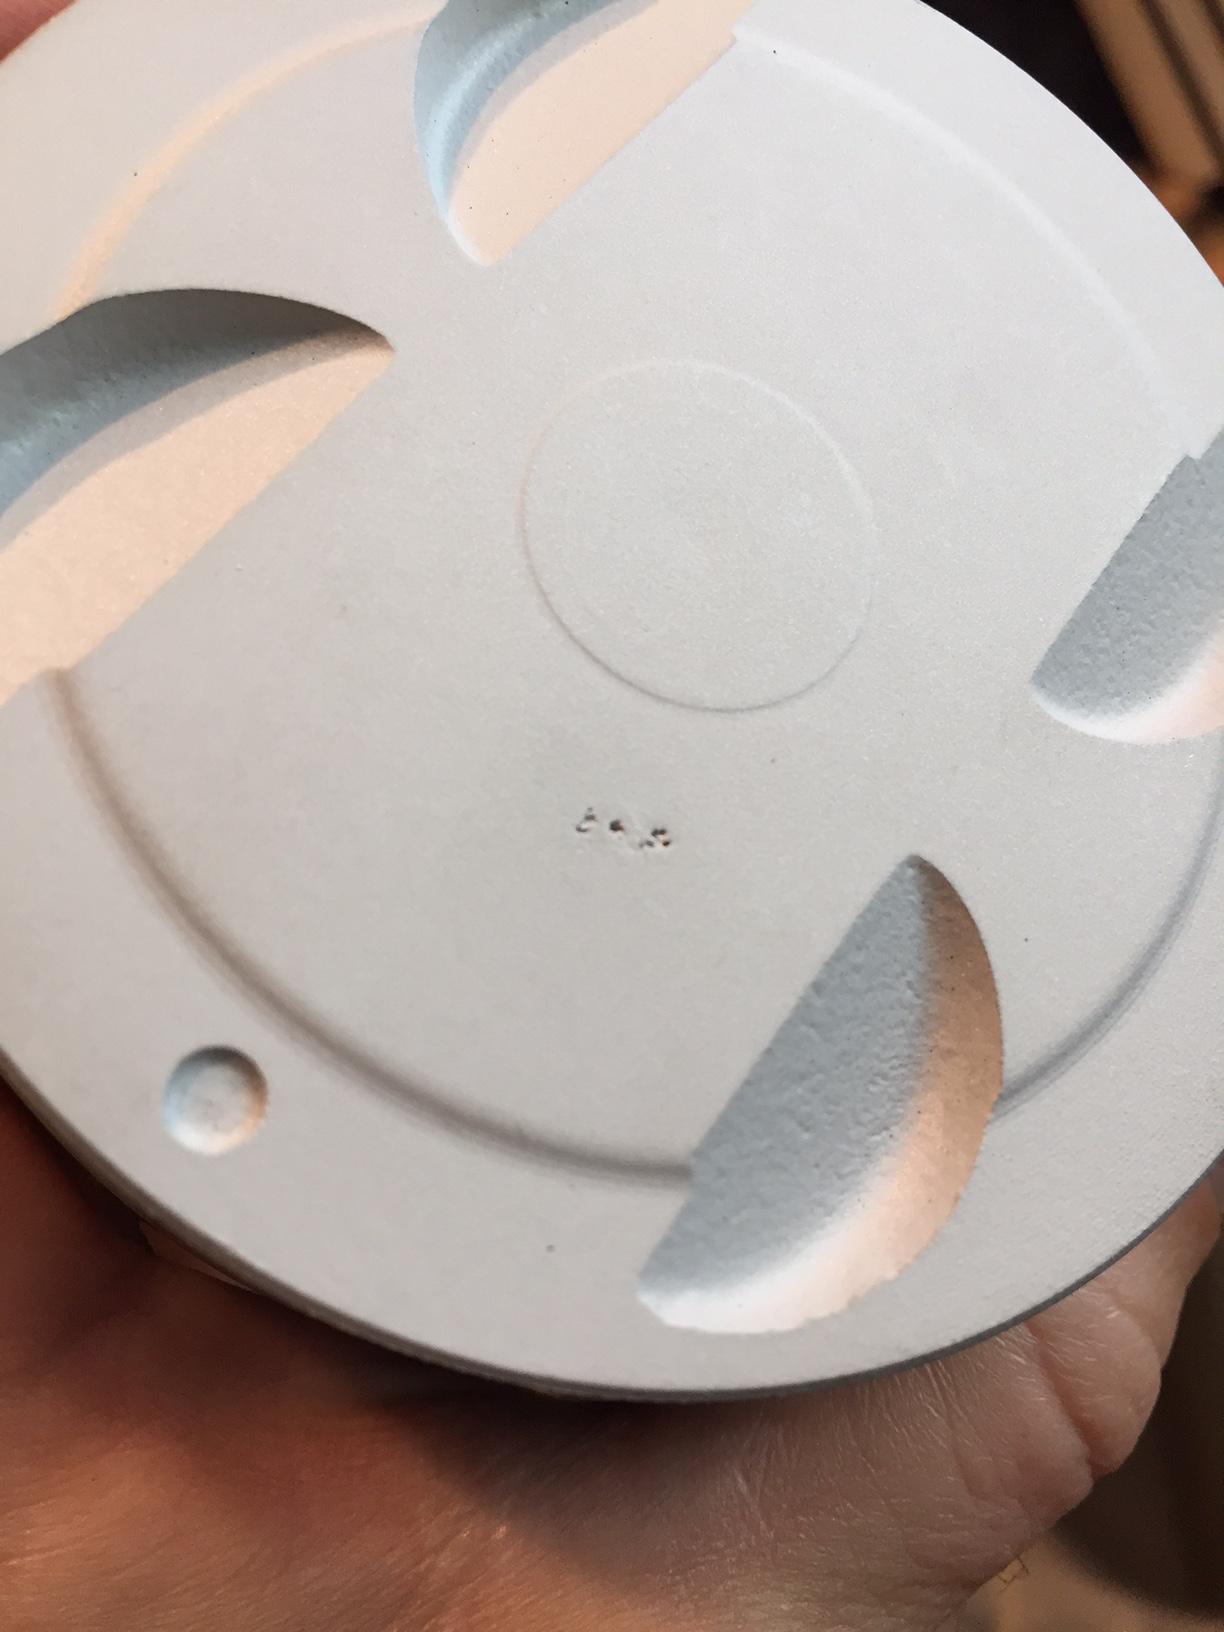
Reply
0
0


Senior Member

Joined: Apr 2016
Posts: 790
Total Cats: 188
From: Atlanta
^hahaha. LOL'd.
Why didn't you deal with the scoring in the cylinder before you got pistons? If they need to bore the cylinders to remove all the scoring, you're looking at aftermarket pistons anyway.
What are you planning to do re: oil pump and harmonic damper? I'm building a motor with a '95 bottom end and a '99 head with similar power goals as yours. I haven't made up my mind. Some say it's essential, some people are running stock oil pump up to 400hp without issues.
I had much more scoring on the cam journals than you. The guys at the machine shop didn't seem too concerned about it.
Reply
-1
-1


Thread Starter
Junior Member
iTrader: (1)
Joined: Dec 2015
Posts: 143
Total Cats: 41
From: Fairfax, VA
^hahaha. LOL'd.
Why didn't you deal with the scoring in the cylinder before you got pistons? If they need to bore the cylinders to remove all the scoring, you're looking at aftermarket pistons anyway.
What are you planning to do re: oil pump and harmonic damper? I'm building a motor with a '95 bottom end and a '99 head with similar power goals as yours. I haven't made up my mind. Some say it's essential, some people are running stock oil pump up to 400hp without issues.
I had much more scoring on the cam journals than you. The guys at the machine shop didn't seem too concerned about it.
Why didn't you deal with the scoring in the cylinder before you got pistons? If they need to bore the cylinders to remove all the scoring, you're looking at aftermarket pistons anyway.
What are you planning to do re: oil pump and harmonic damper? I'm building a motor with a '95 bottom end and a '99 head with similar power goals as yours. I haven't made up my mind. Some say it's essential, some people are running stock oil pump up to 400hp without issues.
I had much more scoring on the cam journals than you. The guys at the machine shop didn't seem too concerned about it.
In a perfect world I would run the BE pump and ATI damper, but its not a perfect world is it?
Talked to the machine shop about the piston today. This is the same shop that has built two 400+whp motors on this forum so I imagine they know a thing or two as well. They weren't worried about.
At the end of the day, these are all just opinions, some based on more knowledge and expertise than others but all worthy of consideration.
sixshooterI would JB Weld a quarter over the bad spot to protect the piston.
Reply
0
0

If you're buying an oil pump, get the NB2 replacement.
I think all the NB pumps are NB2 pumps now though. I think they replaced them, but I'd make sure it was for the NB2 motor!
I think all the NB pumps are NB2 pumps now though. I think they replaced them, but I'd make sure it was for the NB2 motor!
Reply
0
0
Glad you might be able to use the Pistons after all. You should see if you can find one that's fine and get it coated for the peace of mind if that's going to bother you.
I'm still having second thoughts about having sold those since I'm planning on doing the exact thing you are!
I'm still having second thoughts about having sold those since I'm planning on doing the exact thing you are!
Reply
0
0
Thread Starter
Junior Member
iTrader: (1)
Joined: Dec 2015
Posts: 143
Total Cats: 41
From: Fairfax, VA
While i wait for word from the machine shop i figured i would start cleaning the partts i had removed from the car. They were filthy. Everything was covered in oil and scale. The intake manifold was a real treat. It actually had standing oil in the runners and was full of grease and grime. Wanting a fresh start i looked into ways to clean them. The one thing I didnt try was oven cleaner. Figured i would try various things to see how they worked. I tried
Carb cleaner
Brake cleaner
Kerosene
Mineral Spirits
simple Green
Dish Soap
Eagle one Mag wheel etching cleaner
I also picked up a siphon gun for de-greasing motors at harbor freight. Basically you hook it up to you compressor and feed the line into the solvent you want to use and it sprays the solvent like a mini power washer. Used this with mineral spirits with pretty good success.
kerosene and Mineral spirits both work pretty good. I found carb cleaner broke down the grease better than brake cleaner. I don't understand why Simple Green gets so much love, I think it generally sucks and always seems to leave a film on things. The Mag wheel cleaner is amazing on metal that has already had the heavy grease removed but it makes the aluminum look brand new (because it etches and is made of acid) However, its potent stuff, I would rather not use it if i can help it.
I got the insides of the manifold pretty damn clean, still some slight areas of grime but im not worried about it.
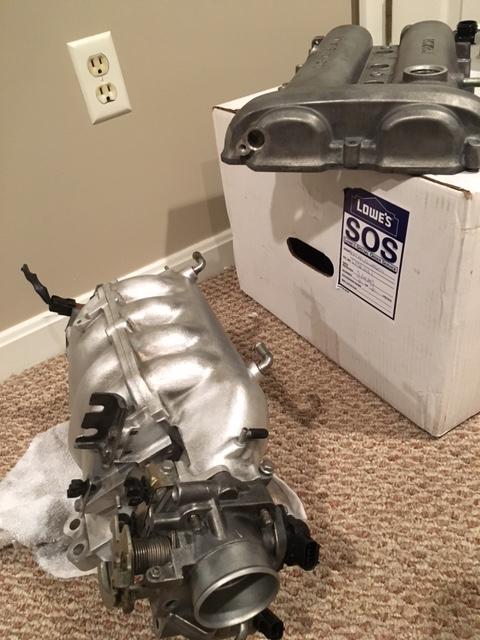
I also hit the manifold with a wire wheel to get off some of the deposits. Oddly enough (or perhaps not) it began polishing the aluminum. I had planned to paint the manifold black but for the hell of it i just kept going with the wire wheel. I actually like how it looks. Its not polished smooth to a mirror finish, but certainly has a lot more shine than the regular casting. I think I will keep it this way.
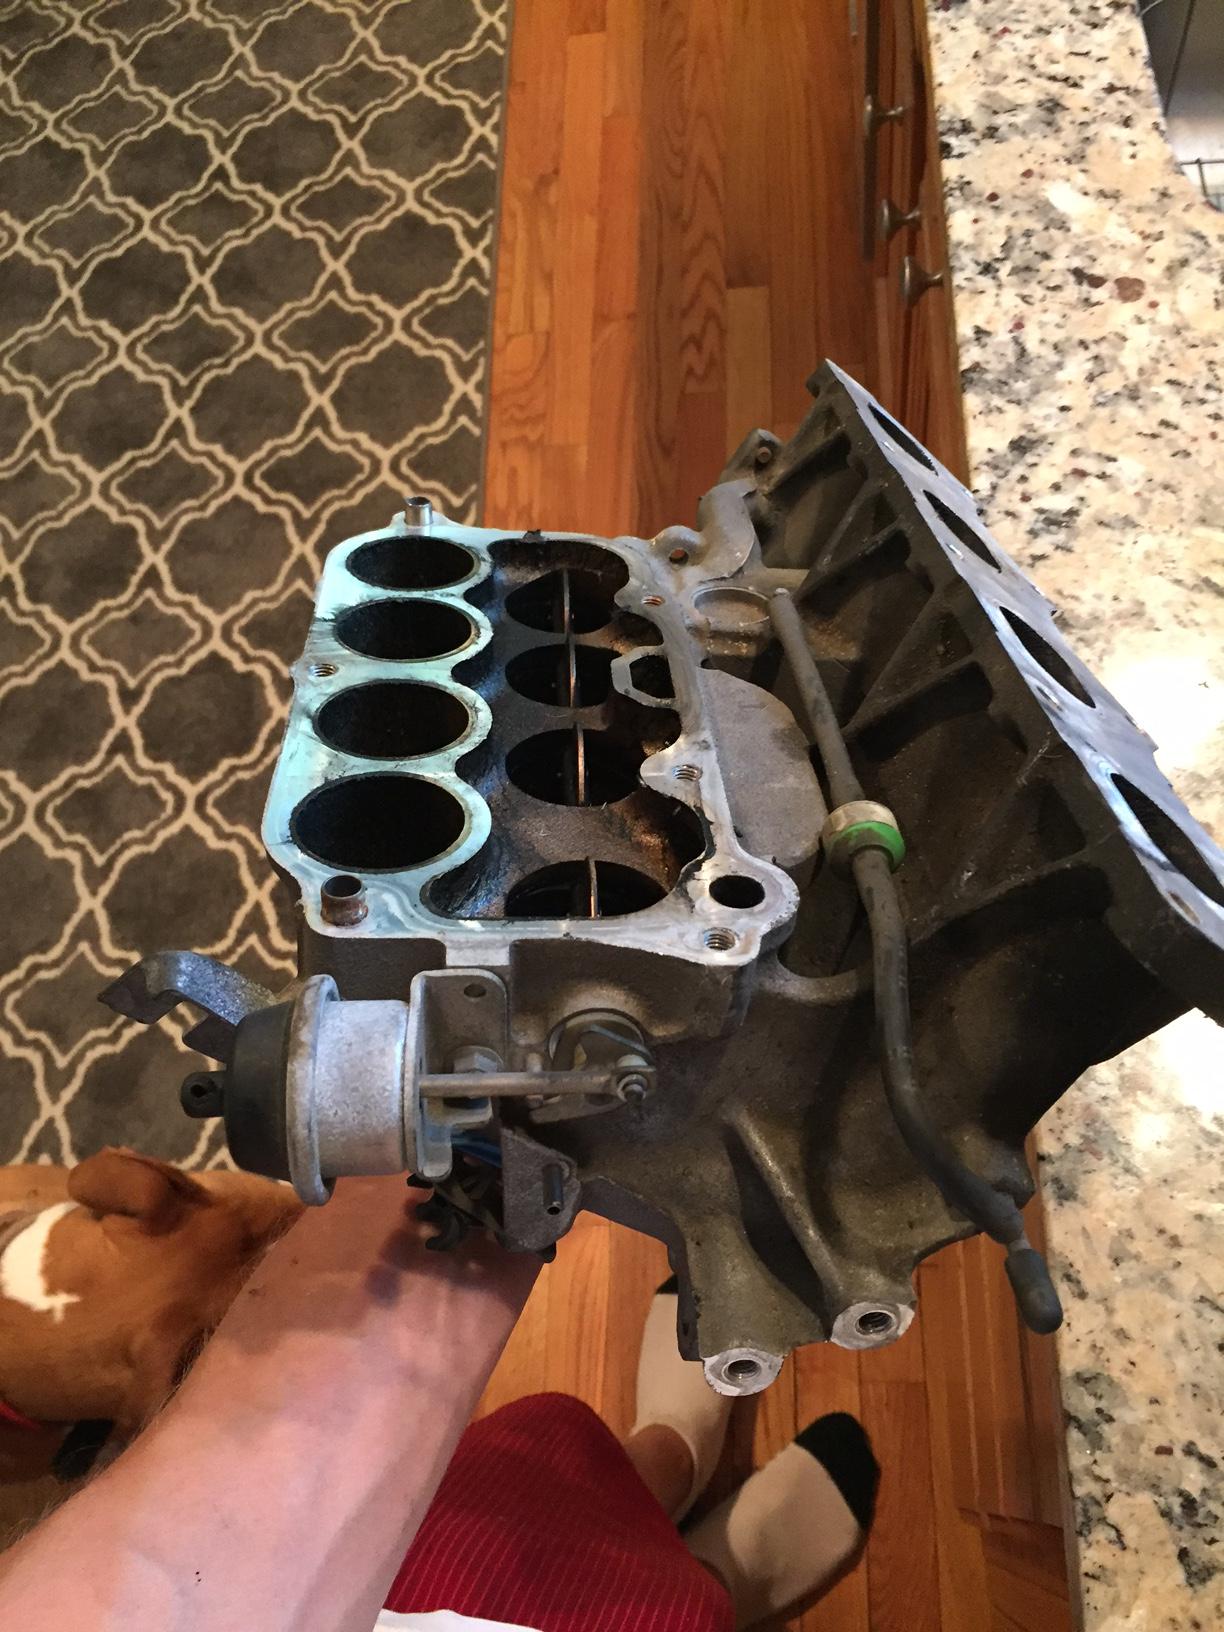
Before:
After:
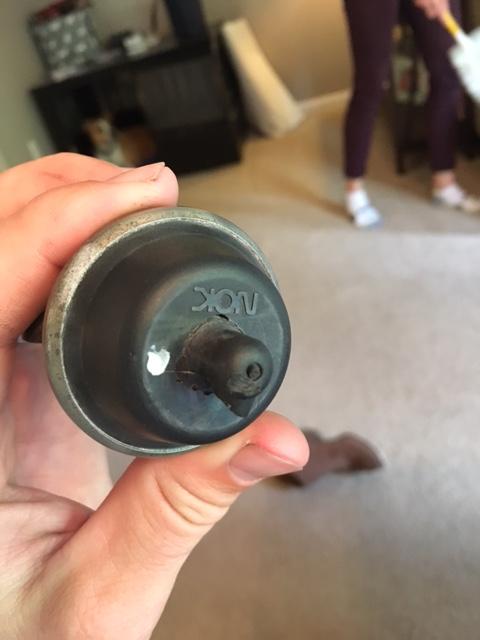
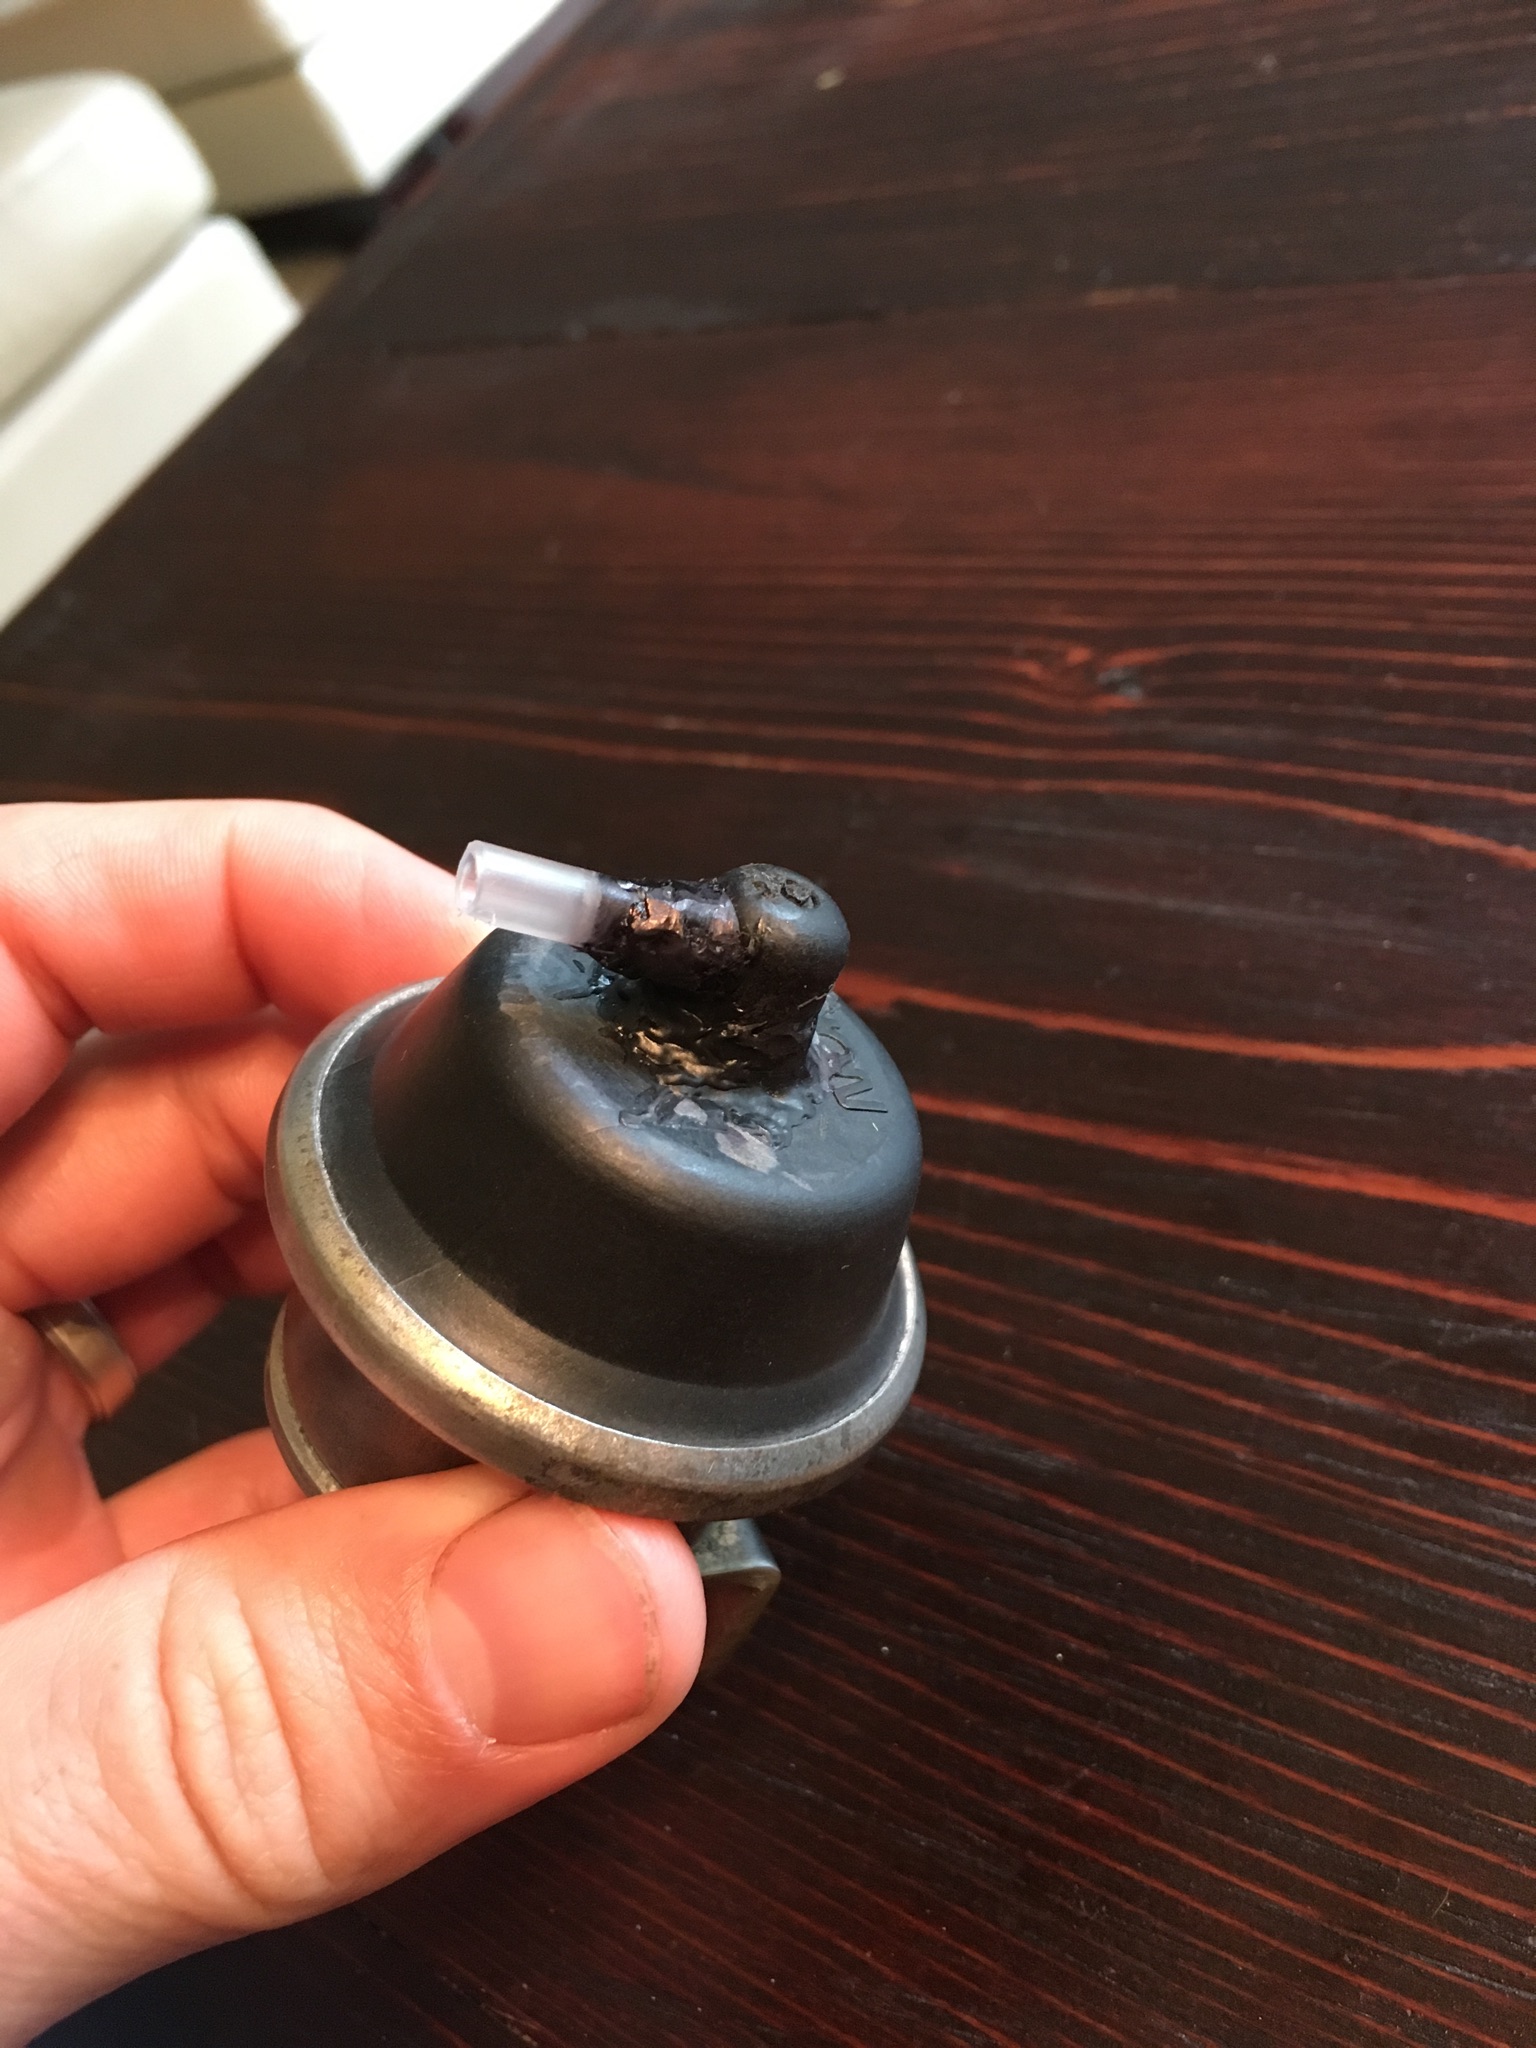
The previous owner had broken the VICS actuator, both the nipple and the entire circumference of where it attaches. I could not seem to find replacements anywhere for one of these so I said screw it and bought some plastic bond epoxy stuff by permatex. I also noticed that the clear straw piece on spray bottles was exactly the right size to fit vacuum hose. I drilled out the nipple to the outer diameter of the plastic "straw" thing and epoxied it in. It aint pretty but perfectly repaired the actuator and saved me some headache and money.
Carb cleaner
Brake cleaner
Kerosene
Mineral Spirits
simple Green
Dish Soap
Eagle one Mag wheel etching cleaner
I also picked up a siphon gun for de-greasing motors at harbor freight. Basically you hook it up to you compressor and feed the line into the solvent you want to use and it sprays the solvent like a mini power washer. Used this with mineral spirits with pretty good success.
kerosene and Mineral spirits both work pretty good. I found carb cleaner broke down the grease better than brake cleaner. I don't understand why Simple Green gets so much love, I think it generally sucks and always seems to leave a film on things. The Mag wheel cleaner is amazing on metal that has already had the heavy grease removed but it makes the aluminum look brand new (because it etches and is made of acid) However, its potent stuff, I would rather not use it if i can help it.
I got the insides of the manifold pretty damn clean, still some slight areas of grime but im not worried about it.
I also hit the manifold with a wire wheel to get off some of the deposits. Oddly enough (or perhaps not) it began polishing the aluminum. I had planned to paint the manifold black but for the hell of it i just kept going with the wire wheel. I actually like how it looks. Its not polished smooth to a mirror finish, but certainly has a lot more shine than the regular casting. I think I will keep it this way.
Before:
After:
The previous owner had broken the VICS actuator, both the nipple and the entire circumference of where it attaches. I could not seem to find replacements anywhere for one of these so I said screw it and bought some plastic bond epoxy stuff by permatex. I also noticed that the clear straw piece on spray bottles was exactly the right size to fit vacuum hose. I drilled out the nipple to the outer diameter of the plastic "straw" thing and epoxied it in. It aint pretty but perfectly repaired the actuator and saved me some headache and money.
Reply
0
0


