When you click on links to various merchants on this site and make a purchase, this can result in this site earning a commission. Affiliate programs and affiliations include, but are not limited to, the eBay Partner Network.
I started with a model in Solidworks. This is the final revision shown, they started off slightly different.
I basically just guessed every dimension. I didn't take any measurements. I took the initial revision and cut it out of some scrap fiberglass reinforced composite and used that as a check.
I tried to test fit one of those and took notes on what was wrong and what was right (not much was right, surprise). I made the changes I felt would be necessary, I bought a 12"x12" sheet of .075 304 stainless from McMaster. The old brackets were some 16? gauge home depot carbon steel so they were a bit too flexible and started to rust from recent humidity. I didn't wanna go thicker because I wanted these to be flexible enough to bend themselves into shape as I tightened them.
Exported a dxf, set up the program for the water jet.
Had a bit of a mess up where the steel slipped on the water jet, so I ended up with two trashed brackets, but the second set came out okay.
They ended up still not fitting just due to some dimensional aspects that are hard to measure. So I had to take a side mill to two of the bolt holes to slot them more, but they still look okay.
They are great so far, much less flex, no more rust, no ugly sharp jagged edges.
I also decided to replace my pads and rotors. I had been running whatever came on the car since I bought it. I don't know for sure what they were, I suspect Carbotech due to the lack of corrosion. I did 8 track days and about 12,000 street miles on them, they were good for the most part. Started to get a bit squeaky, and I found that I was pushing the car to the point where I'd be cooking the pads and blowing braking zones after 4-5 hot laps.
Had a friend hook me up with a set of PFCs for a great deal, that being said they were still more than sticker price for G-Locs.
I went with the 11 compound up front with the 97 compound in the back. I did new Centric rotors all around with the transparent coating so they don't rust over and look ugly. Two of them came in a Stoptech box, I think I remember reading Cetric OEMs some of the Stoptech stuff.
All went smooth besides one rear pad requiring some slight dremeling to fit into the caliper, and my dumb *** rounding out the front two caliper bracket bolts. Didn't realize they'd be 1mm smaller up front versus the rear caliper brackets. New stainless bolts went in.
These are definitely true racing brakes. 11 compound is OEM for 991 GT3 cup cars. They don't even have the little holes for the spreading springs that go up front.
I did zero bed in. I was told they basically don't require it, even on new rotors. The first 5-6 stops were sketchy, but as the pads and rotors cleaned themselves off, they bit pretty hard. Almost ate my wheel on the highway when I felt them grab with near full force.
I took the car to the track again a few days later. Conditions were good once the sun got low, track wasn't super hot, no wind blowing dust everywhere. PFCs were awesome, zero fade issues, awesome bite, release, and modulation characteristics. I was backing up several of my braking zones by half a marker with the improved confidence these gave me.
I went out around 6:45 and started banging out some hot laps with the lack of traffic. Ended up beating my previous best several times during a 45ish minute session, culminating in a 2:16.2, a 7 tenths improvement over my old PB.
Frustratingly, I kept seeing a high 2:15 indicated on my predicted timer, but I would either get caught up by a slow car, or would lose several tenths in the same series of corners. My optimal dropped from a 2:15.9 to a 2:15.0, so I am confident with another good weather day, I could snag that goal 2:15.x time. I'm not sure how much track time I'll get through the rest of the year.
No idea when it happened. I only saw when I was cleaning the brake dust off the wheels. I did a track day about 5 days prior, but I also did a few hundred street miles too. I would guess they broke at the track based on the reputation of this wheel. Adjacent spoke was fracturing in two places as well.
Well it has been an expensive couple of weeks (relative to what I am used to).
I ordered a set of 15x9.5 Konig Freeforms from Good-Win at the beginning of this month after mulling over the lack of enticing wheel options for a couple of weeks.
I was stuck between bronze or silver but ultimately went with silver.
Wheels showed up, I took them to a tire shop managed by a friend and had the 225 RS4s stretched on. He was very generous not to charge me to swap the tires from the 6ULs onto these.
I took the wheels back to a friend's garage and we had a little bit of a ceramic coating party while the wheels were still clean. He ceramic coated his NDs OEM BBS and a set of bronze 15x9.5 Freeforms he had picked up with 245s on them. Was good to be able to compare finishes in person.
It was while ceramic coating and I was up close and personal with the wheels I was able to note the quality. I'm not usually one to complain about this kinda stuff, but there were a few spots of dust underneath the coating, divots in the finish where no coating was present, and some burrs left on the hub surface where some sloppy machining had occurred. Guess that's what you can expect for $160 a wheel. Not stuff that you'd notice realistically and they're track wheels anyway so they don't need to look perfect since I'll trash them anyway.
Then came the task of making them fit.
As far as I could tell, the fenders were unrolled and unmodified for the 6ULs. Good-Win notes that 15x9.5 +29 should fit NBs with just a flat roll for 245s, but mine have 225s on them. I ended up checking clearance with my friends bronze wheels just to make sure that they'll fit a 245 when I eventually go that way.
It was my first time rolling fenders. I opted to take my time and do it alone. I have seen some other people roll their fenders and immediately turn some perfect sheet metal into crispy waves of bacon so I elected to be patient and do it right. I hit the paint with a heat gun, I tried to avoid rolling too much at once, I used a dremel to notch the fender lip where it meets the bumper, I cut the fender liner tabs up front and trimmed the liner, and I even used touch up paint on the areas I cut to prevent any rust forming on the raw edge.
I also disconnected a coilover front/rear so I could articulate the wheel fully and get an idea of how easy it was get clearance.
Here's the clearance on the rear with just a flat roll and said 245s.
They do indeed fit with just a flat roll. I did minimal pulling. A keen eye might be able to see a couple of very gentle kinks on one or two of the corners but overall I think I did okay. The whole operation probably took me...7 hours?
And finally she sat on the new wheels.
(Needs more tire, IMO. But these 225s are going to last me a while at this rate.)
So anyway, with my shiny new ceramic coated wheels, I took the car out for the last Thursday night open lapping day of the year. I met another Miata friend out there. It was a very smoky day due to the wildfires all around the country, but weather was pretty good, not super hot anymore.
(His car has a built motor, turbo and aero so it's a bit quicker than mine)
I tried to get as many laps in as possible before it got dark. I really wanted that 2:15.x I have been shooting for the last few months. I knew I had it in me, and I was really pushing on the laps I had no traffic.
Two or three laps in a row, I had a 2:15.x indicated on my lap timer, and when I went for the 4->5 shift, 5 was just nowhere to be found. I wasn't rushing my shifts or doing anything out of the ordinary. I just could not find the gear. Something just felt off with the gearbox. Even when I could not find 5th, I had trouble going back and finding 4th. I took the car into the pits and ran it through the gears and everything was still there, so I got back out and was very slow and deliberate with my shifts with no issues, but by that point I was catching traffic and sunlight ran out, so I resigned my hopes of a 2:15 to a different day.
I drove the car home as usual, everything felt fine on the drive home, but upon reaching my home, there was a new issue: I was locked out of reverse. Car on or off, clutch in or out, going to 1st then back to reverse, rolling it backwards, I tried everything you can think of, there was no reverse anymore. Notably, there was also no 5th when stationary, but as soon as I was moving, I was able to access it, albeit if I tried to reach it at low speeds, the shift felt pretty awful.
So after some facebooking and some googling, I came to two scenarios:
1) The 5th gear synchro, already worn out, decided to just go kaput during my track session. Google-fu seems to indicate that 5th and reverse share a synchro (Or is that just a 5 speed thing?), thus why I am unable to access either while stationary. I support this theory because 5th gear was always a bit tricky at times ever since I bought the car, even just cruising on the highway without the MiataRoadster kit I would find myself missing the 4-5 shift.
2) In my uncontrollable violent rage of watching my 2:15 slip away due to a botched gear change, I bent a shift fork in anger while trying to find 5th gear. I would believe this theory because I did apply what was in retrospect, too much force to the extended shifter trying to find the gear. But I don't support this theory because 5th and reverse do not share a shift fork. If a bent fork was the cause, I would be unable to use 5th or 6th.
So because I am an idiot and daily my track car, I did some digging that weekend and determined that I could either A) spend $800 for a rebuild kit and try to find a shop to rebuild my gearbox for me = $$$ or B) Buy a new transmission.
I went with B. I was able to source a JDM 6 speed out of a 10AE that allegedly has around 50k miles on it. From what I could find, JDM Miata transmissions/engines never came with VIN plates, so I can't verify the mileage. That being said, even with freight shipping from Houston, this 6 speed was a good buy compared to the completely unknown miles unknown condition local one I could find.
Yesterday morning, myself and some friends gathered to do the swap. Removing the seats and peeling back the carpets so I could drop the butterfly brace is always fun. I recruited a friend (with the turbo-aero Miata pictured above) to help, and he basically single-handedly dropped the gearbox himself in about 2 hours on the ground. Due to time constraints and me being stupid, we elected to reuse the throwout bearing from the removed gearbox, and did not replace any seals on the new one besides swapping the sensors over. Of course, I swapped over the Miata Roadster shifter. The JDM box and new slave cylinder went in with the help of the same friend in another 2 hours, and I was able to send him on his way so I could button up the fluid, exhaust, butterfly brace, and interior.
So far, the new gearbox feels good, shifts are certainly less crunchy than the outgoing box, there may be just some slight differences I need to get used to in terms of where the gears seem to be.
As for the old box, I'm not sure on my plans yet. I was told by Walter Motorsports (shop behind the built Miata gearboxes) that as a core, it's worth about $650 to them. Doing some digging even just for individual synchros online shows a wide range of prices, up to $200 for a single synchro, plus the labor of trying it myself might be more than I want to bite off. I have a feeling the box will sit in a storage closet for a while until I know for sure what I want to do with it.
My 6 speed has done the same thing a few times 5th and reverse disappear. Get the car moving and they come back. It's a pain. I'm about the pull it out and put in the original 5 speed back in, while swapping over to a 4.3 in the back. Curious about what you end up doing with your old one. I'd like to sell mine for parts or something to make up for the cost.
I still have the old box sitting around. I don't know what to do with it yet. It's good as worthless on the second hand market. The guys at Walter Motorsports told me that a good 6 speed core is worth a $750 core refund, and mine is perhaps worth $650 with the parts he suspects are broken.
But I'd have to mail it to GA and they'd have to disassemble it to figure out what it's worth.
I have been enjoying the new transmission. It feels notably better than the last one once it's warm. I have yet to tear down the old one. I am curious what is busted, wonder if its related to the detent pin on 6 speeds that people often accidentally remove and lose 5th and reverse.
Currently having some fun tracking down a transmission leak that seems to have appeared after my first track day with the new box. It appears to be the reverse switch, which can leak through the body of the switch apparently, as I observed some fresh oil where the wires exit. If not that, it must be the factory gasket where the housing comes together. Really hoping it's the switch...
I was at the regional NASA season closer this past weekend supporting a friend in his new-to-him race car. While the car was terribly underpowered for his class, we had a fun time pretending we were on a real racing team.
While there, I saw they were weighing the competitor cars after each race for impound. Even though I wasn't an HPDE participant or anything, they let me throw my car on the scales with myself and about half a tank of gas in it.
Full interior, AC, PS, hardtop, soft top, roll bar, butterfly brace, spare, etc. any guesses?
I got a good deal on a "lightly" used BBFW spoiler (seems like they're all cracked ffs). Picked it up.
Got an even better deal on a pretty beat up CF trunklid (read: free). I didn't want to ruin the stock one even though it's the wrong shade of blue.
I may have underestimated how big a trunk lid is. I did indeed drive half an hour with the corner of it about 3" from my right eyeball.
Got bored in my friends garage, decided to install it all. Note that the turnbuckle holes were already cracked. We only cracked it once more on install where the spoiler meets the trunk.
Yeah the clear is cracked and it's pretty fucked up, but free CF trunklid!
Also the fitment is awful. Bonus pic on my winter tire setup because it looks hilariously stupid.
So anyway, I ran it for one track day and pretty immediately noticed that my corner exit oversteer in the high speed (60-80mph) corners was basically eliminated.
A week later I took it out again for my last track day of 2020 in that car.
During the last session, I ended up meeting my 2020 goal of getting into the 2:15s, despite subpar weather conditions. The spoiler really helps. I think I went from 60 to 65mph minimum speed in T1, which previously would send the car sideways at anything beyond 60. My top speed was also down by 6mph, although I can't say for sure if this was due to the spoiler or the wind, but I'm thinking more the wind. There's obviously a lot more time in it with some driver mod and optimal weather.
My goal for 2021 is to do some wheel to wheel racing, I feel comfortable enough driving at a quick pace consistently. I did a track day in my friends "ST6" NA, which is basically an ex-WRL GP4 car we are turning into a non aero competitive ST6 car with a VVT swap, with plans to run aero in WRL GP3 as well. The car at the moment has an estimated 110whp, NLR big ****, air dam, C6Z06 wood splitter, 800/500 xidas with the fancy tophats. It's probably a touch over 2100lbs wet. The motor is very tired, it runs notably hot but because it's so light it actually pulls harder than my pig. I have some minor ergonomic issues with the car that I will be resolving.
In a few sessions I was able to get it down to a 2:12.5, so 3.4 seconds off my best time in my car. The aero definitely helps, as do the good shocks. Same tires as my car. I think with another 20whp from the VVT motor and some sticky tires it will be a really competitive ST6 car locally. WRL might be harder to be competitive since GP3 puts us against BMWs and NCs, which power/weight being equal would just destroy us.
It's a JDM K24A from an Odyssey or something. It was cheap ($950 delivered to a residential address with liftgate service), looks pretty clean, and allegedly has low miles. I got it from eBay from an engine importer called JDM New York.
From my research, it appears that ALL of the JDM K24As are identical to the 04-05 USDM TSX K24A2. From 2006-2008, the TSX received a revised engine with +1mm intake valves and higher lift + longer duration cams. There were no TSX engines locally, and all the ones I could find on CarPart had 3-4x the miles of the JDM engines and were nearly double the price. I'm not sure what the power difference is between the two engines but I think for me, it wasn't worth double the price.
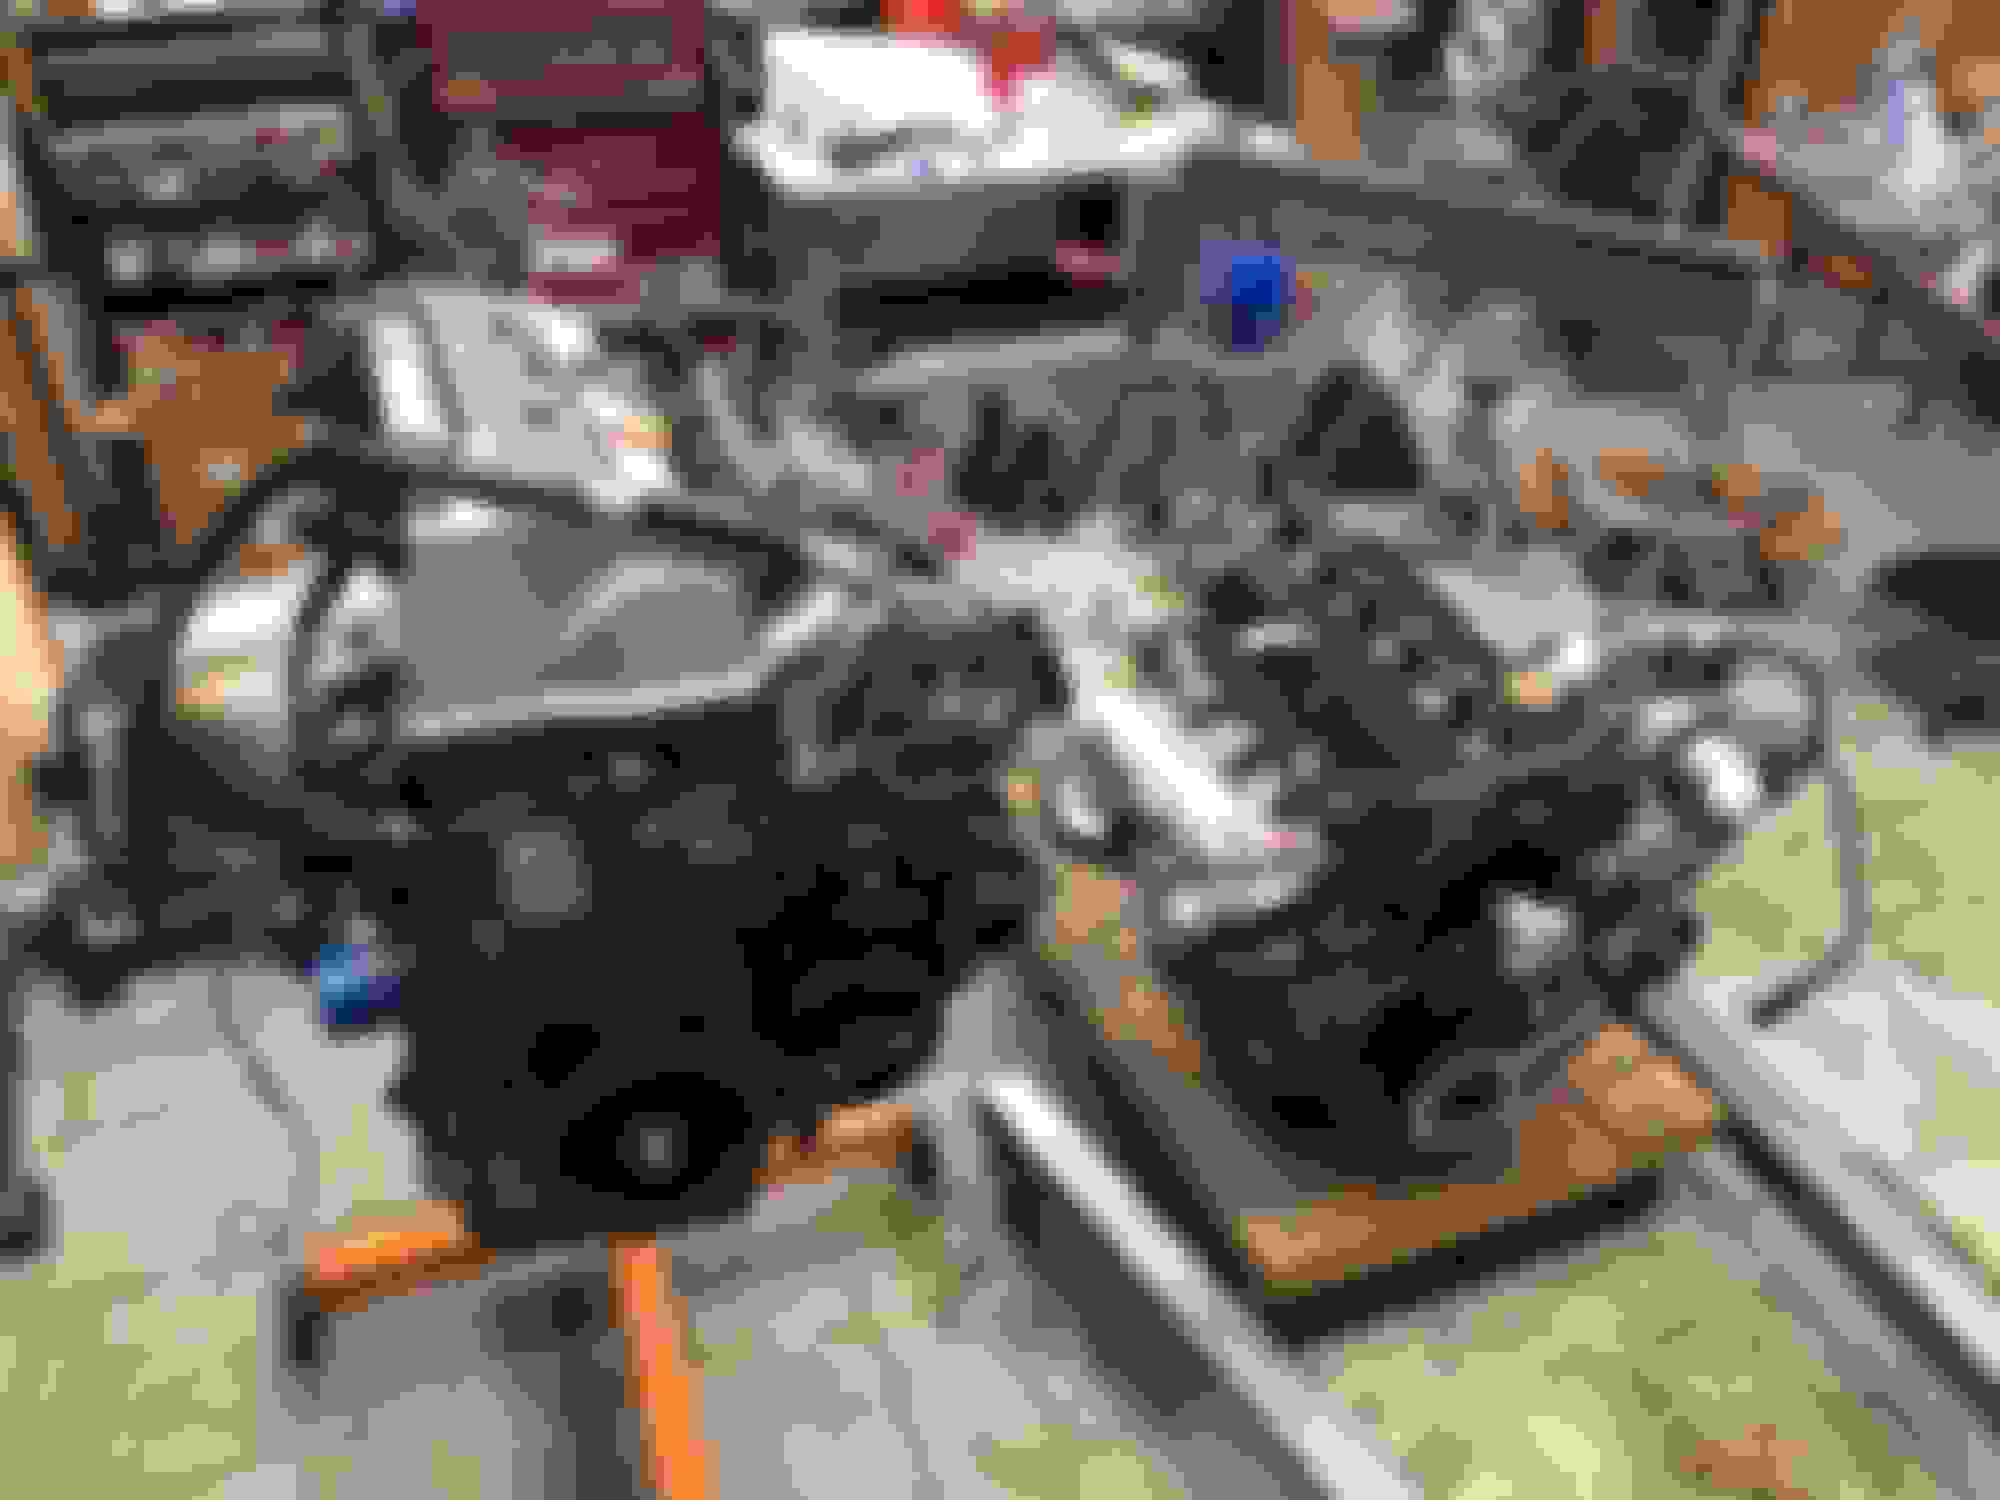
Threw the engine on a stand.
I spent a bit of time on the Honda forums trying to figure out what length M12x1.25 bolts people are using to stick the engine on stands, but of course, Honda people are stupid so I got answers ranging from "at least 130mm" to "65mm is fine". I went to the local hardware store and picked up four 90mm long ones and 8 washers. The cashier charged me wrong so I got $24 in bolts for $5. Neat.
Anyway, 3 of the bolts were too long and one was too short. I would suggest getting three 70mm long bolts, which should suffice with just a washer or two on each. I ended up stacking almost all of mine on one bolt and then grabbing random washers off the floor for the remaining bolts. The fourth bolt should be at least 100mm long to go through one of the unthreaded holes to a nut on the other side.
Here she sits next to Nick470's freshly rebuilt EFR'd BP6D/4W hybrid.
Only issues I've noticed with the engine is that the valve cover could use a respray or powdercoat and one of the transmission alignment dowel pins appears to be slightly crushed. Boohoo, $5 part.
My plans for this engine are doing literally nothing outside of the standard K swap stuff. I'll probably throw on a sandwich plate for oil pressure/temp, and that's about it. I am debating using the stock 1/8 BSPT thread and attaching an NPT adapter and pressure sensor that way, but I'm not sure if that sensor feeds anything besides the cluster on a stock Honda. The KPower folks indicated to me that an oil cooler isn't really necessary on a naturally aspirated HPDE track/street toy, curious if anyone has any input on that.
I'm gonna pull all the crap off besides the starter I guess and then sit around for many weeks and wait for parts to arrive.
edit: Anyone know if any of the junk I pulled off the motor that I don't need is worth anything or should it go in the bin? I try to avoid interacting with the general Honda community but I wasn't sure if the manifolds have any value.
So I didn't end up receiving my swap kit until early September, about 110 days after ordering.
Over the following several months, I continued to amass parts and continued to neglect doing it due to some life struggles and starting a new job.
But with the new year and racing season on the horizon my interest renewed.
I didn't finish motor teardown until December. I had a hell of a time removing the crank pulley bolt. I'll skip through most of the stuff I tried that didn't work and skip to what did work: 19mm weighted socket, 1400lb-ft Milwaukee 1/2" impact (460lb-ft Milwaukee and 860lb-ft Dewalt both were unable).
Alrighty, motor cracked open, all the old stuff is off. Looks good inside.
I had a little back and forth with KPower about a low point on my oil pan I was concerned about. David said I shouldn't worry and run it, but he did offer to have it checked for leaks and corrected. I didn't want more hold ups so I decided it was.
Oil jet thing plugged with a bolt, new windage tray, oil pump, pump chain and guide go on.
New pickup tube, old tensioner, everything gets torqued to spec (which is like 102 in-lbs for all the tiny bolts)
Disgustingly large quantity of RTV goes on, inside and outside all the bolt holes. God help me if this leaks.
New tensioner, old chain guides, 50 degree VTC gear on the intake side goes on, don't forget the pulse plate on the crank. This motor is super duper easy to time, just align some colored chain links with some marks, no counting teeth or anything stupid. Spun it over a few times to verify it all looks good. Large bead of RTV goes on again. Don't forget the VTC solenoid in the middle of the timing cover. Timing cover got a new OEM front main seal as well. Highly recommend buying one of those permatex ultra black power cans for $22, made laying down these super long beads really easy. One can should easily do a whole motor with plenty of extra leftover.
I put the motor mount back on with the stock bolts just to get even pressure all around the timing cover. I removed the mount and replaced it with shorter bolts after taking this photo.
As far as I was ever told, I need a USDM water pump housing (right) to replace the JDM one (left).
Firstly, yes, I bought a brand new water pump housing from Honda (19410-RAA-A00). This ran me about $130. You can find used ones all day for sub $100, I just wanted to go new because I am stupid.
I paired this with a remanned Denso USDM alternator which was about $240. The core refund hypothetically knocked $91 off that if you were to trade in the old alternator, but the JDM alternator is different than any Honda alternator in the U.S., so you should not trade it in as that would be unethical.
BUT if hypothetically you were to take it to the auto parts store in the box and give it in as a core, you would get $91 back in theory, and nobody would know any better if you were to do this.
So what people failed to communicate in my research is that the USDM water pump housing and alternator use slightly different hardware to mount than the JDM stuff.
In an effort to be concise for once in this build thread, here are all the parts I bought for my USDM water pump housing and alternator to attach them to my JDM engine:
19322-PNA-003 ---QTY:1--- This is the O-ring/gasket thing that goes between the thermostat housing and the water pump housing. I elected to replace it because my old one was a little crusty and its good security since it's all apart and this cost me $4.59.
19322-PCX-003 ---QTY:1--- O-ring that goes between the water pump housing and the block. This separates the water part and oil part of the housing, so I would suggest you replace it because it costs $2.64 and if you wanted to mix oil and water you'd buy a subaru.
95701-10105-08 ---QTY:1--- This is an M10x1.25x105mm flange bolt that goes through the fat part of the water pump housing into the block.
92900-10060-0B ---QTY:1--- M10x1.25x60mm stud that goes in the top right hole in the water pump housing and reuses a nut from the JDM unit.
90025-PNA-000 ---QTY:1--- M8x1.25x105mm bolt that goes through the top hole on the alternator into the water pump housing.
95701-08055-08 ---QTY:2--- M8x1.25x55mm bolts that go through the bottom two alternator holes.
So what you'll end up with is one long stud at the bottom left of the water pump housing that was already there, and a short one that you just installed up top right. Reuse the two nuts from the JDM unit and then I used the other long (105mm?) bolt the JDM unit came with along with my new one in the remaining two holes.
KPower told me they've never had to buy different hardware to do what I just described and they reuse the JDM hardware so it is possible I am stupid. I think you can get away with backing out one of the very long studs and moving it over and using it in place of a 105mm bolt.
ANYWAY.
Bolt on that new water pump and alternator and you'll be looking pretty.
This is a good time to stick on the first shiny KPower piece that is visible in the car (sorta).
I put a brand new gasket on the rear water neck and also did a layer of RTV on BOTH sides of the gasket around the coolant passages because after my coolant reroute install experience I never want to deal with a leak on the back of the motor while its in the car again.
Get some aftermarket goodies on there. Mishimoto sandwich plate where I will pull oil temp and pressure from. New Honda oil filter threads in.
Permatex high temp thread sealant on all threads as well.
So all that remains on the motor is the thermostat, which I can install as soon as I get some safety wire to do the heater pipe delete, and then I need a larger belt because this is a JDM motor and the crank pulley is 3/8" larger diameter than the USDM motors. Based on another users build thread, that belt should be a Dayco 5060420.
I also dropped off the injectors at a local specialist to get cleaned. I don't think they are particularly dirty, but the o-rings looked like they had seen better days and it's good peace of mind. While I am disregarding my budget, I also have some plans for the gross valve cover the engine came with.
In the midst of all this garbage I also did a track day to remind myself of how miserably slow this car is with the BP. Yes it's very dirty.


 0
0