HarryB's Strato Blue NB2 - Ganbaru
 05-26-2018, 05:11 PM
#1
Senior Member
Thread Starter

Join Date: Jul 2015
Posts: 1,015
Total Cats: 140
Long time lurker and occasional poster for the past 3 years or so, but no build thread up to date; time to start one!
Disclaimer; I will be posting rarely (work obligations), and most of the updates will be lame, mostly me cleaning or buying stuff which I install months to years later due to me not having time to do so.
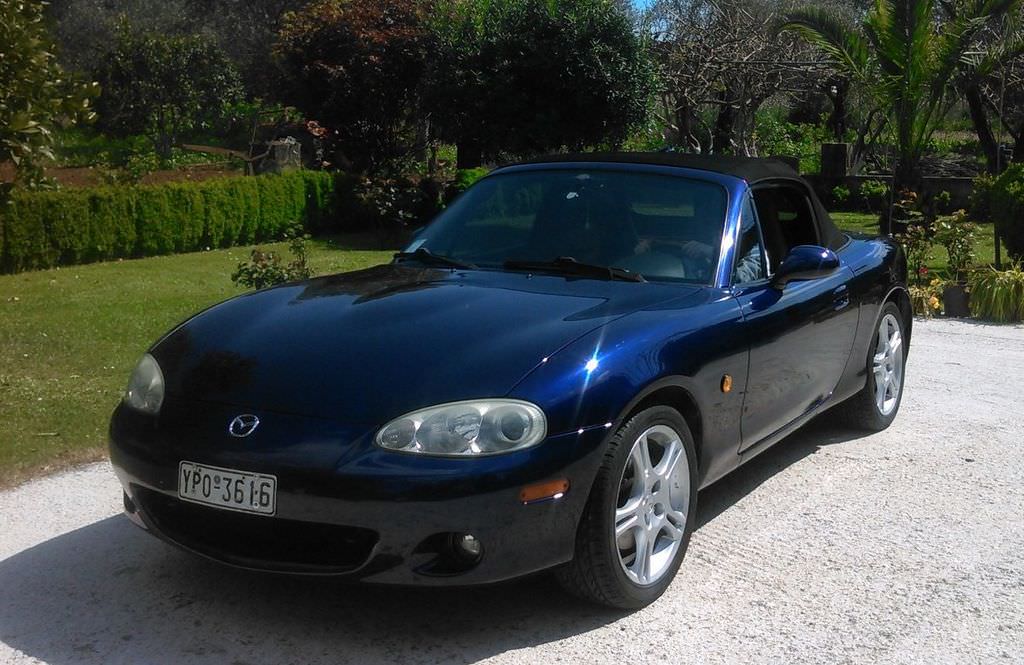
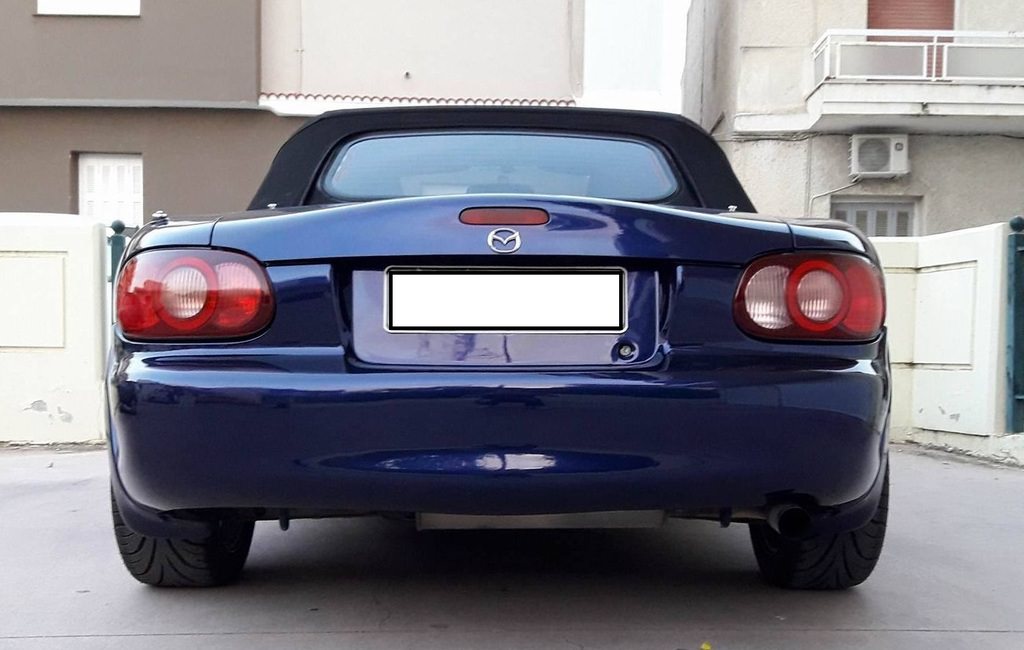
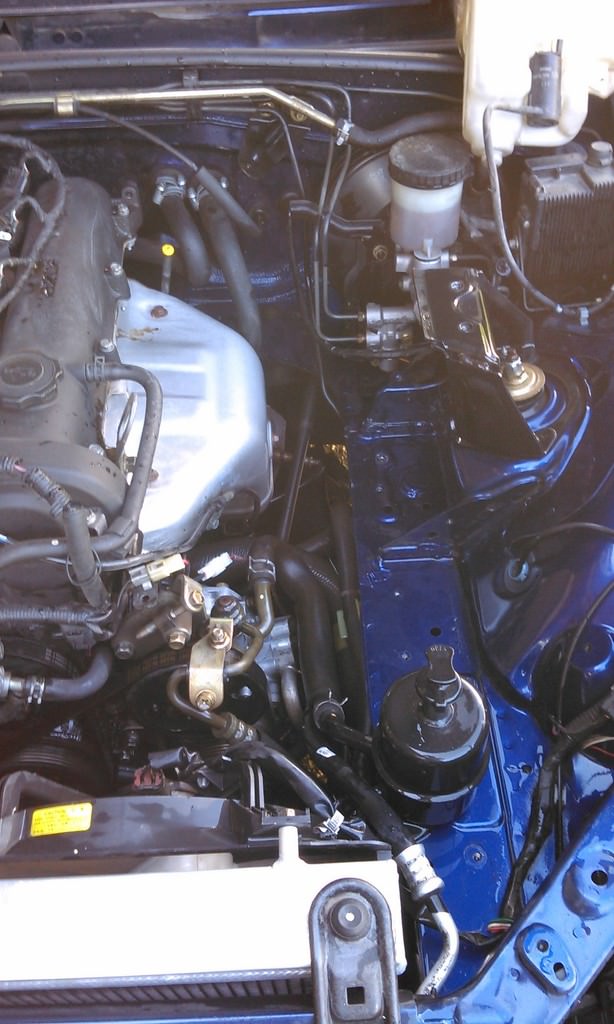
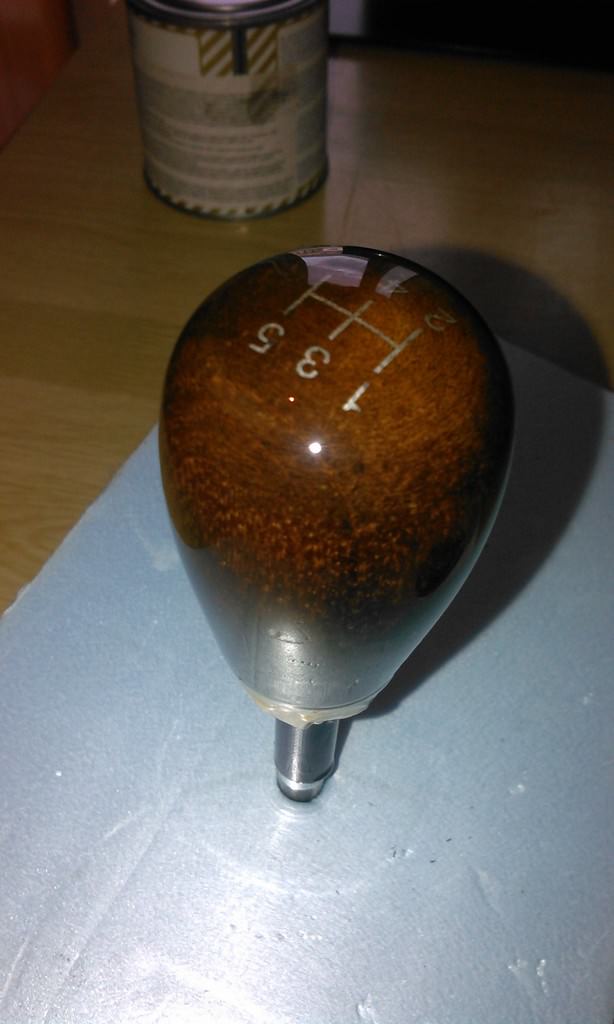
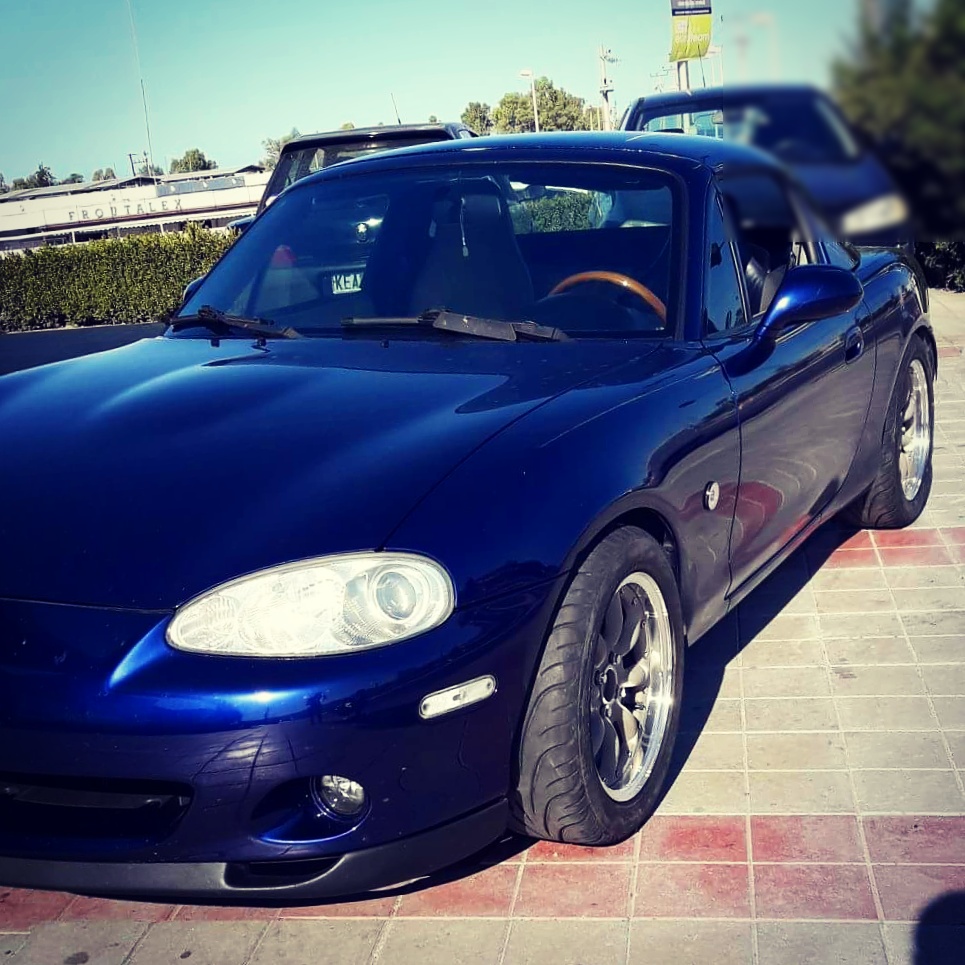
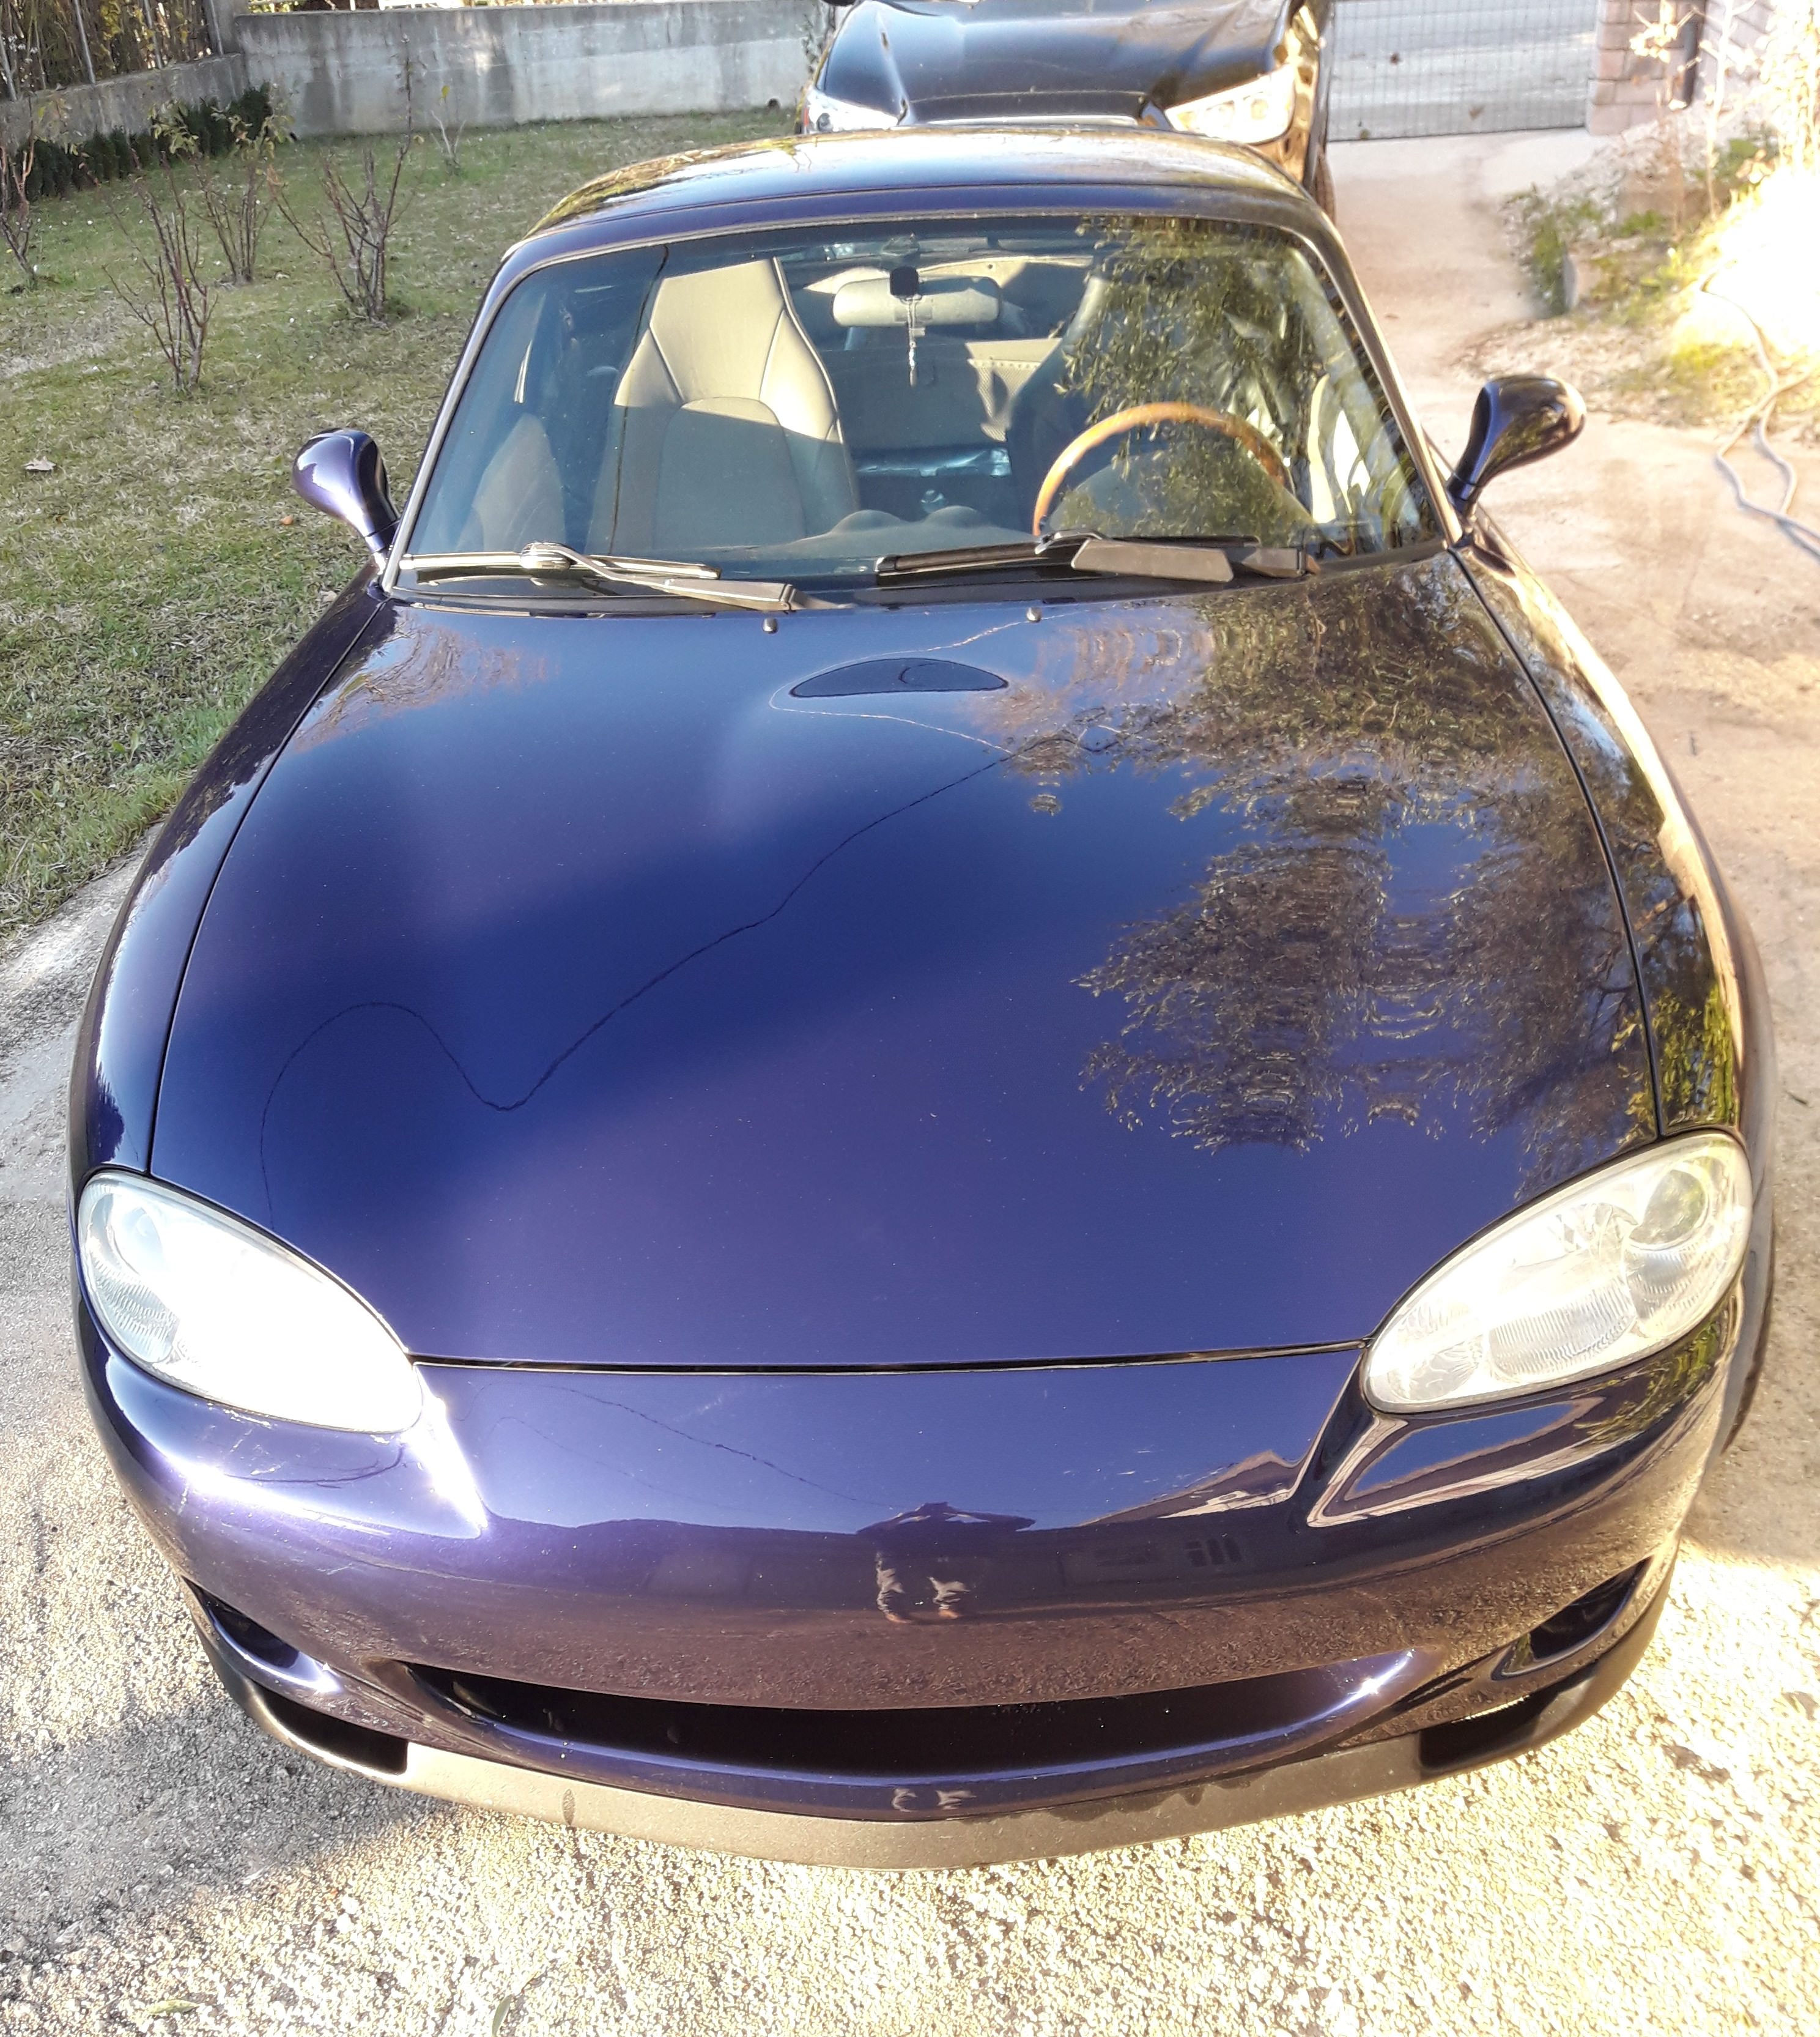
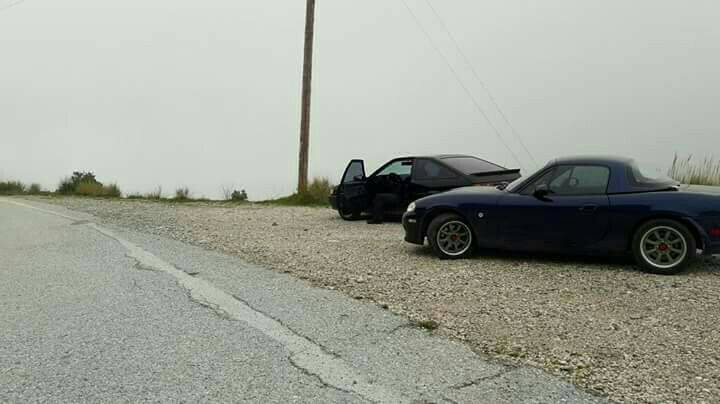
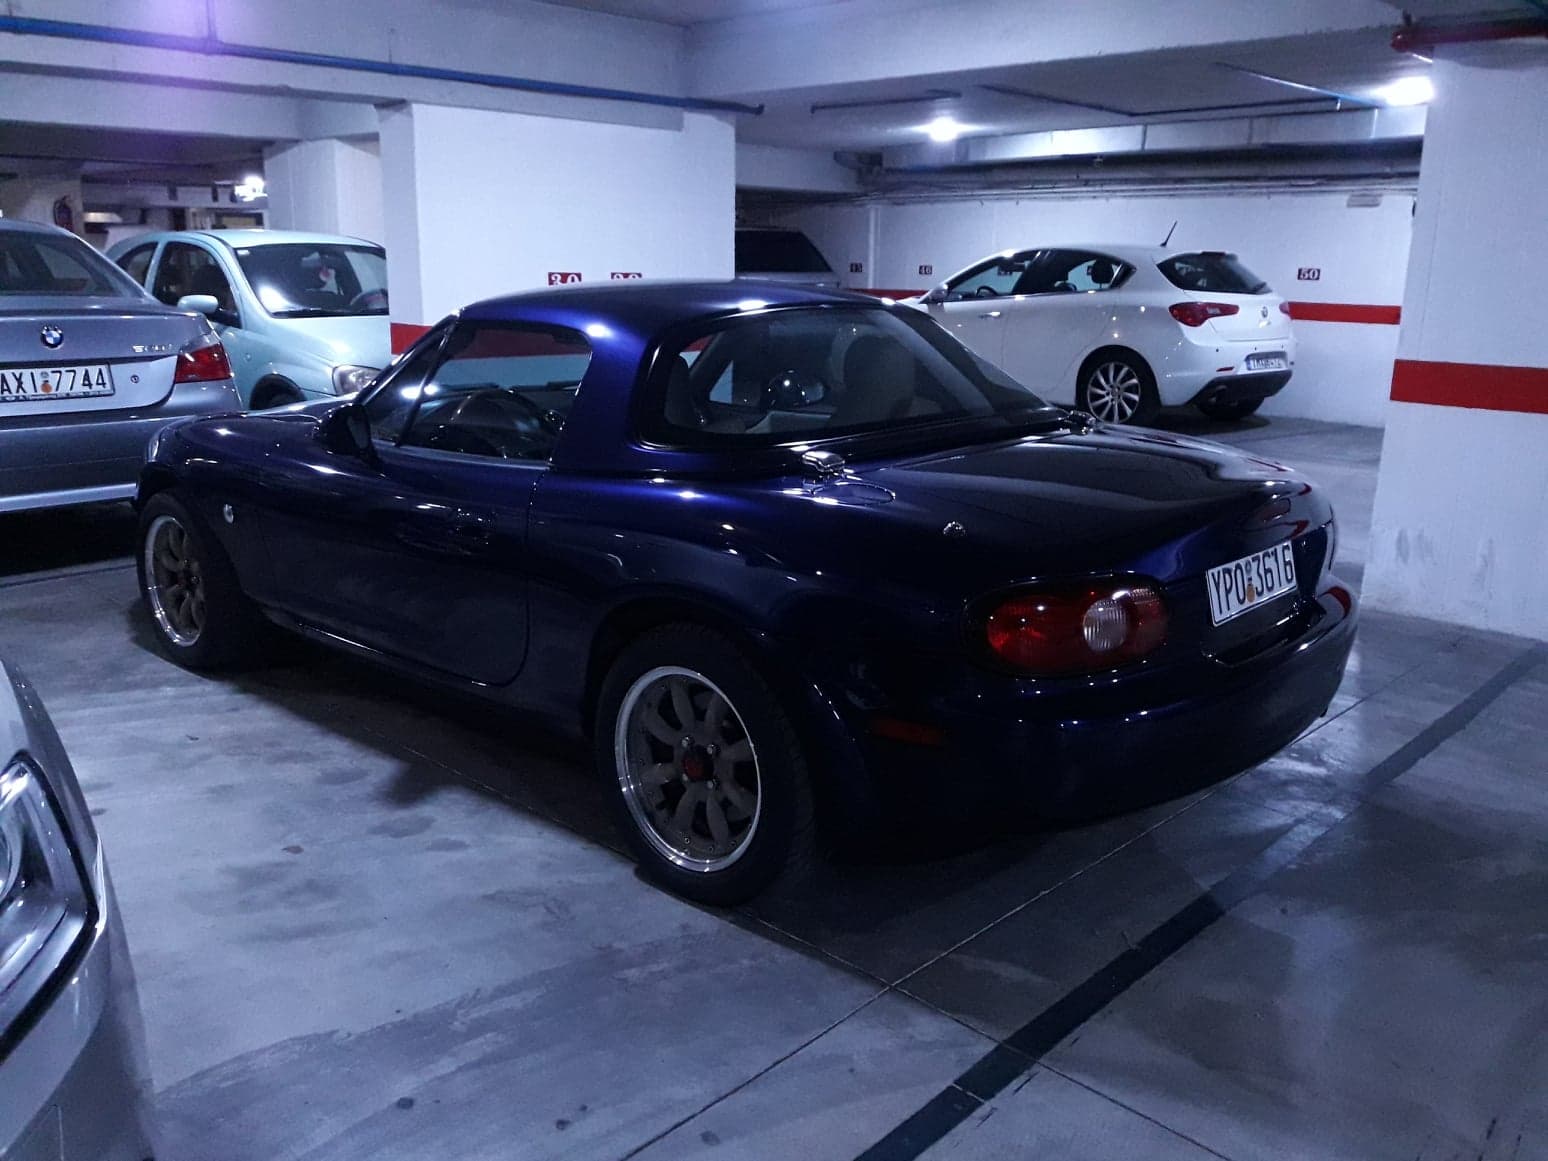
Meet Ganbaru's; on the 1st photo under my ownership nonetheless. "Ganbaru (頑張る lit., stand firm), also romanized as gambaru, is a ubiquitous Japanese word which roughly means to slog on tenaciously through tough times. The word Ganbaru is often translated to mean "doing one's best", but in practice, it means doing more than one's best." Bought in March 2015 as my DD; 2004 1.6 EUDM NB2, beige leather interior with wooden Nardi wheel/shifter ****/handbrake, 128k kms, and really well maintained. It was the "High edition" model, meaning that it already had the OEM 1.8 Sport "big brake" kit and underbraces. PO has added a T2 Torsen, IL Motorsport alloy rad and Toyota COPS.
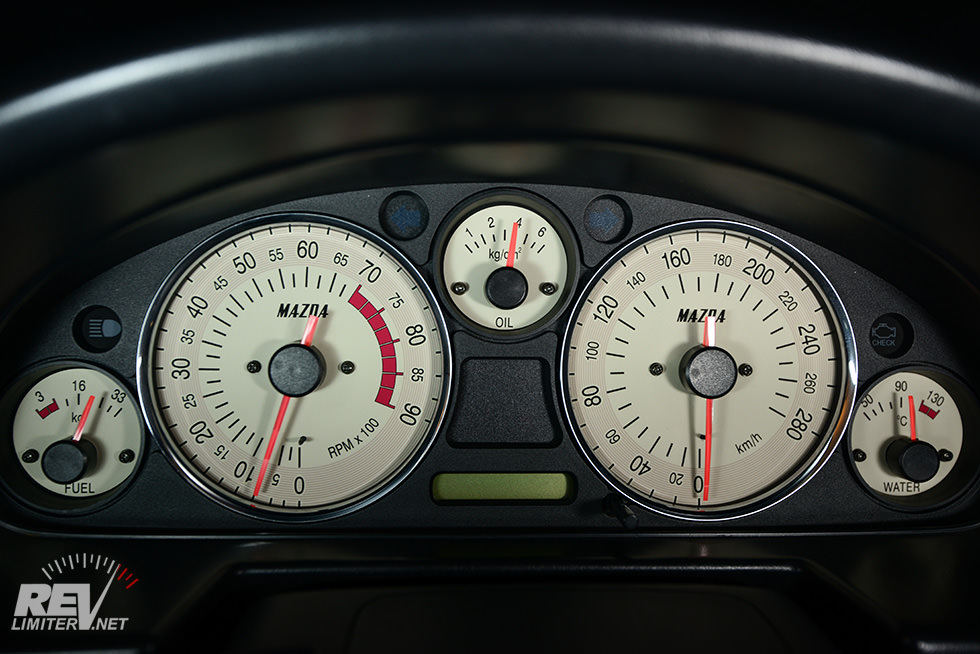
Plan was to build what I call an OEM+ car; something that could have been an OEM special edition, focusing on canyon/b-roads carving rather than (occasional) trackdays. In essence a fun car that can be daily driven. With that in mind, I started off with regular maintenance items; changed cam/crank seals, changed all fluids, shifter rebuild, hood latches rebuild and repaint, and a very good cleaning both inside and out. First order for the car was a custom set of Revlimiter gauges, something I have had my eyes upon even before getting a Miata.
[img]https://i.imgur.com/U3jCZWh.jpg[img]
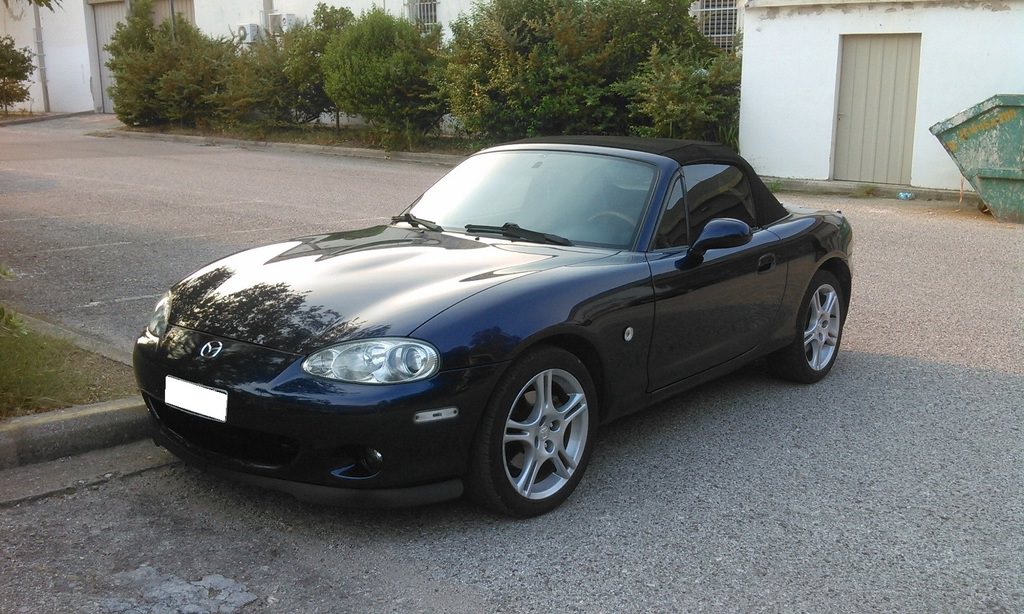
Next up, a hardtop, which made the car heaps more comfortable in highway driving. I also polished my foggy headlights, repaired and painted the cracked front bumper, and added a front lip out of an Opel (which was not terrible but I removed after a while).
To match the Revlimiter gauges, map and tunnel lights were upgraded to warm white LEDs. I also removed the orange bulb condoms from all switches. More cleaning, reconditioning, rattle-proofing, HVAC unclogging and disinfecting....

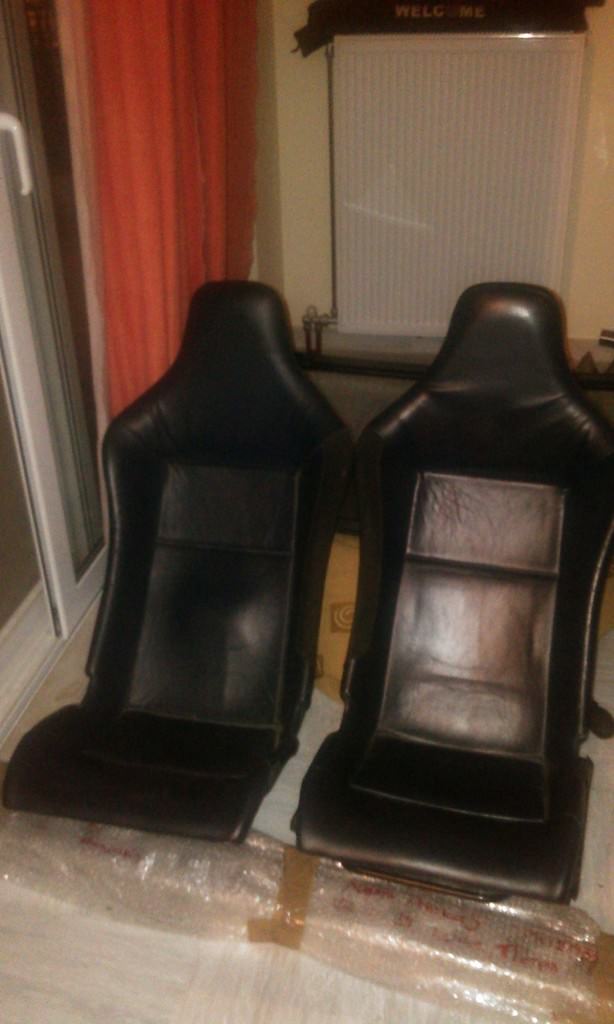
Then, I found some (very cheap) Lotus Elise S1 seats for sale semi-locally, so I bought them, sight unseen. Turned out to be in good shape, albeit the padding was long gone. Fabricated some brackets and test-fitted one to see if I was going to keep them...2+ years later, the seat is still "test-fitted"...
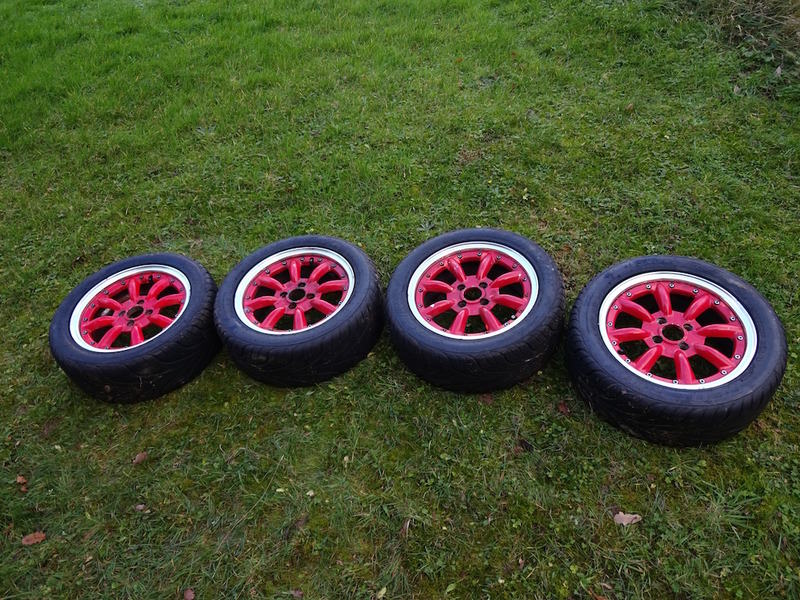
Then, wheels. At that point I had no intention of moving away from the ones the car already had; until an ad came up for a set of Watanabes. These were too narrow, and painted red (!) but came with tires and the price was tempting so I impulsively bought them.
To be continued...
Disclaimer; I will be posting rarely (work obligations), and most of the updates will be lame, mostly me cleaning or buying stuff which I install months to years later due to me not having time to do so.
Meet Ganbaru's; on the 1st photo under my ownership nonetheless. "Ganbaru (頑張る lit., stand firm), also romanized as gambaru, is a ubiquitous Japanese word which roughly means to slog on tenaciously through tough times. The word Ganbaru is often translated to mean "doing one's best", but in practice, it means doing more than one's best." Bought in March 2015 as my DD; 2004 1.6 EUDM NB2, beige leather interior with wooden Nardi wheel/shifter ****/handbrake, 128k kms, and really well maintained. It was the "High edition" model, meaning that it already had the OEM 1.8 Sport "big brake" kit and underbraces. PO has added a T2 Torsen, IL Motorsport alloy rad and Toyota COPS.
Plan was to build what I call an OEM+ car; something that could have been an OEM special edition, focusing on canyon/b-roads carving rather than (occasional) trackdays. In essence a fun car that can be daily driven. With that in mind, I started off with regular maintenance items; changed cam/crank seals, changed all fluids, shifter rebuild, hood latches rebuild and repaint, and a very good cleaning both inside and out. First order for the car was a custom set of Revlimiter gauges, something I have had my eyes upon even before getting a Miata.
[img]https://i.imgur.com/U3jCZWh.jpg[img]
Next up, a hardtop, which made the car heaps more comfortable in highway driving. I also polished my foggy headlights, repaired and painted the cracked front bumper, and added a front lip out of an Opel (which was not terrible but I removed after a while).
To match the Revlimiter gauges, map and tunnel lights were upgraded to warm white LEDs. I also removed the orange bulb condoms from all switches. More cleaning, reconditioning, rattle-proofing, HVAC unclogging and disinfecting....
Then, I found some (very cheap) Lotus Elise S1 seats for sale semi-locally, so I bought them, sight unseen. Turned out to be in good shape, albeit the padding was long gone. Fabricated some brackets and test-fitted one to see if I was going to keep them...2+ years later, the seat is still "test-fitted"...
Then, wheels. At that point I had no intention of moving away from the ones the car already had; until an ad came up for a set of Watanabes. These were too narrow, and painted red (!) but came with tires and the price was tempting so I impulsively bought them.
To be continued...

Reply
 0
0

0
05-28-2018, 12:05 PM
#2
Senior Member
Thread Starter
Join Date: Jul 2015
Posts: 1,015
Total Cats: 140
Wheels arrived, test-fitted...

and rattle-canned one to decide on the colour.
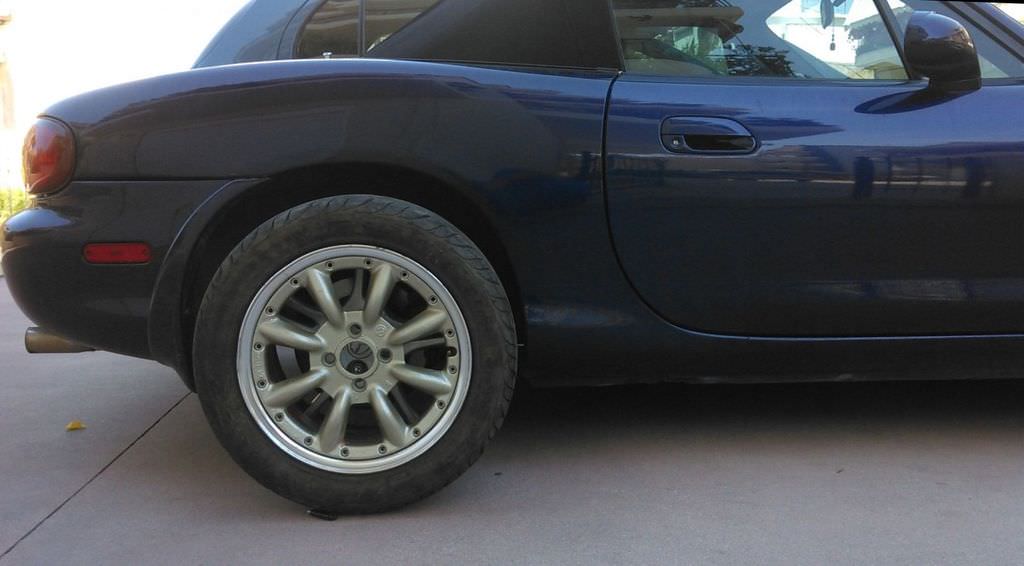
Right after splitting them and before sending them off to powdercoaters, a similar set albeit 7" wide appeared, so sold these and bought the 7" ones instead. Fitted with 205/50/15 Federal RSRs:

Moar cleaning, and restoring, including a used RS Factory Stage lip that replaced the Opel one I previously had
Bought some JDM interior parts
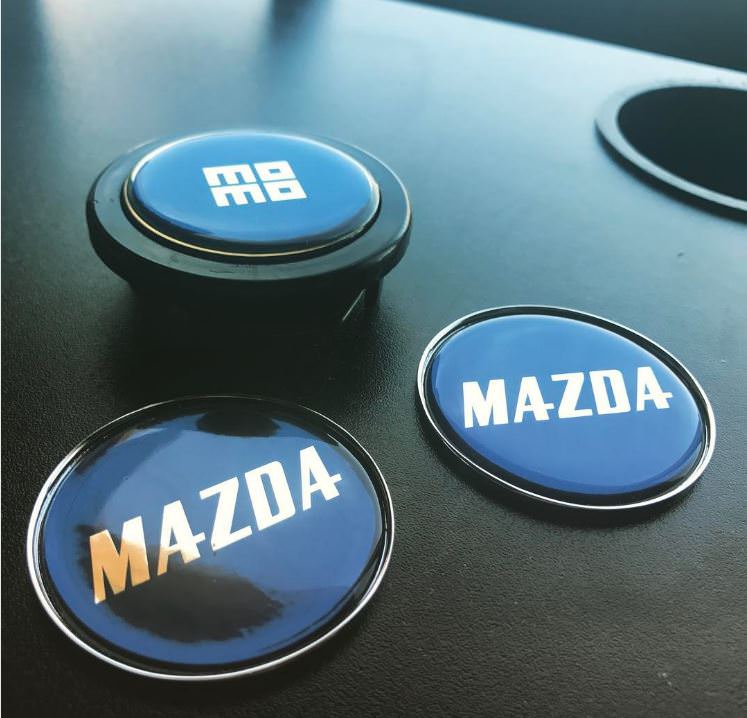
...and got some custom Revlimiter badges and horn button (thanks Adam and Peter!!)
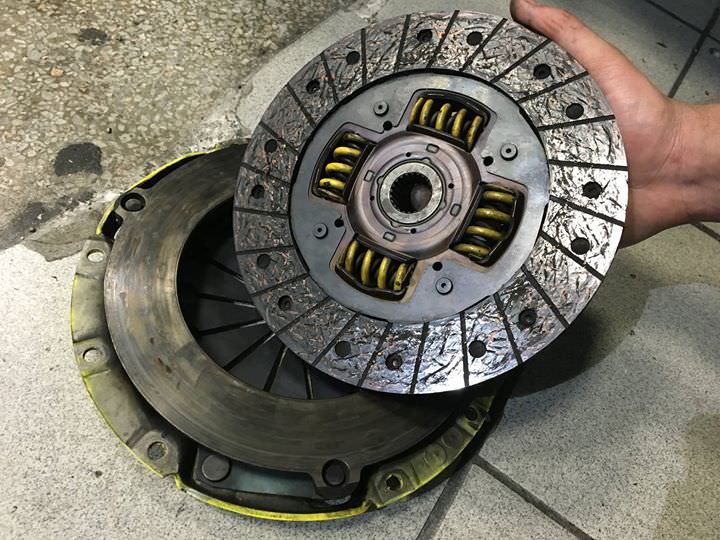
Got an ACT HD clutch and an ACT ProLite flywheel;
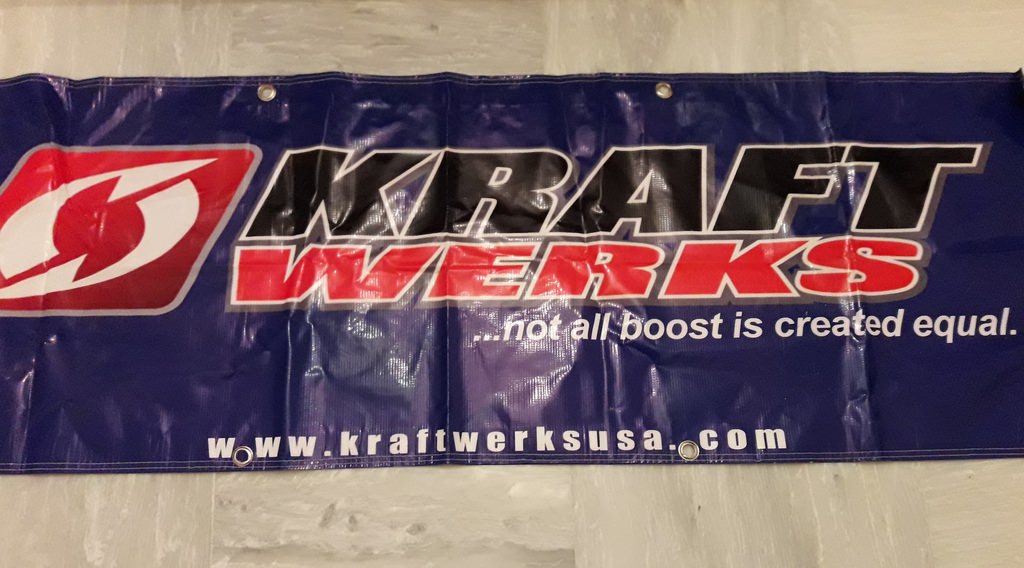
got a banner (along with a box full of go-fast but not turbo-fast bits)
and machined myself a set of derlin door bushings to see if they make any difference
and rattle-canned one to decide on the colour.
Right after splitting them and before sending them off to powdercoaters, a similar set albeit 7" wide appeared, so sold these and bought the 7" ones instead. Fitted with 205/50/15 Federal RSRs:
Moar cleaning, and restoring, including a used RS Factory Stage lip that replaced the Opel one I previously had
Bought some JDM interior parts
...and got some custom Revlimiter badges and horn button (thanks Adam and Peter!!)
Got an ACT HD clutch and an ACT ProLite flywheel;
got a banner (along with a box full of go-fast but not turbo-fast bits)
and machined myself a set of derlin door bushings to see if they make any difference
Reply
0
0
05-28-2018, 12:14 PM
#3
Senior Member
Thread Starter
Join Date: Jul 2015
Posts: 1,015
Total Cats: 140
Bought moar parts (crappy cellphone pics as usual).
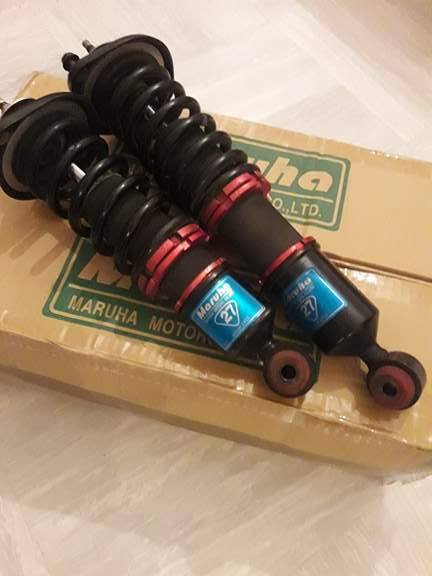
Maruha coilovers:
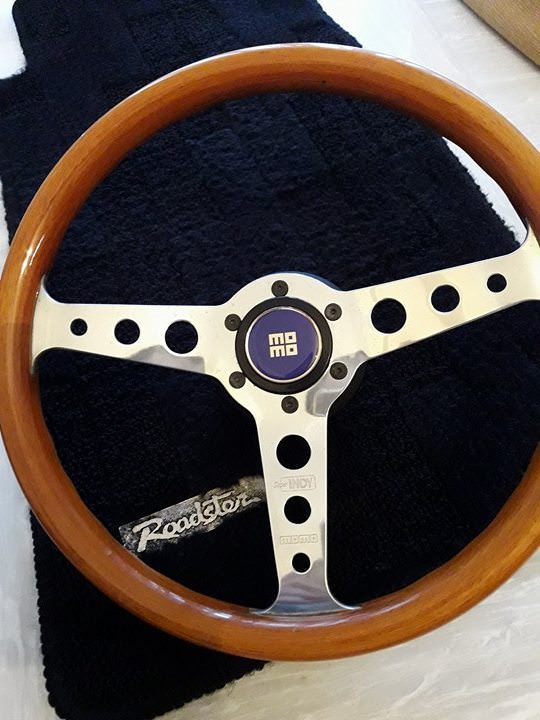
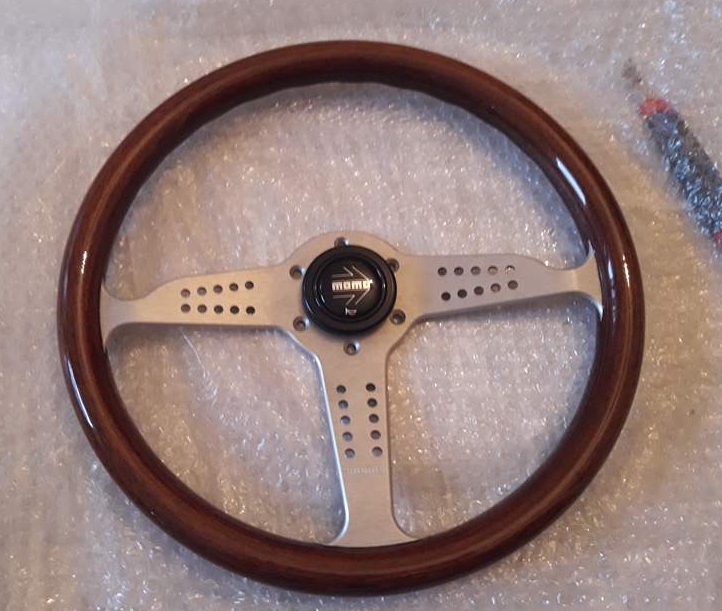
Momo Futura steering wheel to replace the Super Indy
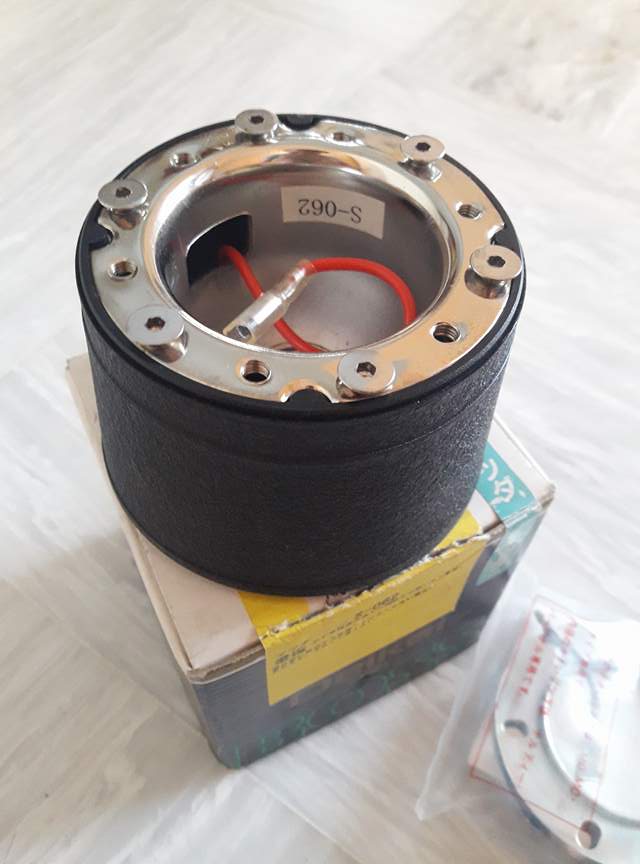
Daikei NB2 hub w. airbag delete to replace the NA MOMO one
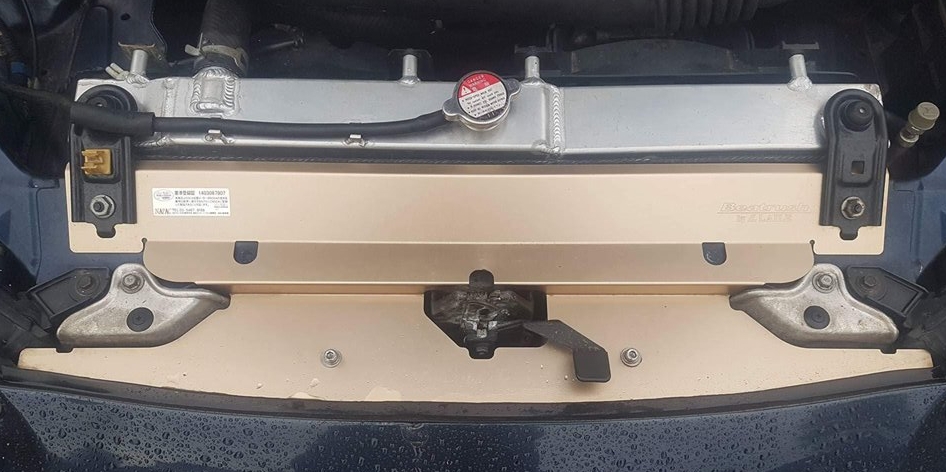
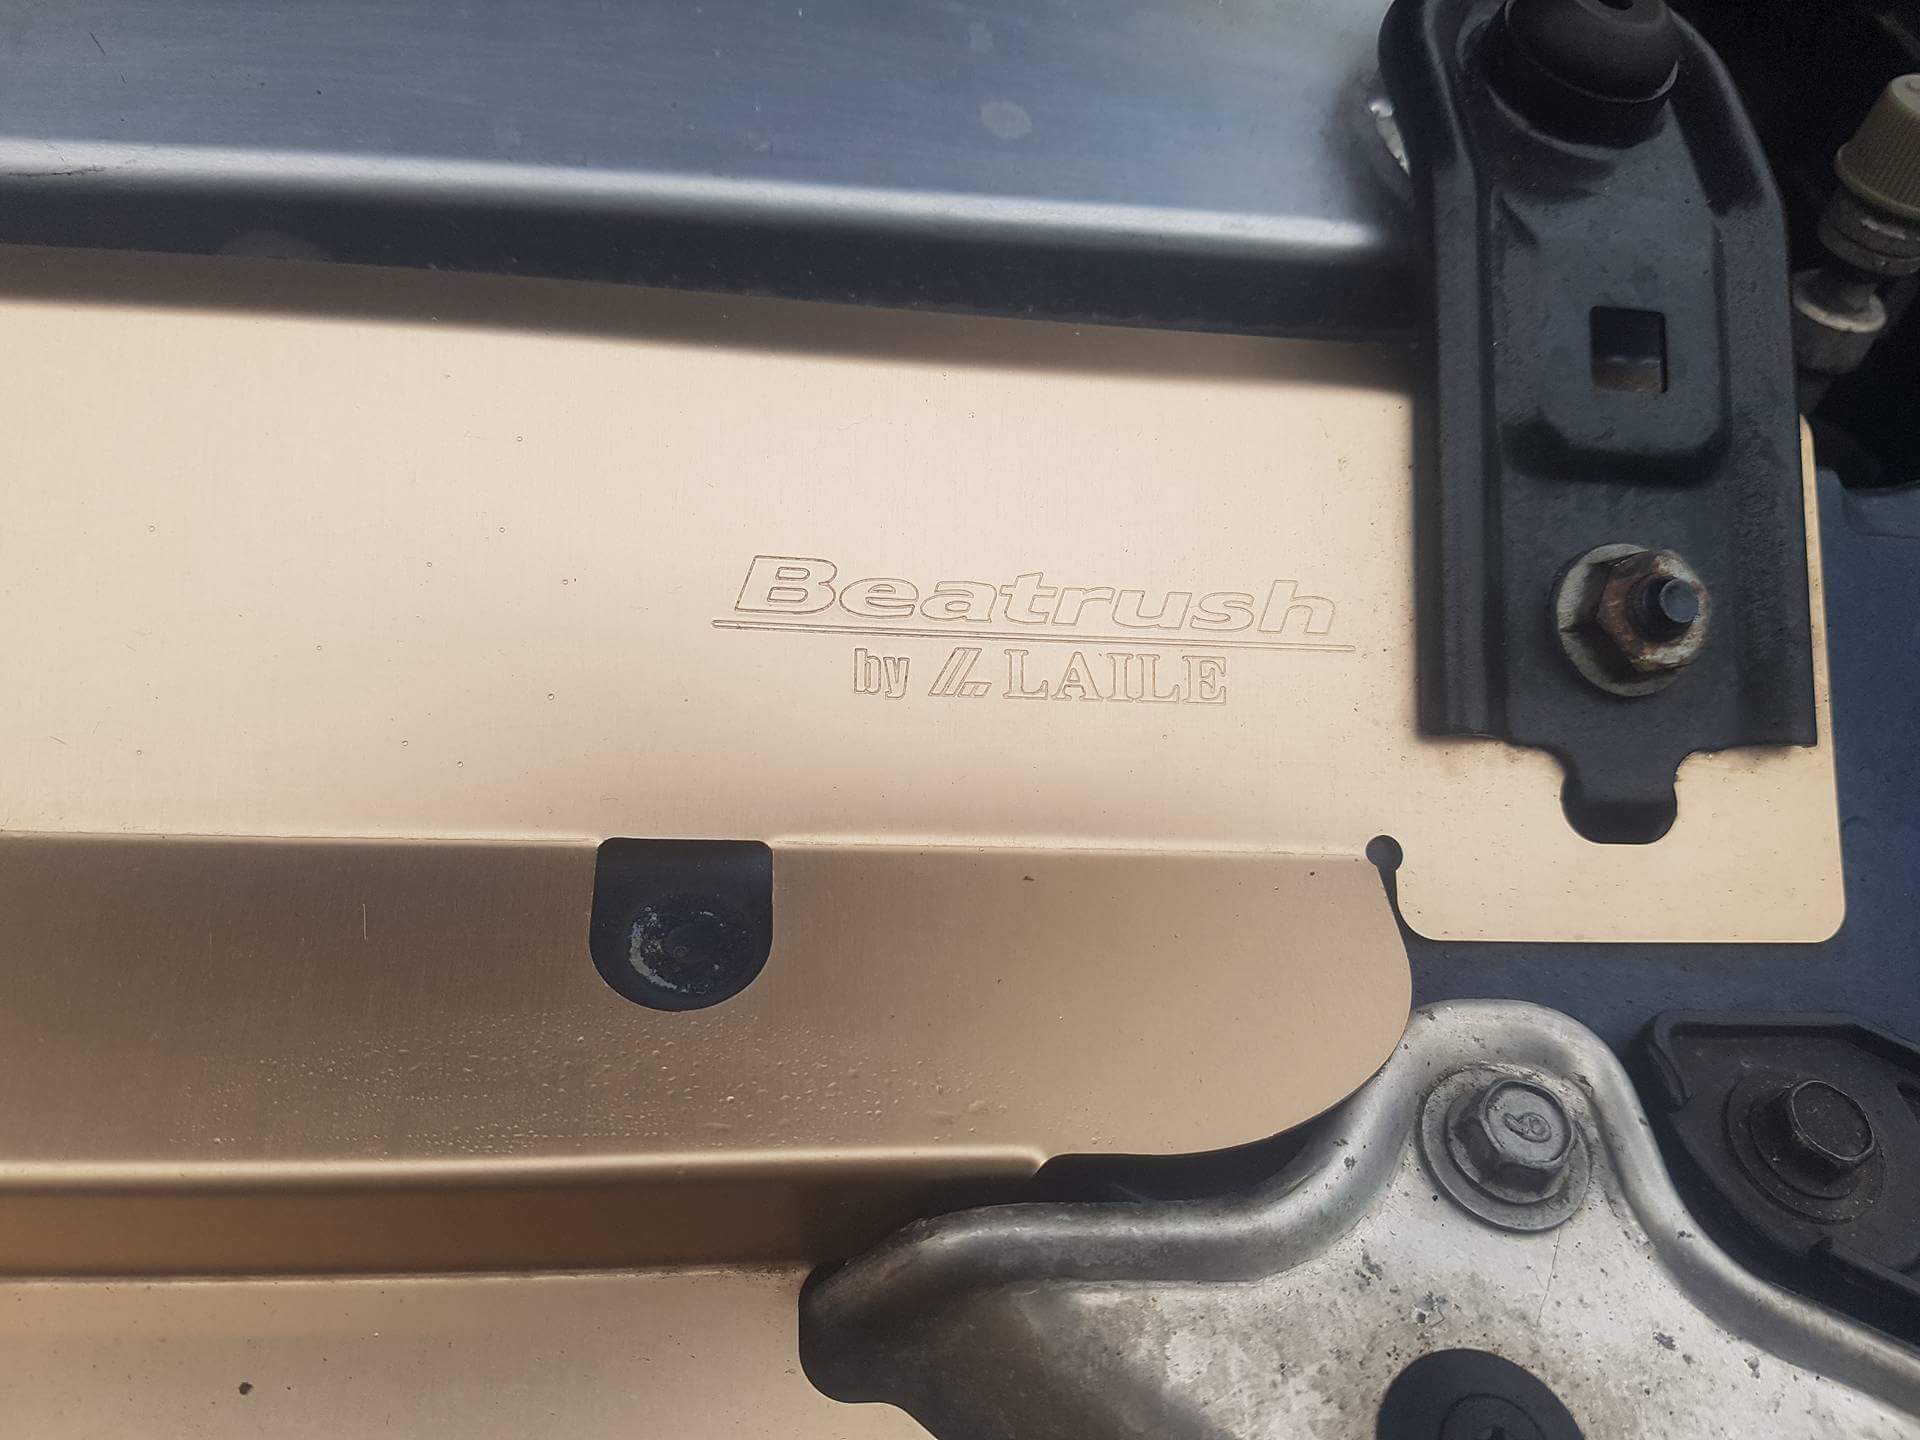
Beatrush rad panel
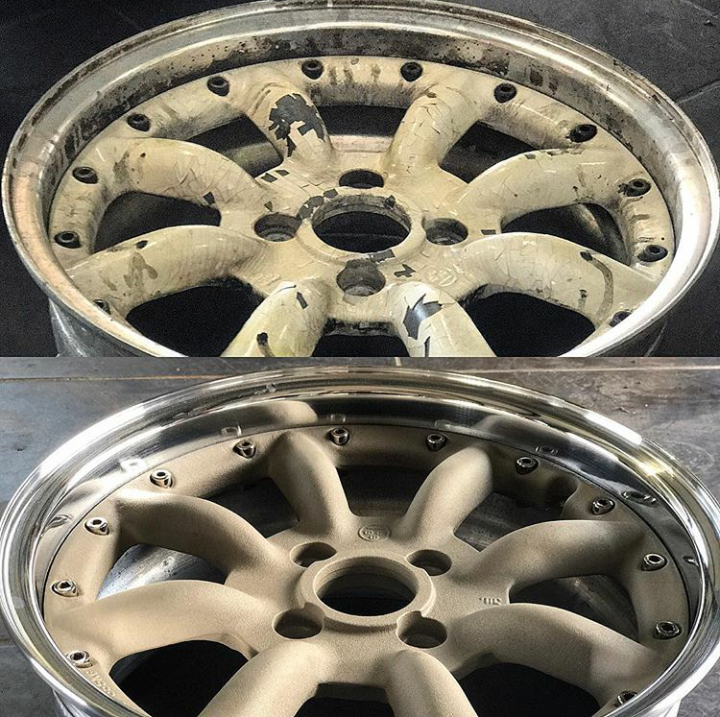
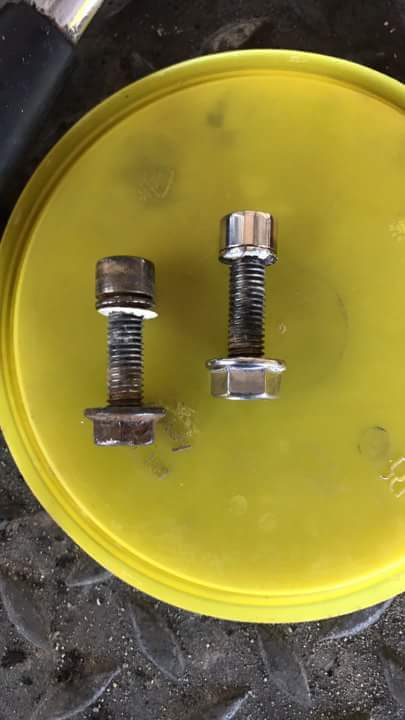
Original Watanabe wheel nuts, center caps and valve stem dust caps awaiting for the wheels to get back from the powdercoater

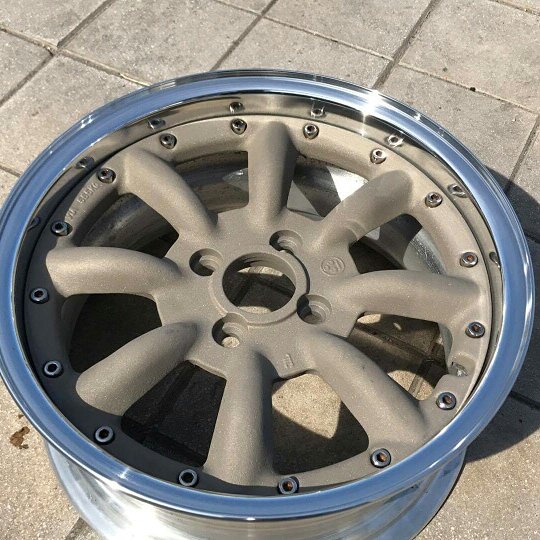
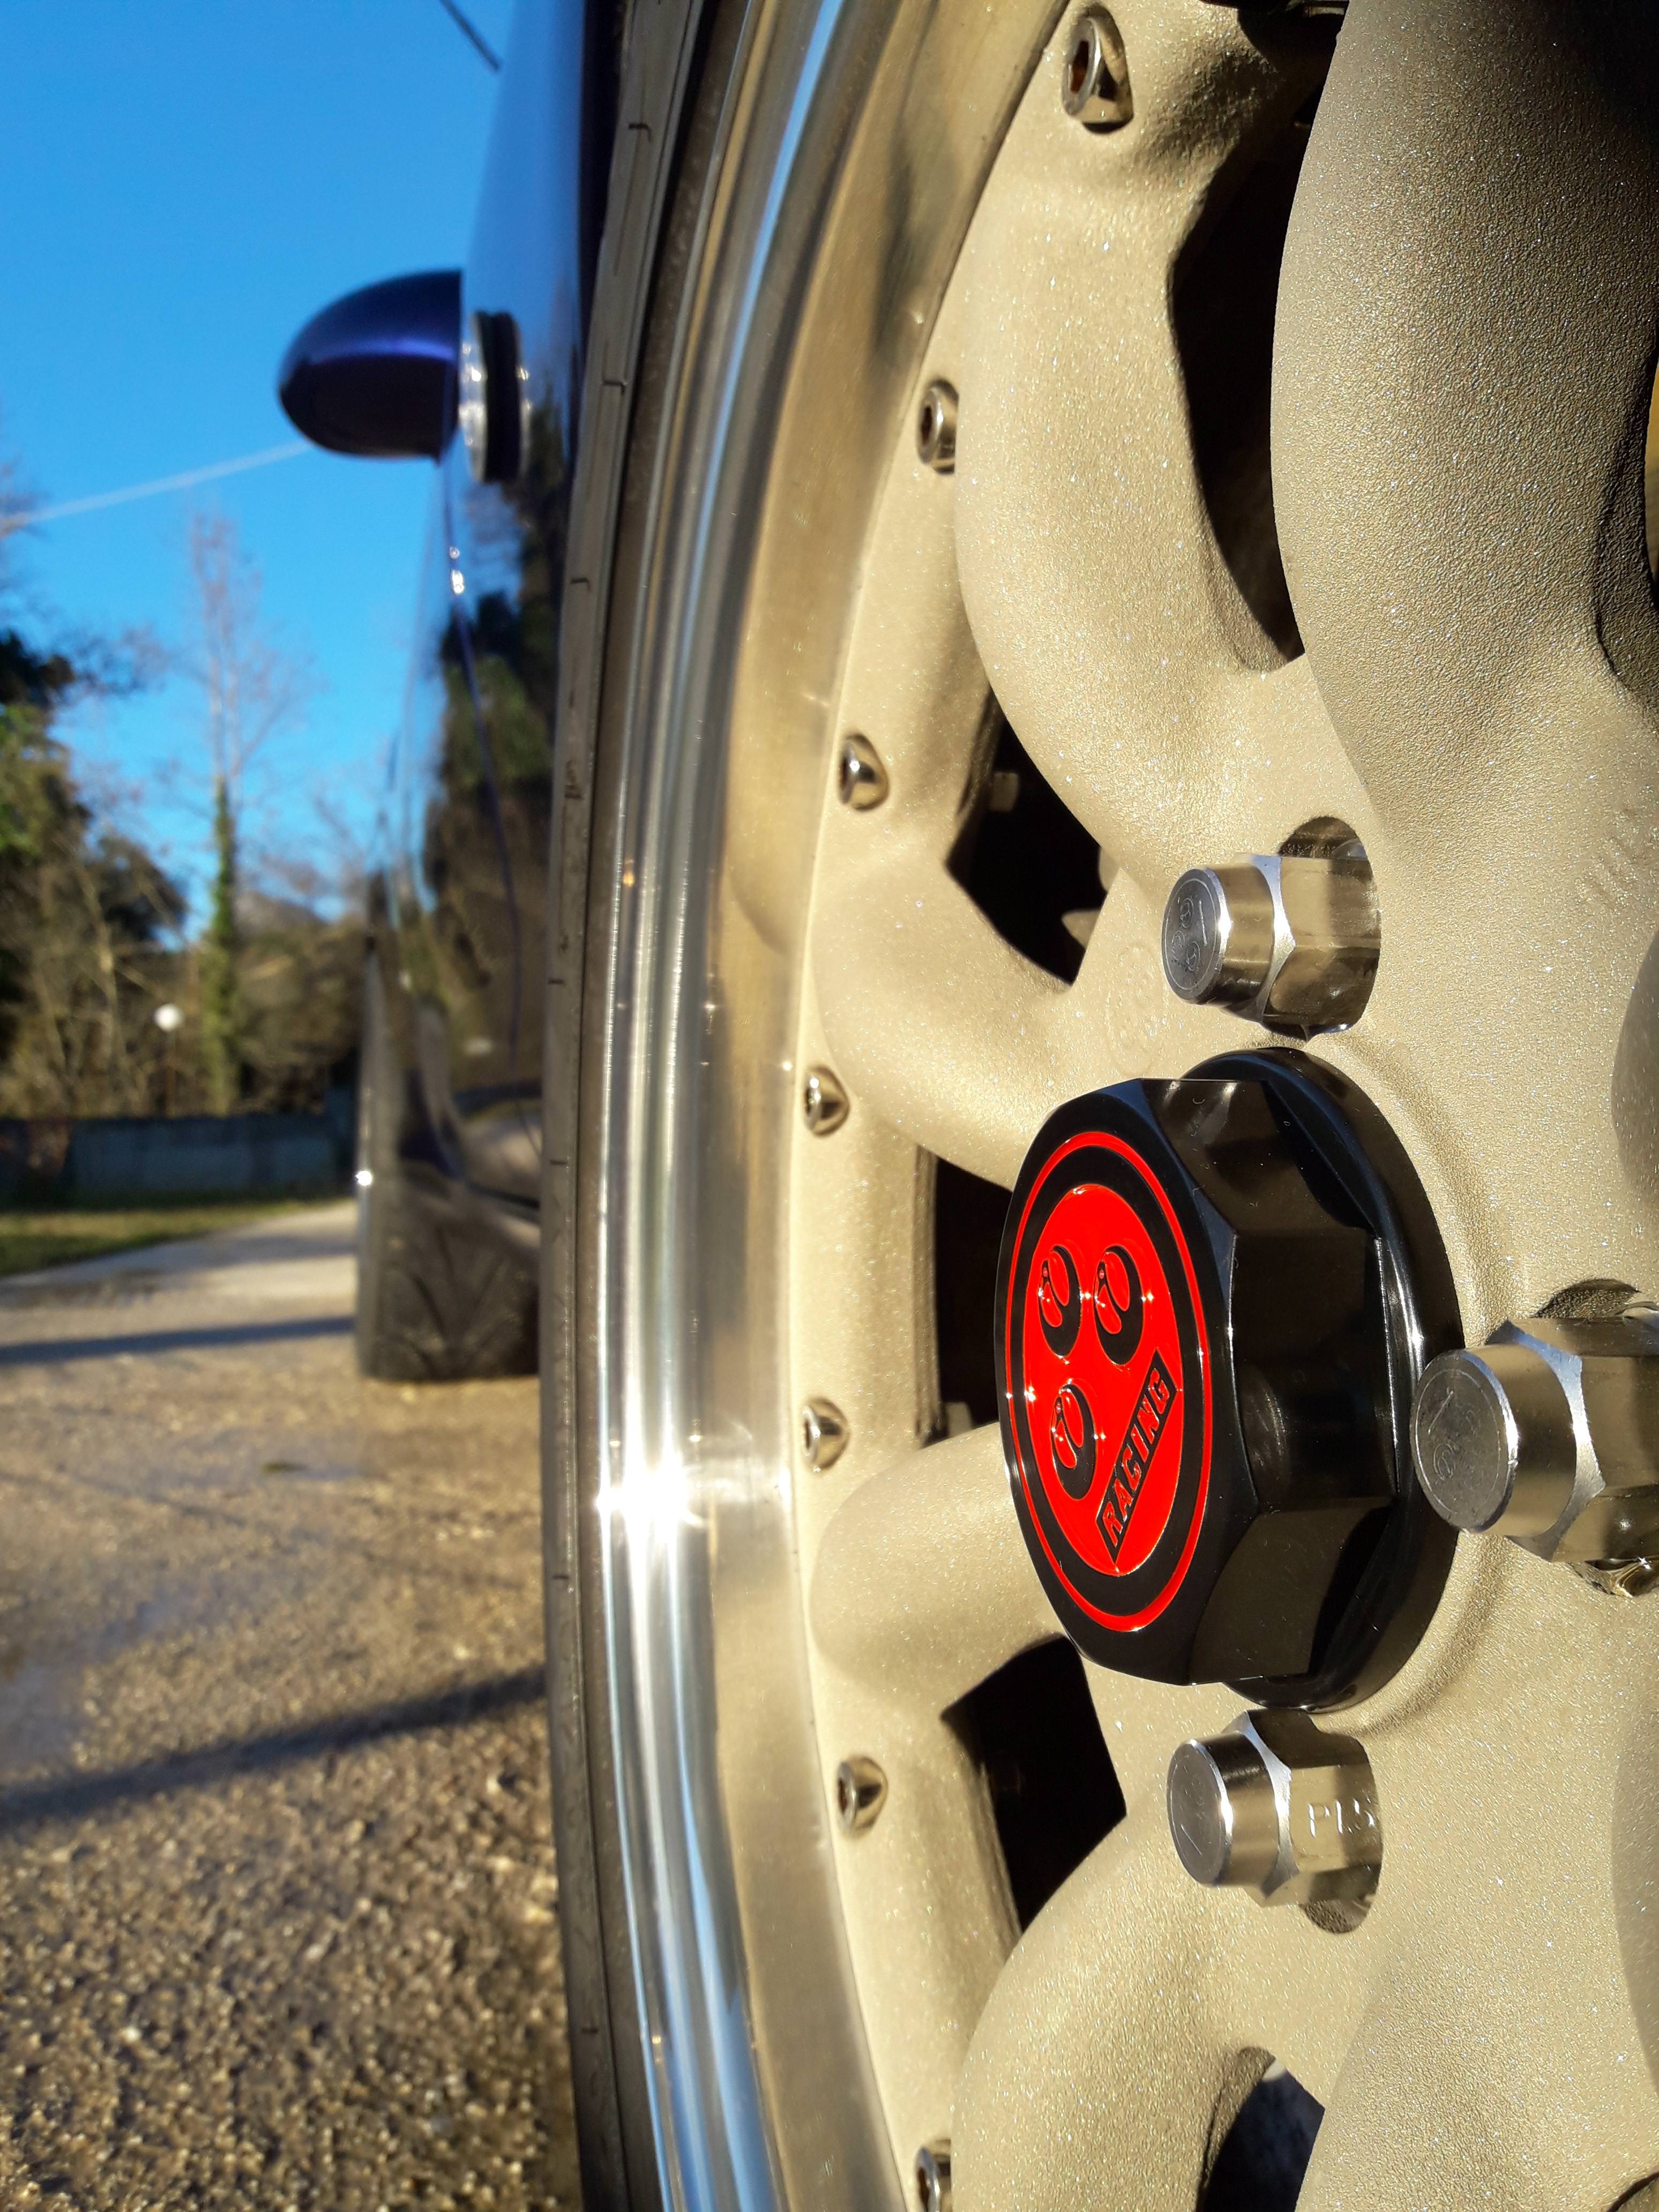
Speaking of; wheels have been powdercoated by a local place/tires and wheels shop, which I had used for some work-related stuff in the past and was cooperative enough. Owner's son (around 20) is now in charge of the powder coating side of the business, and he was very enthusiastic of undertaking the work. I explained to him as much as I could that I wanted to keep the wheels as original as possible. That meant polishing and not chroming the outer lips, cleaning the inner barrels but keeping the original SSR/Watanabe stickers and cleaning/reusing the original rim bolts if possible. Rim nuts were far too gone due to salt of UK roads and brake dust, so they were replaced with brand new ones.
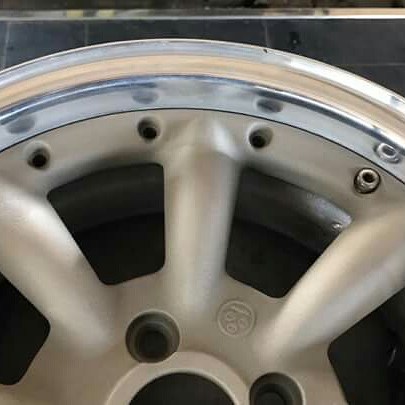
He first made sure the wheels ran true. One lip was slightly bent, so it was pressed back in shape. Then he welded all curb rashing to fill it, and cut back. Lips were polished to a mirror-like finish, centers disassembled and sandblasted to remove the previous flaking coat of paint and tons of primer. After that, the centers were powdercoated a champagne, sand-like textured powder that was custom-ordered. Really cannot describe the colour/feel of it, and it cannot be easily put into photos; the colour is really sparkling and deep but matte at the same time. Gold sand is the best description I can come up with.
Before/after
Polished bolts
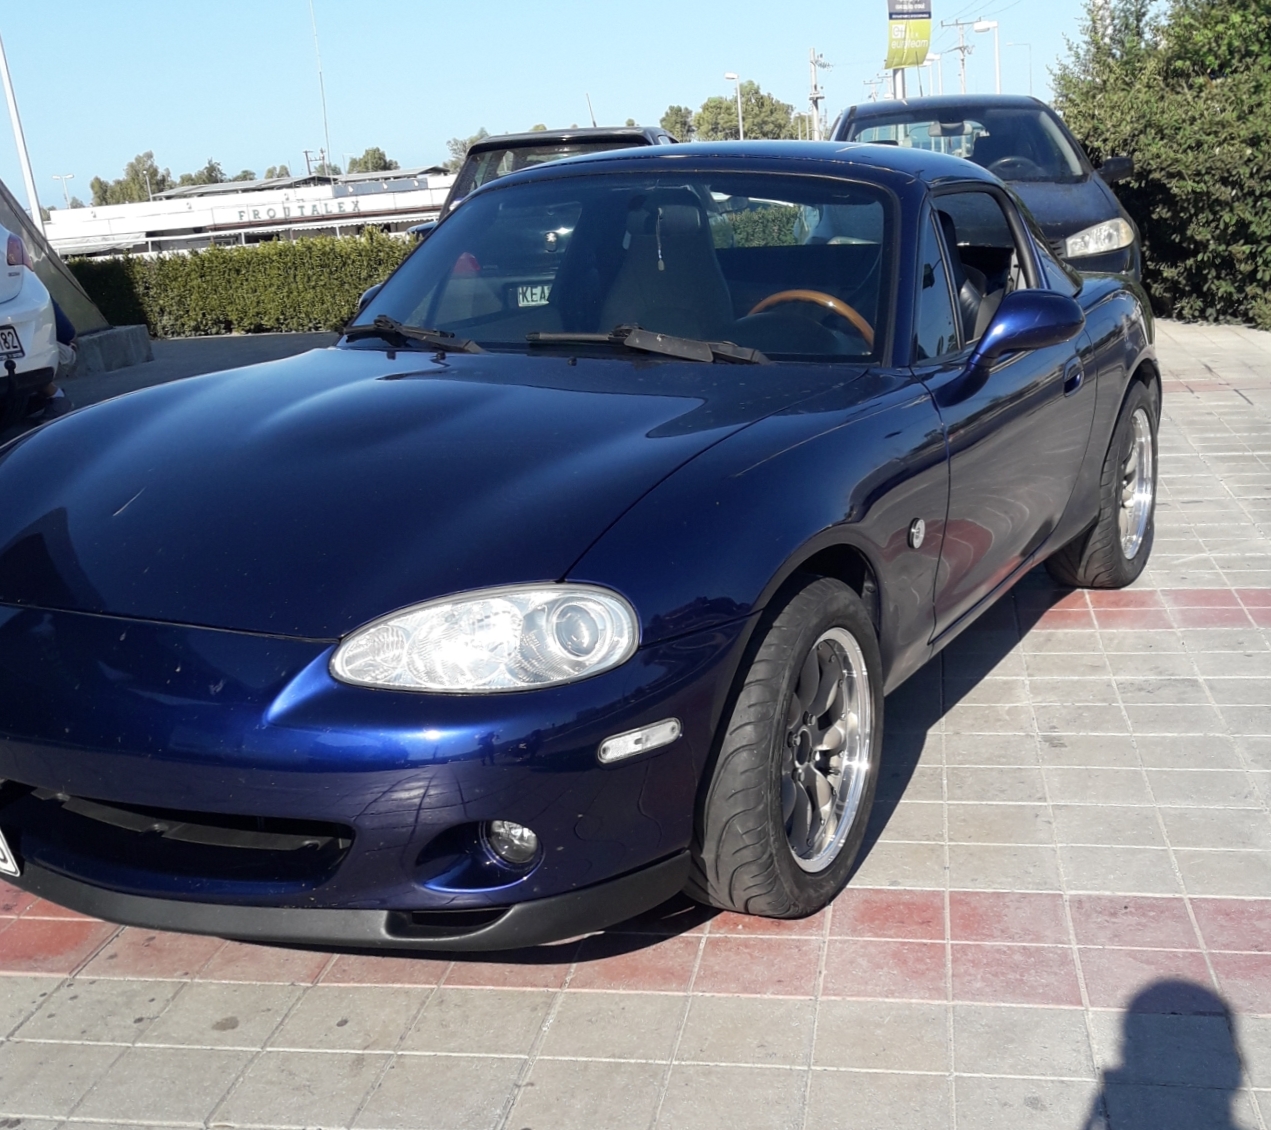
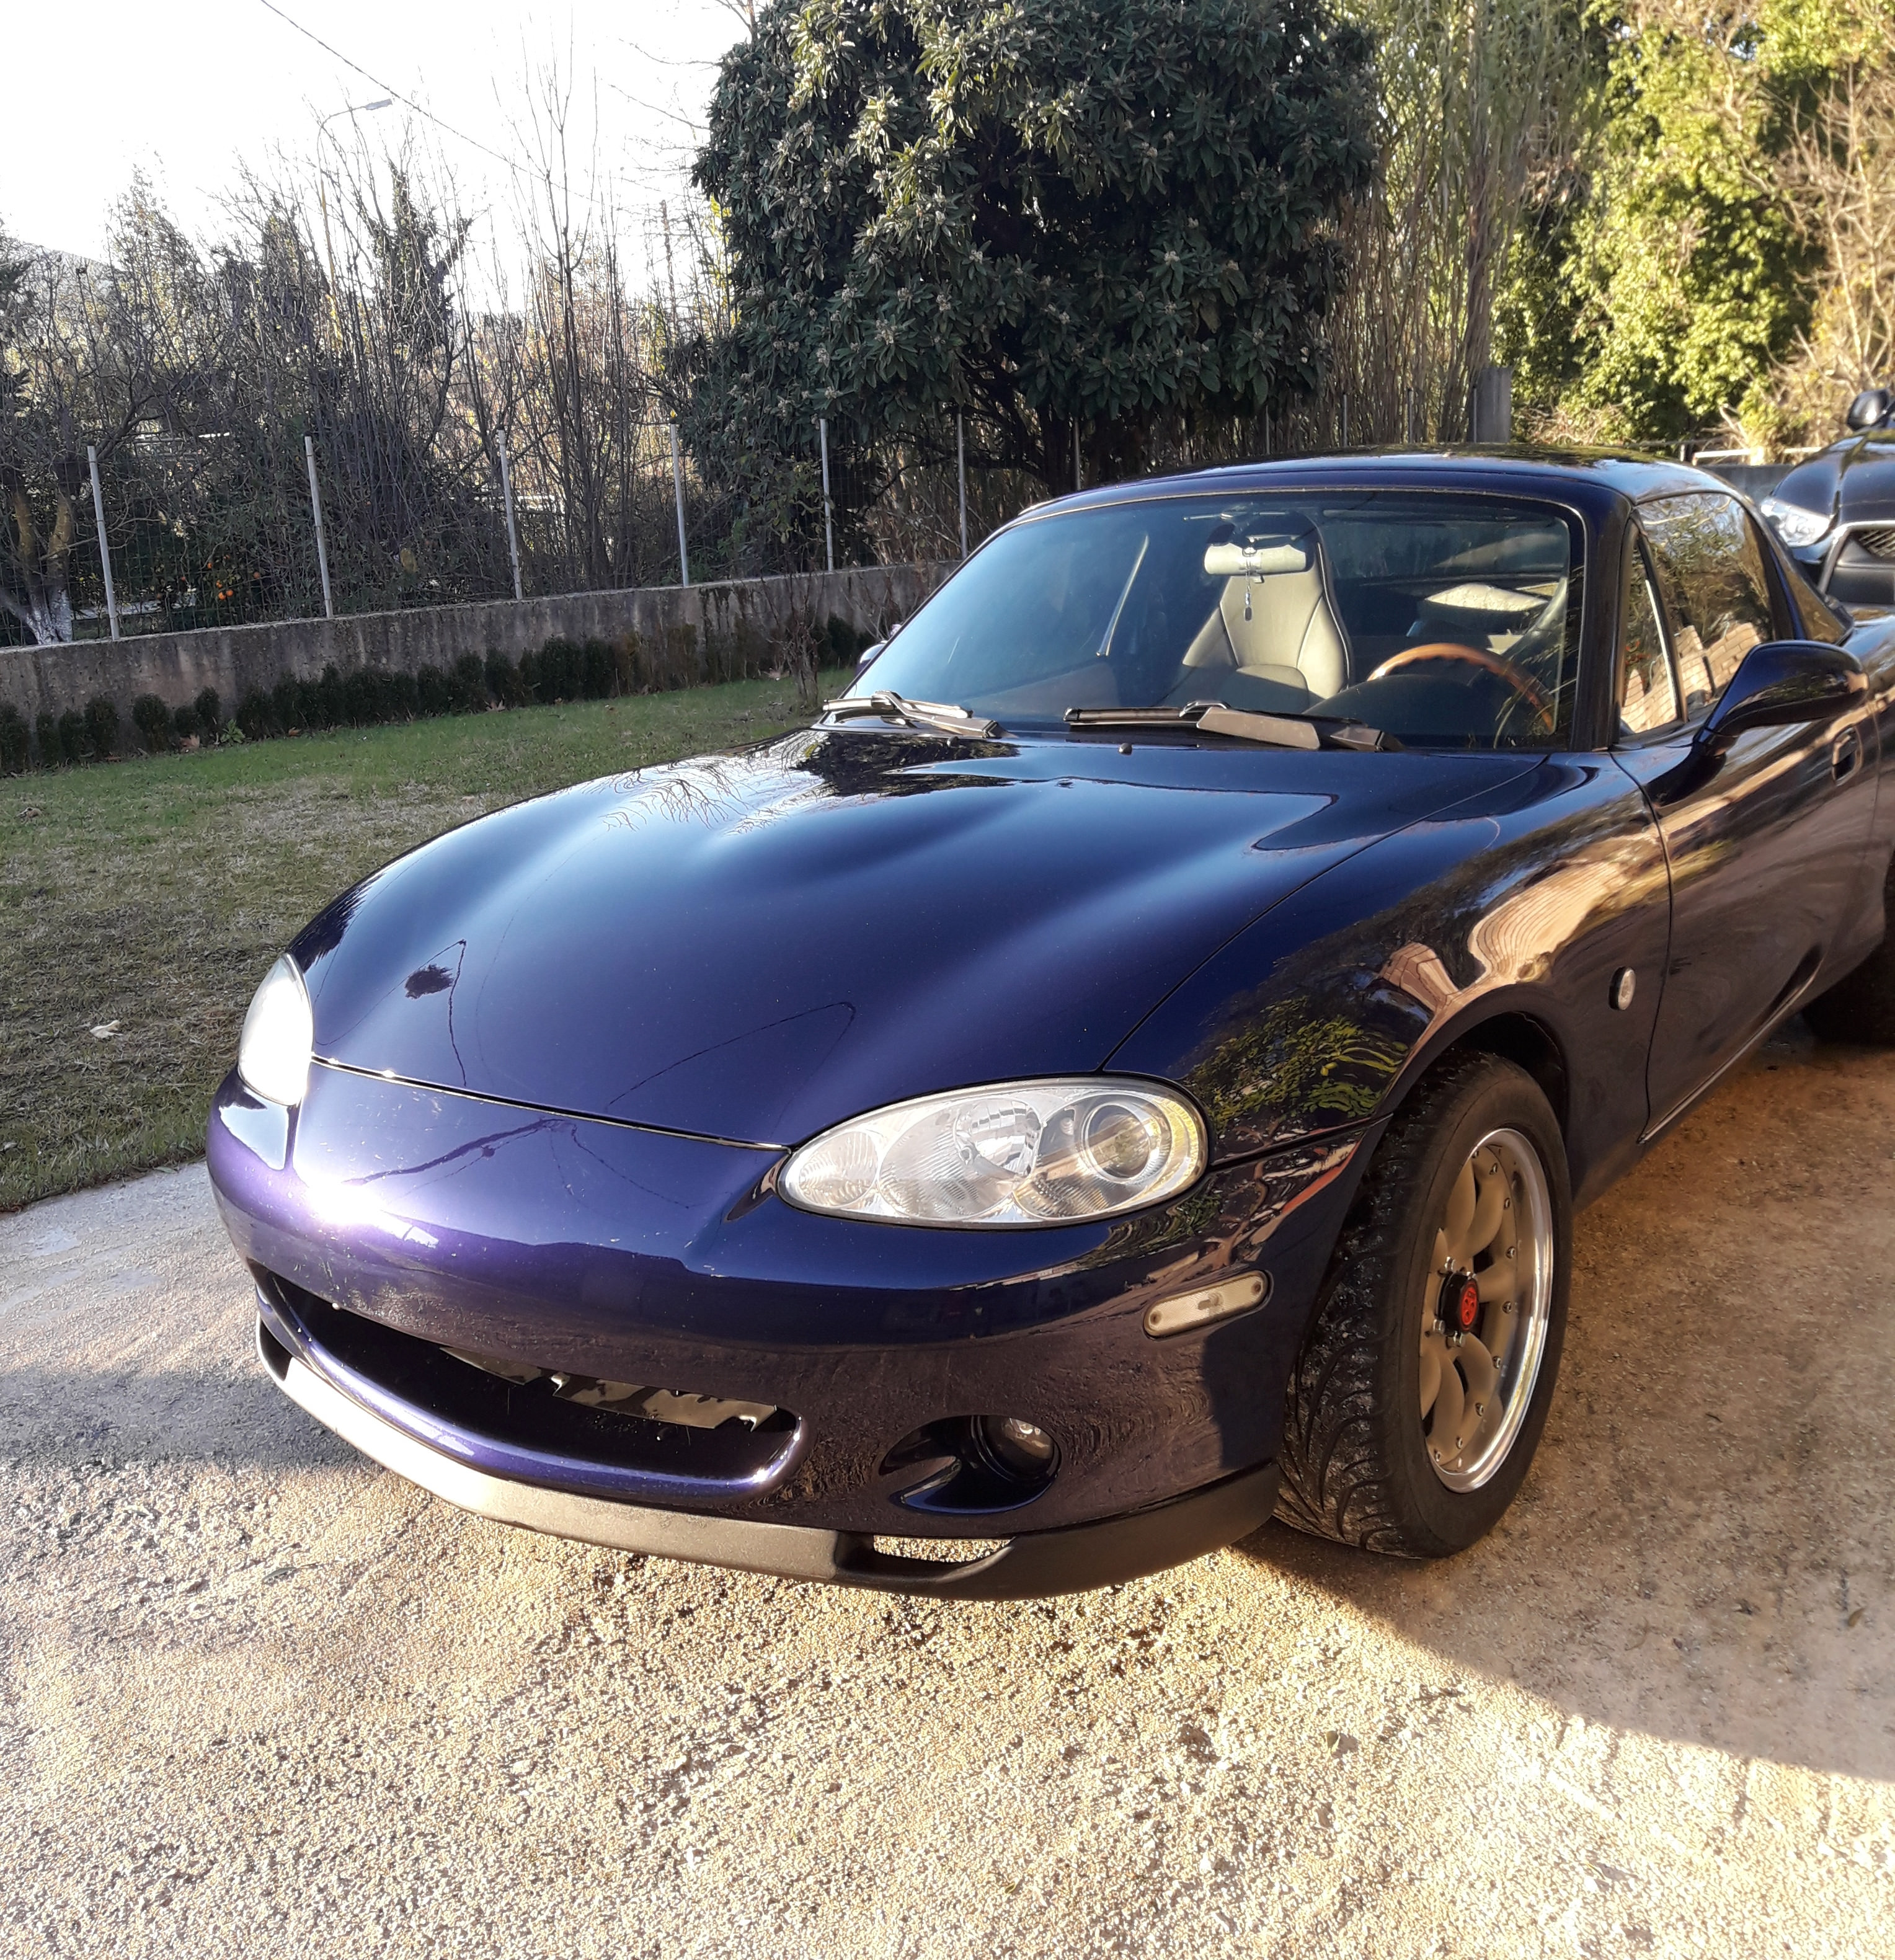
End result, out on the sun, the colour is simply amazing up close!
...and not too bad in the shade either!
And on the car!
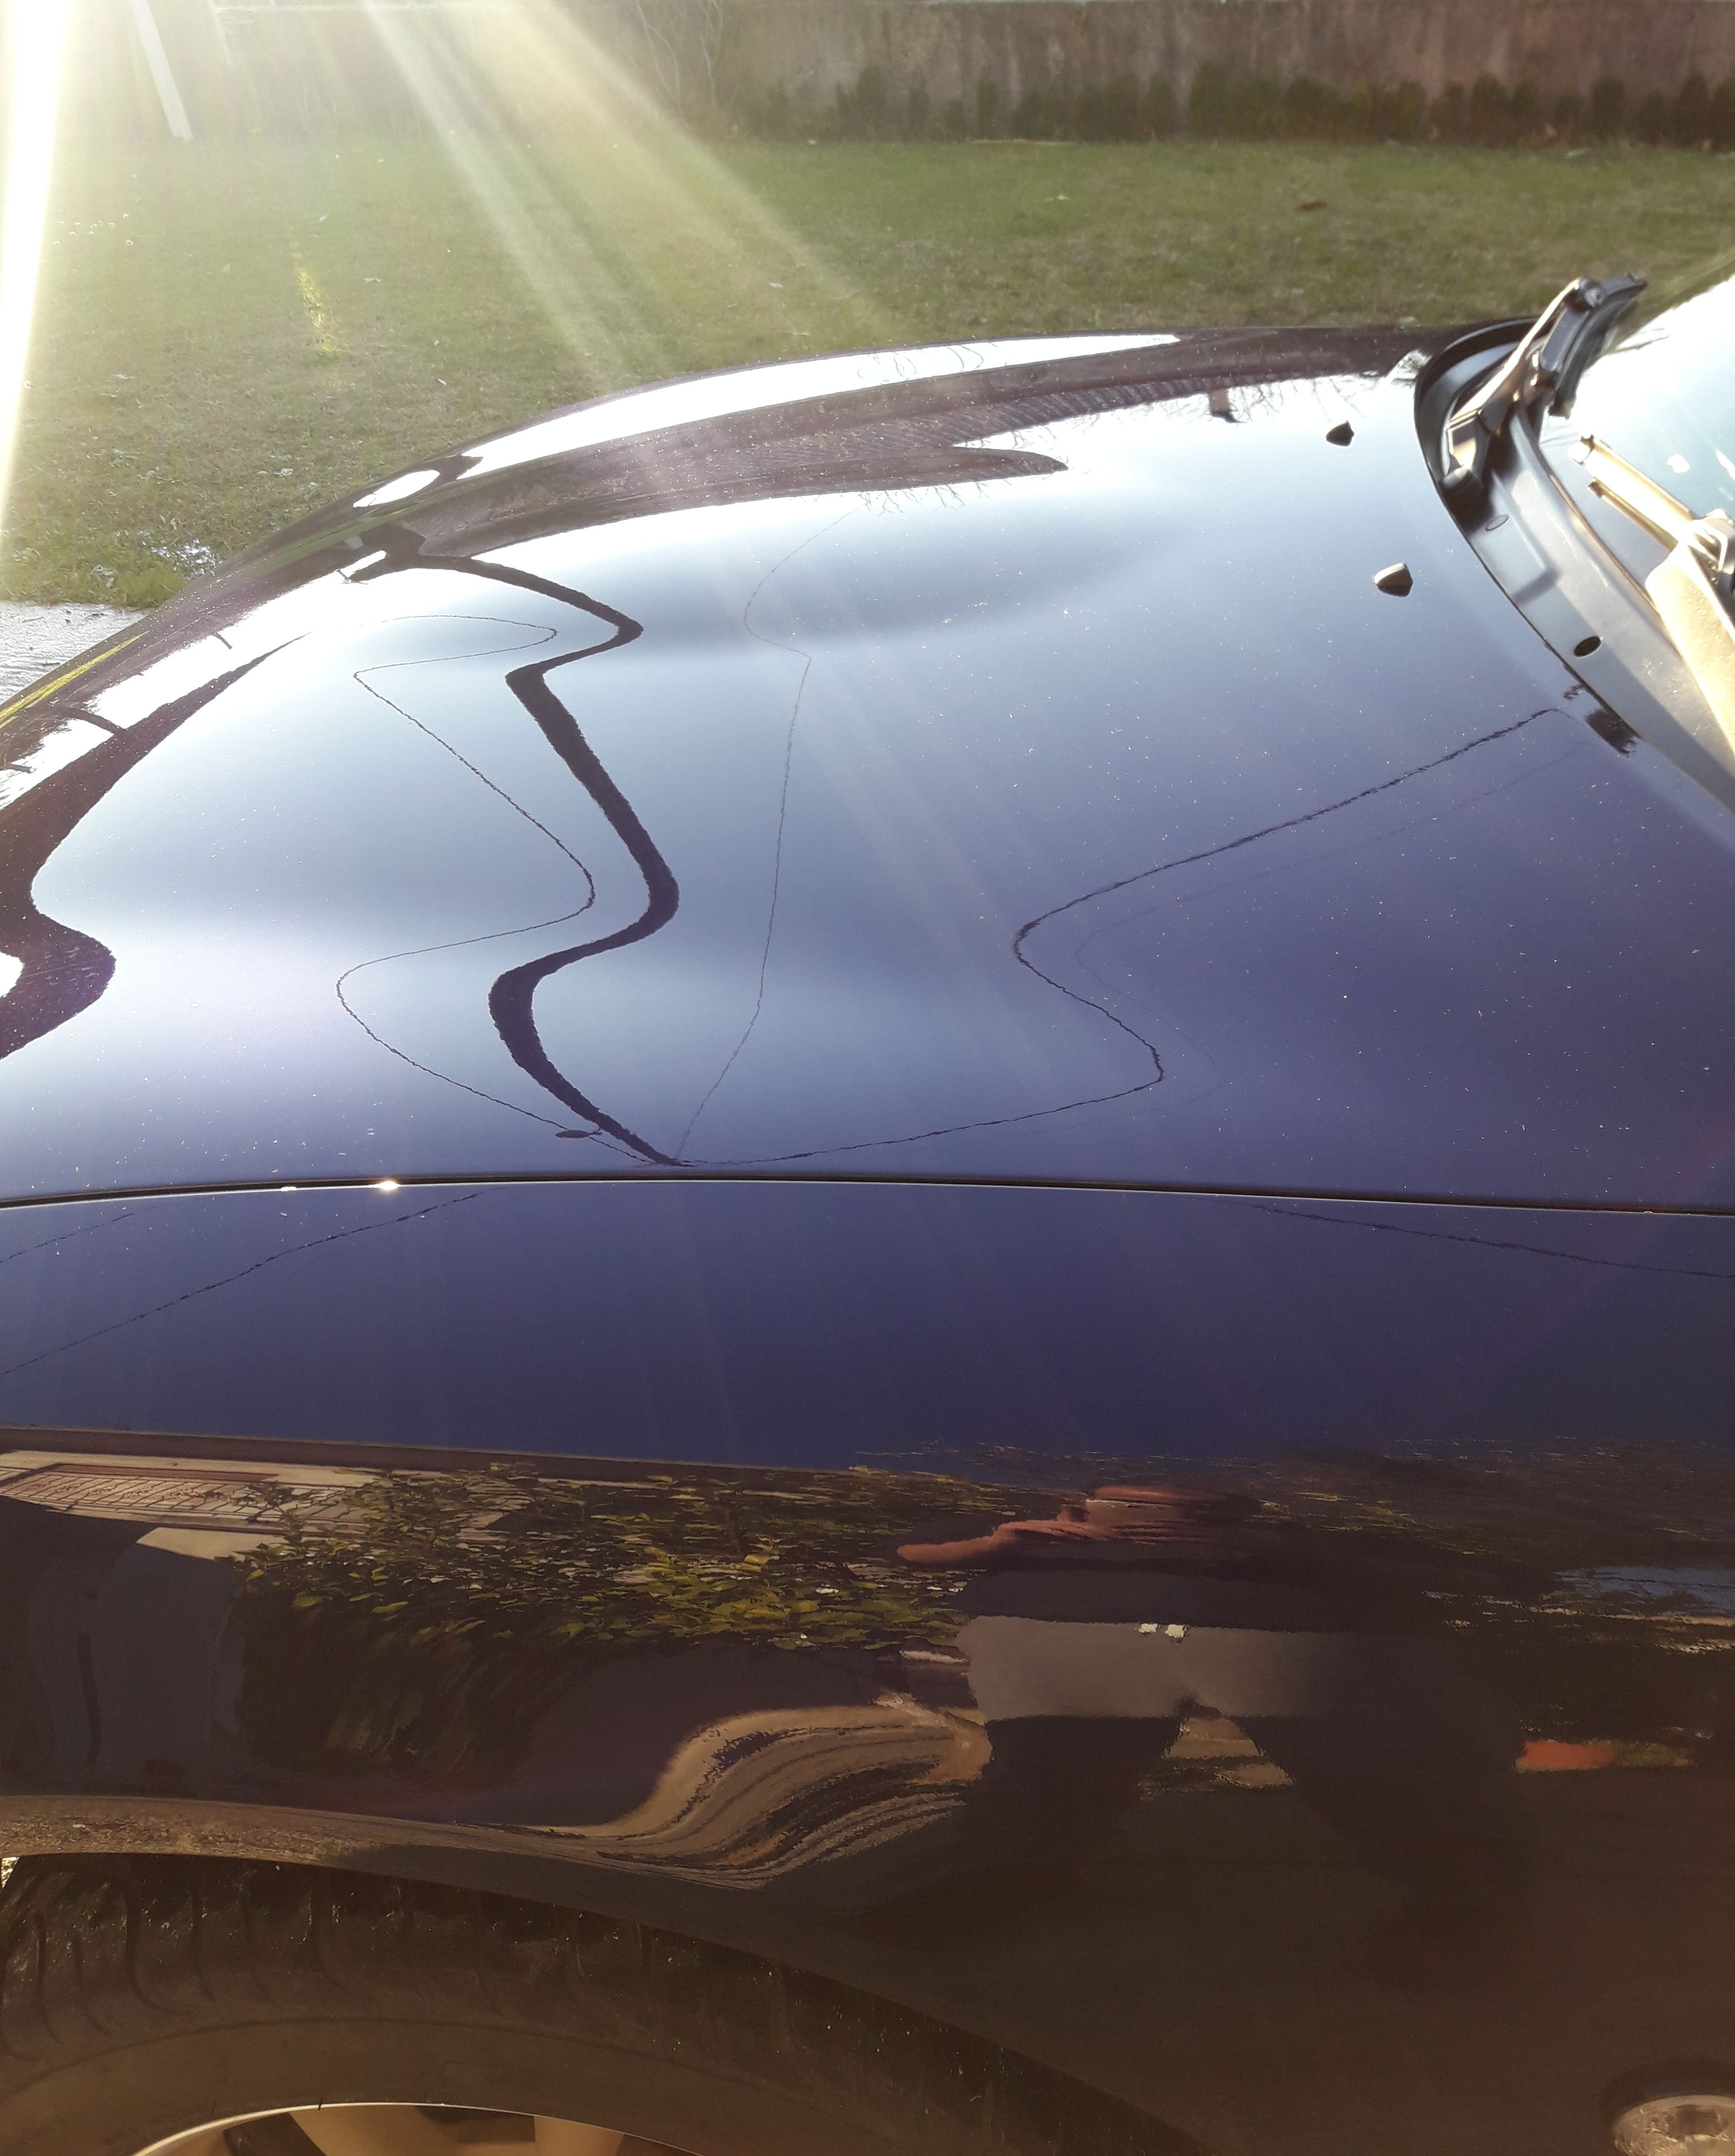
Since the SUV height and the ding on the hood bugged me, did a quick & dirty attempt on PS until I install the coilovers
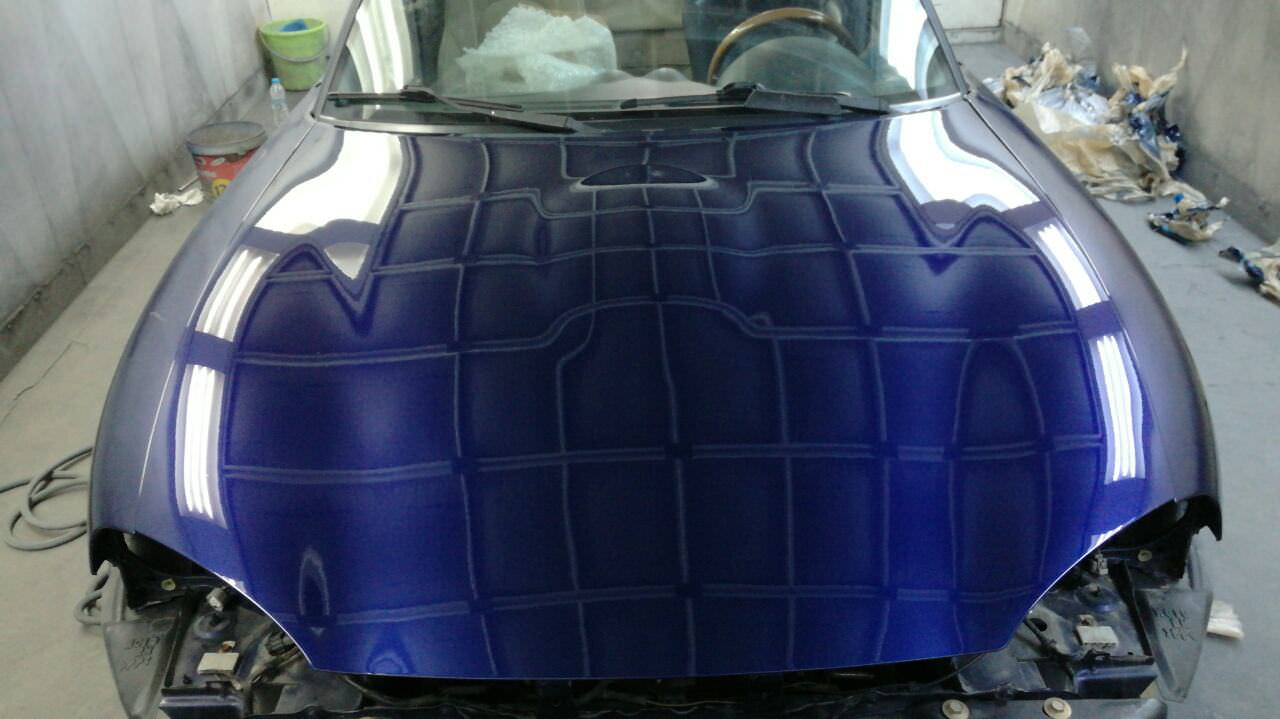
Then, due to a small accident (flying object landing on the hood while driving on the freeway) and to a million of dings around the car I opted for a complete respray. Installed fender braces at the same time.
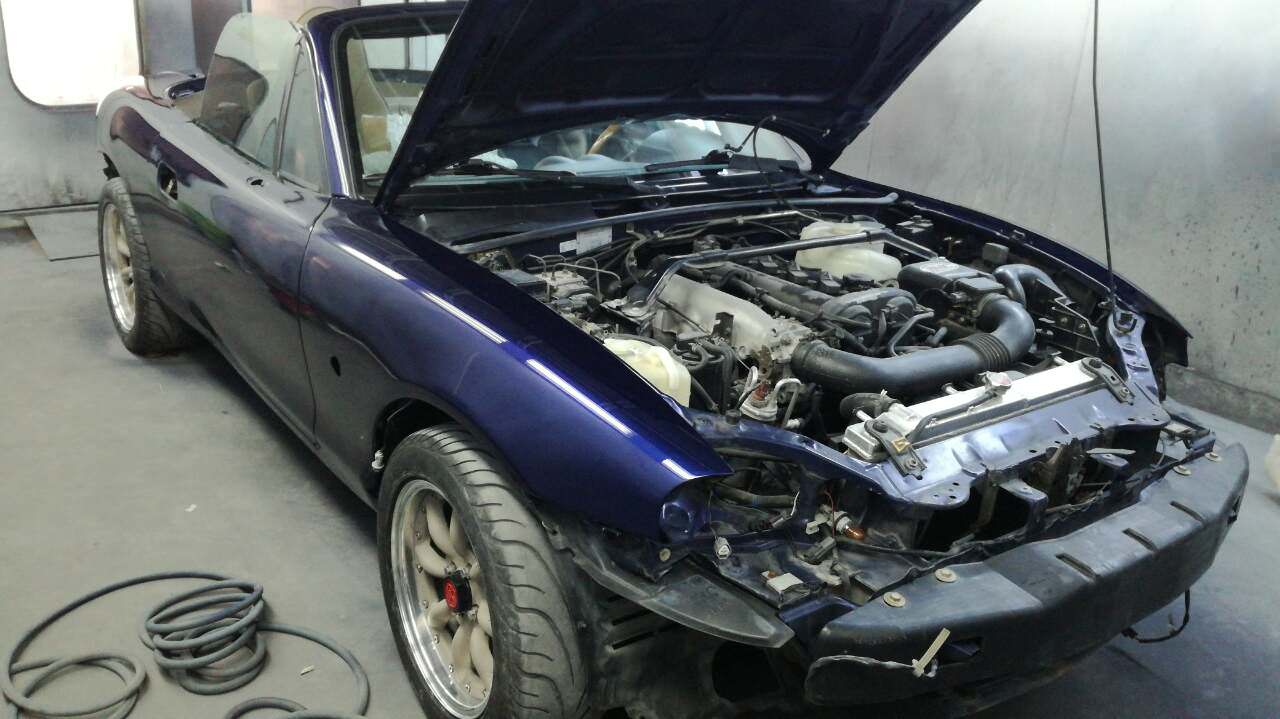

The paintjob was a great chance for me to replace all belt line mouldings, doors/windows and at the rear of the car. Fresh OEM goodness:

And poser artsy bonus pic
Maruha coilovers:
Momo Futura steering wheel to replace the Super Indy
Daikei NB2 hub w. airbag delete to replace the NA MOMO one
Beatrush rad panel
Original Watanabe wheel nuts, center caps and valve stem dust caps awaiting for the wheels to get back from the powdercoater
Speaking of; wheels have been powdercoated by a local place/tires and wheels shop, which I had used for some work-related stuff in the past and was cooperative enough. Owner's son (around 20) is now in charge of the powder coating side of the business, and he was very enthusiastic of undertaking the work. I explained to him as much as I could that I wanted to keep the wheels as original as possible. That meant polishing and not chroming the outer lips, cleaning the inner barrels but keeping the original SSR/Watanabe stickers and cleaning/reusing the original rim bolts if possible. Rim nuts were far too gone due to salt of UK roads and brake dust, so they were replaced with brand new ones.
He first made sure the wheels ran true. One lip was slightly bent, so it was pressed back in shape. Then he welded all curb rashing to fill it, and cut back. Lips were polished to a mirror-like finish, centers disassembled and sandblasted to remove the previous flaking coat of paint and tons of primer. After that, the centers were powdercoated a champagne, sand-like textured powder that was custom-ordered. Really cannot describe the colour/feel of it, and it cannot be easily put into photos; the colour is really sparkling and deep but matte at the same time. Gold sand is the best description I can come up with.
Before/after
Polished bolts
End result, out on the sun, the colour is simply amazing up close!
...and not too bad in the shade either!
And on the car!
Since the SUV height and the ding on the hood bugged me, did a quick & dirty attempt on PS until I install the coilovers
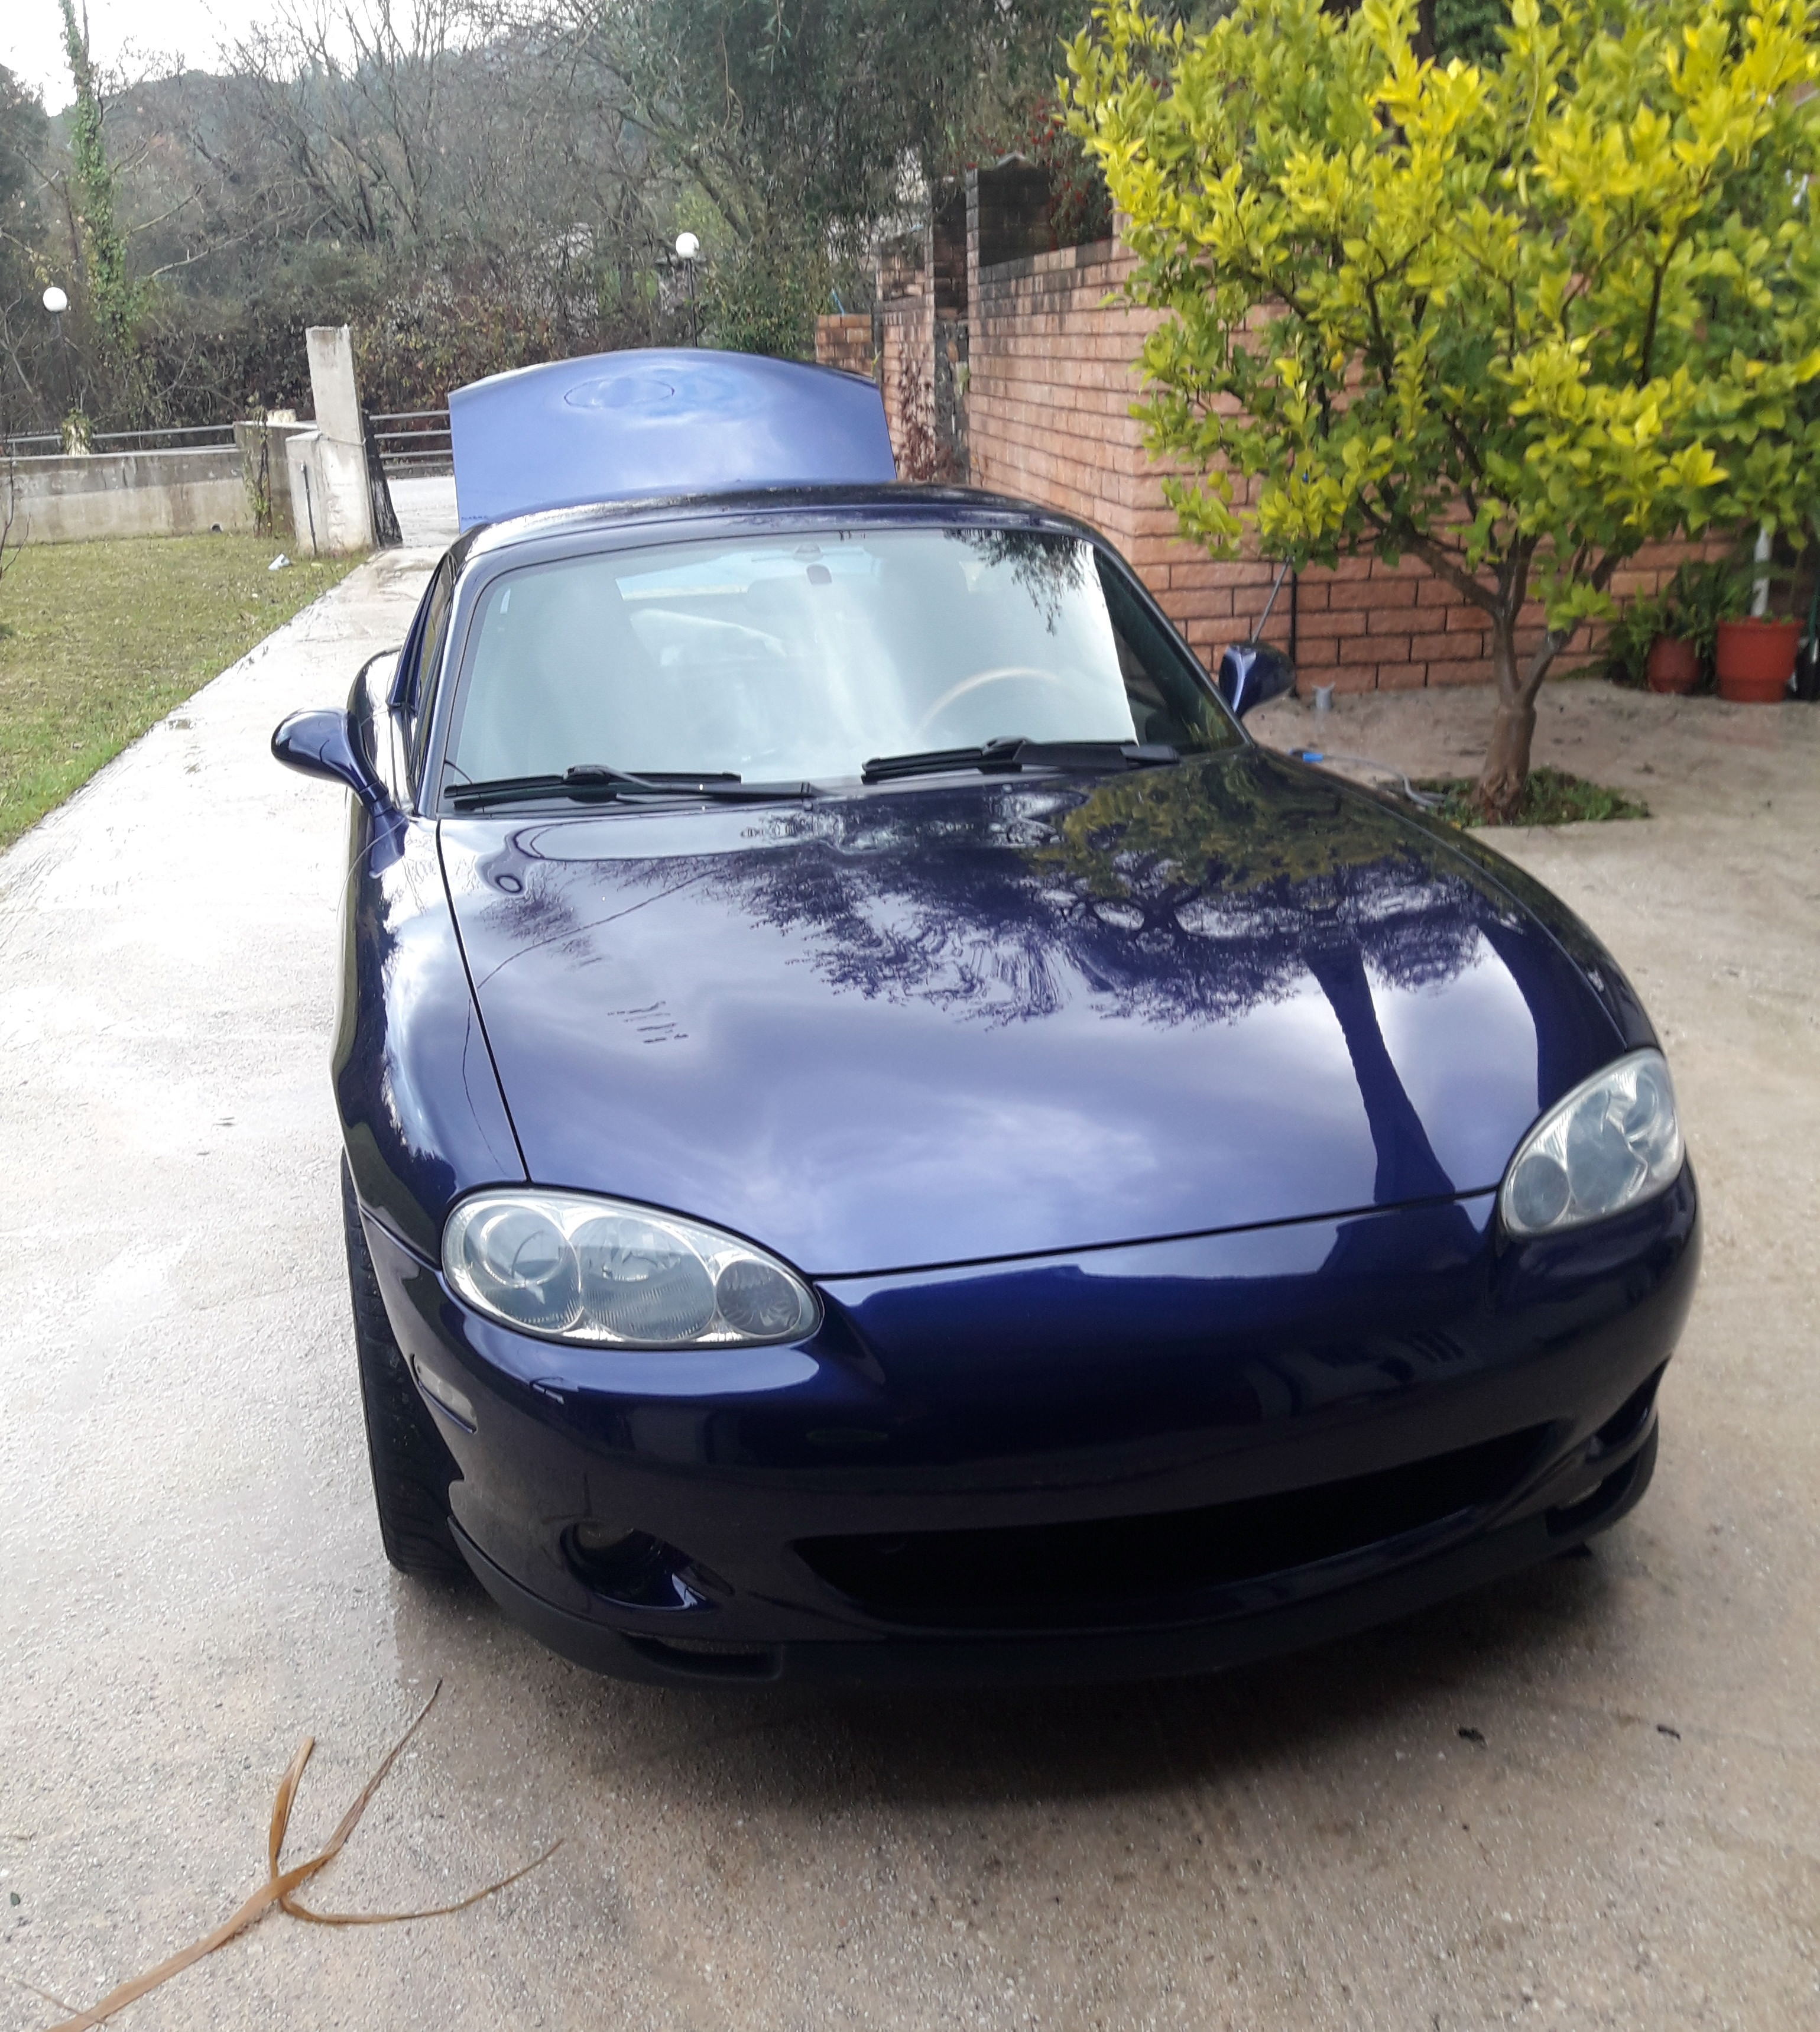
Then, due to a small accident (flying object landing on the hood while driving on the freeway) and to a million of dings around the car I opted for a complete respray. Installed fender braces at the same time.
The paintjob was a great chance for me to replace all belt line mouldings, doors/windows and at the rear of the car. Fresh OEM goodness:
And poser artsy bonus pic
Reply
0
0
05-28-2018, 12:30 PM
#4
Senior Member
Thread Starter
Join Date: Jul 2015
Posts: 1,015
Total Cats: 140
...and bought even moar parts
Dropped my spare VC for a fresh powdercoat in crinkle black, came out rather nice, and paired nicely with a gold Mazdaspeed oil cap.
and occasionally let some steam off in local touges
That brings us effectively to today. Current "spec list" (some of these are still yet to be installed)
EXTERIOR
RS Factory Stage front lip (copy)
OEM mud flaps
Custom Revlimiter Type 60 badges
Side relocation front plate mount
OEM HT
New mohair hood
INTERIOR
Lotus Elise seats
KG Works stainless cluster bezel
AWD gauge rings
AWD needle covers
Revlimiter custom "Spyder" gauges
LED interior/gauges/switch bulbs
Trans tunnel side lights
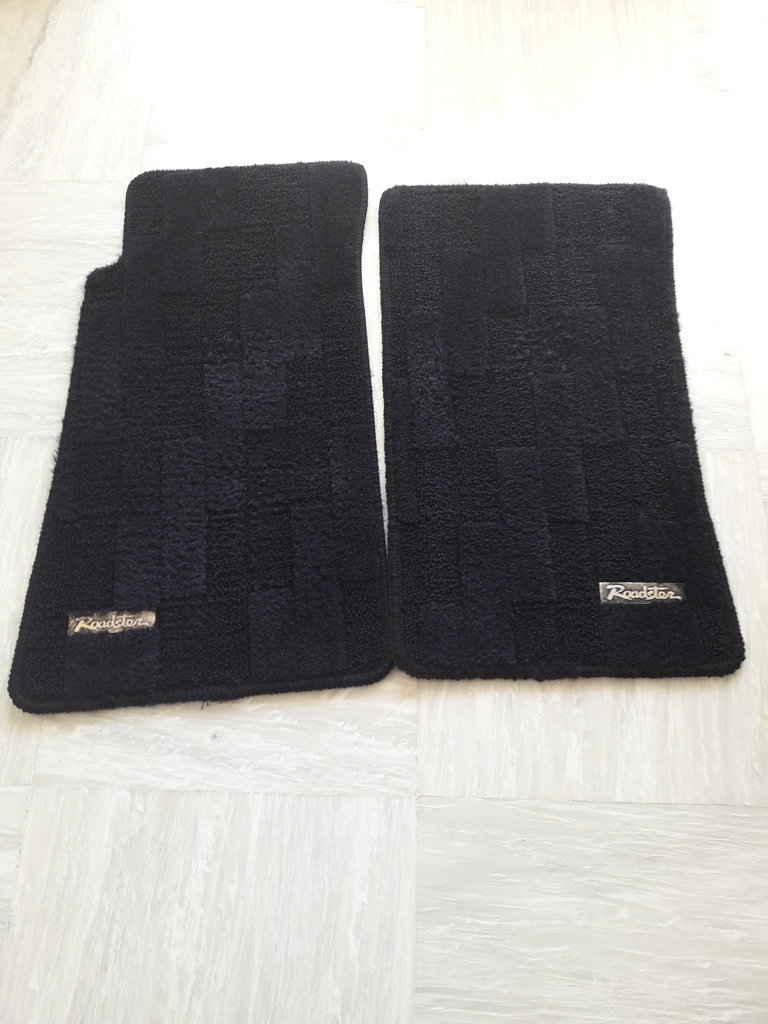
JDM Eunos "oval" floor mats
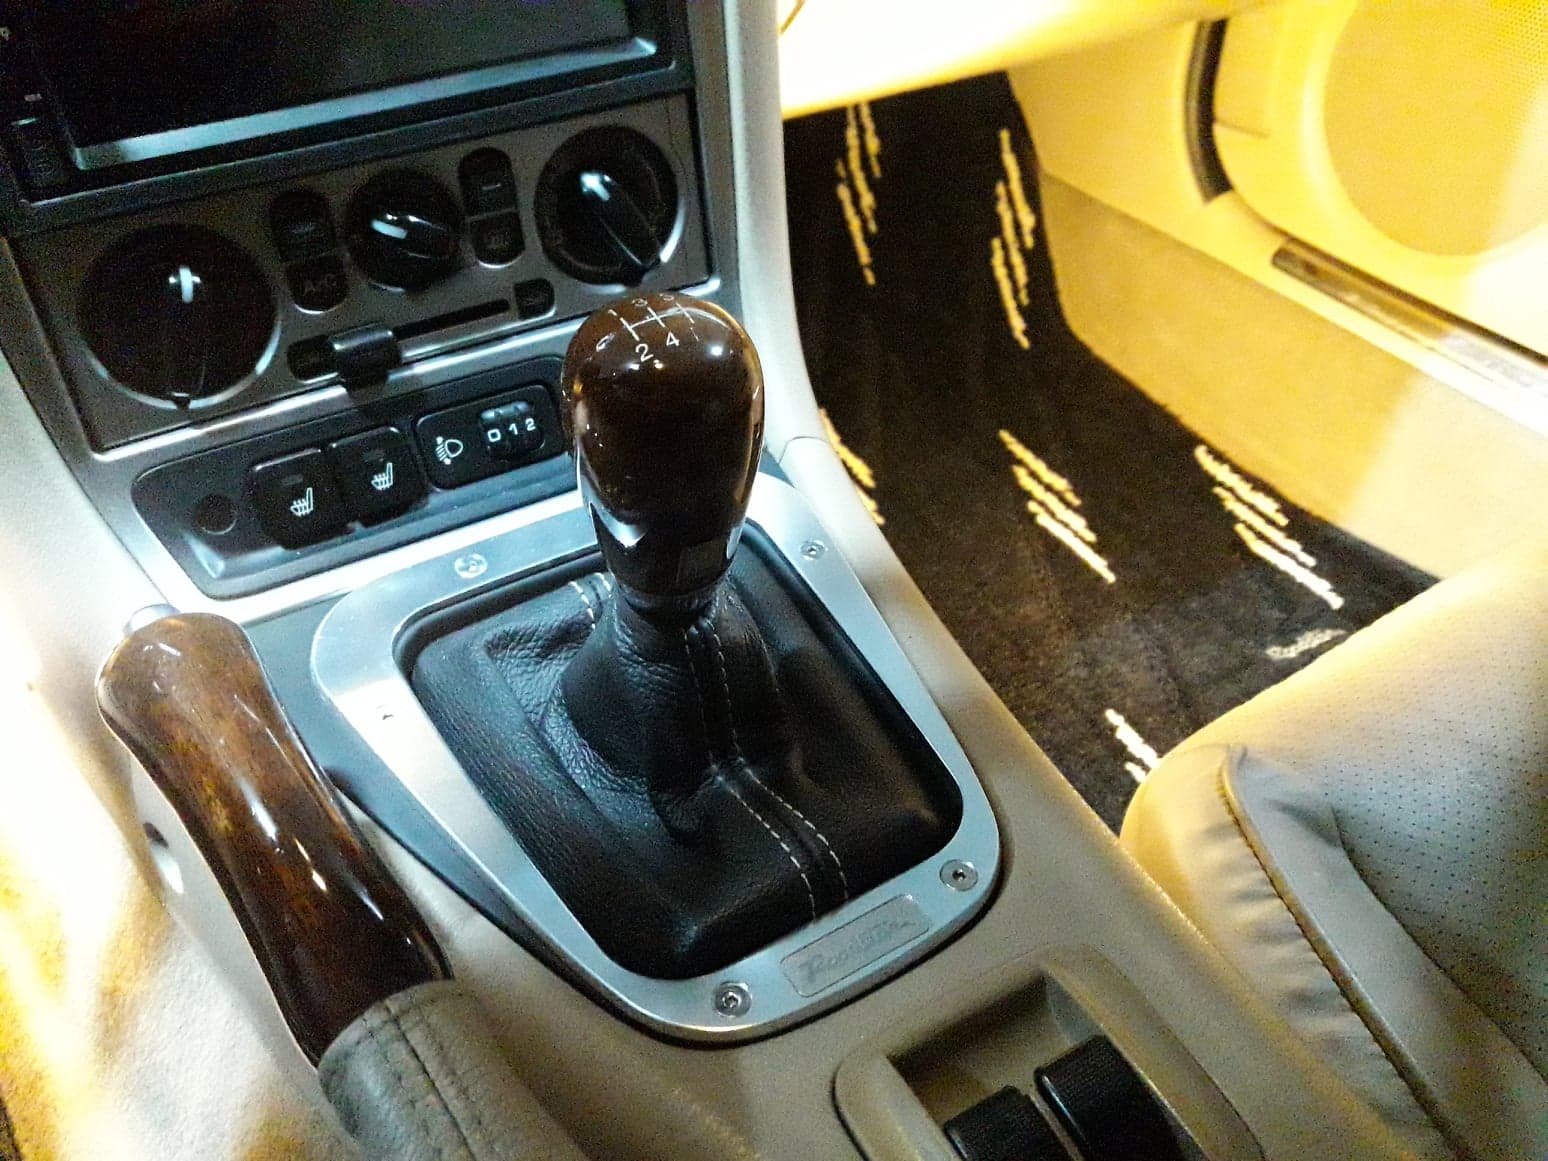
JDM Roadster gear lever surround
Custom leather door handle covers
Custom leather handbrake cover
Custom leather gaiter cover
Padded glovebox/central console
JDM folding visors
MOMO Futura
Daikei hub
Custom Revlimiter Type 60 horn button
ENGINE & TRANSMISSION
Toyota COPS
IL Motorsport aluminum radiator
Kraftwerks Rotrex C30/74 intercooled kit
MS2 Enhanced ECU
Bosch EV14 600cc injectors
FlowForce injector adapter kit (to be ordered)
Rewrapped wiring loom
Mazdaspeeed engine mounts
OEM Torsen T2
ACT ProLite flywheel
ACT HD clutch
Mazdaspeed gold oil cap
Beatrush radiator panel
SUSPENSION & HANDLING
OEM Sport package underbraces
TR Lane double hoop roll bar
Frame rails
RB rear subframe brace
Maruha coilovers on extended Maruha top hats, 350/250 rates
WHEELS, TIRES, BRAKES
15x7 et24 Watanabe RS8
Watanabe center caps
Watanabe lug nuts
Watanabe valve stems & caps
205/50/15 Federal 595RSR
OEM "Sport package" brakes (270/276mm)
Pagid rotors
HEL braided brake lines
ATE Typ100 fluid
OTHERS & MAINTENANCE
Front Tie Down Hooks Removed
Reconditioned Wiper Arms
Reconditioned top latches
Cappuccino washer bottle
Philips 4300K Crystal Vision headlamp bulbs
Custom derlin door bushings
Cleaned/sanitized HVAC system
Continental accessory belts
Continental timing belt
OEM Mazda idler bearings replacement
OEM Mazda cam seal replacement
OEM Mazda crankshaft seal replacement
OEM Mazda fuel filter replacement
OEM Mazda PCV valve replacement
OEM Mazda VC gasket replacement
OEM Mazda shifter insulation replacement
OEM Mazda shifter boots & cap replacement
OEM Mazda top latch end caps replacement
OEM Mazda thermostat replacement
OEM Mazda brake lights grommets replacement
Valeo 100 coolant
Redline LSD oil
Redline gearbox oil
Dropped my spare VC for a fresh powdercoat in crinkle black, came out rather nice, and paired nicely with a gold Mazdaspeed oil cap.
and occasionally let some steam off in local touges
That brings us effectively to today. Current "spec list" (some of these are still yet to be installed)
EXTERIOR
RS Factory Stage front lip (copy)
OEM mud flaps
Custom Revlimiter Type 60 badges
Side relocation front plate mount
OEM HT
New mohair hood
INTERIOR
Lotus Elise seats
KG Works stainless cluster bezel
AWD gauge rings
AWD needle covers
Revlimiter custom "Spyder" gauges
LED interior/gauges/switch bulbs
Trans tunnel side lights
JDM Eunos "oval" floor mats
JDM Roadster gear lever surround
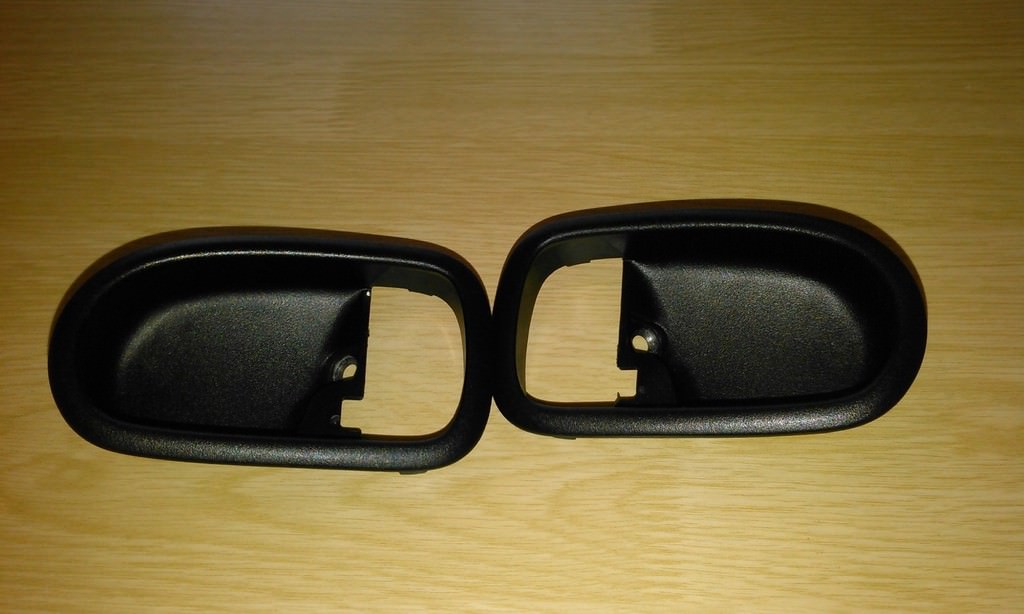
Custom leather door handle covers
Custom leather handbrake cover
Custom leather gaiter cover
Padded glovebox/central console
JDM folding visors
MOMO Futura
Daikei hub
Custom Revlimiter Type 60 horn button
ENGINE & TRANSMISSION
Toyota COPS
IL Motorsport aluminum radiator
Kraftwerks Rotrex C30/74 intercooled kit
MS2 Enhanced ECU
Bosch EV14 600cc injectors
FlowForce injector adapter kit (to be ordered)
Rewrapped wiring loom
Mazdaspeeed engine mounts
OEM Torsen T2
ACT ProLite flywheel
ACT HD clutch
Mazdaspeed gold oil cap
Beatrush radiator panel
SUSPENSION & HANDLING
OEM Sport package underbraces
TR Lane double hoop roll bar
Frame rails
RB rear subframe brace
Maruha coilovers on extended Maruha top hats, 350/250 rates
WHEELS, TIRES, BRAKES
15x7 et24 Watanabe RS8
Watanabe center caps
Watanabe lug nuts
Watanabe valve stems & caps
205/50/15 Federal 595RSR
OEM "Sport package" brakes (270/276mm)
Pagid rotors
HEL braided brake lines
ATE Typ100 fluid
OTHERS & MAINTENANCE
Front Tie Down Hooks Removed
Reconditioned Wiper Arms
Reconditioned top latches
Cappuccino washer bottle
Philips 4300K Crystal Vision headlamp bulbs
Custom derlin door bushings
Cleaned/sanitized HVAC system
Continental accessory belts
Continental timing belt
OEM Mazda idler bearings replacement
OEM Mazda cam seal replacement
OEM Mazda crankshaft seal replacement
OEM Mazda fuel filter replacement
OEM Mazda PCV valve replacement
OEM Mazda VC gasket replacement
OEM Mazda shifter insulation replacement
OEM Mazda shifter boots & cap replacement
OEM Mazda top latch end caps replacement
OEM Mazda thermostat replacement
OEM Mazda brake lights grommets replacement
Valeo 100 coolant
Redline LSD oil
Redline gearbox oil
Reply
0
0
08-28-2019, 09:12 AM
#5
Senior Member
Thread Starter
Join Date: Jul 2015
Posts: 1,015
Total Cats: 140
Things are getting more interesting lately, so a few updates dump!
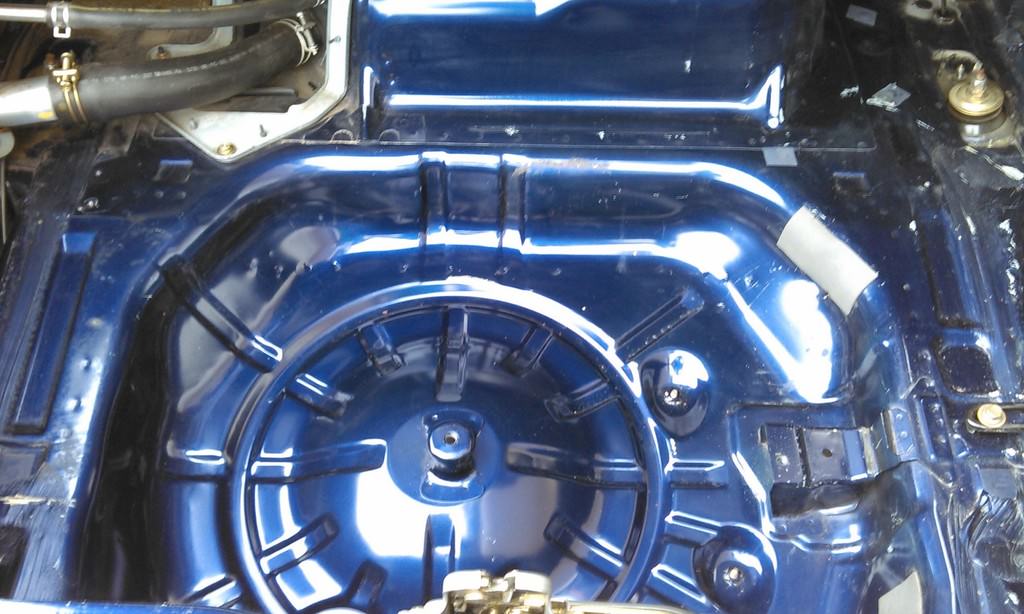
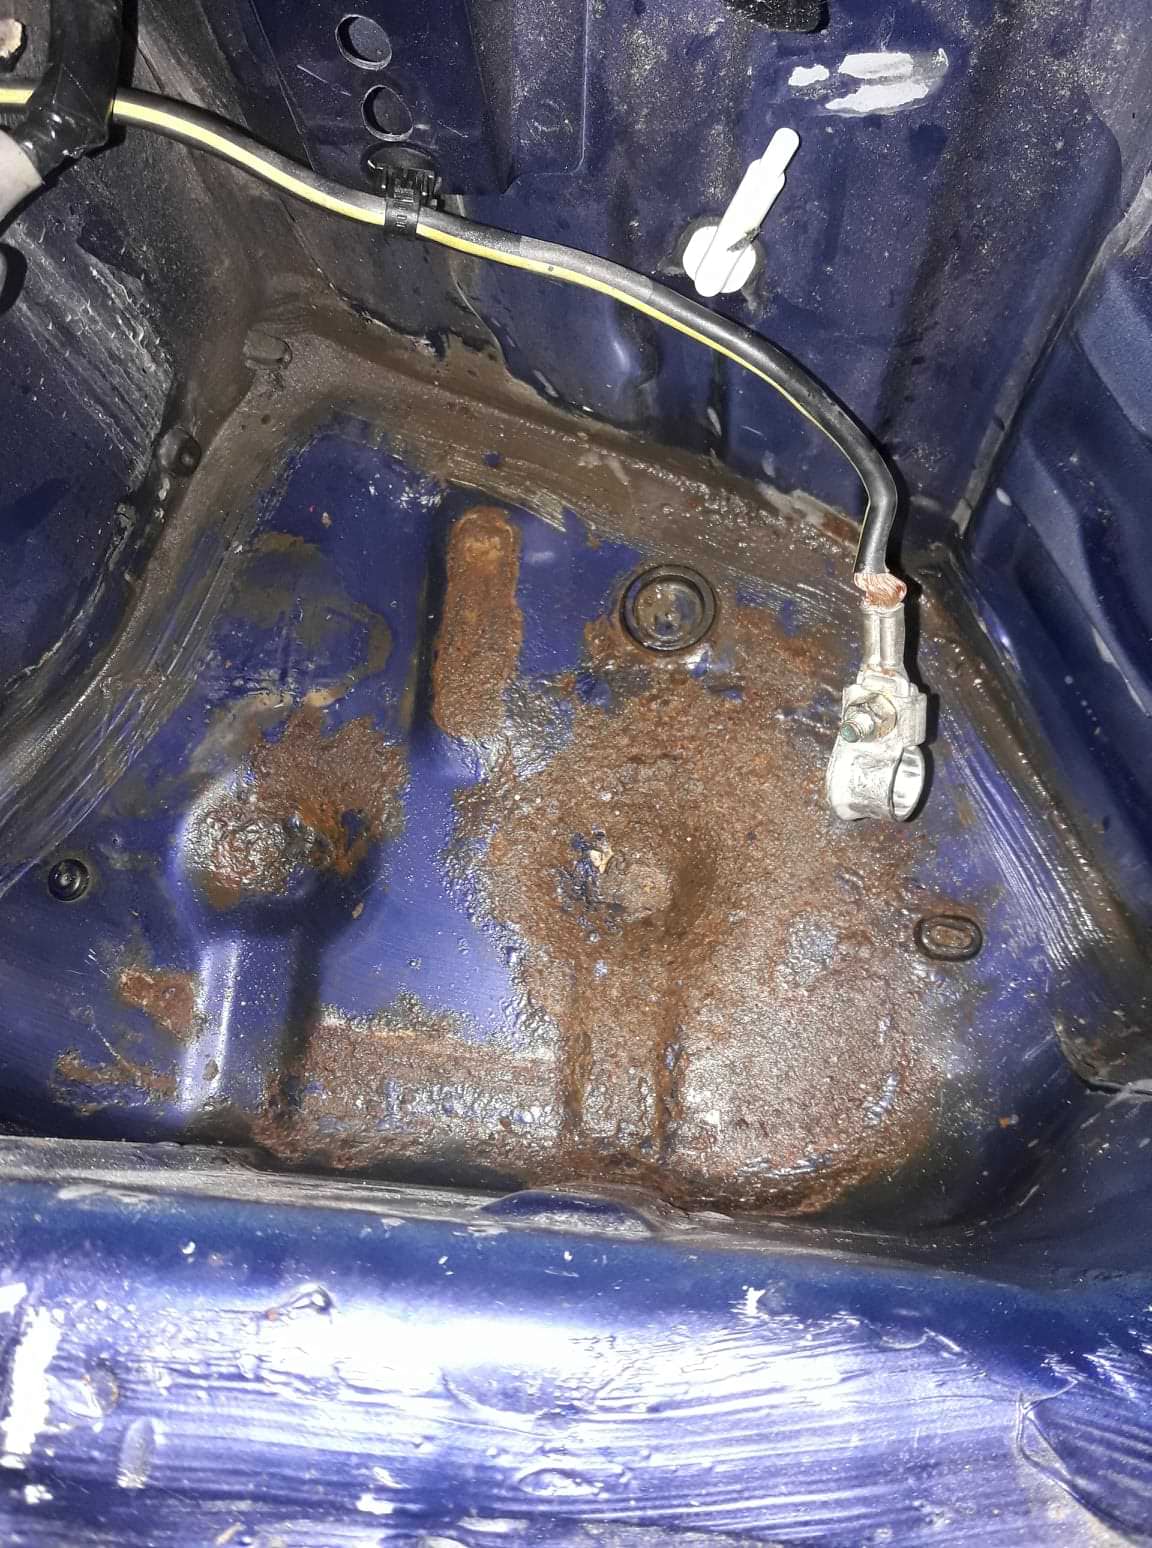
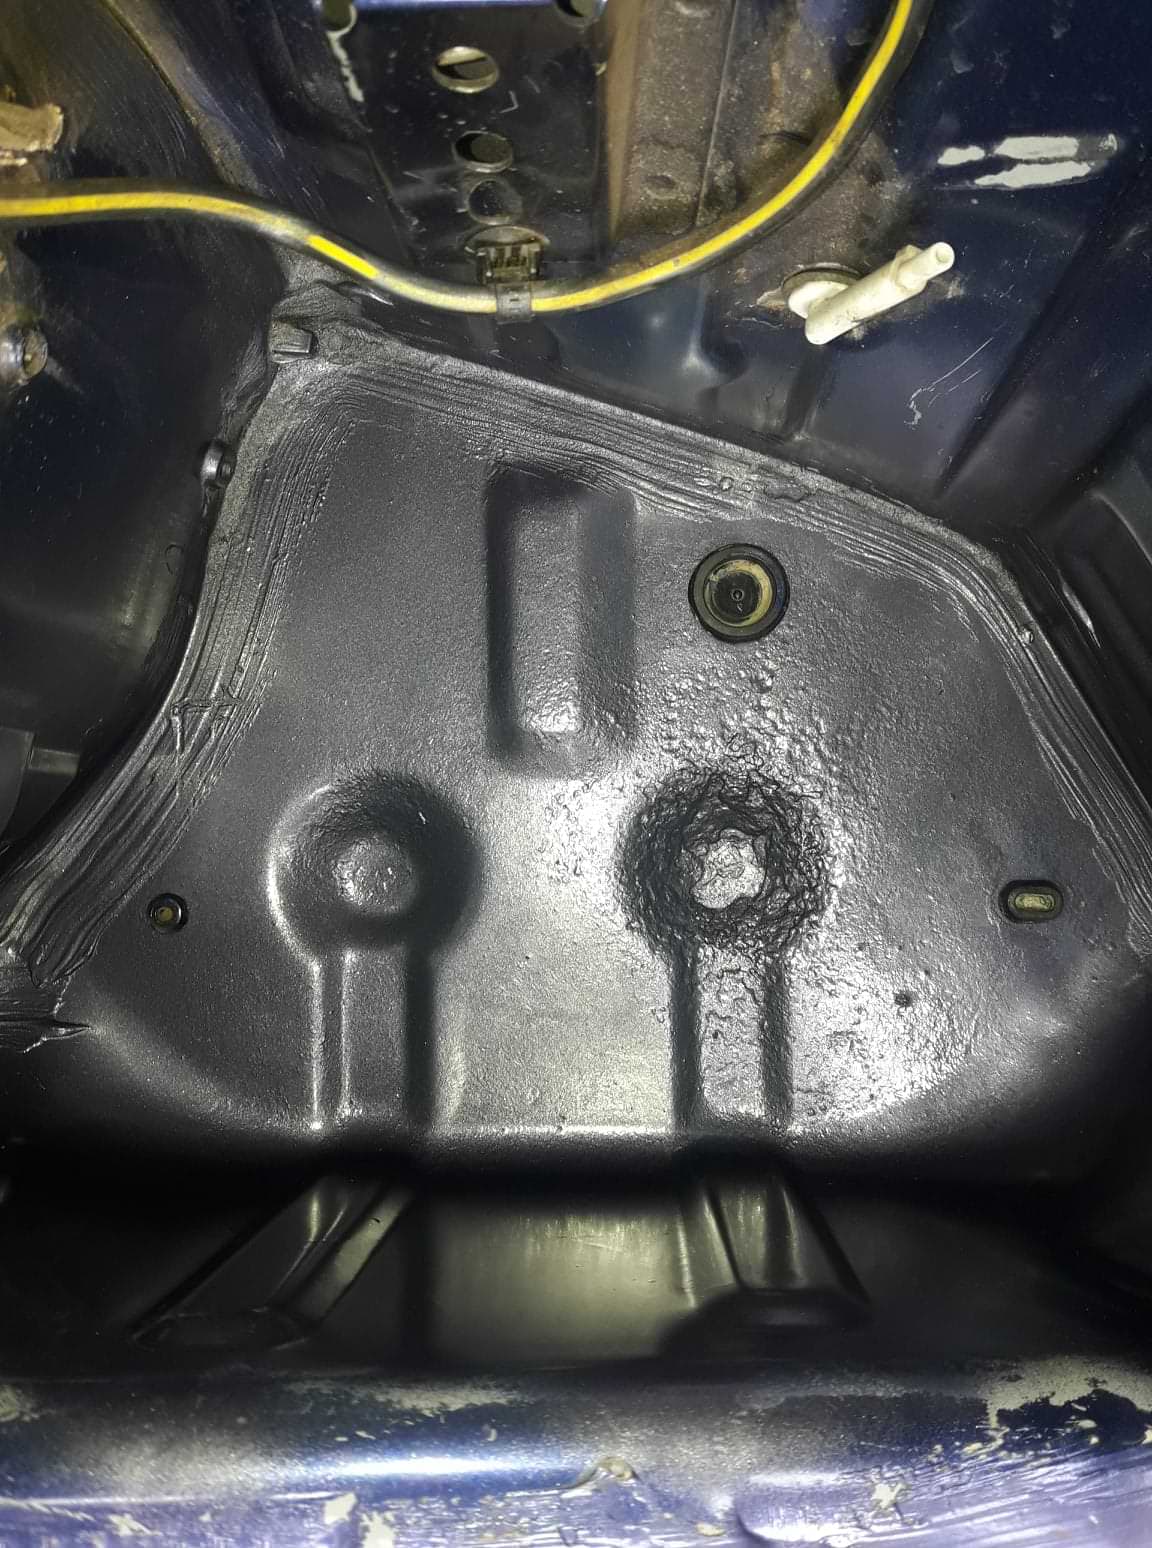
Found some cancer on the battery tray, which thankfully was not terminal for the sheet metal, took care of it:
Ordered a few bits to complete the Maruha coilover installation; new bump stops, stamped steel 20mm extended top mounts and new top and bottom bushings all around.
Ordered a few service items for the 1.6 engine

Transmission tunnel insulation is going to be installed at the same time (already have 2 12x24''sheets of Thermo Tec Adhesive Backed Heat Barrier that I plan on sticking to the underside of the tunnel when the transmissions' out). Door hinges are just spares, as they were less than 5 euros each (OEM Mazda ones that is!!!), same with the "brake fitting kit" which is the metal pad springs really.
Changed the engine mounts with some Mazda Motorsport ones; great move, as the driver's side one was completely torn. Got myself a set of new Advan AD08R in 205/50/15, as the old Federal RSR's have started to degrade. Did a different alignment, and a ton of mountain driving.
Changed the tail lights with symmetrical JDM units, as EU tails are different (one houses the reverse light and it's clear, while the other houses the rear fog light and it is red). Quick DA polishing, and on they went with fresh stud gaskets, and a LED reverse lamp courtesy of SBL.
Also purchased another set of JDM mats; this time a set ob black/tan ones from an NB RS in immaculate condition.

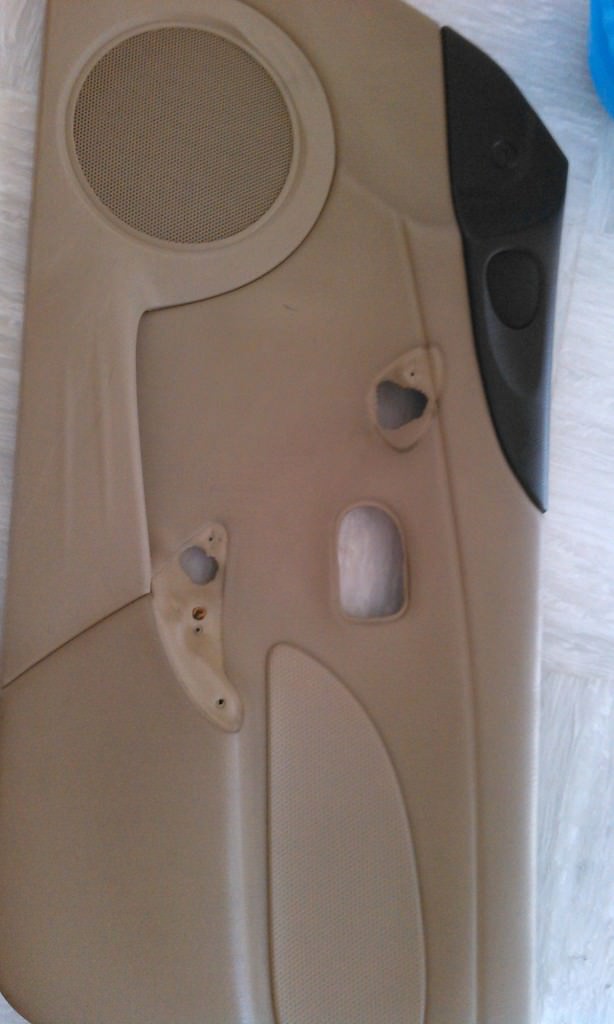
Finally, decided to move away from the satin silver in the radio surround; while I love it in complete black interiors, I find it cheap looking next to tan. Half-arsed attempt (need to change the top part and HVAC too), complete with OEM Roadster aluminum trim ring.
3D printed a new bezel for the radio, primed and painted to match. Pretty happy with it all, although the radio needs a new proper mount (is a bit crooked in there)

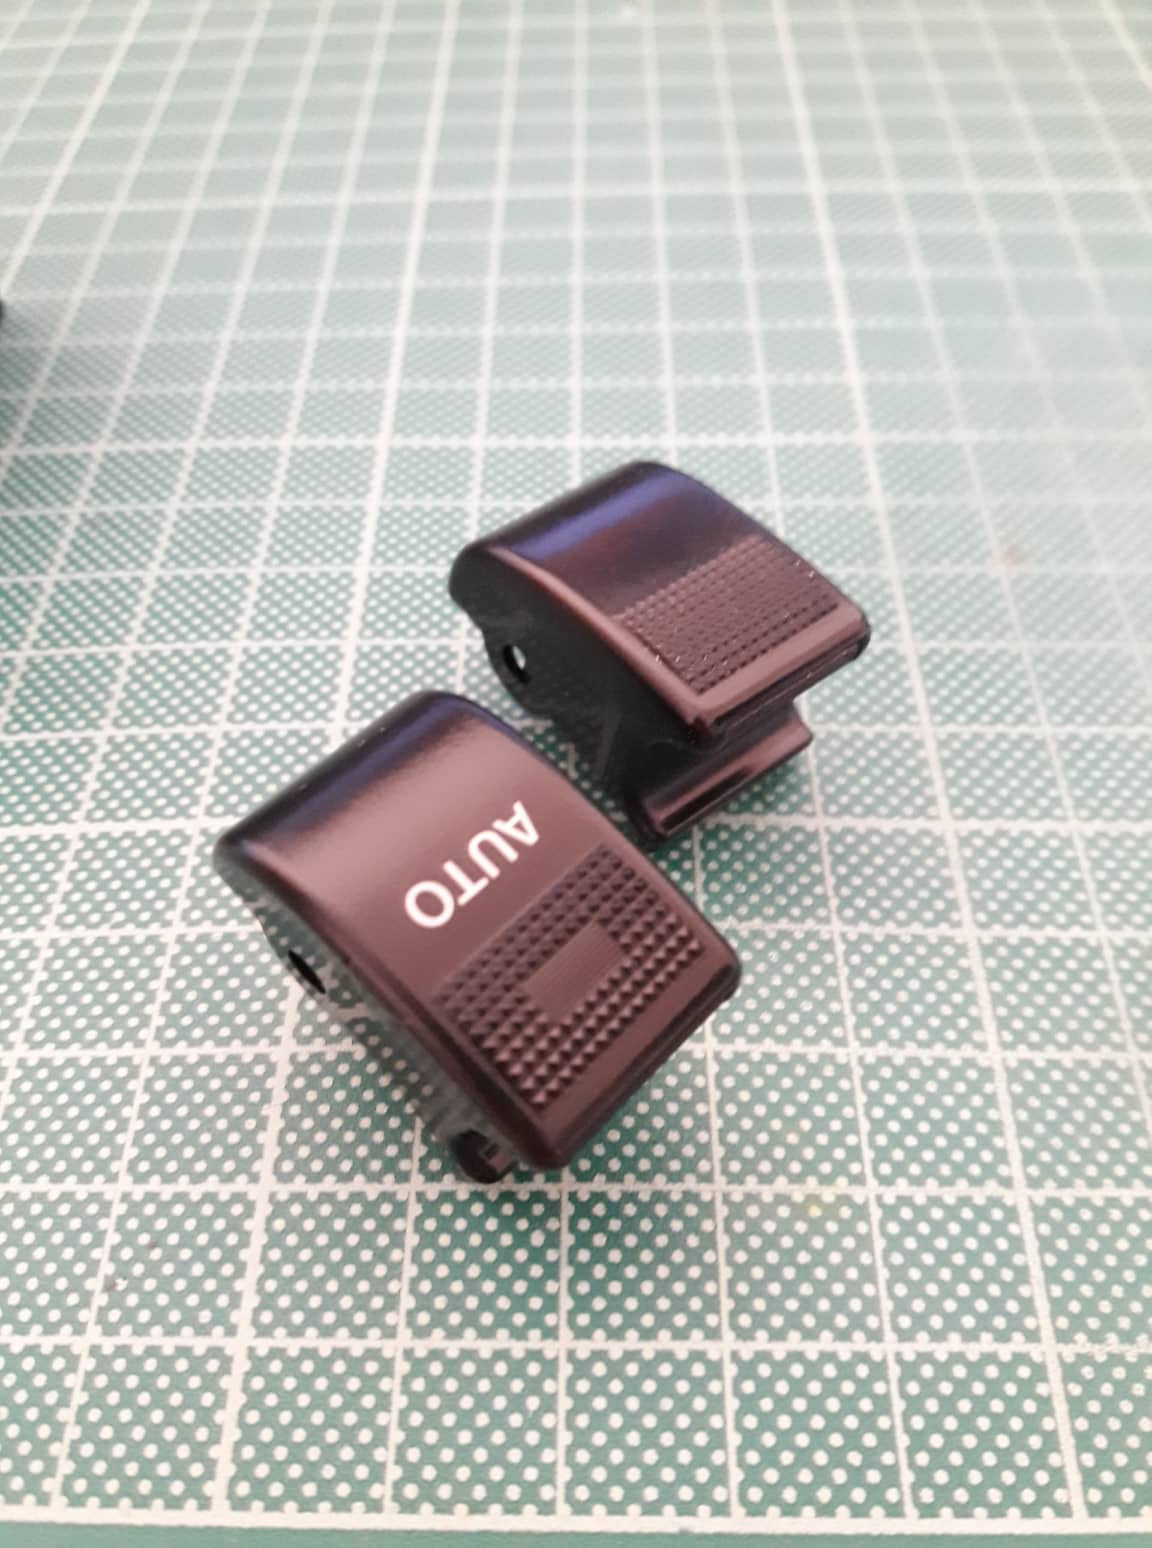
Refurbed the window switch. Tan ones are way more brittle than black (guess has to do with coloring in the plastic) and 15 years of sun exposure did not do it any favors. Sourced a black one with all tabs intact, took it apart, cleaned everything really well, and had a color matched spray can made.
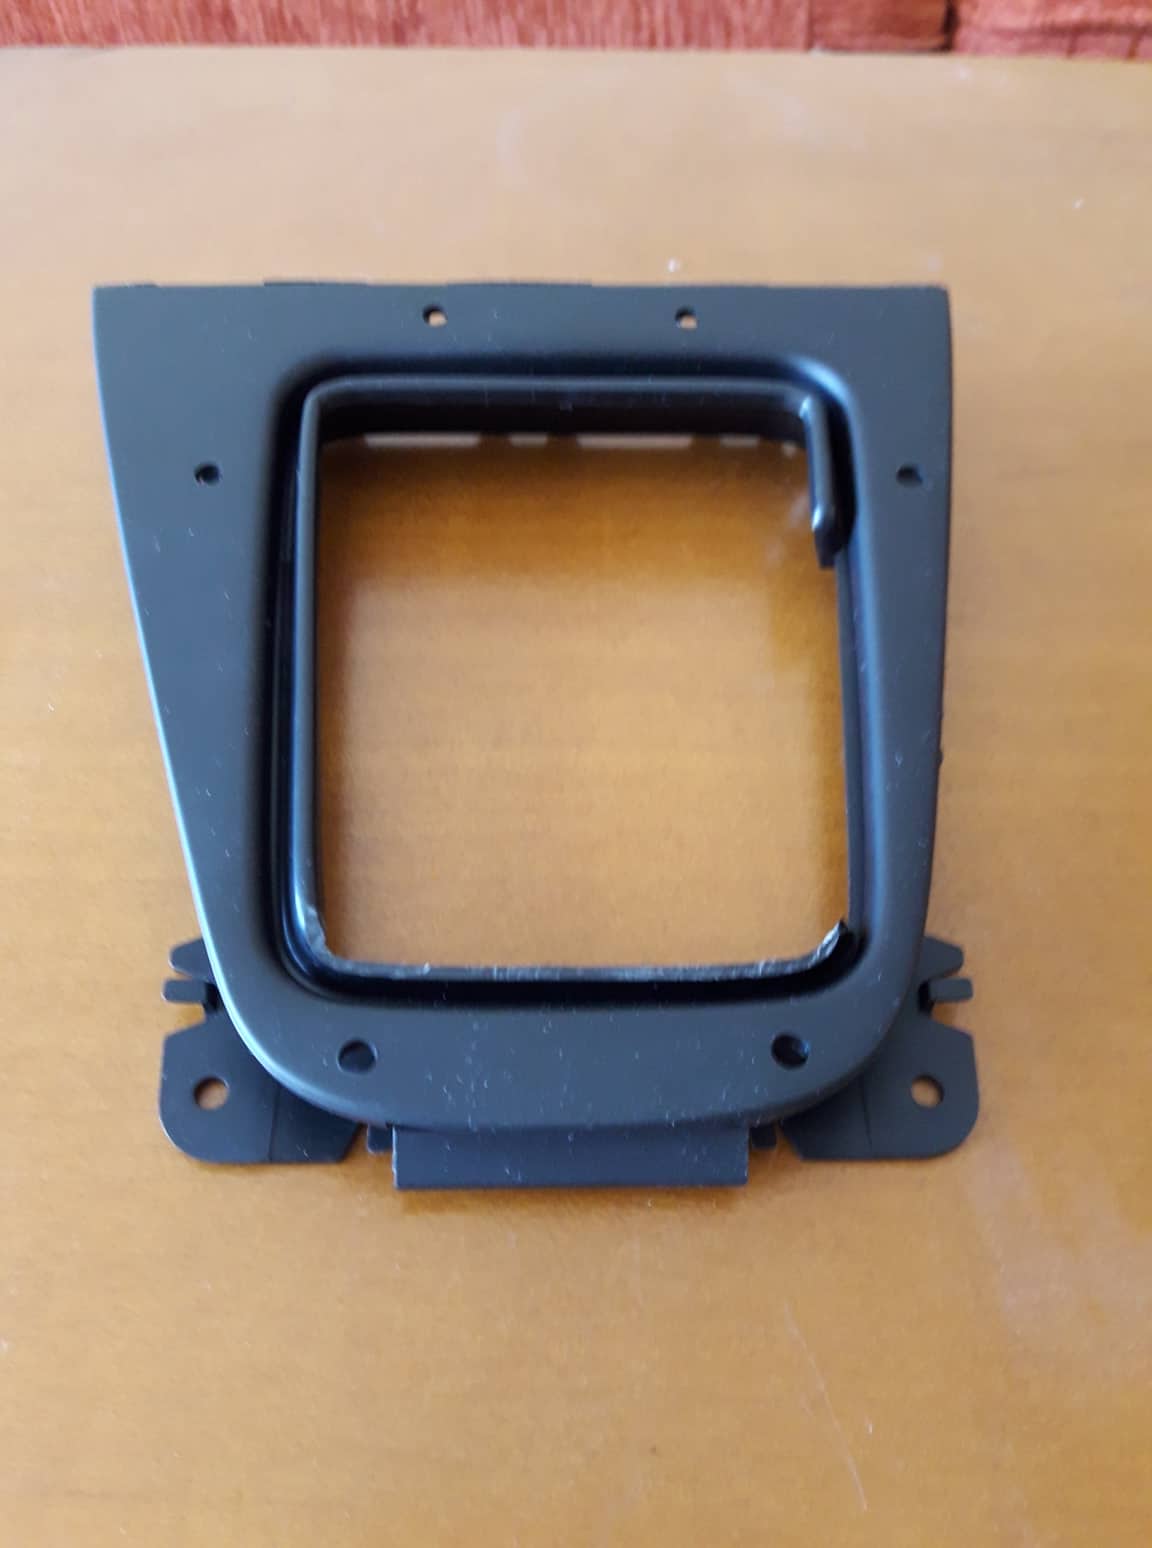
While I had it all apart, I also trimmed the plastic gear boot ring. This is originally taller on the back, which stretches the leather boot when going in 5th and annoyed me a LOT.
End result, after giving the center console a quick wash as well.
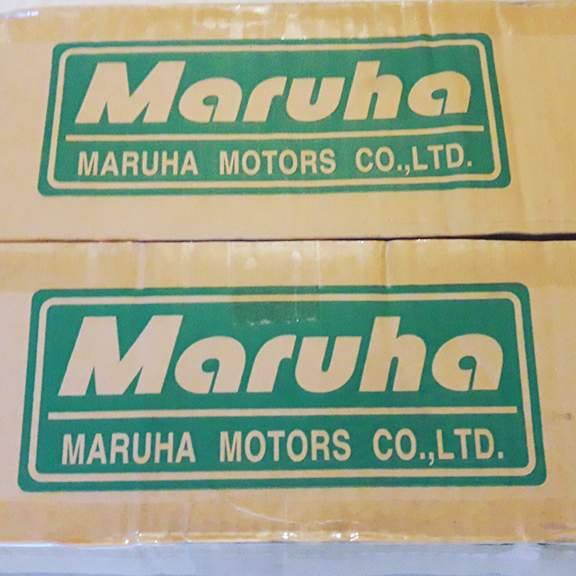
Got a package from Maruha
Took the coilovers apart to clean up and inspect, but also to measure general dimensions and travel. Although Maruha advises in replacing the damper units once shot, these are proper rebuildable units; the bottom cap is removable (threaded not crimped) and there's a schrader valve installed on the bottom.
Got 93LE tie rod ends, new upper & lower ball joint boots, IL motorsport rubber bushes, Prothane rack sleeve (plan to turn my own delrin rack bushes), all waiting to be installed.
Got new ILM diff bushes and a Beatrush PPF/diff brace, and looking for a FC housing to swap my T2 Torsen over, while changing all bearings too.
Found some cancer on the battery tray, which thankfully was not terminal for the sheet metal, took care of it:
Ordered a few bits to complete the Maruha coilover installation; new bump stops, stamped steel 20mm extended top mounts and new top and bottom bushings all around.
Ordered a few service items for the 1.6 engine
Transmission tunnel insulation is going to be installed at the same time (already have 2 12x24''sheets of Thermo Tec Adhesive Backed Heat Barrier that I plan on sticking to the underside of the tunnel when the transmissions' out). Door hinges are just spares, as they were less than 5 euros each (OEM Mazda ones that is!!!), same with the "brake fitting kit" which is the metal pad springs really.
Changed the engine mounts with some Mazda Motorsport ones; great move, as the driver's side one was completely torn. Got myself a set of new Advan AD08R in 205/50/15, as the old Federal RSR's have started to degrade. Did a different alignment, and a ton of mountain driving.
Changed the tail lights with symmetrical JDM units, as EU tails are different (one houses the reverse light and it's clear, while the other houses the rear fog light and it is red). Quick DA polishing, and on they went with fresh stud gaskets, and a LED reverse lamp courtesy of SBL.
Also purchased another set of JDM mats; this time a set ob black/tan ones from an NB RS in immaculate condition.
Finally, decided to move away from the satin silver in the radio surround; while I love it in complete black interiors, I find it cheap looking next to tan. Half-arsed attempt (need to change the top part and HVAC too), complete with OEM Roadster aluminum trim ring.
3D printed a new bezel for the radio, primed and painted to match. Pretty happy with it all, although the radio needs a new proper mount (is a bit crooked in there)
Refurbed the window switch. Tan ones are way more brittle than black (guess has to do with coloring in the plastic) and 15 years of sun exposure did not do it any favors. Sourced a black one with all tabs intact, took it apart, cleaned everything really well, and had a color matched spray can made.
While I had it all apart, I also trimmed the plastic gear boot ring. This is originally taller on the back, which stretches the leather boot when going in 5th and annoyed me a LOT.
End result, after giving the center console a quick wash as well.
Got a package from Maruha
Took the coilovers apart to clean up and inspect, but also to measure general dimensions and travel. Although Maruha advises in replacing the damper units once shot, these are proper rebuildable units; the bottom cap is removable (threaded not crimped) and there's a schrader valve installed on the bottom.
Got 93LE tie rod ends, new upper & lower ball joint boots, IL motorsport rubber bushes, Prothane rack sleeve (plan to turn my own delrin rack bushes), all waiting to be installed.
Got new ILM diff bushes and a Beatrush PPF/diff brace, and looking for a FC housing to swap my T2 Torsen over, while changing all bearings too.
Reply
0
0
08-28-2019, 09:13 AM
#6
Senior Member
Thread Starter
Join Date: Jul 2015
Posts: 1,015
Total Cats: 140
Did a proper engine bay wash, as well as removing the wheels, washing the barrels to remove all brake dust, cleaning wheel wells, suspension arms and brake calipers, before doing brakes. Quick before-after:

Realized that undercoating needs re-doing in some areas (especially on the rear where the fuel filter cover has rubbed through), so that's added on the list. Speaking of brakes, front rotors were warped, so took the chance to refresh the braking system. Got OEM replacement Pagid rotors (zinc coated so that the hubs stay nice for long), new Brembo pads, black HEL braided lines and ATE Typ 200 fluid. Removed the calipers, brackets, sliders and boots, cleaned up old grease, applied new Cera-tec synthetic grease, wire-brushed the hubs, applied a thin coat of copper grease between them and the rotor hub, reinstalled rotors and calipers. Then swapped the lines, and manually bled the brakes with the help of a good friend. The only "issue" I had was with the HEL rear distribution block, which needed some persuasion to mount in the stock position. Also, the machined recess for the mounting nut to tighten onto was too small, with the nut not having enough area to push against. Put it real quick on a manual milling machine at work and problem solved. The whole process (incl. bleeding) took me approx. 3.5 hrs, but I took it easy and fooled around with friends a lot. Honestly, the toughest part was putting the car on jackstands. Unfortunately no photos of the process, as it was a nasty mess most of the time.
Did it made any difference? Hard to tell as I haven't got the chance for a spirited driving since. The most evident one was due to fresh, non-warped rotors. Pedal has gone somewhat stiffer (plan to re-bleed the brakes again), but I can definitely feel more flex somewhere, and I am sure it comes from the bulkhead. Plan to tackle that soon. Would I recommend it? Guess so, but using only quality components and either having a pro doing the installation, or going though everything 10 times. Needless to say I have been laying under the car for a week after the installation, trying to make sure that nothing is rubbing or leaking.
Reply
0
0
08-28-2019, 09:14 AM
#7
Senior Member
Thread Starter
Join Date: Jul 2015
Posts: 1,015
Total Cats: 140
Then..I decided to do an engine swap. My car is an NB6, so 1.6, with 190k kms at the moment. I plan on boosting this (using a Rotrex supercharger) but I know it would eventually bite the dust, although compression is really good and it has been properly looked after.
I was planning to get a spare engine to rebuild on the side, and be ready to swap that in when time comes. I came across a 1.8 VVT engine/gerabox combo with 30k miles on them, price was good so I bought it. I also bought a stock 1.8 ECU and engine wiring loom, so that the swap looks OEM, and to get me through the 1st start after the swap (car is getting
Primary goal for this engine is to refresh it so it can make another 120k miles RELIABLY with mild boost. 7500 max redline, stock CR (10:1), pump gas (no E85 here), Rotrex C30-74 (started as a KW kit, but will change the mounts and possibly the "hot" side plumbing). As such, I plan to do the following:
Bottom end:
- Boundary oil pump
- Maruha oil pan baffles
- Usual service items (seals etc.)
- Replace freeze plugs (they are cheap) and paint the block as well while I am on it.
- Stock/untouched otherwise (OEM crank bearings/bolts, pistons etc.)
Head:
- Head will have to be removed to swap out the HG for an OEM for a 99-00 engine (BP4W) for a reroute. As such:
- ARP head studs
- OEM BP4W MLS head gasket
- Pressure check, deck/cleanup to get a proper HG surface
- DIY ports cast flash cleanup (since it will be dissasembled)
- New OEM valve seals
- VVT actuator rebuild with Miataroadster viton seal kit
- Skandix Volvo intake valve springs. My thinking is to these heavier ones only on the intake, to compensate for boost. Given the OEM cam specs, OEMish rev limiter and Rotrex, I do not see any need for heavier springs on the exhaust side; my logic says that they will only increase wear and parasitic losses, even marginally. On the intake side, and calculating a boost of 14.5psi over a stock valve, I see that I need an additional 37lbf of seat pressure to counteract it. It's oversimplified as a calculation but at least it gives me an idea. Sock VVT intake springs (20% heavier) will go on the exhaust side.
Ancillaries:
- EUDM Squaretop manifold
- Maxim Works exhaust manifold to custom 2.5" exhaust
- Rotrex C30-74 blower on custom designed/build mount
- MS3 mini ECU (eventually, car will work as NA with OEM ECU for a while)
- Bosch EV14 GT500 injectors w. FlowForce BYOI kit
- DW200 fuel pump, fuel pump re-wire, new OEM fuel sock. Contemplating converting the car to return-syle using a JDM NB fuel rail (already have one)
The plan of attack is as follows:
- Finish the engine rebuild-refresh.
- Swap fuel pump with DW200 (not really necessary but guess the OEM one is getting tired, plus I already go the DW pump).
- Swap out the 1.6.
- Swap engine wiring loom, injectors and ECU with an OEM 1.8VVT one (already got these) to simplify things and make sure it runs.
- Install MS3 and tune.
- Swap injectors with EV14 and fine tune.
- Add Rotrex.
I may give the MS3 a go in the 1.6 first, as this would allow me to play around with tuning without worrying too much. Also, knowing me, this most probably will take a couple of years, but I am taking this easy and love doing everything by myself, so no rush; it's all about the journey.
Suggestions are always welcome!
Reply
0
0
08-28-2019, 09:14 AM
#8
Senior Member
Thread Starter
Join Date: Jul 2015
Posts: 1,015
Total Cats: 140
Next up, exhaust. Before deciding on the 1.8 swap, I had purchased a Maxim Works header off of a 1.6 NA. General condition was OK, but it was broken at the flex pipe; not much of an issue as this section would have to be modified in any case for the manifold to fit a NB chassis. Since the original plan was to go Rotrex on the 1.6, I have been planning a 2.5" exhaust all the way, from the header merge pipe backwards. What I wanted was an almost-factory quiet system, (maybe a tad louder and deeper tone), with a factory look to it, but free-flowing enough to accommodate boost.
Having seen (and being impressed by) Kraken's work, I got in contact with him for a complete system. At that time, he had just moved his business to Bulgaria, so being so close, it was only logical to me to send him the manifold too. In the meanwhile, I found the VVT engine, and another Maxim manifold for it (in a pretty sorry state), so this was also shipped to Kraken. Few months forward, and this is what I got back.
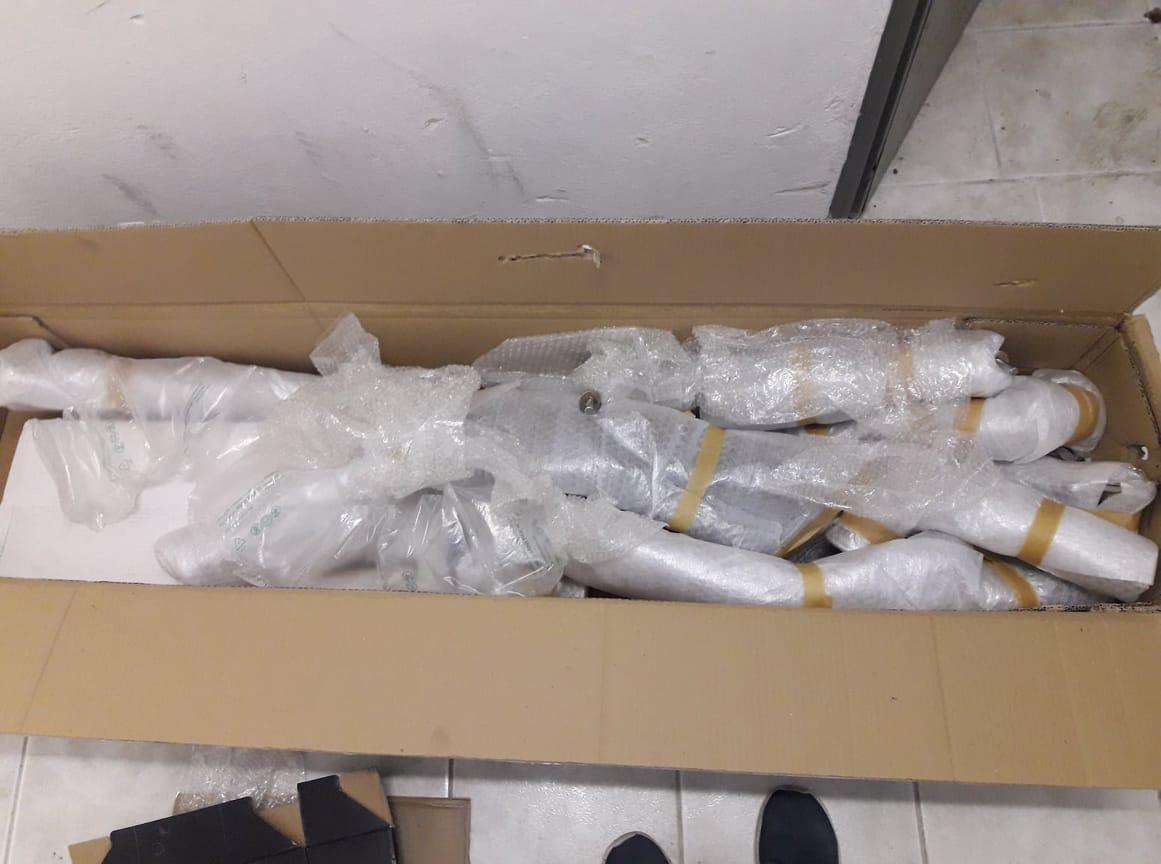
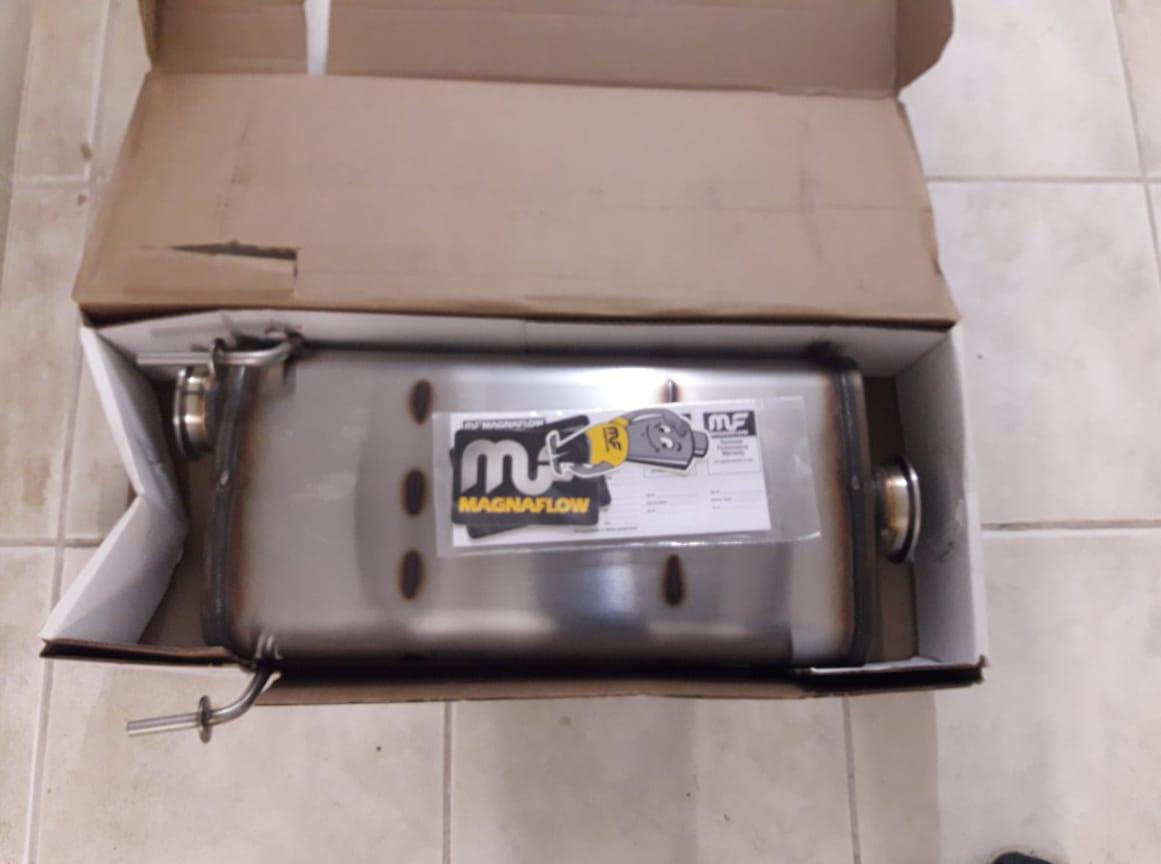
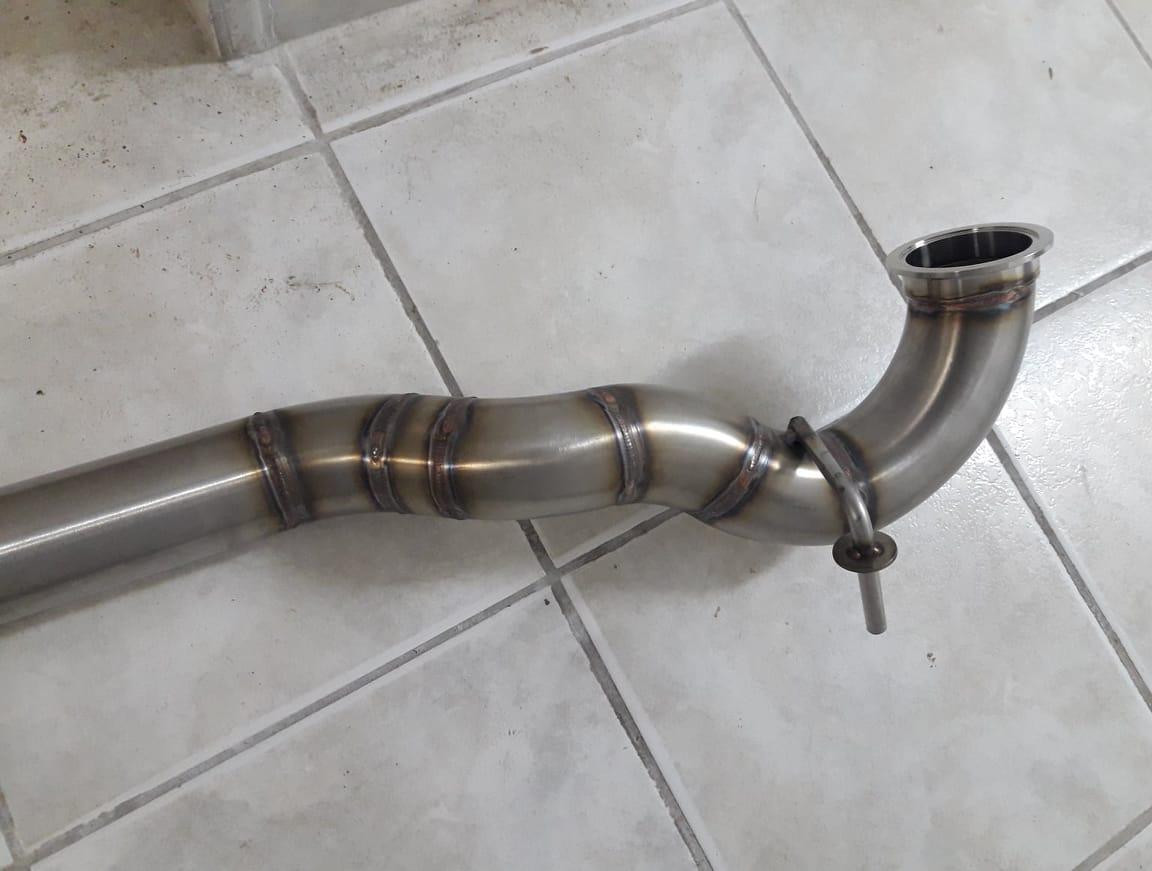
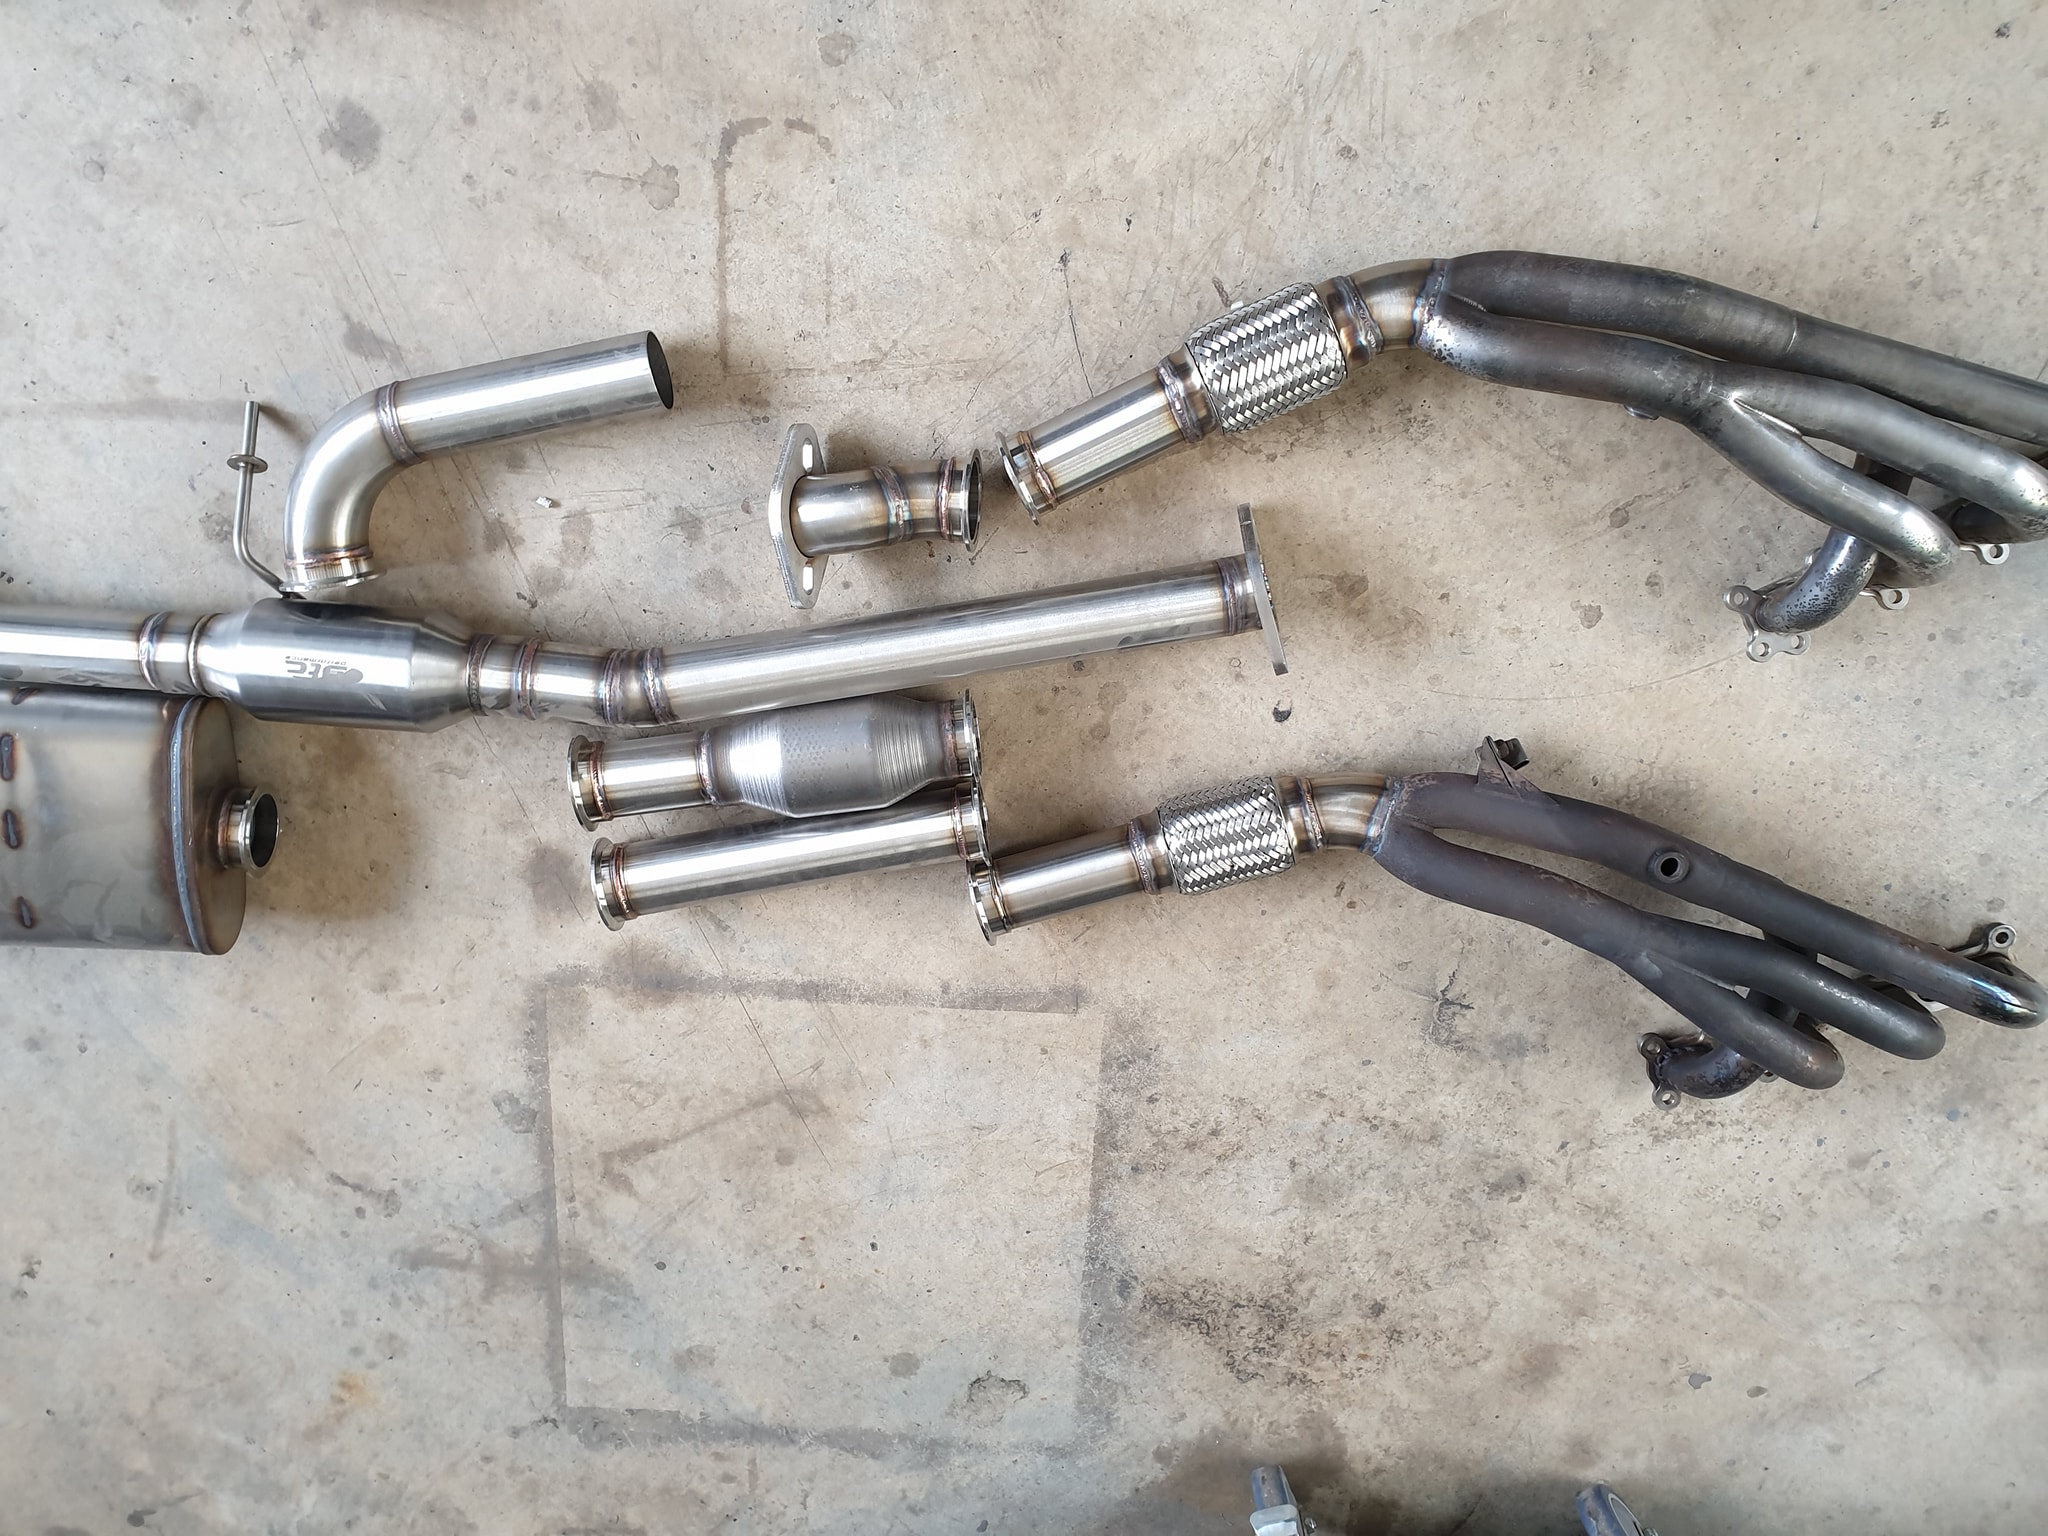
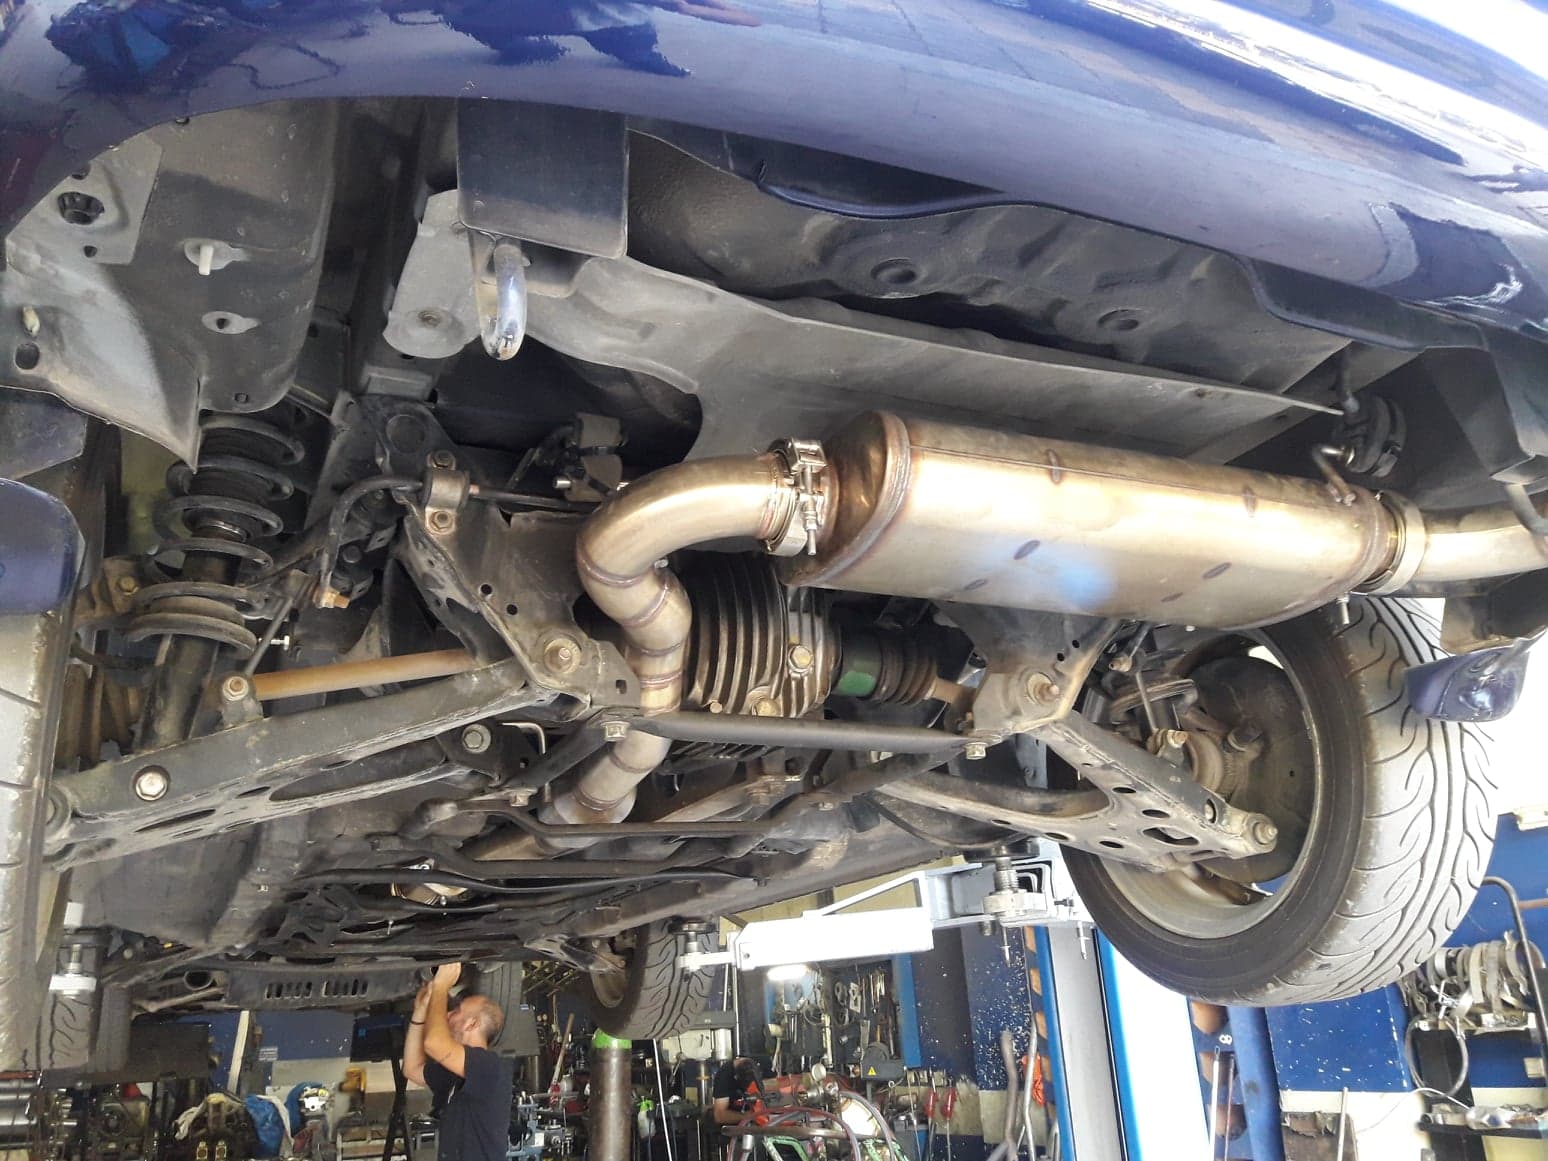
2x manifolds, expanded to 2.5" at the collector, cat on v-bands and a test pipe if I ever decide to remove it, resonated midpipe and chambered Magnaflow muffler. I specifically asked for a bolted flange in the stock location, so I could use "half" the exhaust with any OEM or aftermarket system if I ever wanted to. I also asked that the whole thing works with either manifold. As you see, craftsmanship is amazing, and Mike (the owner) was super helpful and with an impressively positive attitude throughout the process. And the package was unbelievably well-wrapped, more like it was glass than stainless exhaust parts! I honestly cannot recommend Kraken enough!
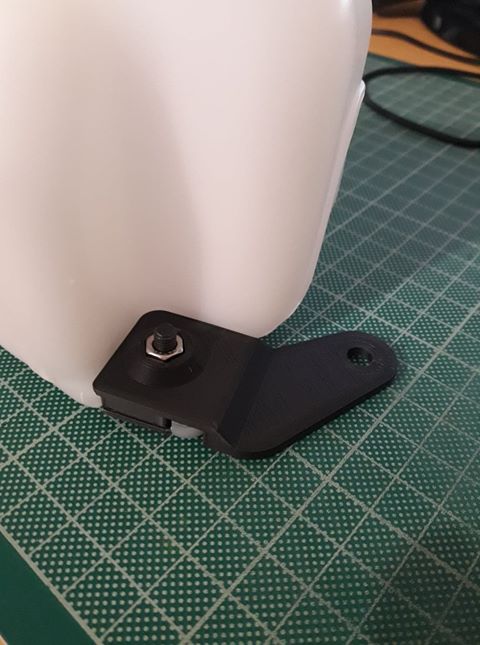
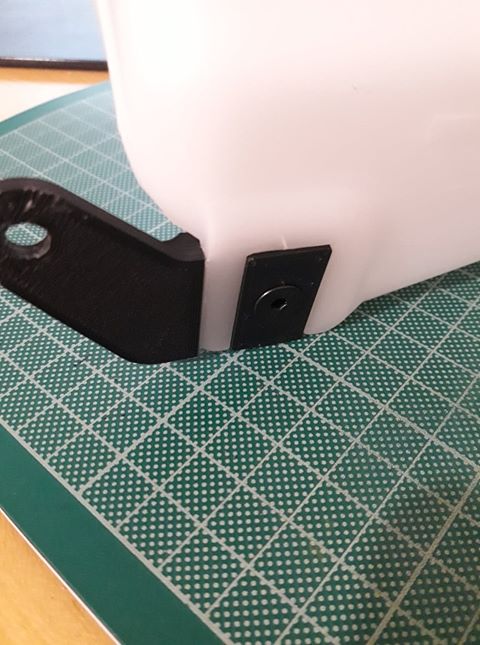
To make room for the manifold, the stock mammoth of a windshield washer tank was removed and replaced with a Suzuki Cappucinno one. Plenty of write-ups out there, but I was not happy with none of the existing solutions; I did not want to drill any extra holes, cut or splice wiring, and wanted to use all OEM hardware. Goal was for it to look factory-installed. Fired up the CAD, and a few days (and prototypes) later, this is what I ended up with.

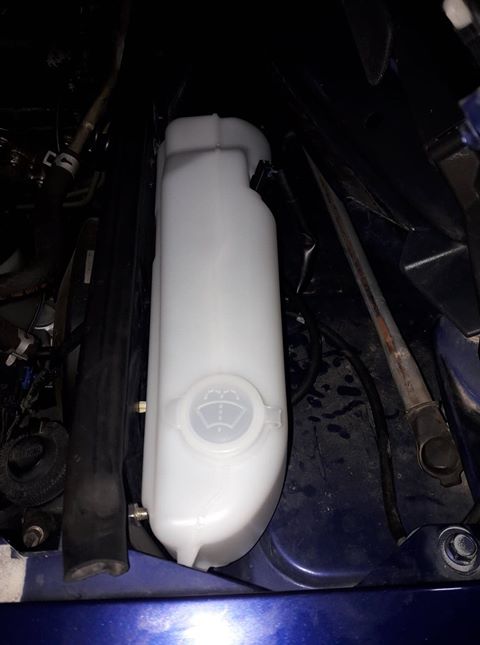
10' installation time, no modifications to the car body or wiring, and fits like a glove! And yes, I just realized I need to take better installed photos, under daylight, with the car clean....
I have had it installed since a month now, and works like intended. Once durability testing is complete, I may offer this as a "kit" for people that are OCD like myself.
Having seen (and being impressed by) Kraken's work, I got in contact with him for a complete system. At that time, he had just moved his business to Bulgaria, so being so close, it was only logical to me to send him the manifold too. In the meanwhile, I found the VVT engine, and another Maxim manifold for it (in a pretty sorry state), so this was also shipped to Kraken. Few months forward, and this is what I got back.
2x manifolds, expanded to 2.5" at the collector, cat on v-bands and a test pipe if I ever decide to remove it, resonated midpipe and chambered Magnaflow muffler. I specifically asked for a bolted flange in the stock location, so I could use "half" the exhaust with any OEM or aftermarket system if I ever wanted to. I also asked that the whole thing works with either manifold. As you see, craftsmanship is amazing, and Mike (the owner) was super helpful and with an impressively positive attitude throughout the process. And the package was unbelievably well-wrapped, more like it was glass than stainless exhaust parts! I honestly cannot recommend Kraken enough!
To make room for the manifold, the stock mammoth of a windshield washer tank was removed and replaced with a Suzuki Cappucinno one. Plenty of write-ups out there, but I was not happy with none of the existing solutions; I did not want to drill any extra holes, cut or splice wiring, and wanted to use all OEM hardware. Goal was for it to look factory-installed. Fired up the CAD, and a few days (and prototypes) later, this is what I ended up with.
10' installation time, no modifications to the car body or wiring, and fits like a glove! And yes, I just realized I need to take better installed photos, under daylight, with the car clean....
I have had it installed since a month now, and works like intended. Once durability testing is complete, I may offer this as a "kit" for people that are OCD like myself.
Reply
0
0
08-28-2019, 09:15 AM
#9
Senior Member
Thread Starter
Join Date: Jul 2015
Posts: 1,015
Total Cats: 140
Took delivery of some items for the engine overhaul; most directly from Mazda, VVT rebuild kit from Bill @Mazdaroadster, ARP head studs and slightly used (50 miles or so) Boundary VVT oil pump off of a friend. Photo time!
These are only some of the items received, full list as follows (already had some for the 1.6 that can be now used on the 1.8):
- Intake valve seals
- Exhaust valve seals
- VVT rebuild kit
- Cam seals
- Gates timing belt, OEM pulleys and tensioner
- Front crank seal
- Rear crank seal
- VVT cam cover gasket
- Intake manifold gasket
- Exhaust manifold gasket
- NB Cylinder head gasket
- Gates cast impeller water pump
- Oil pan front seal
- Oil pan rear seal
- Crank main bolt
- Woodruff crank key
- Core plugs, large (35mm)
- Core plugs, small (30mm)
- Oil pump o-ring
- Oil strainer gasket
- Oil cooler o-ring
- Oil pan long bolts
- Lock bolt flywheel
Also got delivery of a complete VVT engine loom and ECU, and an AEM X-series gauge-less AFR sensor. More on that once the rest of the (additional) sensors are in.
With these in hand, I started removing the engine peripherals.

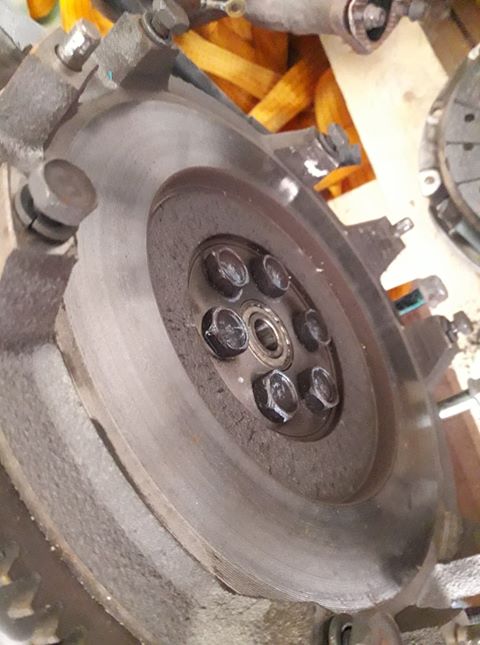
Albeit the engine looks like it had spent some time outside, the overall condition is excellent so far. All fasteners removed easily, without using any penetrating oil; even the OEM O2 sensor! Water passages look clean AF, machining can still be seen on the OEM flywheel, and even the small water hoses seem brand new (albeit dirty). All these make me believe even more the 30k mile claim. I stopped before removing the main pulley and tearing into the engine, as I did not have a helper to hold the flywheel; decided to make a tool to stop it in place instead. Moments later, I fell, fracturing my right ankle and elbow, so it is going to take a while till the next update.
These are only some of the items received, full list as follows (already had some for the 1.6 that can be now used on the 1.8):
- Intake valve seals
- Exhaust valve seals
- VVT rebuild kit
- Cam seals
- Gates timing belt, OEM pulleys and tensioner
- Front crank seal
- Rear crank seal
- VVT cam cover gasket
- Intake manifold gasket
- Exhaust manifold gasket
- NB Cylinder head gasket
- Gates cast impeller water pump
- Oil pan front seal
- Oil pan rear seal
- Crank main bolt
- Woodruff crank key
- Core plugs, large (35mm)
- Core plugs, small (30mm)
- Oil pump o-ring
- Oil strainer gasket
- Oil cooler o-ring
- Oil pan long bolts
- Lock bolt flywheel
Also got delivery of a complete VVT engine loom and ECU, and an AEM X-series gauge-less AFR sensor. More on that once the rest of the (additional) sensors are in.
With these in hand, I started removing the engine peripherals.
Albeit the engine looks like it had spent some time outside, the overall condition is excellent so far. All fasteners removed easily, without using any penetrating oil; even the OEM O2 sensor! Water passages look clean AF, machining can still be seen on the OEM flywheel, and even the small water hoses seem brand new (albeit dirty). All these make me believe even more the 30k mile claim. I stopped before removing the main pulley and tearing into the engine, as I did not have a helper to hold the flywheel; decided to make a tool to stop it in place instead. Moments later, I fell, fracturing my right ankle and elbow, so it is going to take a while till the next update.
Reply
2
2
 07-13-2020, 07:18 AM
#11
Senior Member
Thread Starter
Join Date: Jul 2015
Posts: 1,015
Total Cats: 140
1 year later, mostly lame updates. Lost almost 4 months waiting for my arm to get back to shape (elbow fractures are nasty!).
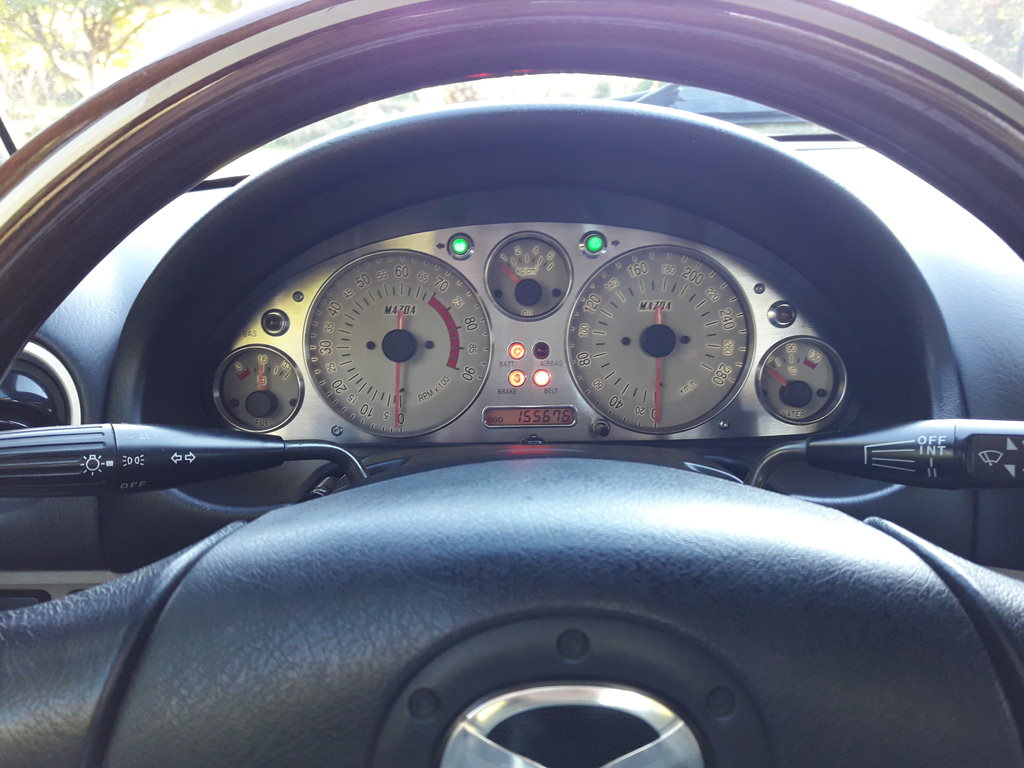
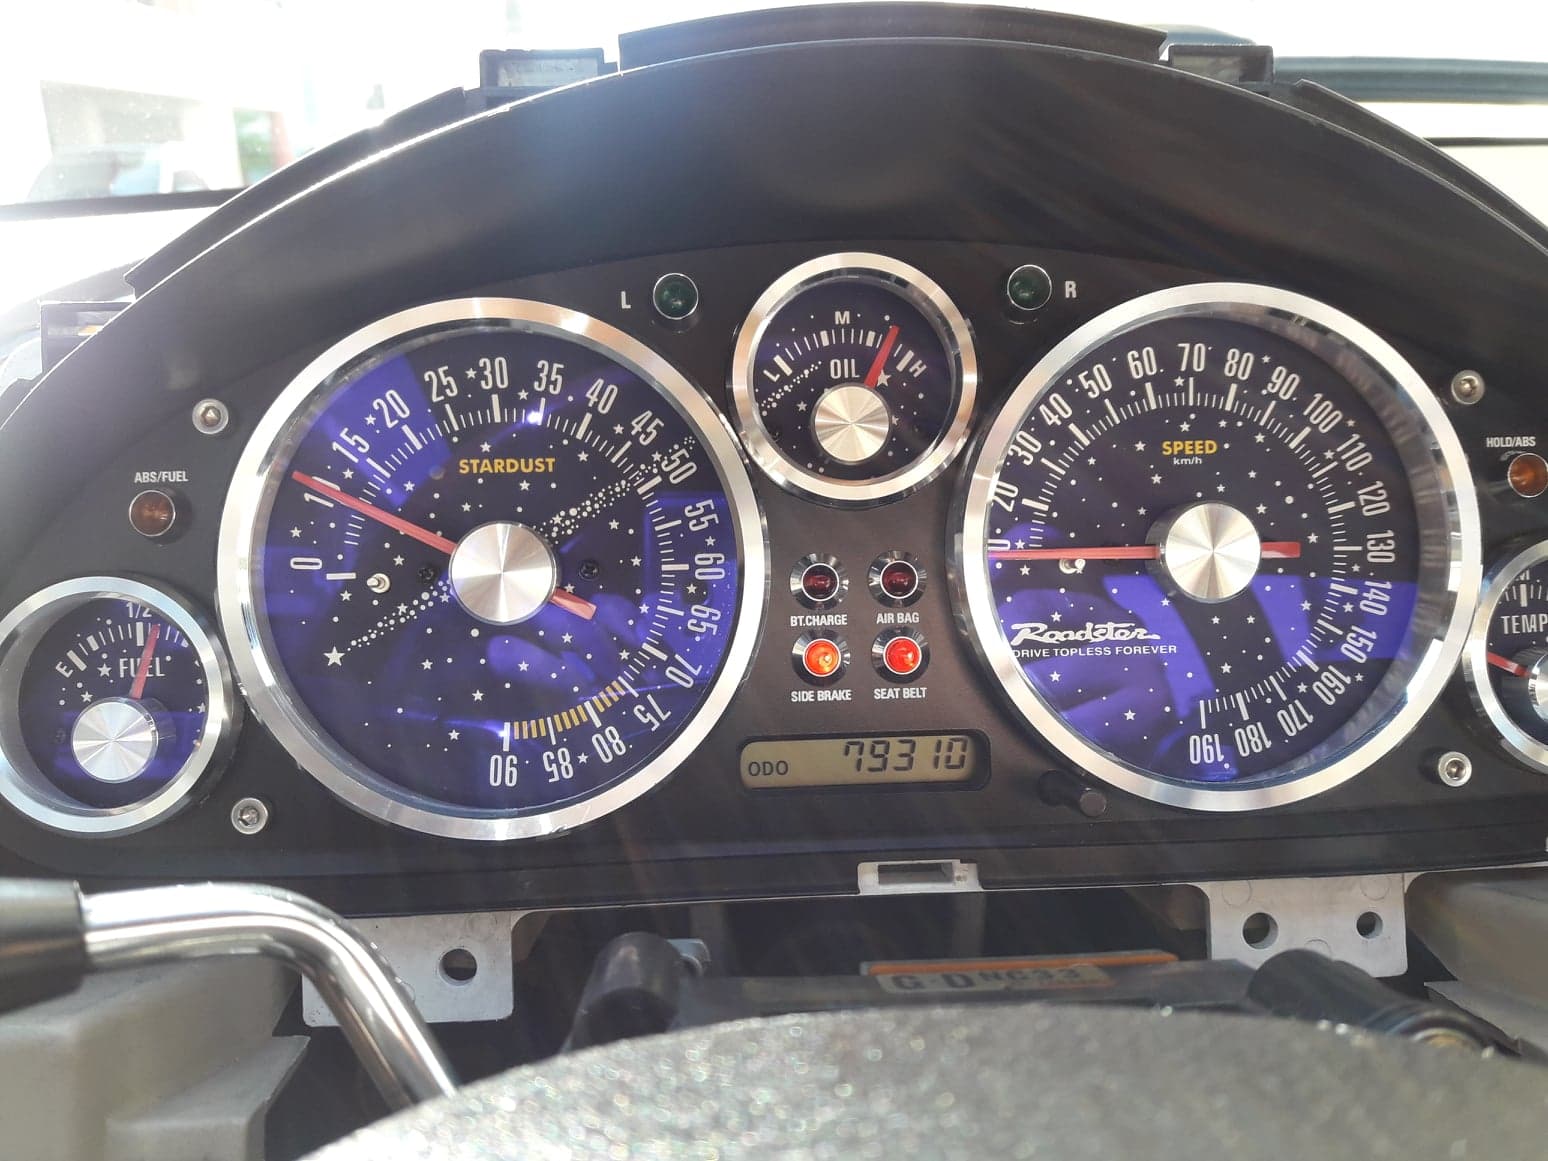
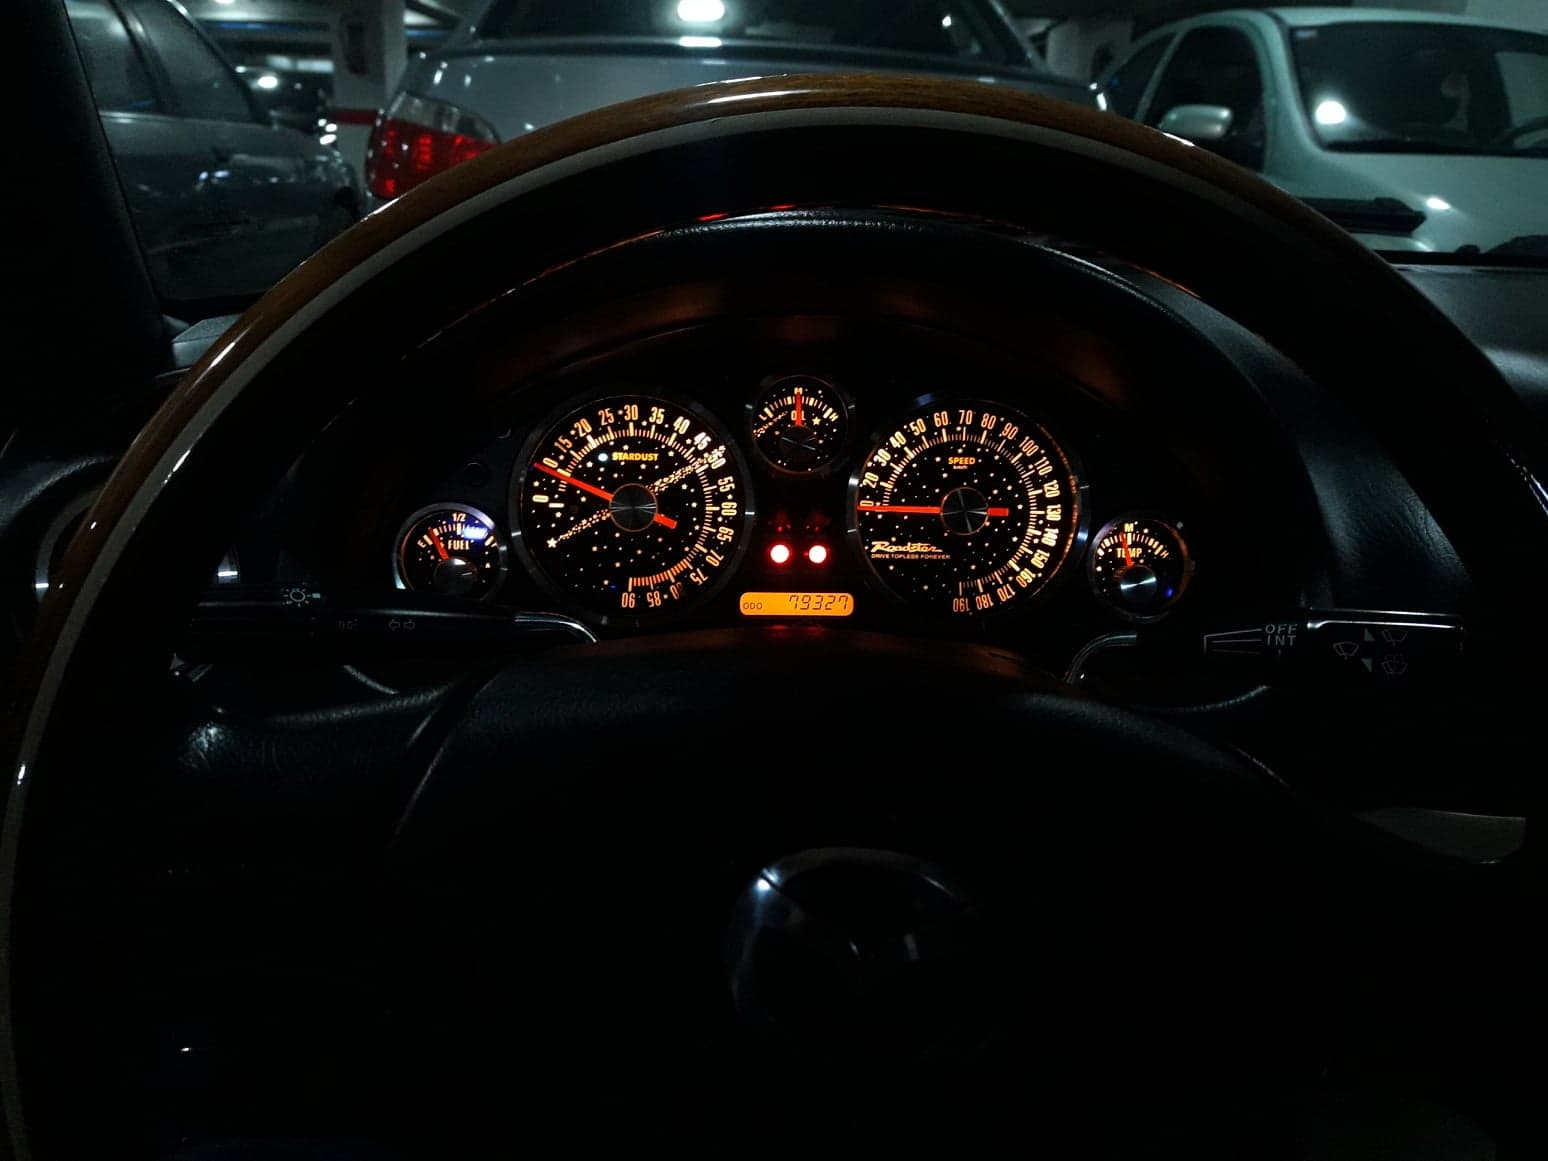
Managed to piece together my dream cluster setup
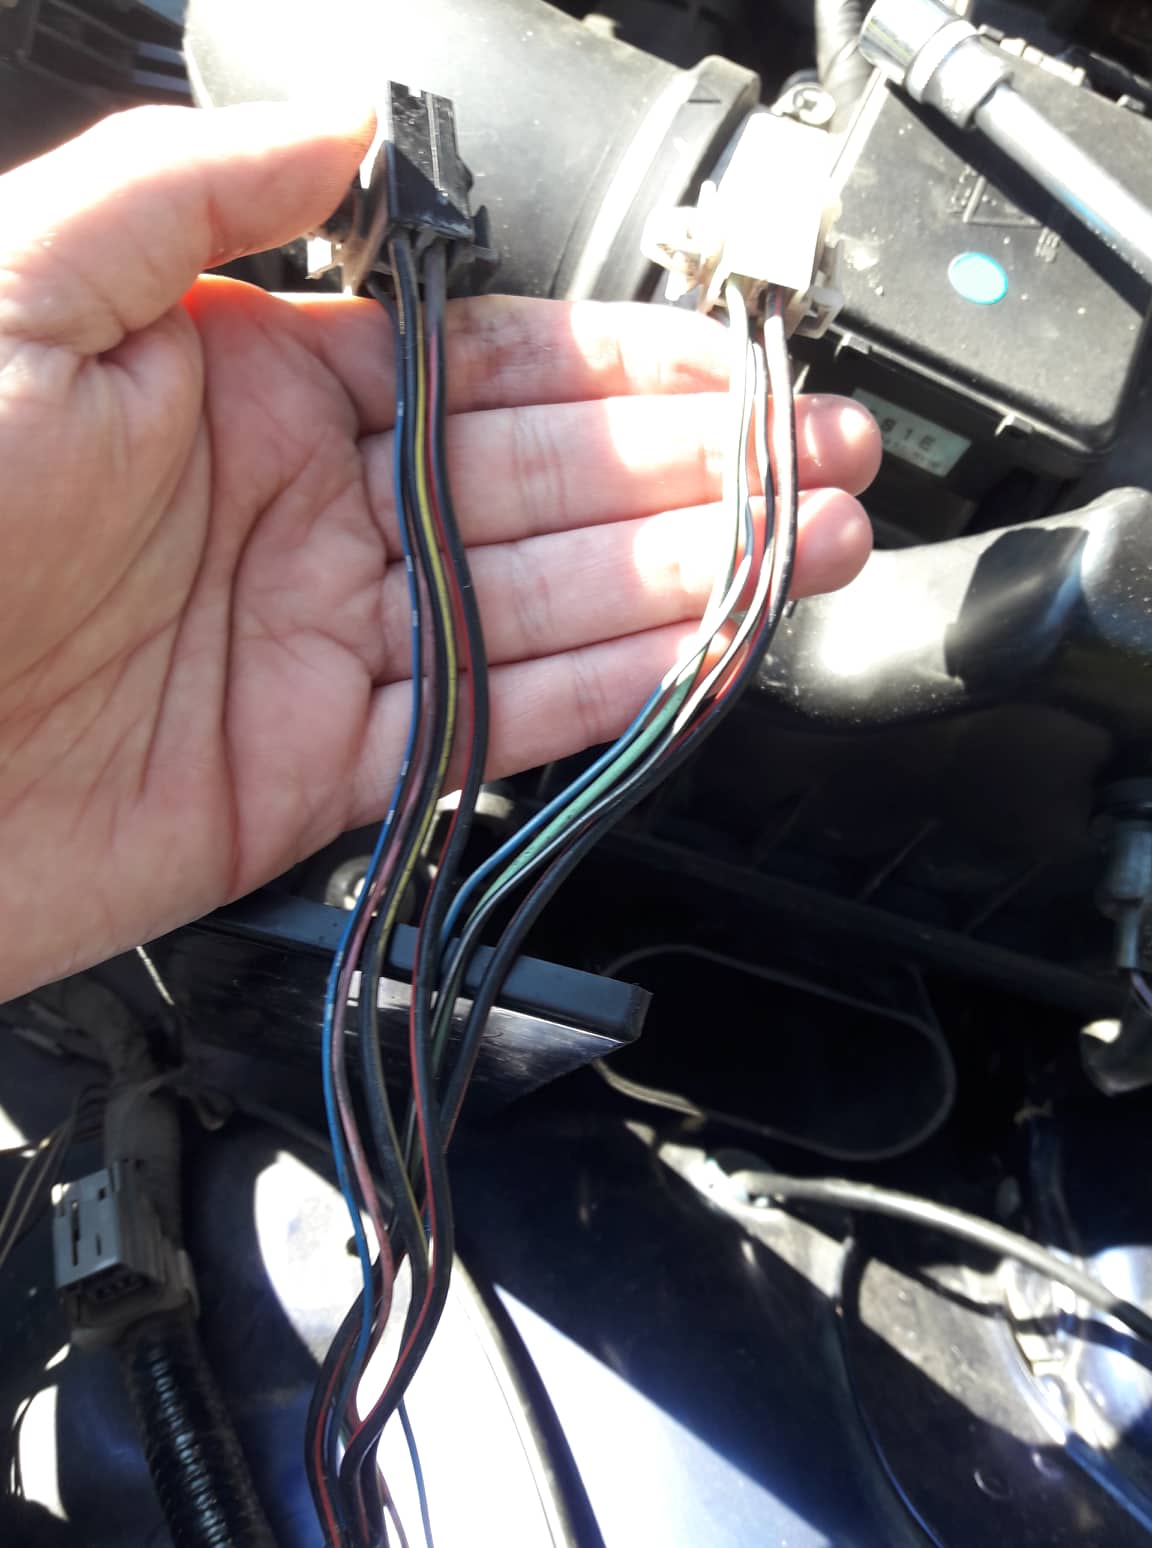
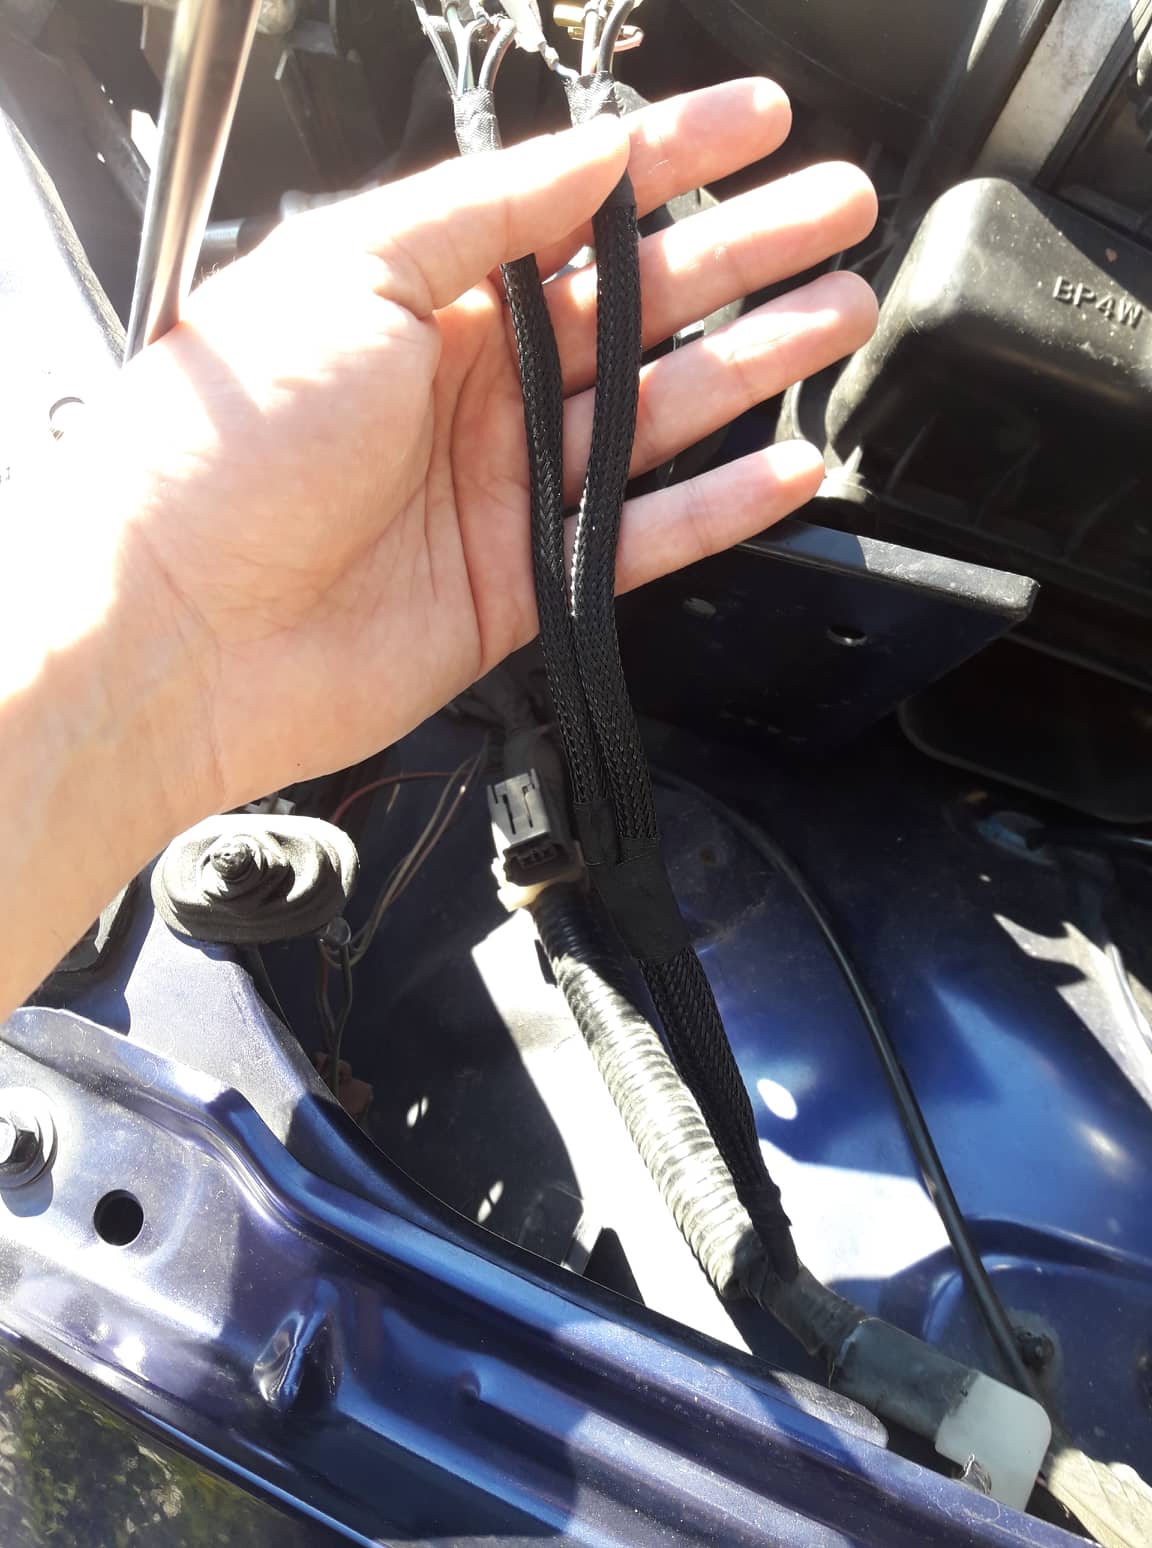
Wrapped some of the body loom as I hate bare wires (and have no clue why they were like this from factory). Used a combination of flame retardant mesh/overbraid and Tesa automotive cloth tape, for that OEM+ look. Had to de-pin the connectors to do so, but it was a quick job. The only ones I could not figure out (in 10') were the headlight connectors, so if you know how to take them apart please let me know. I have a "new" VVT engine loom that I will be modifying and swapping in with the engine, so did not touch that at all. Before and after pics:
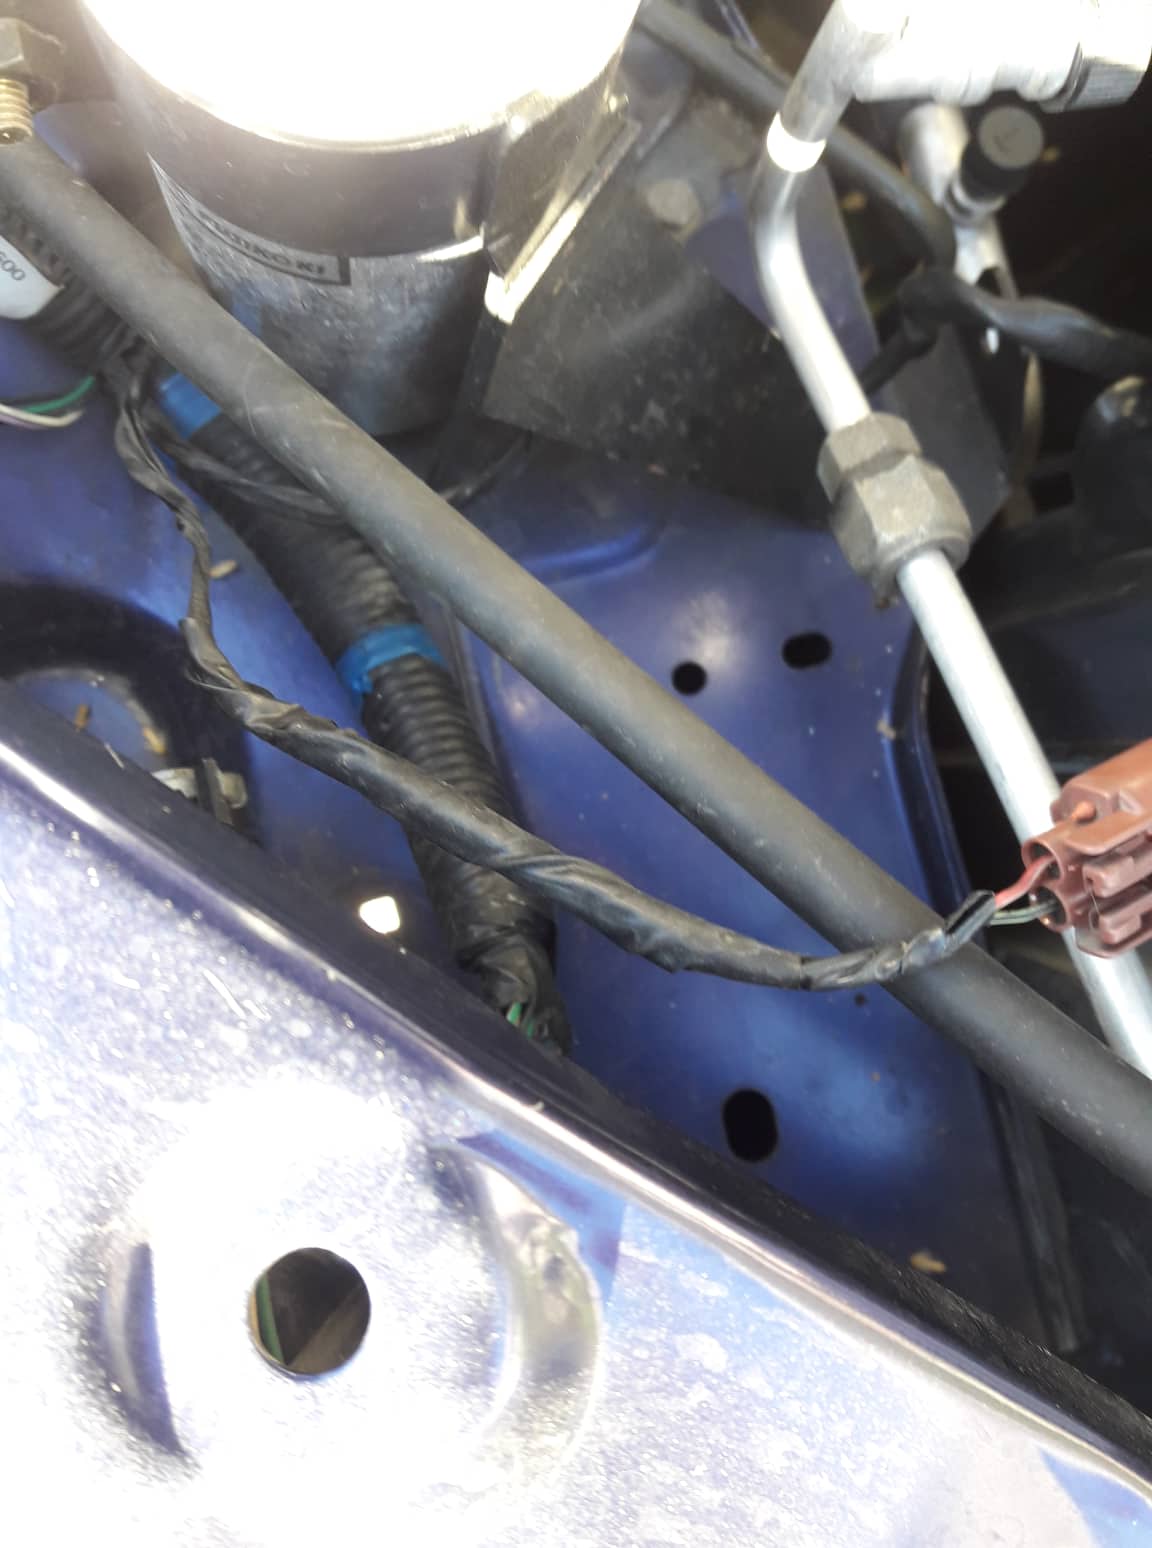
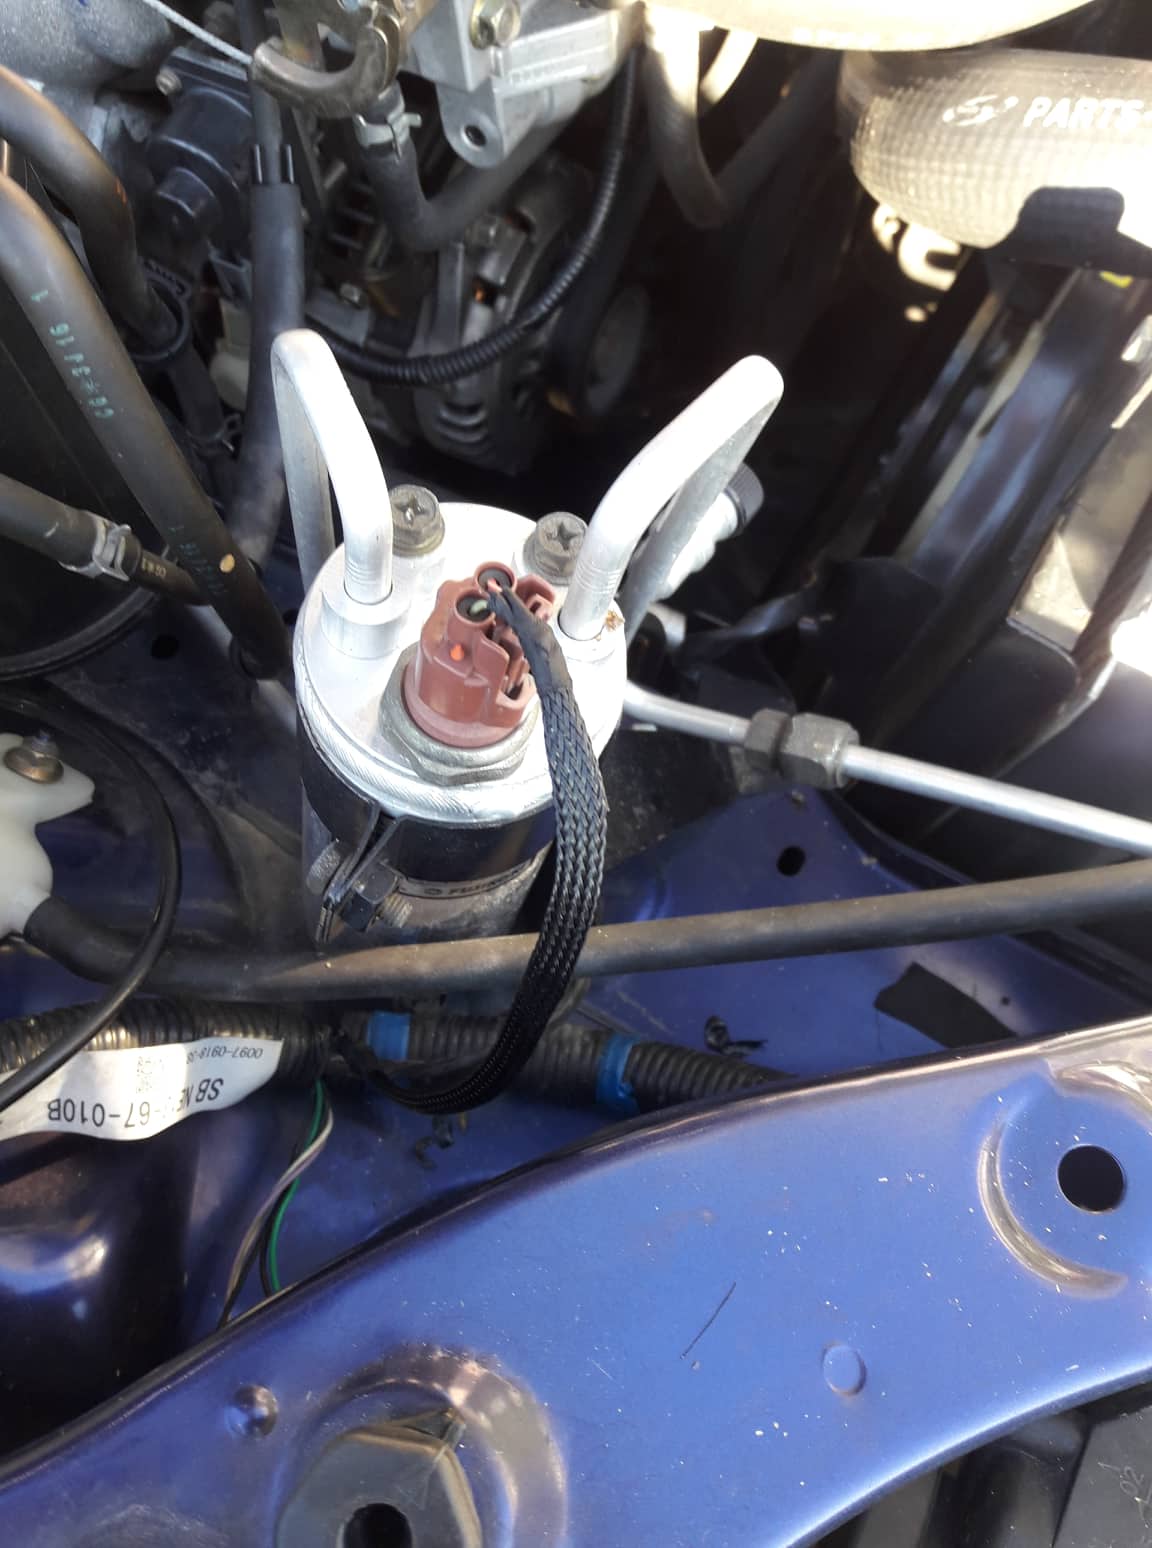
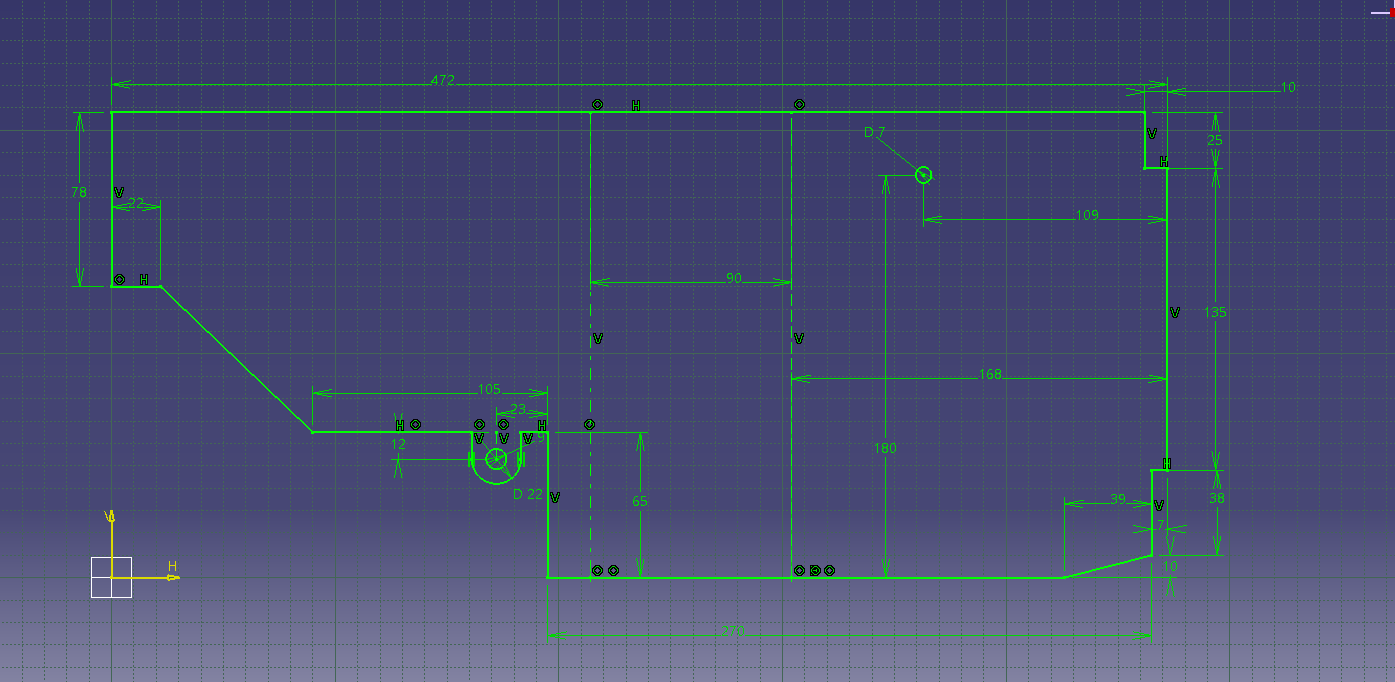
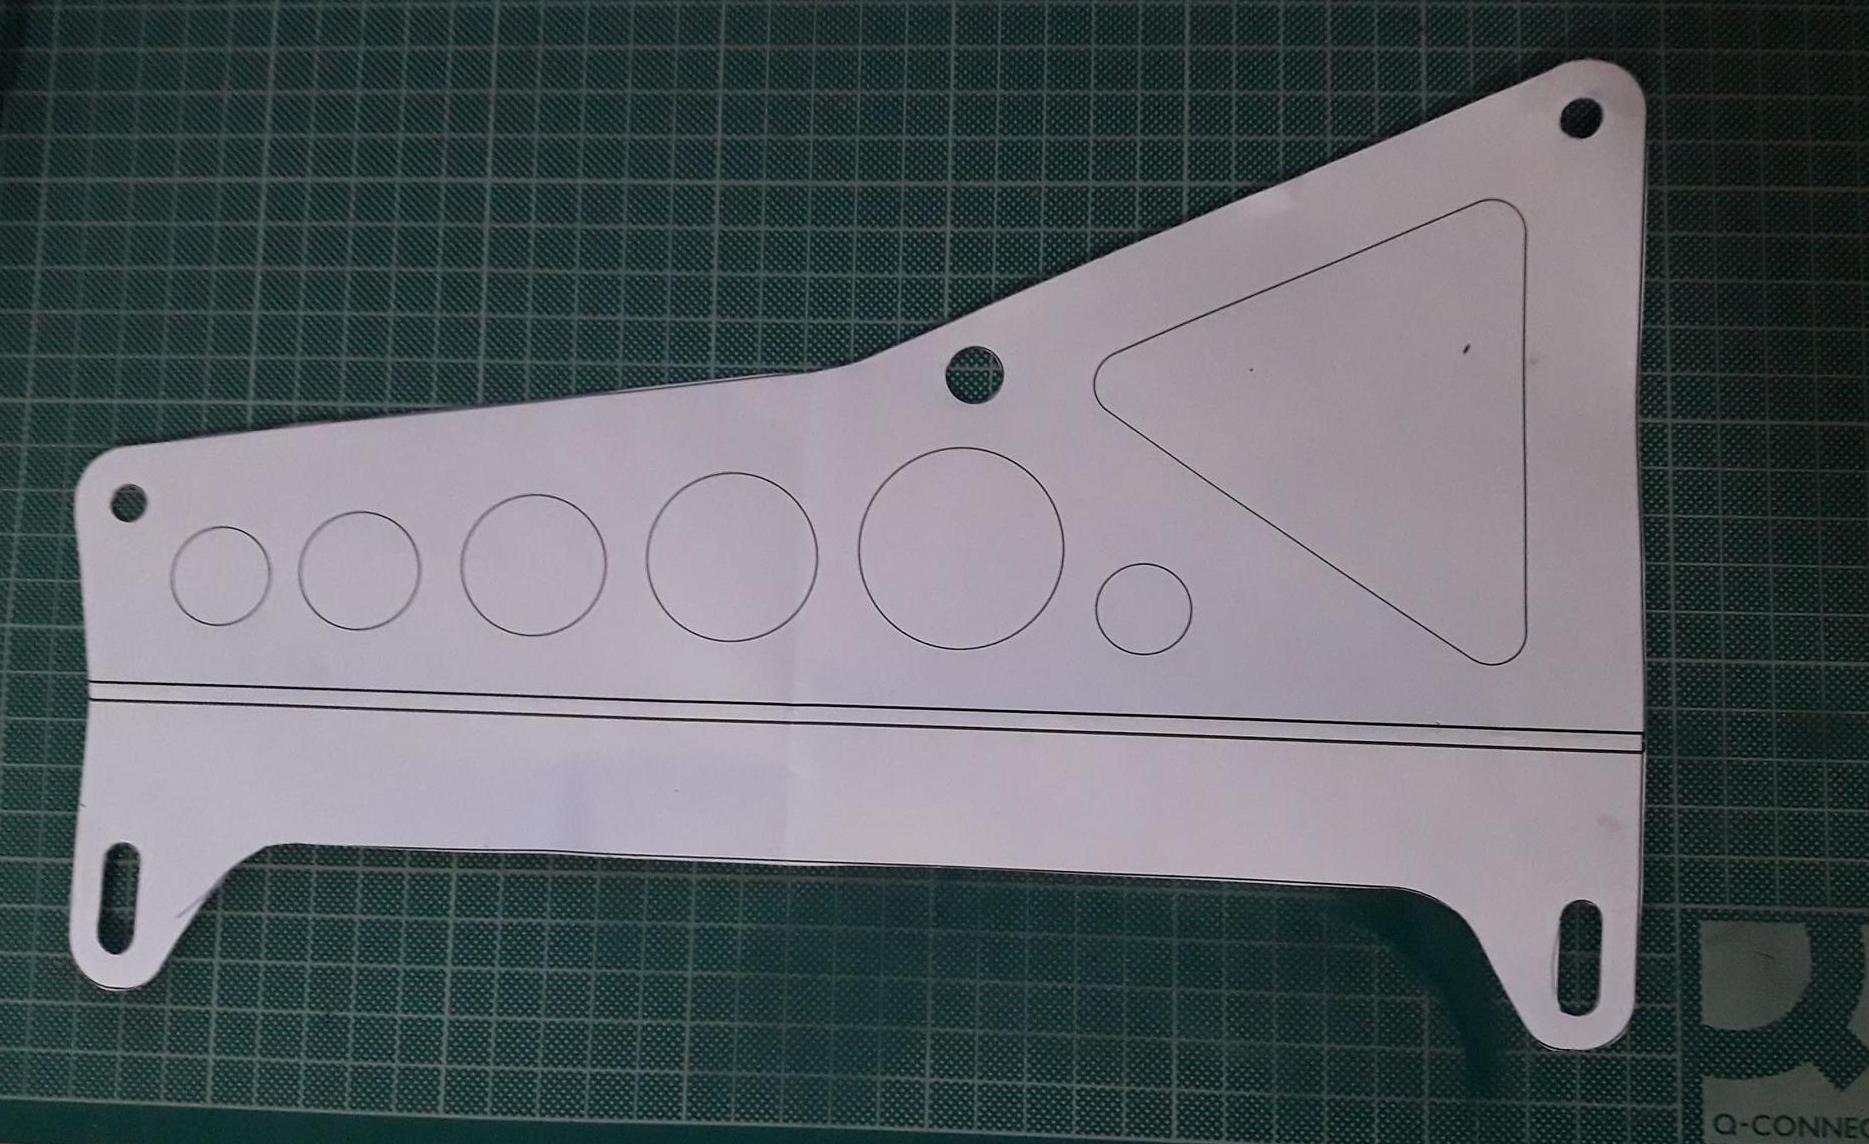
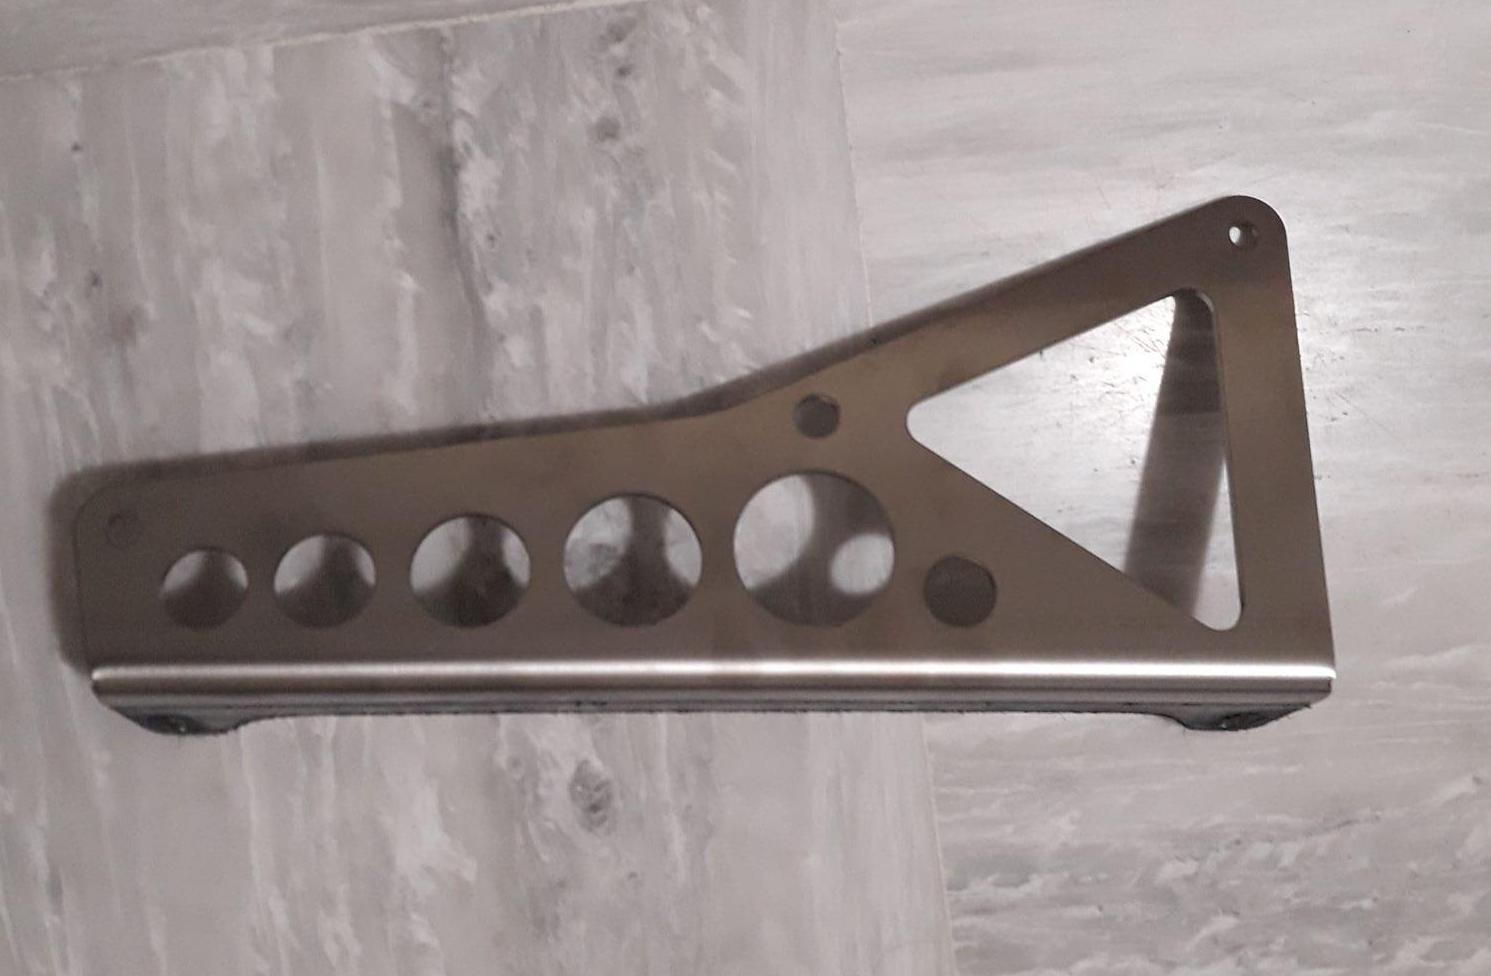
Next I decided to create a heat shield for the master cylinder/brake lines, as they are quite close to the exhaust manifold. Torn between adding a heat shield to the exhaust, add this or add both, but went on anyways. Cereal box CAD (cardboard-aided design) followed by quick drawing. Dimensions are in mm and measured with a ruler on the cardboard, so not 100% verified, but I will report back when I get this done; hope this is useful to someone!
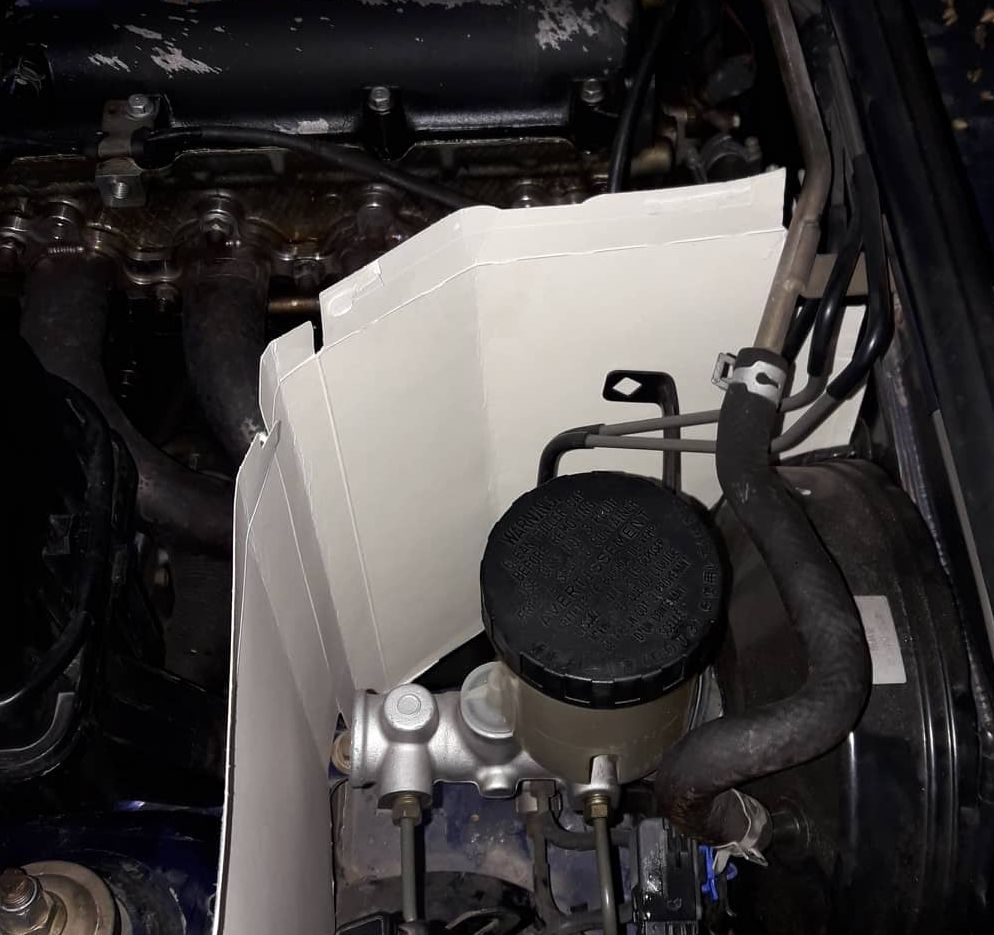
(Don't mind the dirty car or my valve cover)
This is off to laser cutters to be done in 1mm thick aluminum; will roll some beads on the flat sides and add stick-on foam insulation on the inside (armaflex is quite cheap and effective).
Designed myself some proper Elise seat mounts (these were designed to conform to the FIA regulations for seats).
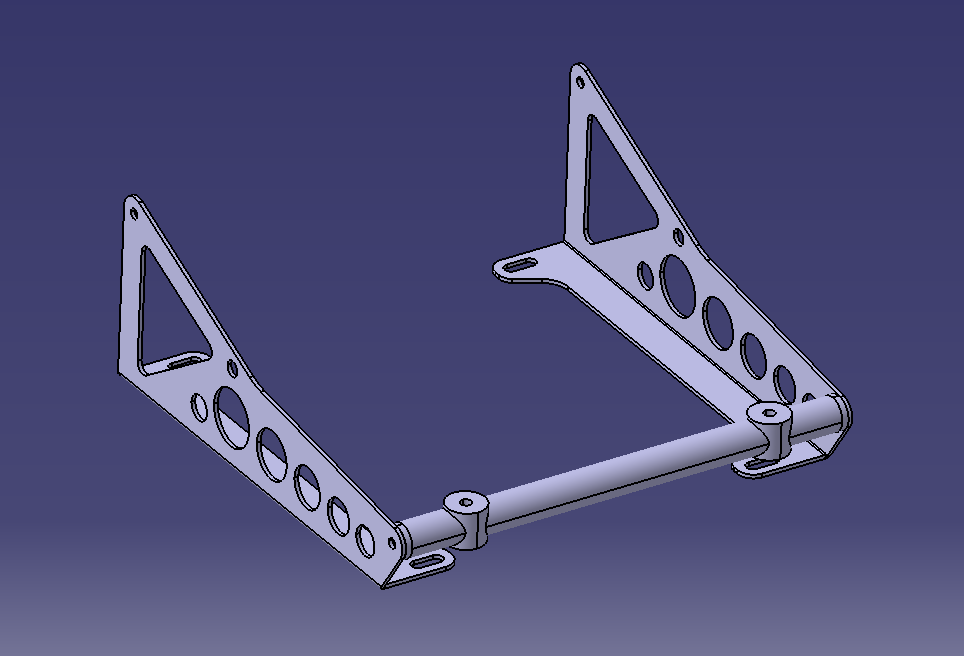
Usual process, measure, print in 1:1 scale in A3 paper sheet, trace to cardboard, test-fit, laser cut. They need the front tubular mount welded, hope to do that soon.
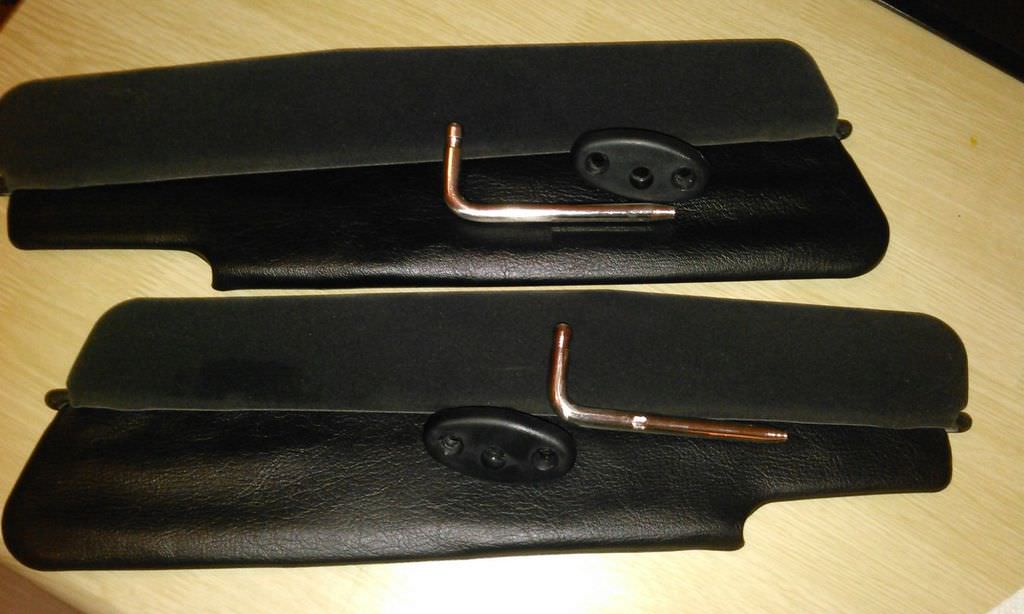
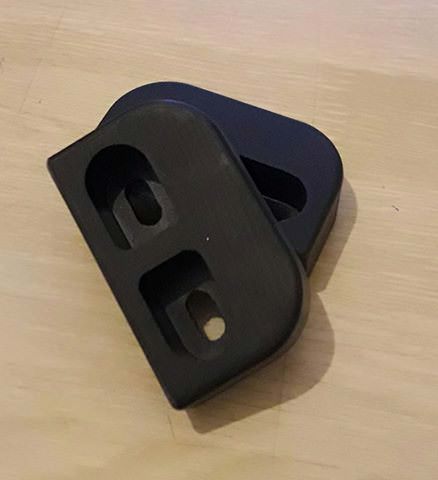
Also made myself a "frankenstein delete" mount. This replaces the OEM mounting system for the hardtop, reducing squeaks, while it can also be an anti-theft protection.
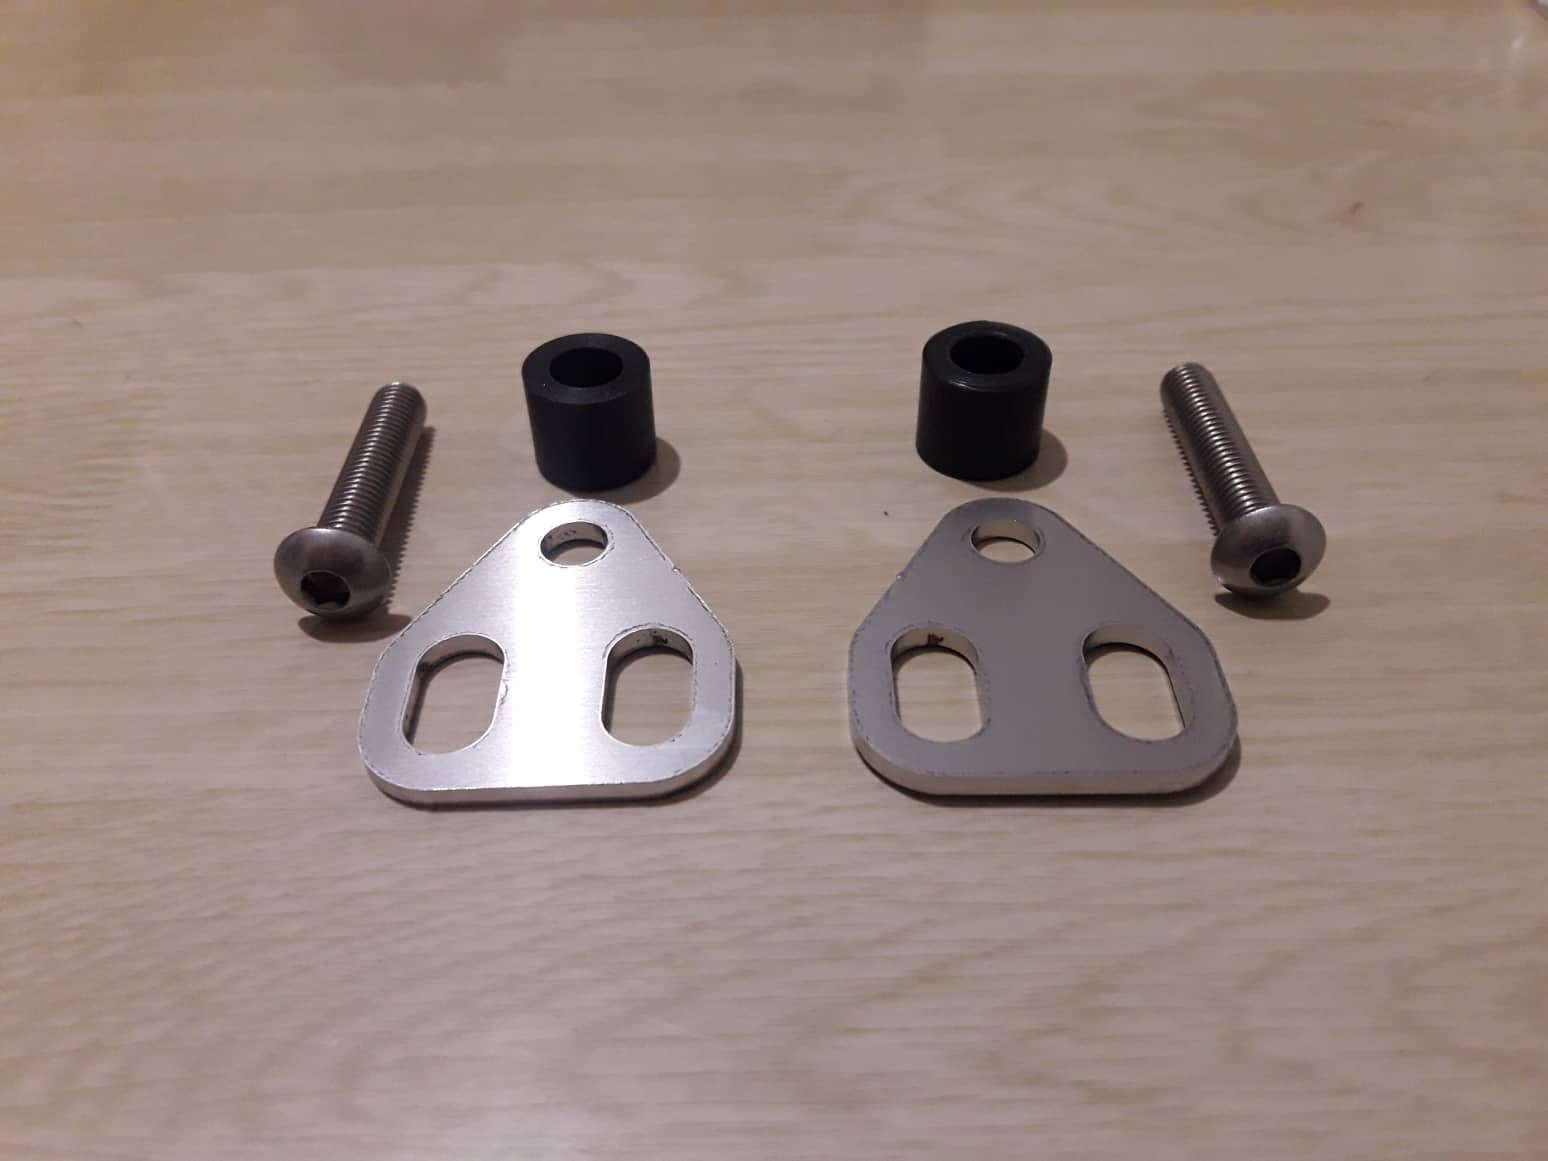
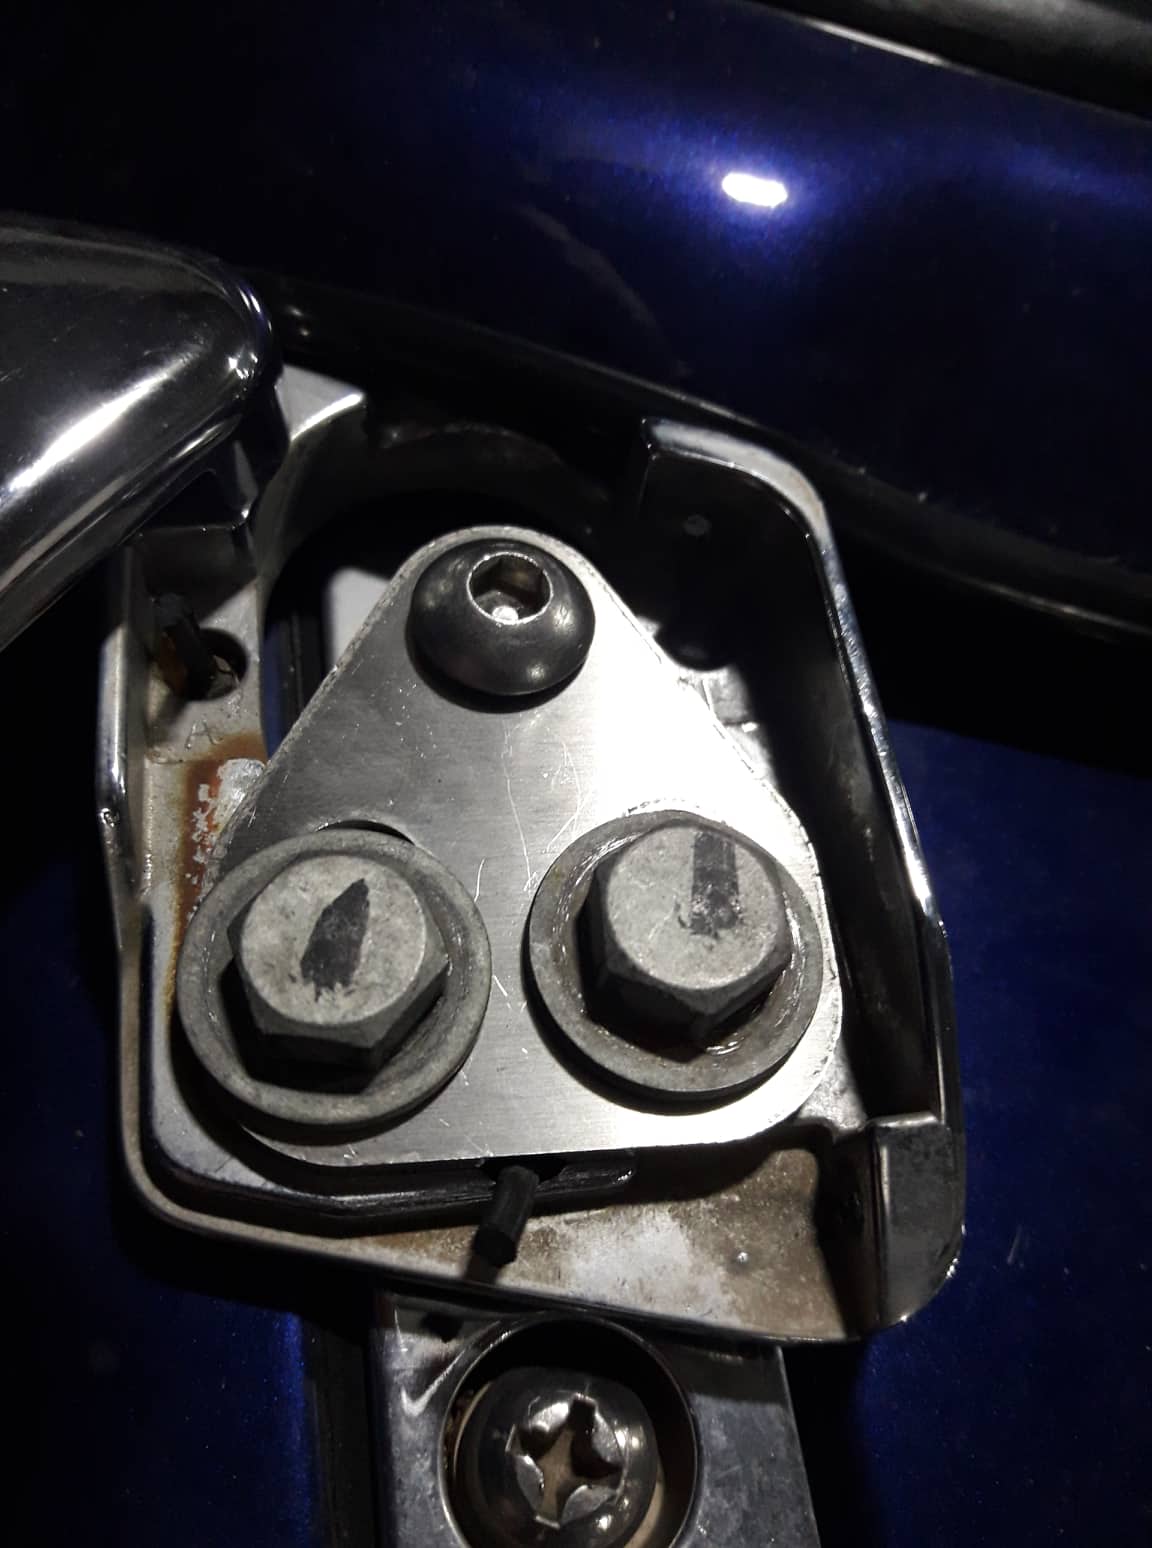
Got a few sets of these available; if anyone fancies one PM me.
Managed to piece together my dream cluster setup
Wrapped some of the body loom as I hate bare wires (and have no clue why they were like this from factory). Used a combination of flame retardant mesh/overbraid and Tesa automotive cloth tape, for that OEM+ look. Had to de-pin the connectors to do so, but it was a quick job. The only ones I could not figure out (in 10') were the headlight connectors, so if you know how to take them apart please let me know. I have a "new" VVT engine loom that I will be modifying and swapping in with the engine, so did not touch that at all. Before and after pics:
Next I decided to create a heat shield for the master cylinder/brake lines, as they are quite close to the exhaust manifold. Torn between adding a heat shield to the exhaust, add this or add both, but went on anyways. Cereal box CAD (cardboard-aided design) followed by quick drawing. Dimensions are in mm and measured with a ruler on the cardboard, so not 100% verified, but I will report back when I get this done; hope this is useful to someone!
(Don't mind the dirty car or my valve cover)
This is off to laser cutters to be done in 1mm thick aluminum; will roll some beads on the flat sides and add stick-on foam insulation on the inside (armaflex is quite cheap and effective).
Designed myself some proper Elise seat mounts (these were designed to conform to the FIA regulations for seats).
Usual process, measure, print in 1:1 scale in A3 paper sheet, trace to cardboard, test-fit, laser cut. They need the front tubular mount welded, hope to do that soon.
Also made myself a "frankenstein delete" mount. This replaces the OEM mounting system for the hardtop, reducing squeaks, while it can also be an anti-theft protection.
Got a few sets of these available; if anyone fancies one PM me.
Reply
0
0
07-13-2020, 07:19 AM
#12
Senior Member
Thread Starter
Join Date: Jul 2015
Posts: 1,015
Total Cats: 140
Engine made it home from the storage unit (took only a year and a broken arm lol). Of course, the 1st thing that I did was to test-fit my Rotrex bracket mockup
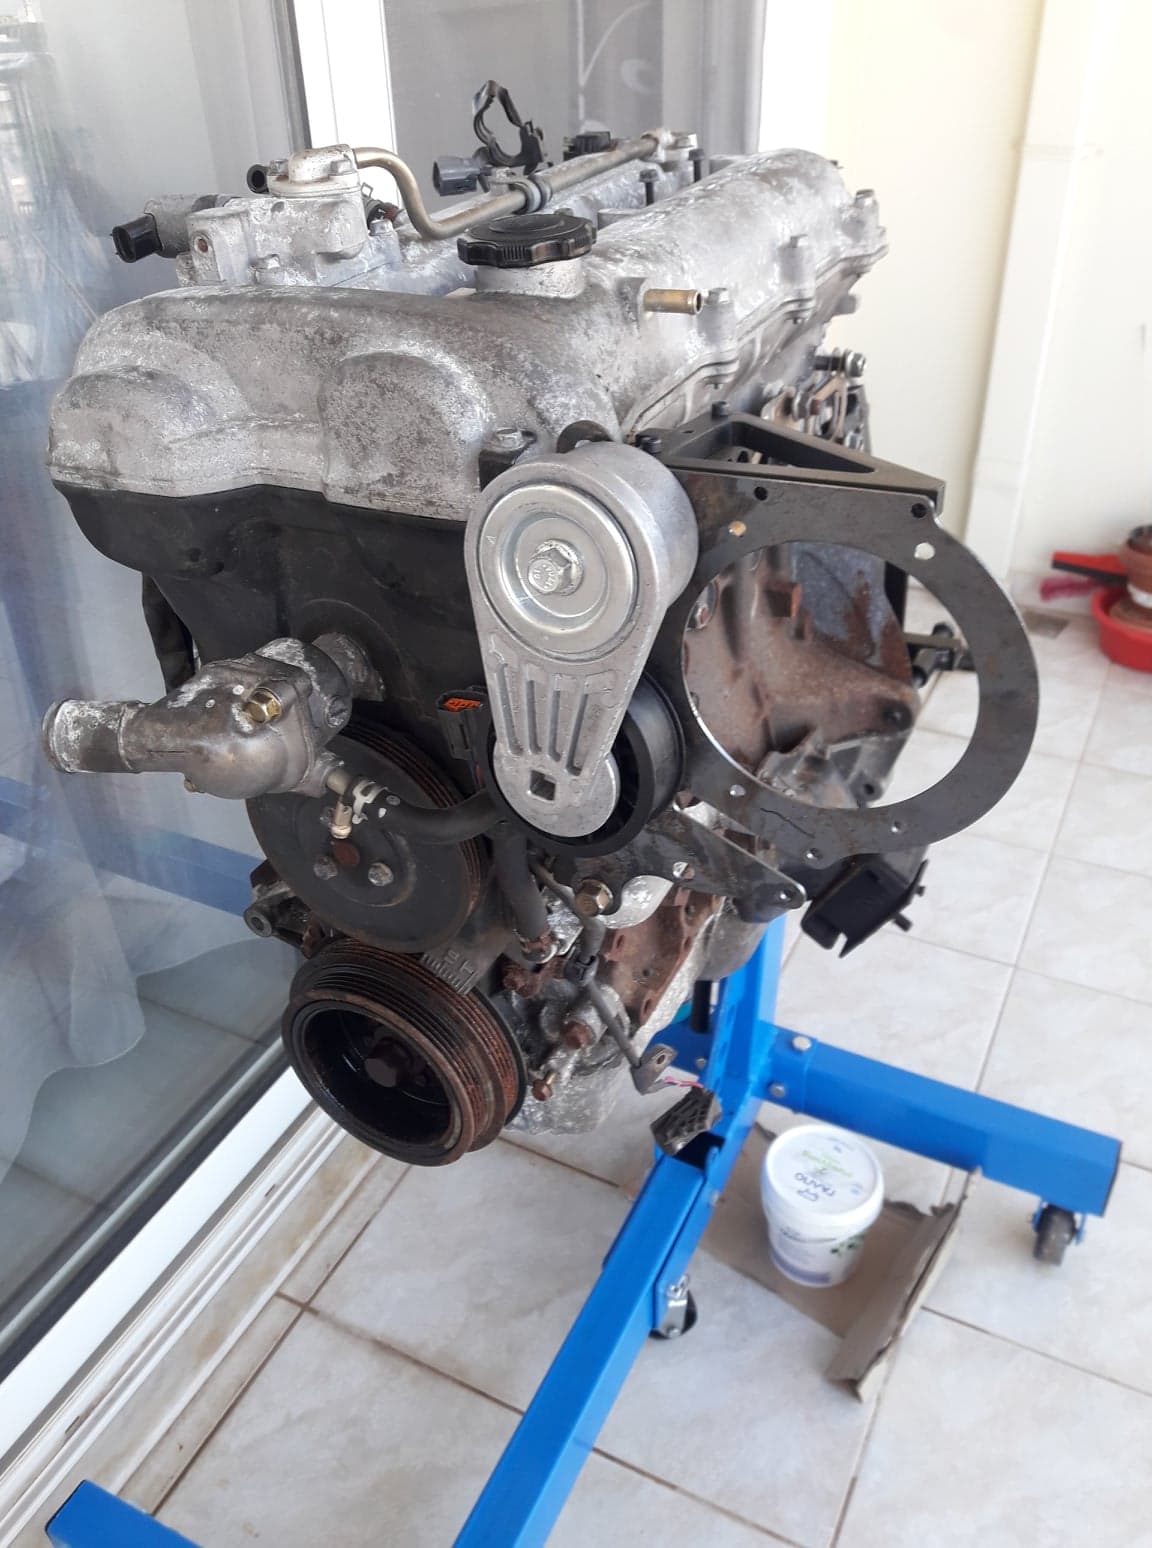
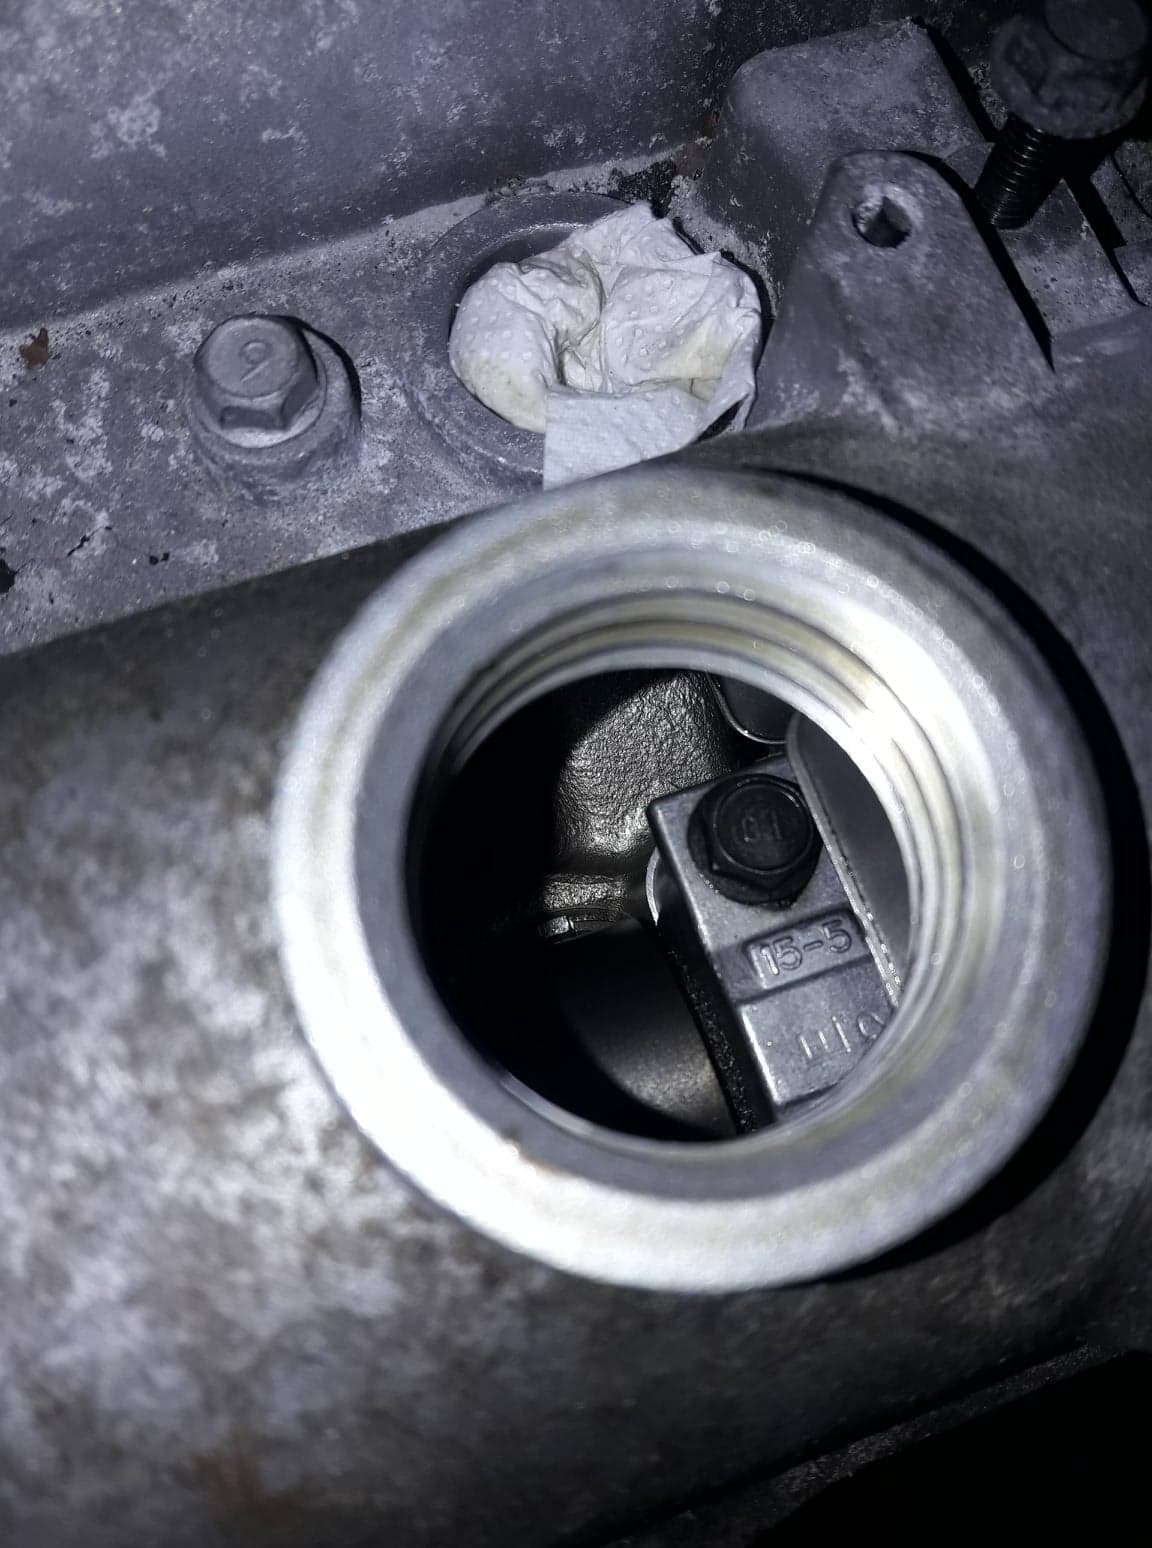
The engine looked rough on the outside, but was supposed to be a low mileage example and I had hopes. Sneak peek through the oil cap, looks clean
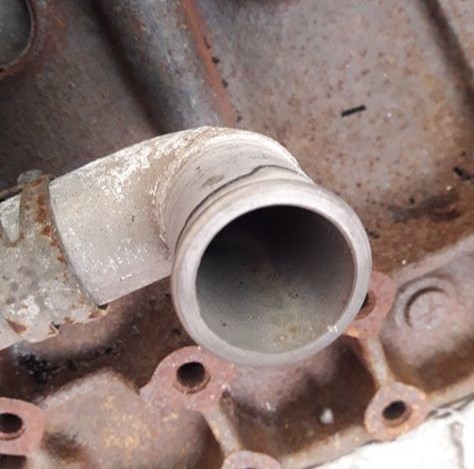
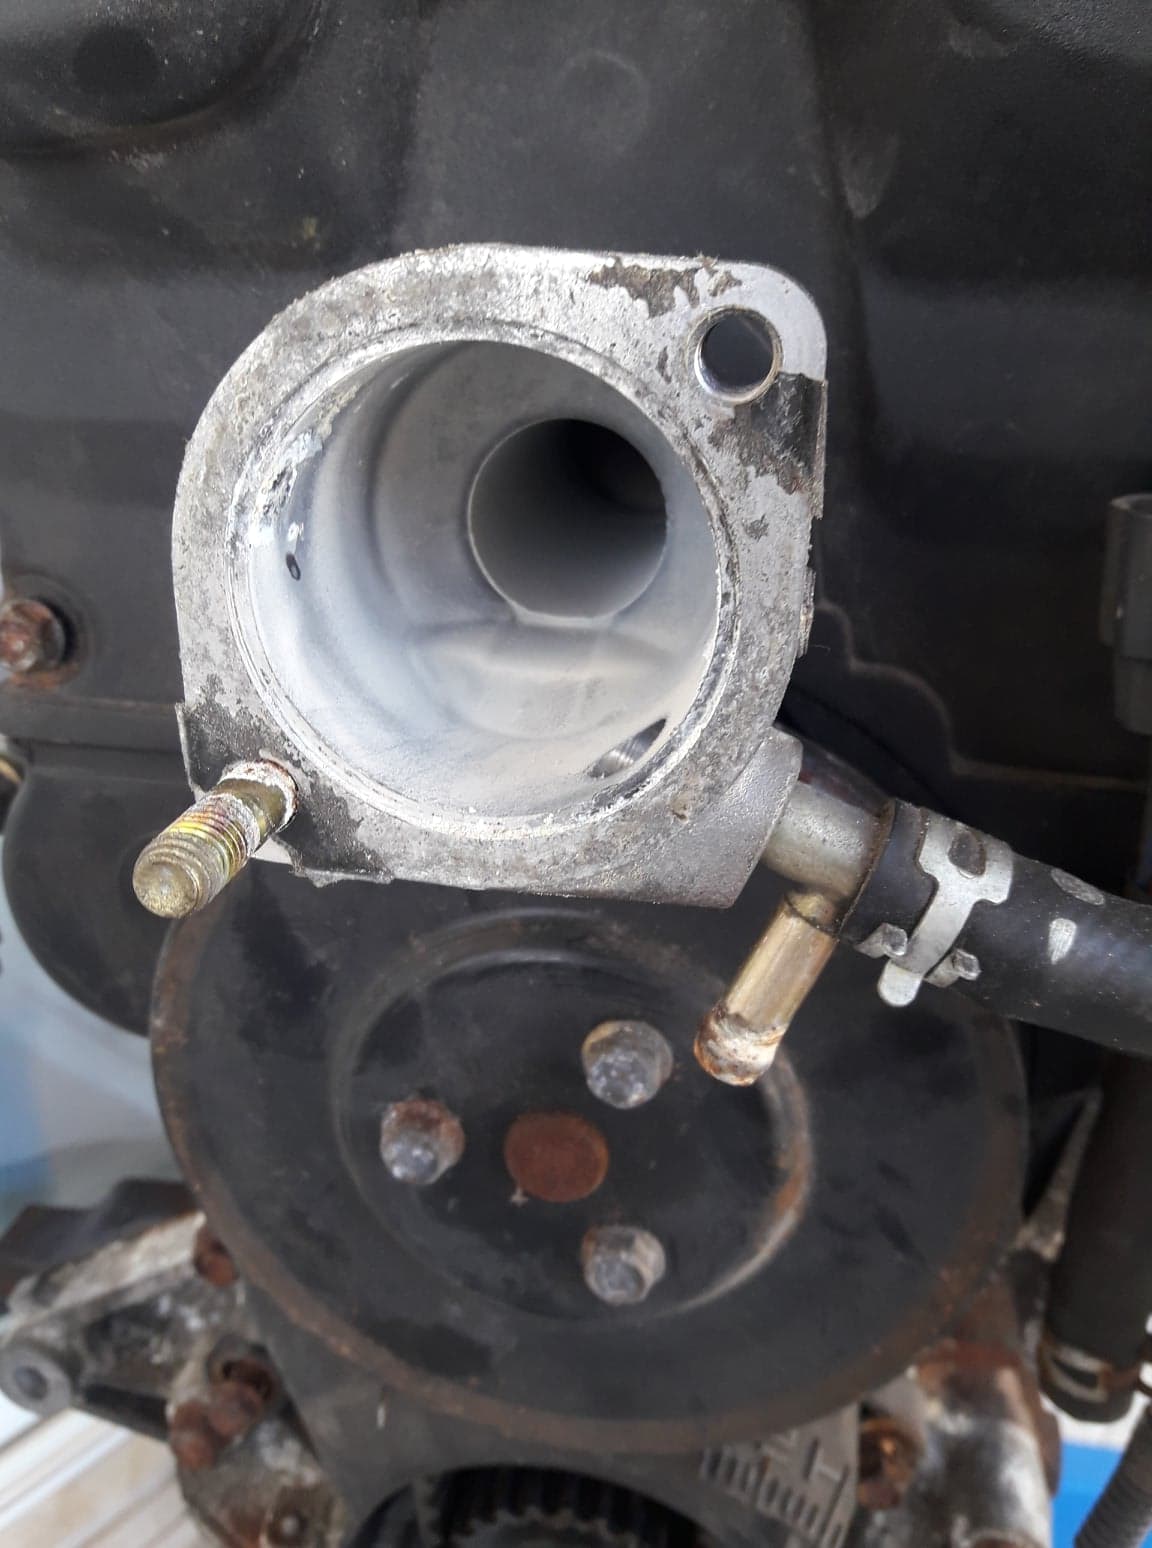
Same after removing the thermostat neck
Managed to remove the crank pulley without an impact wrench. Everything looks clean here as well
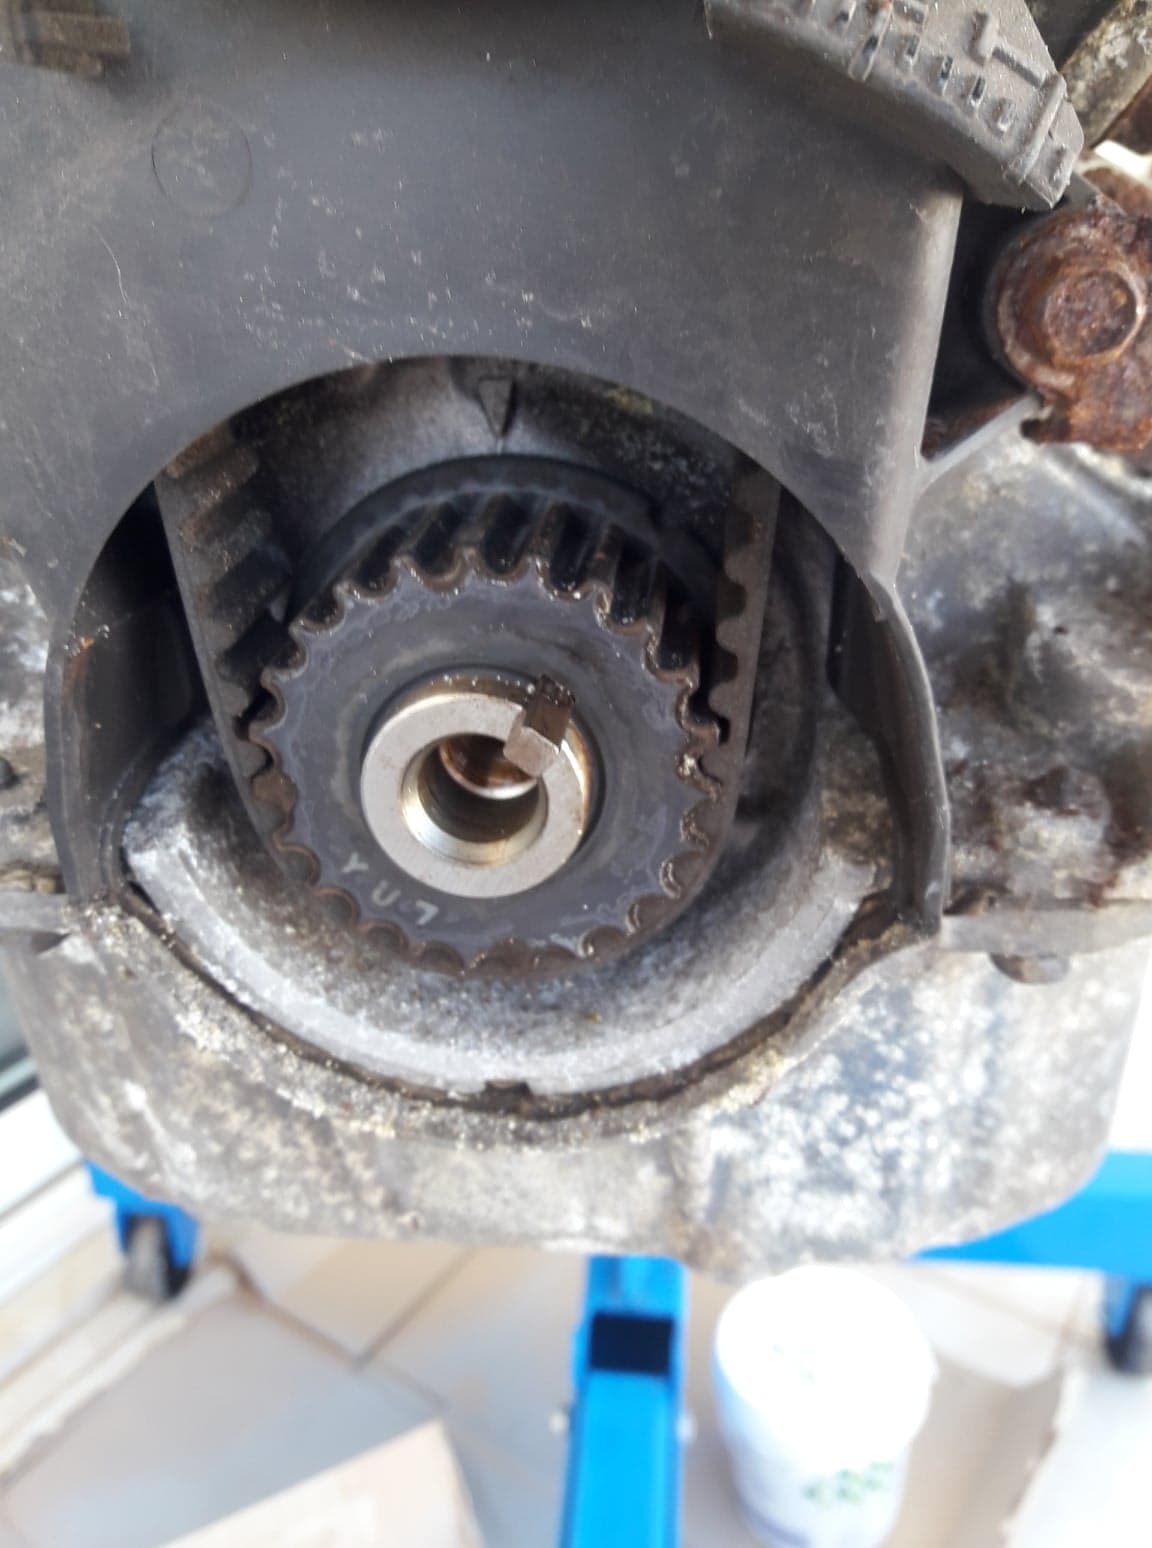
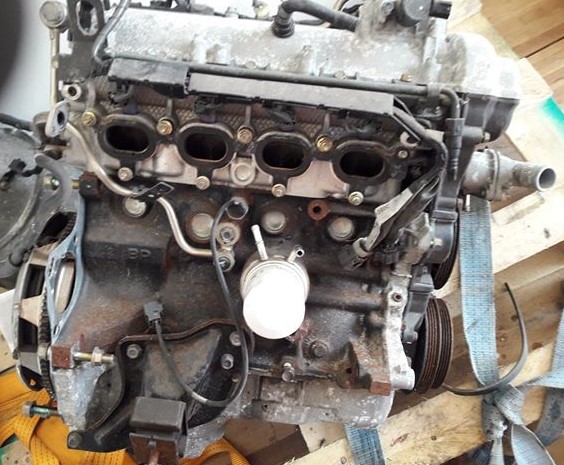
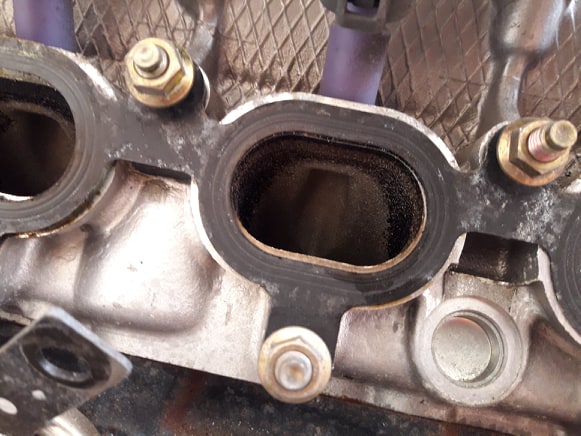
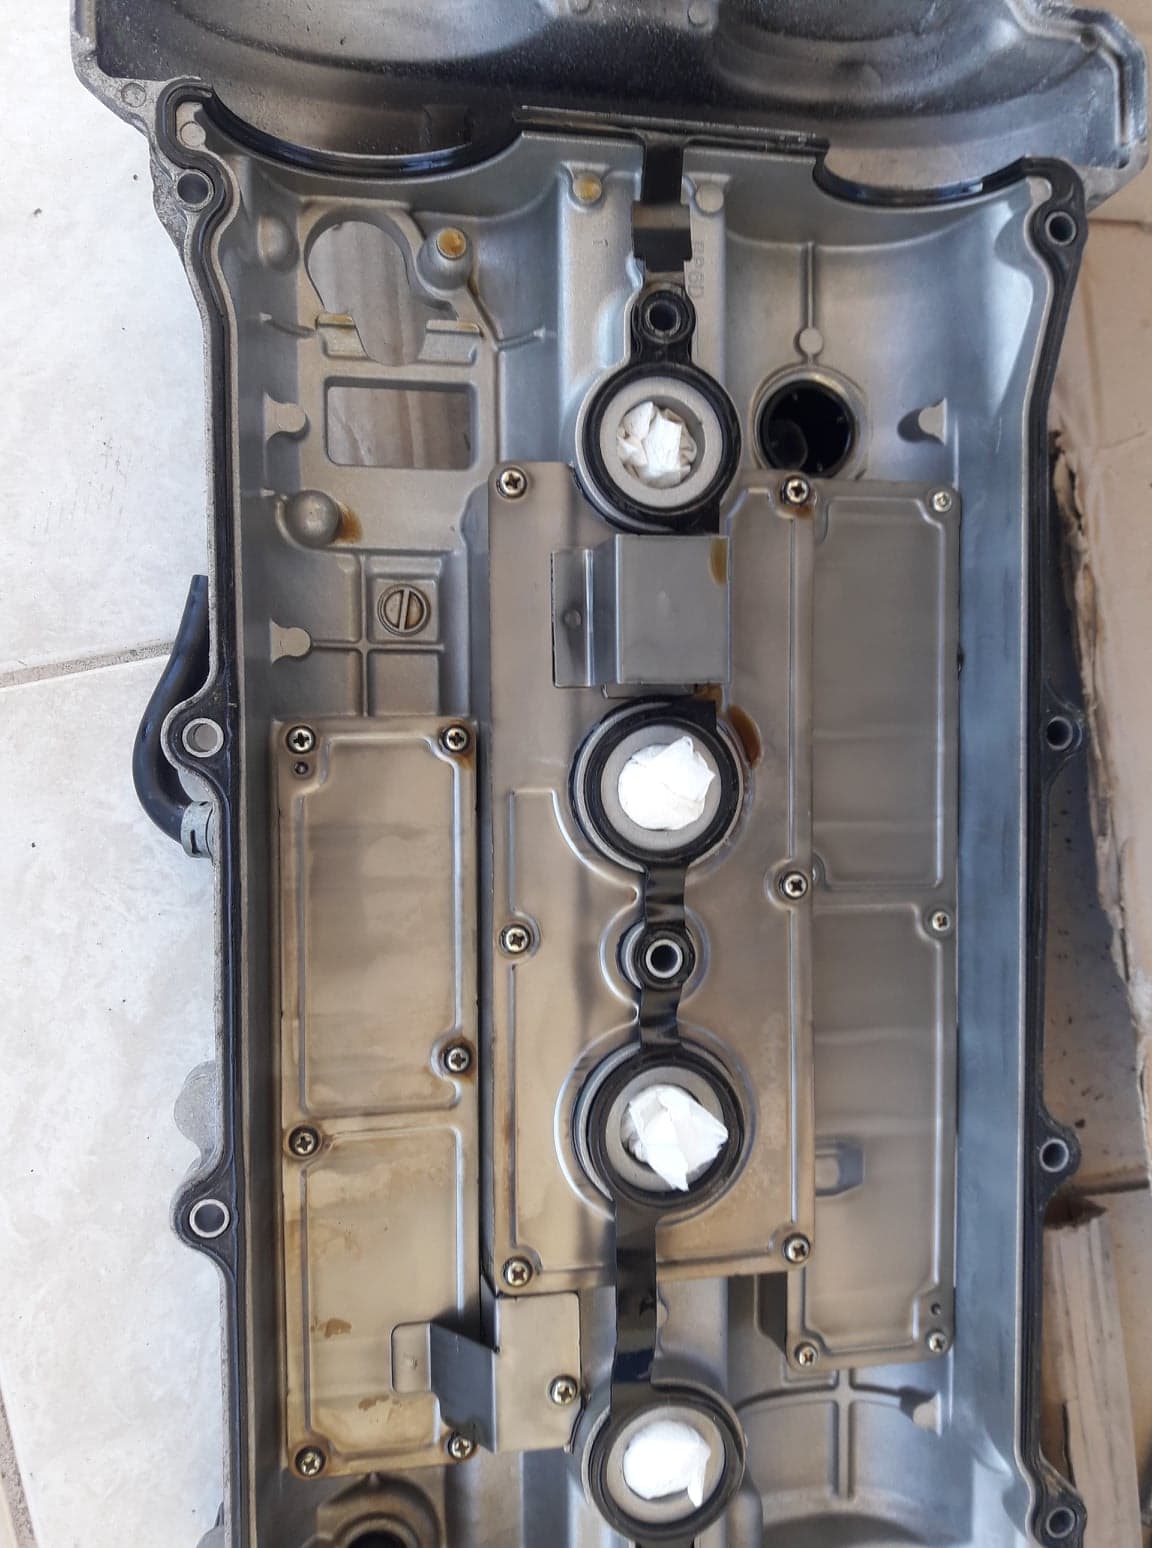
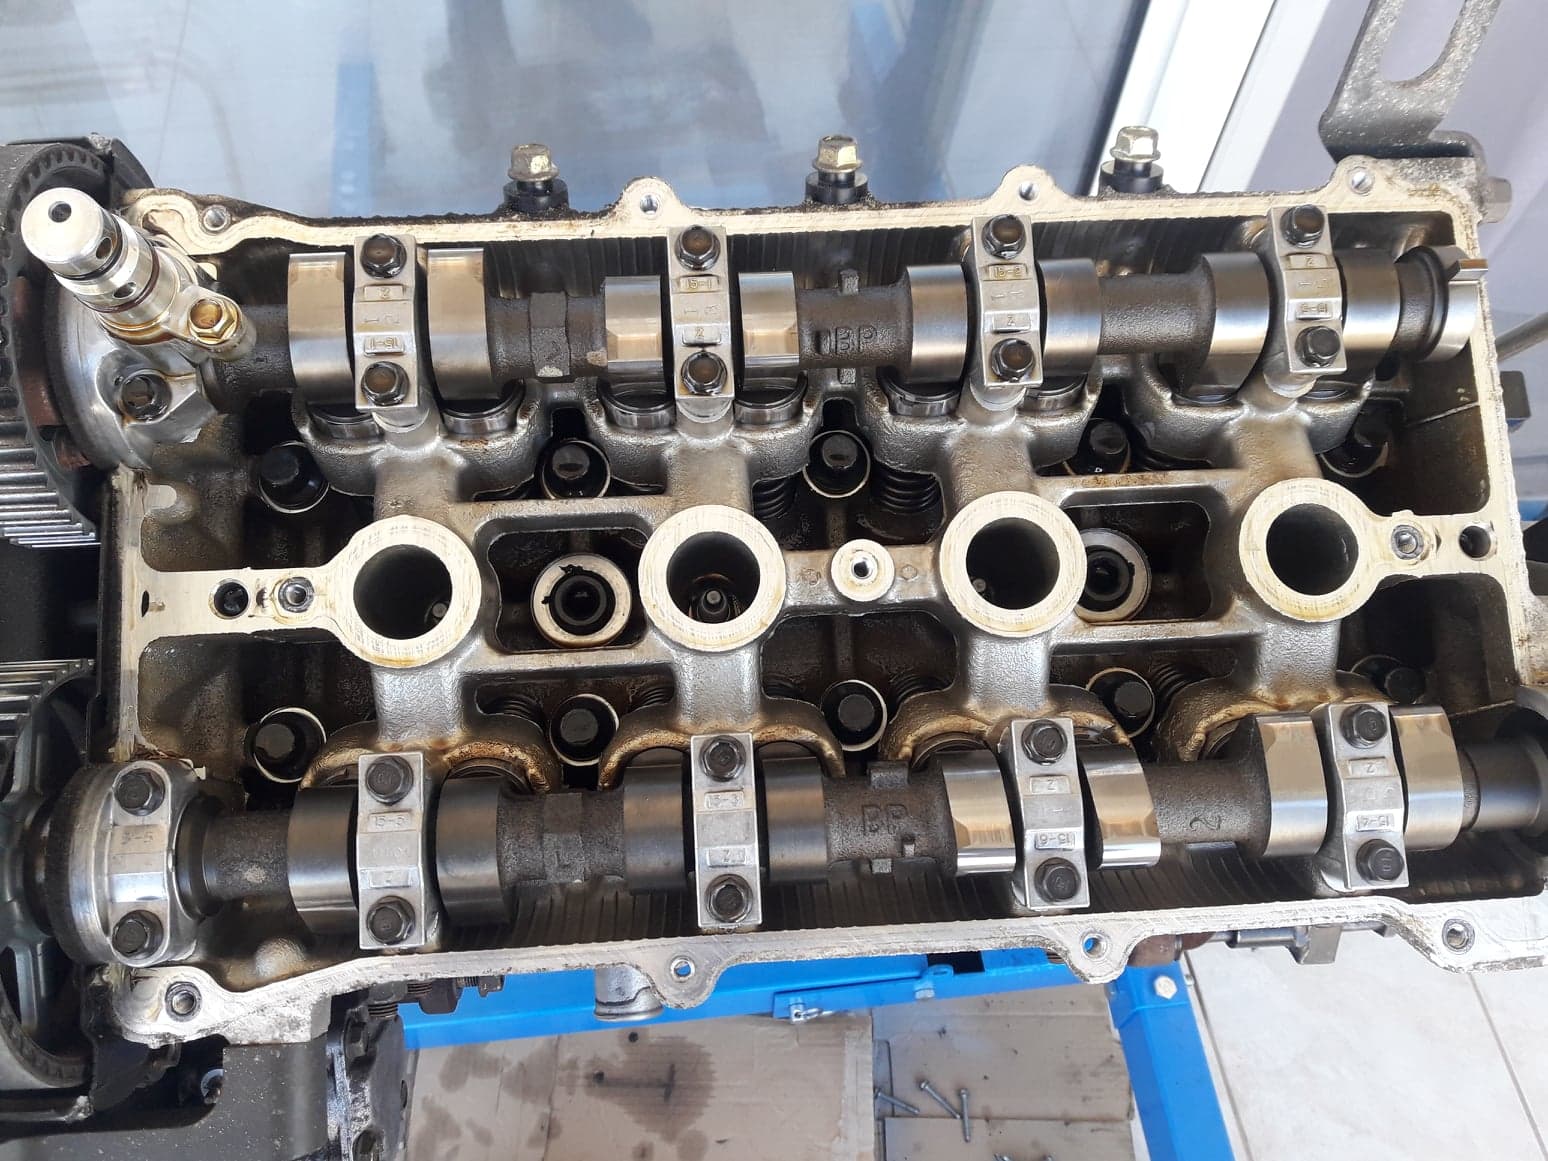
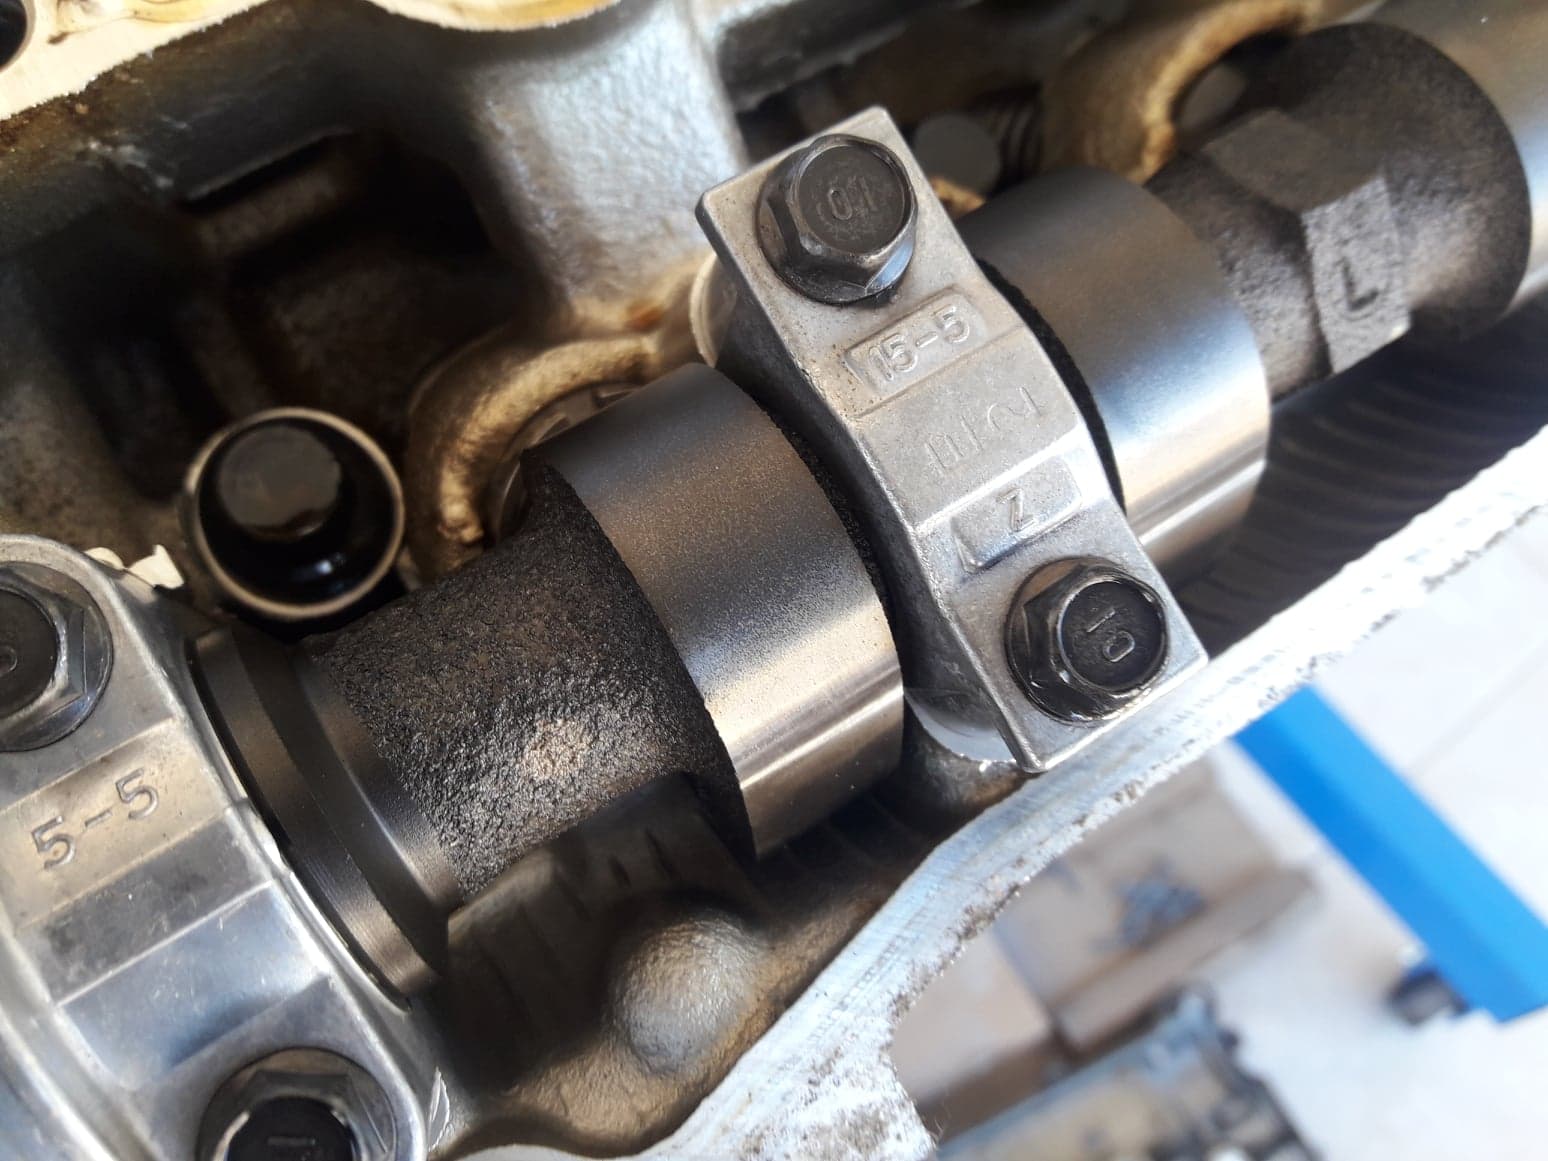
VC off, and I have to say this is one of the cleanest used engines I have ever seen (and I totally believe the mileage stated by the seller now).
Hope I will make a bit of a faster progress now that I have it here. All bolts will be re-plated, block cleaned and painted, aluminum parts cleaned and soda blasted, and all small brackets blasted and powdercoated, so it will also look like a brand new engine also on the outside (hopefully). Meanwhile, I am designing a few parts here and there to go with it (other than the Rotrex mounting).
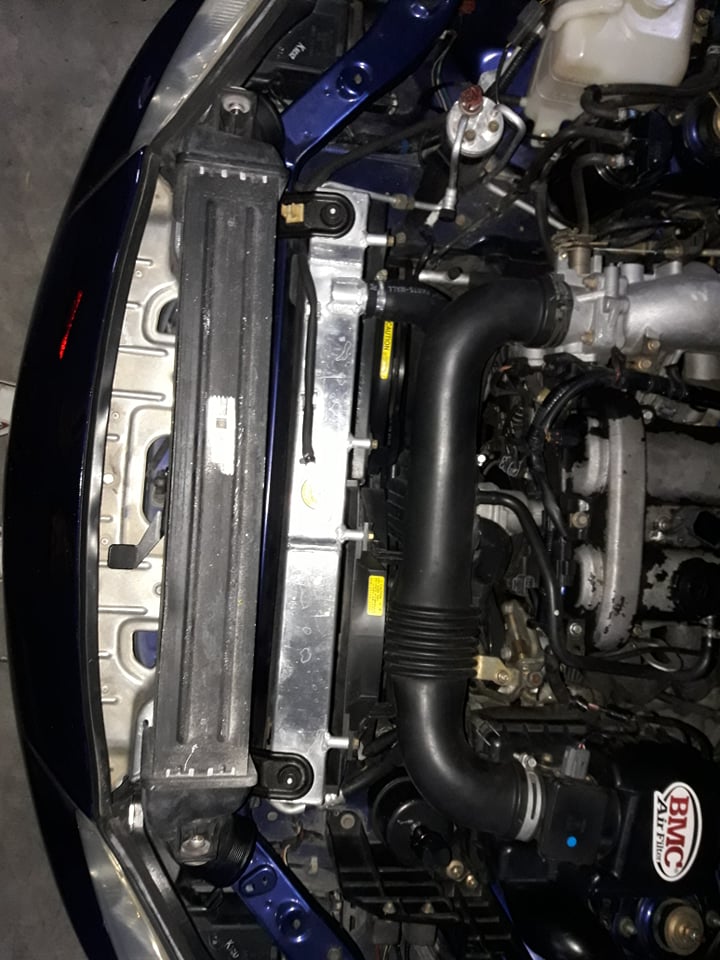
Speaking of, I decided to pull the trigger on a OEM Audi TTRS intercooler. The KW supplied one was too small for the 100+ deg F we reguraly get here. I eyeballed the size and it looked like it would just fit; found one with 30k miles that the owner removed to upgrade to an aftermarket one and I pulled the trigger as it was really cheap too. Looks well designed, with turbulators in the core and a turning vane on the end tank to guide flow.
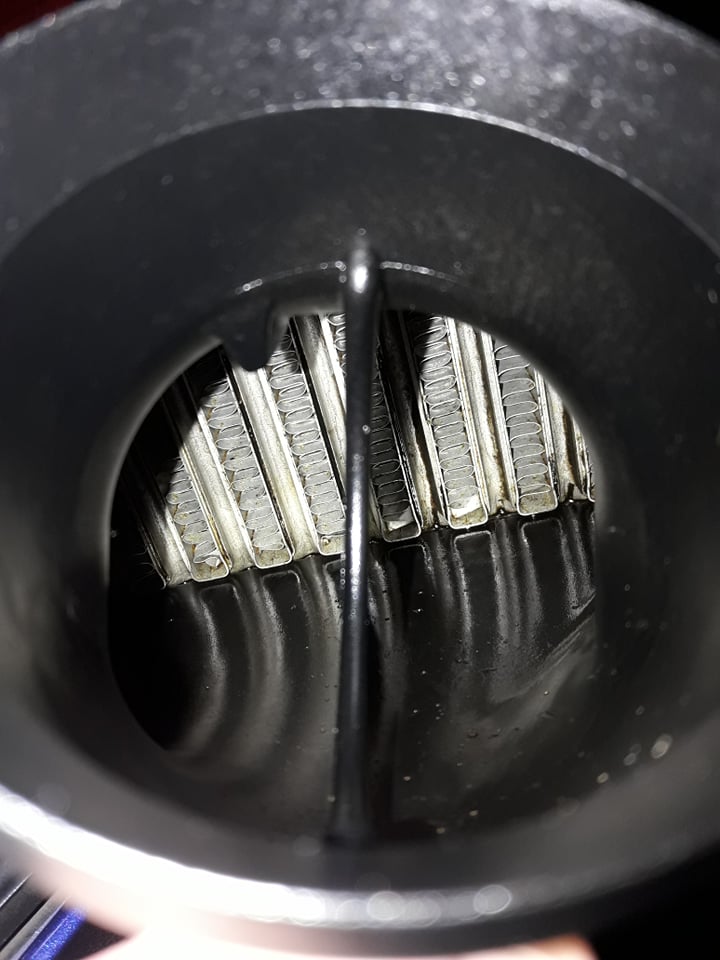
Overlaid on the radiator to quckly check if the outlets clear; success! Next I need to actually remove the bumper.
Unfortunately it has a bit of oily residue on the inside. I was thinking of washing it off wih degreaser, but I am afraid of damaging the seal between the crimp-on end tanks and the core. Any experience on this?
The engine looked rough on the outside, but was supposed to be a low mileage example and I had hopes. Sneak peek through the oil cap, looks clean
Same after removing the thermostat neck
Managed to remove the crank pulley without an impact wrench. Everything looks clean here as well
VC off, and I have to say this is one of the cleanest used engines I have ever seen (and I totally believe the mileage stated by the seller now).
Hope I will make a bit of a faster progress now that I have it here. All bolts will be re-plated, block cleaned and painted, aluminum parts cleaned and soda blasted, and all small brackets blasted and powdercoated, so it will also look like a brand new engine also on the outside (hopefully). Meanwhile, I am designing a few parts here and there to go with it (other than the Rotrex mounting).
Speaking of, I decided to pull the trigger on a OEM Audi TTRS intercooler. The KW supplied one was too small for the 100+ deg F we reguraly get here. I eyeballed the size and it looked like it would just fit; found one with 30k miles that the owner removed to upgrade to an aftermarket one and I pulled the trigger as it was really cheap too. Looks well designed, with turbulators in the core and a turning vane on the end tank to guide flow.
Overlaid on the radiator to quckly check if the outlets clear; success! Next I need to actually remove the bumper.
Unfortunately it has a bit of oily residue on the inside. I was thinking of washing it off wih degreaser, but I am afraid of damaging the seal between the crimp-on end tanks and the core. Any experience on this?
Reply
0
0
 07-16-2020, 03:25 AM
#15
Senior Member
Thread Starter
Join Date: Jul 2015
Posts: 1,015
Total Cats: 140
@DNMakinson just did; will PM you later on 
@Gabo they keep the back of the seat 3-4" off the parcel shelf. I am quite short and they give the right range of adjustment for my height. If you want to replicate it, align the seat so that the front bolts on the Elise seat (the ones on the bottom) align longitudinally with the seat mounting holes on the sliders.
@Gabo they keep the back of the seat 3-4" off the parcel shelf. I am quite short and they give the right range of adjustment for my height. If you want to replicate it, align the seat so that the front bolts on the Elise seat (the ones on the bottom) align longitudinally with the seat mounting holes on the sliders.
Reply
0
0
08-08-2020, 04:17 PM
#16
Senior Member
Thread Starter
Join Date: Jul 2015
Posts: 1,015
Total Cats: 140
Not much time to deal with the car lately; however I "test fitted" the IC today. Well, I did not actually fit it, just offer it up to its' rough final location and measure for brackets/note down issues. As a reminder, this is an OEM IC off a 8J-gen Audi TTRS. As said, I had eyeballed the dimensions. With the bumper off, I could tell that the mounting bosses on the bottom side are in the exact same spot as the stock ones for the AC condenser (I measured, they are the same to the last mm)
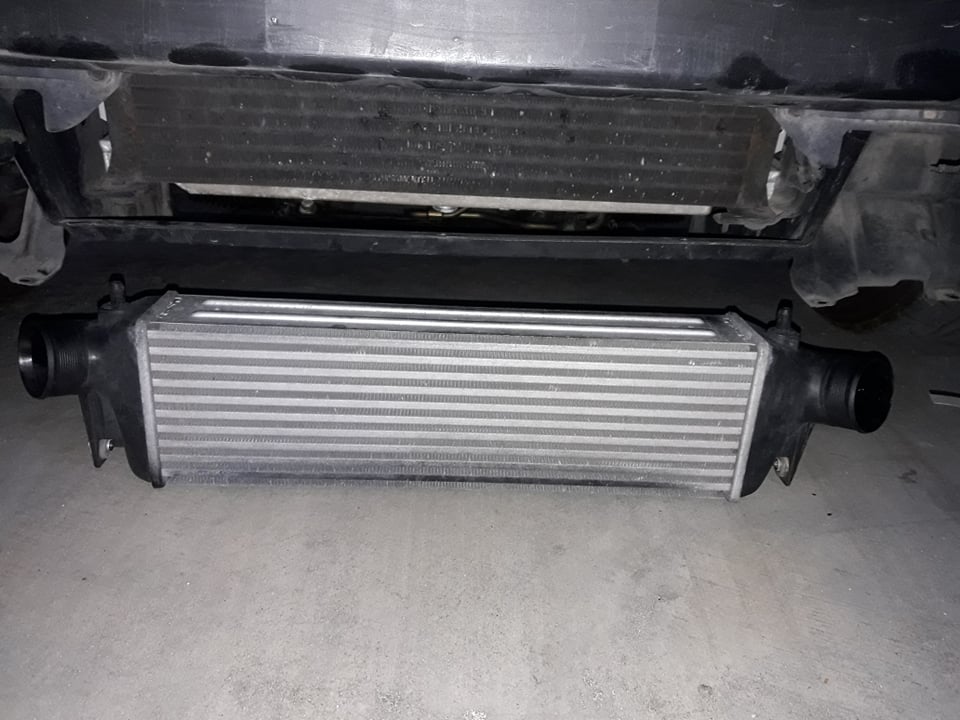
Moreover, both width and height, but also thickness was spot on, as it can be just tucked in behind the PS cooling loop without touching the lines. It also just fits between chassis legs (720mm wide at the mounting bosses)

However... there is interference with said lines on the driver's side, as the lines come upwards in an angle and want to occupy the same space. I removed their bracing and tried to bend them a bit which was quite easy. Not sure how to deal with that at the end (bend them somehow? remove and install a proper oil cooler for the PS system?). How do you guys usually deal with PS lines and "large" ICs?
Moreover, both width and height, but also thickness was spot on, as it can be just tucked in behind the PS cooling loop without touching the lines. It also just fits between chassis legs (720mm wide at the mounting bosses)
However... there is interference with said lines on the driver's side, as the lines come upwards in an angle and want to occupy the same space. I removed their bracing and tried to bend them a bit which was quite easy. Not sure how to deal with that at the end (bend them somehow? remove and install a proper oil cooler for the PS system?). How do you guys usually deal with PS lines and "large" ICs?
Reply
0
0
08-16-2020, 01:56 PM
#17
Senior Member
Thread Starter
Join Date: Jul 2015
Posts: 1,015
Total Cats: 140
Was away for the weekend so studied the photos a bit more. Looks like I can get away with bending the tubes tighter and having the PS loop between the IC and the AC condenser. However every other "large" IC thread I came across seems to opt for the other way round. Anyone that has actually done what I am proposing?
Reply
0
0
09-08-2020, 04:05 PM
#18
Senior Member
Thread Starter
Join Date: Jul 2015
Posts: 1,015
Total Cats: 140
Question for the Rotrex crew; I already have a C30-74 in practically brand new condition that came with the KW kit I had originally purchased, and I was planning to use. I have the opportunity to essentially part-ex it with a used and repaired C30-94 unit with an uprated titanium shaft, off of a company in the UK (UK Supercharger repairs). The question is, should I or is it just asking for trouble with an essentially stock VVT engine?
Reply
0
0
09-09-2020, 04:58 PM
#19
Senior Member

Join Date: Mar 2017
Location: Granbury Texas
Posts: 668
Total Cats: 190
I added a small dedicated ps cooler for a MSM that I put a large intercooler into.
Mounted it under the upper radiator cowl with a couple of 6mm isolators (Mercedes air filter mounting stuff).
Worked far better than the "loop" that gets in the way of everything.
Your fab work is excellent!
I want your mounts for my water bottle...
I'm not a "gauge" guy but your gauges are way cool.
I'm an engine guy and you need less compression, forged rods and more boost!
It looks like you already have it apart.
Finish it...
That engine looked trashy on the outside but near perfect in. You cannot judge a book by it's cover
Your car is really nice, almost too nice to mod...
Keep it up, going be really nice.
Reply
1
1
09-17-2020, 11:44 PM
#20
Junior Member

Join Date: May 2009
Location: SE Melbourne, Australia
Posts: 143
Total Cats: 31
Question for the Rotrex crew; I already have a C30-74 in practically brand new condition that came with the KW kit I had originally purchased, and I was planning to use. I have the opportunity to essentially part-ex it with a used and repaired C30-94 unit with an uprated titanium shaft, off of a company in the UK (UK Supercharger repairs). The question is, should I or is it just asking for trouble with an essentially stock VVT engine?
Reply
0
0


