When you click on links to various merchants on this site and make a purchase, this can result in this site earning a commission. Affiliate programs and affiliations include, but are not limited to, the eBay Partner Network.
Concealer- Don't get me started, I was dreaming about a brown/bronze and gold scheme
Ryan- I agree for the most part, there are plenty of janky version out there. These are A2-70, it's a 304 SS bolt, with a strength between grade 5.8 and 8.8 (700 N/mm2 vs 830N/mm2 for grade 8) Racethetix makes good pieces.
Which Prusa do you have? I've had tons of trouble with the mk3, ended up turning it to silent mode which doesn't run the skipped step sensors, and unplugging the filament sensor. Essentially I have a quieter mk2s.
The intake parts were done on an ultimaker before I had my Prusa, the radio panel and new white intake endcaps were done on the Prusa. I prefer the direct drive of the Prusa over the bowden of the Ultimaker.
Once the Ultimaker was calibrated though, it stayed calibrated, I have to recalibrate mine every 3 or 4 prints or it starts getting sloppy.
Starting to print these any time my printer isn't tasked. Radio delete for NA (and any other that has the same mounting, no idea about NB, etc...). I can do blank ones, any design you want, switches, gauges, etc. Working on a single gauge with hex pattern for mine right now, will post when complete. Can do other colors too, I have dark navy blue, vibrant orange, sky blue, and this in stock right now (filament color names "dark blue", "true orange", "blue glass", "HD smoke", or whatever spray paint you'd like. If you'd prefer a custom color non painted, I can do any of these: https://www.makergeeks.com/collectio...ilament-1-75mm
$15 plus shipping, or $10 for the file if you have access to your own printer.
Hit me up for any custom designs or idea you have, I'm trying to turn this into a side business.
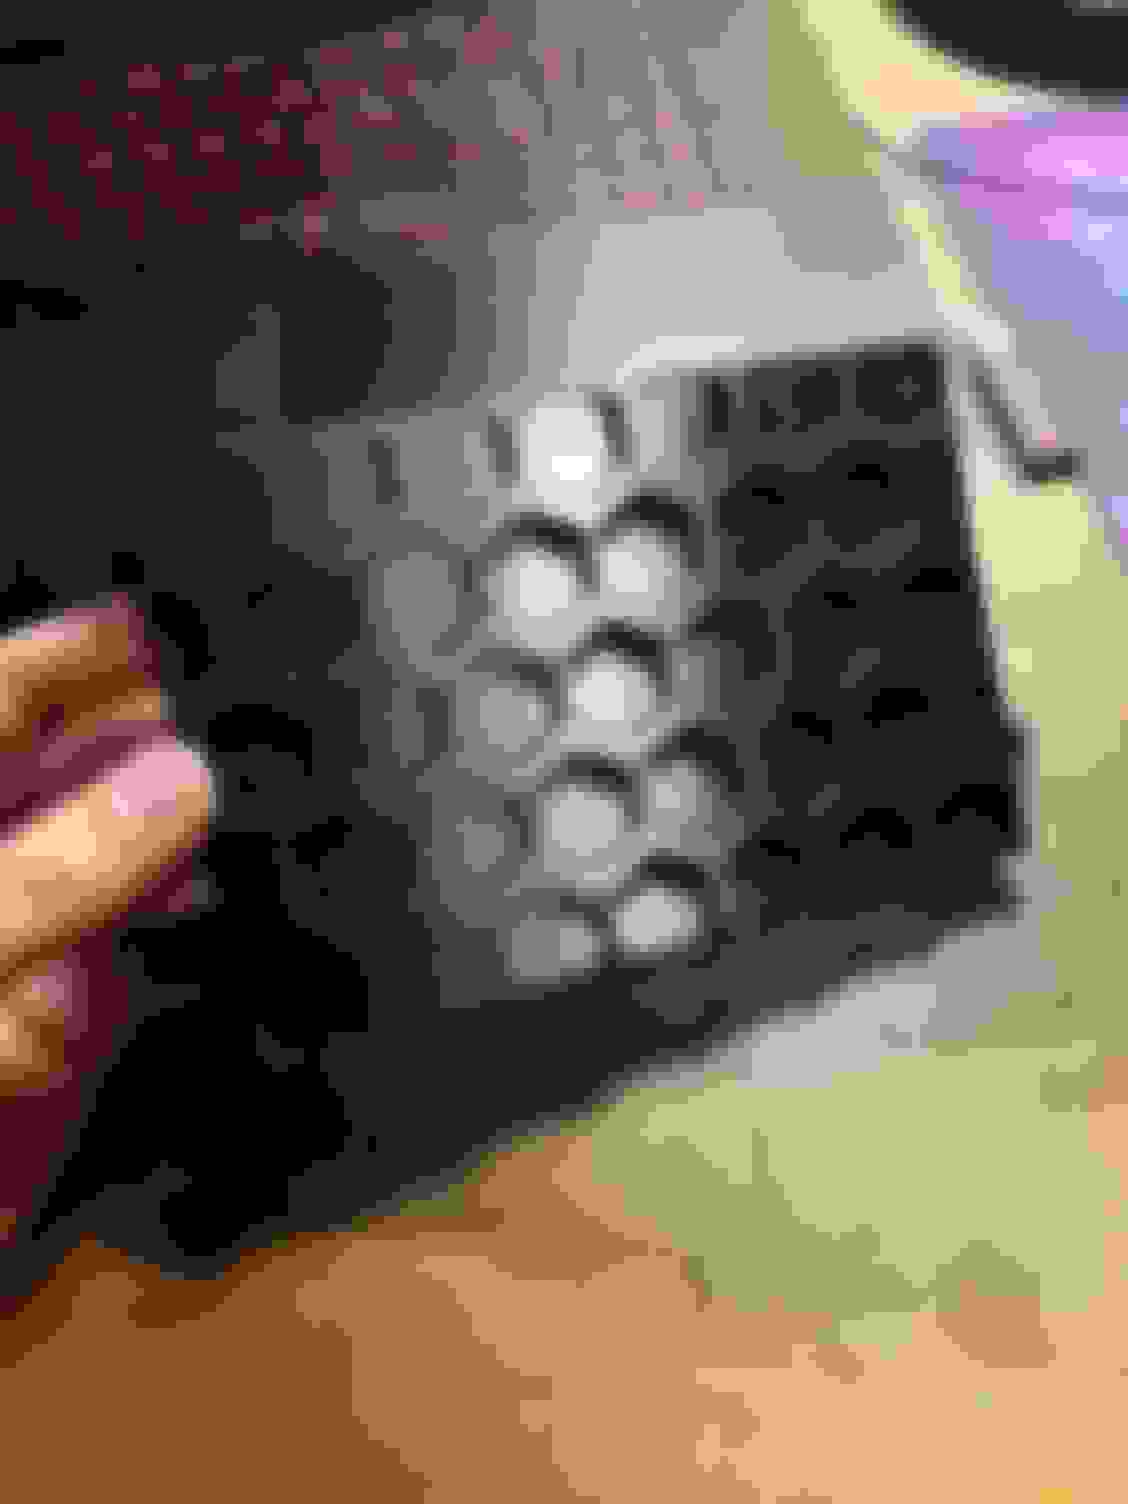
Front side, Hex pattern
These are unfinished directly off the printer, supports removed.
Back side. Directional up arrow so you can't **** it up. Mounts with the same screws as the radio that it replaces.
Amazon muffler, got good reviews, might suck ***, might be great, youtube videos sounded good, was definitely cheap and it'll fit where I want it.
Bride Vios 1 in carbon kevlar, super stoked, mounting might be a pain in the ***. Probably taking it to a local shop for install so I can get provisions for the sub strap and proper mounting.
Fabric is pretty rough, figured worst case scenario I could redo it myself, I've got a sewing machine at the house so I should be able to disassemble it and pattern it out and redo it.
Might 3d print new belt guides.
Newest iteration of the radio delete panel to fit my new A/Fr gauge. AEM uego, fit like a dream on the first try, so that was cool. Confirmed that I can do gauge pods in these for anyone interested in one.
Went 15 degrees up and 15 degrees over for better line of sight, forgot the slight angle of the tombstone, so it's probably more like 20 or 25 degrees up, but I'm tall as ****, so it still works great for me, might need to angle down a tad for shorter drivers.
Might start working on an HVAC delete panel next, but that would require pulling my HVAC controls every iteration and that's a ******* pain since I'm keeping mine. If anyone is interested and in the Seattle area, let me know as I'd like to prototype one, I'll give you one free if you let me use your car to design it on. Would be a better eye level gauge platform.
Anyone know if I need a back brace to safely run a carbon seat like you do with an aluminum seat? I feel like carbon would have more similar properties to an FRP seat, but I'm not sure.
Got my exhaust installed, outlet needed more trimming, but is finally finished 15 dremel discs later, was rattling really bad for a bit, got that solved, the noise cleared up which let me notice a different rattling under the car which I assume to be my ill fitting butterfly brace, might pull that in a bit and trim it to fit properly without binding.
Pulled the seat apart, pulled the stitching out of the cover, removed all of the old foam, I'm lazy and busy, so everything is just in piles in my workroom.
Tried to go to cars and coffee at 425 motorsports, but it was dead. On the plus side I picked up a set of seat brackets.
Ended up going to Driftcon instead which was fun, spent more time working on my buddy's car this weekend. He blew his air ride at the show, then we redid all of the hardware on his 3 piece wheels. Do you research if you're getting a pair, and double check the shop's work, they stripped 1/4 of the hardware, clearly use an impact to install them, and no loc-tite on them, so 3/4 were loose. Took about 4 hours to pull every bolt one by one, clean the threads, and loc-tite all of them (blue)
Finally got my seat installed just in time to drive to school and take my evolution final exam. Pretty damn happy about it, I feel so much more connected to the car, the car feels happier, there are less rattles for some reason, literally everything just feels better. Might be one of the best purchases I've made for the car.
Bride Vios 1 carbon kevlar
Status racing 6 point cam lock harness (need mounting point for 6th point installed still)
planted seat brackets
Isn't there a seat mounting thread somewhere? These seats are old and thus slightly rare, but it might help someone out with fitment.
yo you still need/want to prototype that hvac delete panel? None of my hvac works, I just use the ac button as a stupid aux fan switch. My car is stored in SODO and I typically only drive it on the weekends, I live just behind the lakeview exit, off i5 north.
I do, but my car is down for at least 2 weeks waiting on a new lower rad hose from FM, so I'll probably just pull it out and prototype on mine. I can hook you up with one with a hole for a switch if you want to wire one in. I'm just up in Edmonds, a couple miles north.
****, me too. At the rate I'm going currently the 3D printing business is taking all the printer time, I'm going to need to pick up a second one to get anything done. I do finally have my entire front end apart though, so I can start getting mounting point measurements and an idea of how much room I have to work with.
Mounted the rotrex and checked all the fitments, needs work on the intercooler tubing, it's plug and play on the 1.8, but my intake doesn't line up well, and the lower radiator hose interferes too. Got the proper belt as well. Only a 4 rib unfortunately, but I don't have the money to replace all my crank **** with 6 rib right now, so I'll keep it chill and wait to upgrade. The only belt slip I've seen reported with 4 ribs has been from improper install. Still plenty to do to get the rotrex running. Shooting for the end of the year.
Went to Stancewars Seattle, Friend of mine won best air ride, and another guy I know won best fitment, so that was super cool. Went out the next day and did a photoshoot with the only 3 bagged mazdaspeed 6's on the west coast. I was the camera car driver for the rolling shots. I know y'all hate stance, but I can't even get a light flip from other miata drivers around here.
Opened her up to change the valve cover, really hoping all is well when I start it back up and I didn't do anything wrong. Pretty new to opening up engines, even just valve covers.
You can see my coolant reroute pretty well from there too. Not too bad of an install with a completely empty side of the engine bay. It was done with the valve cover still on, so no coolant in there.
Plugged the coolant neck at the block. Trusting this block off plate, didn't have a freeze plug handy. Didn't call for silicone, used a light coat anyway to preempt any uneven surfaces causing leaks. (didn't say not to either)
Better shot of the reroute block at the rear of the engine.
Tried this trick to pull the timing belt off and the gears to pull the backer plate to get at the bolts holding the coolant neck on. Pain in the ***. Wrenches slipped, would not recommend. Timing shouldn't be more than a tooth off if at all. We shall see. Retained tension, so it's still on the crank at least.
most **** back together. trouble shooting, problem solving, excessive zip tie usage. Looking fly as **** though.
Until....
Because **** me right?
Got tired of all the **** talking. Also realized the c30-94 was set up for a really well cooled setup, so it was time. trans cooler installed as well since there were no provisions for it.
Got it repaired because I wasn't about to try to source another. Some porosity and residue, probably from lack of preheating and contaminants in the pores of the cast aluminum. Not amazing, but it's not load bearing so as long as there's no oil spraying out I couldn't give a ****. Not my weld.
Had to strip it for the weld job, was considering keeping it the old color with a raw area and the weld for a wabi-sabi kinda thing, but decided to go a different way.
IACV and air valve deleted. Don't want to hear it unless you want to help me troubleshoot it. I know the plates are ugly as ****, my dremel wouldn't do 3/16 aluminum and my jig saw hates me.
Someone find me a new oil cap, I hate this thing. anybody know the threading on these bad boys? It's big AF and coarse. If I can figure it out I'll just print my own.
Rerouted some hoses and ****. Need to find some angled hose bits for the PCV valve, or better yet catch can.
Last edited by Zajicek; 07-18-2018 at 08:26 PM.
Reason: commentary

 05-01-2018, 09:42 AM


 1
1