Luke's "I have an EFR but refuse to use it" Build
 11-06-2013, 04:30 PM
#21
Elite Member
iTrader: (13)

Join Date: Dec 2006
Location: Taos, New mexico
Posts: 6,611
Total Cats: 567
Engine looks fine to me. Has less cross hatching than mine, but also less scoring on the walls. I don't see why it wouldn't be fine with a quick ball hone and re-ring.
Lookin good!
Lookin good!

Reply
 0
0

0

 11-07-2013, 12:58 PM
#24
Elite Member
Thread Starter
iTrader: (4)

Join Date: Sep 2006
Location: Charlotte, NC
Posts: 3,310
Total Cats: 98
That is, if I spend $150 at a machine shop, that's a 30% increase in total budget for this engine "rebuild".
I guess I should clarify my expectations/goals for this engine. My plan was to do a "rods only" rebuild for as cheap as possible, and use that motor while I slowly build the other motor properly. The motor that is in the car will be pulled out and built properly, rods, pistons, '99 head, BE oil pump, machine work, etc. etc. My hope for this motor is that it will be just "good enough" to hold me over whilst the other motor is being built over a longer period of time. So as long as this motor can last a year around 270hp, and not have too many leaks, or burn too much oil, I will be happy.
Also, I've never built a motor all on my own, so that's another reason for doing this motor refresh. Hopefully I'll learn something so that next time I have at least some idea of what I'm doing.
Thanks for the input, I'll measure the head for flatness and go from there.
Reply
0
0
11-07-2013, 01:55 PM
#25
Elite Member
iTrader: (2)

Join Date: Sep 2008
Location: Central Florida
Posts: 2,799
Total Cats: 179
This thread is like watching a car drive toward train tracks as the crossing barrier is descending. You are pretty sure the driver is making a series of really poor choices and that it will end with an explosion or destruction of some type...
... but there is still a chance it all works out okay.
... but there is still a chance it all works out okay.
Reply
0
0
11-07-2013, 03:33 PM
#26
Elite Member
Thread Starter
iTrader: (4)
Join Date: Sep 2006
Location: Charlotte, NC
Posts: 3,310
Total Cats: 98
This thread is like watching a car drive toward train tracks as the crossing barrier is descending. You are pretty sure the driver is making a series of really poor choices and that it will end with an explosion or destruction of some type...
... but there is still a chance it all works out okay.
... but there is still a chance it all works out okay.

Reply
0
0
11-16-2013, 12:56 PM
#27
Elite Member
Thread Starter
iTrader: (4)
Join Date: Sep 2006
Location: Charlotte, NC
Posts: 3,310
Total Cats: 98
Subaru is sold, so now I have some $$$ and more time for this.
Engine teardown will continue today, hopefully I'll post some pics tonight.
Also I pm'd Tekel...
Engine teardown will continue today, hopefully I'll post some pics tonight.
Also I pm'd Tekel...
Reply
0
0
12-20-2013, 05:02 PM
#28
Elite Member
Thread Starter
iTrader: (4)
Join Date: Sep 2006
Location: Charlotte, NC
Posts: 3,310
Total Cats: 98
Sooooooooo......
My build thread sucks!
I've done a little bit of work since the last post, but basically none. It's been so damn cold here since Thanksgiving that I would rather pull hair out than spend time in my freezing cold garage.
BUT
It's supposed to be ~50F here the next two days so I'm hoping to get some work done.
Anyway, back to the engine build. I finished the engine tear down and the bearings looked OK, but not great so I bought some new clevite main and rod bearings. I also spent a significant amount of time cleaning the block but still couldn't get it very clean. FAEL.
I'll post some pics and a proper update sometime this weekend. Hopefully I can get the bottom end buttoned up this weekend, and then I should have time to work on the head on Monday.
F*$k the cold!!!
Reply
0
0
12-20-2013, 06:56 PM
#29
Elite Member


Join Date: Feb 2007
Location: Columbus, OH
Posts: 1,538
Total Cats: 745
I have access to a pretty decent machine shop that has done a fair amount of miata engines, and their prices are pretty decent. However cheap it may be, it still will increase my total rebuild budget by too much.
That is, if I spend $150 at a machine shop, that's a 30% increase in total budget for this engine "rebuild".
.....
Thanks for the input, I'll measure the head for flatness and go from there.
That is, if I spend $150 at a machine shop, that's a 30% increase in total budget for this engine "rebuild".
.....
Thanks for the input, I'll measure the head for flatness and go from there.
Ive been talking to Larry at the Carquest machine shop off 71 and Silver dr. He said(before seeing it) that he can skim a miata head without removing the valves for $42.99. You could then clean it yourself for the ultimate cheapness. He let me take his jar of dychem home for my porting project last week and did a couple flywheels and stuff for me last year. Pretty cool guy.
With that said, I'll probably have Mike at M&M in Delaware do the work on my bp4w rebuild, which is who I think you're referencing.
Reply
0
0
12-23-2013, 10:18 AM
#32
Elite Member
Thread Starter
iTrader: (4)
Join Date: Sep 2006
Location: Charlotte, NC
Posts: 3,310
Total Cats: 98
Catching this late, but...
Ive been talking to Larry at the Carquest machine shop off 71 and Silver dr. He said(before seeing it) that he can skim a miata head without removing the valves for $42.99. You could then clean it yourself for the ultimate cheapness. He let me take his jar of dychem home for my porting project last week and did a couple flywheels and stuff for me last year. Pretty cool guy.
With that said, I'll probably have Mike at M&M in Delaware do the work on my bp4w rebuild, which is who I think you're referencing.
Thanks for the heads up, I hadn't thought of using a place like Carquest, but yes I was speaking of M&M.
Anyway, this weekend wasn't as productive as I hoped, no engine work. I spent what time I had in the garage installing FM Frame Rails and the Roll bar I've had sitting around. I was hoping that reinforcing the chassis will make me hate this car less, which should hopefully motivate me to keep working on it. FM rails went in pretty easily, a nice product, I highly recommend them. Roll bar not so much, spent a lot of time effing with it. Finally got it "in" late last night, but haven't finished drilling, bolting, re-assembly etc.
OH WELL
I'm going to be working on head disassembly today, maybe a little polishing of the combustion chamber, if not for anything but a little extra knock protection.
I'll post some pictures sometime, I promise...
Reply
0
0
 12-26-2013, 06:10 PM
#34
Elite Member
Thread Starter
iTrader: (4)
Join Date: Sep 2006
Location: Charlotte, NC
Posts: 3,310
Total Cats: 98
Okay, I think I owe some pictures, though I haven't been doing a good job of taking them.
Monday I was able to get the head mostly disassembled. I had a few valves that failed the poor mans leak test, and after taking the valves out I found a couple valve stem seals that definitely look suspect. Anyway on to the
Pictures:
Some are older, this is when I inspected the bearings.
The state of my garage, as of a few weeks ago...poor.


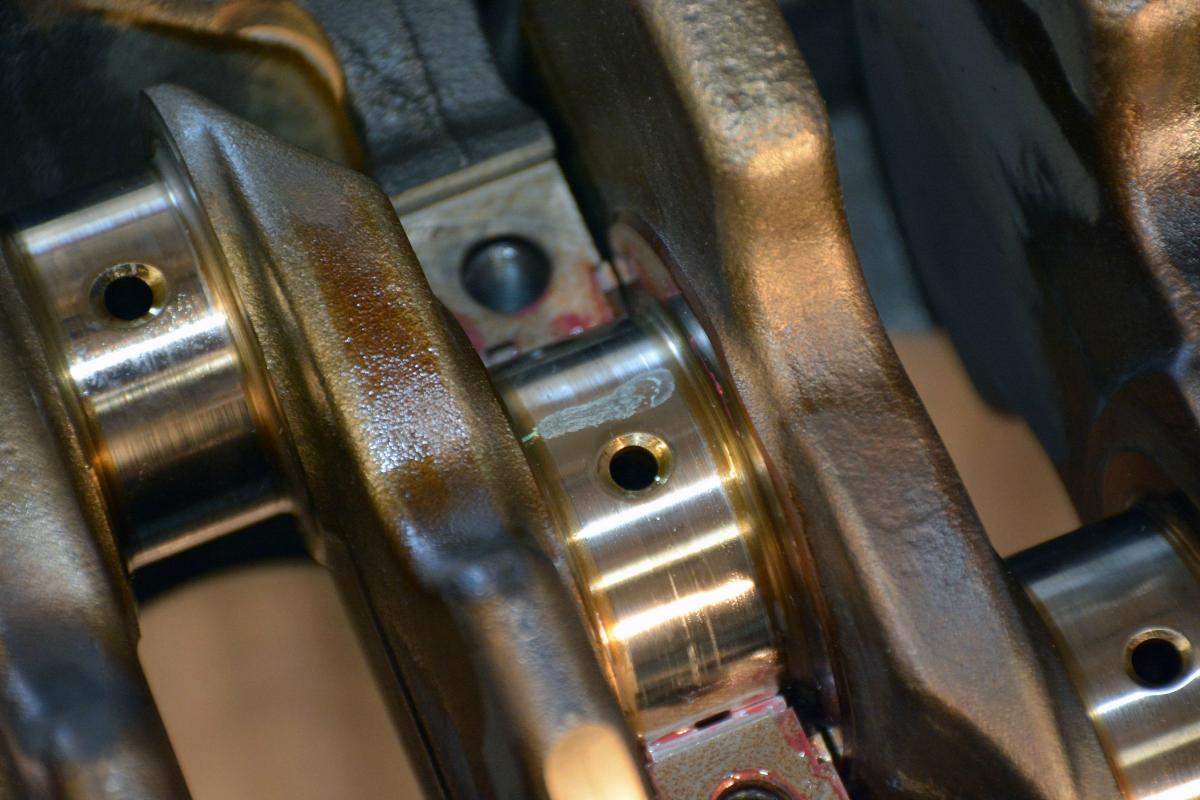
The crankshaft journals looked fine, and my paint by numbers system is still in effect.

And why I bought bearings


On to cylinder head disassembly, I numbered each valve individually, so I can keep all the valve cotters, retainers, etc. all together and put them back in the same spots. 1-8 are intake side, front to back. 9-16 are exhaust, also front to back.

Now, for the leaky valve stem(s). One of the valves that failed the leak test I did showed some signs of the valve stem seal leaking quite badly. This is what I found:

SO, now I guess I'm replacing valve stem seals. I've never done it before and I don't have the tools for it.
Anyone have remover and install tools you recommend? Something I can get on Amazon cheap?
Also, anyone have insights about installing new ones? Obviously, setting the height on them is critical, and I don't necessarily know the best way to do it / measure it.
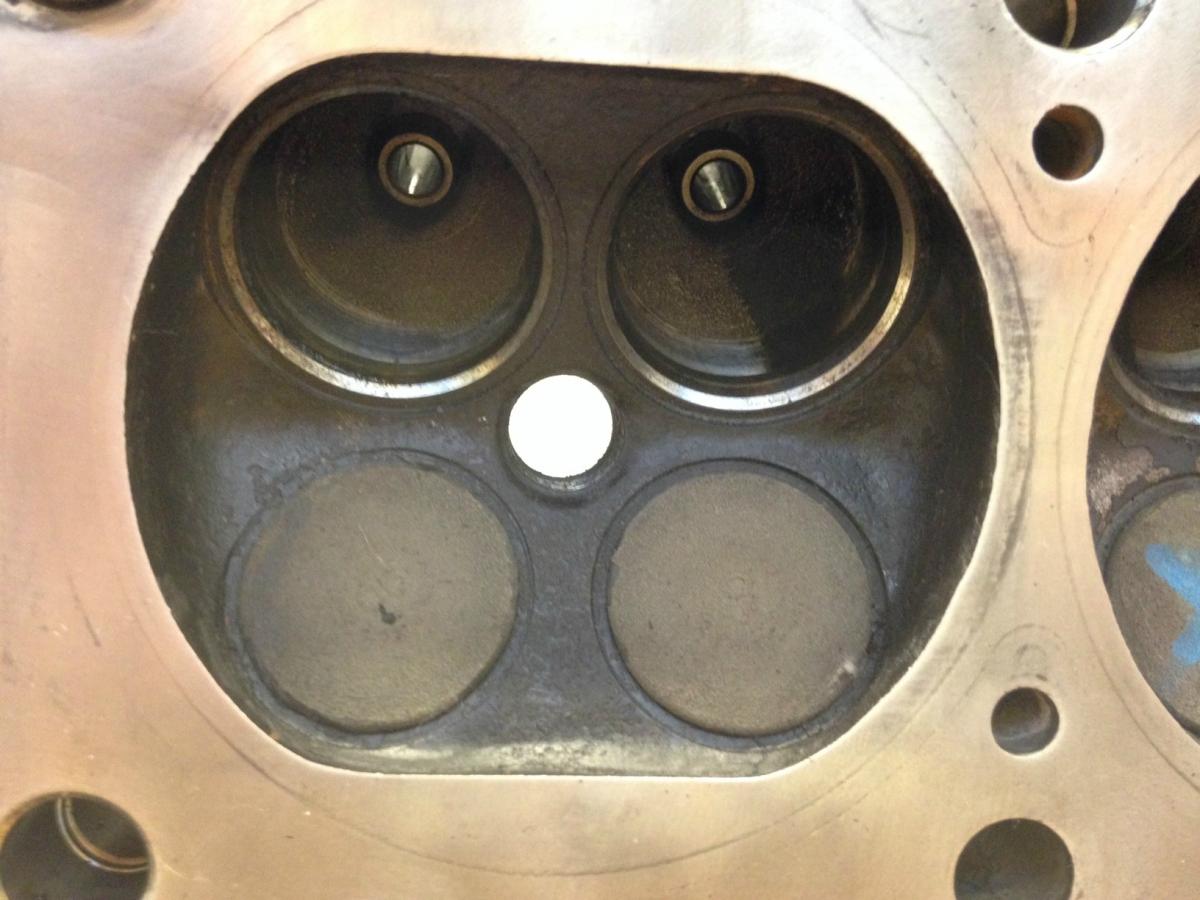
One more question; as you can see the combustion chambers are quite dirty. I'd like to spend some time polishing the chambers and runners a bit but they are too caked with sh*t to work on. Degrease and scrub with a plastic brush? Anything else that works a charm?
I'm out of town for a while so no work on the head/engine for a bit.
Monday I was able to get the head mostly disassembled. I had a few valves that failed the poor mans leak test, and after taking the valves out I found a couple valve stem seals that definitely look suspect. Anyway on to the
Pictures:
Some are older, this is when I inspected the bearings.
The state of my garage, as of a few weeks ago...poor.
The crankshaft journals looked fine, and my paint by numbers system is still in effect.
And why I bought bearings
On to cylinder head disassembly, I numbered each valve individually, so I can keep all the valve cotters, retainers, etc. all together and put them back in the same spots. 1-8 are intake side, front to back. 9-16 are exhaust, also front to back.
Now, for the leaky valve stem(s). One of the valves that failed the leak test I did showed some signs of the valve stem seal leaking quite badly. This is what I found:
SO, now I guess I'm replacing valve stem seals. I've never done it before and I don't have the tools for it.
Anyone have remover and install tools you recommend? Something I can get on Amazon cheap?
Also, anyone have insights about installing new ones? Obviously, setting the height on them is critical, and I don't necessarily know the best way to do it / measure it.
One more question; as you can see the combustion chambers are quite dirty. I'd like to spend some time polishing the chambers and runners a bit but they are too caked with sh*t to work on. Degrease and scrub with a plastic brush? Anything else that works a charm?
I'm out of town for a while so no work on the head/engine for a bit.
Reply
0
0
 03-07-2014, 09:47 PM
#36
Elite Member
Thread Starter
iTrader: (4)
Join Date: Sep 2006
Location: Charlotte, NC
Posts: 3,310
Total Cats: 98
Long overdue update.
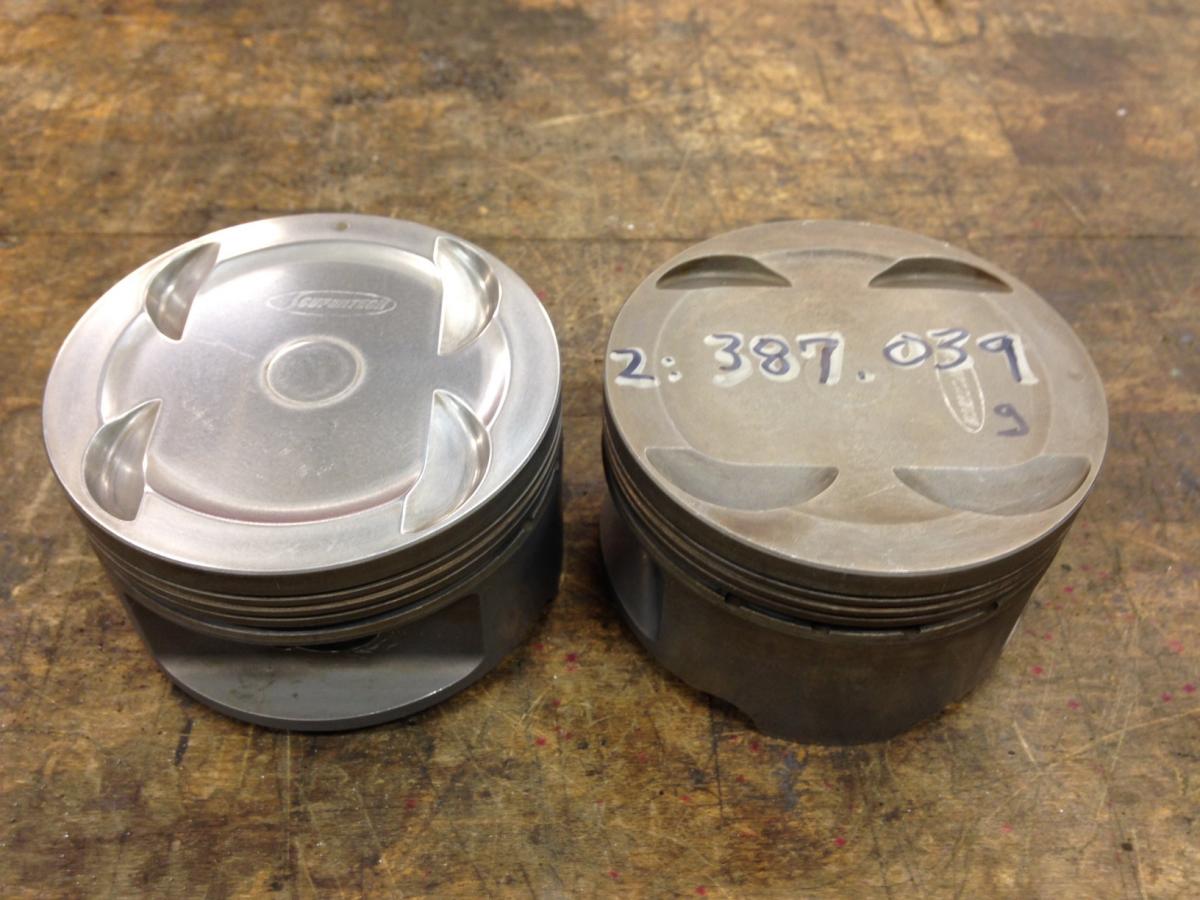
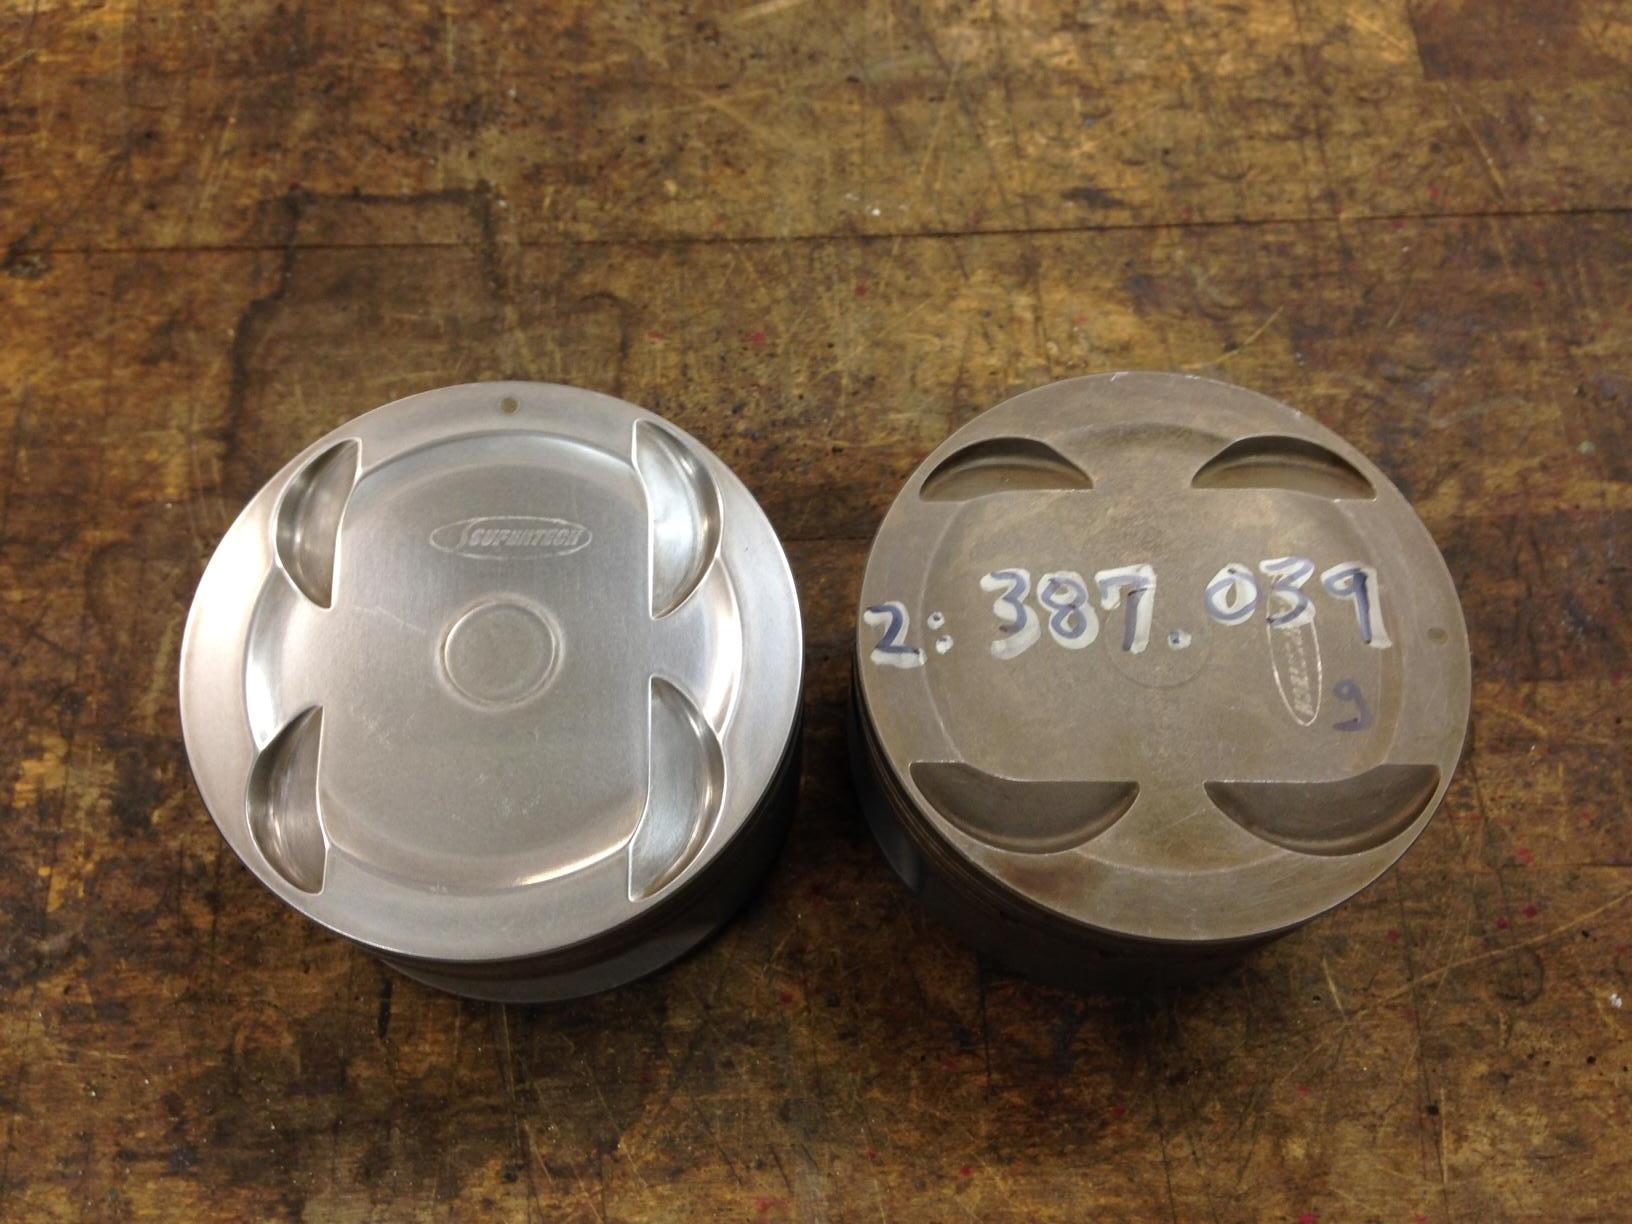
So...as you could probably guess from the previous post, I bought some supertech pistons. They are used and were on sale here. 83.5mm 8.6:1 compression. I got them for really pretty cheap. Too cheap to pass up.
Bumping to 83.5mm bore meant the block had to go to the machine shop, so I took the block and the head to a place in Delaware, OH. Block got overbore, final hone, and hot tanked. Head got a valve job, new valve stem seals installed, springs/valves/cotters assembled, and a slight deck job (18psi should be very happy). Grand total was less than $430.
Not counting the head work, which I would have paid to have done anyway, going to forged pistons cost me just over $400. That includes the pistons and the machining. I couldn't pass on that.
Just today I ordered a new OEM oil pump from Rosenthal. I had planned on running the old one, but at this point what's another $140?
OK, pictures.
The block, as received from the machine shop. Don't worry, it will get a fresh lick of paint. It's been too cold here in Ohio to paint anything yet.

Cylinders 3&4

So I took a half day of vacation this morning to assemble the bottom end. Things didn't quite go as planned.
First step (after thorough cleaning) was to put assembly lube everywhere. Even places it's not needed like the back side of bearings. I have no idea what I'm doing...

Next step was to plastigauge the main bearings with the new Clevite bearings. Naturally, I only measured the #1, 3, and 4 mains. 3/5ths... that's about what kind of build this is. A 3/5ths quality build.

It's kind of hard to see in the pictures, but the tiny green strips are the plastigauge before torquing the main caps down.
This is after torquing the caps down then pulling them off again.


The plastigauge kit I bought didn't have a great scale bar for the main bearing clearance. The Mazda spec is 0.0008-0.0014", but my gauge was 0.0010" - 0.0015" - BIGGER. So I couldn't get exact measurements but I could tell if it was less than 0.0015". The #1 main clearance was closer to 0.0010" as was the #4 main. The #3 main was closer to the 0.0015" scale, but slightly under it.
I thought it kind of weird that the #3 would be different from the other two, but I didn't do a great job laying down that specific plastigauge, you can see in the pics it's a little crooked.
Anyway, they were all less than 0.0015", so within the Mazda recommended range. So I said "eff it" and decided to install the crank for good.
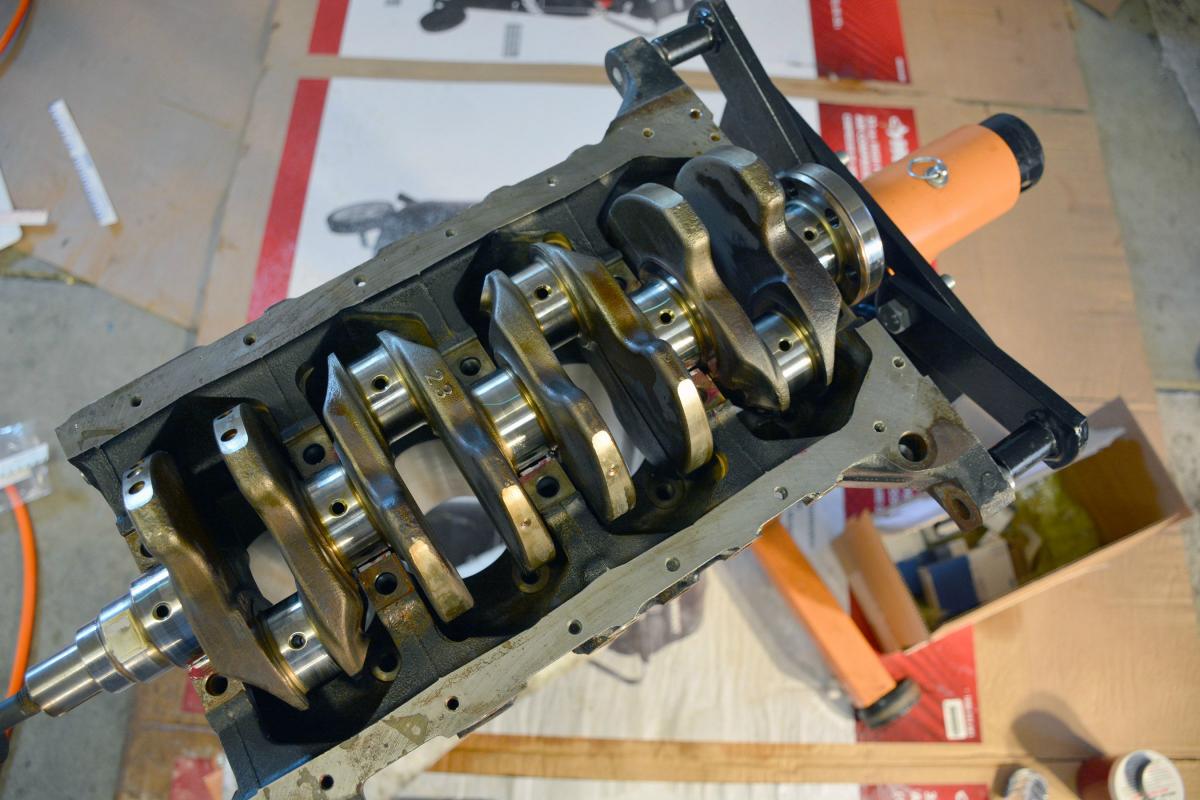
Like dis:

As you can see, all of the bolts are numbered in the order they are supposed to be tightened, all of the main caps are numbered and installed in the correct direction. And I made sure to paint the bolt heads after torquing them so I wouldn't miss one.
But I forgot to install the oil squirters, as you can see if you look closely at the picture.
So I had to pull the crank out AGAIN to install those.
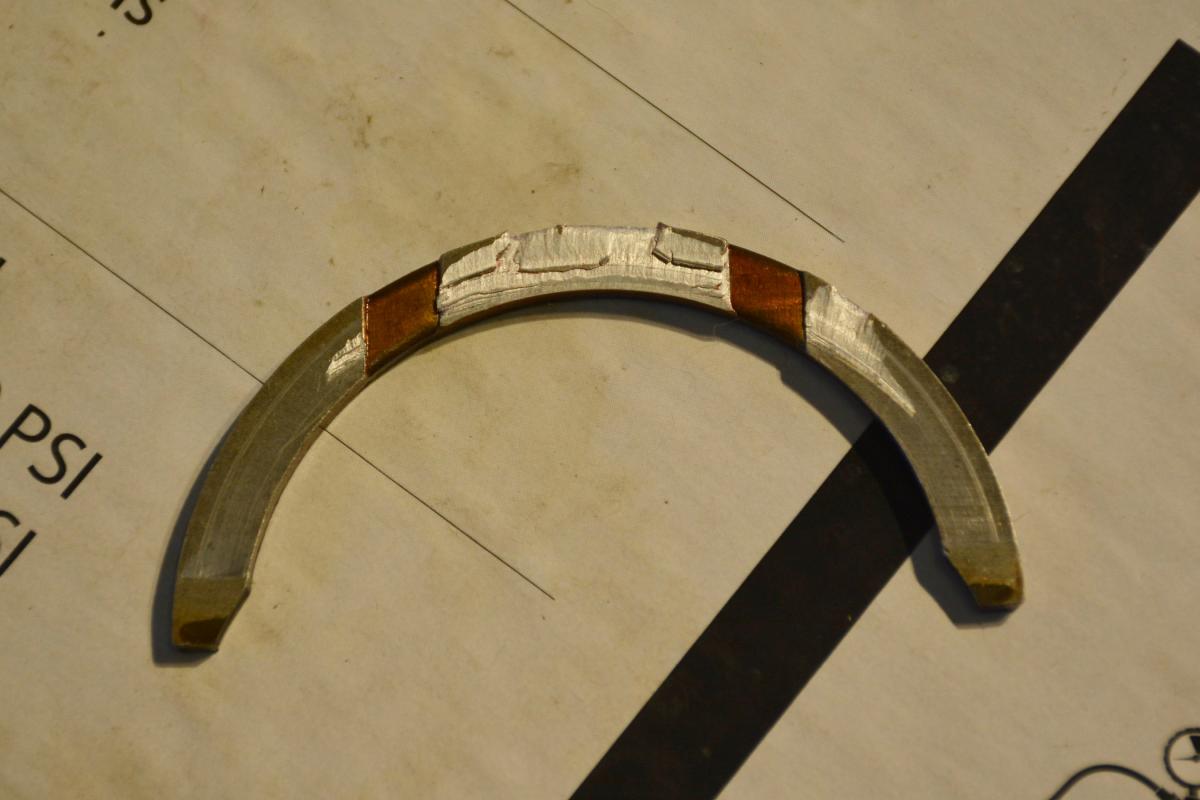
Whilst installing the #3 oil squirter I noticed something that looked like aluminum foil stuck to the side of the cylinder wall in cylinder #3. Sure enough it was a nice shaving of aluminum. After wondering wtf (where the eff) did that come from, I noticed the thrust bearing had been fubar'd by my incessant installing and removing of the crankshaft.
Like dis:


for doing that
and
for not installing the oil squirters and finding it.
SO
new thrust bearings on order, new oil pump on order.
Until then I'm going to finish hand polishing the piston domes. Then I'm going to try to match all of the pistons, rods, rings, pins, etc. (the powercell as we call it) so that all four sets are as close in combined weight as possible. Based on the wide variance in piston weights, that might be quite difficult.
Oh and I'm hand polishing a valve cover, for no good reason.
Oh and I installed a new 949 driveshaft which got rid of the awful harmonic NVH issue...YAY!
Oh and I installed all new rotors and pads (NAPA rotors + Carbotech street pads).
Oh and I bought a bunch of 15x7 Volk TE37s. Because #futureracecar
Engine assembly will continue next week.
FINALLY, can someone spoon feed me ring gaps for 83.5mm supertech pistons with new rockauto 83.5mm rings?
PLZ?
So...as you could probably guess from the previous post, I bought some supertech pistons. They are used and were on sale here. 83.5mm 8.6:1 compression. I got them for really pretty cheap. Too cheap to pass up.
Bumping to 83.5mm bore meant the block had to go to the machine shop, so I took the block and the head to a place in Delaware, OH. Block got overbore, final hone, and hot tanked. Head got a valve job, new valve stem seals installed, springs/valves/cotters assembled, and a slight deck job (18psi should be very happy). Grand total was less than $430.
Not counting the head work, which I would have paid to have done anyway, going to forged pistons cost me just over $400. That includes the pistons and the machining. I couldn't pass on that.
Just today I ordered a new OEM oil pump from Rosenthal. I had planned on running the old one, but at this point what's another $140?
OK, pictures.
The block, as received from the machine shop. Don't worry, it will get a fresh lick of paint. It's been too cold here in Ohio to paint anything yet.
Cylinders 3&4
So I took a half day of vacation this morning to assemble the bottom end. Things didn't quite go as planned.
First step (after thorough cleaning) was to put assembly lube everywhere. Even places it's not needed like the back side of bearings. I have no idea what I'm doing...
Next step was to plastigauge the main bearings with the new Clevite bearings. Naturally, I only measured the #1, 3, and 4 mains. 3/5ths... that's about what kind of build this is. A 3/5ths quality build.
It's kind of hard to see in the pictures, but the tiny green strips are the plastigauge before torquing the main caps down.
This is after torquing the caps down then pulling them off again.
The plastigauge kit I bought didn't have a great scale bar for the main bearing clearance. The Mazda spec is 0.0008-0.0014", but my gauge was 0.0010" - 0.0015" - BIGGER. So I couldn't get exact measurements but I could tell if it was less than 0.0015". The #1 main clearance was closer to 0.0010" as was the #4 main. The #3 main was closer to the 0.0015" scale, but slightly under it.
I thought it kind of weird that the #3 would be different from the other two, but I didn't do a great job laying down that specific plastigauge, you can see in the pics it's a little crooked.
Anyway, they were all less than 0.0015", so within the Mazda recommended range. So I said "eff it" and decided to install the crank for good.
Like dis:
As you can see, all of the bolts are numbered in the order they are supposed to be tightened, all of the main caps are numbered and installed in the correct direction. And I made sure to paint the bolt heads after torquing them so I wouldn't miss one.
But I forgot to install the oil squirters, as you can see if you look closely at the picture.
So I had to pull the crank out AGAIN to install those.
Whilst installing the #3 oil squirter I noticed something that looked like aluminum foil stuck to the side of the cylinder wall in cylinder #3. Sure enough it was a nice shaving of aluminum. After wondering wtf (where the eff) did that come from, I noticed the thrust bearing had been fubar'd by my incessant installing and removing of the crankshaft.
Like dis:
for doing that
and
for not installing the oil squirters and finding it.
SO
new thrust bearings on order, new oil pump on order.
Until then I'm going to finish hand polishing the piston domes. Then I'm going to try to match all of the pistons, rods, rings, pins, etc. (the powercell as we call it) so that all four sets are as close in combined weight as possible. Based on the wide variance in piston weights, that might be quite difficult.
Oh and I'm hand polishing a valve cover, for no good reason.
Oh and I installed a new 949 driveshaft which got rid of the awful harmonic NVH issue...YAY!
Oh and I installed all new rotors and pads (NAPA rotors + Carbotech street pads).
Oh and I bought a bunch of 15x7 Volk TE37s. Because #futureracecar
Engine assembly will continue next week.
FINALLY, can someone spoon feed me ring gaps for 83.5mm supertech pistons with new rockauto 83.5mm rings?
PLZ?
Reply
0
0
03-08-2014, 01:39 AM
#37
Elite Member
iTrader: (14)

Join Date: Sep 2009
Location: Birmingham, AL
Posts: 2,101
Total Cats: 180
Oh and one time, at band camp... - street moderate turbo/nitrous - top ring = .0055 x bore (3.287), bottom ring .0060 x bore
rockauto can't be that different from Supertech rings right? lol, use at own risk... best better buying ST rings
rockauto can't be that different from Supertech rings right? lol, use at own risk... best better buying ST rings
Reply
0
0


