
Mistakes were made - LS3


Thread Starter
Senior Member
Joined: May 2007
Posts: 997
Total Cats: 156
From: Atlanta
So build was happening at the same time as the LFX but with lower priority. I didn't set out to document it as a build, so I just took random photos throughout - for comparison, I have ~800 photos of the LFX build - barely 120 for the LS3. With MATG coming up and a few geeky things I want show off, I might as well throw this up.
Originally had a 96 A package. Threw M45 on it, MS1, water injection and upped the boost. Burned the **** out of the exhaust valves because I didn't know what I was doing.
Picked up a 94 NA C package. Started stock, bad paint. Rollbar. Installed NB dash, black carpets. Begi S4, 2871, built bottom end. 263hp @ 13psi, MS3x. Was perfectly happy with the power, just working on getting the tune dialed in before applying moar boost.

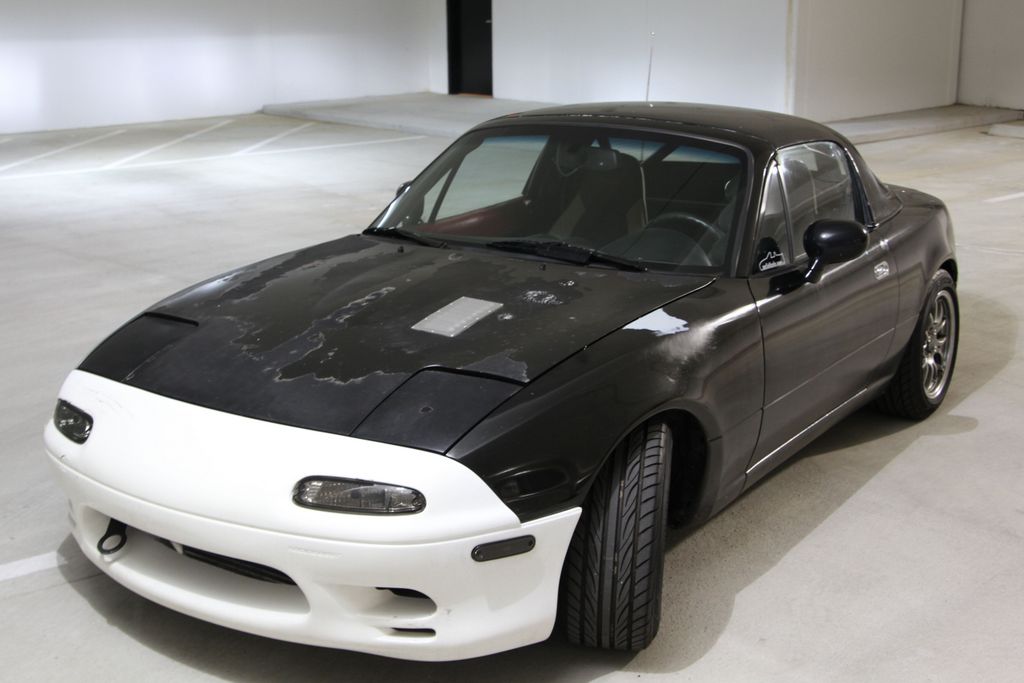
Gratuitious parking lot shot. This is what a $400 paintjob looks like from the previous owner. Upgraded to the RB type2 nose.
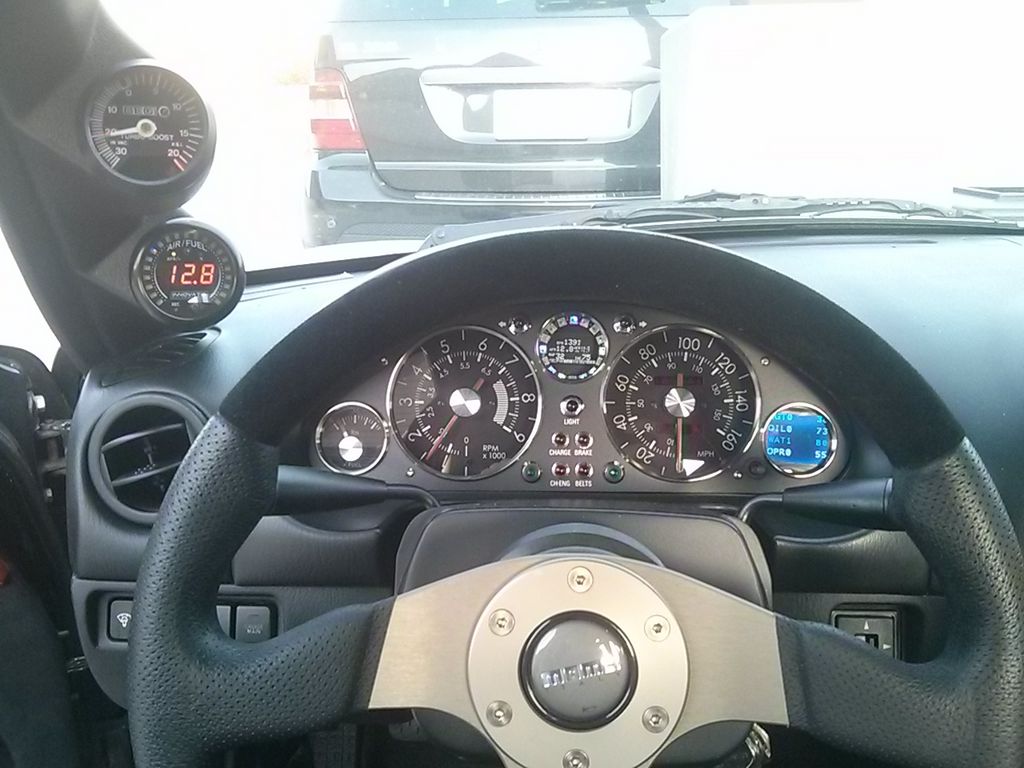
Warbirds, my own canbus-based megasquirt gauge - nice interior.
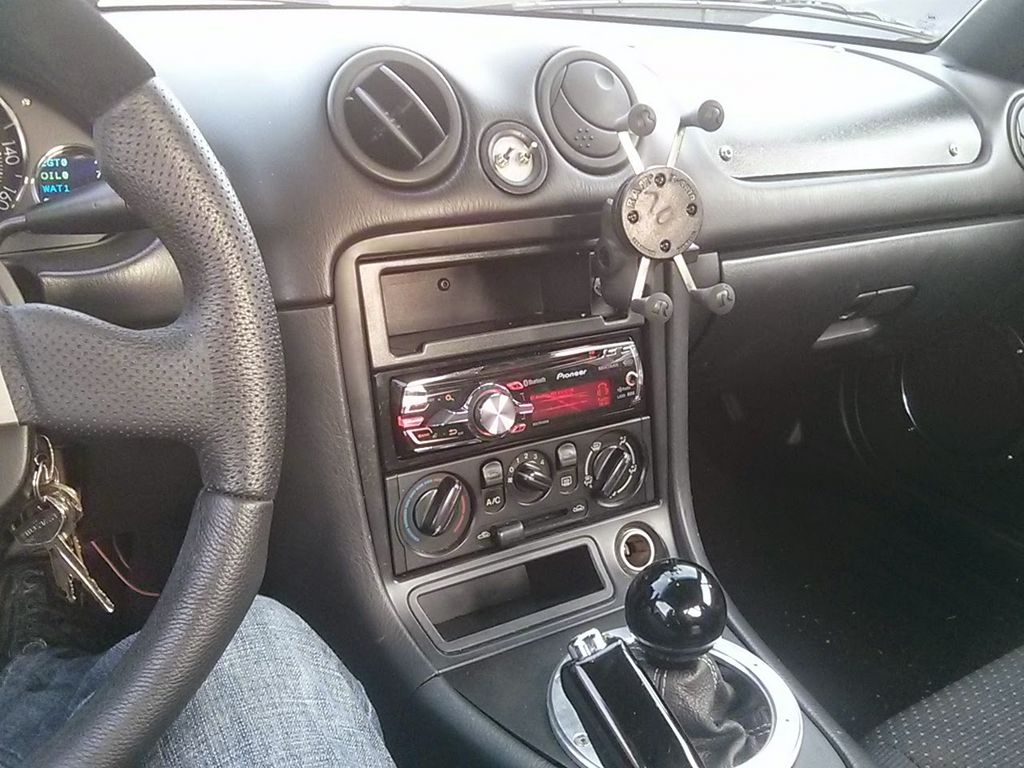
Eclipse vents, etc etc etc..
Alas - my idle was .. decent. Not 100% dialled in. Car wouldn't stall but it'd certainly struggle. AFR's wouldn't stabilize when cold, and I was getting a fair amount of blowby. After weeks of troubleshooting I eventually ran a compression test and had a cylinder that was down. Pulled the valve cover and found I had lost my valve lash (99 head). Yeap, supertech +1mm intake valves. I'm sure some people here know to stay away, but I'll reiterate: Stay away.
I promised myself if the engine ever had to come out a V8 was going back in it's place.
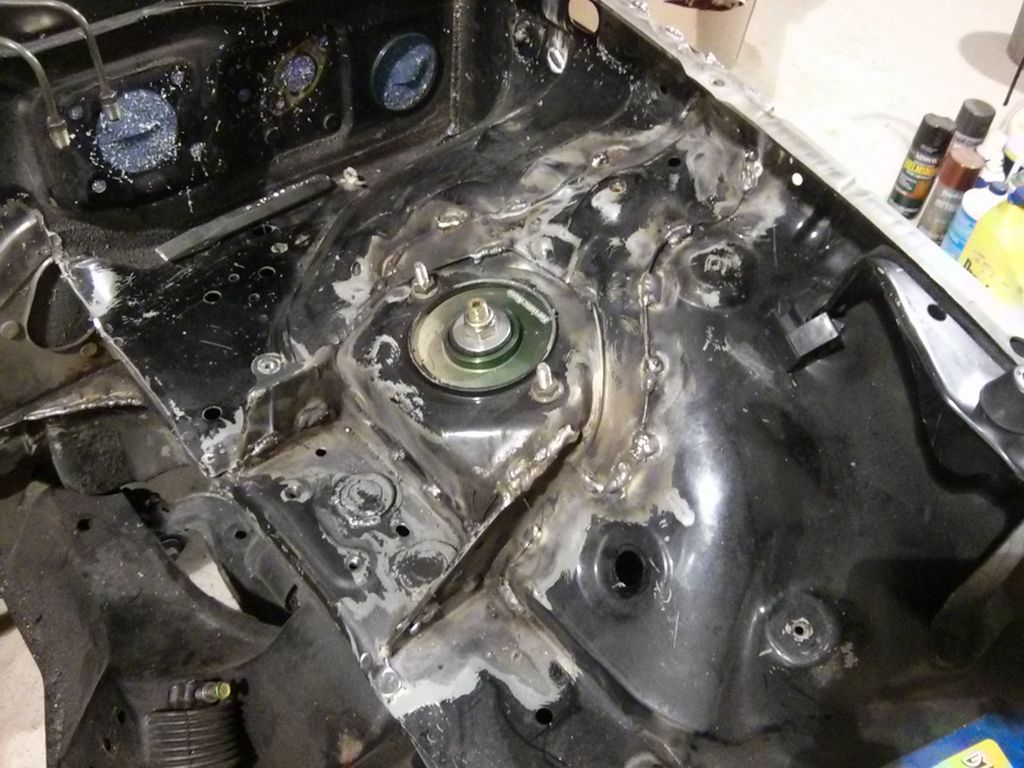
And so I began. I started seam stitching the engine bay - these were among some of my first welds. By the time I had moved from the passenger side to the driver side and inhaled god knows how much seam sealer I had a decent grasp of where my settings should be and how fast I should be moving.
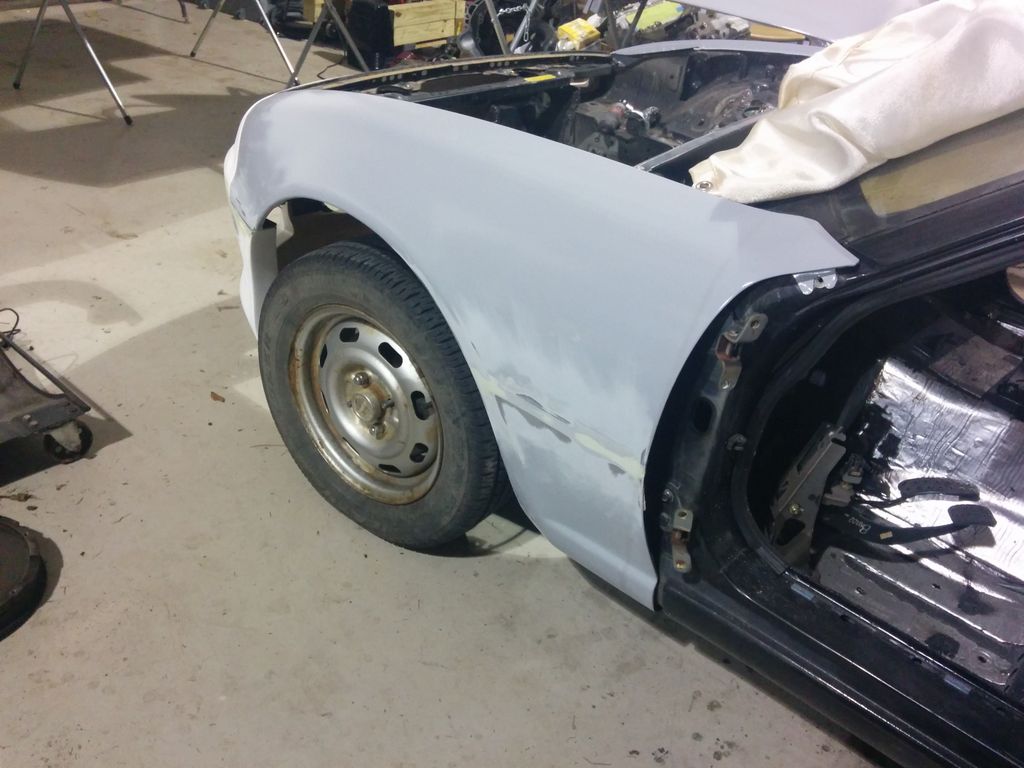
Insert disassembly montage here.
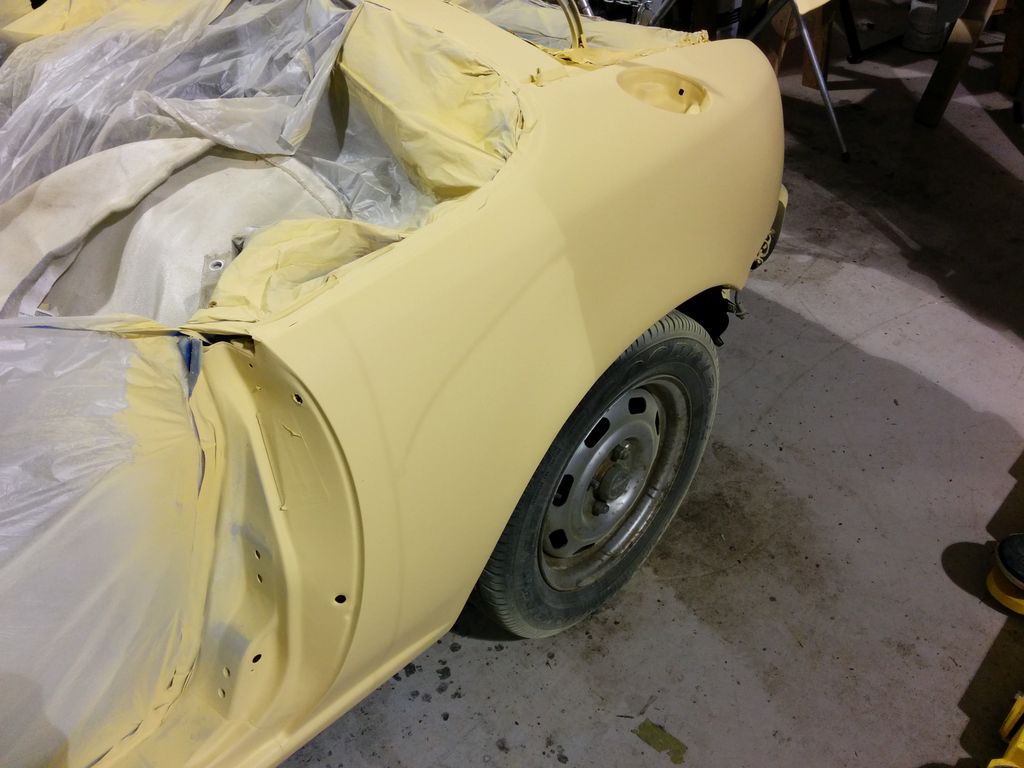
This is the first car I've ever painted. Southern Polyurethanes epoxy primer (gray) and sandable primer (cream) which is pretty nice stuff. Southern's clearcoat as well. Lots and lots of sanding and a few body modifications while you're at it - in for a penny, in for a pound.
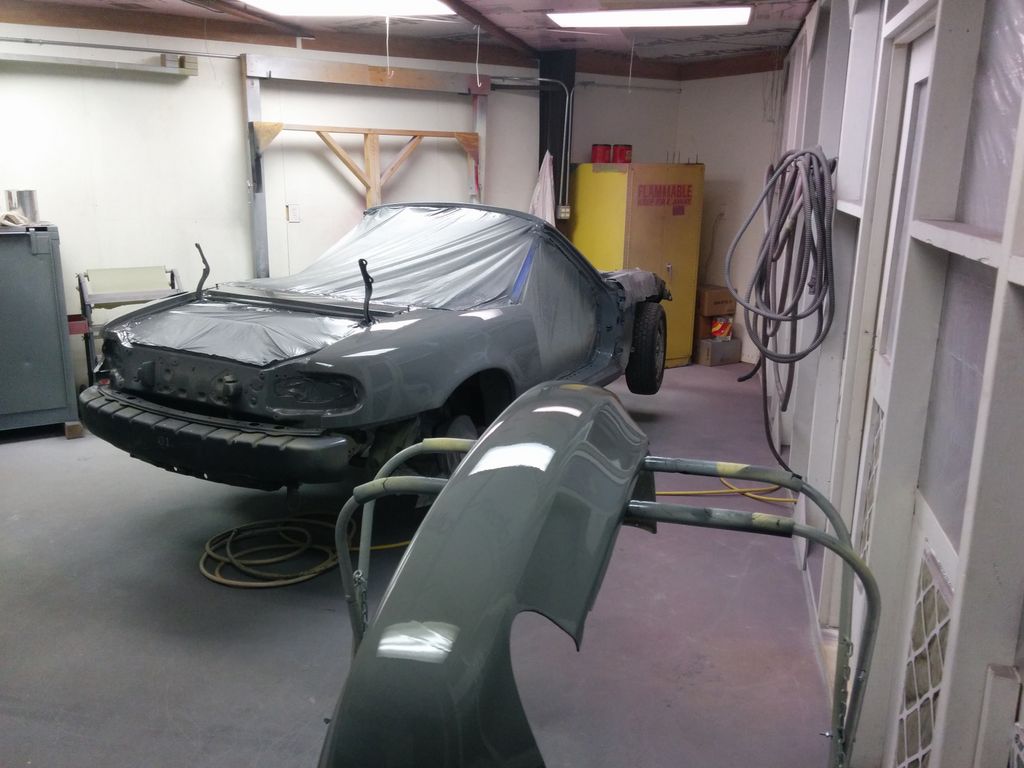
One of the hangars at the airfield I do all this work has a DIY paint booth in it. Had to pick out a number of bugs.
I am not a professional.
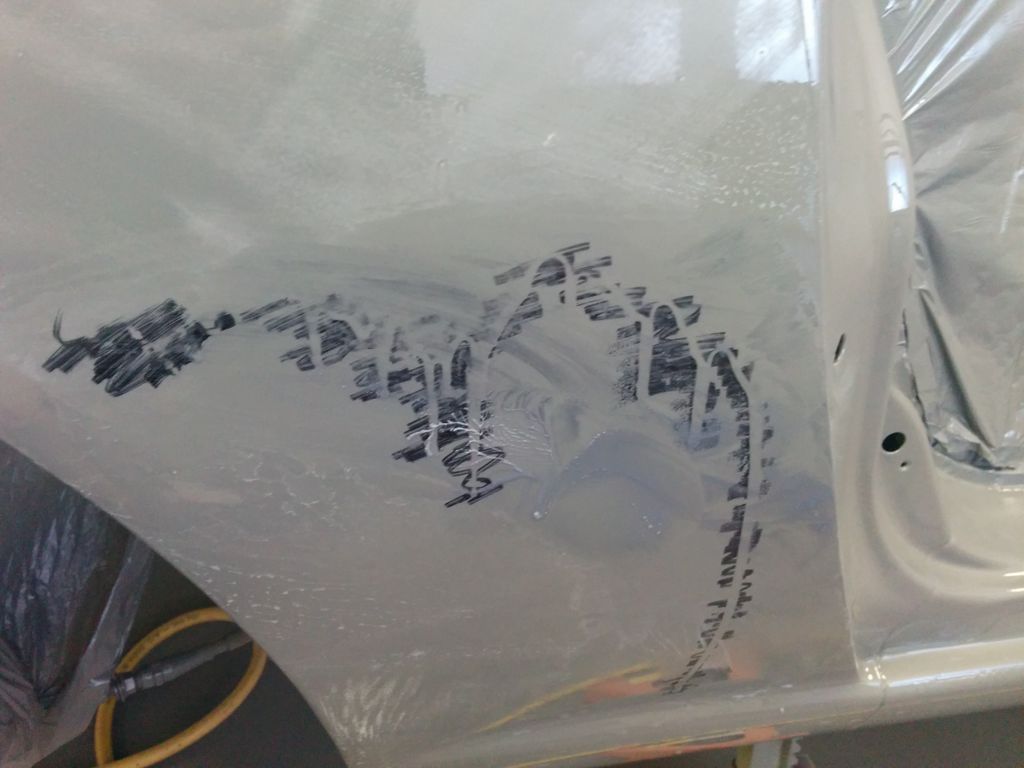
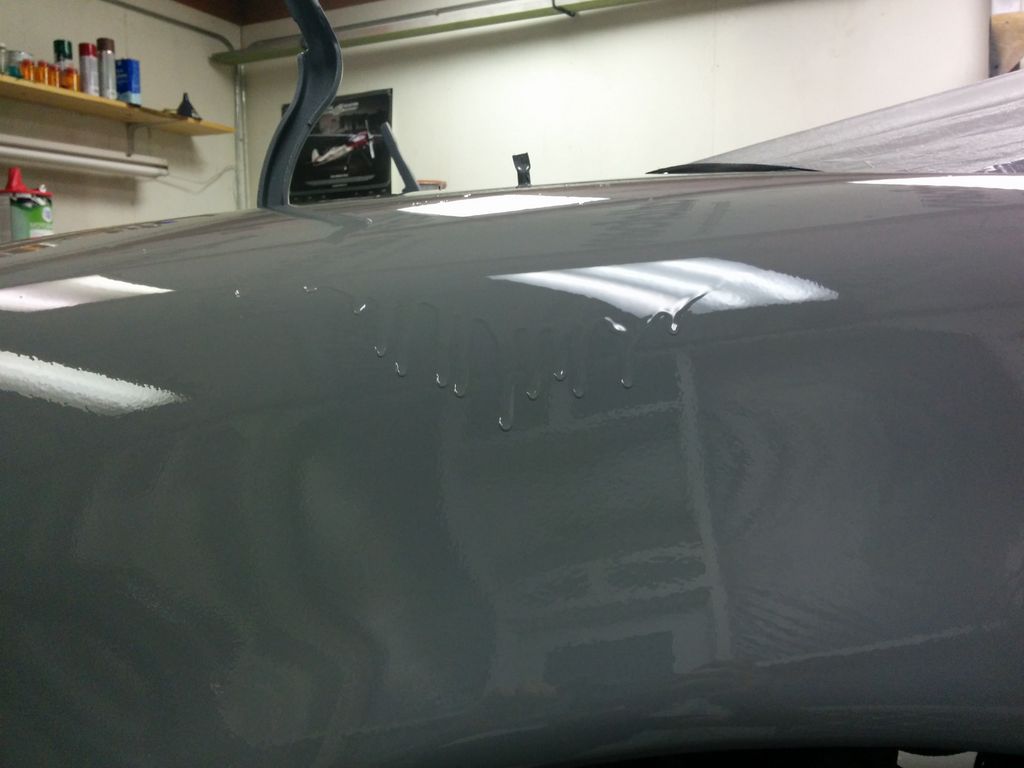
Neat trick - sharpie over your runs, then wetsand it down till it levels.
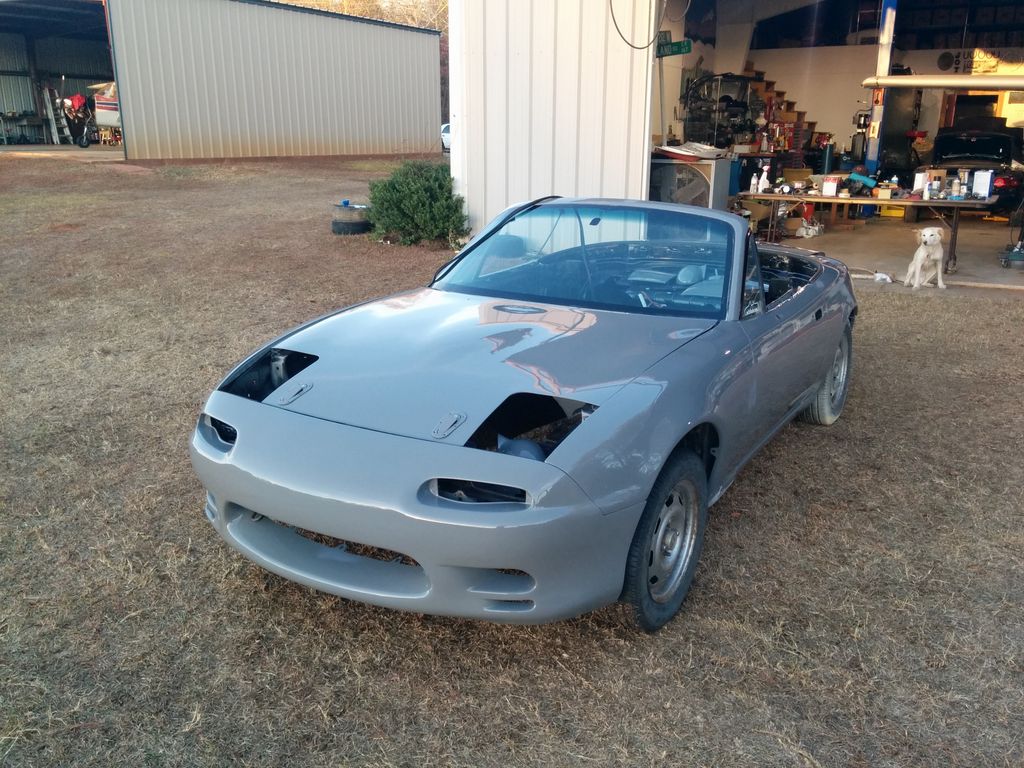
Audi Nardo Gray. I chose this color because A. I like it B. it's a non-metallic non-pearl paint - which means it's easier for the inexperienced gunman. No I did not copy Middtenn. Yes that is the LFX in the background.
Originally had a 96 A package. Threw M45 on it, MS1, water injection and upped the boost. Burned the **** out of the exhaust valves because I didn't know what I was doing.
Picked up a 94 NA C package. Started stock, bad paint. Rollbar. Installed NB dash, black carpets. Begi S4, 2871, built bottom end. 263hp @ 13psi, MS3x. Was perfectly happy with the power, just working on getting the tune dialed in before applying moar boost.
Gratuitious parking lot shot. This is what a $400 paintjob looks like from the previous owner. Upgraded to the RB type2 nose.
Warbirds, my own canbus-based megasquirt gauge - nice interior.
Eclipse vents, etc etc etc..
Alas - my idle was .. decent. Not 100% dialled in. Car wouldn't stall but it'd certainly struggle. AFR's wouldn't stabilize when cold, and I was getting a fair amount of blowby. After weeks of troubleshooting I eventually ran a compression test and had a cylinder that was down. Pulled the valve cover and found I had lost my valve lash (99 head). Yeap, supertech +1mm intake valves. I'm sure some people here know to stay away, but I'll reiterate: Stay away.
I promised myself if the engine ever had to come out a V8 was going back in it's place.
And so I began. I started seam stitching the engine bay - these were among some of my first welds. By the time I had moved from the passenger side to the driver side and inhaled god knows how much seam sealer I had a decent grasp of where my settings should be and how fast I should be moving.
Insert disassembly montage here.
This is the first car I've ever painted. Southern Polyurethanes epoxy primer (gray) and sandable primer (cream) which is pretty nice stuff. Southern's clearcoat as well. Lots and lots of sanding and a few body modifications while you're at it - in for a penny, in for a pound.
One of the hangars at the airfield I do all this work has a DIY paint booth in it. Had to pick out a number of bugs.
I am not a professional.
Neat trick - sharpie over your runs, then wetsand it down till it levels.
Audi Nardo Gray. I chose this color because A. I like it B. it's a non-metallic non-pearl paint - which means it's easier for the inexperienced gunman. No I did not copy Middtenn. Yes that is the LFX in the background.
Reply
 0
0

0
Thread Starter
Senior Member
Joined: May 2007
Posts: 997
Total Cats: 156
From: Atlanta
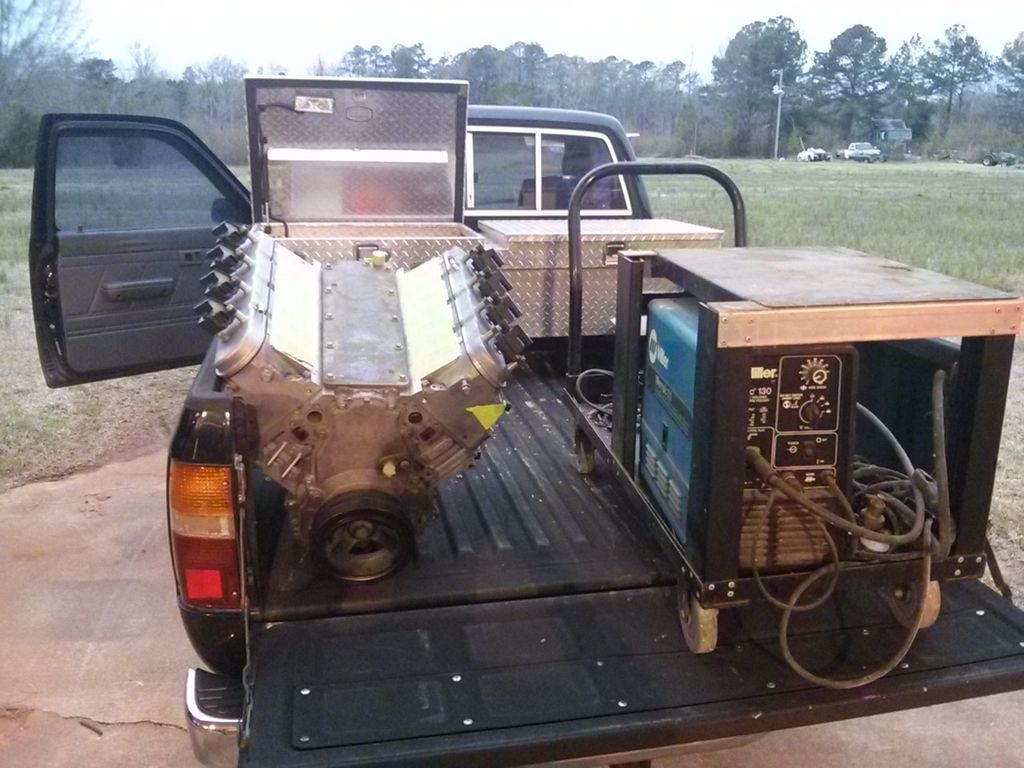
So the LS3 is not *actually* an LS3. It's actually an L92 truck motor - that's had displacement on demand (DoD) removed, and LS3 heads and camshaft installed - which makes it pretty much an LS3. Either way, it was $2700 - fair amount cheaper than a crate engine, more expensive than a 5.3. It took me months to find a T56 to mate it up to. After reading various heritages of the T56 I decided I wanted the GTO varient with the carbon syncro's and .50 6th gear. Eventually I found one for $1700 - which isn't a terrible price considering they normally go for 2-2.2k. With my wallet crying I picked it up.
I spent a lot of time on ebay picking up the other accessories that didn't come with my sub-3k engine - like the intake manifold I managed to score for $50. It came off a corvette, but had a broken vacuum nipple. I remelted the plastic with a soldering iron and JB welded the rest of it for good measure. Finding crate engine takeoffs also saved a fair amount of change - snagged a set of 8 injectors for $50, a stock clutch for $140. Penny pinching. That said - oh lord the corvette tax is real. LFX is waaaay more economical to put together - but I can't let my dad be faster than I am.
Learning how to weld has been a huge boon. "Hey, this is gonna be a gigantic pain in the *** to drill and tap out.. I wonder..."
Anyway - with Transmission and Engine in hand and ready to make sweet sweet love, I made a gigantic error.
The LS3 and LS1 are very similar in many respects. But they're also not the same. Turns out the pilot bearing is different. The LS3 uses a ball bearing that sits flush with the crank, and the TR6060 uses a smaller snout that fits snugly inside it. The LS1 uses a needle bearing that sits recessed inside the shaft. The LS3 has this diameter change in the crankshaft - but hey, it's an LS3, I should be using LS3 parts right.
Nope!
I blame myself having only worked on iron blocks - but the input shaft rarely just glides on. The alignment is never perfect - sometimes you need just a little bit of persuasion by tightening the bellhousing bolts. And it was really hot that day and I was sweaty and just wanted the damn thing to go on. Or I'm a grade A moron. But the gap between the bellhousing and engine was narrowing! Clearly it just needed just a little more torque to.. SNAP
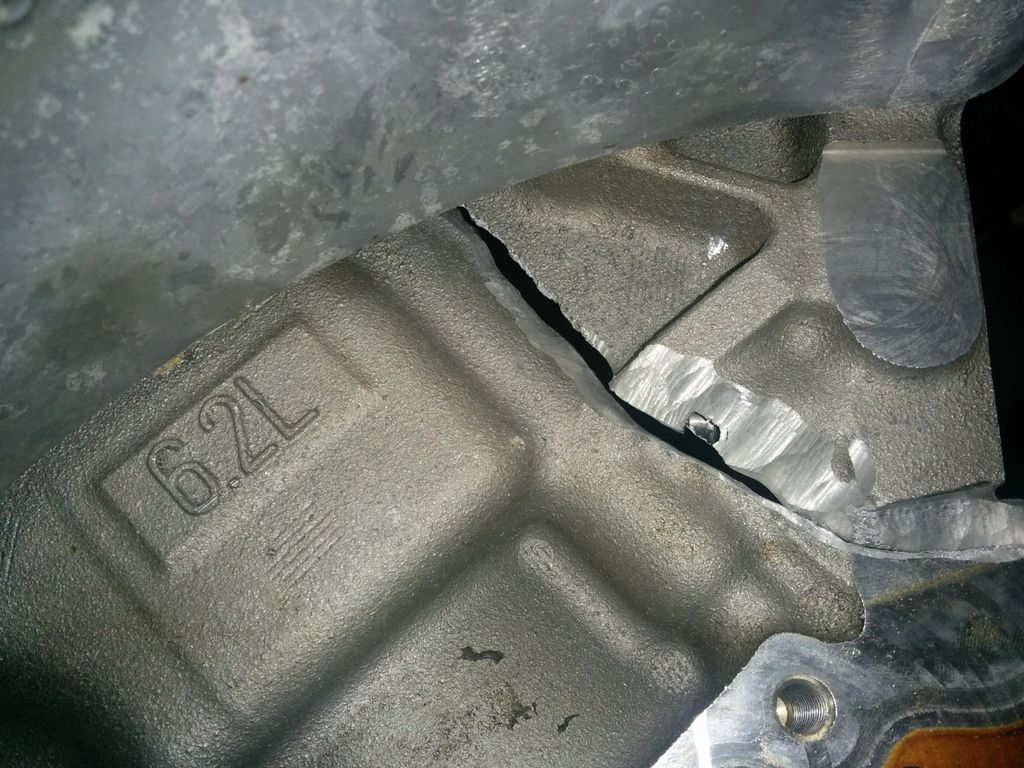
Yeah. Low point right there. Focused on the LFX, didn't touch my car for a month.
But yeah - the LS3 pilot bearing prevented the input shaft from inserting itself, and I kept torquing the bolts. I'm not the first person to do this, so clearly there are lots of morons out there like me. I went to my other mechanic buddies and they told me "it's trashed, Summit Racing has new blocks" - well a new block is $1500. Stopped by the welding shop and asked them to recommend a professional.
We had just picked up an AlphaTig 200x but really hadn't graduated to TIG welding yet. But I'll tell you - there's a vast difference between watching youtube videos to learn how to weld and watching a professional at work, being able to move your head around as he's laying a bead gives you a much better view of their hands. We ended up just giving the guy more welding projects just to watch him work.
Insert building montage here -
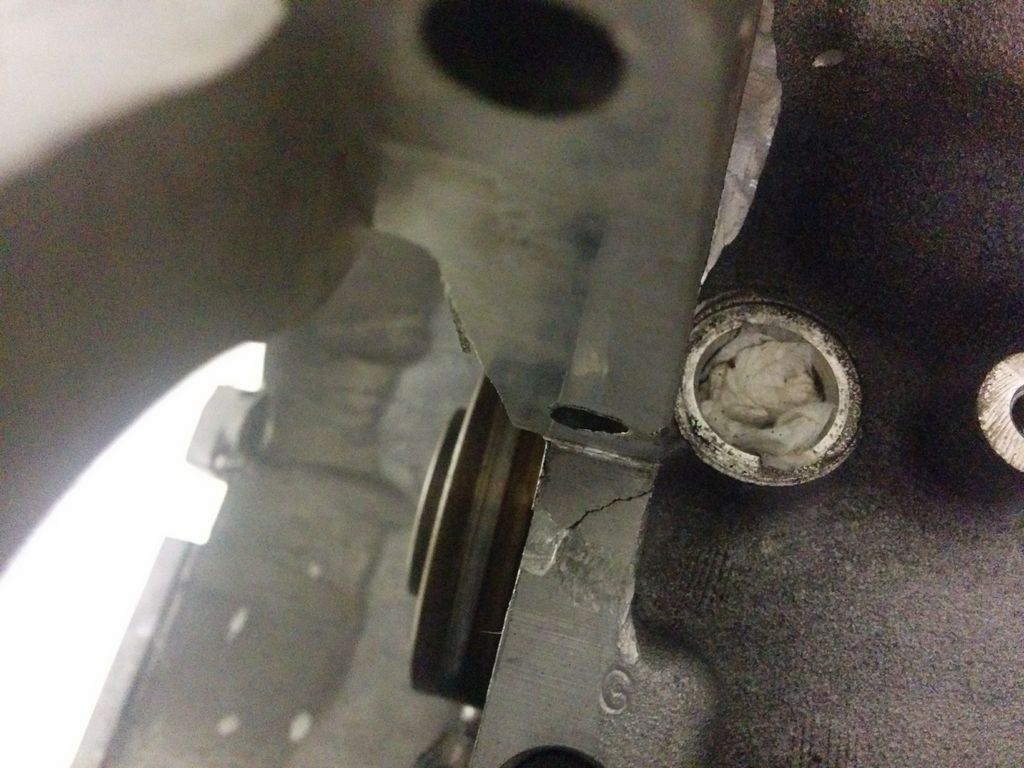
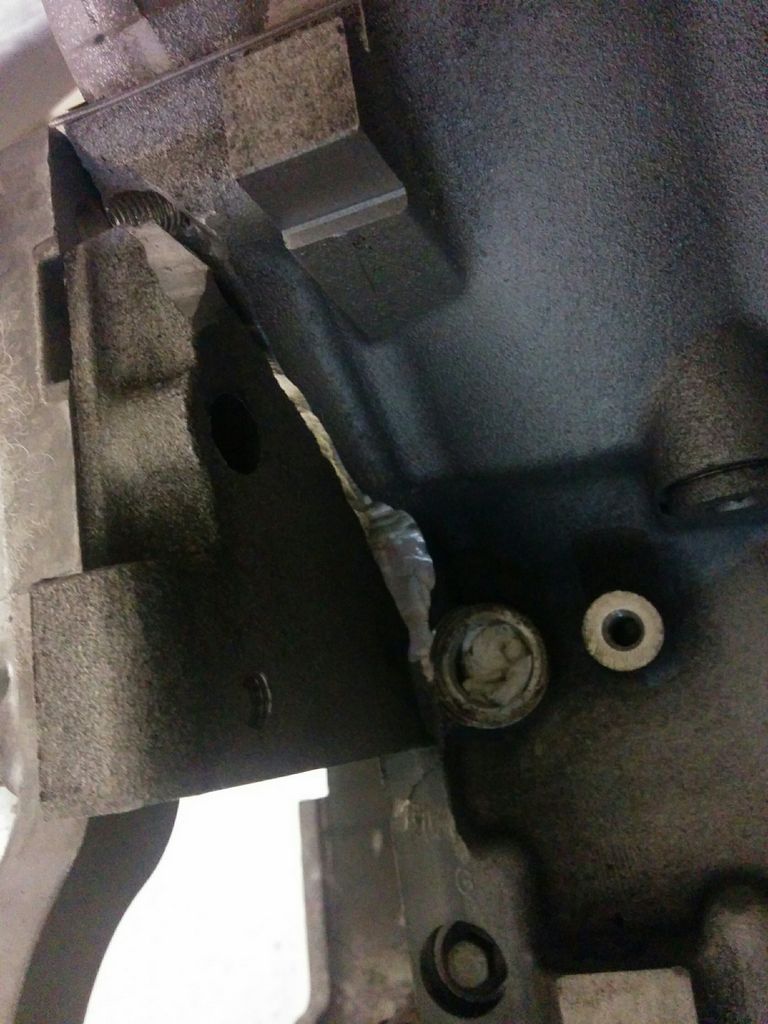
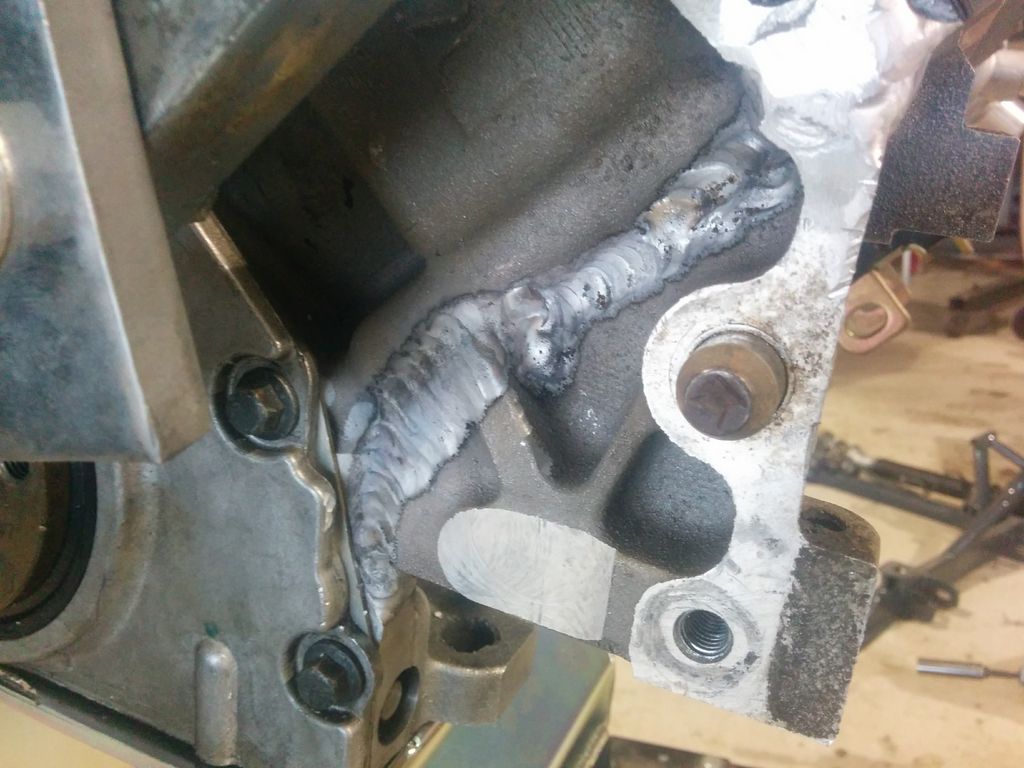
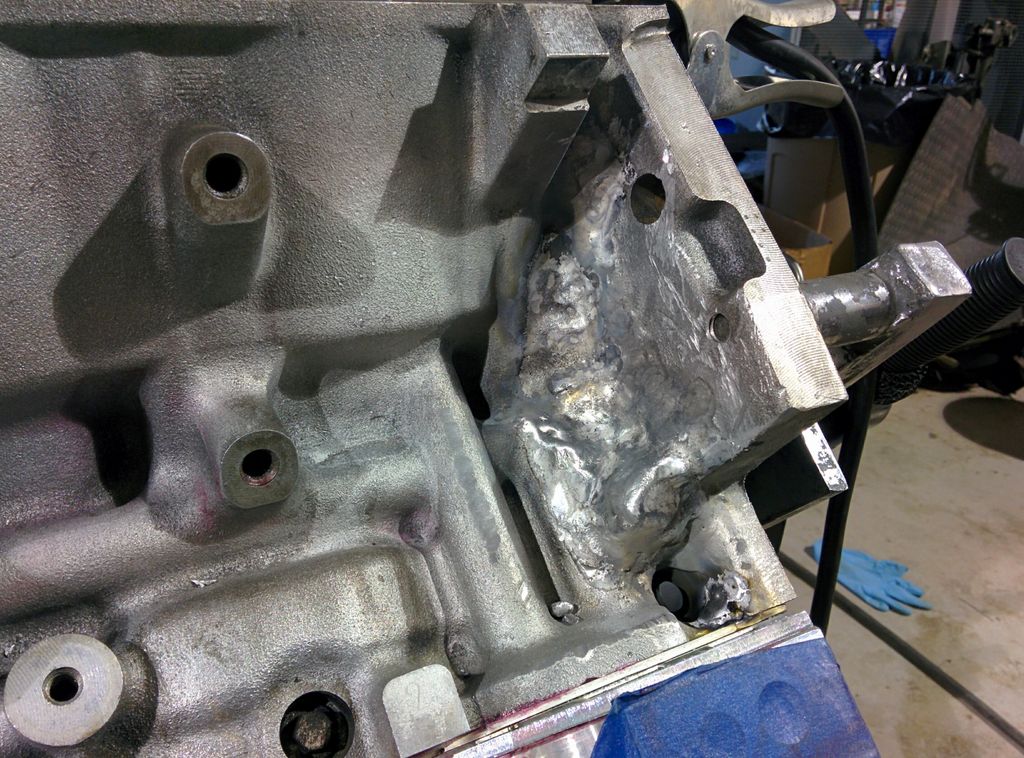
The bellhousing also had a piece shatter but I decided to try my hand at welding that on my own. Sand-cast aluminum is tricky to weld - there's lots of impurities that float to the top as you're welding, and about the best you can do is let the torch do the work and float the impurities off with more filler rod and grind them off later. Managed to badly weld that piece back on.
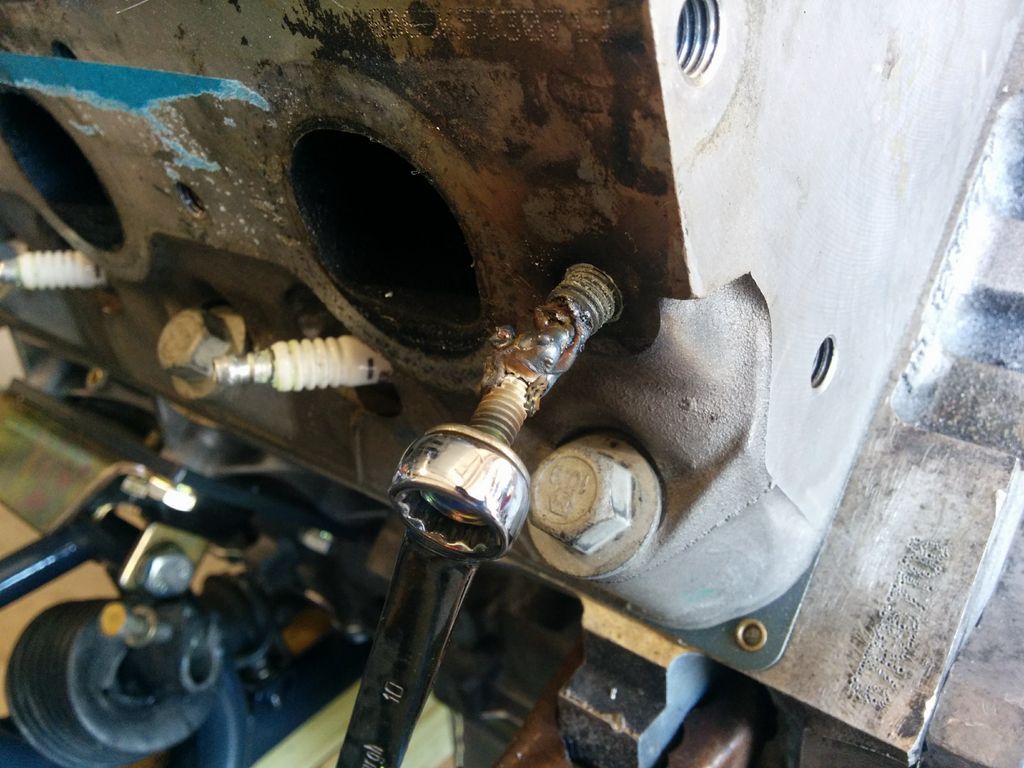
And then I discovered another crack. I hadn't just snapped the starter ear off, I had managed to crack the oil galley on the other side of the block. There's a steel plug at the bottom of a tapped hole - I think that steel managed to crack the aluminum when it was being forcefully stretched. Well, at this point I have two options - new block, or try and fill it up myself with the power of TIG welding.
I don't have a picture of the before - but basically stopdrilled the crack then melted a 17 sized torch and 3/32 tungstens until upgraded to a 21 and 1/8th tungsten and pushed the alphatig full bore. The red dye you see is weld-check to look for any additional cracks.
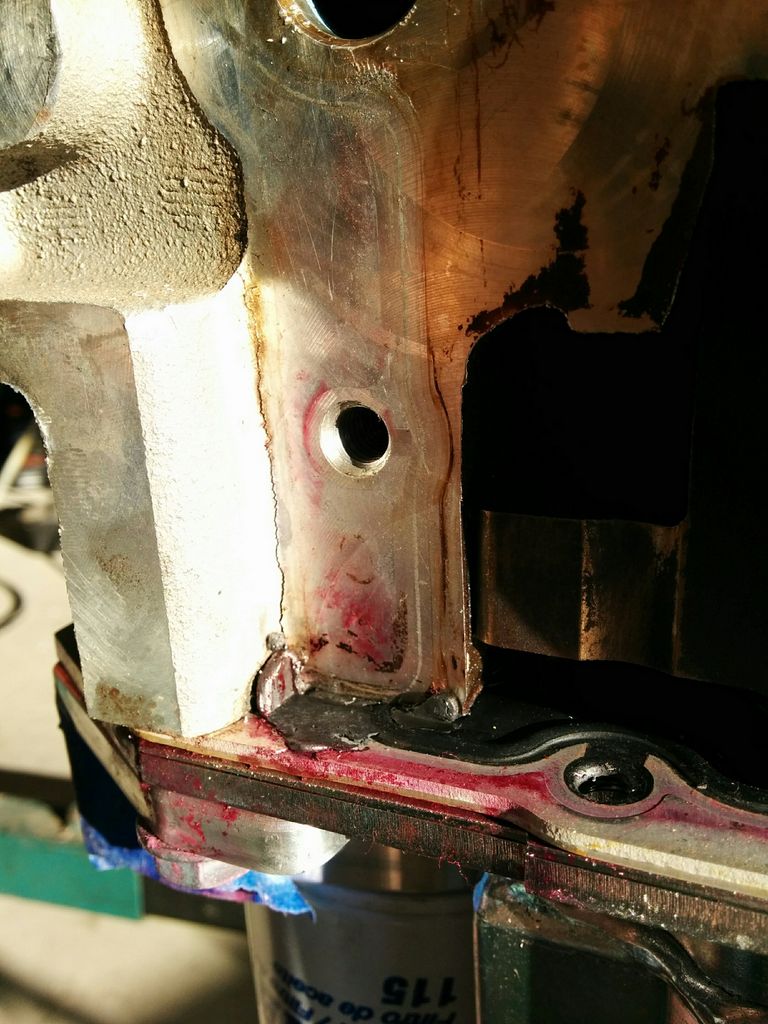
Yeah.. couldn't fix this one. But this crack is more or less outside the oil galley and I'd have to machine that surface flat again. And that means machine shop and disassembly and fixturing and.. if it ends up breaking then I'll deal with it then. Maybe I should become a yubtubs celeb and have summit deliver me one..
I spent *hours* welding on the block though. Aluminum dissipates heat like a mother, and that much time under the helmet I managed to get a feel for it.
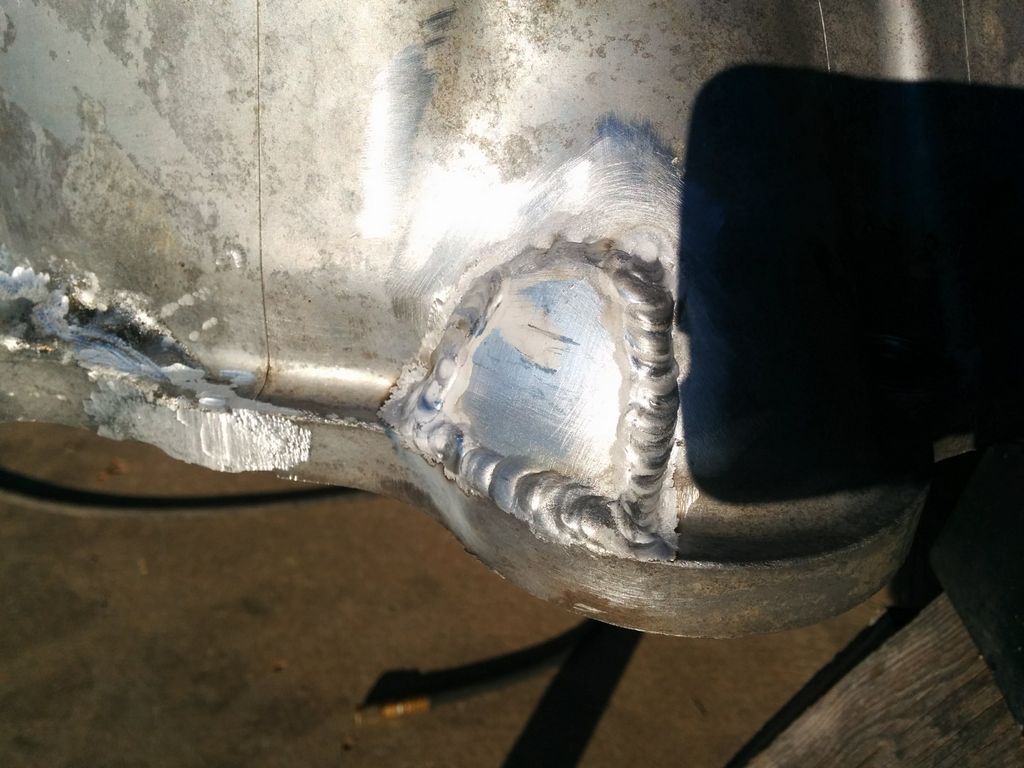
So there's my repair on the left hand side - the right hand side.. well, again, there are differences between the LS1 and LS3 - namely with starter location. You can buy a LS2(?) bellhousing that'll leave you enough room to get the starter snout into the bellhousing, or you can grab a die grinder and make a hell of a lot of chips to clearance the starter, leaving a few holes. Ahwell, TIG to the rescue again - but look, it almost looks decent!
Couple welding tools built along the way
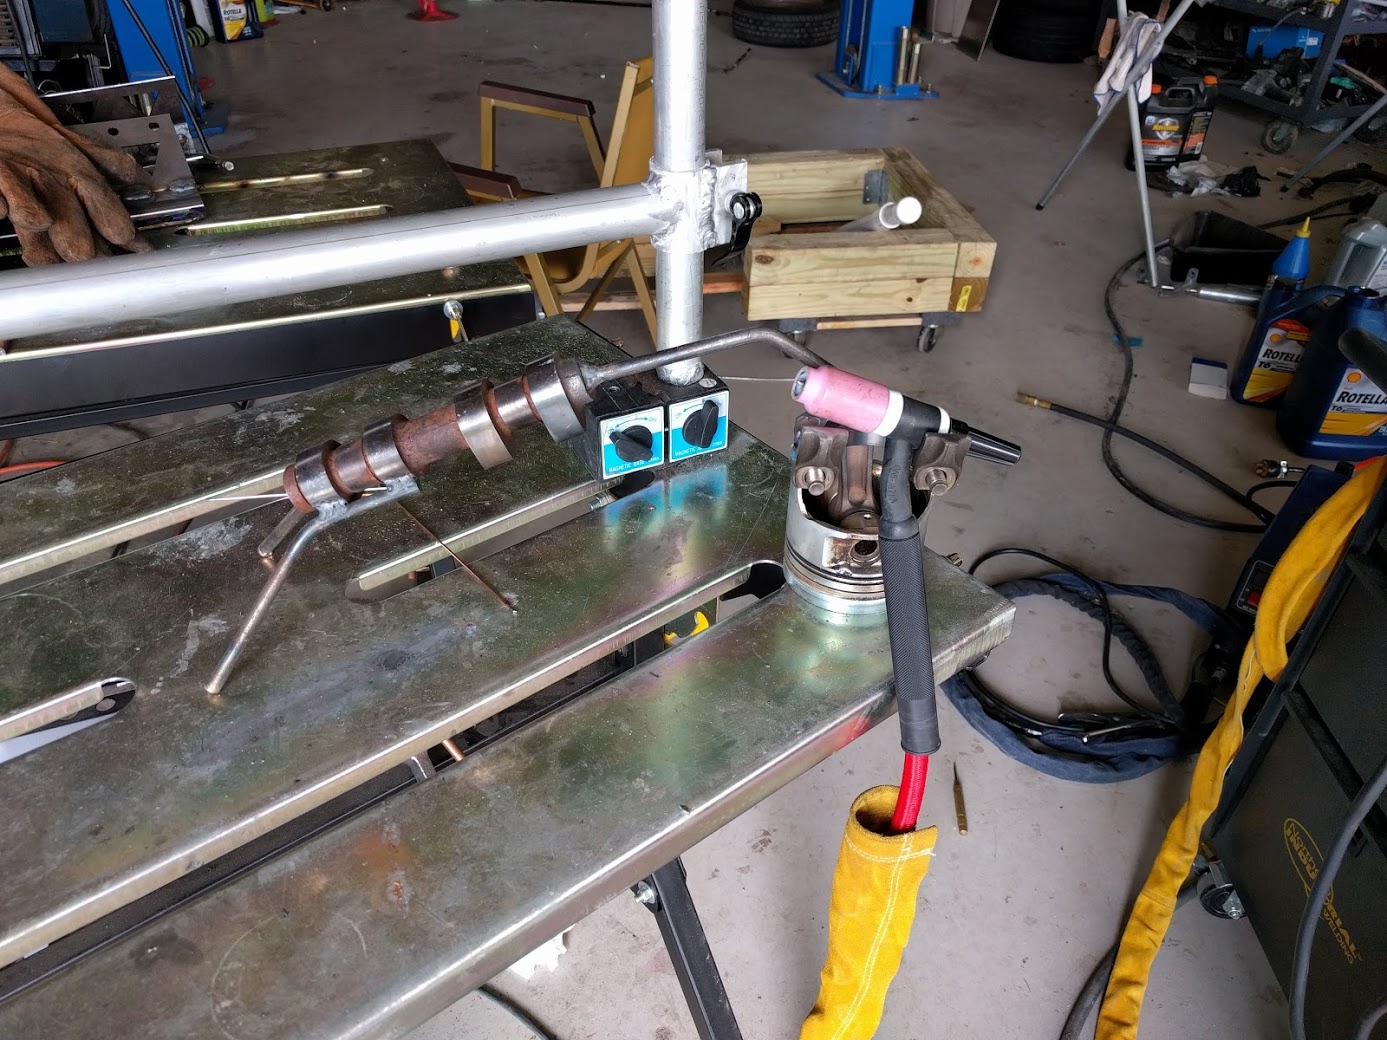
3rd hand tool made from the LFX's old BP camshaft - the bottoms of the feet are silicon bronze, help with conducting your ground.
Hand rest - made from 2 pieces of aluminum tubing and a bicycle seat cam/clamp. Helps rest your torch hand somewhere in space. Magnetic bases from harbor freight (tacked together - don't want to go over the curie point and demagnetize).
Torch holder - BP piston and rod heated up with acytelyene torch, bent over. Drilled and tapped a HF magnet on the base into the piston.
I spent a lot of time on ebay picking up the other accessories that didn't come with my sub-3k engine - like the intake manifold I managed to score for $50. It came off a corvette, but had a broken vacuum nipple. I remelted the plastic with a soldering iron and JB welded the rest of it for good measure. Finding crate engine takeoffs also saved a fair amount of change - snagged a set of 8 injectors for $50, a stock clutch for $140. Penny pinching. That said - oh lord the corvette tax is real. LFX is waaaay more economical to put together - but I can't let my dad be faster than I am.
Learning how to weld has been a huge boon. "Hey, this is gonna be a gigantic pain in the *** to drill and tap out.. I wonder..."
Anyway - with Transmission and Engine in hand and ready to make sweet sweet love, I made a gigantic error.
The LS3 and LS1 are very similar in many respects. But they're also not the same. Turns out the pilot bearing is different. The LS3 uses a ball bearing that sits flush with the crank, and the TR6060 uses a smaller snout that fits snugly inside it. The LS1 uses a needle bearing that sits recessed inside the shaft. The LS3 has this diameter change in the crankshaft - but hey, it's an LS3, I should be using LS3 parts right.
Nope!
I blame myself having only worked on iron blocks - but the input shaft rarely just glides on. The alignment is never perfect - sometimes you need just a little bit of persuasion by tightening the bellhousing bolts. And it was really hot that day and I was sweaty and just wanted the damn thing to go on. Or I'm a grade A moron. But the gap between the bellhousing and engine was narrowing! Clearly it just needed just a little more torque to.. SNAP
Yeah. Low point right there. Focused on the LFX, didn't touch my car for a month.
But yeah - the LS3 pilot bearing prevented the input shaft from inserting itself, and I kept torquing the bolts. I'm not the first person to do this, so clearly there are lots of morons out there like me. I went to my other mechanic buddies and they told me "it's trashed, Summit Racing has new blocks" - well a new block is $1500. Stopped by the welding shop and asked them to recommend a professional.
We had just picked up an AlphaTig 200x but really hadn't graduated to TIG welding yet. But I'll tell you - there's a vast difference between watching youtube videos to learn how to weld and watching a professional at work, being able to move your head around as he's laying a bead gives you a much better view of their hands. We ended up just giving the guy more welding projects just to watch him work.
Insert building montage here -
The bellhousing also had a piece shatter but I decided to try my hand at welding that on my own. Sand-cast aluminum is tricky to weld - there's lots of impurities that float to the top as you're welding, and about the best you can do is let the torch do the work and float the impurities off with more filler rod and grind them off later. Managed to badly weld that piece back on.
And then I discovered another crack. I hadn't just snapped the starter ear off, I had managed to crack the oil galley on the other side of the block. There's a steel plug at the bottom of a tapped hole - I think that steel managed to crack the aluminum when it was being forcefully stretched. Well, at this point I have two options - new block, or try and fill it up myself with the power of TIG welding.
I don't have a picture of the before - but basically stopdrilled the crack then melted a 17 sized torch and 3/32 tungstens until upgraded to a 21 and 1/8th tungsten and pushed the alphatig full bore. The red dye you see is weld-check to look for any additional cracks.
Yeah.. couldn't fix this one. But this crack is more or less outside the oil galley and I'd have to machine that surface flat again. And that means machine shop and disassembly and fixturing and.. if it ends up breaking then I'll deal with it then. Maybe I should become a yubtubs celeb and have summit deliver me one..
I spent *hours* welding on the block though. Aluminum dissipates heat like a mother, and that much time under the helmet I managed to get a feel for it.
So there's my repair on the left hand side - the right hand side.. well, again, there are differences between the LS1 and LS3 - namely with starter location. You can buy a LS2(?) bellhousing that'll leave you enough room to get the starter snout into the bellhousing, or you can grab a die grinder and make a hell of a lot of chips to clearance the starter, leaving a few holes. Ahwell, TIG to the rescue again - but look, it almost looks decent!
Couple welding tools built along the way
3rd hand tool made from the LFX's old BP camshaft - the bottoms of the feet are silicon bronze, help with conducting your ground.
Hand rest - made from 2 pieces of aluminum tubing and a bicycle seat cam/clamp. Helps rest your torch hand somewhere in space. Magnetic bases from harbor freight (tacked together - don't want to go over the curie point and demagnetize).
Torch holder - BP piston and rod heated up with acytelyene torch, bent over. Drilled and tapped a HF magnet on the base into the piston.
Last edited by gooflophaze; Jul 17, 2019 at 11:48 PM.
Reply
1
1


Thread
Thread Starter
Forum
Replies
Last Post


