Nothing to see here, just project Sisyphus, move along

 10-08-2014, 06:57 PM
#502
Supporting Vendor


iTrader: (1)
Join Date: Sep 2010
Location: Lake Forest, CA
Posts: 7,951
Total Cats: 1,004
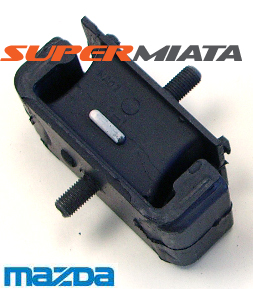
Is it the design of the mounts or what? The Mazdacomp ones 949 sells are reportedly 75 durometer but end up being considerably softer from what I've heard.
Mazda Comp Motor Mounts 90-05 Miata
Mazda Comp Motor Mounts 90-05 Miata

Reply
 0
0

0
10-08-2014, 06:59 PM
#503
Elite Member
Thread Starter
iTrader: (37)

Join Date: Apr 2010
Location: Very NorCal
Posts: 10,441
Total Cats: 1,899
The only weight savings I need to worry about is the
 HOWEVER, this is fabulous information. Do I just cut the little clips off the engine mounts? Also, won't this drop my engine like 1/4" inside the bay?
This:

Compared to this:
The factory style bushing would probably have to be something crazy like 140D to get the same level of stiffness that I have in my mounts now.
Last edited by EO2K; 10-08-2014 at 07:10 PM.
Reply
0
0
10-08-2014, 09:53 PM
#504
Elite Member

Join Date: Oct 2013
Location: Cedar City, UT
Posts: 2,764
Total Cats: 951
Yes sir. Most the time skimming things carries me through...apparently not this time.
I have the Mazdacomp ones from 949 and love them. A little bit of vibration at idle. But that is probably because I idle at 900 rather than 1k. I do get a decent amount of shifter movement though, something I have never been really happy about.
If you remember me talking about that cloth back tape I used in my car EO2LK, I put that on any plastic panels that touched metal/plastic/other parts and I get nary a rattle from my car. This is with fully poly, mazdacomp/door bars/fender bars yadda yadda.
Granted, I also have a lot more sound deadening than the average Miata.
Reply
0
0
10-08-2014, 11:42 PM
#505
Elite Member
Thread Starter
iTrader: (37)
Join Date: Apr 2010
Location: Very NorCal
Posts: 10,441
Total Cats: 1,899
The vast majority of the ***** noise is coming from the hood, hood latch and things under the nose that I can quite identify. I should remove my PS so there are less things under there to vibrate
Things are afoot this evening. Pics soon.
Things are afoot this evening. Pics soon.
Reply
0
0
10-09-2014, 08:30 AM
#507
The subframe has holes cutout, so you don't really do anything for the clips. The clips protrude from the cups too, so there really isn't anything different there.
I know some autocross types that run without the cups. Haven't done it myself. They do provide some shielding for the rubber, but based upon the looks of some of the OEM mounts I've replaced, not really that much.
Reply
0
0
10-09-2014, 01:27 PM
#508
Elite Member
Thread Starter
iTrader: (37)
Join Date: Apr 2010
Location: Very NorCal
Posts: 10,441
Total Cats: 1,899
Sadness. I appear to be missing one of the OEM motor mount nuts. I hate losing OEM fasteners because they are almost impossible to source locally.
They appear to be the same as the exhaust nuts, except I need those so I can put my exhaust back on
They appear to be the same as the exhaust nuts, except I need those so I can put my exhaust back on
Reply
0
0
 10-09-2014, 02:18 PM
#511
Elite Member
Thread Starter
iTrader: (37)
Join Date: Apr 2010
Location: Very NorCal
Posts: 10,441
Total Cats: 1,899
lol you guyth
As for Skunk2, box arrived today! They are getting closer...
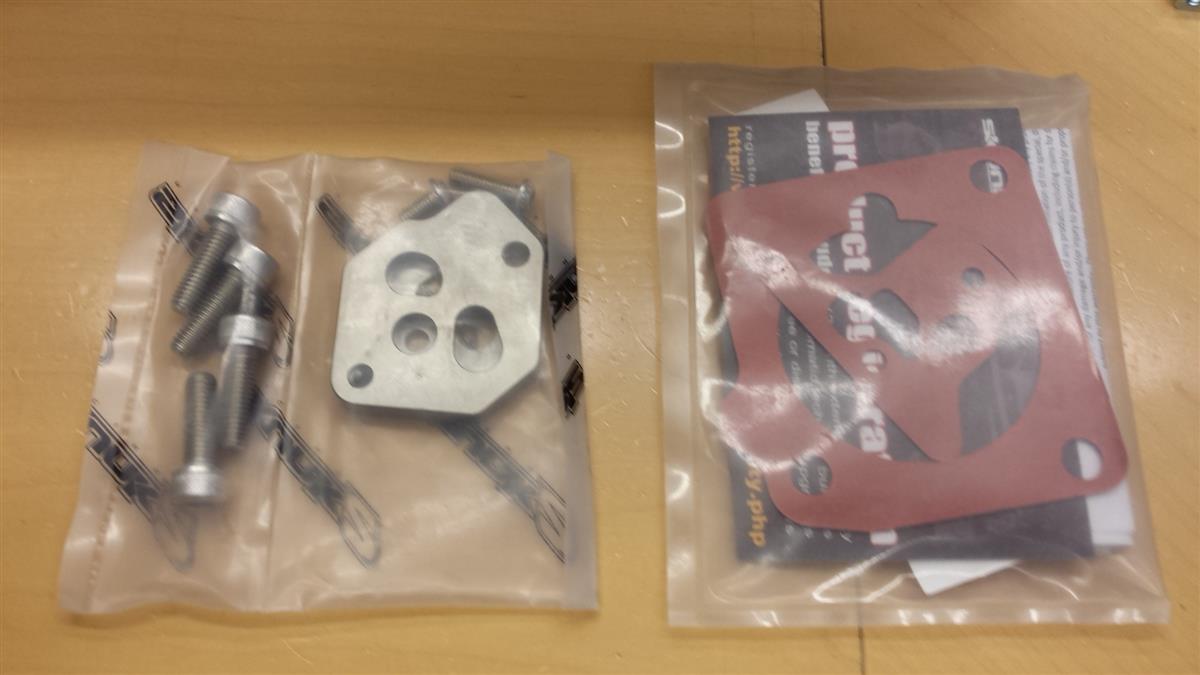
I finally have the right 99-05 IACV mount, but they sent the 94-97 gasket pack I'm not sure if I should call them out on this or not. Part of me is like "Quit while you are ahead! Walk away!" and the other part is going "Make them do it till they get it right!"
Does anyone have one of these gaskets sitting in their garage? I will paypal you $5 to scan and email it to me, or photocopy and snail mail it so I can cut my own.
As for Skunk2, box arrived today! They are getting closer...
I finally have the right 99-05 IACV mount, but they sent the 94-97 gasket pack
I'm not sure if I should call them out on this or not. Part of me is like "Quit while you are ahead! Walk away!" and the other part is going "Make them do it till they get it right!" Does anyone have one of these gaskets sitting in their garage? I will paypal you $5 to scan and email it to me, or photocopy and snail mail it so I can cut my own.
Reply
0
0
10-09-2014, 02:47 PM
#512
Elite Member
Thread Starter
iTrader: (37)
Join Date: Apr 2010
Location: Very NorCal
Posts: 10,441
Total Cats: 1,899
Lets make this official:
If someone has a Skunk2 99-05 Miata throttle body sitting in their garage, I will Paypal you $5 if you scan these two gaskets and post them somewhere I can get to them.
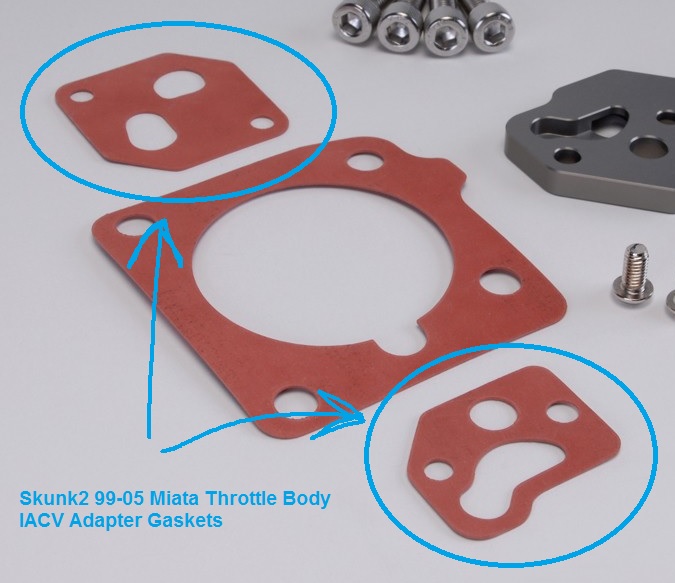
Failing that, I'll just try to trace my IACV adapter and cut my own out of gasket material.
If someone has a Skunk2 99-05 Miata throttle body sitting in their garage, I will Paypal you $5 if you scan these two gaskets and post them somewhere I can get to them.
Failing that, I'll just try to trace my IACV adapter and cut my own out of gasket material.
Reply
0
0
10-09-2014, 06:58 PM
#514

Lets make this official:
If someone has a Skunk2 99-05 Miata throttle body sitting in their garage, I will Paypal you $5 if you scan these two gaskets and post them somewhere I can get to them.
Failing that, I'll just try to trace my IACV adapter and cut my own out of gasket material.
If someone has a Skunk2 99-05 Miata throttle body sitting in their garage, I will Paypal you $5 if you scan these two gaskets and post them somewhere I can get to them.
Failing that, I'll just try to trace my IACV adapter and cut my own out of gasket material.
Reply
0
0
10-09-2014, 06:59 PM
#515
Elite Member
Thread Starter
iTrader: (37)
Join Date: Apr 2010
Location: Very NorCal
Posts: 10,441
Total Cats: 1,899
What, no black RTV this time?
I know, right? Its only been like a month  Yep, that's the plan. I'm going to try tracing something out and see if I can get it to work.
I guess the upshot of this is that if anyone needs the 94-97 gaskets/bolts/IACV adapter/TPS adapter, shoot me a PM because I got extras Skunk2 said not to bother trying to send them back.
Yep, that's the plan. I'm going to try tracing something out and see if I can get it to work.I guess the upshot of this is that if anyone needs the 94-97 gaskets/bolts/IACV adapter/TPS adapter, shoot me a PM because I got extras
Skunk2 said not to bother trying to send them back.
Reply
0
0
10-09-2014, 07:30 PM
#516
Elite Member
iTrader: (2)
Join Date: May 2008
Location: Portland, Oregon
Posts: 3,468
Total Cats: 365
Mazdacomp will happily overnight you your missing nuts for a modest shipping fee 
Use one of your exhaust nuts, and just go grab a stainless nut to use on the exhaust until you can replace it for reals if you want.
Use one of your exhaust nuts, and just go grab a stainless nut to use on the exhaust until you can replace it for reals if you want.
Reply
0
0
10-14-2014, 08:33 PM
#518
Elite Member
Thread Starter
iTrader: (37)
Join Date: Apr 2010
Location: Very NorCal
Posts: 10,441
Total Cats: 1,899
So this happened...
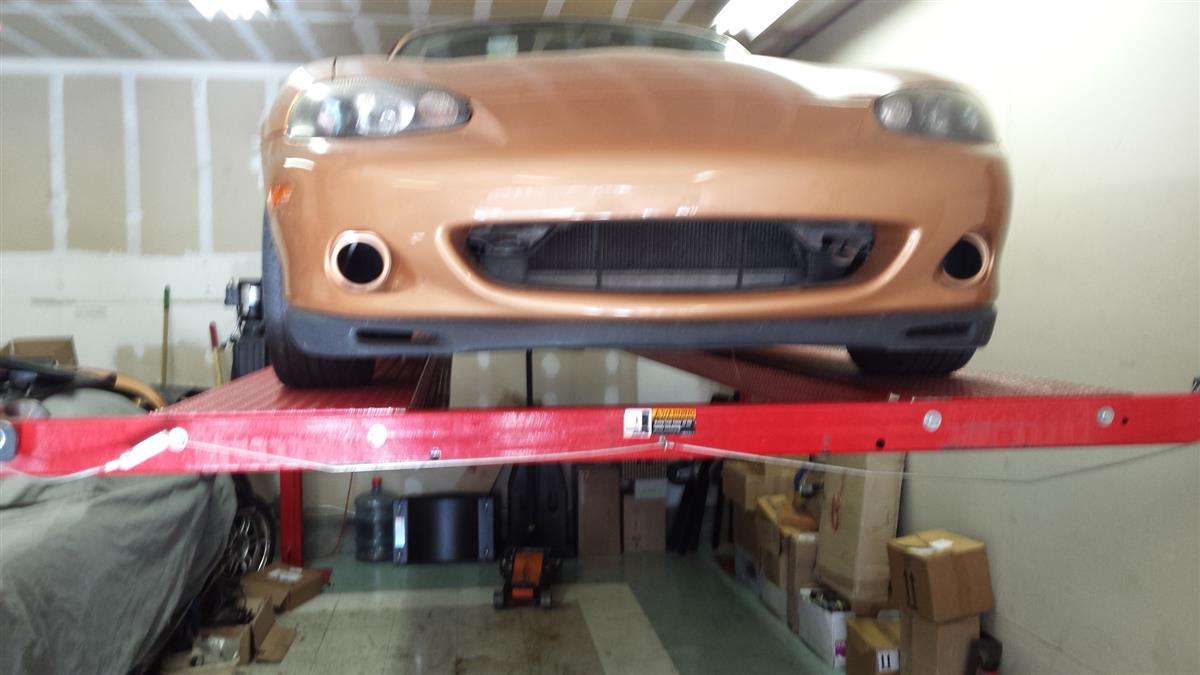
Dat lift doe. I <3 Gessos garage. I was sad that he moved 1.5hrs away, but its starting to show some benefits
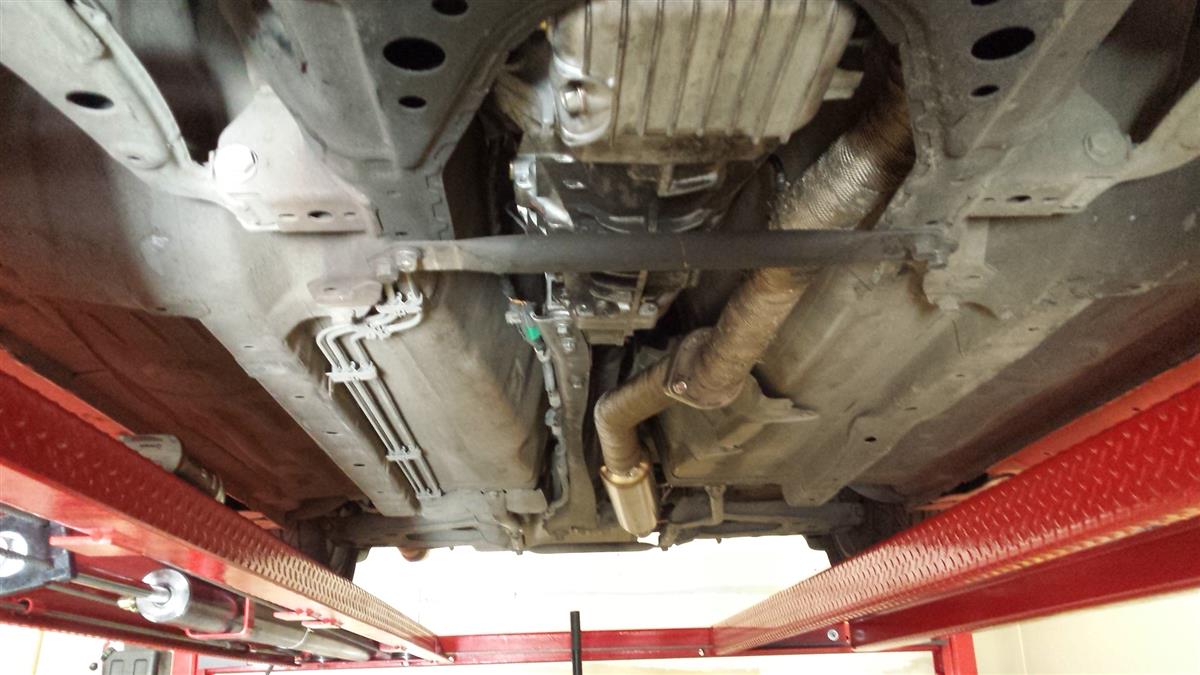
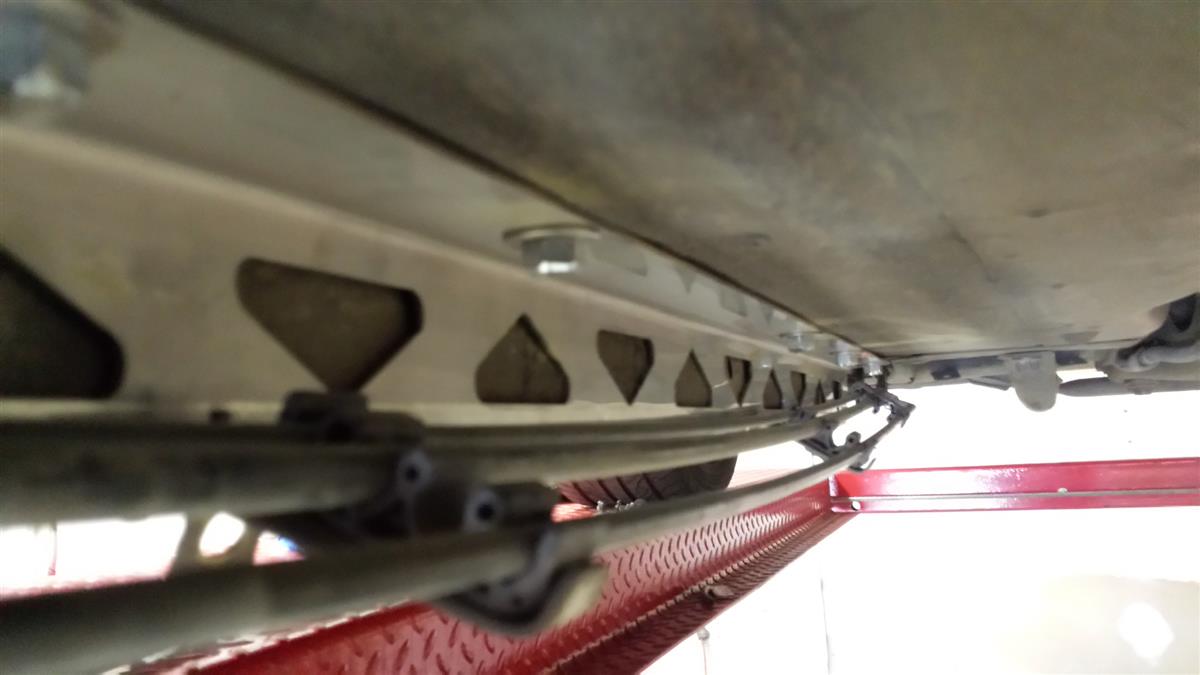
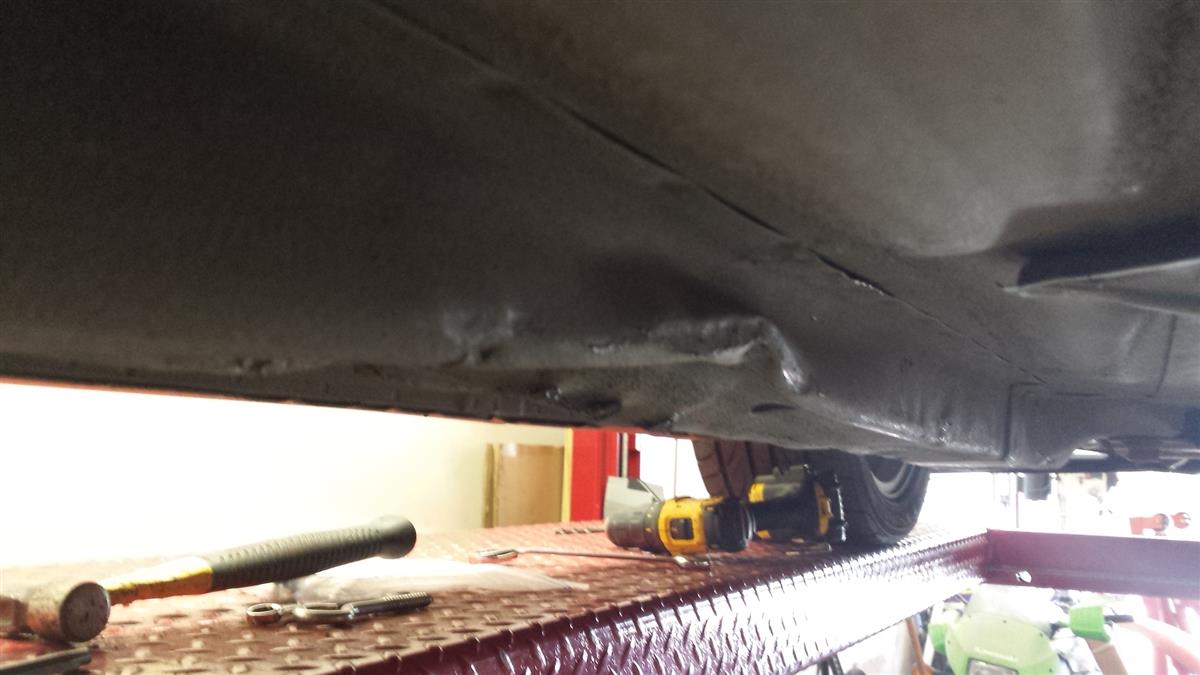
My glorious underside. Can you spot the problem?
Pax side: looks okay...
Drivers side: something is amiss...
SWEET BABY JESUS!
This is damage I've known about for quite some time and have wanted to do something about it, but have had no time. Well, the time finally presented itself.
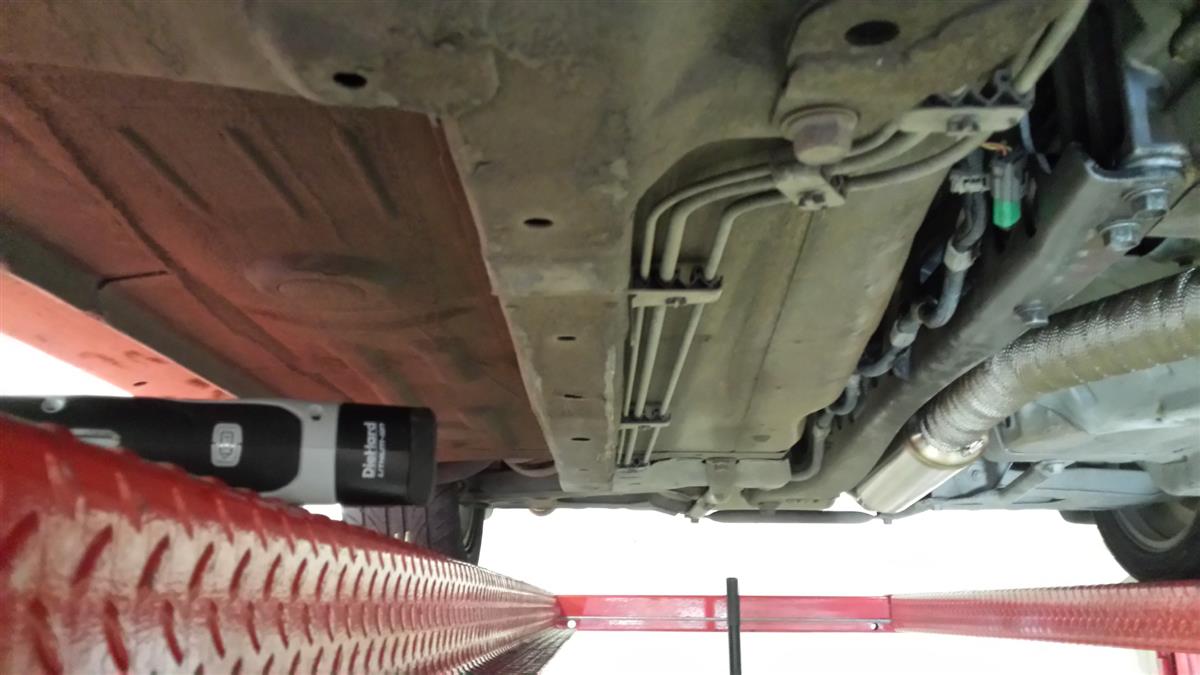
So we started with the passenger side rail because it slipped on with no issues. Normally I have ZERO complaints about Flyin' Miata goodies, but I found something lacking with the way they wanted to me mount the brackets for the brake/fuel/emissions lines. Per FMs instructions, they want to to flatten the stock bracket and attach it to studs that stick out of the bottom of the rail. That's all well and good, but my car (like many others) is a bit lower than stock and my driveway requires a pretty aggressive angle of attack to prevent rubbing. The last thing I wanted to do was snap off the stud that holds on the bracket. So what do?

Drill baby, drill! And tap! That's a 6mm hole tapped in the side of the FM rail about an inch to the rear of the FM provided nut and stud on the bottom of the rail.
Did the same for both the front and rear mount locations. We also went through and chopped off the extra bolt head sticking out of the nuts to completely prevent any possibility of line rubbage.
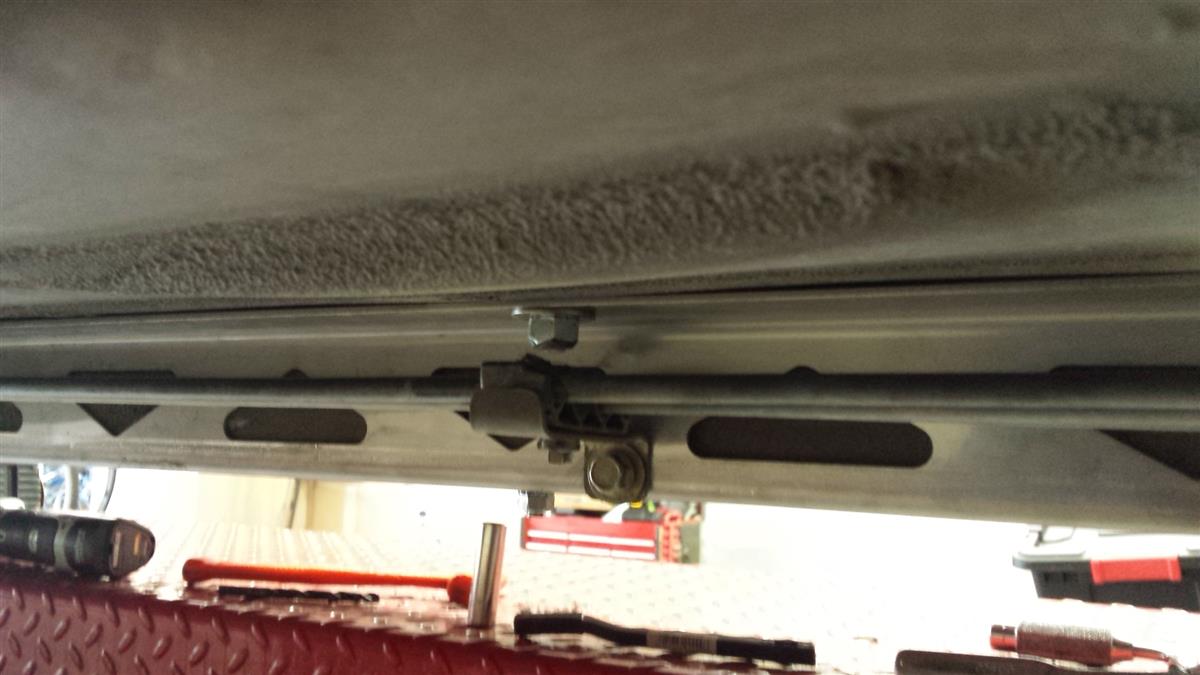
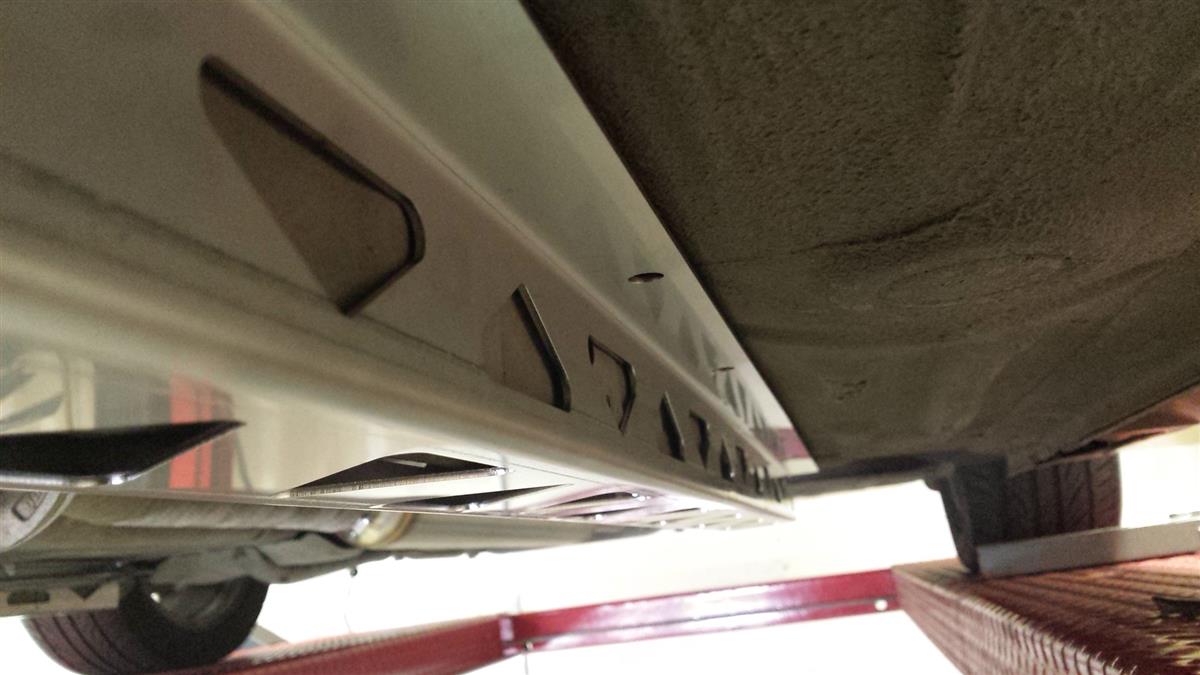
Here it is with the bracket fully bolted down. I don't often have to re-engineer something from FM, but when I do, I try to make sure I do it right.
Gesso also "shortened" the bracket to allow the lines to sit closer to the underside of the car. As you can see, plenty of clearance from the front

...and from the rear. I really, really like that the lines are now completely protected by the body of the rail itself.
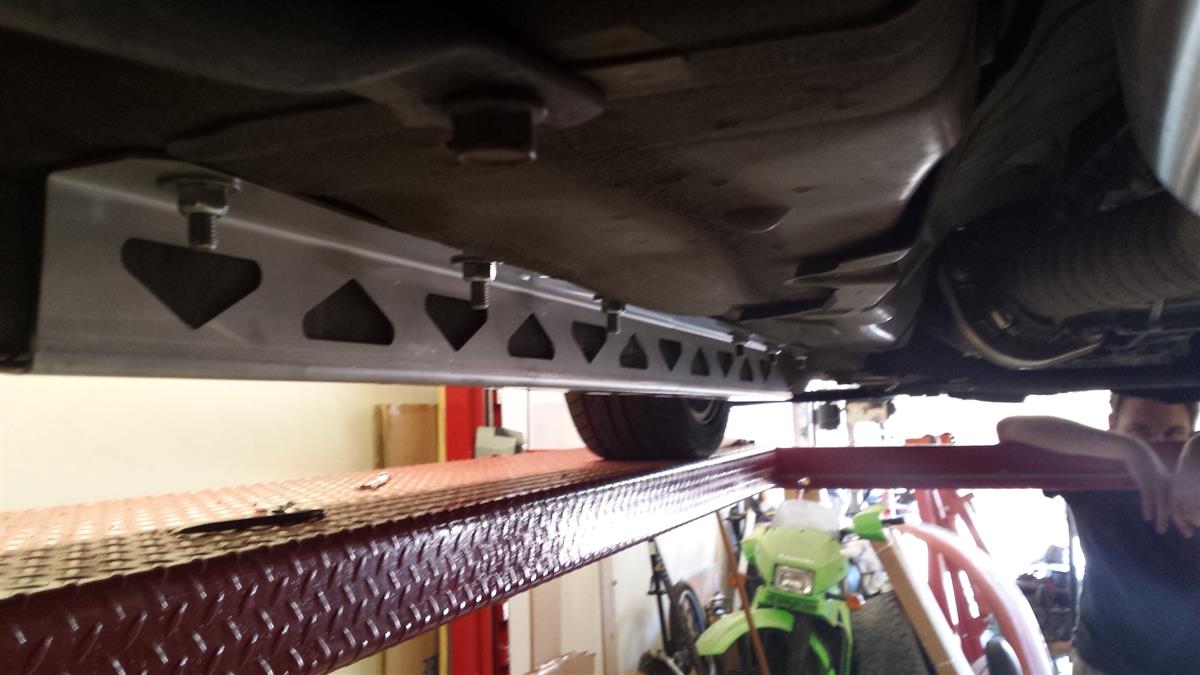
Notice how low the FM stud/nut sits below the rail in the last couple pics? I was just way too uncomfortable with that and his looks much safer. Anyway, on to the drivers side.
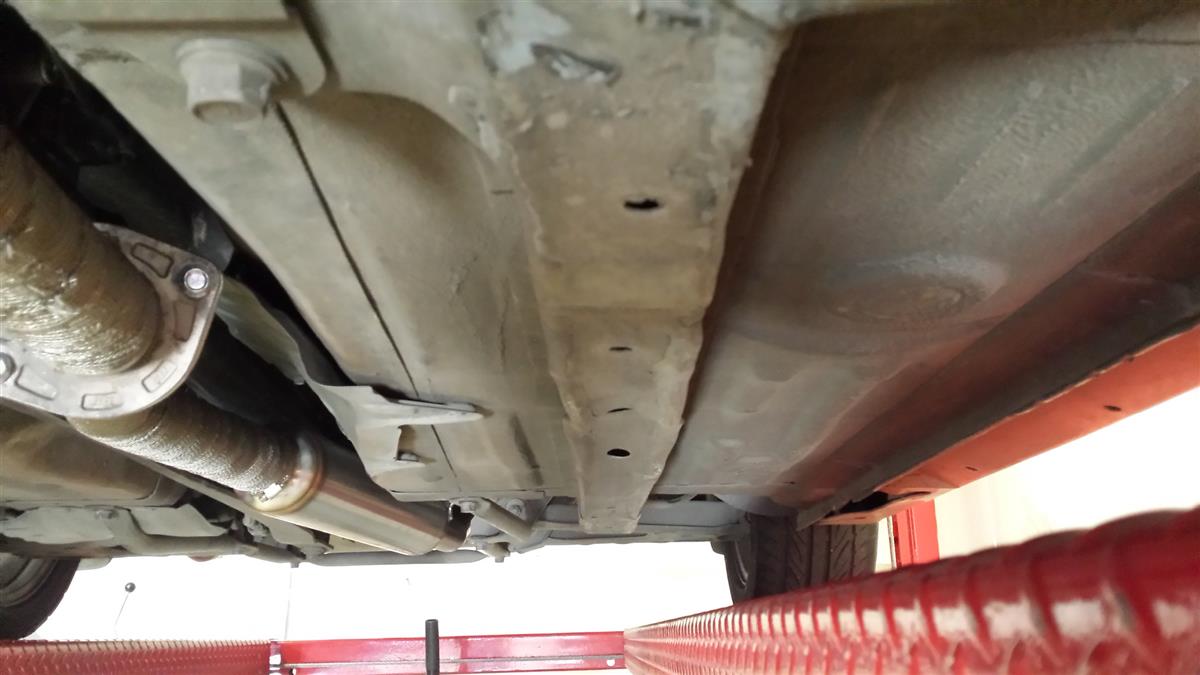
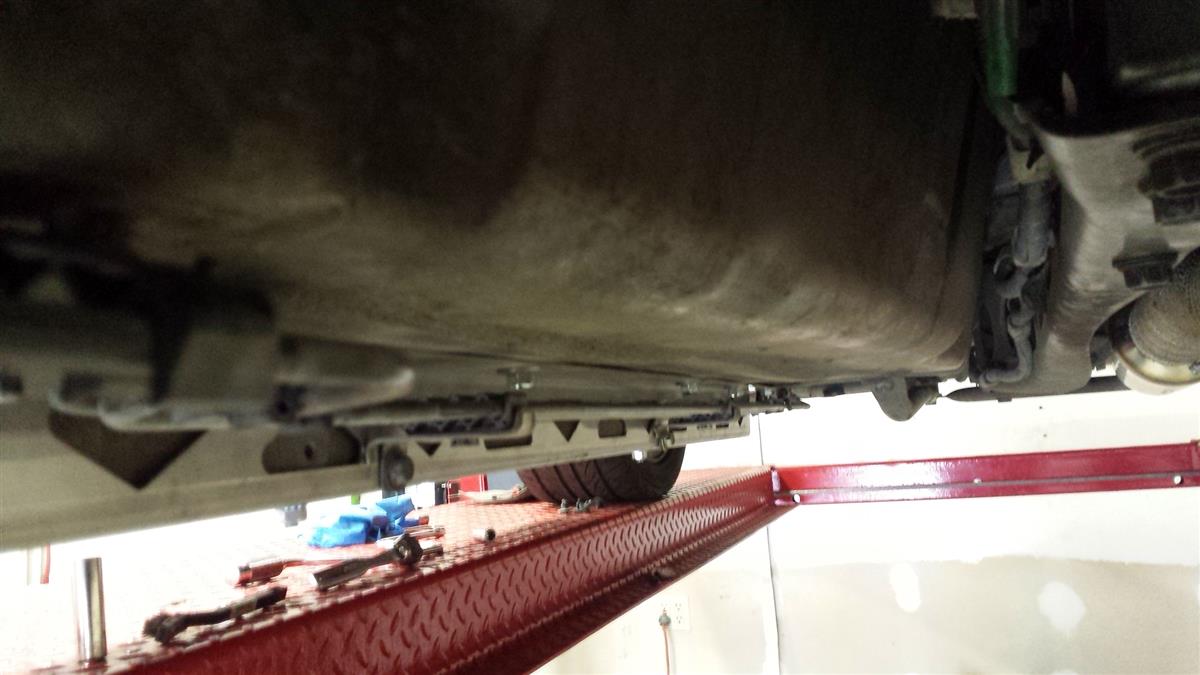
Another angle BECAUSE YOU DIDN'T THINK IT COULD GET WORSE, DID YOU?! How do you fix this ****?

You hit it with a hammer
and keep hitting it
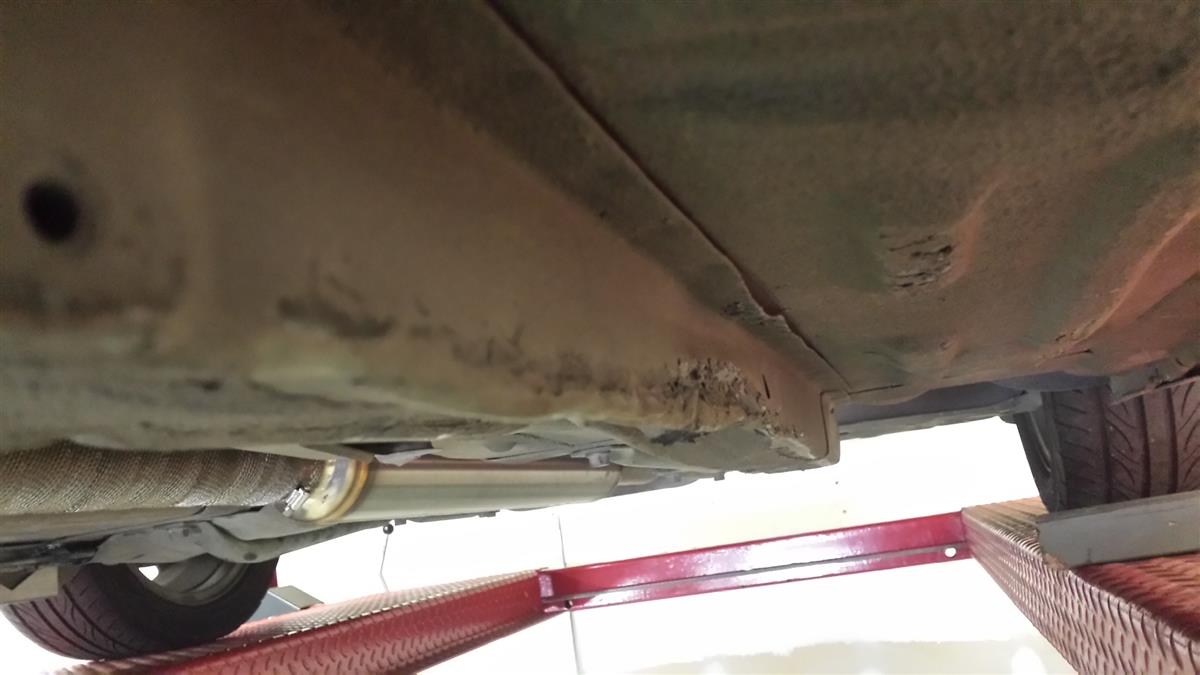
and keep ******* hitting it
and you hit it some more until the rail drops in. This was about an hours worth of work trying to only hit the places where it was required to get the rail in position. I didn't want to smash things up any worse than they already were.
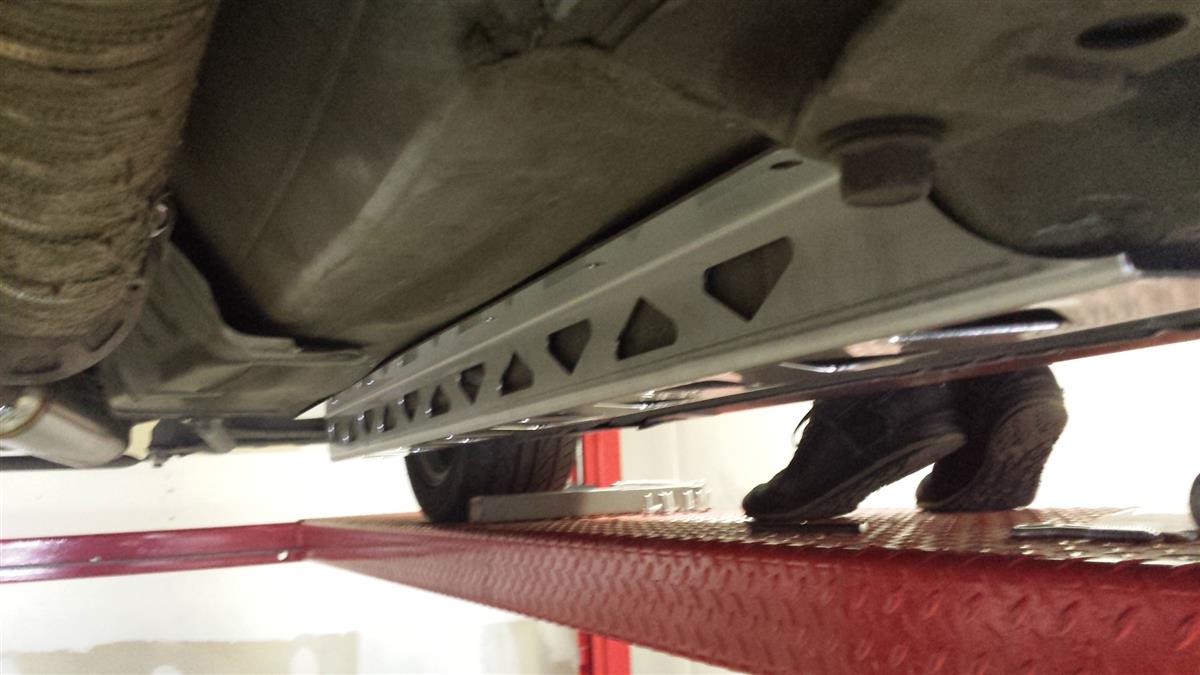
How much better does that look? I mean, seriously.
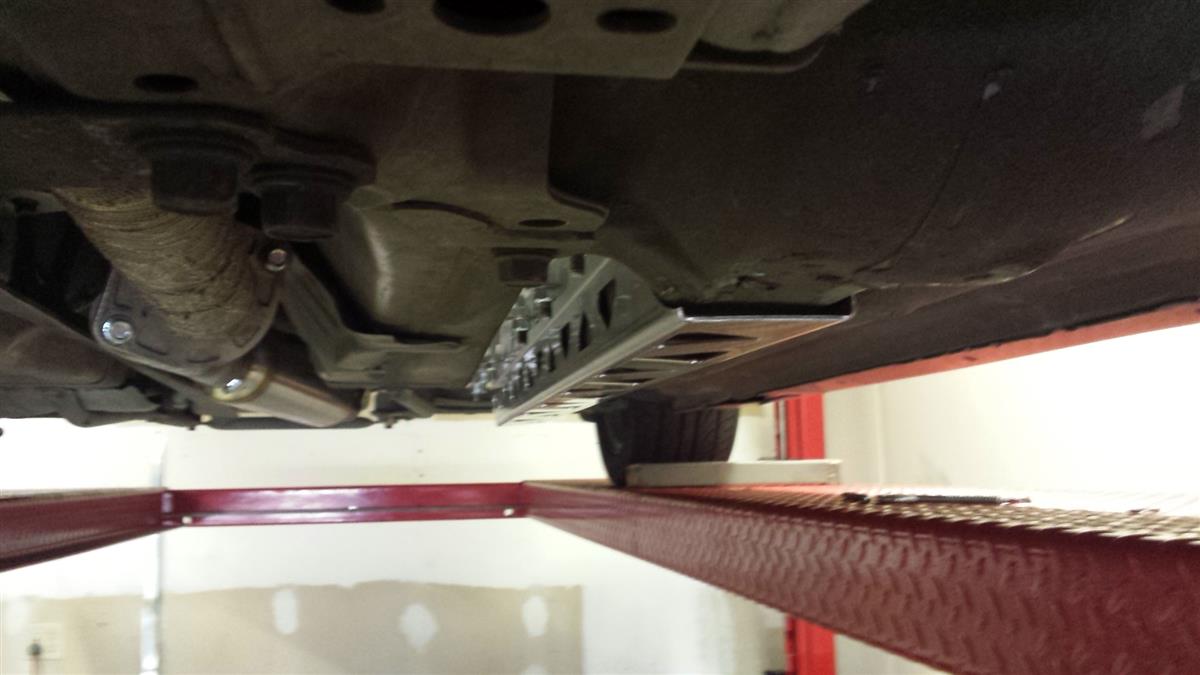
Drill some holes, add some bolts... and voil�!
Gesso inner monolog "Why is it so hot? What are you still here? You've been here for 2 days... the **** are you still in my garage?"
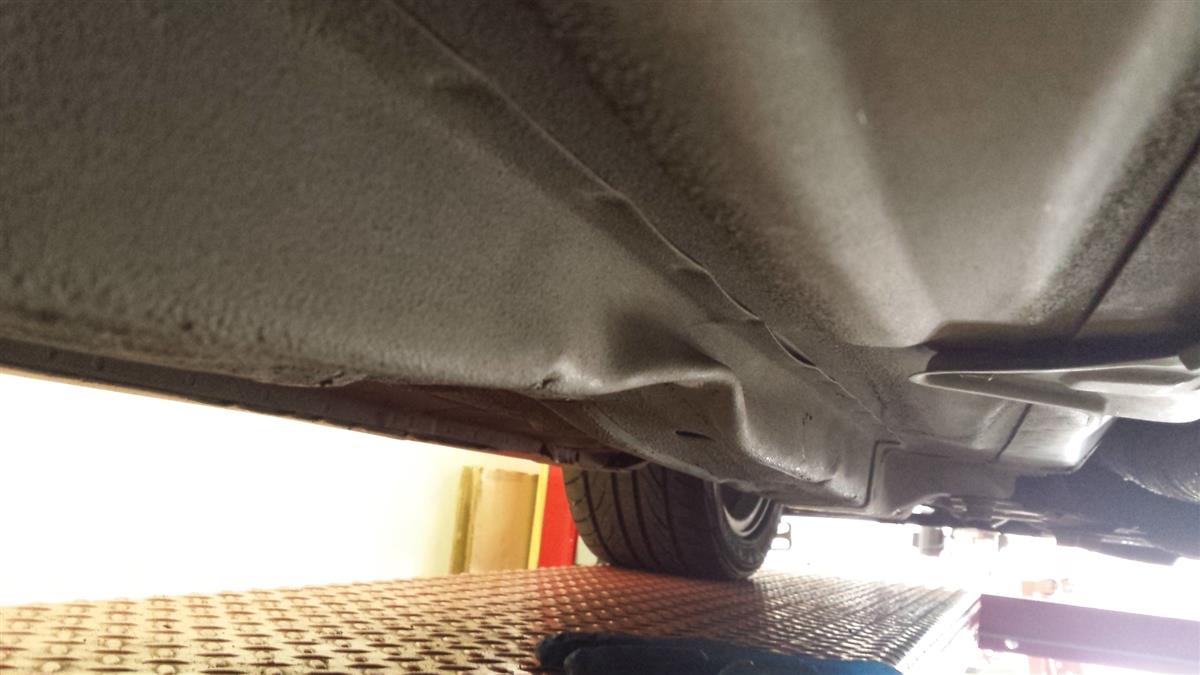
The result? Nothing short of amazing. 10/10: would install again on another car. This level of rigidity reminds me a lot of driving Gesso's 3/4 completed seam welding job on his NB. Keep in mind that we both have roll bars, but I have Frog Arms and he as the seam welding. The car feels MUCH more rigid, planted and in control just driving around town. Interestingly enough, this is the 3rd set of rails I've installed on Miatas, but a first for one of my vehicles.
Somthing I DID notice once I had a full tank of gas is I'm absolutely on the rear bumpstops EVEN MORE. Ungh. I need to figure out how to get more travel. I'm thinking I might need a set of extended tophats
ALSO!
Replaced the FM front bar with a Racing Beat 1.125" OD .188" wall (#54103) sway bar and a fresh set of 949/Supermiata endlinks. The front bar change was done to better match my MazdaSpeed 14mm sway bar (#NE45-28-151) that I've had disconnected for quite some time. I just never felt the FM front and the MSM rear was a good combo for me. Please don't think I'm badmouthing the FM bar because its a great bar, its just not what I was looking for. I'll have the FM set for sale on the classifieds eventually.
ALSO ALSO!
Replaced the AWR/Supermiata 70D mounts with good ol' fashioned Mazda Competition motor mounts. I was SO overjoyed when I drove the car off the rack it was silly. Waves of joy washed over my soul as I enjoyed the sound of the exhaust, rather than the hood. My words are insufficient to express the feeling adequately, much like trying to illuminate the interior of a giant hollow cavern with naught but a single candle. Gesso's GF managed to gouge my hard top with some terrible steel bike pedal thing while it was sitting outside but I was so happy that there were zero ***** given. She felt rather bad, but honestly you would have had to punch me in the nuts at that point to **** me off.
Needless to say, the car is fun to drive again and the nightmare is over.
As I've said before and will continue to say, big THANK YOU to Gesso for once again allowing me to use his garage, lift, tools and time for my silly project. I cannot thank this guy enough
Dat lift doe. I <3 Gessos garage. I was sad that he moved 1.5hrs away, but its starting to show some benefits
My glorious underside. Can you spot the problem?
Pax side: looks okay...
Drivers side: something is amiss...
SWEET BABY JESUS!
This is damage I've known about for quite some time and have wanted to do something about it, but have had no time. Well, the time finally presented itself.
So we started with the passenger side rail because it slipped on with no issues. Normally I have ZERO complaints about Flyin' Miata goodies, but I found something lacking with the way they wanted to me mount the brackets for the brake/fuel/emissions lines. Per FMs instructions, they want to to flatten the stock bracket and attach it to studs that stick out of the bottom of the rail. That's all well and good, but my car (like many others) is a bit lower than stock and my driveway requires a pretty aggressive angle of attack to prevent rubbing. The last thing I wanted to do was snap off the stud that holds on the bracket. So what do?
Drill baby, drill! And tap! That's a 6mm hole tapped in the side of the FM rail about an inch to the rear of the FM provided nut and stud on the bottom of the rail.
Did the same for both the front and rear mount locations. We also went through and chopped off the extra bolt head sticking out of the nuts to completely prevent any possibility of line rubbage.
Here it is with the bracket fully bolted down. I don't often have to re-engineer something from FM, but when I do, I try to make sure I do it right.
Gesso also "shortened" the bracket to allow the lines to sit closer to the underside of the car. As you can see, plenty of clearance from the front
...and from the rear. I really, really like that the lines are now completely protected by the body of the rail itself.
Notice how low the FM stud/nut sits below the rail in the last couple pics? I was just way too uncomfortable with that and his looks much safer. Anyway, on to the drivers side.
Another angle BECAUSE YOU DIDN'T THINK IT COULD GET WORSE, DID YOU?! How do you fix this ****?
You hit it with a hammer
and keep hitting it
and keep ******* hitting it
and you hit it some more until the rail drops in. This was about an hours worth of work trying to only hit the places where it was required to get the rail in position. I didn't want to smash things up any worse than they already were.
How much better does that look? I mean, seriously.
Drill some holes, add some bolts... and voil�!
Gesso inner monolog "Why is it so hot? What are you still here? You've been here for 2 days... the **** are you still in my garage?"
The result? Nothing short of amazing. 10/10: would install again on another car. This level of rigidity reminds me a lot of driving Gesso's 3/4 completed seam welding job on his NB. Keep in mind that we both have roll bars, but I have Frog Arms and he as the seam welding. The car feels MUCH more rigid, planted and in control just driving around town. Interestingly enough, this is the 3rd set of rails I've installed on Miatas, but a first for one of my vehicles.
Somthing I DID notice once I had a full tank of gas is I'm absolutely on the rear bumpstops EVEN MORE. Ungh. I need to figure out how to get more travel. I'm thinking I might need a set of extended tophats
ALSO!
Replaced the FM front bar with a Racing Beat 1.125" OD .188" wall (#54103) sway bar and a fresh set of 949/Supermiata endlinks. The front bar change was done to better match my MazdaSpeed 14mm sway bar (#NE45-28-151) that I've had disconnected for quite some time. I just never felt the FM front and the MSM rear was a good combo for me. Please don't think I'm badmouthing the FM bar because its a great bar, its just not what I was looking for. I'll have the FM set for sale on the classifieds eventually.
ALSO ALSO!
Replaced the AWR/Supermiata 70D mounts with good ol' fashioned Mazda Competition motor mounts. I was SO overjoyed when I drove the car off the rack it was silly. Waves of joy washed over my soul as I enjoyed the sound of the exhaust, rather than the hood. My words are insufficient to express the feeling adequately, much like trying to illuminate the interior of a giant hollow cavern with naught but a single candle. Gesso's GF managed to gouge my hard top with some terrible steel bike pedal thing while it was sitting outside but I was so happy that there were zero ***** given. She felt rather bad, but honestly you would have had to punch me in the nuts at that point to **** me off.
Needless to say, the car is fun to drive again and the nightmare is over.
As I've said before and will continue to say, big THANK YOU to Gesso for once again allowing me to use his garage, lift, tools and time for my silly project. I cannot thank this guy enough
Reply
4
4
10-14-2014, 08:49 PM
#519
Elite Member
Join Date: Mar 2007
Location: Santa Clara, CA
Posts: 5,165
Total Cats: 855

Reply
6
6
10-14-2014, 09:26 PM
#520
Elite Member
Thread Starter
iTrader: (37)
Join Date: Apr 2010
Location: Very NorCal
Posts: 10,441
Total Cats: 1,899
Woo! Thank you Ian, you are the man! :bow: I regret that I have only one +prop to give that post, so all probably spent 20 minutes just +1ing as many of your posts as I can find. 
Reply
0
0


