
Se7en Turbo Build (Was: Thermostat Rerouting)


Thread Starter
Junior Member
Joined: Oct 2008
Posts: 113
Total Cats: 5
From: Cortland, Ohio
Thanks.
I don't know if I should ask this here or start another thread...
This motor is interim. The first is down to the block and is waiting for a cash infusion, probably to the tune of 2k to 2.5k.
As our current economy is telling me "fat chance", I intend on putting the running motor to good use as a test mule, with the only major difference being boost and compression levels. Whereas I am keeping stock compression and do not plan on going higher than 8psi on this one, the other is planned on being bored 2mm over, 8.8:1, and likely 15-20psi. I would like to get it ported and polished before raising the rev to 8-8.5k, but that would be a later project, likely.
What do I need for turbocharging? I know there are things that are nice to have, things that are helpful, and things I have to have.
I know I need some things, like a fpr, ut what are the bare necessities? Are there items I can get from a salvage yard that would work? I AM doing a junkyard turbo setup, after all.
Reply
 0
0

0

Thanks.
I don't know if I should ask this here or start another thread...
This motor is interim. The first is down to the block and is waiting for a cash infusion, probably to the tune of 2k to 2.5k.
As our current economy is telling me "fat chance", I intend on putting the running motor to good use as a test mule, with the only major difference being boost and compression levels. Whereas I am keeping stock compression and do not plan on going higher than 8psi on this one, the other is planned on being bored 2mm over, 8.8:1, and likely 15-20psi. I would like to get it ported and polished before raising the rev to 8-8.5k, but that would be a later project, likely.
What do I need for turbocharging? I know there are things that are nice to have, things that are helpful, and things I have to have.
I know I need some things, like a fpr, ut what are the bare necessities? Are there items I can get from a salvage yard that would work? I AM doing a junkyard turbo setup, after all.
I don't know if I should ask this here or start another thread...
This motor is interim. The first is down to the block and is waiting for a cash infusion, probably to the tune of 2k to 2.5k.
As our current economy is telling me "fat chance", I intend on putting the running motor to good use as a test mule, with the only major difference being boost and compression levels. Whereas I am keeping stock compression and do not plan on going higher than 8psi on this one, the other is planned on being bored 2mm over, 8.8:1, and likely 15-20psi. I would like to get it ported and polished before raising the rev to 8-8.5k, but that would be a later project, likely.
What do I need for turbocharging? I know there are things that are nice to have, things that are helpful, and things I have to have.
I know I need some things, like a fpr, ut what are the bare necessities? Are there items I can get from a salvage yard that would work? I AM doing a junkyard turbo setup, after all.
Might I suggest reading the "Everything you need to know FAQ" that is posted here
Short list:
Manifold (either a cast BEGi/Fm unit or a well made tubular piece)/downpipe
Turbocharger -> if you are going junkyard this will most likely be a t3
Water and oil lines
Some way to control fuel & timing-> I suggest a megasquirt
For 18-20 psi, you will want a bigger fuel pump
Larger injectors, go big or go home on this one. 600cc+ for that much boost.
Intercooler+piping.
Diverter/Blow off valve
Clutch
Wideband
I'm sure I'm forgetting something in there. But like I said, this question has been answered 100000000000^10th times on this forum, and has therefor been stickied. Probably in several places.
Reply
0
0

Thread Starter
Junior Member
Joined: Oct 2008
Posts: 113
Total Cats: 5
From: Cortland, Ohio
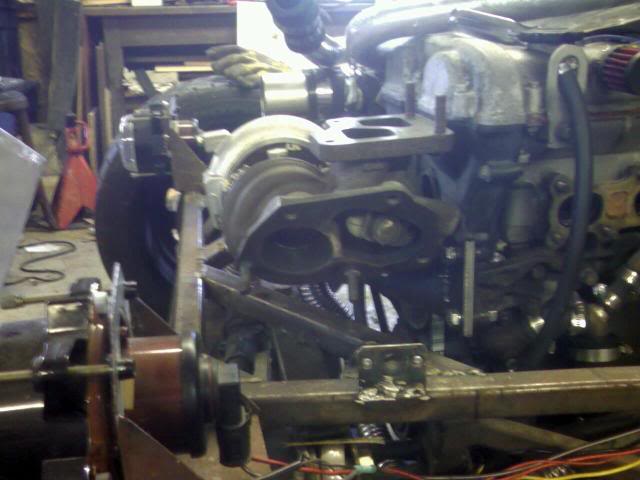
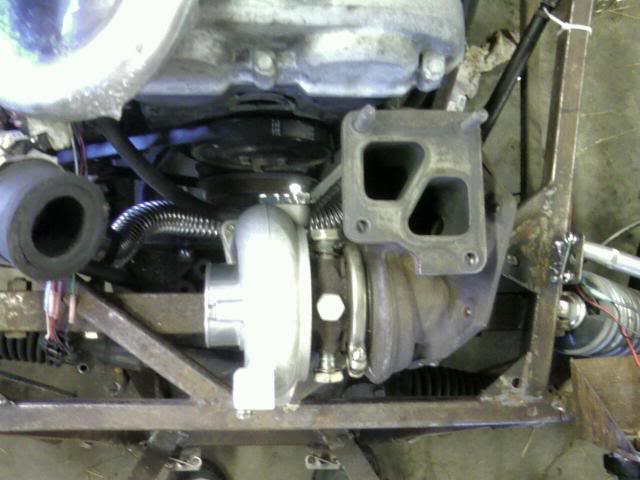
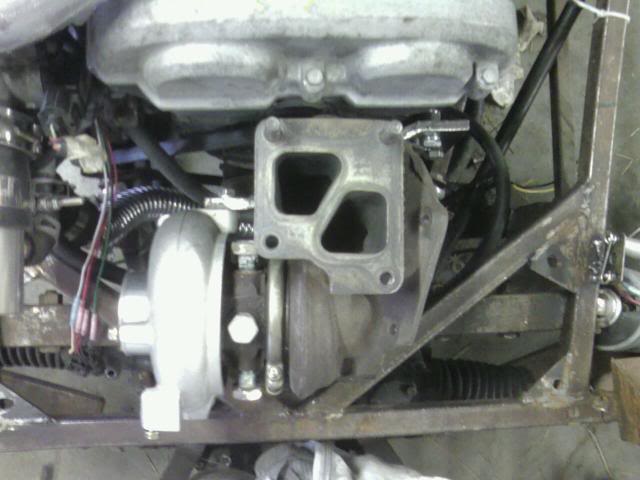
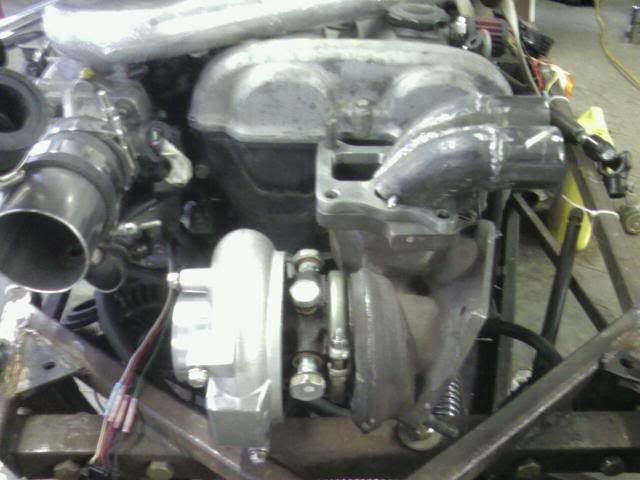
Perhaps I should have worded differently. I already have the turbo, a TD05HR 16g6 9.8T, aka Super 16G. As I am not really using a Miata, I cannot use a conventional manifold, so I am making an equal-length turbo manifold, as the turbo is going to be located in front of the motor.
I have 305cc injectors for the 6-8psi setup, along with a 255lph Walbro pump.
Once I switch motors, I intend on using a MS2 Extra, but for low boost, I am trying to figure out how to control ignition and fuel without spending a lot... yet. I acknowledge that MS is probably the best route, but is it really the minimalist option? Or is a progressive rate fuel regulator and an ignition retardation unit enough to run 6-8psi efficiently? I need to research on the mazdaspeed setup.
The FAQ makes it appear that it s feasable, but how many actual fpr/bipes only setups are there?
Last edited by SteyrTMP; Feb 26, 2010 at 10:53 PM.
Reply
0
0

I ran the fpr/bipes setup with a greddy kit @7psi and it worked fine, but if you can't find them cheap then the MS isn't much more $$ especially if you are planning to go that way eventually.
Reply
0
0
Thread Starter
Junior Member
Joined: Oct 2008
Posts: 113
Total Cats: 5
From: Cortland, Ohio
Yeah, I have been wanting the MS III for a while, but after some recent research, it looks like MS II, maybe with extra, should do the job, and cheaper. My buddy has been trying to convince me out of it due to time constraints, but my dad is a computer engineer, so if I have any problems building the MegaSquirt, I know where to go. I will have to show my buddy this post and I will be out hunting for a MS kit.
Reply
0
0
Thread Starter
Junior Member
Joined: Oct 2008
Posts: 113
Total Cats: 5
From: Cortland, Ohio
well, I read through the rest of the faqs, and looked through the megasquirt section, but have still failed to find reasons to use the ms I rather than the msII.
is it just because of more support, or is there not much needed on the MSII for the bp05?
is it just because of more support, or is there not much needed on the MSII for the bp05?
Reply
0
0
Thread Starter
Junior Member
Joined: Oct 2008
Posts: 113
Total Cats: 5
From: Cortland, Ohio
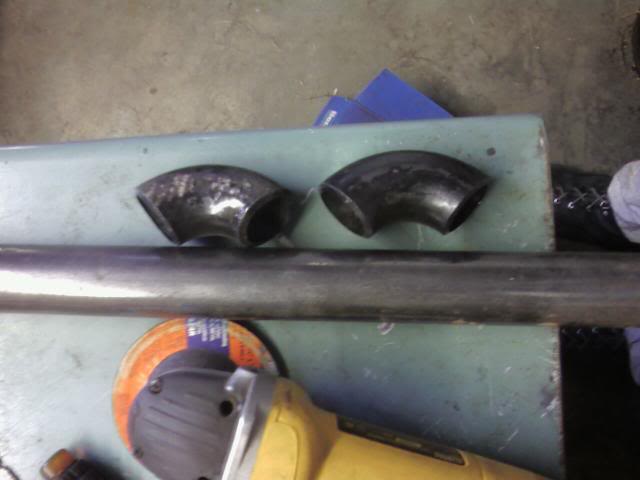
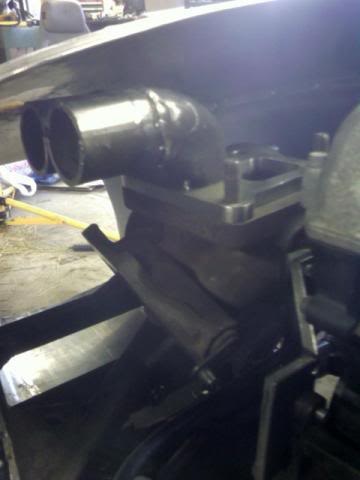
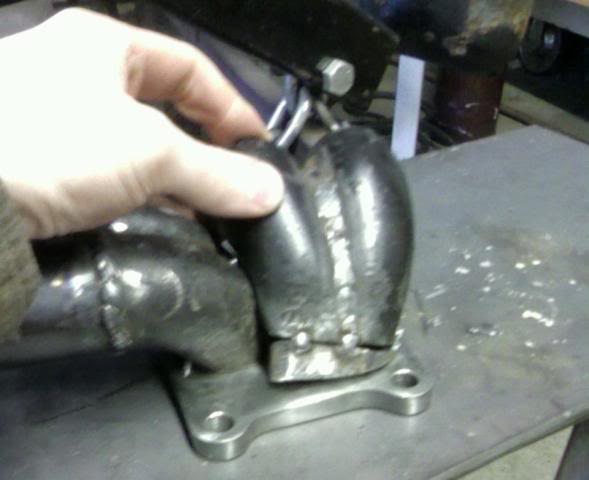
Originally, I intended on utilizing some left-over exhaust tubing from when I made the NA header to build the turbo manifold. However, after some reading and research, I was convinced that, while the mild steel tubing might work with low 6-8psi boost, it would not last long under high boost conditions. So, after quite a bit of searching, I drove to a local metal supply and bought 12 schedule 40 weld els and some pipe, as well as a pack of six els on ebay.
I realize that schedule 40 may be slightly overkill, and will weigh more than a stock cast manifold when finished, but I know it will most likely outlast the motor.
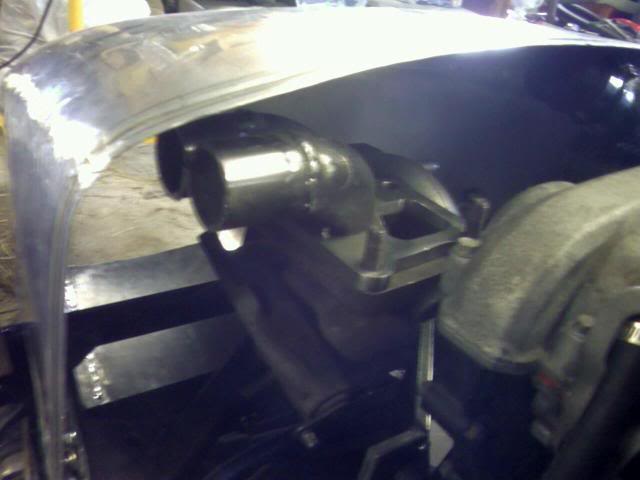
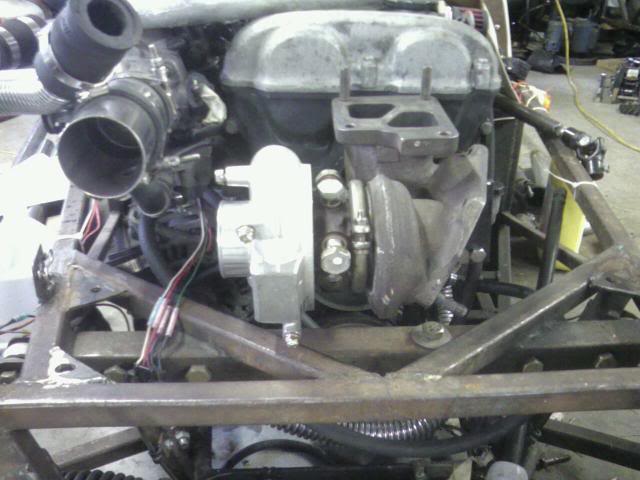
My two main known project restraints, other than financial, are the awkward design of the turbine housing, and space confinement. I will cover the housing later, but to paint a picture of the space, with the necessary front-mounted turbo, there will be roughly .5-.75 inches clearance between the turbo and the frame, and between the turbo and the hood/nose.
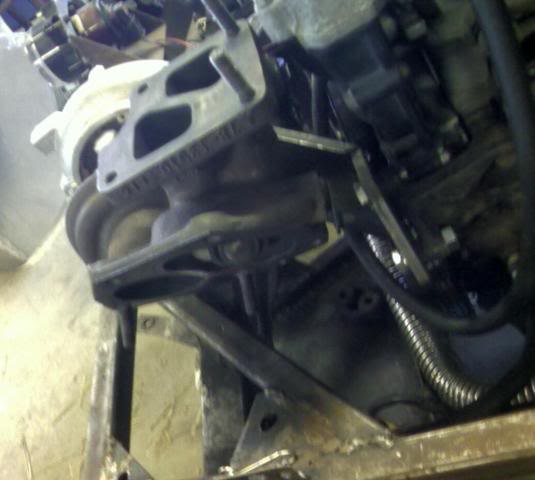
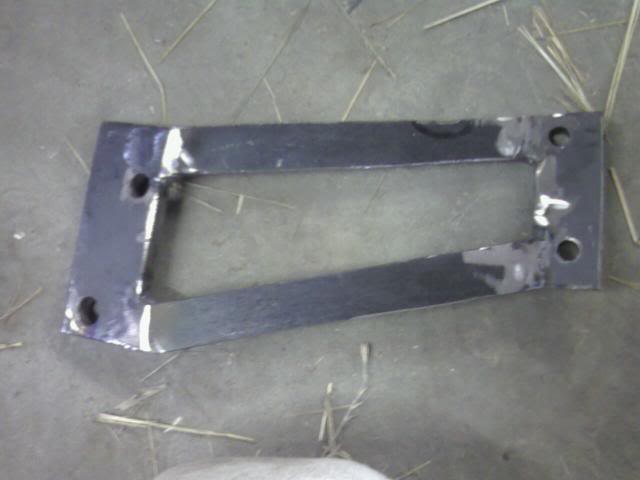
The day before yesterday, I scrounged around until I found the original A/C bracket, ground a few spots down to clear my coolant reroute, and fabbed up a bracket for the turbo that bolts up to the A/C mount.
(note: compound miter saws, even with cut-off wheels, don't like 3/8 plate. While cutting off a 10" section, as my dad used to tell me, the magic smoke came out, so it doesn't work anymore. I guess we will be using the warranty several times before were done here...)
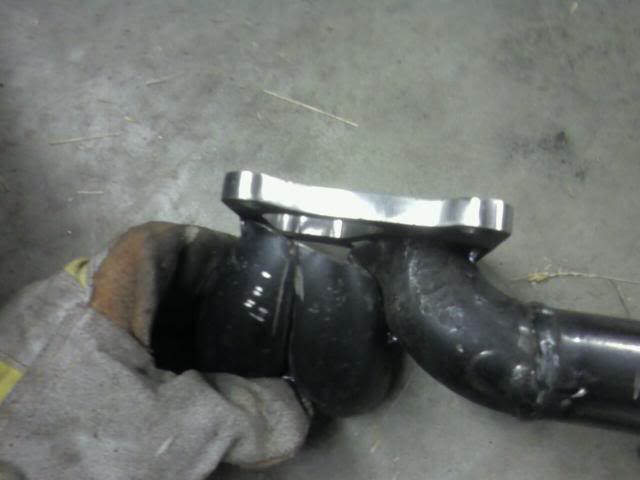
Yesterday morning, I stopped by the garage for an hour or two and started on the manifold. I took the turbo flange, cut a piece of mig wire, and bent it around the inside one of the ports on the flange. I then straightened it out, folded it in half, and cut it. I then bent it into a C and held it up to an el to figure where to cut, and copied on the second el.
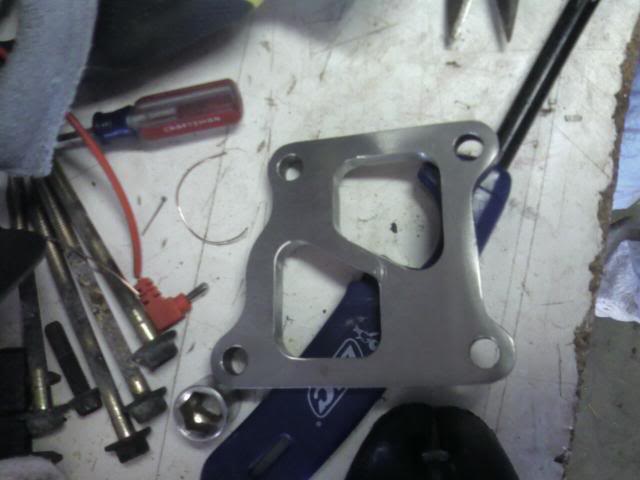
After cutting and grinding the els, I tacked them together, cut the ends flat, and re-measured with the wire. They had to be trimmed twice before meeting the right circumfrence.
Because I knew I would probably be needing some straight tubing before the next els, so I finish welded sections to each of them before joining the two, as doing so later, due to the close proximity, would be near impossible to get good welds.
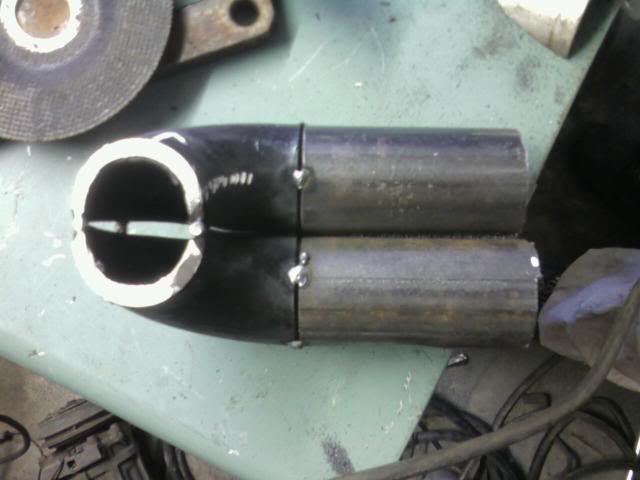
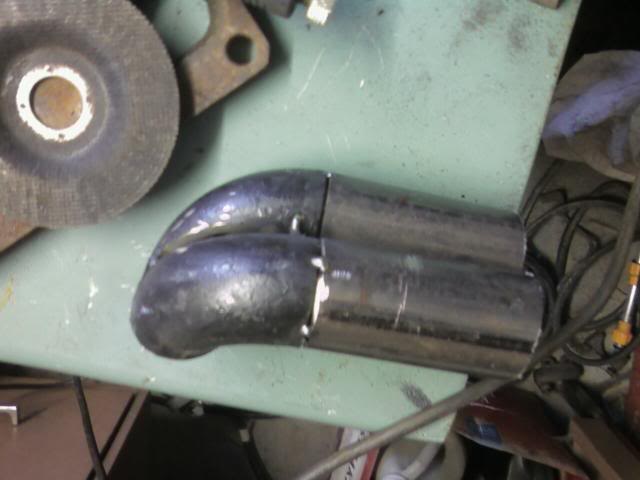
I then welded the two together both outside and in, and ground the internal welds with the electric die grinder. I pulled out the anvil, a BFH, and some bar steel, and started whaling at the base, to turn it from joined circles to the polygonal exhaust port shape.
That was about all I managed to do before I had to head off. As much as I would like to get more done this weekend, I doubt I will get a chance to, as were off saturday to pick up a '66 Impala for a buddy.
I realize that schedule 40 may be slightly overkill, and will weigh more than a stock cast manifold when finished, but I know it will most likely outlast the motor.
My two main known project restraints, other than financial, are the awkward design of the turbine housing, and space confinement. I will cover the housing later, but to paint a picture of the space, with the necessary front-mounted turbo, there will be roughly .5-.75 inches clearance between the turbo and the frame, and between the turbo and the hood/nose.
The day before yesterday, I scrounged around until I found the original A/C bracket, ground a few spots down to clear my coolant reroute, and fabbed up a bracket for the turbo that bolts up to the A/C mount.
(note: compound miter saws, even with cut-off wheels, don't like 3/8 plate. While cutting off a 10" section, as my dad used to tell me, the magic smoke came out, so it doesn't work anymore. I guess we will be using the warranty several times before were done here...)
Yesterday morning, I stopped by the garage for an hour or two and started on the manifold. I took the turbo flange, cut a piece of mig wire, and bent it around the inside one of the ports on the flange. I then straightened it out, folded it in half, and cut it. I then bent it into a C and held it up to an el to figure where to cut, and copied on the second el.
After cutting and grinding the els, I tacked them together, cut the ends flat, and re-measured with the wire. They had to be trimmed twice before meeting the right circumfrence.
Because I knew I would probably be needing some straight tubing before the next els, so I finish welded sections to each of them before joining the two, as doing so later, due to the close proximity, would be near impossible to get good welds.
I then welded the two together both outside and in, and ground the internal welds with the electric die grinder. I pulled out the anvil, a BFH, and some bar steel, and started whaling at the base, to turn it from joined circles to the polygonal exhaust port shape.
That was about all I managed to do before I had to head off. As much as I would like to get more done this weekend, I doubt I will get a chance to, as were off saturday to pick up a '66 Impala for a buddy.
Reply
0
0
Thread Starter
Junior Member
Joined: Oct 2008
Posts: 113
Total Cats: 5
From: Cortland, Ohio
Sometimes it seems as if I am just spinning my wheels. I will return to the same point and have to redesign it yet again.
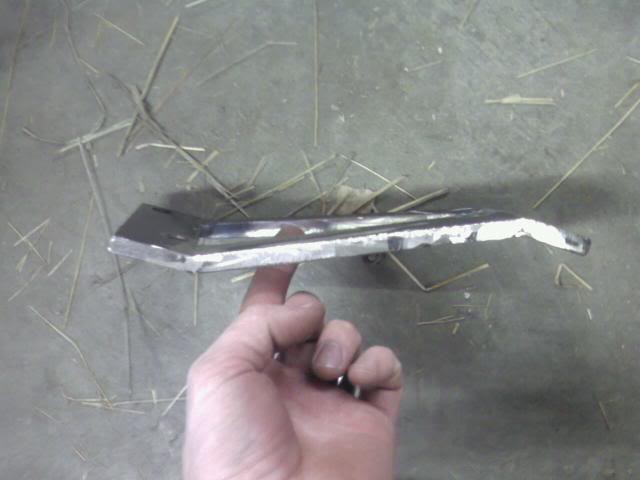
Today, I spent roughly an hour, tacking, breaking welds, grinding, and tacking again, all to get the turbo bracket to fit right. The end product is not exactly what I had in mind--I wanted the turbo more towards the center of the valve cover. However, I do not thnk it is beyond the plausible, so I will try to fit it around as is.
I also hammered on the els to try and shape them to fit the flange, and got as close as I am going to get with that thick of a wall. Schedule 40 is hard to shape!
I ran out of time, but was able to tack the first set of els to the flange and drop it on the turbo. It will be a tight fit, but I remain confident that it will work out in the end.
Reply
0
0

Is that going to clear the hood?
I started playing with my setup now. Looks like im either going to run the turbo in the front (like you but probably lower) or place it right above my brake cylinders.
I started playing with my setup now. Looks like im either going to run the turbo in the front (like you but probably lower) or place it right above my brake cylinders.
Reply
0
0
Thread Starter
Junior Member
Joined: Oct 2008
Posts: 113
Total Cats: 5
From: Cortland, Ohio
I am guessing you are doing a Seven too, in which case it probably depends on the turbo and the frame size. I personally would avoid locating it near the master cylinders, perhaps you can make a power humpin the hood and locate it traditionally? my buddy suggested that, but A) its hard enough to see over the hood as it is, and B) I would have the downpipe going into the valve cover.
PM me on what you have and what you are trying to do.
As for the hood, I will have maybe an inch of clearance, maybe a tad less. enough to work, however, may have issues with the paint on the nose/hood.
A side note: I was going to retitle this as " Now: Turbo Build, was thermostat relocation", but in spite of searching, I was unable to figure out how to edit a post title.
Reply
0
0
Thread Starter
Junior Member
Joined: Oct 2008
Posts: 113
Total Cats: 5
From: Cortland, Ohio
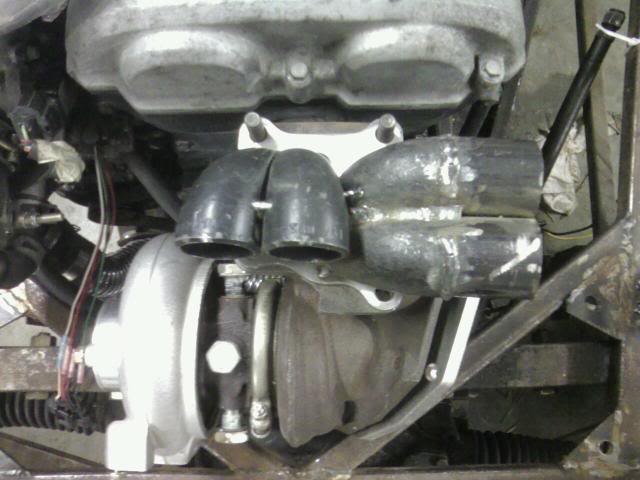
I could route it under either manifold--intake or exhaust, but for now I have it where it is because I used the original 1.8 thermostat housing, as I am too cheap and broke to go buy the Kia houing.
Reply
0
0
Thread Starter
Junior Member
Joined: Oct 2008
Posts: 113
Total Cats: 5
From: Cortland, Ohio
Today I looked at the turbo bracket and decided to make a longer bracket, locating the turbo more towards the center of the engine. In retrospect, it might have been better to have left it, but everyone has 20/20 hindsight.
I reused the two end pieces that were already drilled, and used two strips for the center than one big piece of plate, to lower the weight.
It took about three hours of swearing and trial and error, as the welders are in one corner of the garage, the grinders in the opposite corner, and the car in the middle. I finally gave in, lugged the welders into the middle of the garage and finalized the bracket.
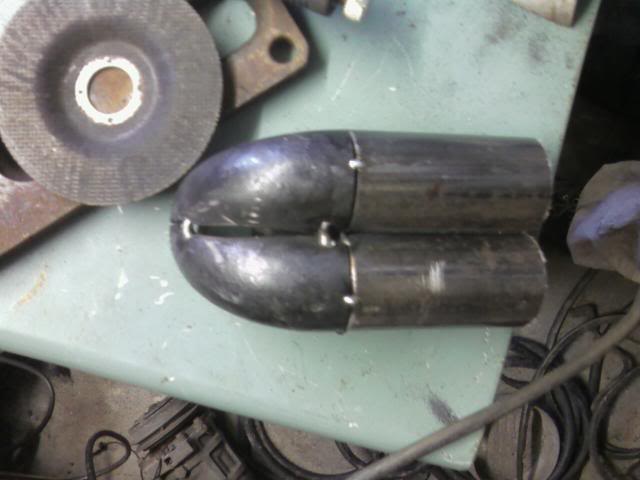
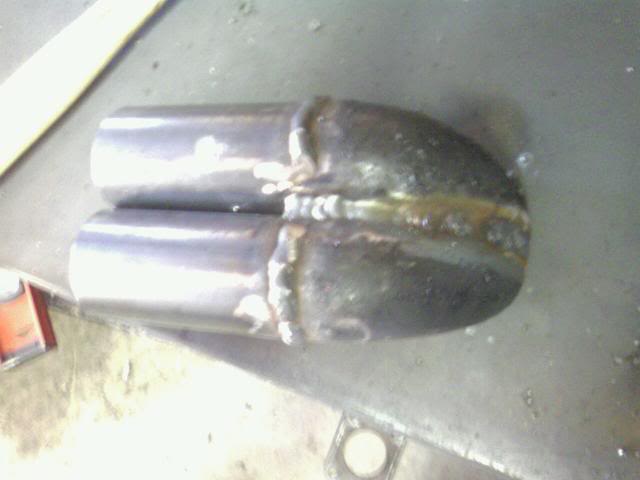
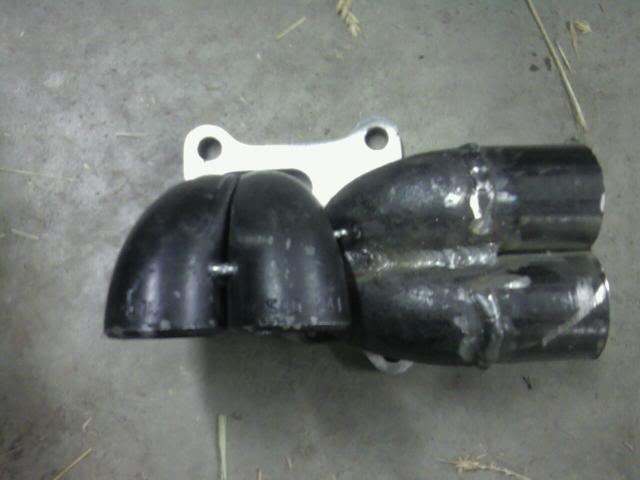
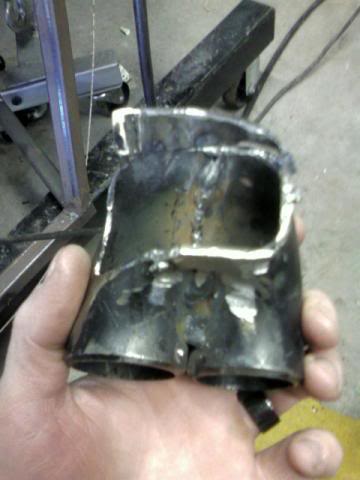
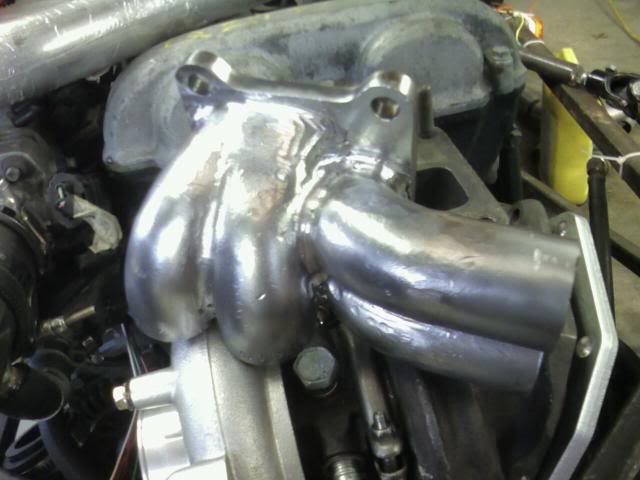
Initially, I figured that having the turbo would leave enough room to have the second "sub-collector" as it were, going over the first pair, to meet together in the traditional cloverleaf, before seperating to equalize each primaries length. Alas, it was not so. I then turned to plan "B", which you see now.
I only had enough time to grind down a pair of els and tack them together to get a rough idea of what I am aiming for, but here it is.
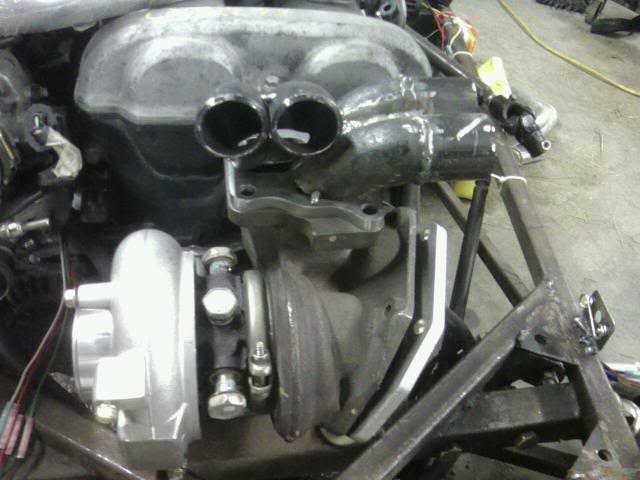
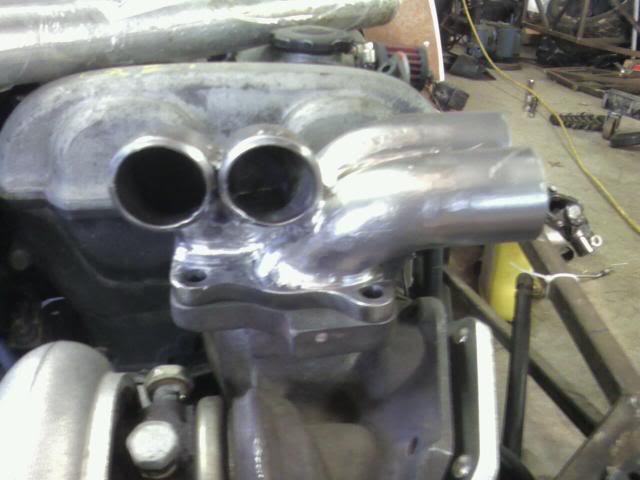
My biggest issue, now the the turbo is in the middle, is the fact that there now is very little room for the intake plumbing. I am going to have to find some tight-radius aluminum tubing, and dog-leg the IAC pipe, or revert back to the old bracket.

I reused the two end pieces that were already drilled, and used two strips for the center than one big piece of plate, to lower the weight.
It took about three hours of swearing and trial and error, as the welders are in one corner of the garage, the grinders in the opposite corner, and the car in the middle. I finally gave in, lugged the welders into the middle of the garage and finalized the bracket.
Initially, I figured that having the turbo would leave enough room to have the second "sub-collector" as it were, going over the first pair, to meet together in the traditional cloverleaf, before seperating to equalize each primaries length. Alas, it was not so. I then turned to plan "B", which you see now.
I only had enough time to grind down a pair of els and tack them together to get a rough idea of what I am aiming for, but here it is.
My biggest issue, now the the turbo is in the middle, is the fact that there now is very little room for the intake plumbing. I am going to have to find some tight-radius aluminum tubing, and dog-leg the IAC pipe, or revert back to the old bracket.
Reply
0
0


Thread Starter
Junior Member
Joined: Oct 2008
Posts: 113
Total Cats: 5
From: Cortland, Ohio
I was going to say you're free to use my welders (MIG: Lincoln SP-175, TIG: Miller Syncrowave 200), but then I realized you are on the other side of the pond.
If anyone lives around OH/PA/MI, they are free to stop by, check out the Sevens, or get a few things welded.
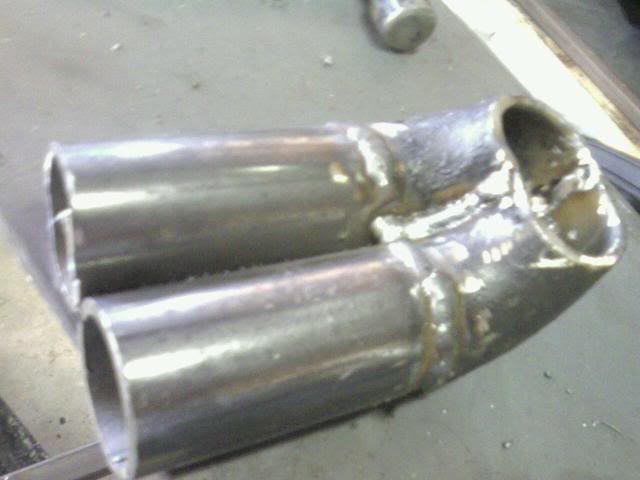
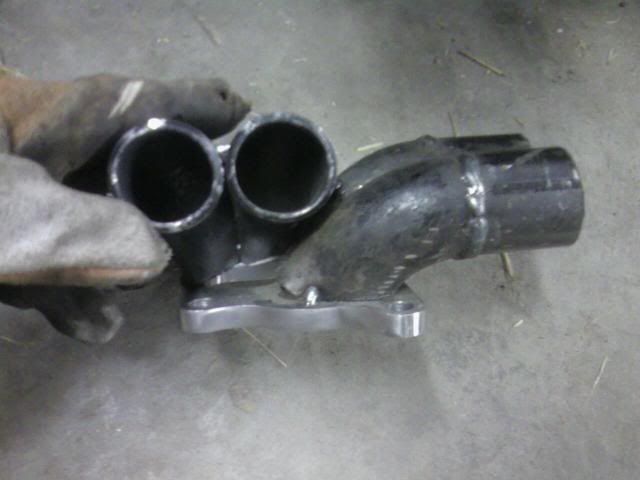
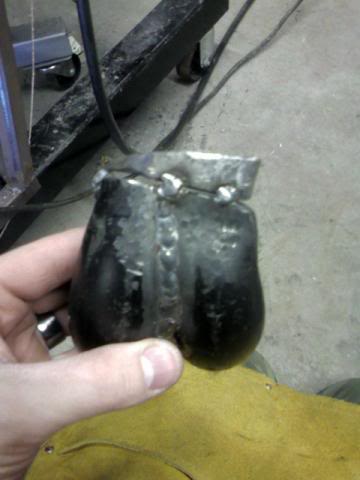
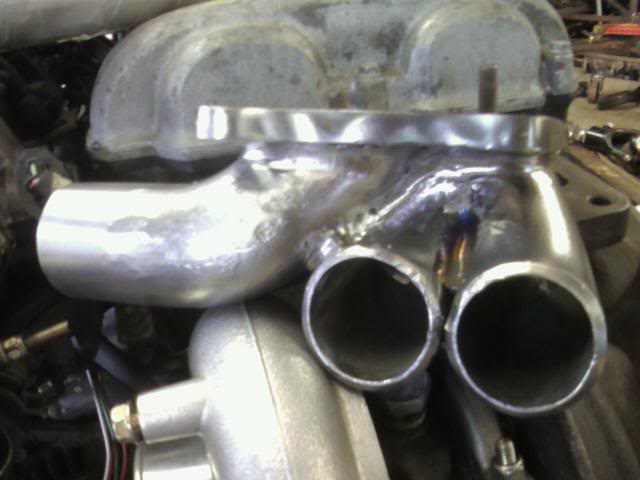
I got an hour in the morning to stop by the garage and work on the turbo collectors. I am getting close to the final welds. While I don't like filling space with weld, because of such contortions, I will probably have to do so in some areas.
If anyone lives around OH/PA/MI, they are free to stop by, check out the Sevens, or get a few things welded.
I got an hour in the morning to stop by the garage and work on the turbo collectors. I am getting close to the final welds. While I don't like filling space with weld, because of such contortions, I will probably have to do so in some areas.
Reply
0
0

Thread Starter
Junior Member
Joined: Oct 2008
Posts: 113
Total Cats: 5
From: Cortland, Ohio
Thanks. It is nice to hear things like that occasionally when in a forum where nearly everyone has more experience in this area than me.
I have tried to change the title, but haven't been able to, at least not on my phone, which is currently my only source of internet.
This is prety much my first serious foray into uncharted waters for me. Before my Seven build, other than the occasional intake or exhaust and the occasional engine pull, the closest automotive work I had done was rebuild the motor for my first car (a Saturn... ugh) under close watch and guidance of my dad some ten years ago.
Since I've started this build, I've learned how to weld (both MIG and TIG), I've diagnosed, shortened, and stripped the Miata wiring harness down to under 40 wires at most points, I've learned the basics of shaping metal, am building my second equal-length manifold... and I still have so much to learn.
Now I have to learn all about turbocharging. While I understand the basics of supercharging, having owned a Mini Cooper S for the last six years, turbocharging was never high in my interests until I started building the Seven. Now, I have been gathering a much information on turbocharging for the last six months or so, and hope to get the basics together enough to have it running under boost by the summer.
Right now, the biggest challenge is financial. It is probably going to be a while before I am going to be able to make much progress, because I still have to come up with some sort of fuel and ignition control, boost control, a BOV, a FPR, and a wideband O2 sensor and gauge. I am probably missing a few things, but that there is enough to keep me busy trying to find for quite some time.
Now I'm starting to ramble, and my mind, as well as my eyes, is starting to shut down.
Reply
0
0


