Something more Imaginative?
 05-02-2012, 09:14 PM
#21
Senior Member

Thread Starter
iTrader: (3)

Join Date: May 2005
Location: Mass.
Posts: 811
Total Cats: 43
In the mean time ...
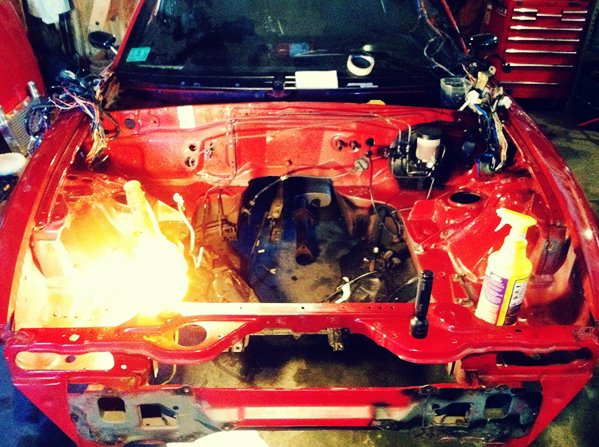
... the lower control arm bolts were total -----s. Hopefully the front clip will be completely repainted by mid May. All depends on how much life decides to get in the way.
-Zach
... the lower control arm bolts were total -----s. Hopefully the front clip will be completely repainted by mid May. All depends on how much life decides to get in the way.
-Zach

Reply
 0
0

0
05-02-2012, 09:19 PM
#22
Senior Member
Thread Starter
iTrader: (3)
Join Date: May 2005
Location: Mass.
Posts: 811
Total Cats: 43
 .
.I cut the inner section out with a 90 dollar Ryobi scroll saw
 ... proof anyone with patience can do this.
-Zach
Reply
0
0
05-02-2012, 09:41 PM
#23
Elite Member
iTrader: (37)

Join Date: Apr 2010
Location: Very NorCal
Posts: 10,441
Total Cats: 1,899
Finally got around to making the wastegate bracket.
I always hated the shitty canister which comes on the Greddy turbo. So when I saw a vendor off loading Forge wastegates for the MS Protege for <$70 ... I hit buy hoping I could make it work.
Turns out it fits perfect. I used .25" 6061 aluminum in an effort to limit bracket flex.
I always hated the shitty canister which comes on the Greddy turbo. So when I saw a vendor off loading Forge wastegates for the MS Protege for <$70 ... I hit buy hoping I could make it work.
Turns out it fits perfect. I used .25" 6061 aluminum in an effort to limit bracket flex.

That bracket and WGA look great, like it was meant to be there! Any chance you would share the source on those? The threaded section would be super easy to extend and adapt to other units. Any reason it wouldn't work with a Garrett & custom bracket?
Keep up the good work!
Reply
0
0
05-02-2012, 11:22 PM
#24
Senior Member
Thread Starter
iTrader: (3)
Join Date: May 2005
Location: Mass.
Posts: 811
Total Cats: 43
I bought it from Street Unit about 2 years ago.
Their price is back up: http://http://www.streetunit.com/Forge_Adjustable_Wastegate_Acutator_MSP_p/fmacmsp.htm
Here's the forge website: http://www.forgemotorsport.com/conte...3&catalog=0001
160 list price ... ouch.
-zach
Their price is back up: http://http://www.streetunit.com/Forge_Adjustable_Wastegate_Acutator_MSP_p/fmacmsp.htm
Here's the forge website: http://www.forgemotorsport.com/conte...3&catalog=0001
160 list price ... ouch.
-zach
Reply
0
0
06-04-2012, 10:46 PM
#25
Senior Member
Thread Starter
iTrader: (3)
Join Date: May 2005
Location: Mass.
Posts: 811
Total Cats: 43
Well, I wasn't going to let another summer pass without a running/driving miata.
So, instead of being manly and finishing my turbo bucket I just bought another
'96, all original, 70k, originally a florida car, always garaged, etc.
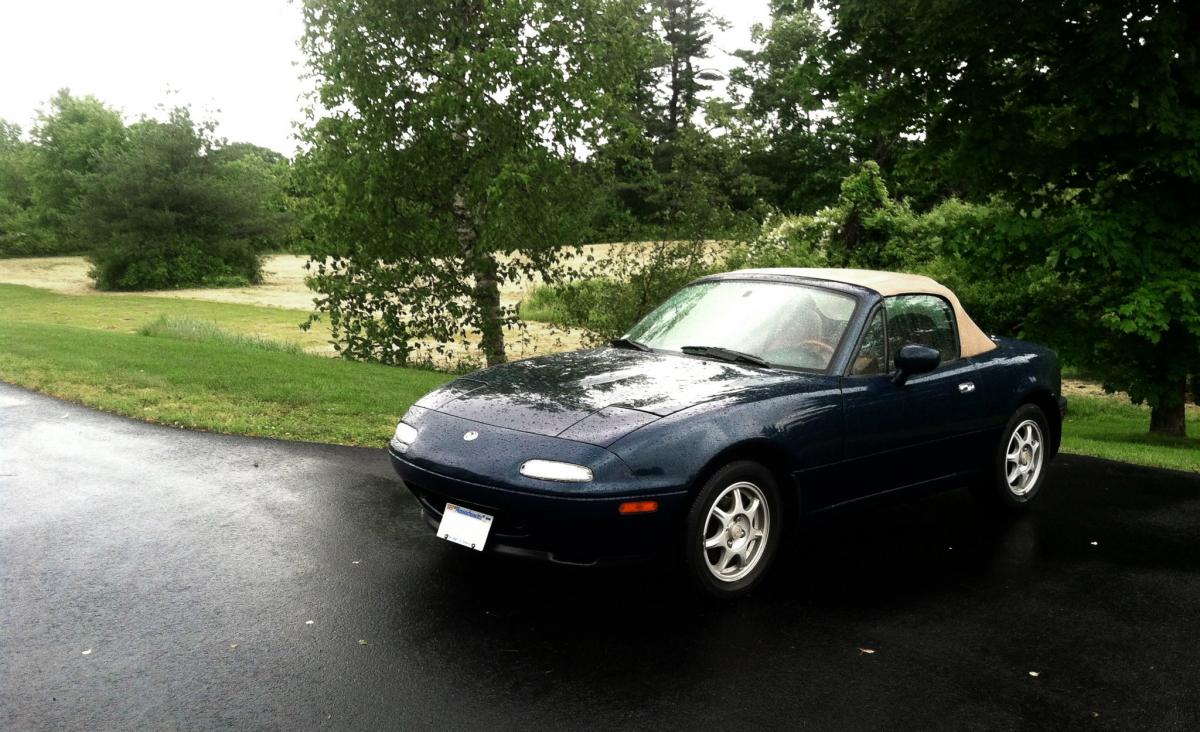
Not gonna lie, after driving this thing I wish I just threw a '99 block with a shaved head and a MS into my '90 and spent the rest of my $$$$ on ASTs. Le sigh ... live and learn.
-Zach
So, instead of being manly and finishing my turbo bucket I just bought another
'96, all original, 70k, originally a florida car, always garaged, etc.
Not gonna lie, after driving this thing I wish I just threw a '99 block with a shaved head and a MS into my '90 and spent the rest of my $$$$ on ASTs. Le sigh ... live and learn.
-Zach
Reply
0
0
09-10-2012, 12:32 PM
#26
Senior Member
Thread Starter
iTrader: (3)
Join Date: May 2005
Location: Mass.
Posts: 811
Total Cats: 43
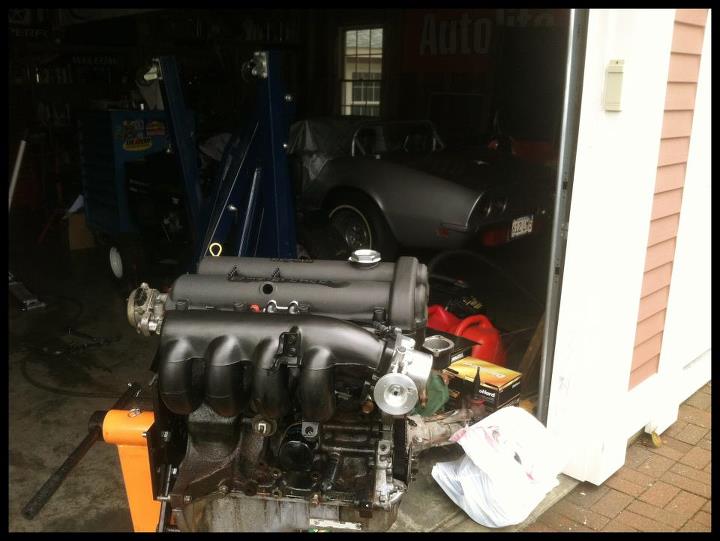
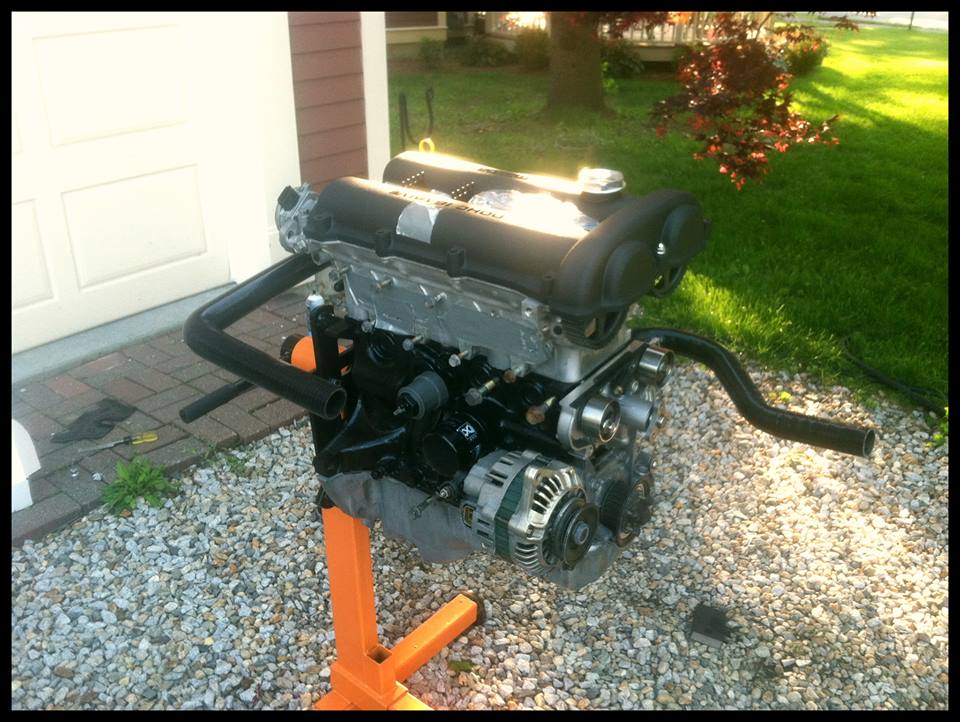
Well, after a summer of distractions the cooler weather is rolling back in so it's time to make progress.
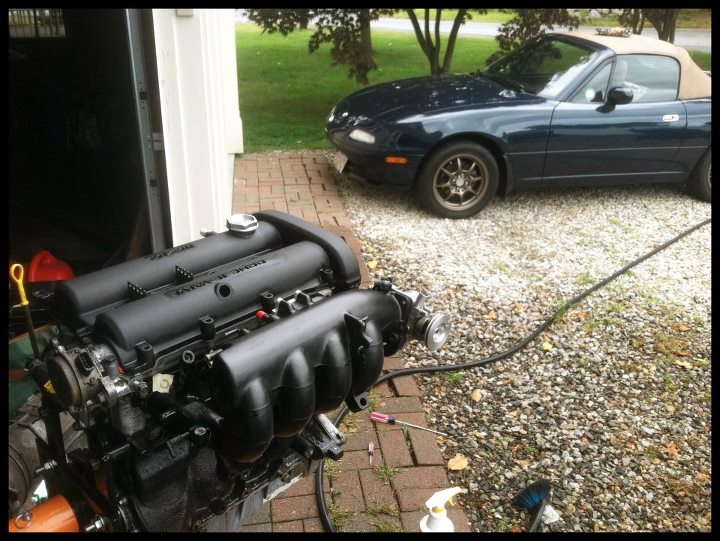
I threw the engine on a stand, stripped of all the accessories, degreased it (man, a leaking CAS and cam seal can sure make a mess), and started replacing all the critical seals.
My 1.6 stares in envy (now that I own a 1.8, I really wish I started this project with one).
Can anyone recommend a good aftermarket rebuilt alternator? The bearings in mine are on their way out.
Also, since I've had 2 OEM regulators fail on me, I'm thinking of upgrading to an aeromotive. This leads to another question, has anyone ran one of these with a M-Tuned rail? I really don't want to drill and tap my rail at this point and the o-ring should be OEM robust.
-Zach
Reply
0
0
04-01-2013, 12:52 PM
#27
Senior Member
Thread Starter
iTrader: (3)
Join Date: May 2005
Location: Mass.
Posts: 811
Total Cats: 43
I've been doing some gauge cluster work to cure winter boredom - more detailed pics once I finish designing the gauge faces in Ai (Adobe Illustrator for you non-creatives).
Shitty phone pic alert:
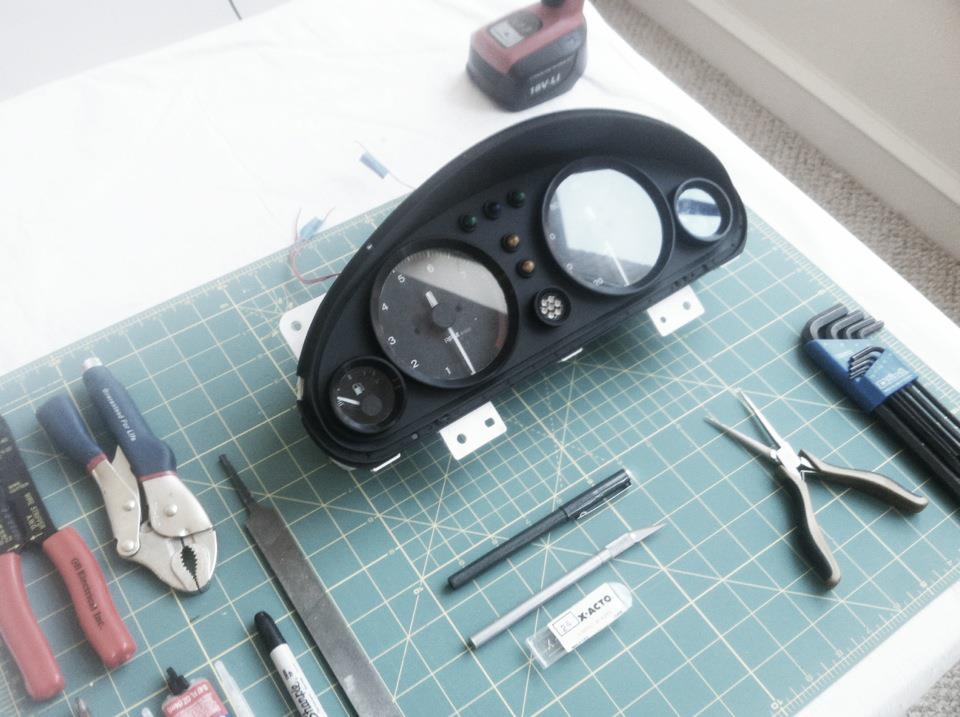
without the shift light trim ring:
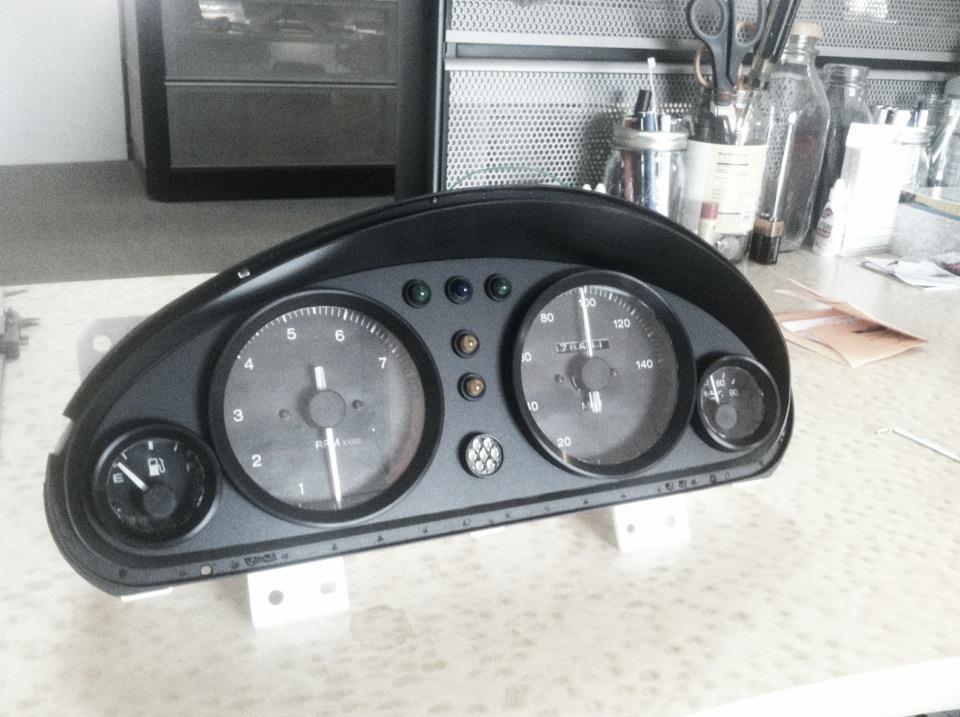
I moved the oil pressure gauge to the water temp spot and ran lead wires from power and signal (the ground lines up with the flex circuit).
LEDs are left overs from a medical marijuana vaporizer project at work (10v Dialight 249 for those interested). The two amber lights will be wired at some point down the road for oil/water temp warning lamps.
I also embedded my raptor shift light into the area once populated by all the OEM warning lamps.
Gauge rings are black ano aluminum from RS Refine (group buy on CR).
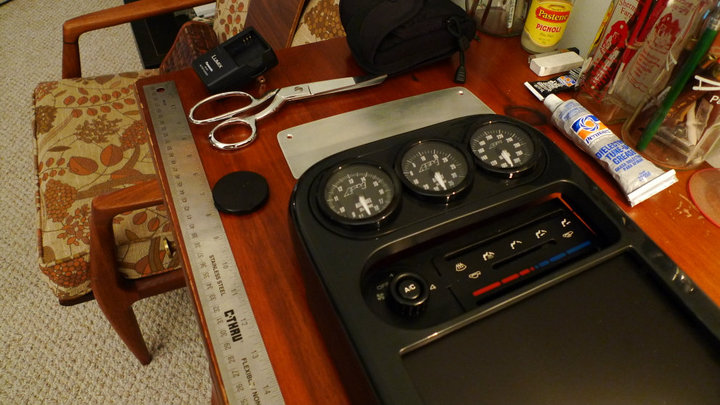
I'm also designing matching gauge faces for my AEM gauges in the center console.
Hopefully the snow will be melted this week and I can paint the engine bay and started bolting things back together. It's only taken me 3 years to get this far.
Shitty phone pic alert:
without the shift light trim ring:
I moved the oil pressure gauge to the water temp spot and ran lead wires from power and signal (the ground lines up with the flex circuit).
LEDs are left overs from a medical marijuana vaporizer project at work
(10v Dialight 249 for those interested). The two amber lights will be wired at some point down the road for oil/water temp warning lamps.I also embedded my raptor shift light into the area once populated by all the OEM warning lamps.
Gauge rings are black ano aluminum from RS Refine (group buy on CR).
I'm also designing matching gauge faces for my AEM gauges in the center console.
Hopefully the snow will be melted this week and I can paint the engine bay and started bolting things back together. It's only taken me 3 years to get this far.
Reply
0
0
04-01-2013, 02:09 PM
#29
Senior Member
Thread Starter
iTrader: (3)
Join Date: May 2005
Location: Mass.
Posts: 811
Total Cats: 43
I'm an industrial designer for a medical development consultancy. The variety of projects we get is rather ... interesting.
"I really like those rings, I may have to see if I can find them on CR"
I've got a set in my DD '96 (polished aluminum though). I might let them go for the right price.
"Are they going to be UV stable?"
They're just test prints right now. I was going to take the Revlimiter approach which is listed on his website. I might have custom dry transfer decals made instead and apply them to thin styrene ... not sure yet. I need to do some testing.
-Zach
Reply
0
0
06-16-2013, 09:41 PM
#30
Senior Member
Thread Starter
iTrader: (3)
Join Date: May 2005
Location: Mass.
Posts: 811
Total Cats: 43
The weather has been tolerable as of late (not 20 degrees, not 80% humidity, i.e., it's May/June). As a result, progress has been good and it looks like the car will finally come together this year.
The engine was degreased, painted, WP and timing belt replaced with new oil seals.
Started the coolant reroute. Waiting for my custom hardline to be welded up. I don't know why you guys say these reroutes are so hard ... plenty of working room
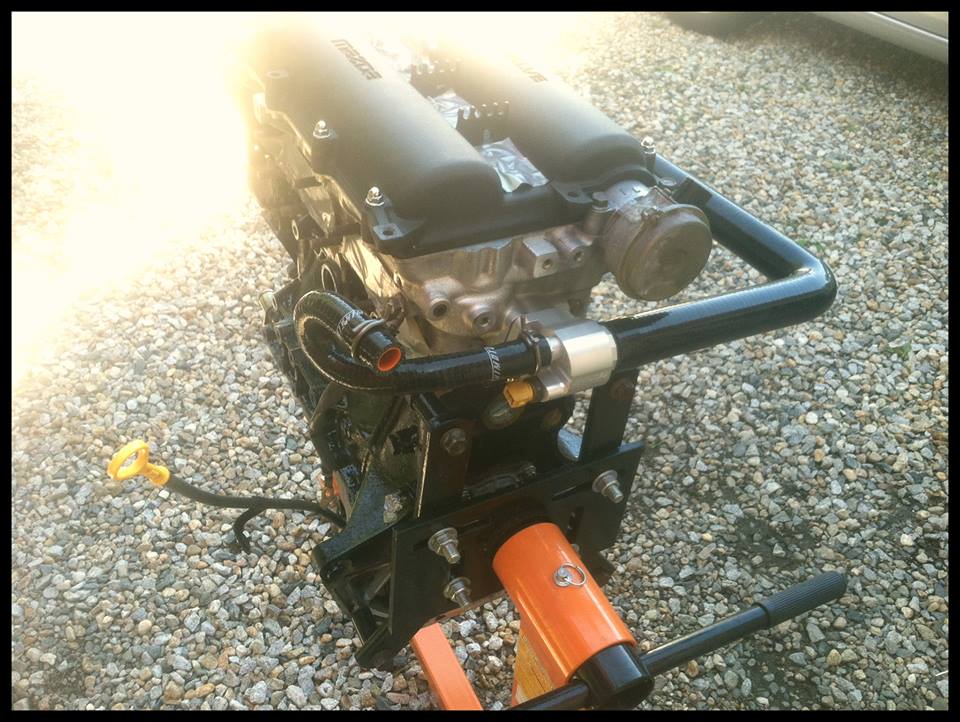
While I wait for the hot parts to get ceramic coated, I decided to finally address the engine bay (with some much needed assistance from my father whos painted far more cars than I).
Base/clear classic red. The wheel wells, chassis, and trans tunnel received SEM rust shield via a foam roller - came out ****.
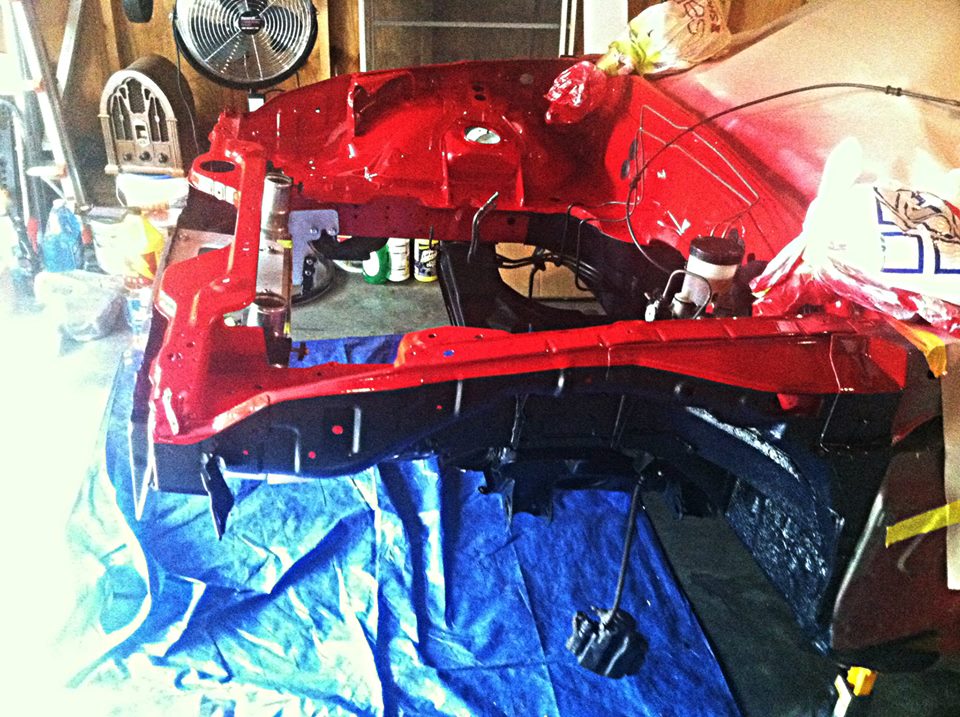
...and **** going back in. I have way too many hours restoring the headlamp assemblies. Also added DEI head shielding to the trans tunnel to hopefully fend off future calf burns.

I've created a new alternator bracket using 8mm aurora rod ends and buttoned up the engine. More proper pics to come.
-Zach
The engine was degreased, painted, WP and timing belt replaced with new oil seals.
Started the coolant reroute. Waiting for my custom hardline to be welded up. I don't know why you guys say these reroutes are so hard ... plenty of working room
While I wait for the hot parts to get ceramic coated, I decided to finally address the engine bay (with some much needed assistance from my father whos painted far more cars than I).
Base/clear classic red. The wheel wells, chassis, and trans tunnel received SEM rust shield via a foam roller - came out ****.
...and **** going back in. I have way too many hours restoring the headlamp assemblies. Also added DEI head shielding to the trans tunnel to hopefully fend off future calf burns.
I've created a new alternator bracket using 8mm aurora rod ends and buttoned up the engine. More proper pics to come.
-Zach
Reply
0
0
07-15-2013, 06:28 PM
#31
Senior Member
Thread Starter
iTrader: (3)
Join Date: May 2005
Location: Mass.
Posts: 811
Total Cats: 43
Well, after many years of dragging *** the car is hopefully a month or so away from running (notice I left out 'driving'). I've also become an adult and started hosting my images on imgur.com AND bought a CanonS100 AND leveled my images in PS. Crispy crisp.
Anyway
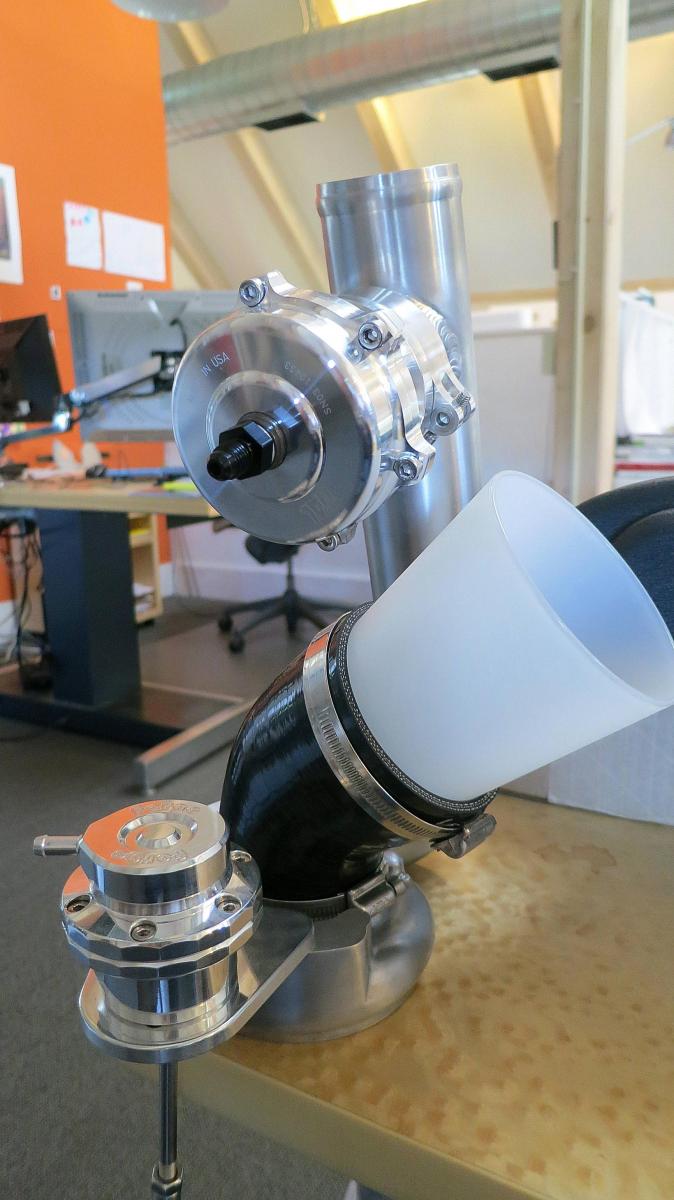
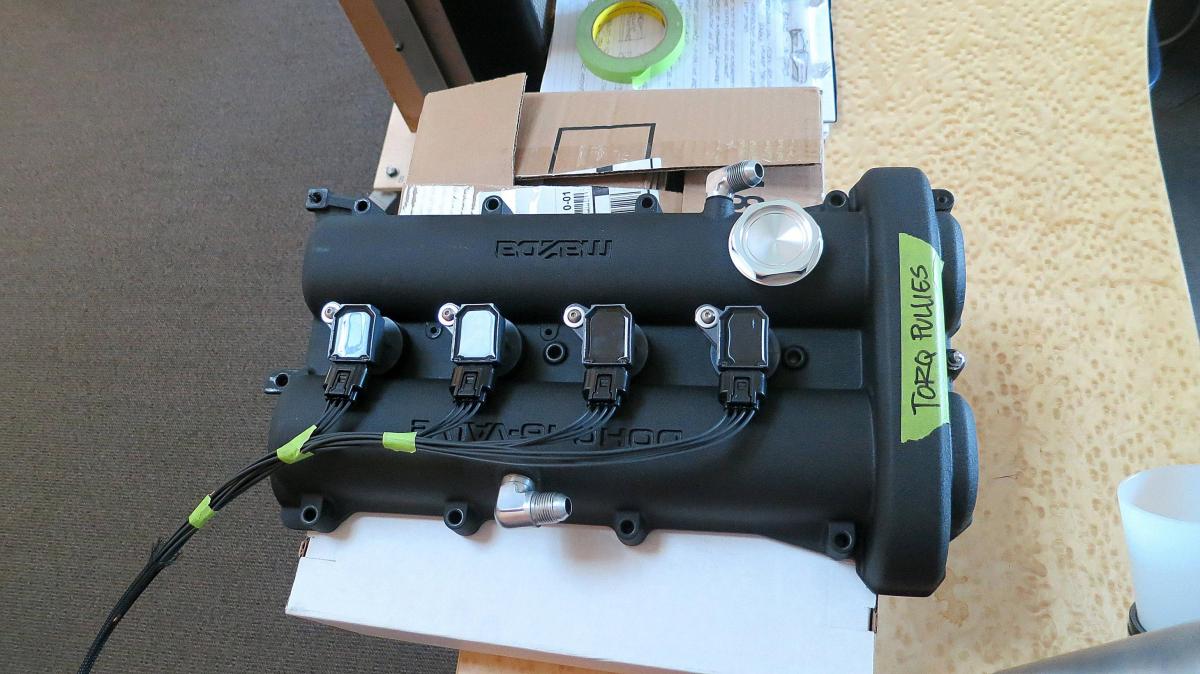
I took my hot parts to get cerakoted last week and in the mean time I bit the bullet and bought some ebay COPs. Since my camcover was already powdercoated I took the low impact approach to COPs mounting - stainless m5 male/female standoffs from M-Carr with some .180" ABS plastic spacers between the COP housing and the COP seal (bonded with RTV).
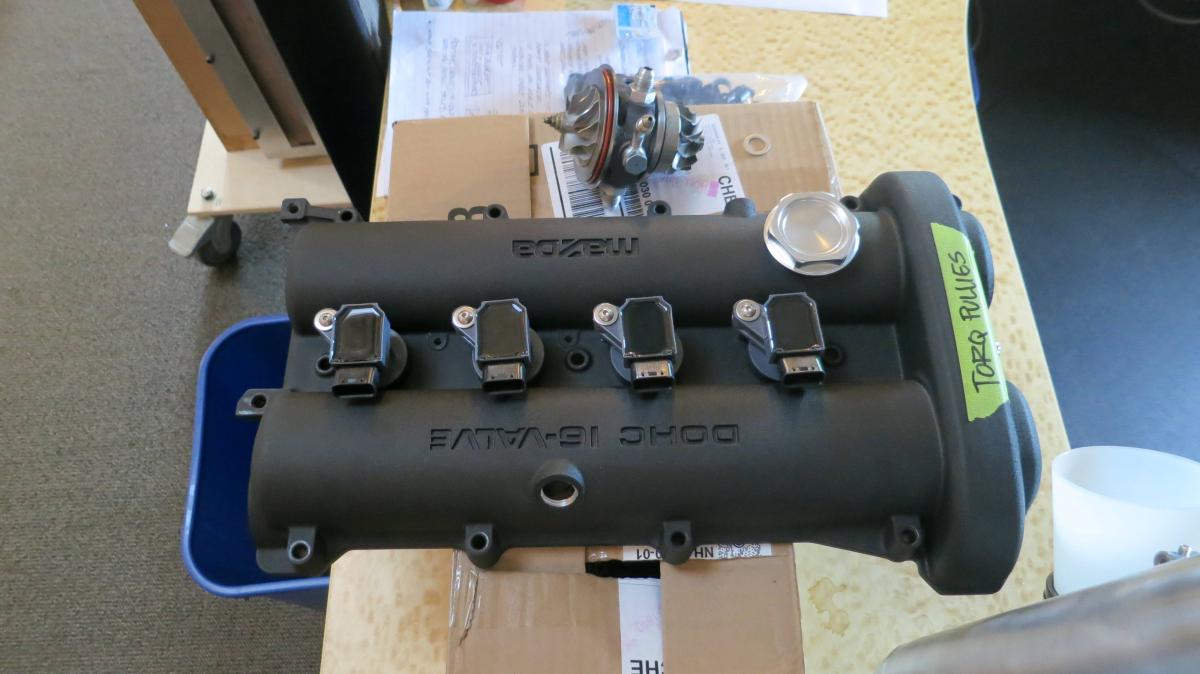
And some bling while it's still shiny (debating going the powdercoat route).
Also, MODS - feel free to change the thread title as it sucks.
-Zach
Anyway
I took my hot parts to get cerakoted last week and in the mean time I bit the bullet and bought some ebay COPs. Since my camcover was already powdercoated I took the low impact approach to COPs mounting - stainless m5 male/female standoffs from M-Carr with some .180" ABS plastic spacers between the COP housing and the COP seal (bonded with RTV).
And some bling while it's still shiny (debating going the powdercoat route).
Also, MODS - feel free to change the thread title as it sucks.
-Zach
Reply
0
0
07-15-2013, 06:50 PM
#32
Elite Member
iTrader: (37)
Join Date: Apr 2010
Location: Very NorCal
Posts: 10,441
Total Cats: 1,899
You've been around long enough to know better than to say things like this... 
Good progress, better than my stockmobile. Did you tap directly into the cover for the standoffs, and are these .180" plastic spacers homebrew, or are they some sort of premade ring? Because it came out incredibly clean.
Good progress, better than my stockmobile. Did you tap directly into the cover for the standoffs, and are these .180" plastic spacers homebrew, or are they some sort of premade ring? Because it came out incredibly clean.
Reply
0
0
07-15-2013, 07:24 PM
#33
Senior Member
Thread Starter
iTrader: (3)
Join Date: May 2005
Location: Mass.
Posts: 811
Total Cats: 43
You've been around long enough to know better than to say things like this...
Good progress, better than my stockmobile. Did you tap directly into the cover for the standoffs, and are these .180" plastic spacers homebrew, or are they some sort of premade ring? Because it came out incredibly clean.
Good progress, better than my stockmobile. Did you tap directly into the cover for the standoffs, and are these .180" plastic spacers homebrew, or are they some sort of premade ring? Because it came out incredibly clean.
McMaster-Carr
The spacers/rings are home brew. Just some sheet stock ABS, Rigid holesaws/drill, and some file work over a beer.
Reply
0
0
07-18-2013, 12:26 PM
#34
Senior Member
Thread Starter
iTrader: (3)
Join Date: May 2005
Location: Mass.
Posts: 811
Total Cats: 43
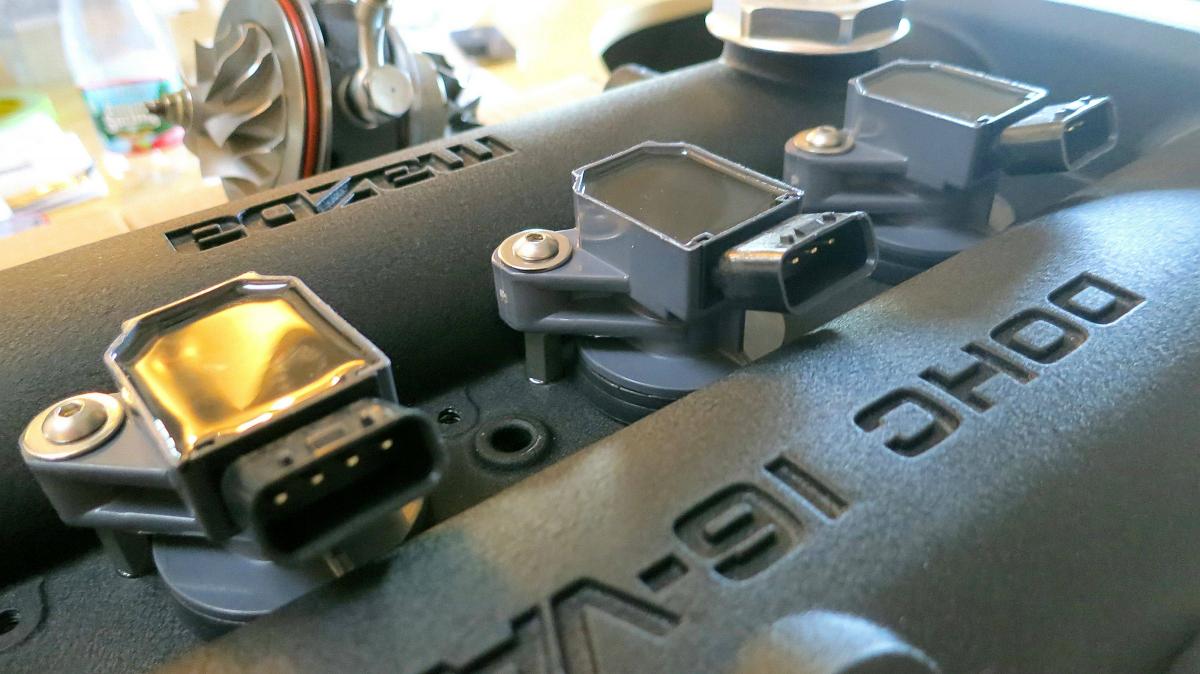
NPT/AN fittings and COP pigtails came in this morning ... time to slap this b*tch back on the head.
Now that my OEM water neck is gonzo, my plans are to fab up a custom breather set up which mounts to the front of the engine using the two unused bolt threads on the cam cover ... blur your eyes an imagine (added bonus: I only need to buy 2 feet of -8an PTFE hose).
Hot parts should be back from the coater tomorrow and then the engine gets dropped back in. Woot-woot.
-Zach
Reply
0
0
07-25-2013, 01:42 PM
#35
Senior Member
Thread Starter
iTrader: (3)
Join Date: May 2005
Location: Mass.
Posts: 811
Total Cats: 43
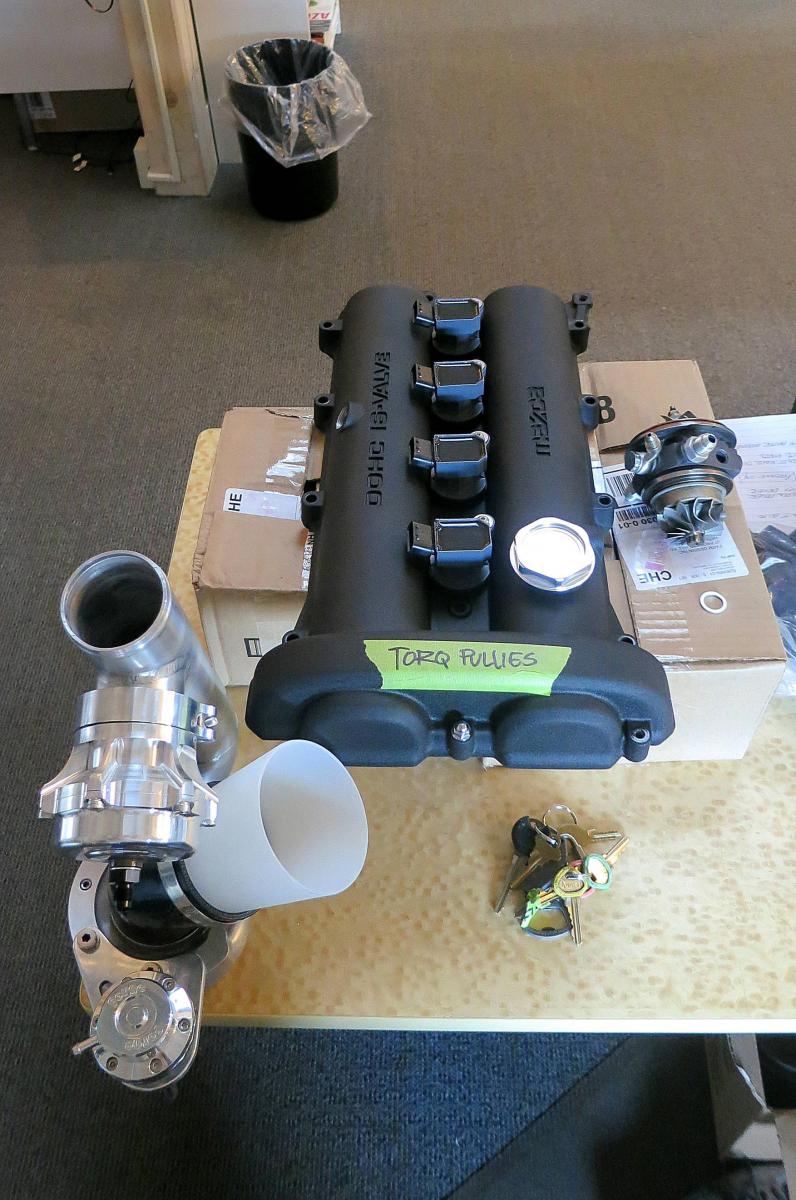
Wired. I just need to test continuity one more time while on the bench.
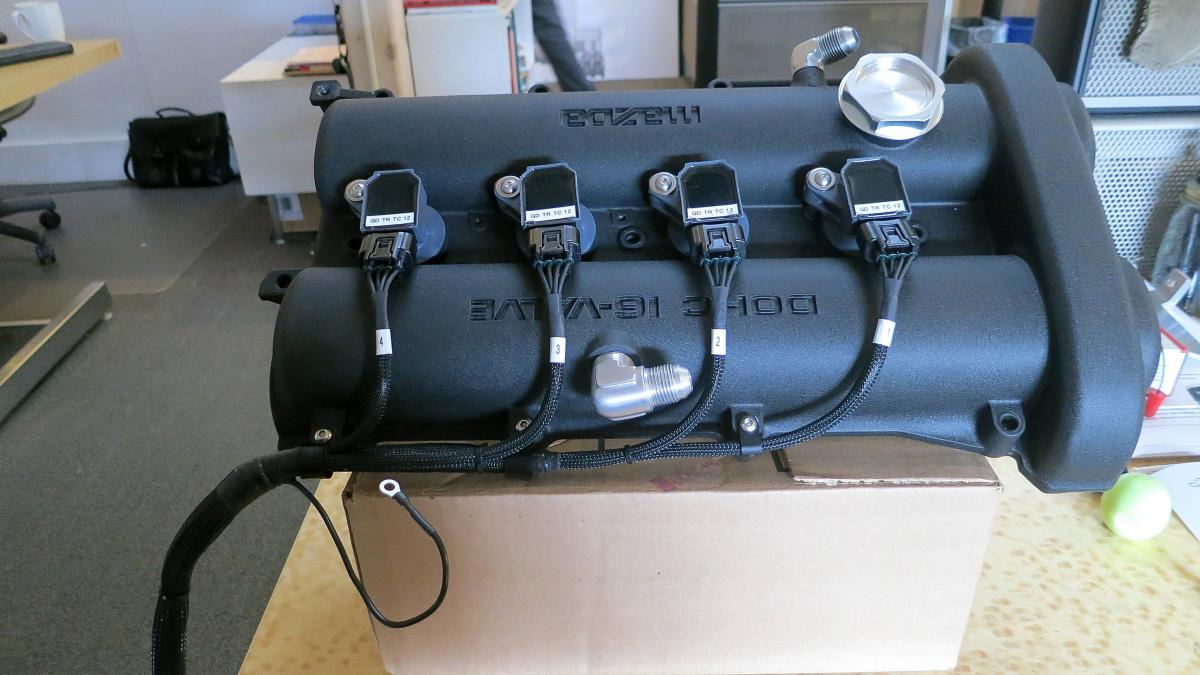
It's been a good day - finished the COPs harness, got my summit shipment, AND the powdercoater called saying the parts were ceramic coated and ready to pick up. Engine in by the end of the month? Maybe!
The million hour/dollar Greddy build continues
-Zach
It's been a good day - finished the COPs harness, got my summit shipment, AND the powdercoater called saying the parts were ceramic coated and ready to pick up. Engine in by the end of the month? Maybe!
The million hour/dollar Greddy build continues
-Zach
Reply
3
3

 07-25-2013, 02:05 PM
#38
Senior Member
Thread Starter
iTrader: (3)
Join Date: May 2005
Location: Mass.
Posts: 811
Total Cats: 43
Thanks brah ... so Brainy, can you change my title to something more imaginative? I give you full creative freedom.
As far as making the harnesses for others ... no thanks. It's fiddly work (and not in a fun way). If I were to do it again I would pony up for a crimper so I could avoid pigtail connectors ... live and learn. Hopefully my splices hold up.
-Zach
As far as making the harnesses for others ... no thanks. It's fiddly work (and not in a fun way). If I were to do it again I would pony up for a crimper so I could avoid pigtail connectors ... live and learn. Hopefully my splices hold up.
-Zach
Reply
0
0


