When you click on links to various merchants on this site and make a purchase, this can result in this site earning a commission. Affiliate programs and affiliations include, but are not limited to, the eBay Partner Network.
Any grease in the outer oillite sleeve is just there to ease installation as well. You only need/want one rotating interface in the bushing, and that's the part that needs lubrication during normal use. With normal poly bushings, that interface is the inner surface of the bushing against the metal sleeve. It needs lubrication because poly is sticky, and the slots in the inner surface of the bushings are designed to hold grease. They kinda suck, though, which is why you need the zerks to replenish the grease,
WIth oillite bushings, there are now three parts -- the bushing, the outer sleeve, and the inner sleeve. The intent is that the inner and outer sleeves rotate against each other, the outer sleeve is supposed to stay in one location relative to the bushing itself. This means that you don't need to lubricate the surface between the bushing and the outer sleeve, except for installation.
As for the FUCAs, IIRC they are the only bushings where the sleeve diameter is a different size than the others (and is one that is not commonly available in oillite sleeves). So when I asked Andrew about it, he recommended running delrin bushings in that location with the standard sleeves. Delrin does not need greasing in the same way that poly does, so an occasional squirt of normal grease (rather than the nasty silicone stuff) is supposed to be OK.
But grease oozing out isn't something I've worried about. Because Zerks, I can add more grease at any time.
1 piece bushings dont matter, but the 2 piece bushings need the hole plugged. If not, grease takes the path of least resistance which is right out that hole, so if you dont plug that hole there is absolutely no reason to even install a grease fitting. Because at that point you are just using a miata control arm to transport grease from your gun back to the earth.
Originally Posted by afm
With a 2-piece bushing, any extraneous holes can let grease injected from a zerk escape without spreading axially through the bushings.
I luv albert
Originally Posted by MiataMan00
Right. Grease needs to travel down to the sleeve. But the hole will prevent any pressure buildup. I dont know how big of a broblem this is with the oil impregnated sleeves tho.
Has nothing to do with pressure. As stated, the grease is to keep water and debris out and is less about actual lubrication. But you all should know you can never have to much lube.
Originally Posted by codrus
Wait, I thought the whole point to the oil lite bushings was that they didn't need to be greased? Am I missing something?
As stated, water and dirt
FWIW, I found that zerk fittings were not that useful as far as greasing poly bushings, even with one-piece units. You could pump it in, but it would only squeeze out axially on one side, leaving the other one dry.
With the bearing this is entirely eliminated on the one piece bushings by the radial channel formed between each bearing half. The 2 piece bushings form their own channel in addition to the bearing channel
--Ian
Hi Ian
Edit: Even if you did try to zerk-lube the oillite bushings, I suspect the grease would take the path of least resistance and go down the lube grooves on the inner sleeve of the poly bushing, rather than getting between the two pieces of oil lite.
That's why you should fill those channel in with rtv when you install the bearing. I need to add that to the delrin instructions and will mention it in the poly retro instructions that don't exist yet
Originally Posted by MiataMan00
My understanding is that the surface between the bushing and and outer oil lite sleeve needs to be greased (thus the grooves in the bushings). The outer oil lite and inner metal dont need grease. Why cant I drill out the FUCA to 7/8ths and stick an oil lite sleeve in there?
I know this was answered, but yea no. The grooves are for the original poly install as Energy/Prothane intended and should be sealed with rtv prior to bronze retrofit. The oillite and "inner metal" DO need (want?) grease, for reasons mentioned above. You can and are supposed to drill the FUCA to 7/8" just like all the sadfab kits do.......
Originally Posted by MiataMan00
Well fak. The TSE kit didnt come with a sleeve for that location. Can I get a set off you? Or do I need to talk to sean for that?
Aidan doesn't sell that stuff and im going to charge you a PITA fee of $90, minus whatever i normally would have charged for those, in addition to what i would normally charge for those.
Originally Posted by codrus
Any grease in the outer oillite sleeve is just there to ease installation as well. You only need/want one rotating interface in the bushing, and that's the part that needs lubrication during normal use. With normal poly bushings, that interface is the inner surface of the bushing against the metal sleeve. It needs lubrication because poly is sticky, and the slots in the inner surface of the bushings are designed to hold grease. They kinda suck, though, which is why you need the zerks to replenish the grease,
WIth oillite bushings, there are now three parts -- the bushing, the outer sleeve, and the inner sleeve. The intent is that the inner and outer sleeves rotate against each other, the outer sleeve is supposed to stay in one location relative to the bushing itself. This means that you don't need to lubricate the surface between the bushing and the outer sleeve, except for installation.
As for the FUCAs, IIRC they are the only bushings where the sleeve diameter is a different size than the others (and is one that is not commonly available in oillite sleeves). So when I asked Andrew about it, he recommended running delrin bushings in that location with the standard sleeves. Delrin does not need greasing in the same way that poly does, so an occasional squirt of normal grease (rather than the nasty silicone stuff) is supposed to be OK.
(deleted line that I now know to be wrong).
--Ian
/\ yea pretty much that lol. And to be clear: delrin bushings should be greased for the same reason. Not that they need to, but that they WANT to, for the same reasons as the bronze/poly. And in this day n' age with millennials and what not, everybody/everything/everyit is supposed to get what they want, right?
I originally made those sleeves for Rover, which has offset FUCA bushings, and made several extra sets to make them more cost effective. Since the FUCA bushing is an odd size (like super odd) and I don't have a lathe, and I didn't have an immediate pressing need for a FUCA sleeve setup, I just skipped that position. I have used delrin FUCA bushings from Sean (SADFab) for subsequent installs on other cars with ELBJs. George, I'm 99% sure I mentioned this when you bought them, I even showed you a set of Sean's FUCA delrins that I have here for a future project.
I don't recall noticing that hole in my lower control arms, but that could be an NB thing. If it's there, goop some JBWeld in there. I would personally use RTV, since I didn't zerk any of the bushings on Rover. I recently had the RR corner apart replacing an axle and the bushings still operate perfectly smoothly after ~1yr of racing.
Yes, you did show me. I was just thinking it would be easier to drill out the poly bushing and install the sleeve than spending $90 on 4 delrin bushings and press them in with no sleeve.
I don't recall noticing that hole in my lower control arms, but that could be an NB thing. If it's there, goop some JBWeld in there. I would personally use RTV.
I would personally use RTV, since I didn't zerk any of the bushings on Rover. I recently had the RR corner apart replacing an axle and the bushings still operate perfectly smoothly after ~1yr of racing.
I updated Megalogviewer to 4.3.01 and it screwed up my scale settings. Anyone else have this issue? I set knock back to auto scale but it still seems kinda off? It could just be a style update.
This week I have been working on my suspension bushings. I finally got it all buttoned up today.
Here are most of the arms ready to pop in.
neked
rear not neked
front neked
front not neked
I installed the new PFC 11s all round. Im in love with these pads.
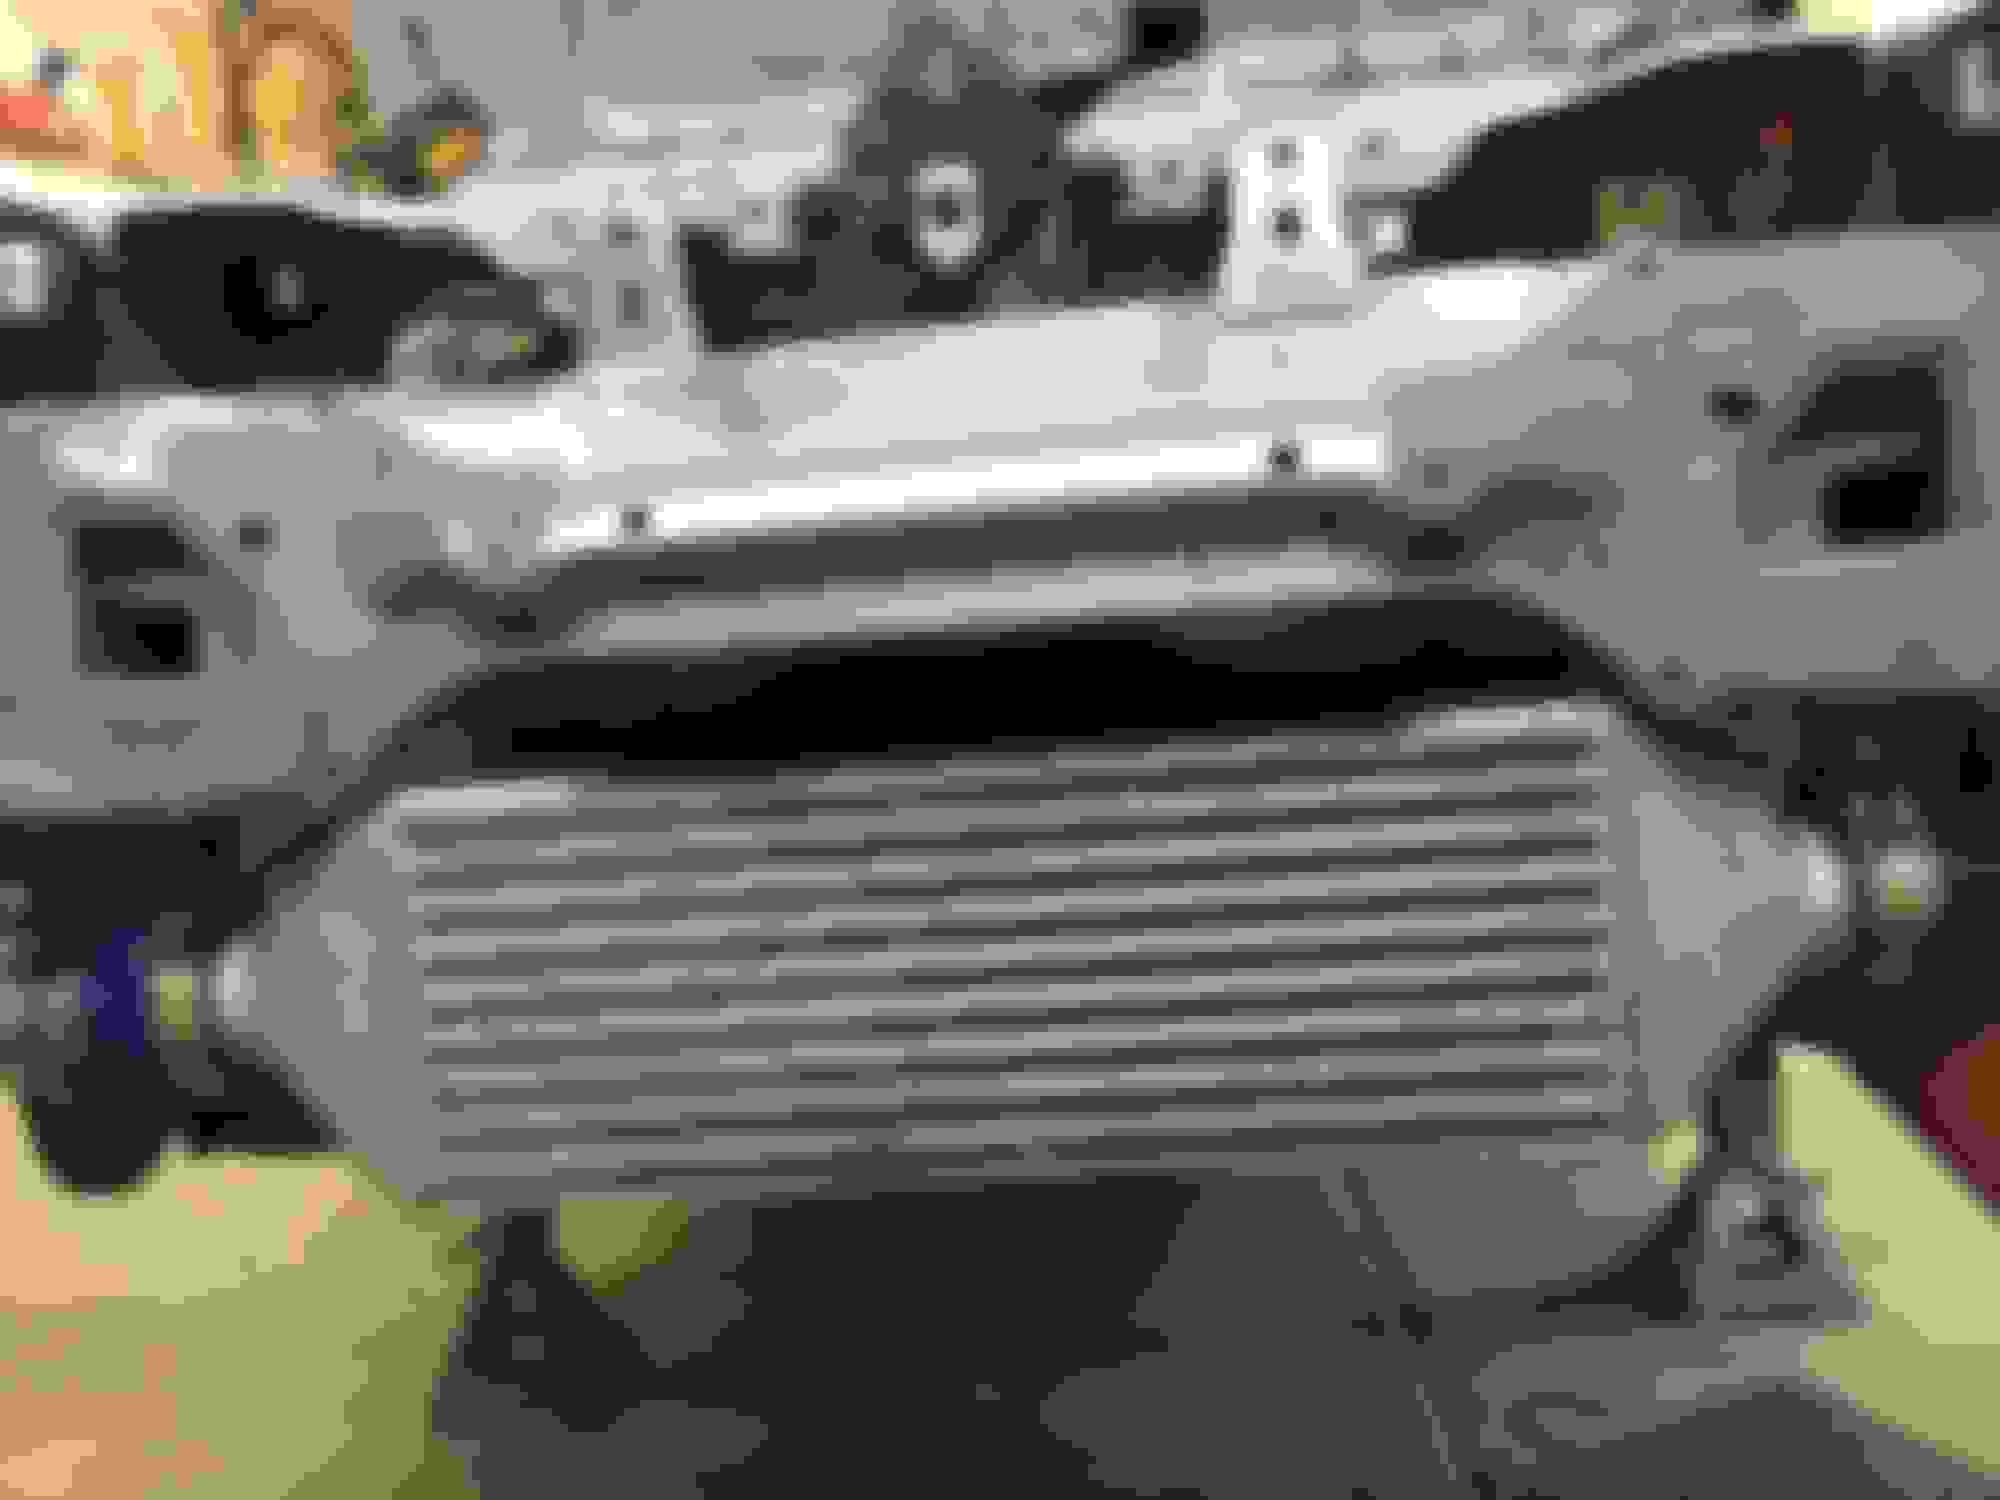
I then got to wok mounting the new intercooler. I cut out the crash beam and welded in a 1x1" square tube to mount the hood latch and provide a little bit of support. Then painted silver. Turned out alright. All the airflows now.
pre-cut
see how small the gap is for airflow.....eww.
Much better.
The alignment was terribad. My *** cheeks were clenched so hard as I was driving to the alignment shop. No bueno.
this is with the steering wheel pointed straight.
*** cheeks clenched.
The guys at the shop are super cool. Looks like a new job is in my future. They were nice enough to throw my car on the scales so I could finally find out how much my car weighs. I was VERY surprised. only 2387 with no driver and just under 1/2 tank and a bunch of heavy tools (10lbs at least) in the passenger seat (what like 30lbs?). Not bad. 2537 with me in the car. Cross weights looked pretty good too.
pic is sideways, sry.
I was aiming for -3* in the front, -2.3 in the rear, 1/8" total toe. Didn't quite happen. Lowest rear camber we could get in the rear was 2.7. Seems like a lot. but it is what it is. He said I need to raise my car to get my target numbers, but my car isn't that low.
The car feels AMAZING. Bushings are awesome. Sleeves were 1000% worth it. The car feels like its soaking up bumps way better now. Its almost more comfy than stock bushings. The other thing is I had NO IDEA what a good alignment would do for grip. Holy ****. My car is on rails. Im so pumped for this weekends track day.
 03-26-2018, 05:26 PM


 0
0